SNMP Monitoring
Configuring SNMP monitoring on Cisco Secure Firewall
Introduction
This document provides information, configuration, and troubleshooting guidance on Simple Network Management Protocol (SNMP) monitoring for Firewall Threat Defense (FTD) deployments managed by the Firewall Management Center (FMC).
Background Information
Cisco Secure Firewall Threat Defense appliances have two major subsystems:
- The Firepower eXtensible Operating System (FX-OS) controls the chassis hardware.
- The Firewall Threat Defense Software (FTD) runs within a security module in the chassis.
FTD is a unified software consisting of two engines, the Snort engine and the LINA engine. The current SNMP instance of FTD provides unified health monitoring, meaning the FMC and/or the network management system used to monitor the deployment receives details on CPU, memory, Snort statistics, critical processes, high availability, and cluster status as a whole. In previous versions, SNMP monitoring had visibility into the LINA-related features only.
FX-OS and FTD have independent control planes, and for monitoring purposes, they have different SNMP engines. Each SNMP engine provides different information, and monitoring both provides a more comprehensive view of the device's status.
From a hardware point of view, there are two different architectures for the Firewall Threat Defense appliances to consider:
-
Firepower 4100/9300 - Have a dedicated interface for device management, which is the source and destination for the SNMP traffic addressed to the FXOS subsystem. The FTD application, which resides on a FP9300 Security Module(s) within the chassis, uses a LINA interface (management/data/diagnostic).
-
Firepower 1000/2100 - The SNMP engine on these appliances uses the FTD management interface and IP. The appliance itself bridges the SNMP traffic received on this interface and forwards it to the FXOS software, which is not managed separately on these appliances.
About SNMP
Simple Network Management Protocol is an application-layer protocol that provides a message format for communication between SNMP managers and agents. SNMP provides a standardized framework and a common language used to monitor and manage devices in a network.
The SNMP framework consists of three parts:
- An SNMP manager: The system used to control and monitor the activities of network devices using SNMP.
- An SNMP agent: The software component within Secure Firewall that maintains and reports the data, as needed, to the SNMP manager.
- A Management Information Base (MIB): A collection of managed objects on the SNMP agent.
FTD supports SNMPv1, SNMPv2c, and SNMPv3.
Warning
SNMPv1 and SNMPv2c use a community string as the only form of authentication. As a result, there are known serious security risks since they transmit all information without encryption, including the community string.
As a best practice recommendation, this document focuses on the configuration of SNMPv3 since it provides much better security than v1 and v2.
Configuration
Complete the following steps to configure SNMPv3 for your Secure Firewall deployment.
Prerequisite
- Network management server(s) to Poll the managed devices and receive SNMP traps.
Configure SNMP on FXOS (Firepower 4100/9300)
First, configuring SNMP in FXOS, allows the chassis to be polled by and send SNMP traps to the network management server.
Step 1: Log in to the Firepower Chassis Manager (FCM).
Step 2: Navigate to Platform Settings and click SNMP.
Step 3: Check the Enable checkbox. The Community/Username is not required for SNMPv3.
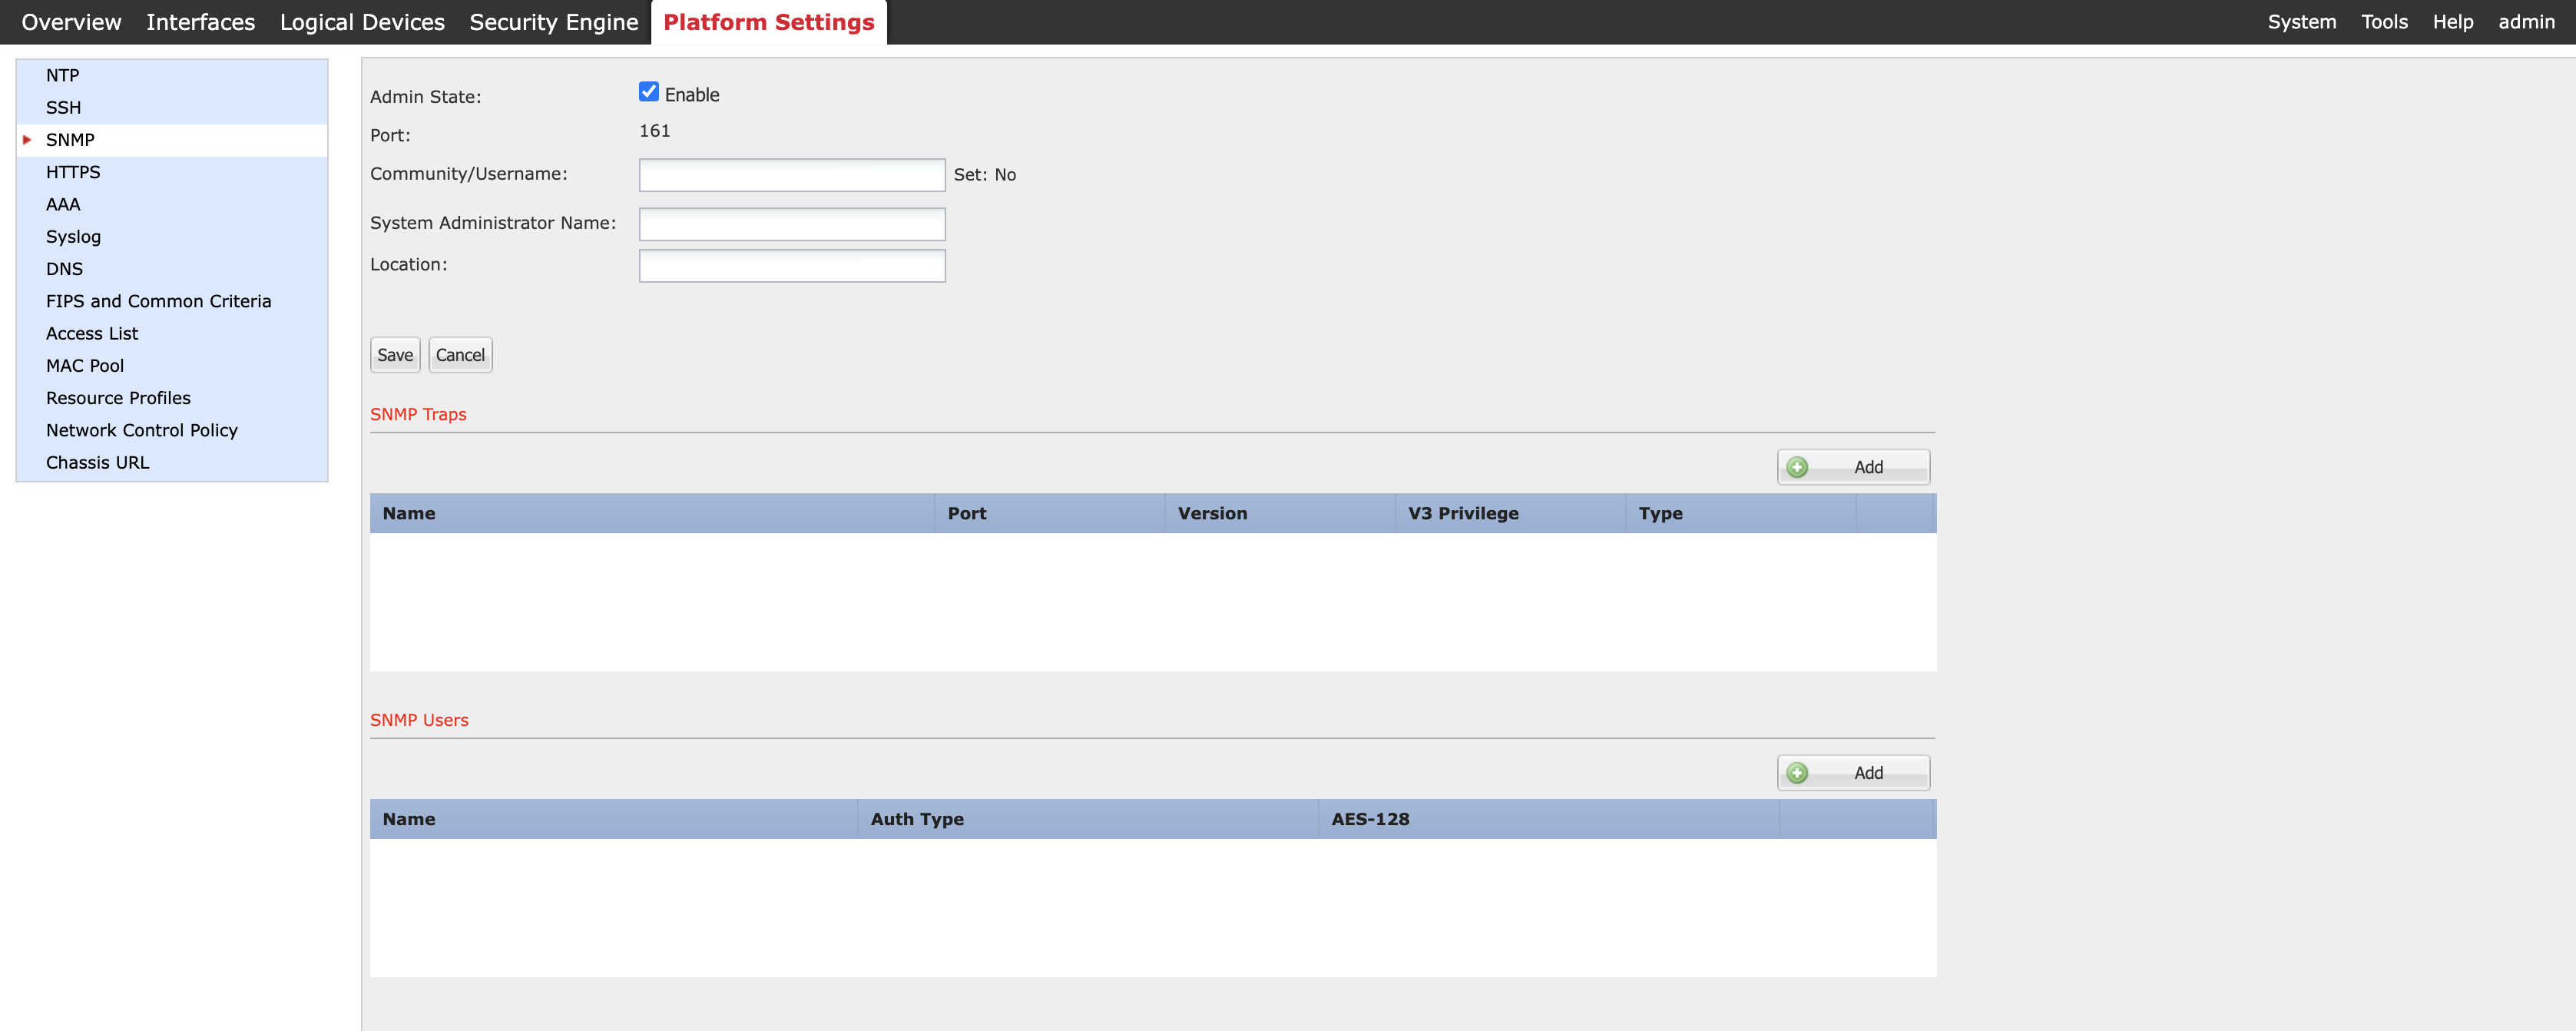
Figure 1: Enabling SNMP on the Firepower Chassis Manager
Note
The System Administrator's name and location are optional. The "Set: Yes/No" value to the right of Community/Username changes to 'Yes' once you have entered a value and saved your changes.
Step 4: Click Add under SNMP Users and complete the required fields in the window that displays:
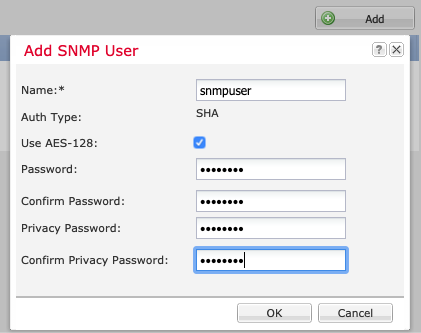
Figure 2: Adding SNMP Users for SNMPv3
-
Name is the user name assigned to the SNNPv3 user. It can be up to 32 characters and must begin with a letter. Other valid characters are letters, numbers, and the following symbols: _ . @ -
-
Auth Type is hardcoded to SHA and cannot be changed.
-
Use AES-128, if checked (recommended), enables 128-bit Advanced Encryption Standard as the privacy protocol for SNMPv3 message encryption conforming to RFC3826. If unchecked, DES is used as the encryption protocol.
-
Password sets the password for the user.
-
Defining the Privacy Password, combined with AES-128 encryption, allows the chassis to use this password to generate a 128-bit AES key.
Note
Passwords have the following requirements:
- Must contain a minimum of 8 characters and a maximum of 80 characters.
- Must contain only letters, numbers, and the following characters: ~`!@#%^&*()_-+{}[]|\:;"'<,>./
- Must not contain the following symbols: $ (dollar sign), ? (question mark), or = (equals sign).
- Must contain at least five different characters.
- Must not contain too many consecutively incrementing or decrementing numbers or letters. For example, the string "12345" has four such characters, and the string "ZYXW" has three. If the total number of such characters exceeds a specific limit (typically more than around 4-6 such occurrences), the simplicity check will fail.
Step 5: Click Add under SNMP Traps and complete the required fields in the window that displays:
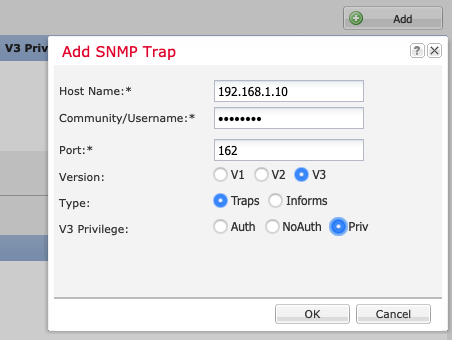
Figure 3: Adding SNMP Traps
-
Host Name is the hostname or IP address of the SNMP manager that the chassis should send the traps.
-
For Community/Username, enter the SNMPv3 username created in Step 4.
-
Enter the Port number on which the chassis will communicate with the SNMP host. An integer between 1 and 65535 is required.
-
Select V3 as the SNMP version.
-
For Type, click the Traps radio button. (Informs are only valid when using SNMPv2.)
-
V3 Privilege defines the privilege level associated with the Trap. The recommendation is to use Priv since this enables Authentication and Encryption.
Note
While it is possible to select NoAuth, FXOS does not support its use with v3.
Step 6: On the main SNMP configuration window under Platform Settings, click Save.
Configure SNMP on FTD via Firewall Management Center (FMC)
Now we will see how to configure SNMP in the FMC to allow the management server to define how the FTD devices (LINA) operate in the SNMP environment.
Step 1: Log in to the FMC user interface.
Step 2: Navigate to Devices > Platform Settings.
Step 3: Choose an existing FTD Platform Settings Policy or create a new one if required.
Step 4: On the left-hand side of the FTD_Platform_Settings window, choose SNMP.
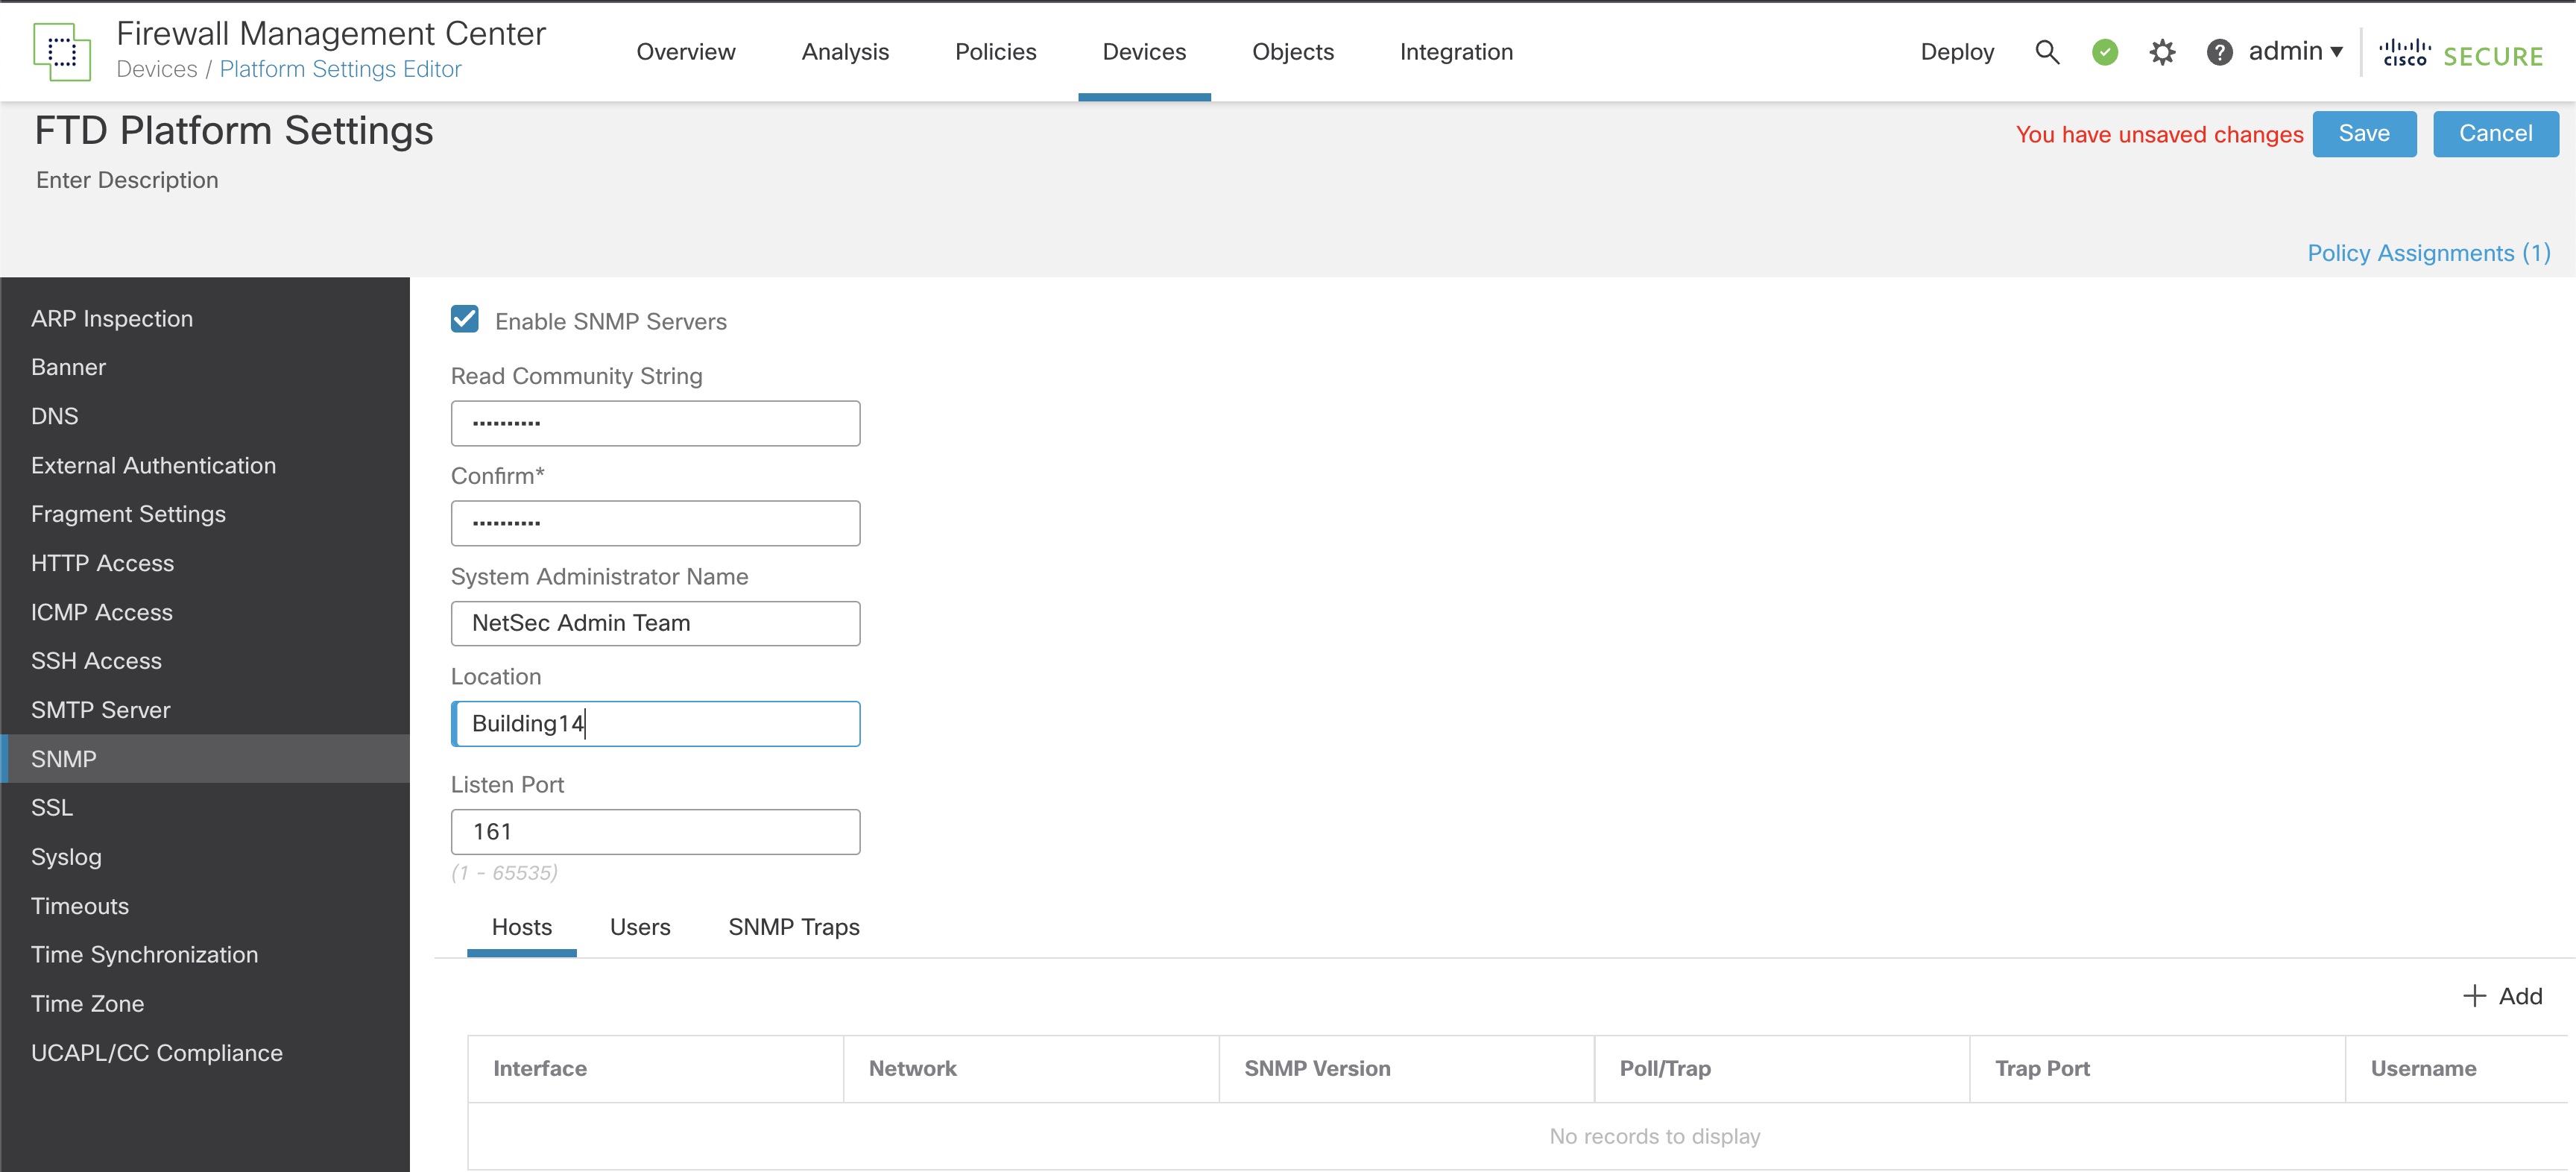
Figure 4: FMC/FTD Platform Settings SNMP Configuration
Step 5: Enable SNMP and configure the basic settings:
-
Enable SNMP Servers: Choose whether to allow devices to provide SNMP information to the configured SNMP hosts.
-
Read Community String: Enter the password used by the SNMP management host when sending requests to FTD devices. Passwords are case-sensitive, comprised of an alphanumeric string of up to 32 characters. Spaces and special characters are NOT supported.
-
System Administrator Name and Location (both optional) allow you to include contact information.
-
Specify the Port number (UDP) on which incoming requests to the FTD devices will be accepted. The default is 161/UDP, but this can be changed if needed to suit your requirements.
Step 6: Below the Listen Port field, click Users. Now we're going to define the users for SNMPv3. SNMP users have a specified username, an authentication password, an encryption password, and authentication & encryption algorithms to use. The authentication algorithm options are MD5 and SHA. The encryption algorithm options are DES, 3DES, and AES128.
Step 7: Click Add to open the Add Username window.
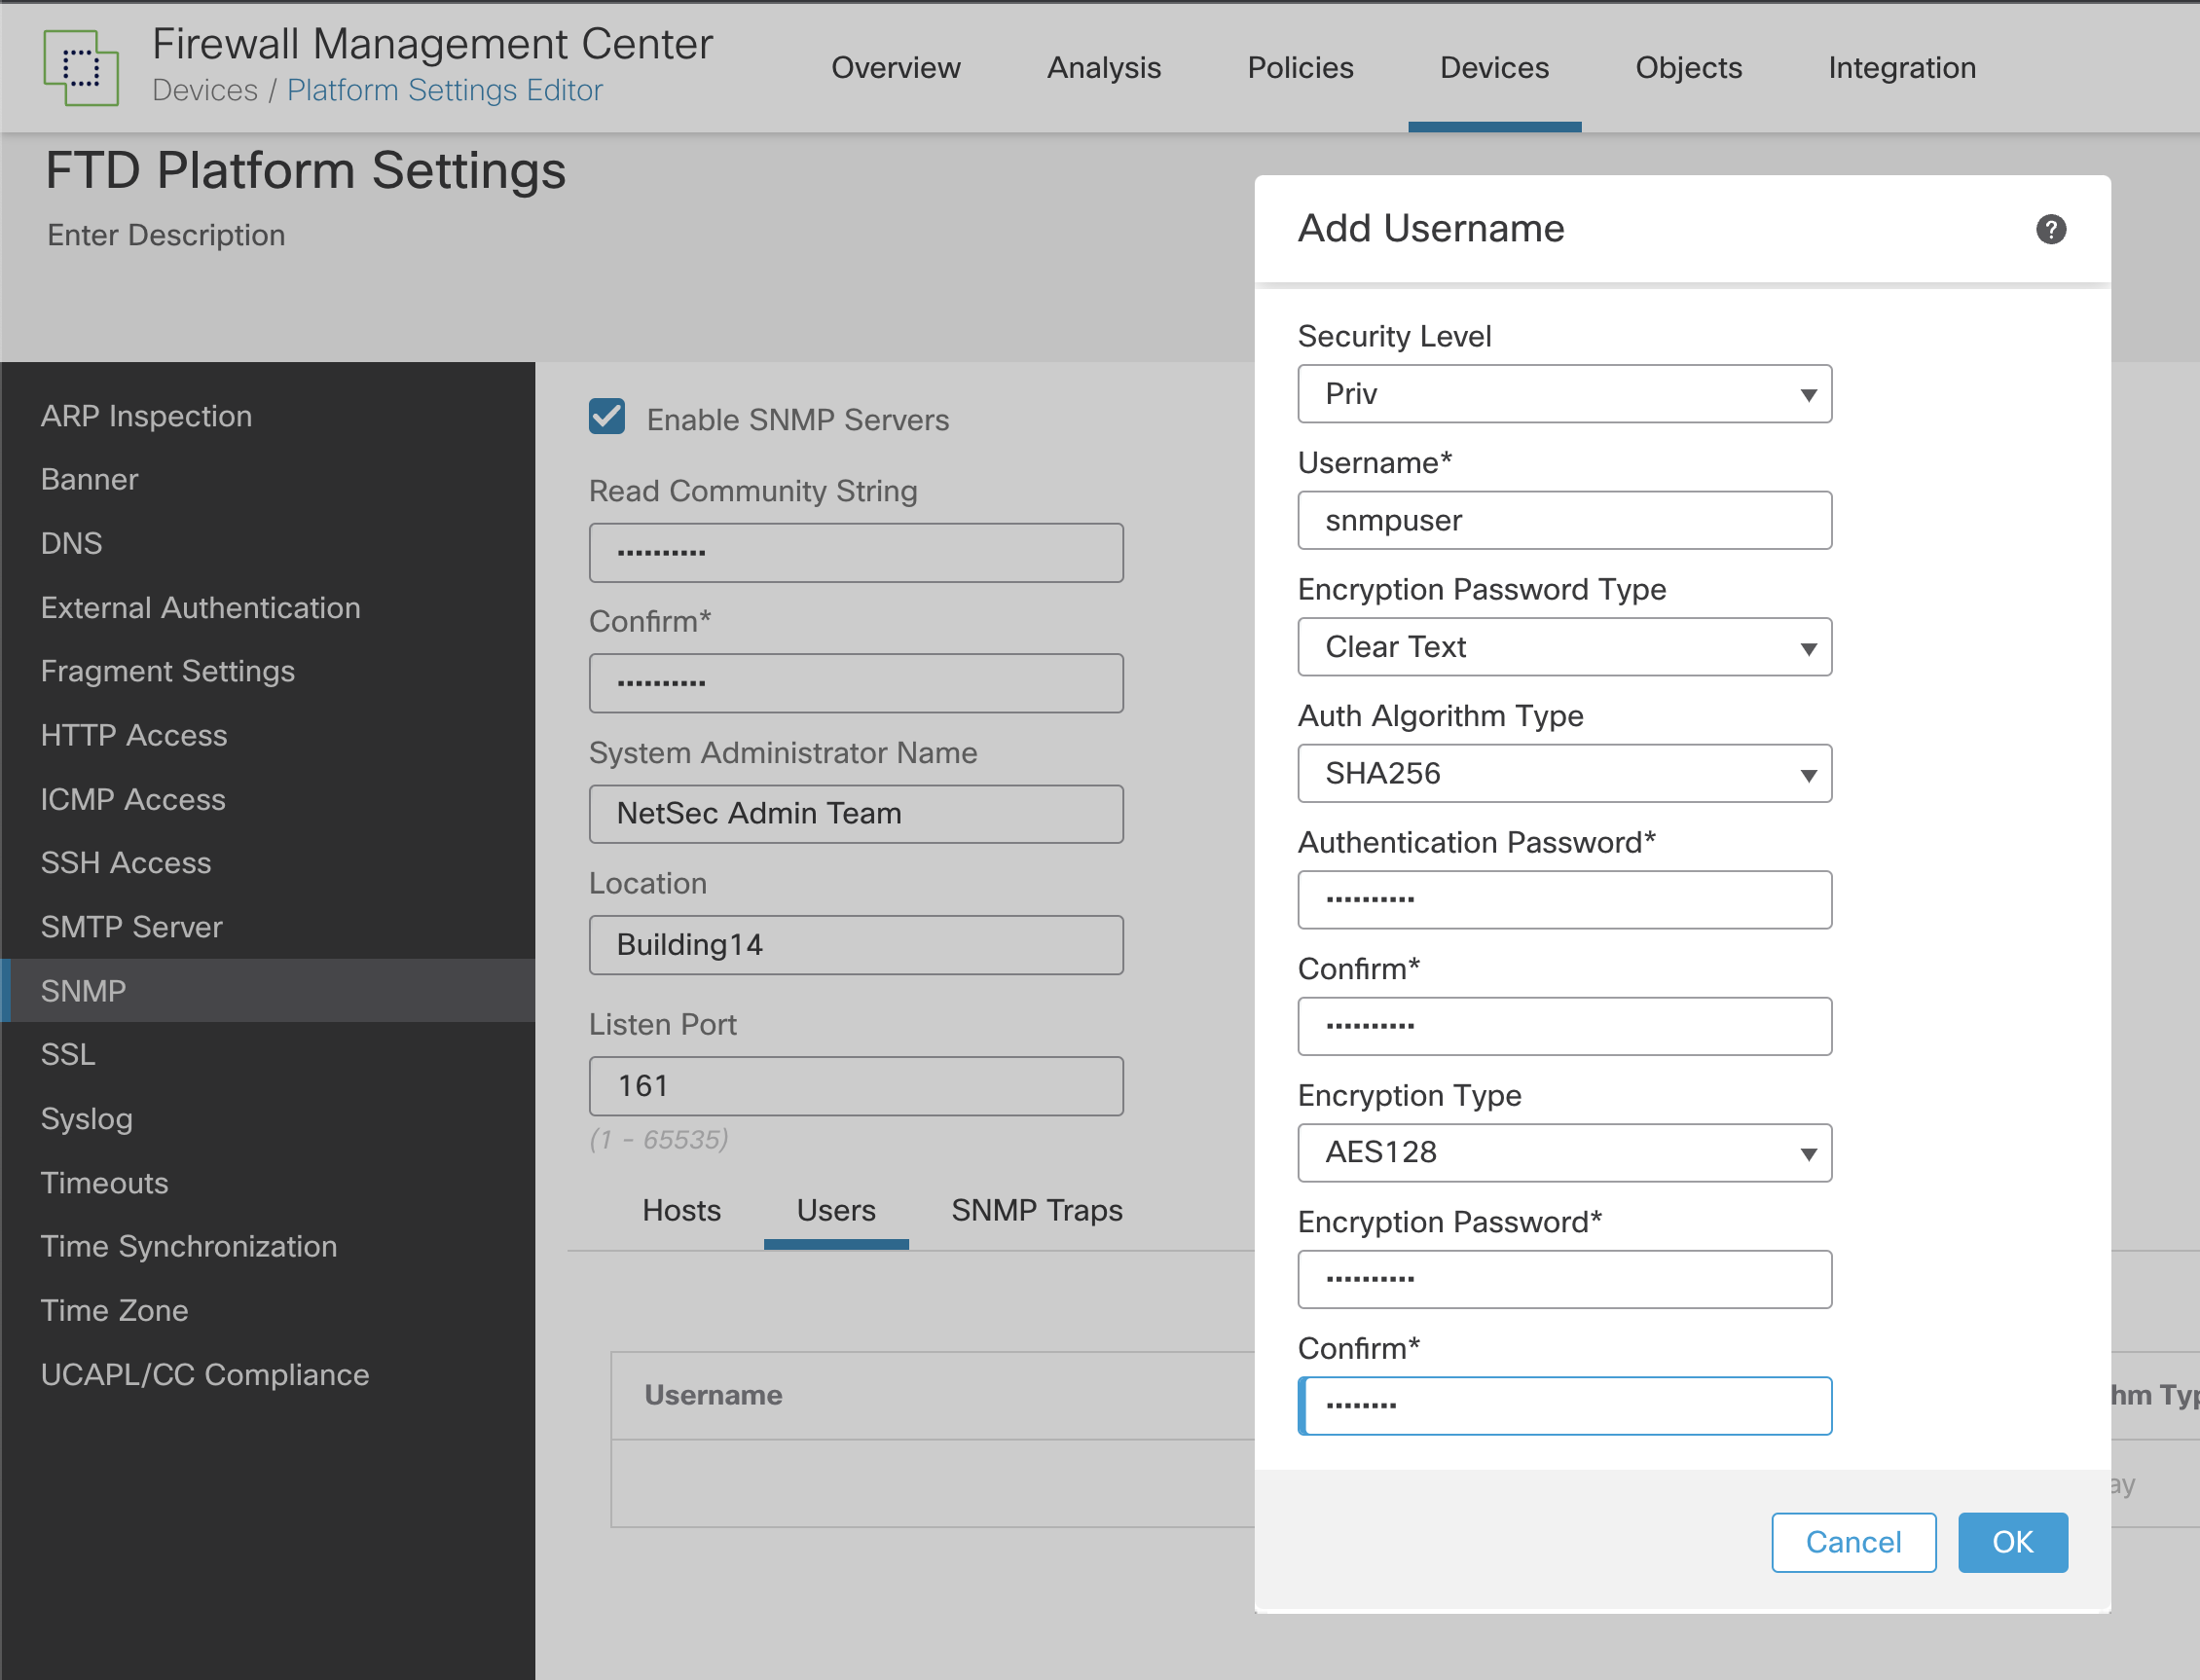
Figure 5: Adding SNMP user to FMC Platform Settings
-
First, set the Security Level. The recommendation is to choose Priv because this means SNMP messages are authenticated and encrypted.
-
Next, define the user name to be used. The maximum number of characters is 32.
-
For Encryption Password Type, the options are Clear text or Encrypted.
-
With Encrypted, the password must be formatted as xx:xx:xx.... (where xx are hexadecimal values). The FTD device will then directly deploy the encrypted password.
-
With Clear text, enter the password as usual (and confirmed). The FTD device still encrypts the password when deploying. The recommendation is to use the Clear text option to avoid converting the password to hexadecimal..
-
For the Auth Algorithm Type, choose SHA256 (MD5 and SHA are also options).
-
As we selected Clear text as the Encryption Password Type,you now need to enter the Authentication Password and confirm it.
-
Finally, choose the Encryption Type you want to use and enter the Encryption Password. The recommendation is to use AES256 for the Encryption Type. Again, since we set Clear text as the Encryption Password Type, you can enter the Encryption Password and confirm it.
Note
To use AES or 3DES encryption, you must have the strong encryption license installed.
If you want to enable features that use strong encryption and that are restricted by geographic region:
See Licensing for Export-Controlled Functionality.
- Click OK when complete.
Step 8: Next to the Users tab, click Hosts. This area defines the SNMP management servers allowed to access the FTD devices for monitoring. A maximum of 4000 hosts can be defined, but be aware that only 128 of these can be used for SNMP traps.
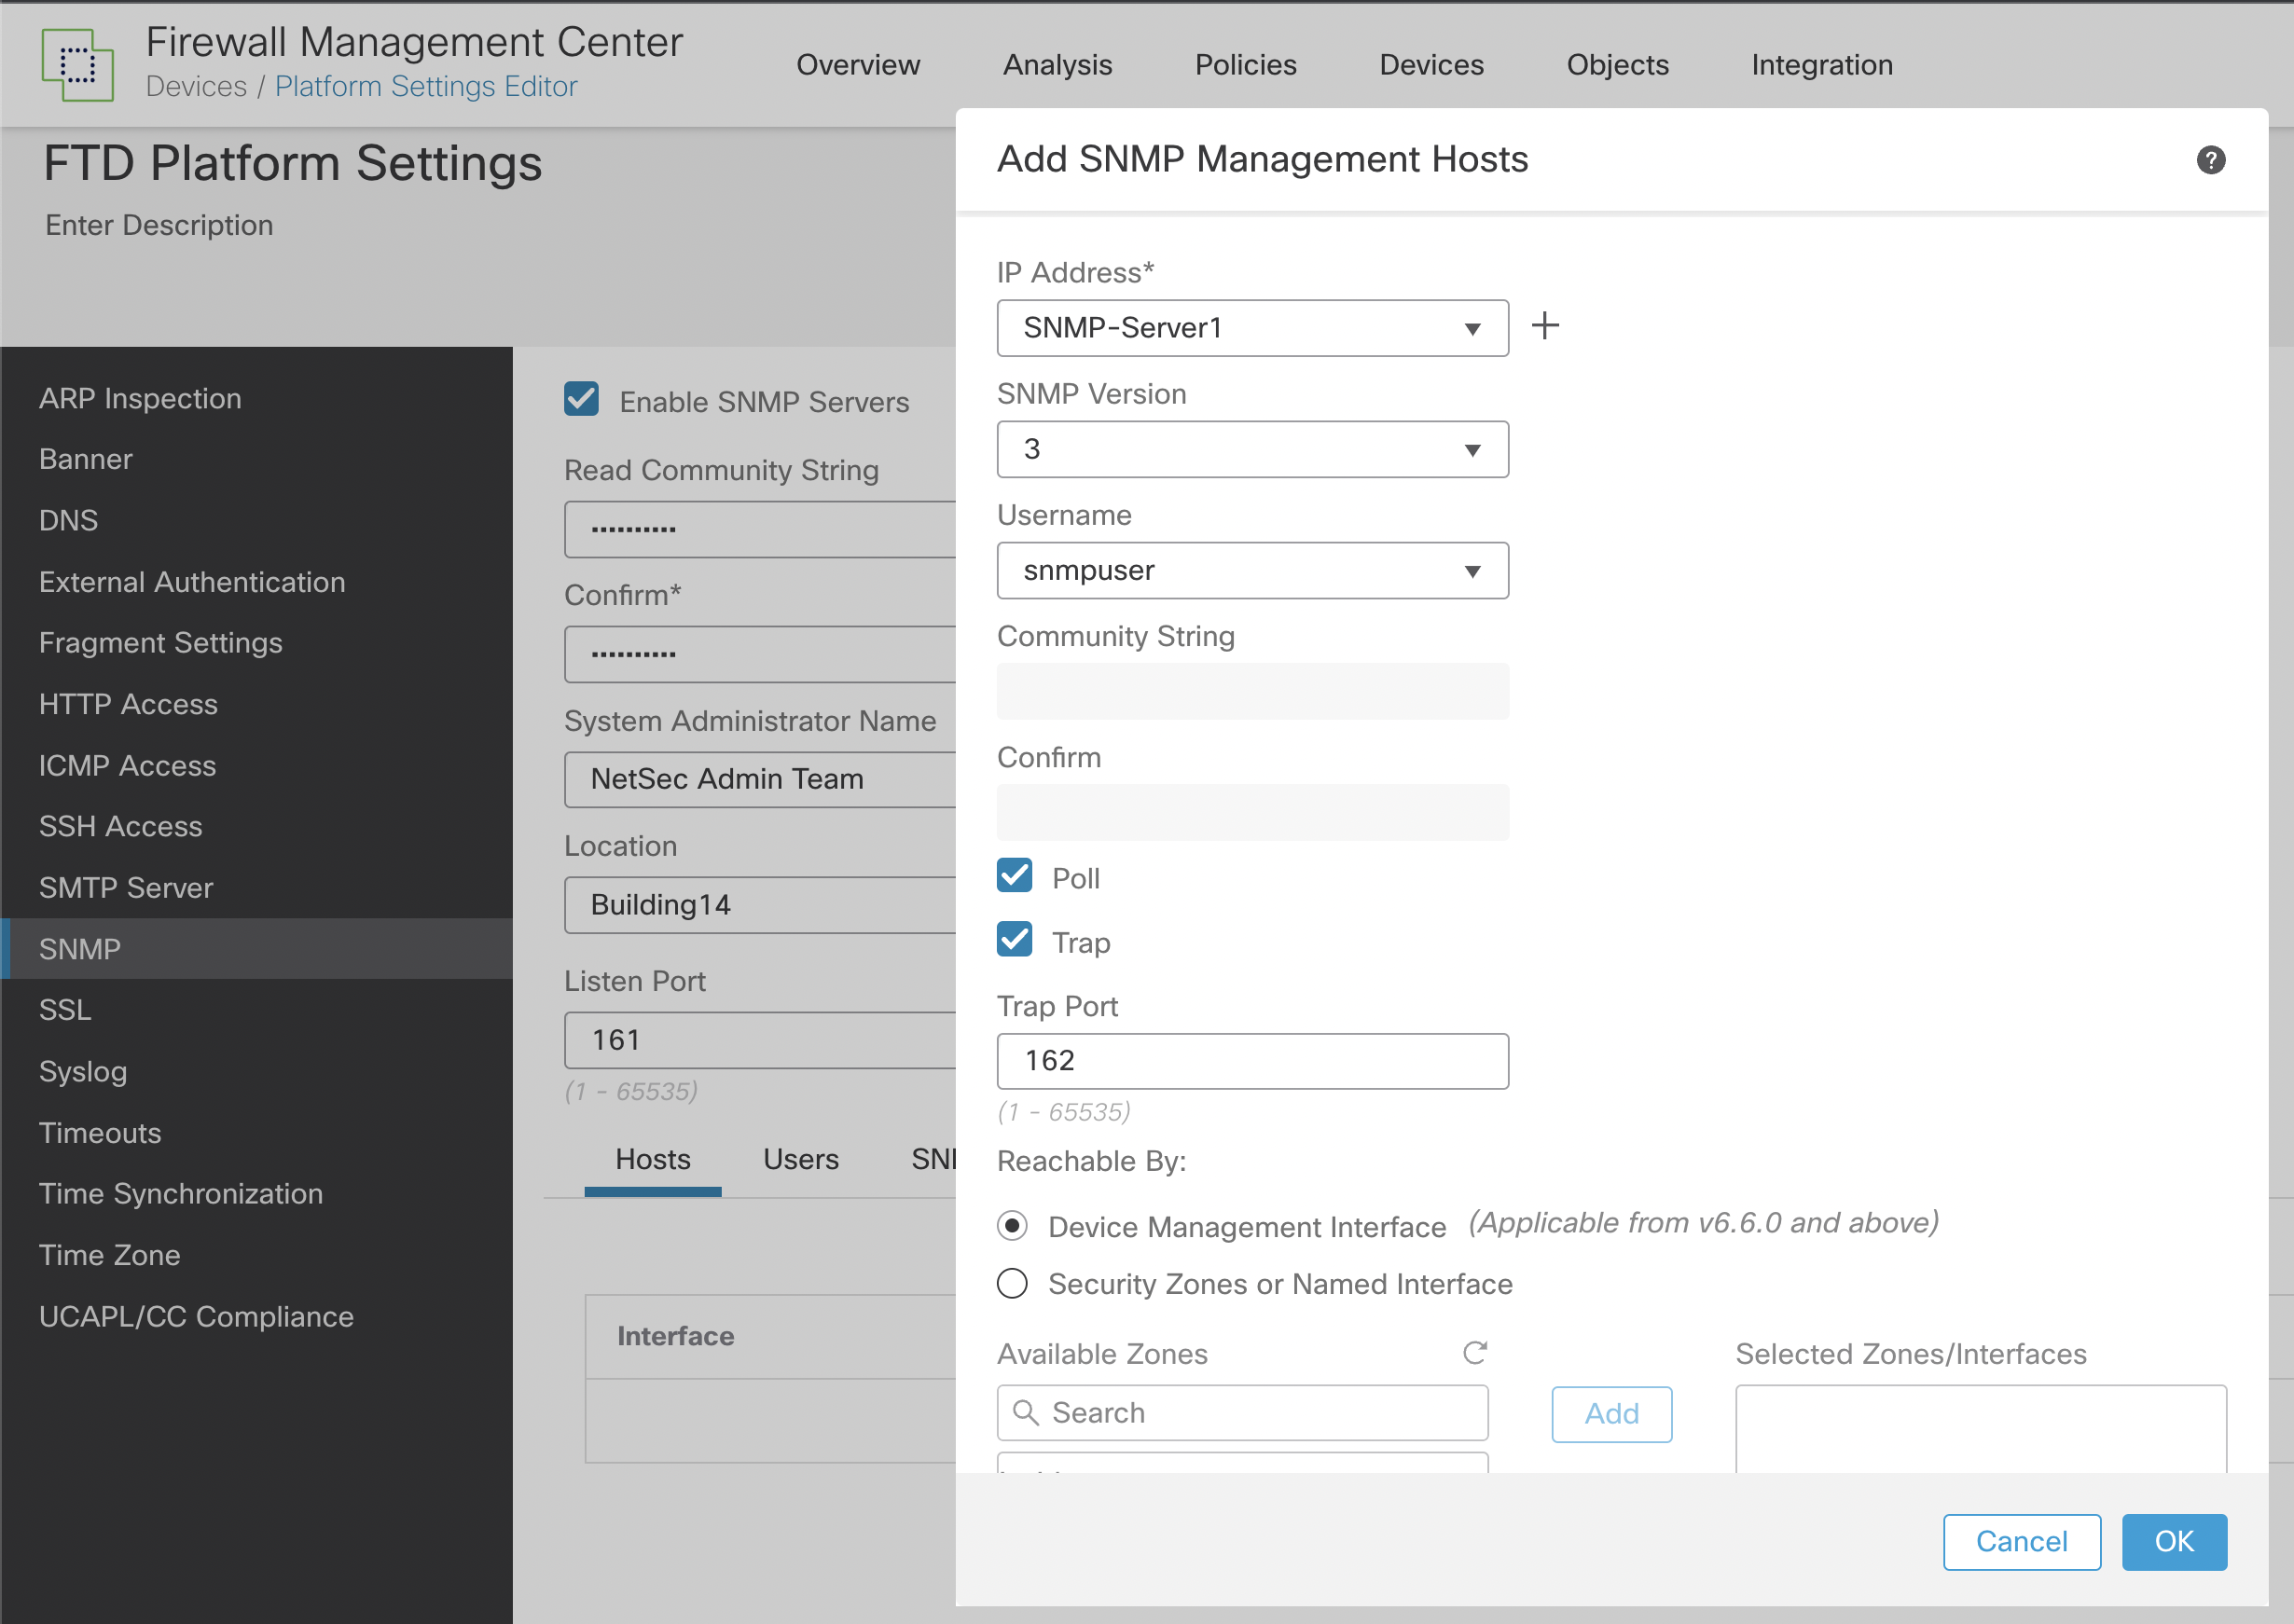
Figure 6: Adding SNMP Management Hosts
-
For IP Address, enter an IPv4 or IPv6 address or choose a host previously configured in network objects from the drop-down list. The best practice uses a network object, either one already defined or one added using the + sign at the side of the IP address field.
-
Under the SNMP version, choose 3. This option requires a user to exist, so make sure you created the user as described in Step 7.
-
For Username, choose from the drop-down list the user you created in Step 7.
-
As we are using SNMPv3, the Community String isn't required and is greyed out.
-
Select the type of SNMP communication between the device and the SNMP management host. Choose Poll or Trap individually, or you can choose both. Poll allows the SNMP management host to periodically request information from the FTD devices.
-
Trap means the device will send trap events to the SNMP management host as they occur.
Note
If you have defined the SNMP host IP as either an IPv4 range or subnet, you can only configure either Poll or Trap, not both.
-
The default Port value is 162/UDP. This value can be customized within a range from 1 to 65535.
-
From v6.6 of Firepower, the Device Management interface of the managed devices as the communication source/destination for SNMP is available and recommended. However, based on your environment's specific requirements, you may choose a Security Zone or another Named Interface to act as the communication channel.
-
Click Ok.
Step 9: Click Save to commit the changes.
Step 10: The last part of the configuration is to choose SNMP Traps in the main SNMP window next to the Users tab.
Traps are event notifications sent from the FTD device and are different from polling. They are unsolicited "comments" from the FTD device to the management station for specific events such as linkup, linkdown, and Syslog event generated. An SNMP Object Identifier (OID) for the device appears in SNMP event traps sent from the device.
Some traps do not apply to specific hardware models and are ignored if you deploy the policy to one of these models. For example, not all models have Field Replaceable Units (FRUs), so the Field Replaceable Unit Insert/Delete trap will not be configured on those models.
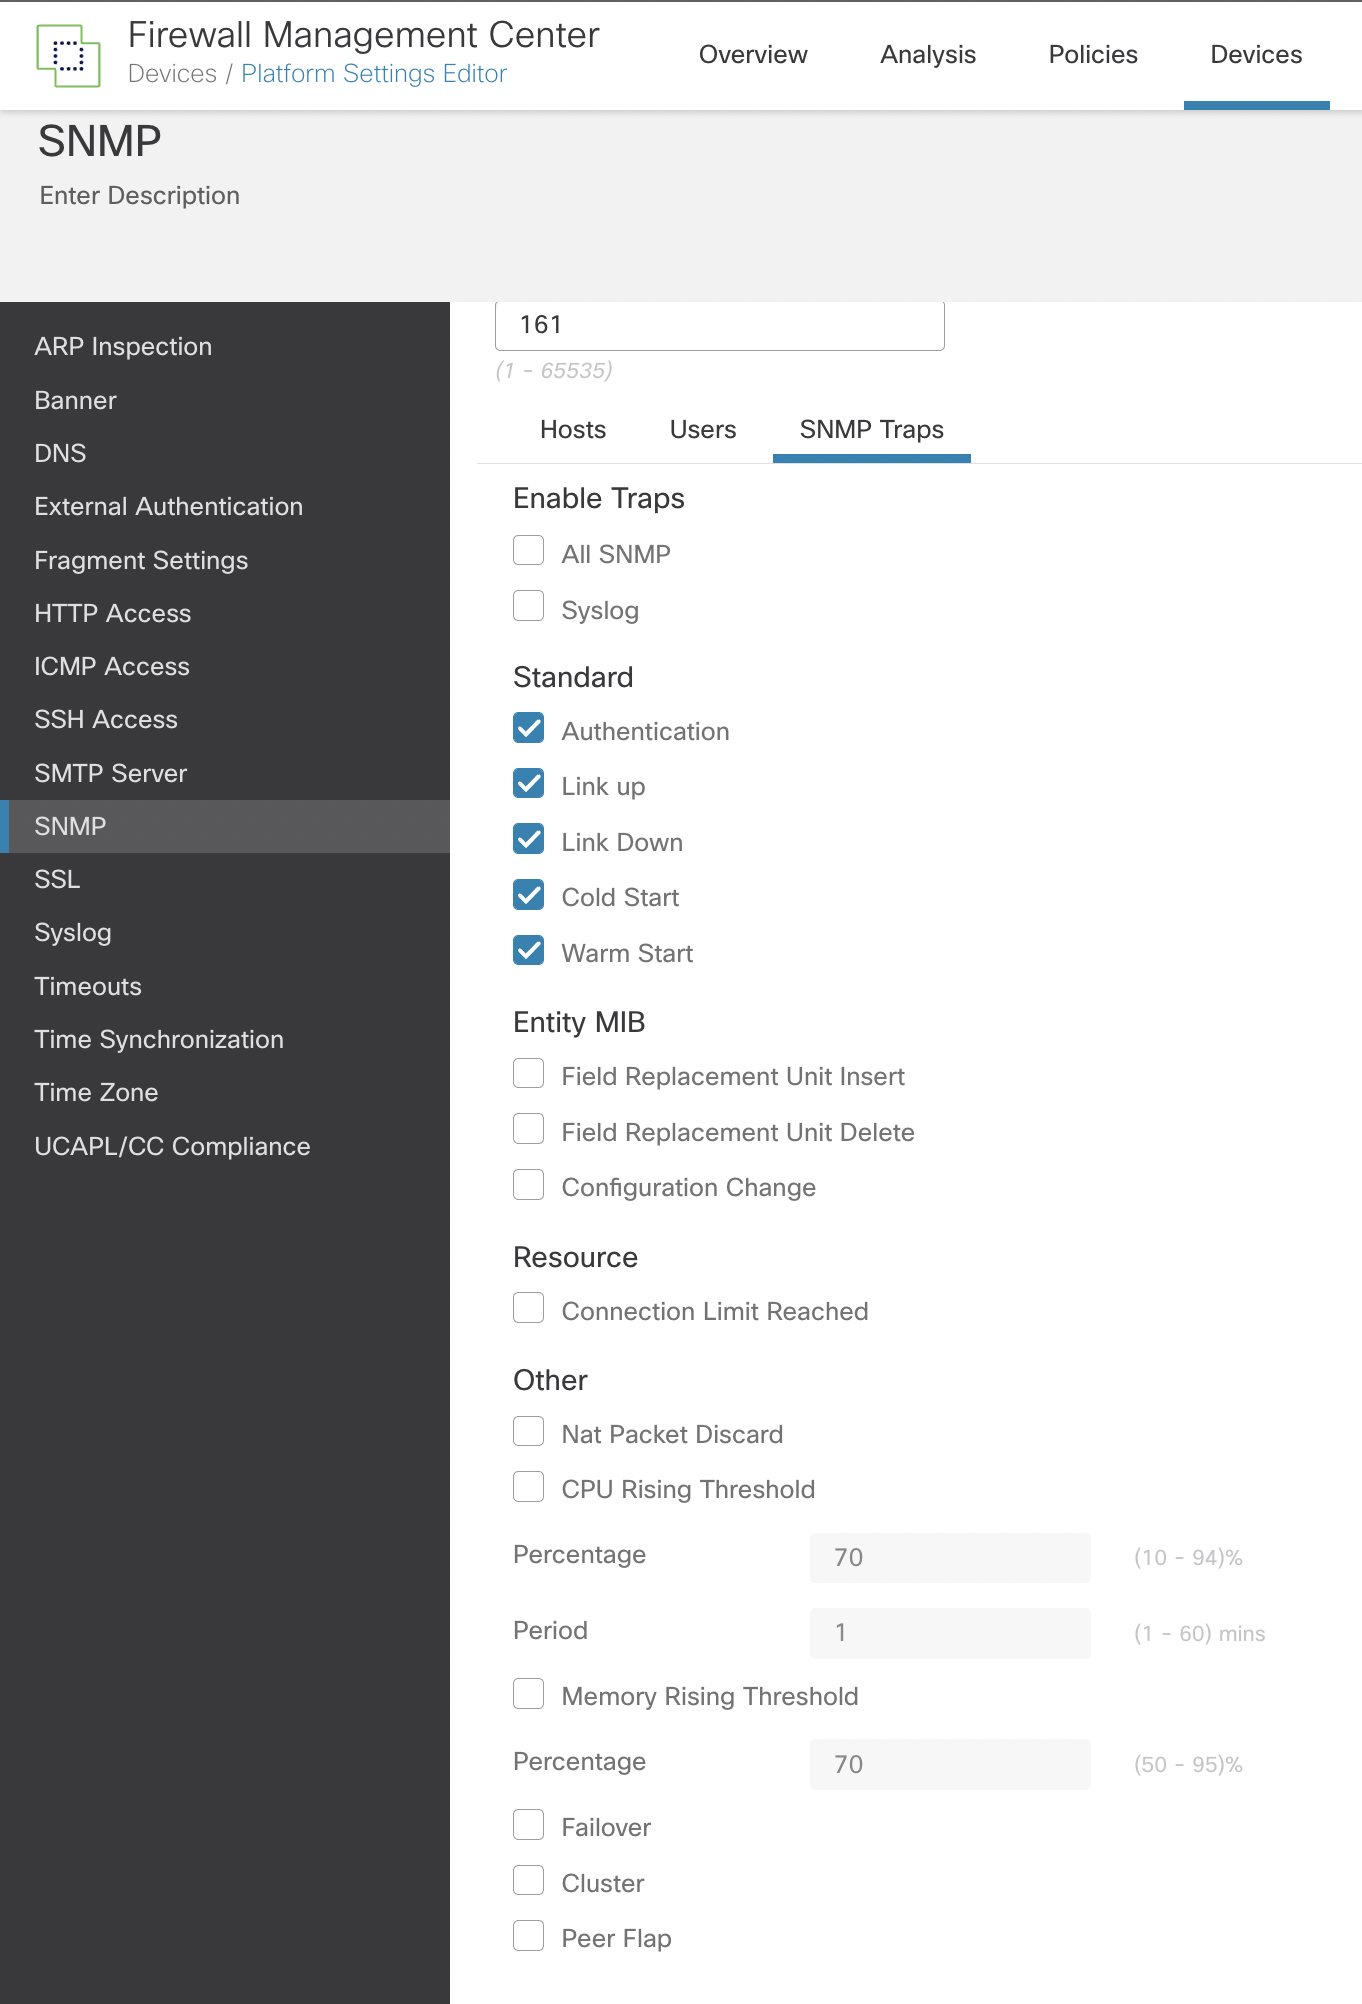
Figure 7: Defining SNMP Traps
-
The best practice here is only to enable the traps that you require. Choosing All SNMP could have an impact on system resources.
-
The traps in the Standard section are enabled by default and have the following definitions:
-
Authentication: Unauthorized SNMP access. This authentication failure occurs for packets with an incorrect community string.
-
Link Up: One of the device's communication links has become available (it has "come up"), as indicated in the notification.
-
Link Down: One of the device's communication links has failed, as indicated in the notification.
-
Cold Start: The device is reinitializing itself such that its configuration or the protocol entity implementation may be altered.
-
Warm Start: The device is reinitializing itself such that its configuration and the protocol entity implementation are unaltered.
-
Entity MIBs are only supported if the hardware supports FRUs, such as the Firepower 4100/9300 chassis. If these are enabled and the policy is applied to devices that do not support FRUs, they will be ignored.
-
The other recommended options are the Nat Packet Discard, CPU Rising Threshold, and Memory Rising Threshold. The default values should be accepted.
-
If you deploy FTD devices in Failover or Cluster modes, choose the Failover or Cluster traps.
-
Click Save.
Step 11: Navigate to Deploy > Deployment and deploy the policy to the assigned devices. Changes made to the SNMP configuration will not be active until you deploy them.
Verification/Troubleshooting
Use the following link as an additional information source and for steps to verify/troubleshoot your configuration:
To verify your FMC configuration, make sure your SNMP server receives SNMP traps from your managed devices (if configured) and verify that your SNMP management server can poll the devices. Ensure that the ports used in the configuration match the configuration of the SNMP server and that any firewalls or access lists between the managed devices and SNMP servers are configured to allow the connections.
Summary
SNMP is an effective way of monitoring network devices centrally. By following the steps included in this document, you can allow your Secure Firewall solution to take part in your SNMP monitoring strategy in addition to the built-in monitoring capabilities that Firewall Management Center provides.
📚 Additional Resources
For more information about using SNMP MIBs and how to use SNMP traps for FXOS faults, please see the following resources:
Updated about 3 years ago
