Umbrella Connector
Cisco Secure Firewall Umbrella Connector
Introduction
DNS, or domain name system, is an Internet protocol often used in attacks; in fact, 90% of malware uses DNS (Source: Cisco Security Research Report). However, many organizations don't monitor their DNS or use DNS-focused security.
A recent report by Global Cyber Alliance org explored the “Value of DNS Security” and found that:
- 1 in 3 breaches could have been prevented by implementing DNS focused security controls
- DNS security could have prevented significant losses in terms of Billions of dollars
Why is DNS useful for security?
DNS is the first step in most Internet connections, and nearly all connected devices use it. Because of this, adding security at the DNS layer allows us to detect and block threats earlier before a malicious connection is even established.
Cisco Secure Firewall Threat Defense supports local DNS policy enforcement using the Security Intelligence Block List of Domain Names. The configuration allows you to use Global Block/Allow lists or custom Block/Allow lists to control DNS traffic. Apart from blocking DNS traffic, it can return custom DNS responses such as Domain Not Found or a Sinkhole IP.
For customers looking to use cloud-delivered DNS Security across their environment or to implement an additional layer of DNS Security, release 7.2 adds support for redirecting DNS requests from the Cisco Secure Firewall to Cisco Umbrella.
Note
This feature was already available in Cisco Secure Firewall and configurable through FlexConfig. Release 7.2 allows for this configuration using the Secure Firewall Management Center GUI and API, on any firewall running version 6.6 or later.
This allows the DNS requests passing through the firewall to be validated by Cisco Umbrella, and allowed or blocked based on the cloud-delivered DNS Security Policy. Thereby providing two layers of DNS protection, locally enforced by the Cisco Secure Firewall and cloud-delivered by Cisco Umbrella.
How Umbrella DNS Security Works
Cisco Umbrella DNS Security augments the Security Intelligence (SI) based DNS Security. Thus, it provides two lines of protection. If the Firewall SI DNS policy blocks or drops a DNS request, the request is not forwarded to Cisco Umbrella.
Secure Firewall Management Center fetches the Umbrella DNS Policy from the associated Umbrella tenant and shows it as an additional DNS policy in the Security Intelligence settings. Any changes to the Umbrella policy on the Umbrella tenant are synchronized to the Firewall Management Center.
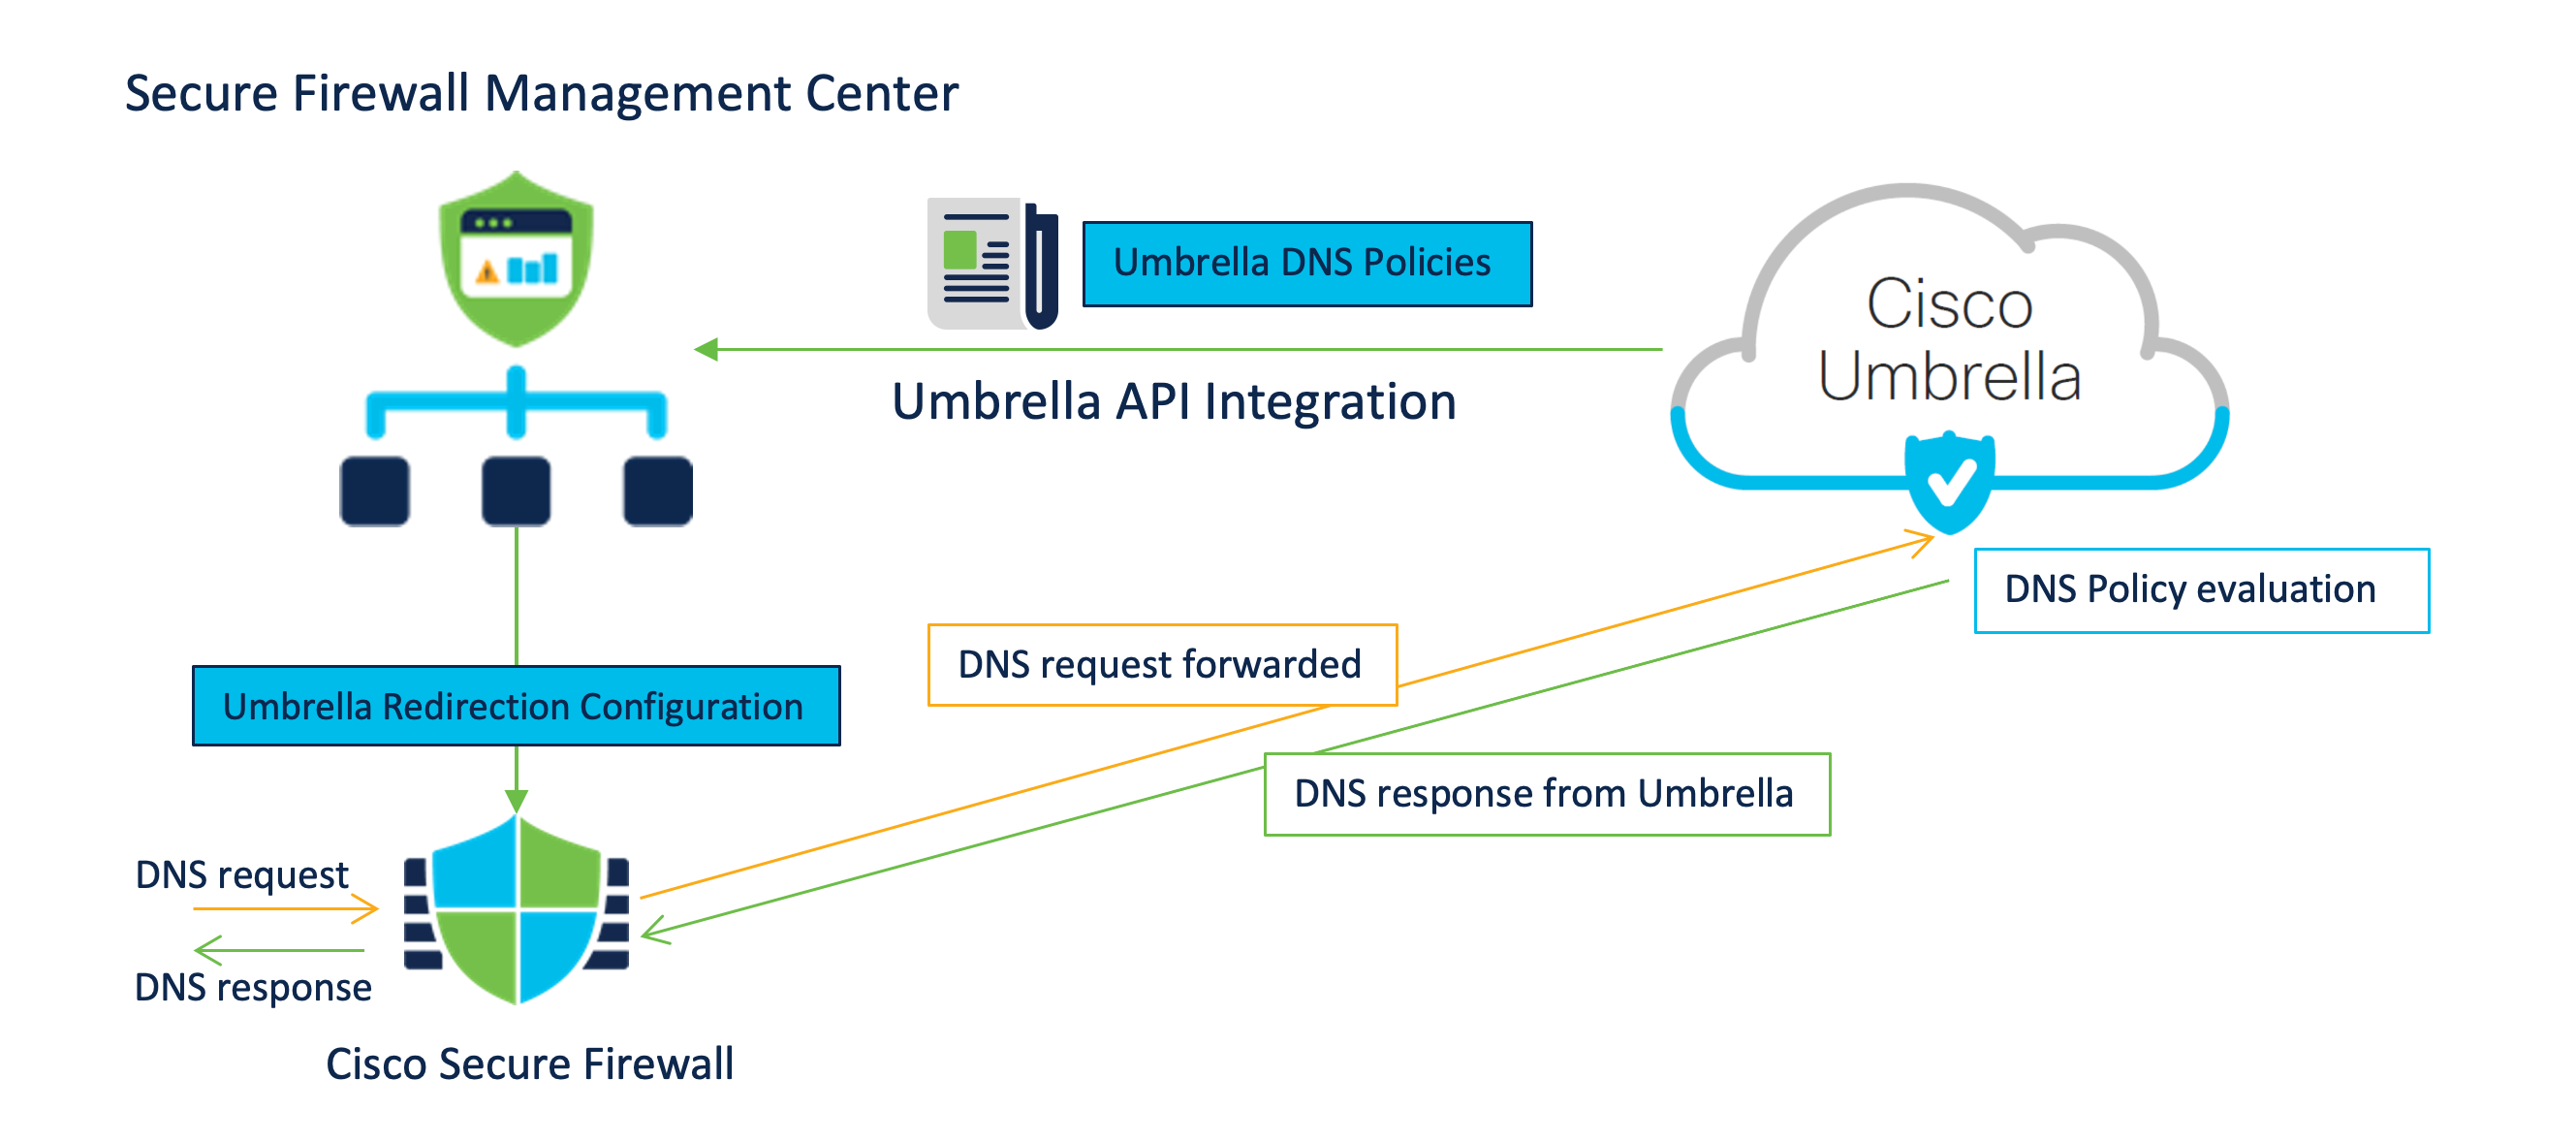
When redirecting DNS requests to Cisco Umbrella, the Umbrella Connector running on the Secure Firewall adds an EDNS (Extension for DNS) record containing its identification info. The Umbrella Cloud uses this info to ensure that it forwards the request to the correct Umbrella tenant and applies the appropriate policy.
Configuration
Prerequisites:
- Admin access to an active Umbrella Account with at least the DNS Security Essentials package
- An Umbrella account configured with DNS Policies
- One Umbrella account per FMC
- Export-Controlled enabled on the Secure Firewall Management Center (FMC)
- FMC can reach management.api.umbrella.com
- FTD has to be in routed and can reach api.opendns.com and theUmbrella Resolver IP addresses
- The Umbrella Cloud Root certificate needs to be enrolled and installed on the Secure Firewall. The certificate is available here: https://docs.umbrella.com/hardware-integrations/docs/import-the-root-certificate
️Warning
This document does not cover the basics of the DNS Policy configuration in the Umbrella Dashboard.
Umbrella Connector Integration in Secure Firewall Management Center
Step1: From the Global Search, type Cloud Services and click on the Navigation result presented

Cloud Services Navigation
Step 2: Scroll down to the Cisco Umbrella Connection widget, and enter the following details to enable the integration. These details are available in the Umbrella Dashboard Admin panel.
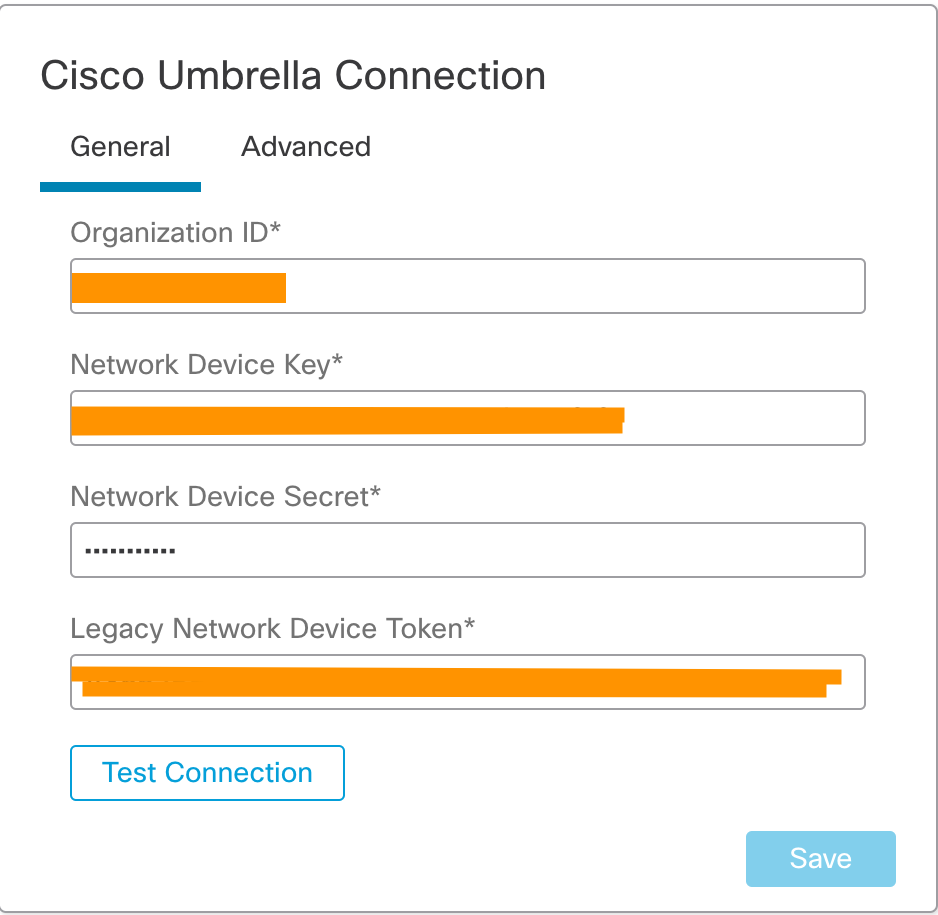
Cisco Umbrella Connection widget in Secure Firewall Management Center
Cisco Umbrella Connection Mandatory Settings explained
Organization ID, Network Device Key and Network Device Secret are used to identity the Umbrella account and fetch the associated Umbrella DNS policies.
The Legacy Network Device Token is used by the Secure Firewall to register with the Umbrella account and forward the DNS requests to the account.
If you have multiple Umbrella Organizations, ensure that you switch to the correct Organization.
Step 3: Login to your Umbrella Dashboard and navigate to Admin > API Keys
Step 4: Note the URL in the browser. It will follow the following format:
https://dashboard.umbrella.com/o/[OrganizationID]/#/admin/apikeys
Copy the number displayed in the URL and paste it under Organization ID in the Umbrella Connection Details
Step 5 Click on Umbrella Network Devices
- If the Key and Secret are not available or known, click on Refresh to generate a Key and Secret pair
- Copy the Key and paste it under Network Device Key in the Umbrella Connection Details page on FMC
- Copy the Secret and paste it under Network Device Secret in the Umbrella Connection Details page on FMC
Step 6 Click on Legacy Network Devices
- If the Key is not available or known, click on Refresh to generate a Key
- Copy the Key and paste it under Legacy Network Device Token
The screenshot below shows an example:
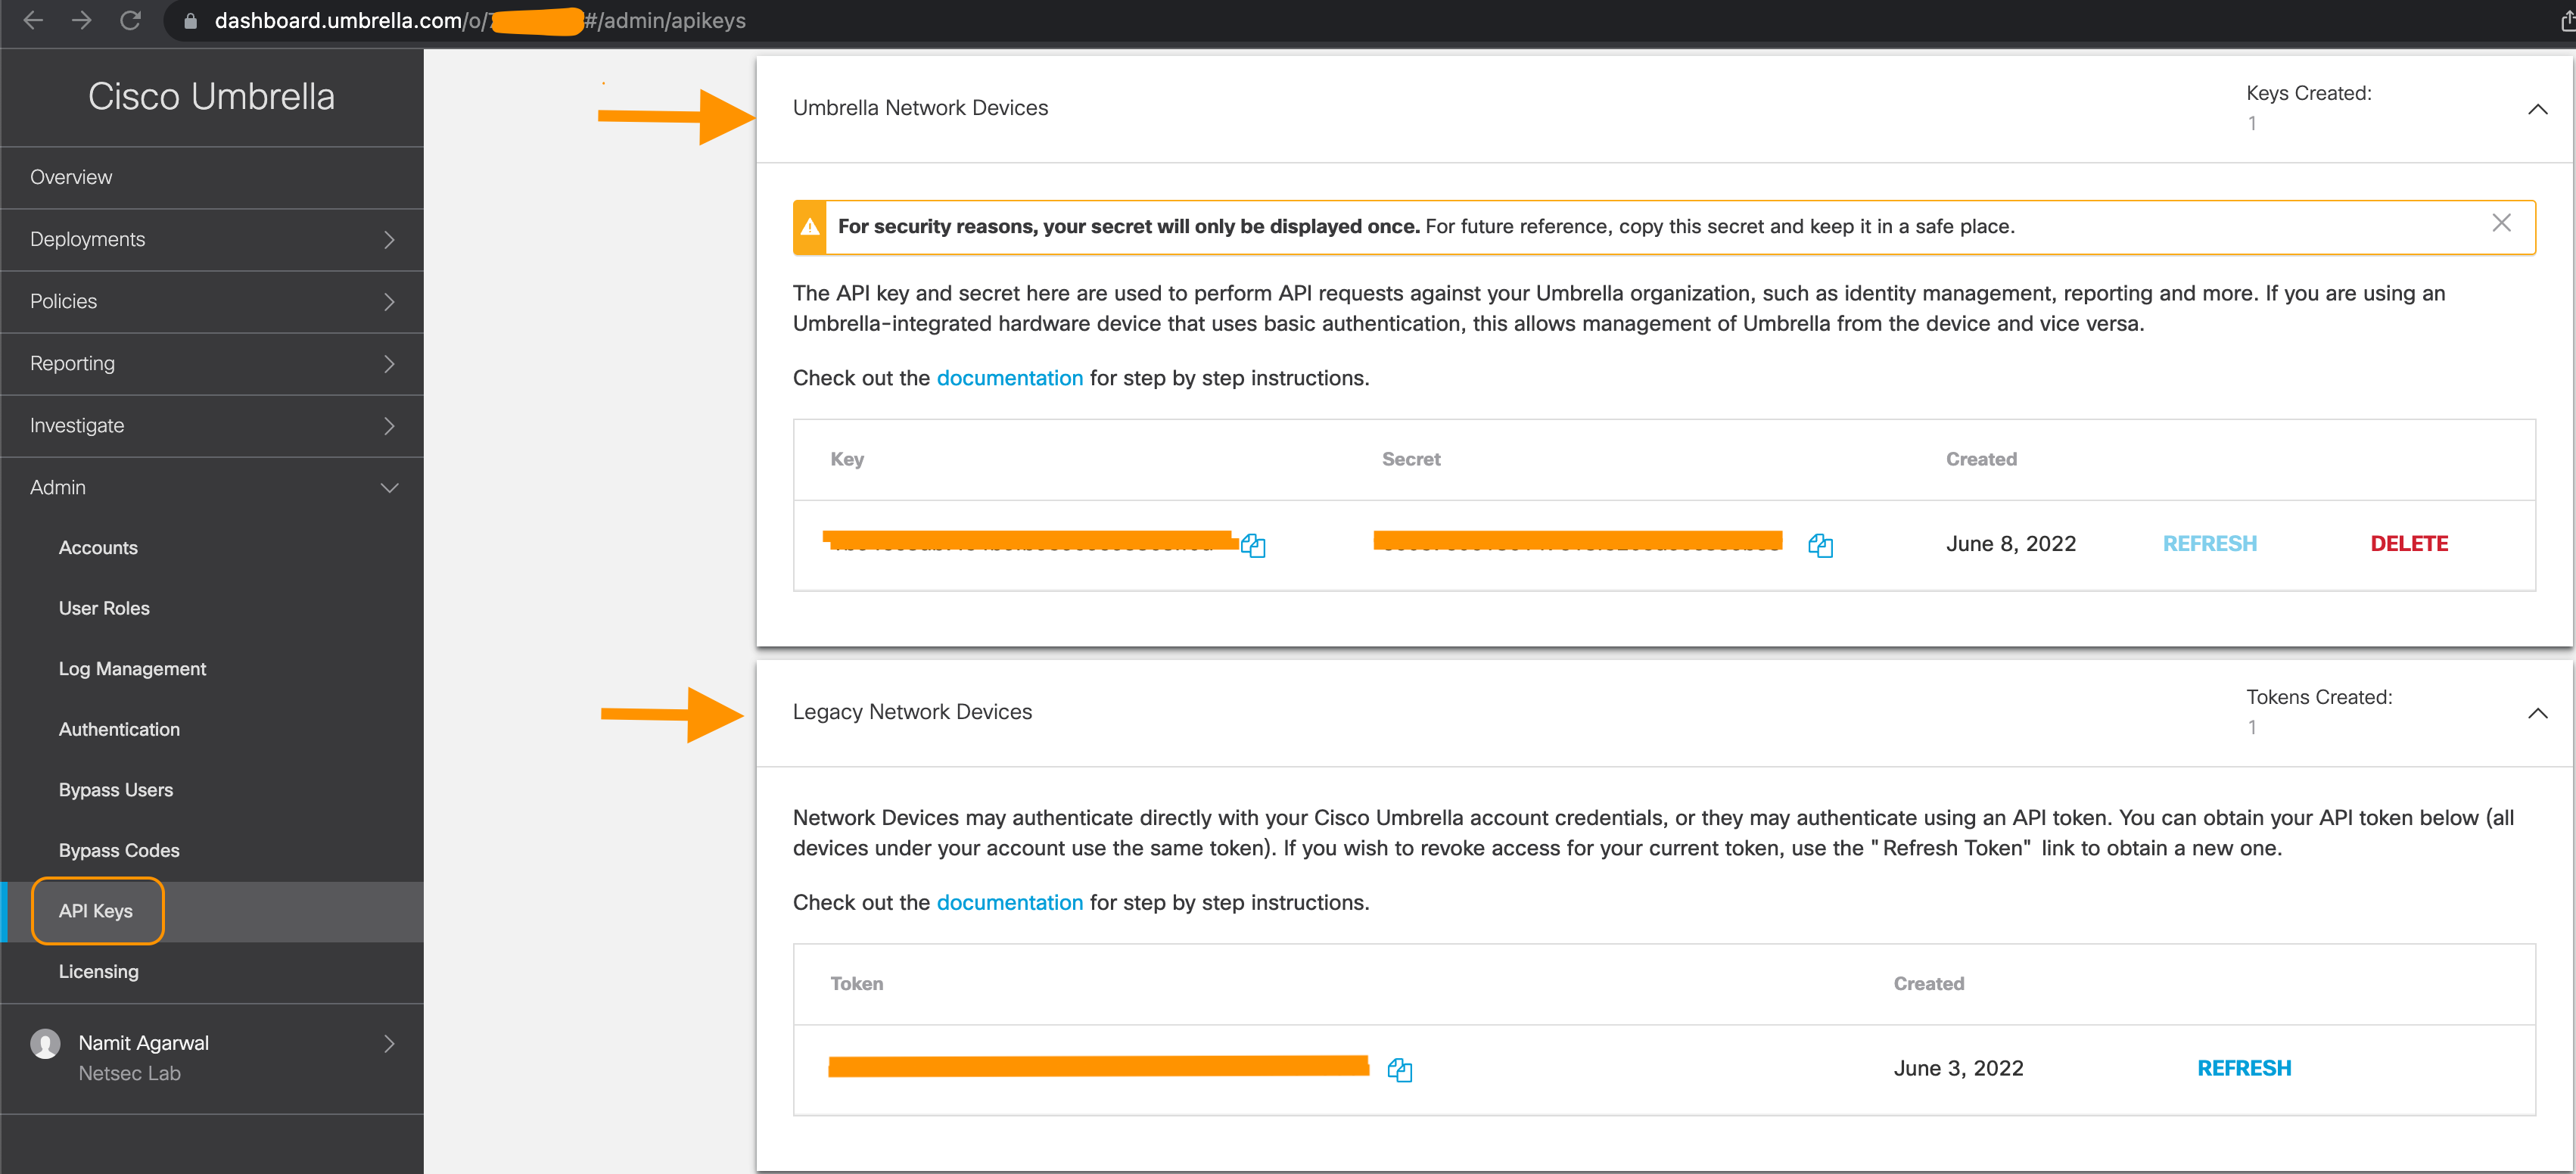
Umbrella Dashboard with the Integration Details
Step 7: After entering all the details in the Firewall Management Center, click Test Connection. The connection test is initiated from the Firewall Management Center and should be successful, as shown below. If the test fails, please validate the Umbrella settings and ensure that Firewall Management Center has internet connectivity. Click Save when the test succeeds.
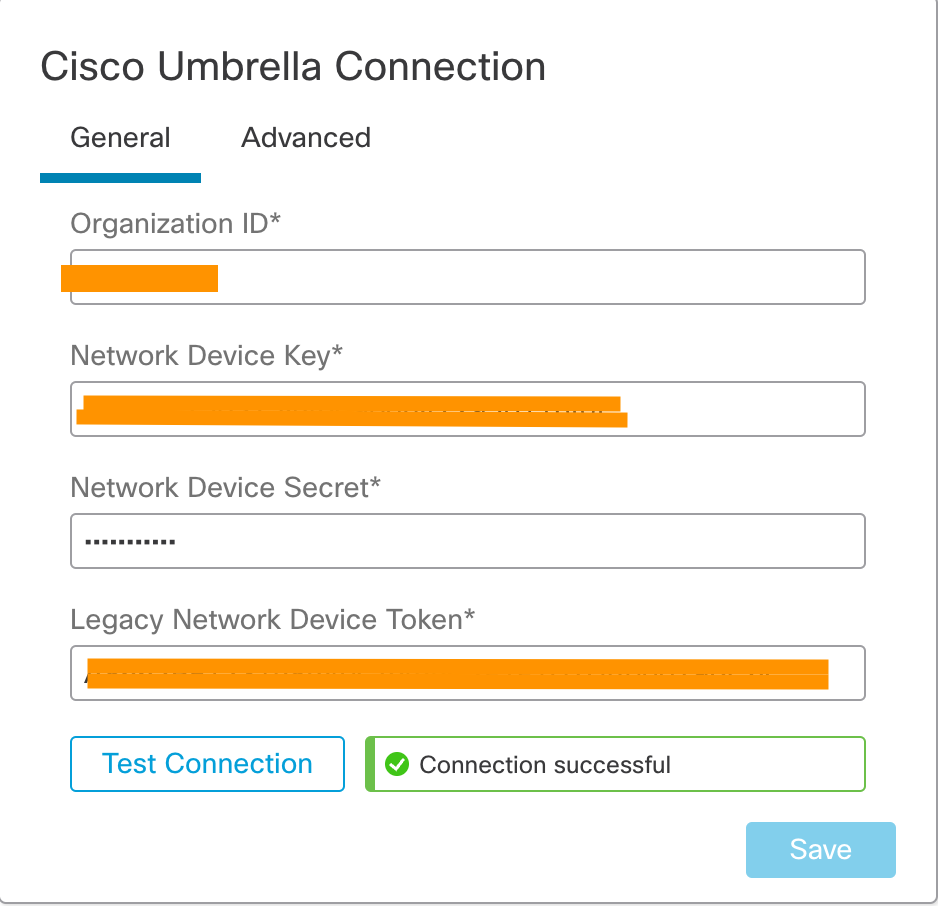
Successful Connection Test
Creating a new Umbrella DNS Policy
Step 1: On the Firewall Management Center, navigate to Policies>DNS
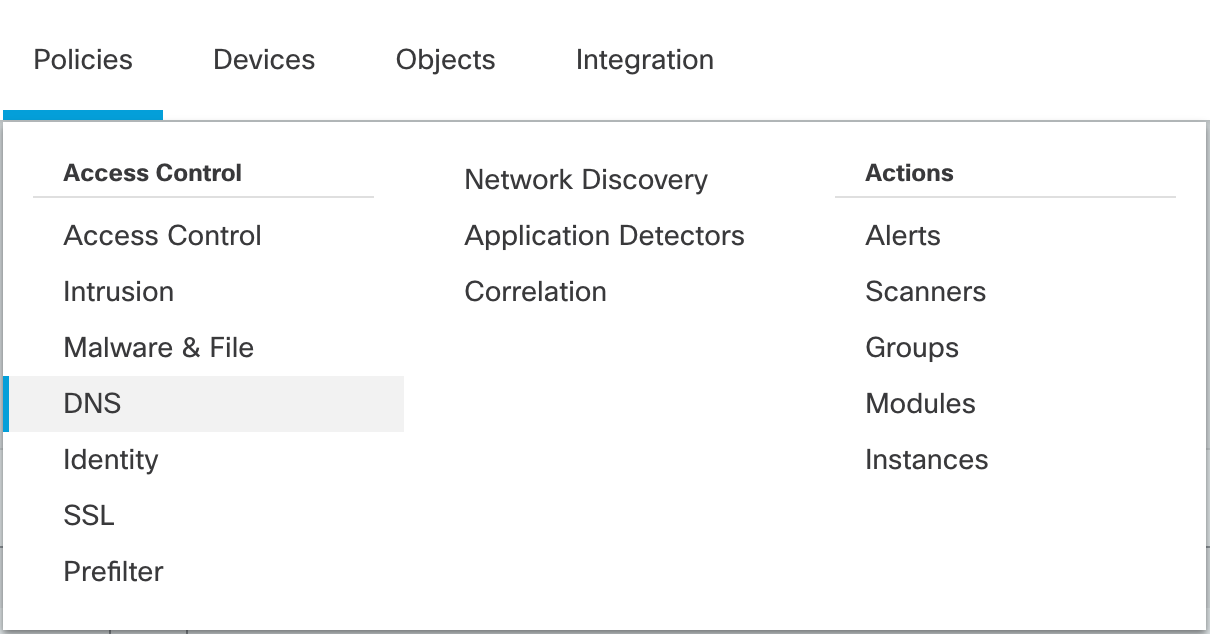
Policy Navigation Options
Step 2: Click Add DNS Policy and select Umbrella DNS Policy

New Umbrella DNS Policy
Step 3: Enter FTD Umbrella Policy for Name and an optional Description. Click Save.
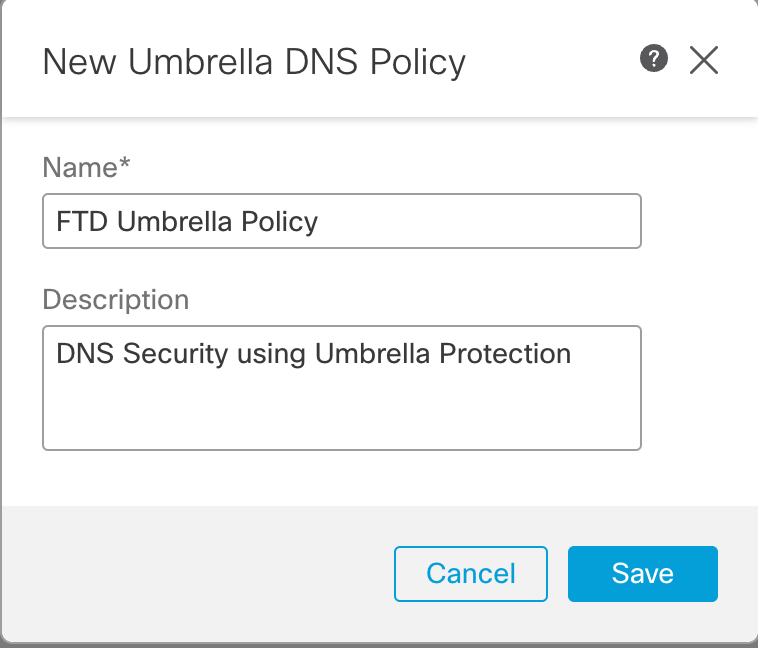
Name and Description of the Umbrella DNS Policy
Step 4: You will be presented with the policy editor with a Default rule as shown below.

Default settings in the new policy rule
Step 5: Click on the edit icon, and you will see the configurable options for the rule.
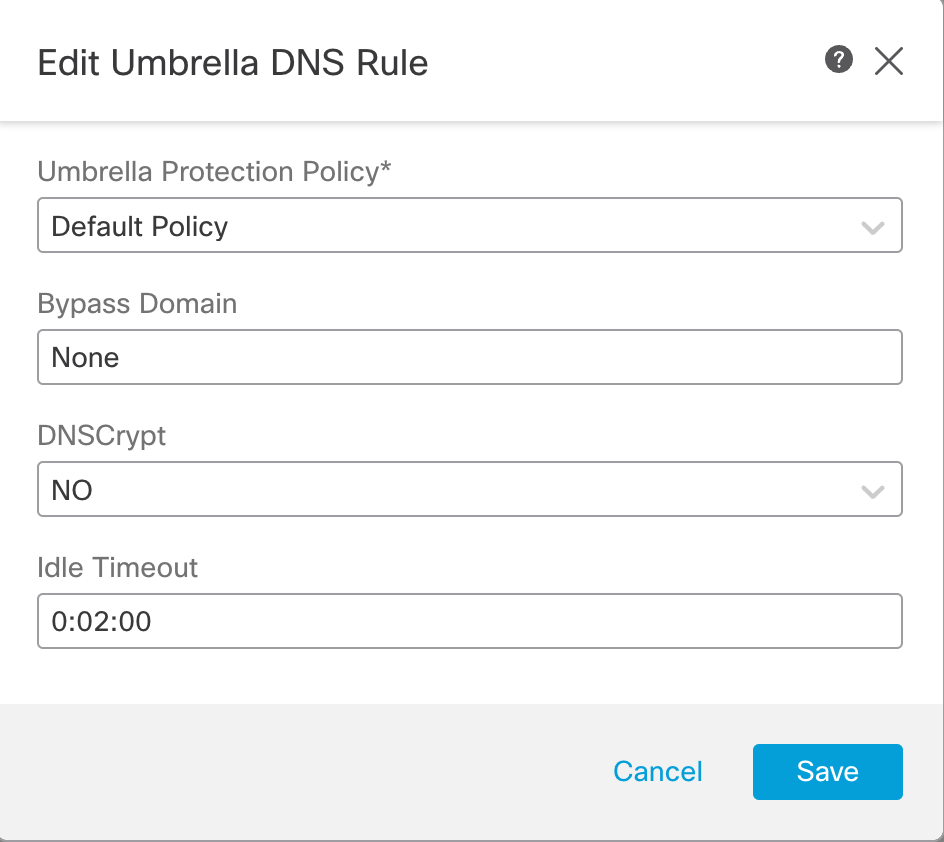
Configurable settings in the Umbrella DNS Policy rule
Policy Rule Fields
- Rule Number denotes the rule ordering. In this release, only one rule per Umbrella DNS Policy is supporrted.
- Interface Objects represents the interface of the Secure Firewall where the DNS traffic is received. In this release, only any is supported which implies that DNS traffic received on all the Firewall interfces will be matched against the policy.
- Umbrella Protection Policy is the name of the DNS policy defined in the Umbrella Dashboard. Using the integration we configured earlier, the Firewall Management Center is going to fetch the list of all DNS Policies from the Umbrella account. We can select any one from the drop-down.
- Bypass Domain lets you configure the list of domains for which Umbrella Policy check has to be bypassed. It is None by default. For multiple domains, enter a comma separated list. e.g. This could be a list of your local domains which don't need to be filtered or evaluatd by Umbrella DNS security.
- DNSCryptallows the DNS request to be encrypted before being forwarded to Umbrella cloud. It is No by default. If this is changed to Yes the Secure Firewall forms an encrypted channel with Umbrella cloud on UDP port 443 for forwarding the DNS requests. If you intend to enable it, you need to provide the DNSCrypt Key in the Advanced section of the Cisco Umbrella Connection under the Integraton settings.
- Idle Timeout configures the time interval to wait if there is no response from Umbrella cloud, after which the Secure Firewall connection to the Umbrella cloud is removed. It is entered in the format hh:mm:ss. The default value is 00:02:00 and maximum configurable value is 1193:0:0, which is not recommended generally.
Step 6: From the Umbrella Protection Policy dropdown, select the Umbrella DNS Policies. This example shows three policies, including the Default DNS Policy defined in the Umbrella account. Select Umbrella_DNS_Policy_1. Use default values for the rest of the settings. Click Save.
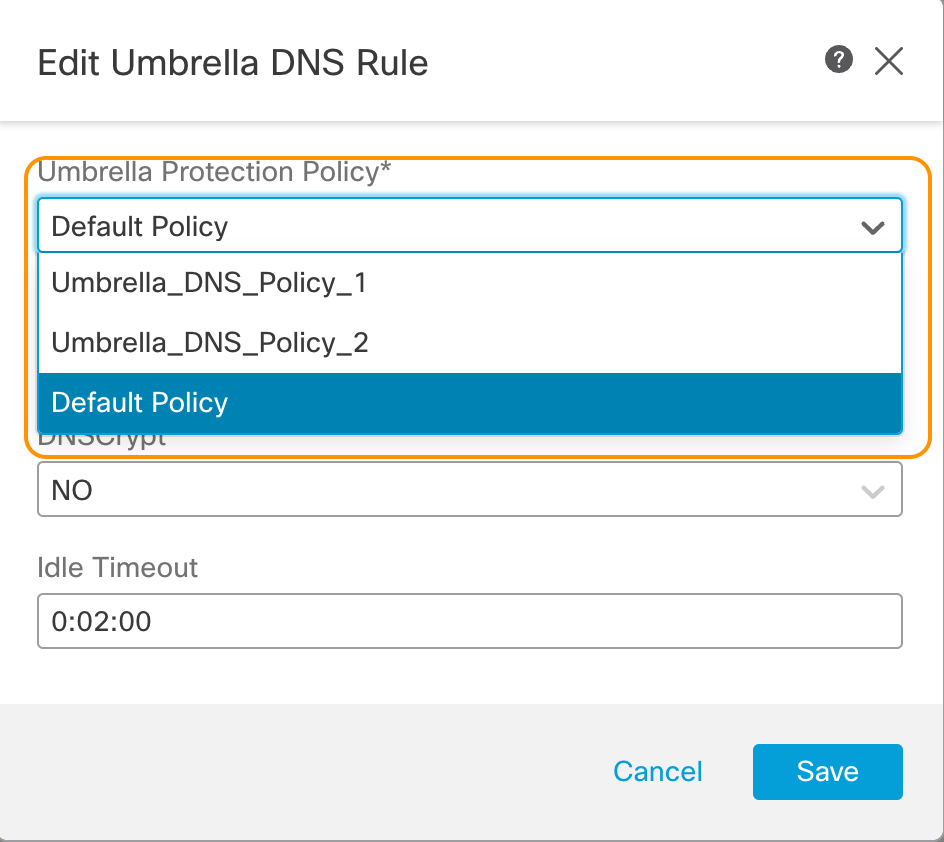
List of DNS policies fetched from integrated Umbrella account
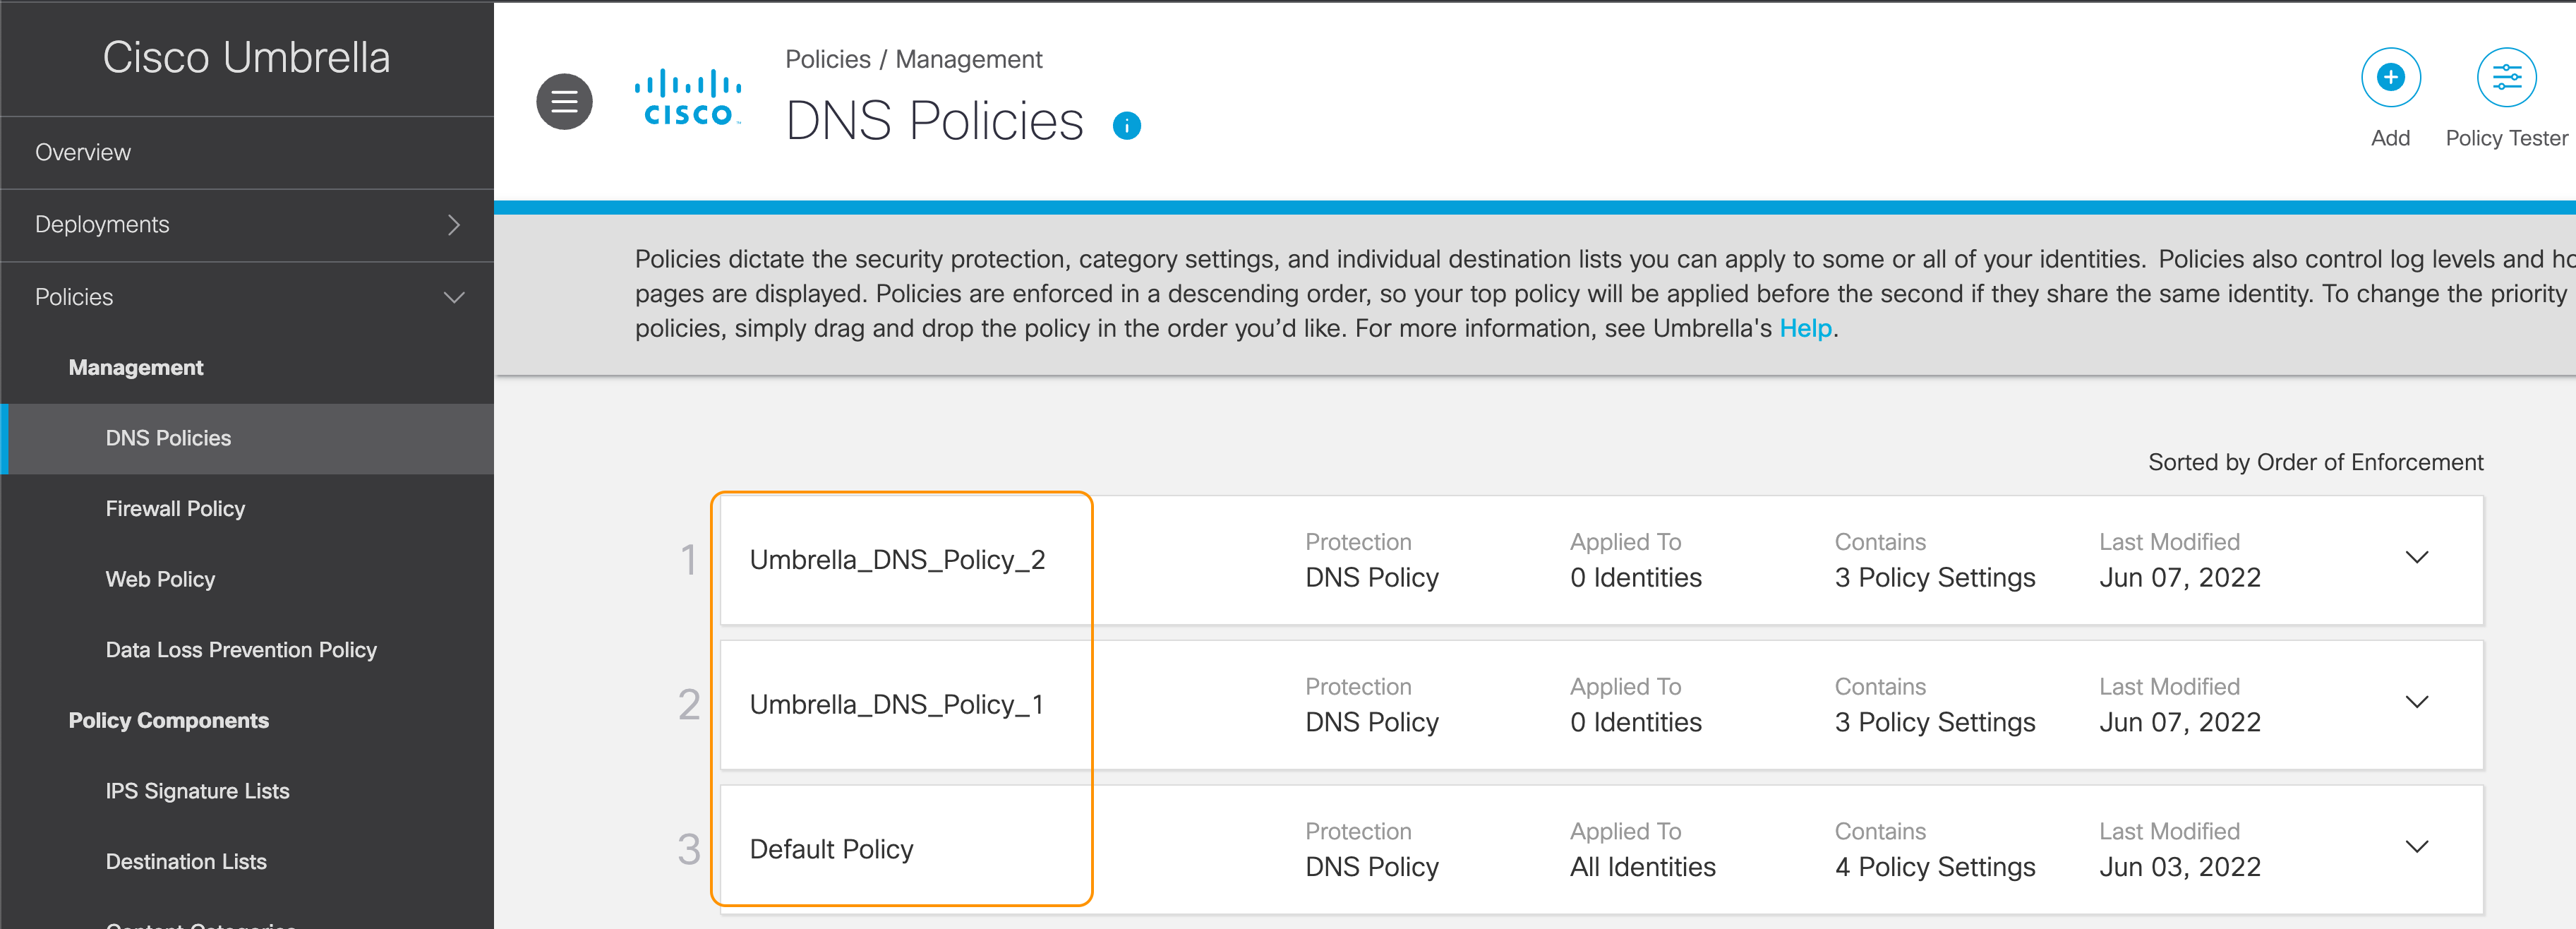
Matching list of DNS Policies in Umbrella Dashboard
Note:
A DNS policy created in the Umbrella account is automatically fetched and displayed in the drop down in Umbrella DNS Policy rule editor on the Firewall Management Center. To manually fetch the policy list click on the refresh button.
Assigning Umbrella DNS Policy
Step 1: Navigate to Policies > Access Control and edit the Access Control Policy where we want to enable the Umbrella DNS protection.
Step 2: Click the Security Intelligence tab. Under the DNS Protection section, you will see two types of policy options :
DNS Policy: this is the DNS Policy using the local Security Intelligence on Secure Firewall
Umbrella DNS Policy: this is the newly added Umbrella DNS Protection.
Step 3: From the Umbrella DNS Policy dropdown, select the previously created FTD Umbrella Policy

Umbrella DNS Policy assignment
Step 4: Click Save and deploy your policy changes from the quick Deploy menu at the top.
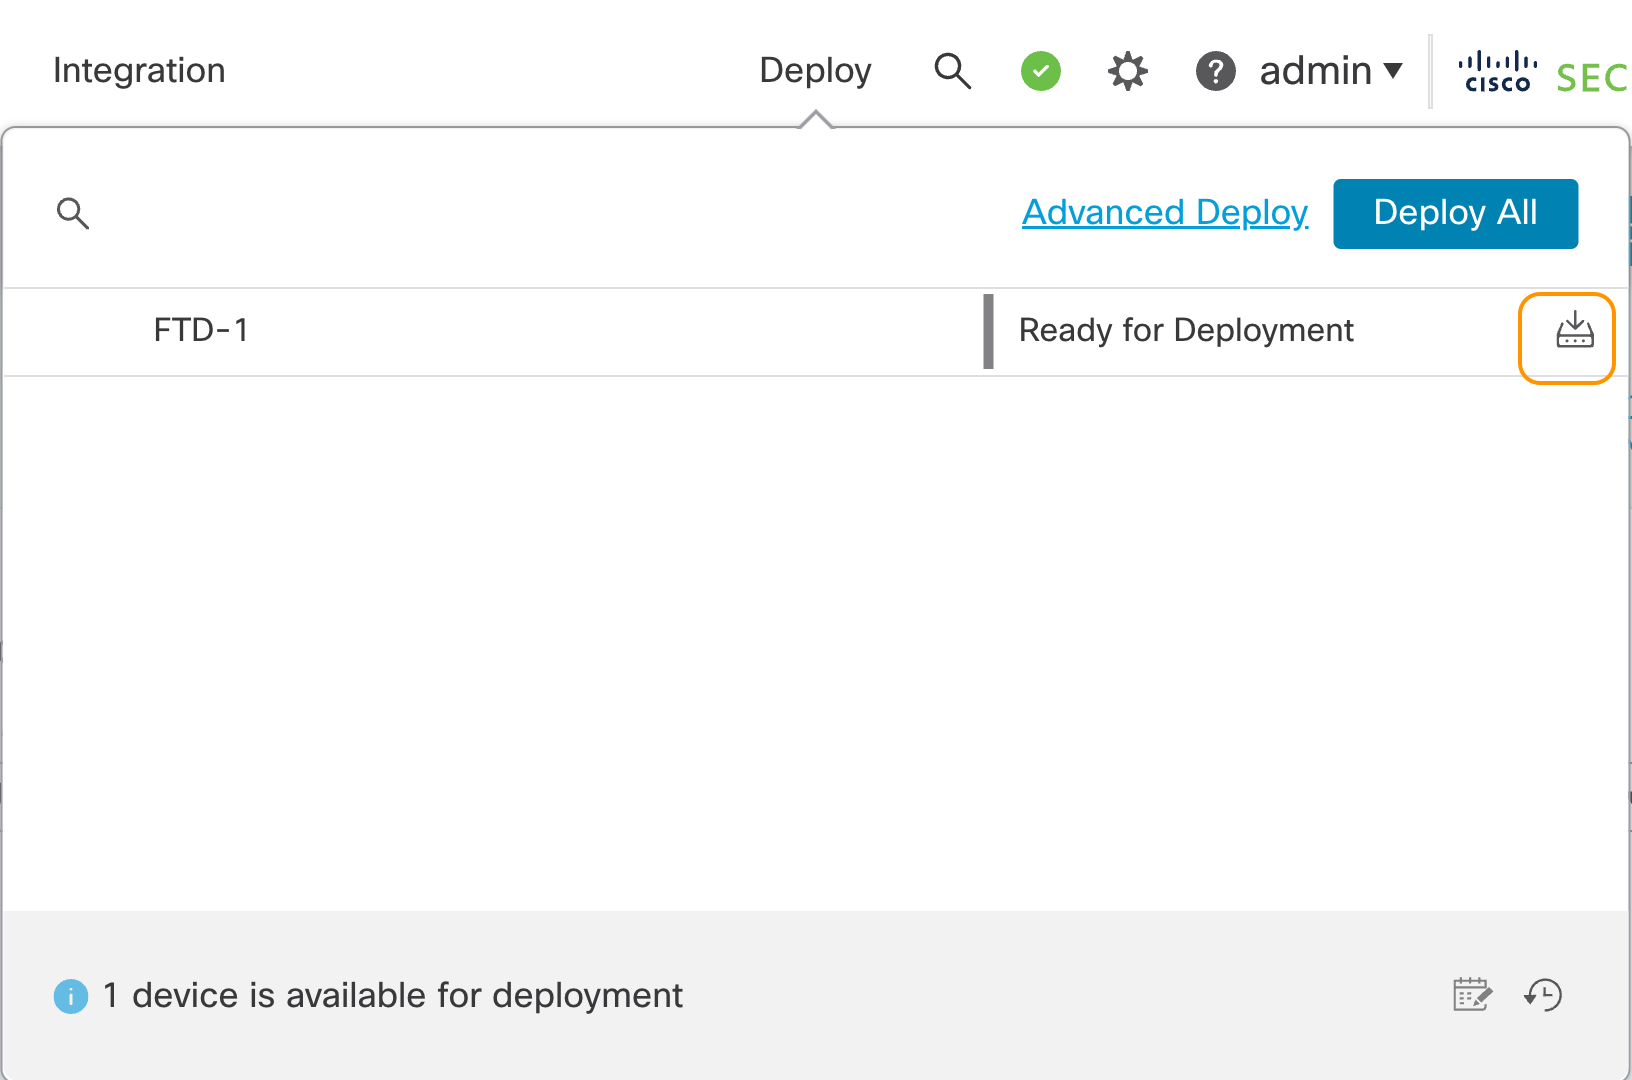
Quick Deploy Popup
Verification and Troubleshooting
Once the deployment is complete, you can run the below CLI commands to ensure that the Umbrella configuration has been successfully deployed.
show run umbrella-global
shows the Umbrella settings used to forward DNS requests to the Umbrella cloud
show service-policy inspect dns [detai]
shows the summarized or detailed statistics for the integration
Summary
The new Umbrella DNS Connector integration in 7.2 enhances Secure Firewall's DNS Security allowing for a second line of defence after the local DNS Security Intelligence. Also, it enables the transition to cloud-delivered Security Policy enforcement. Moreover, customers already using Umbrella DNS, e.g. Secure Client (formerly Anyconnect) users or Secure Access scenarios, can apply a common policy framework for DNS Security.
📚Additional Resources
Provide links to any additional resources:
Updated about 3 years ago

