Scenario 2 - Zero Trust Access (ZTA)
Objective
- What - In this scenario, we will look at the Zero Trust Access (formerly called Zero Trust Application Access) feature set available in 7.4 release of firewall software. The Zero Trust Access feature is based on Zero Trust Network Access (ZTNA) principles allowing clientless access with the least privilege, after verifying the user, the context of the request, and analyzing the risk if access is granted.
- Why - Enables users to access applications without requiring additional software on personal devices. SAML-based authentication of users with support for Duo, Azure AD, Okta, & other Identity Providers.
- How - Pre-downloaded Certificates, Zero Trust Application Policy, and SAML-tracer.
Lab Tasks
These are the tasks in the scenario below.
- Task 1 - Install certificates required for Zero Trust Access - in this task you will import and review a set of certificates, used by the firewall throughout the ZTA authentication and flow inspection.
- Task 2 - Configure Zero Trust Application Policy - once the required certificates are installed in the firewall, you may proceed with configuring the clientless access policy. In this task you will configure the internal/external URLs of the application as well as SAML IdP integration. You specify what IPS and File protection is applied to user traffic.
- Task 3 - Verify Zero Trust Access - in this section, you verify the ZTA configuration and observe end-user experience during authentication and application access, as well as the administrator's side of the process.
Task 1 - Install certificates required for ZTA trusted access
In this task, you will import and review a set of certificates, used by the firewall throughout the ZTA authentication and flow inspection.
-
Using the Quick Launch or the Google Chrome browser connect to the FMC web UI.
Login as admin/C1sco12345. These credentials should be pre-populated in the browser.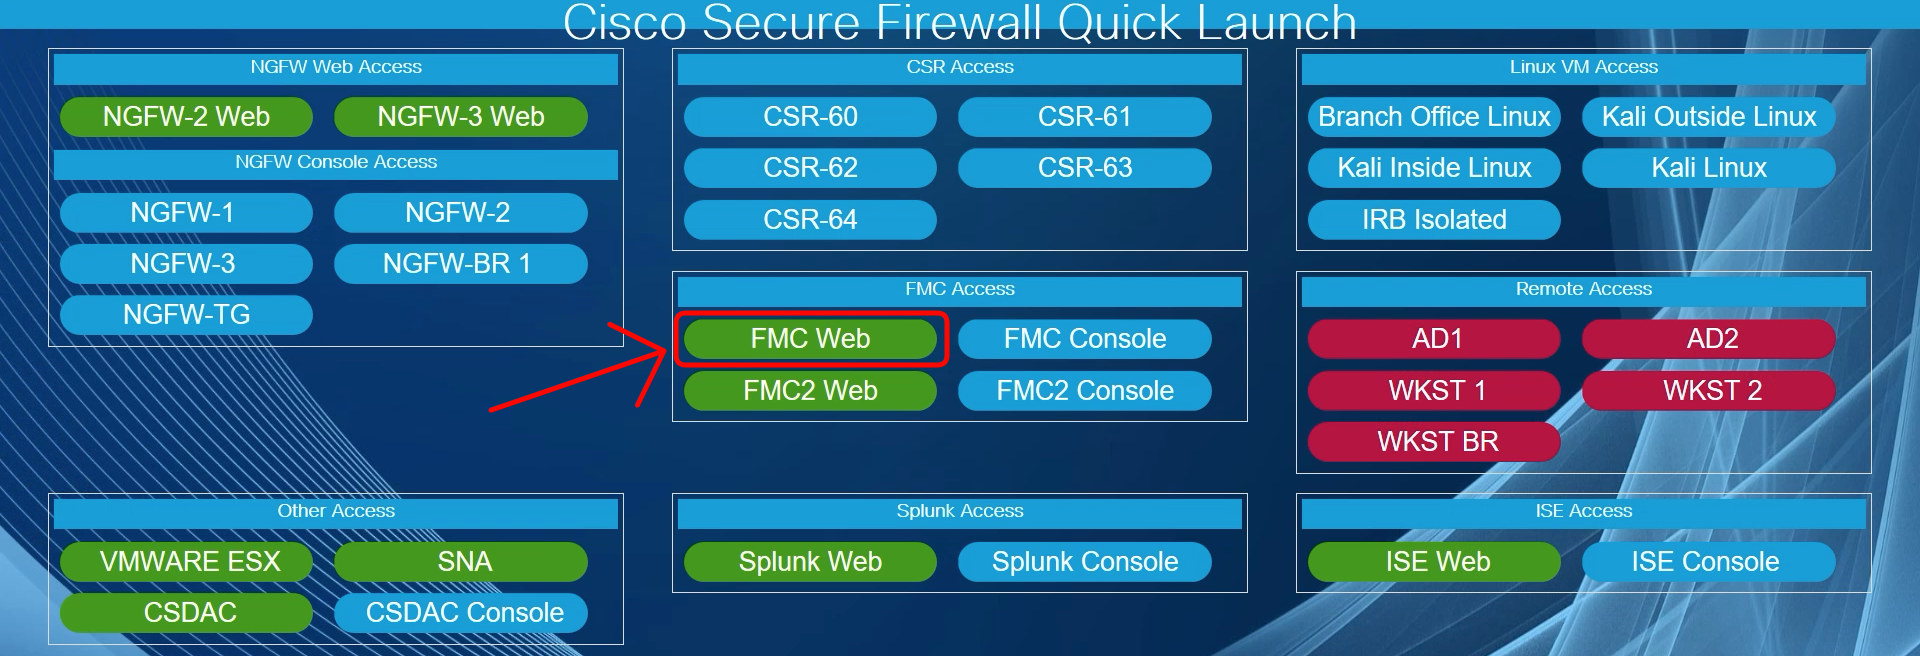
We start with importing the certificates required for the Zero Trust Access configuration. There are three certificates that we need to consider:
- ZTA authentication certificate
- SAML IdP (Identity Provider) certificate
- Protected application certificate
-
You begin with adding the ZTAA authentication certificate presented by the firewall to the users during authentication. This certificate is used when accessing any of the ZTA-protected applications. For the certificate to be trusted by clients' browsers, it must either be a wildcard certificate or include all individual application URLs in the SAN (Subject Alternative Name). In this laboratory, for simplicity, we will use a wildcard entry *.dcloud.local in the SAN field.
Navigate to Devices -> Certificates and click Add.

-
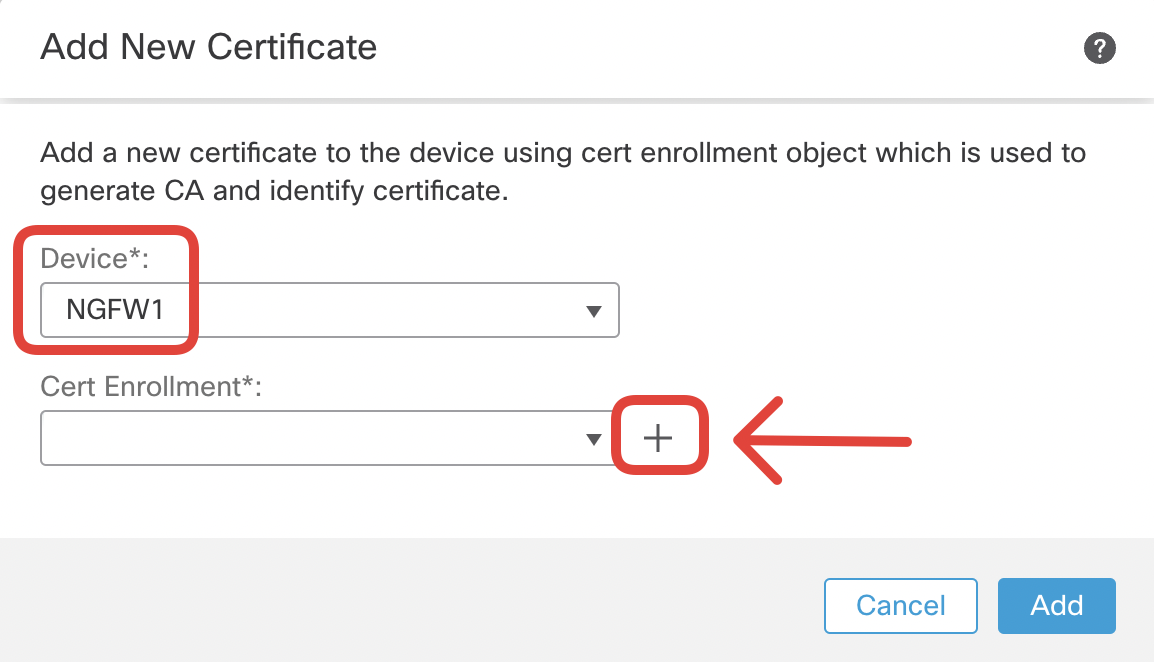
Select the NGFW1 in the Device dropdown and click on + to add a certificate enrollment.
-
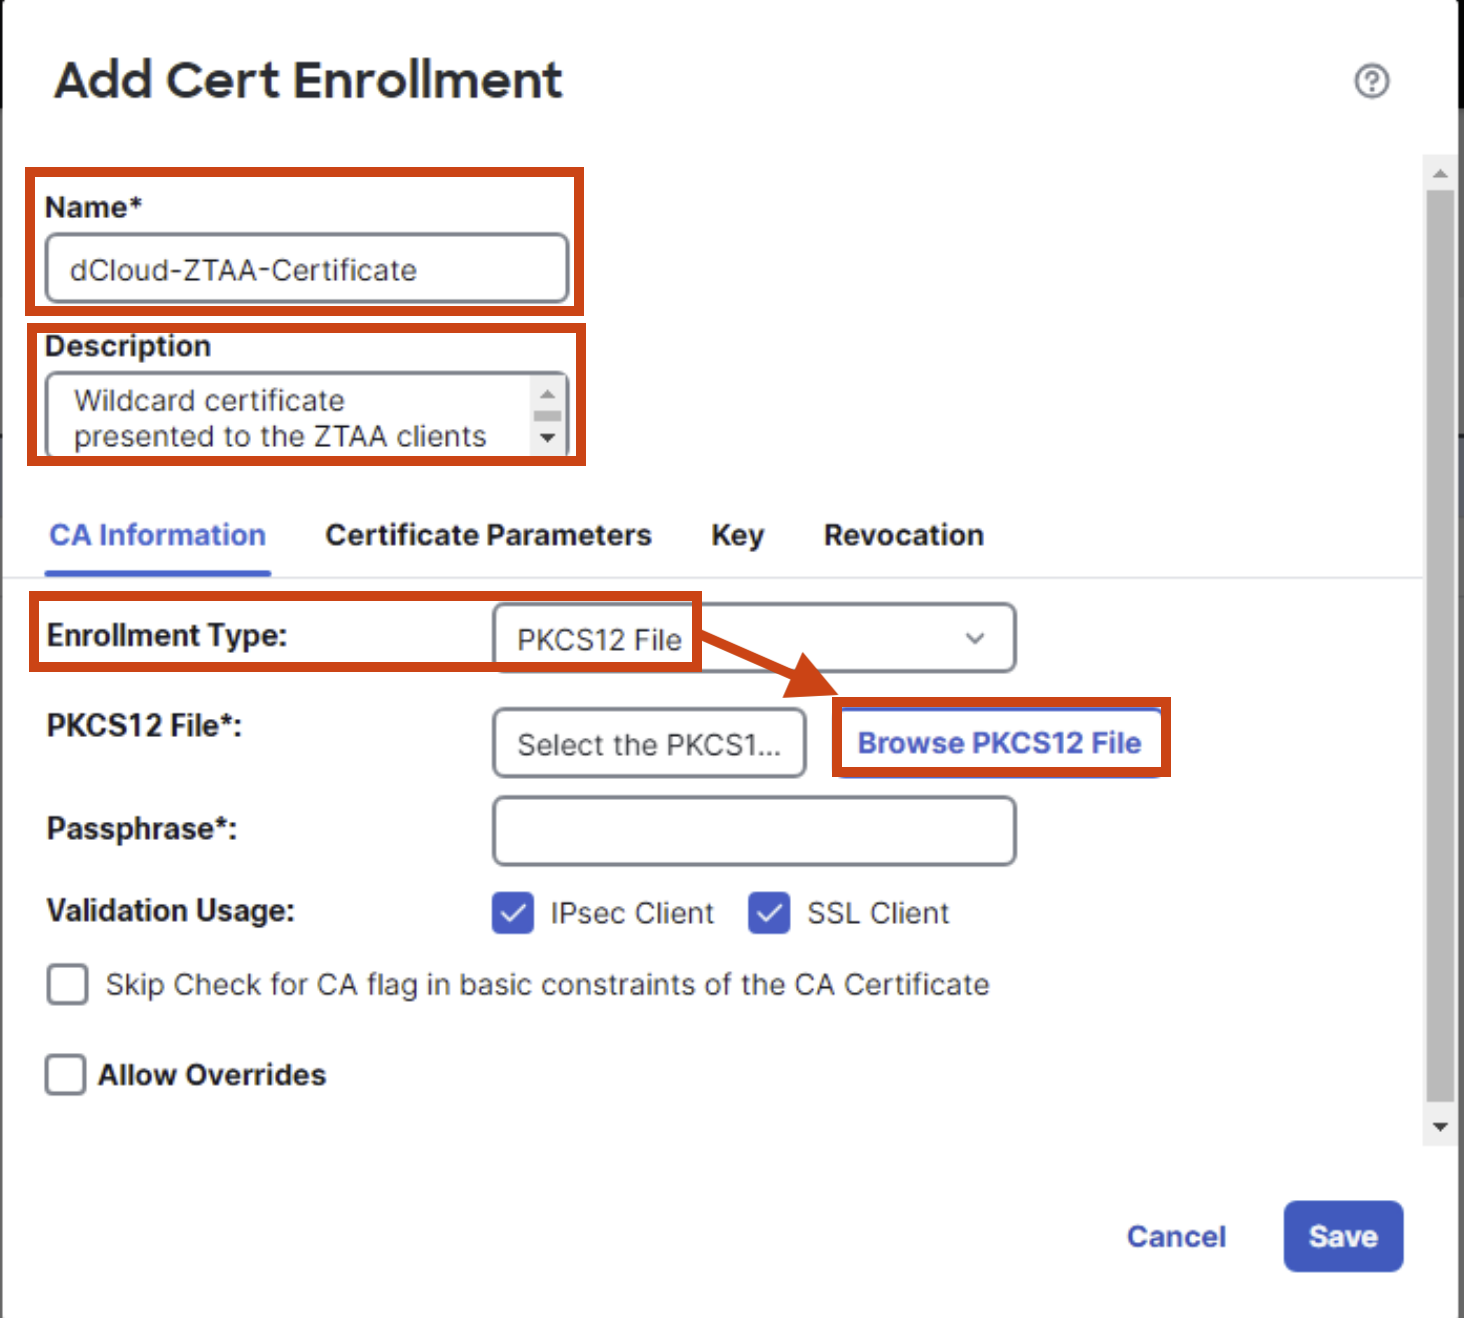
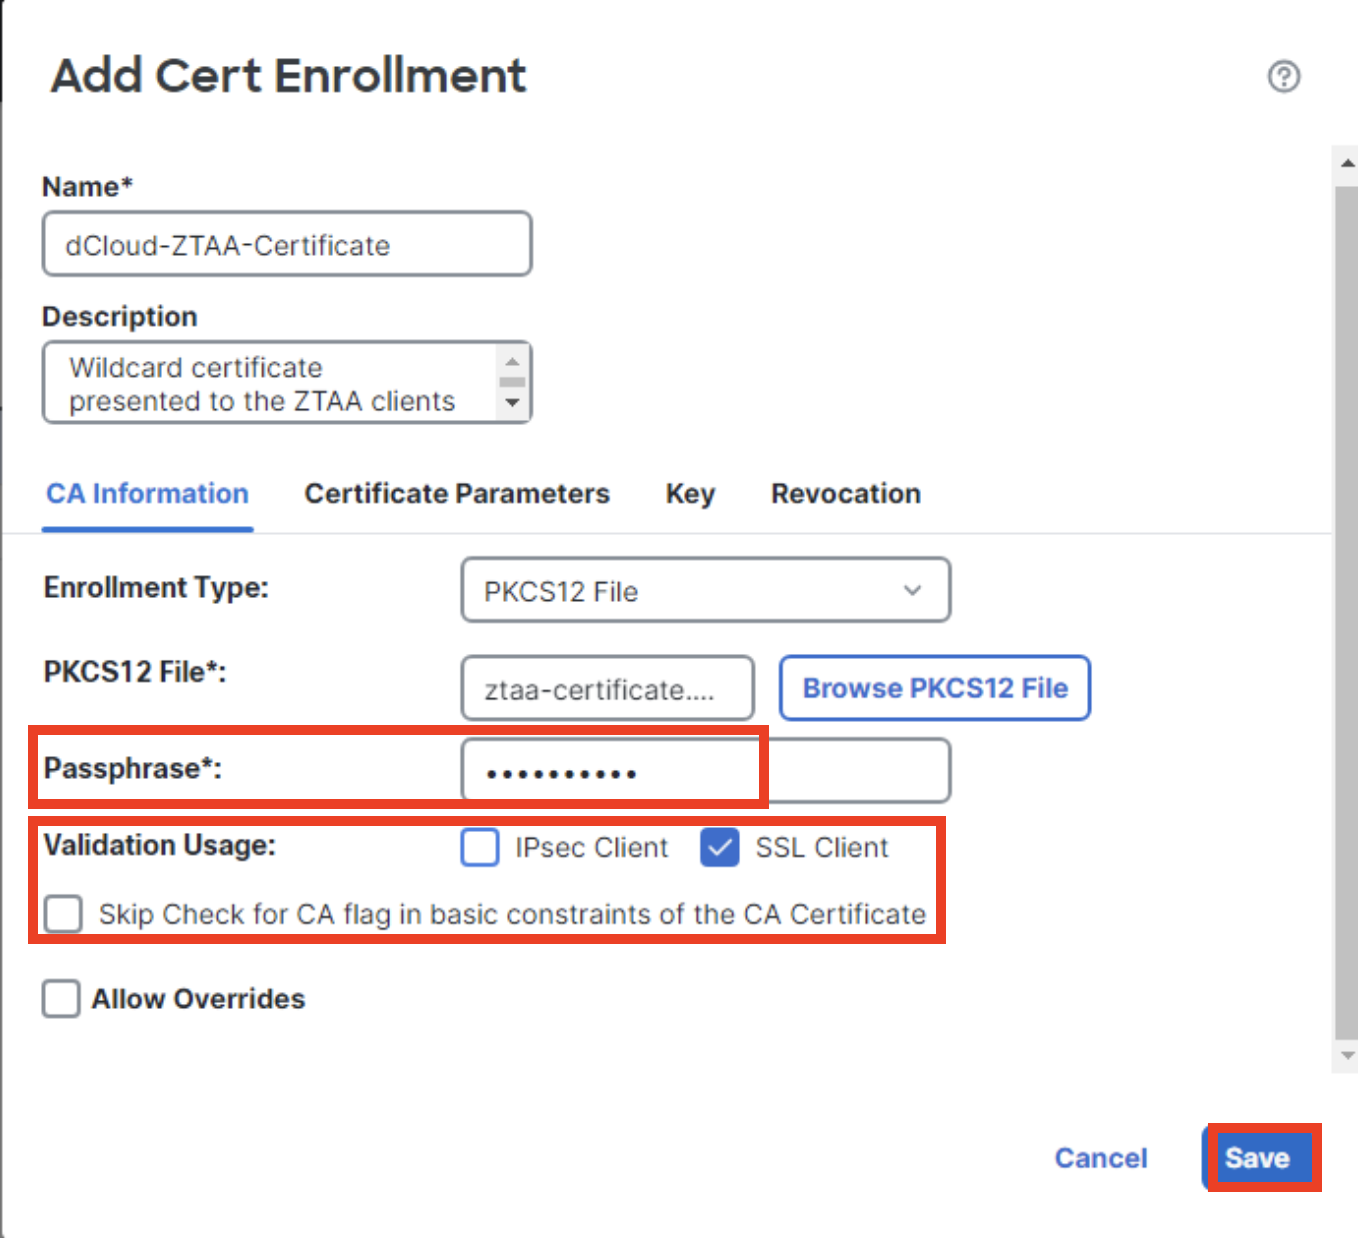
Configure the certificate enrollment details as follows:
- Name: dCloud-ZTAA-Certificate
- Description: Wildcard certificate presented to the ZTAA clients during auth/authz
- Enrollment Type: PKCS12 File
-
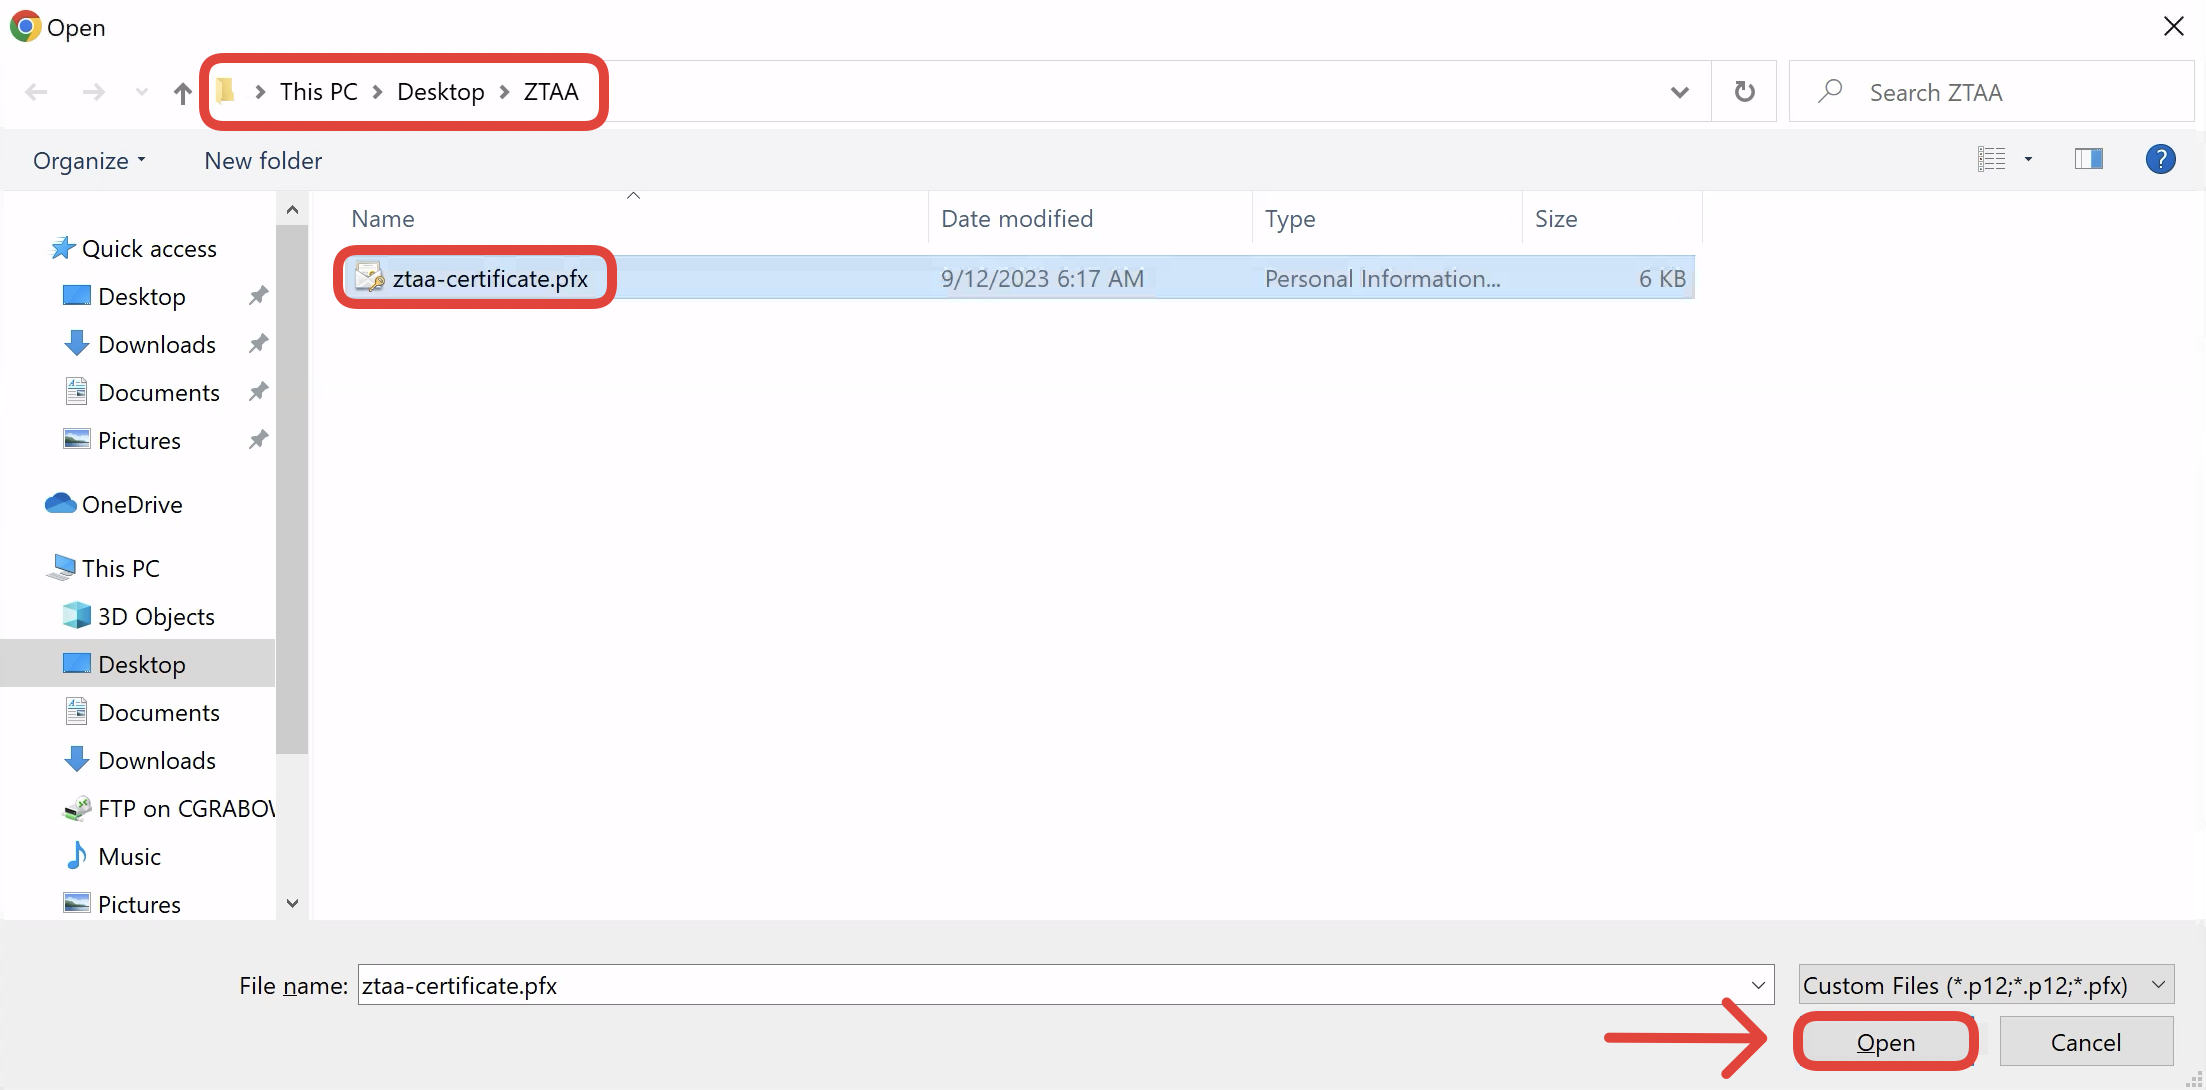
Click on Browse PKCS File and navigate to ZTAA directory on the jumphost's Desktop. Select ztaa-certificate.pfx file and click Open.
-
Use C1sco12345 as the Passphrase. Select only SSL Client options in Validation Usage.
-
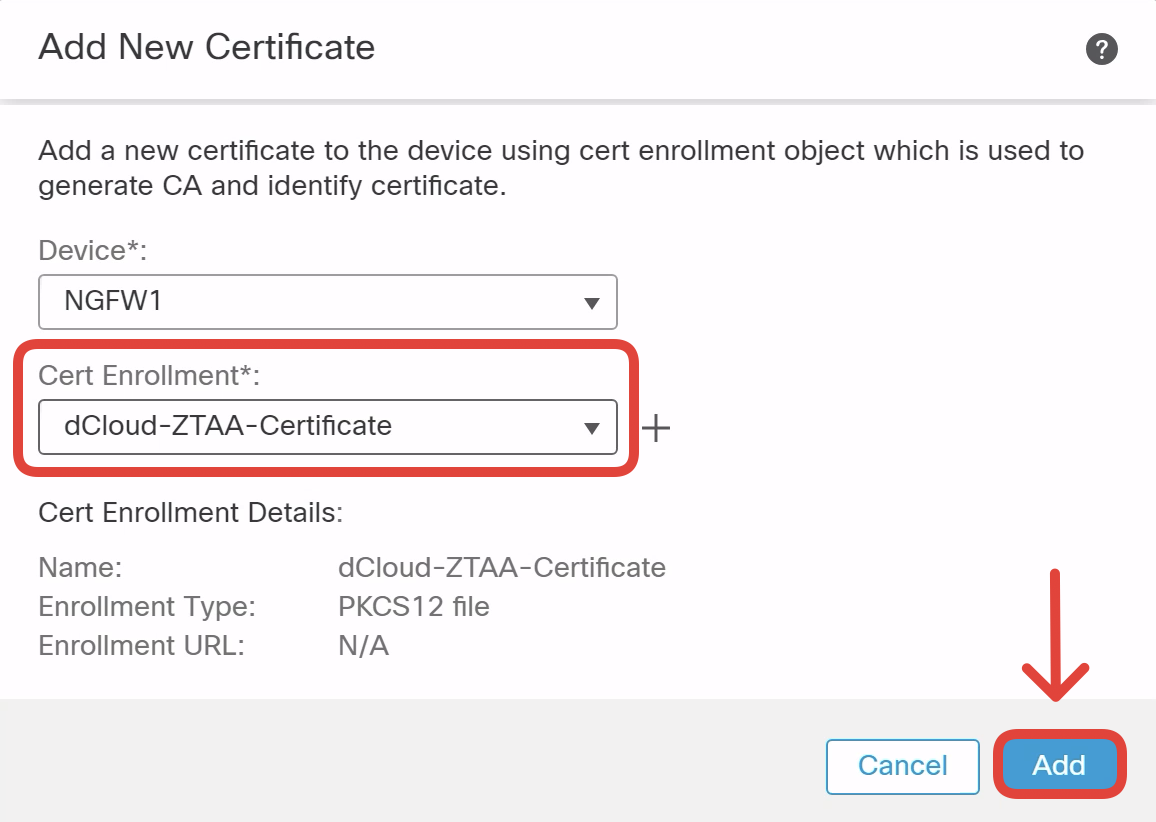
Click Save and then Add when brought back to Add New Certificate window.
-
Confirm the dCloud-ZTAA-Certificate is successfully enrolled. Verify that CA and ID certificates are available in the Status column.

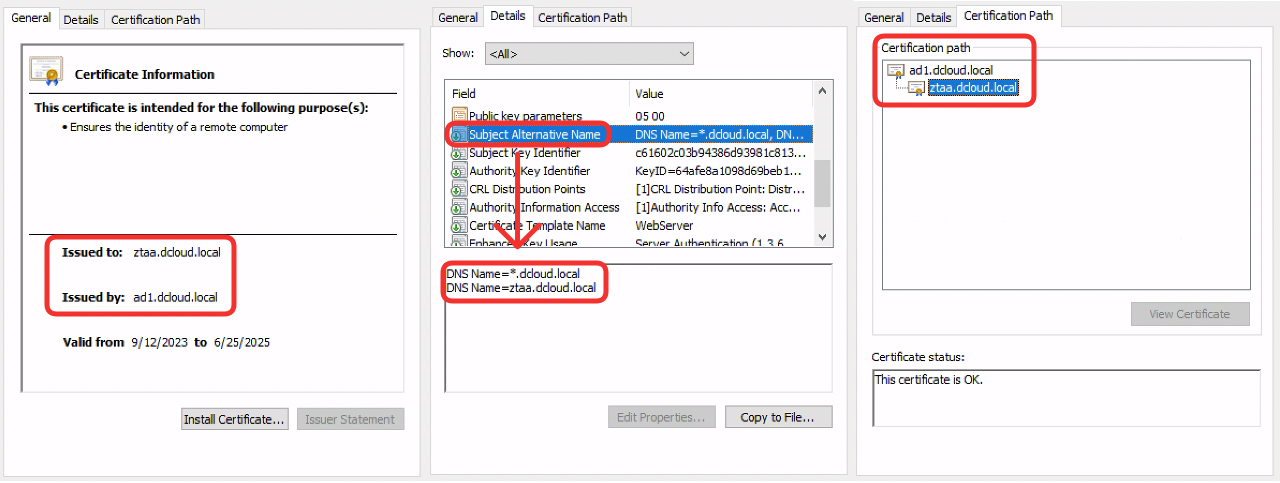
The Firewall Management Center interface does not display the Subject Alternative Name when viewing certificate details. The screenshot below displays ZTAA authentication certificate details for your convenience. (Optional) To see all certificate details you can export the ID certificate to the jumphost and view it using the default Windows certificate viewer.
The dCloud-ZTAA-Certificate was issued by the AD1 Root CA server in dCloud pod. The AD1 Root CA certificate is trusted by all Windows endpoints in this laboratory. The Subject Alternative Name fields contain a wildcard entry *.dcloud.local. This allows the ZTAA firewall to trustfully frontend secured applications inside the network to the external clients.
-
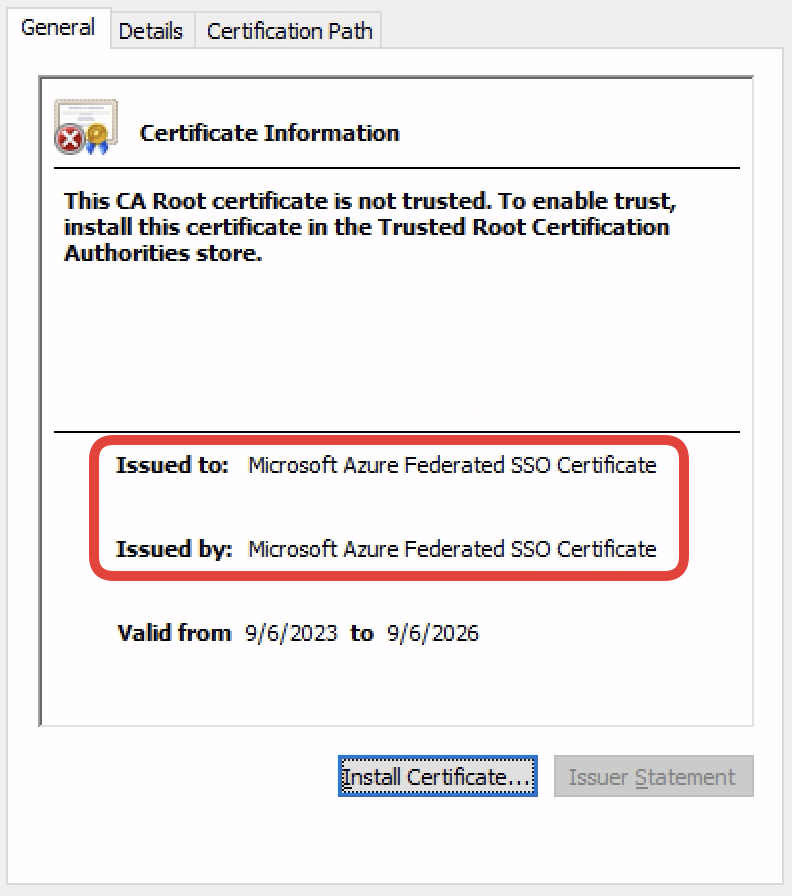
Notice, there is also an Azure_AD_SAML_cert installed on the NGFW1 firewall.

This is the SAML IdP certificate, in our case the AzureAD token signing SAML certificate. Azure uses the private key associated with this certificate, to sign SAML assertions proving successful user authentications against AzureAD. The NGFW1 uses the public key of this certificate to verify SAML assertions forwarded by the users during the authentication/authorization phase.
-
In ZTAA access, the firewall performs full TLS, known-key decryption of the traffic. In this step, you install the certificate and the private key of the protected internal application - Identity Services Engine GUI interface. The certificate (ISEZTAACert.pem) and private key (ISEZTAACert.pvk) files are pre-uploaded in the ZTAA directory on the desktop of the jump host. You will use them in the coming steps.
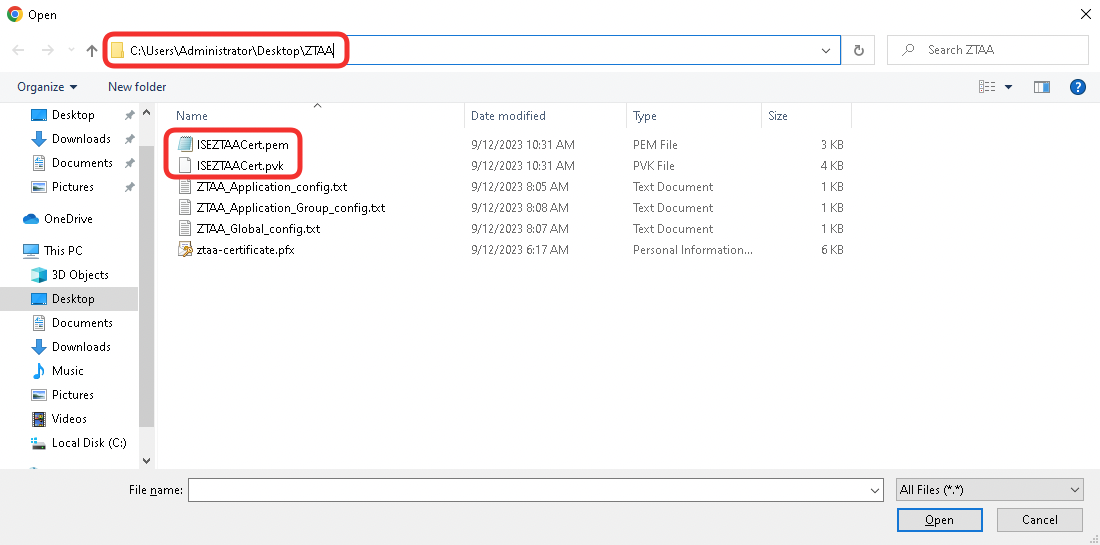
-
Navigate to Objects -> Object Management -> PKI -> Internal Certs. Click Add Internal Cert.
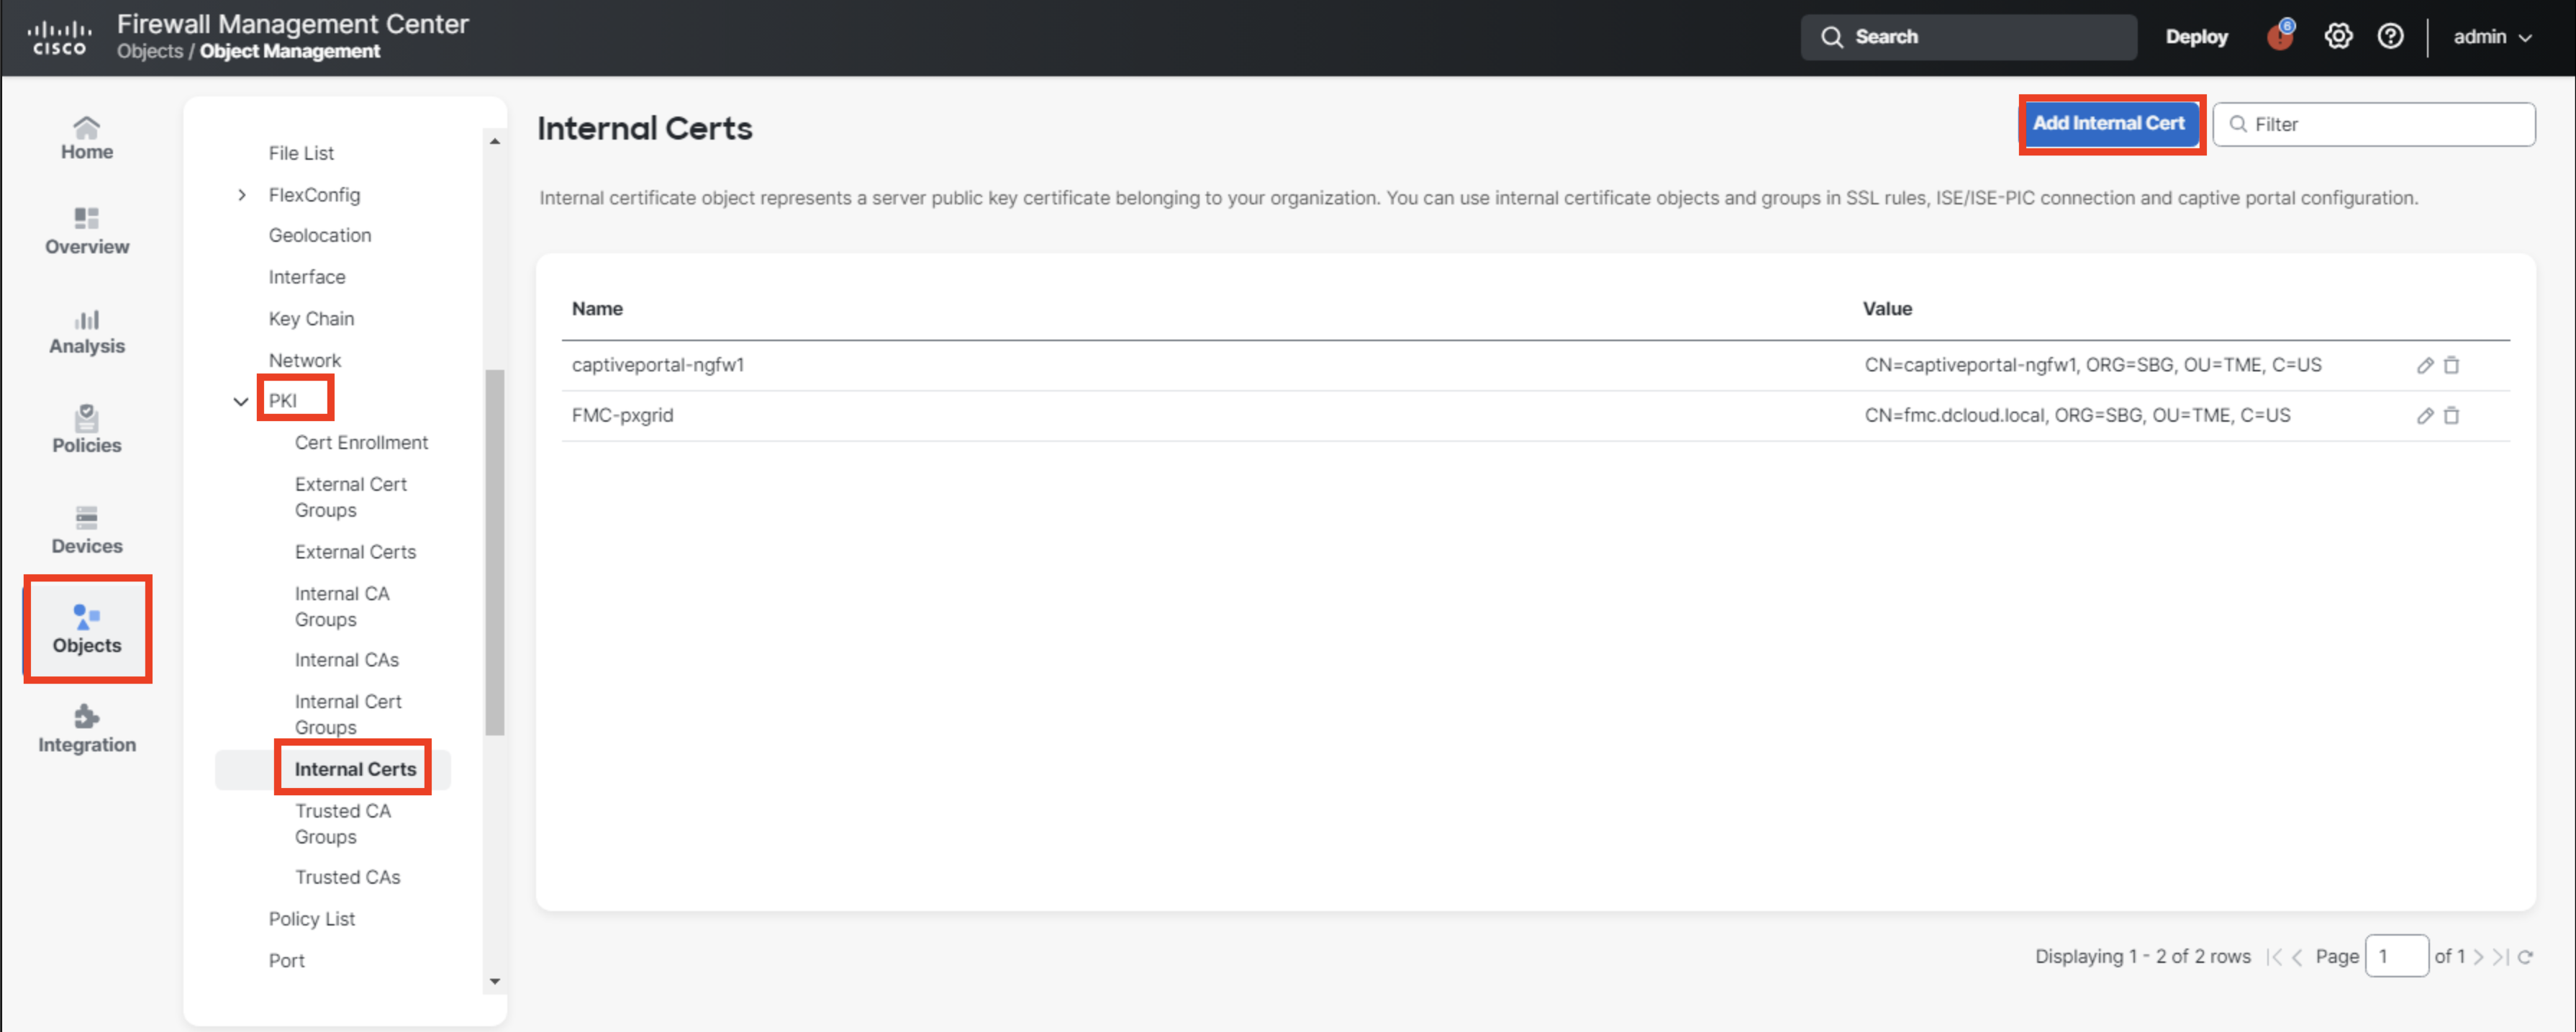
-
Configure the certificate as follows:
- Set the name to ZTAA_ISE_GUI
- Use Browse.. button to import the certificate - ISEZTAACert.pem
- Use Browse.. button and import private key - ISEZTAACert.pvk
- Select Encrypted and type in the password: C1sco12345.
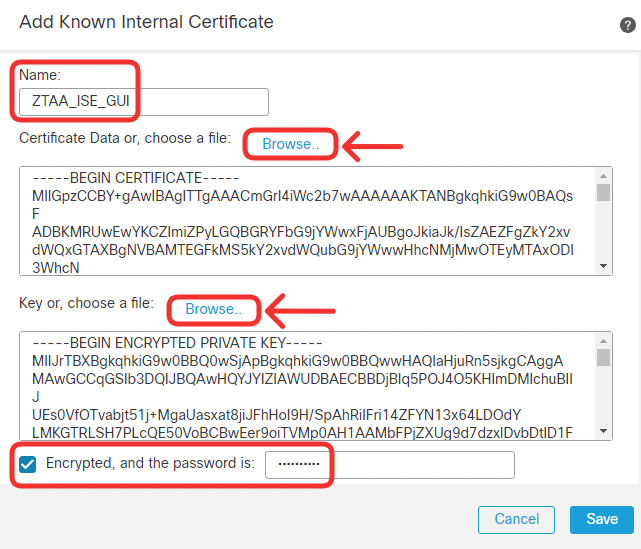
Click Save.
-
Confirm the application certificate is successfully installed.

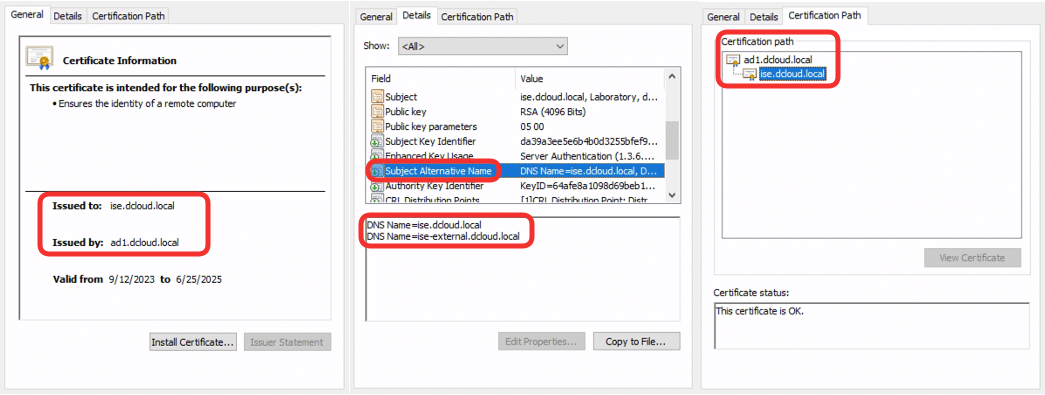
The Firewall Management Center interface does not display the Subject Alternative Name when viewing certificate details. The screenshot below displays ISE GUI certificate for your convenience.
The ISE certificate was issued by the AD1 Root CA server, which is trusted by Windows workstations. The SAN field includes:
- The internal DNS name ise.dcloud.local used by clients inside the trusted network
- The external DNS name ise-external.dcloud.local used by the clients on the Internet trying to access ISE GUI securely.
Task 2 - Configure Zero Trust Application Policy
In this task, you set the core configuration of the Zero Trust Application Policy. As you installed the required certificates in the previous task, you may proceed with configuring the clientless access policy. Now, you will configure the internal/external URLs of the application as well as SAML IdP integration. You specify what IPS and File protection is applied to user traffic.
Please follow the instructions very carefully and double-check correct spelling of URLs, names, and SAML integration elements. For example, a typo in ZTAA group name results in a different SAML service provider metadata that would not match expected pre-sets in AzureAD.
For your convenience, text files with correct configuration details are located in the ZTAA directory on the desktop of the jump host. You can copy configuration details from these text files to your FMC when doing the labs. The files are:
- ZTAA_Global_config.txt - includes details for steps X - X
- ZTAA_Application_Group_config.txt - includes details for steps X - X
- ZTAA_Application_config.txt - includes details for steps X - X
-
Navigate to Policies -> Zero Trust Application. Click Add Policy.

-
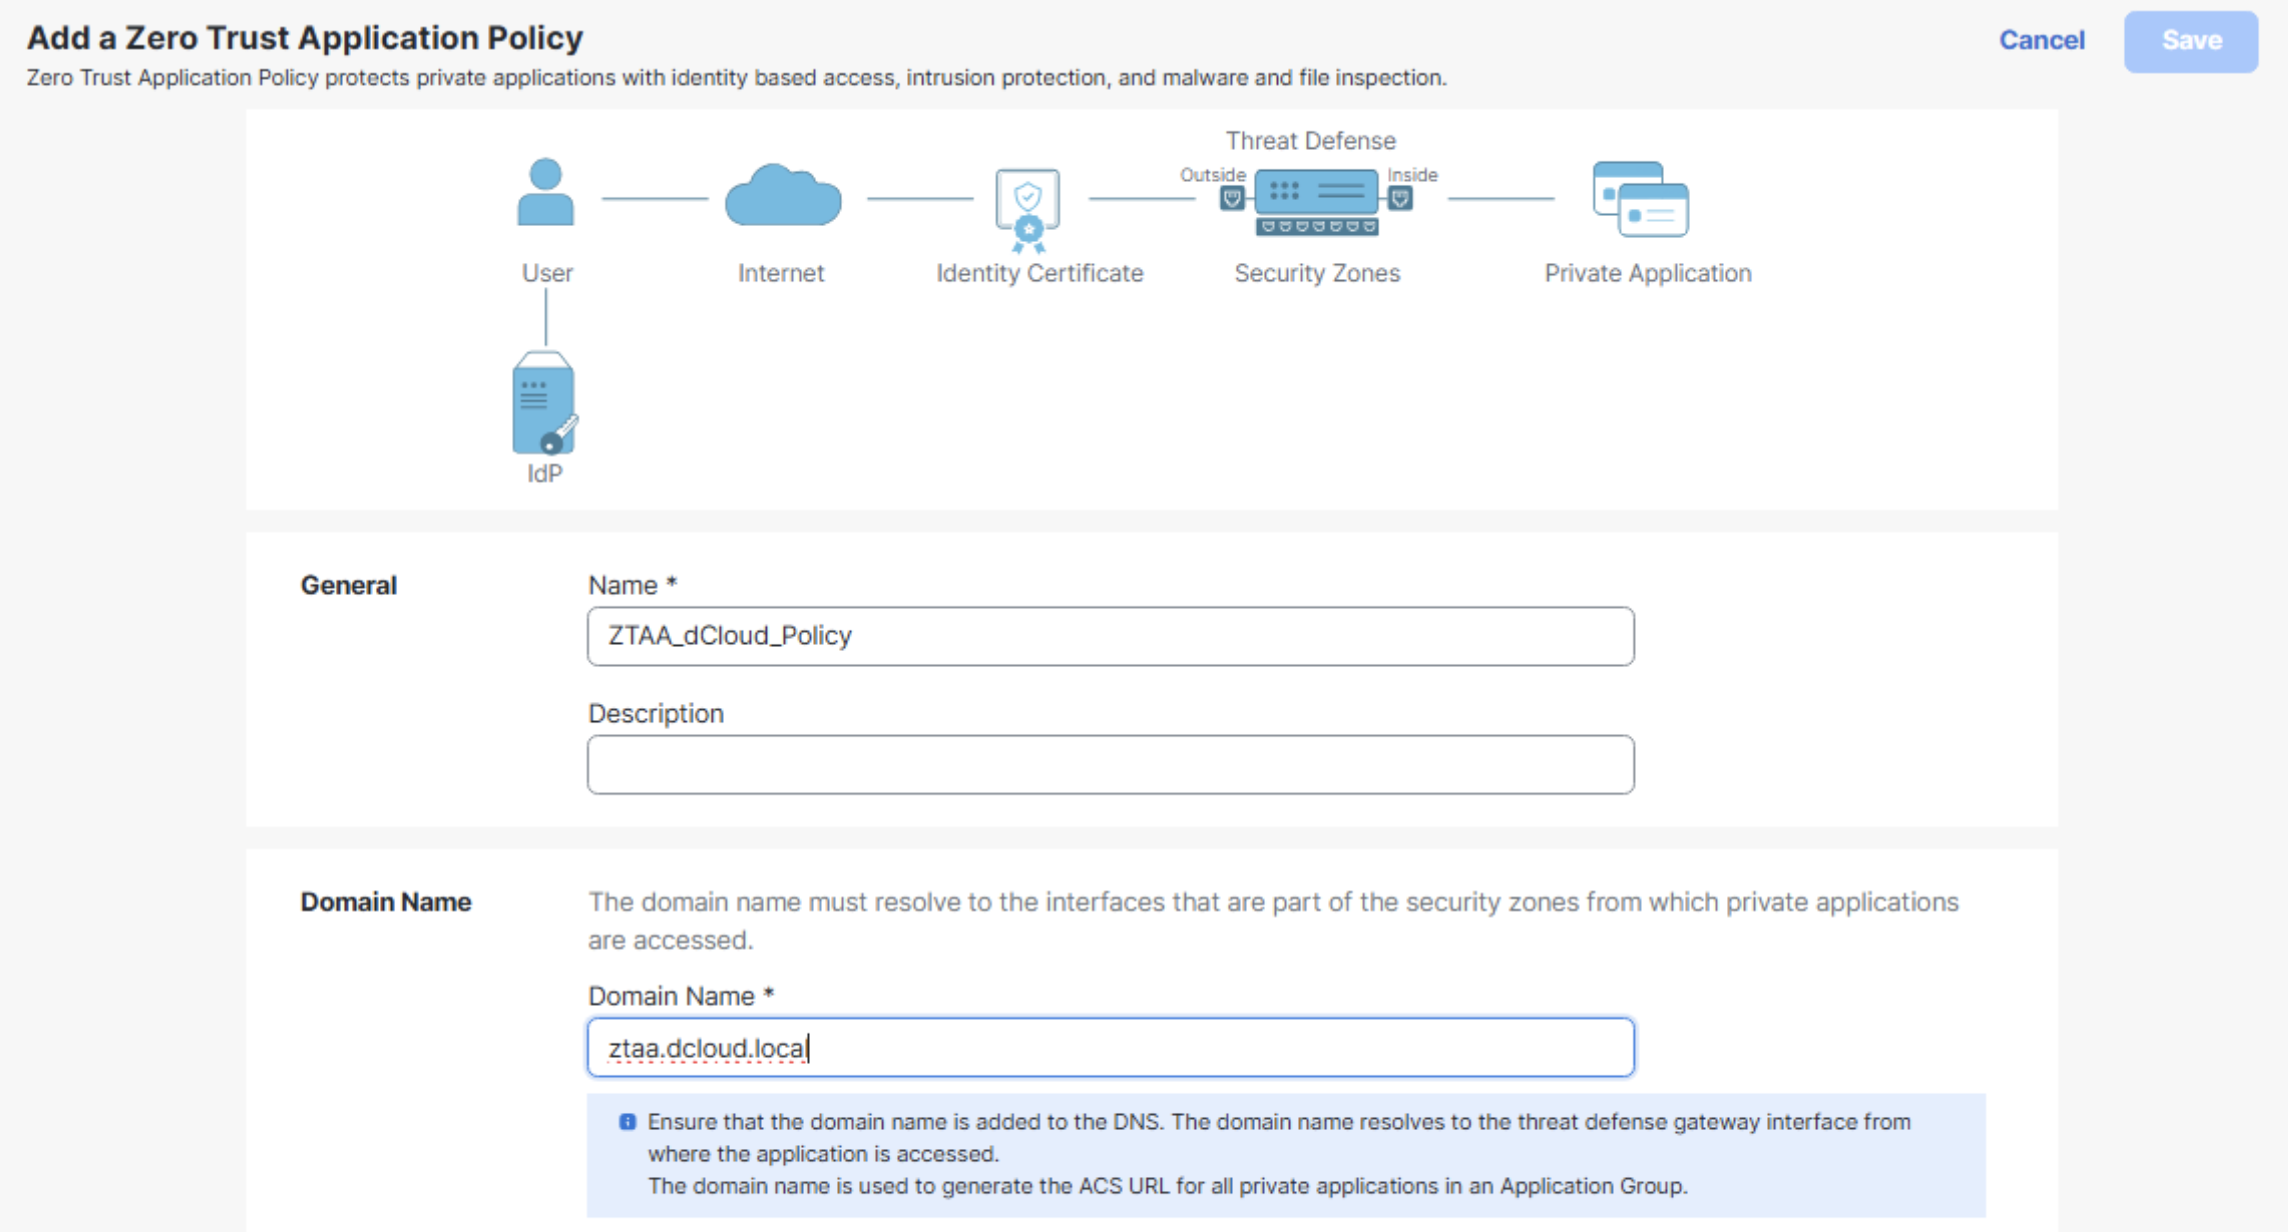
Configure Zero Trust Application Policy settings as per below:
- Name: ZTAA_dCloud_Policy
- Domain Name: ztaa.dcloud.local
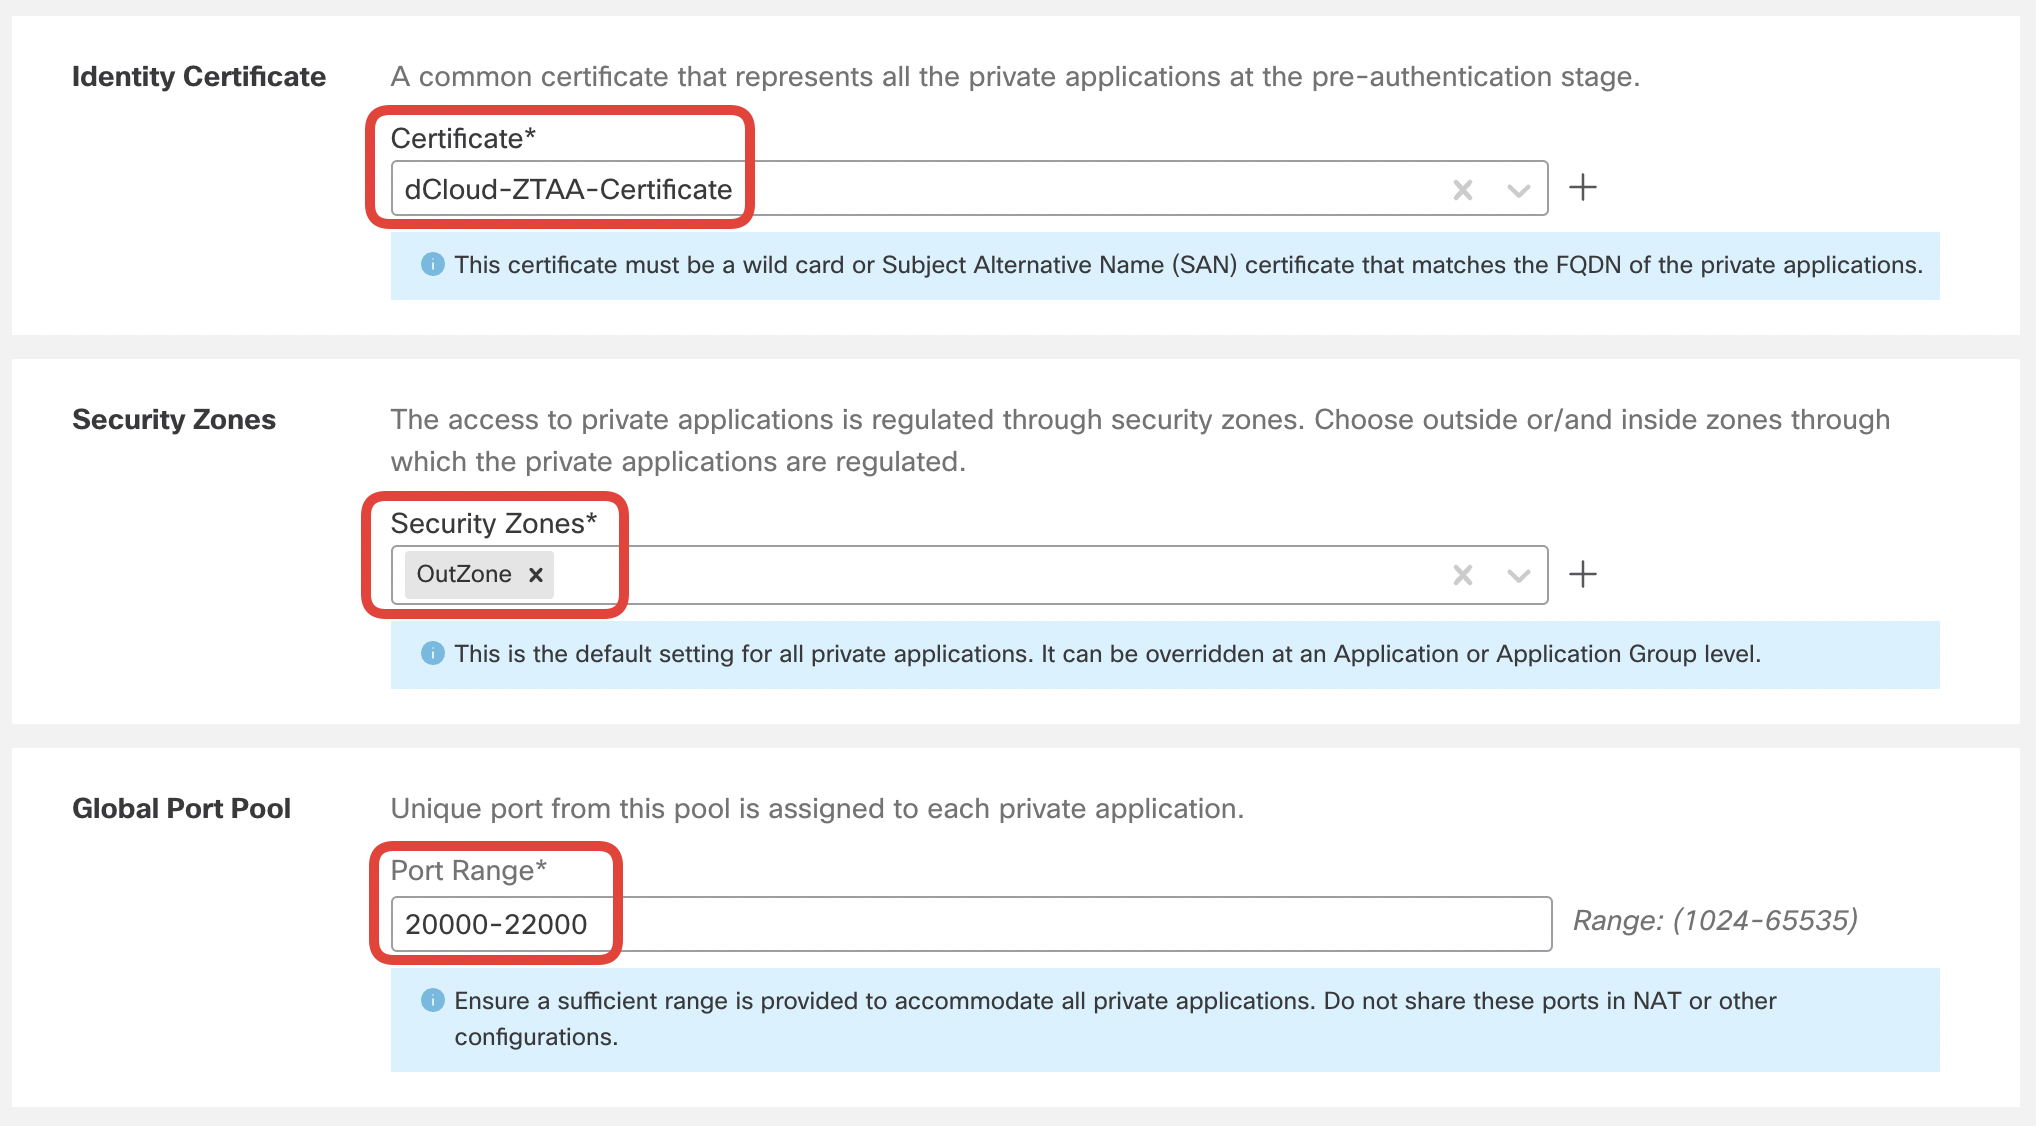
- Certificate: dCloud-ZTAA-Certificate (this is the ZTAA authentication certificate you imported previously)
- Security Zones: OutZone
- Port Range: 20000-22000 (leave the defaults)
- Intrusion Policy: dCloud Balanced Intrusion
- Variable Set: Default-Set
- Malware and File Policy: Block Malware

Click Save.
-
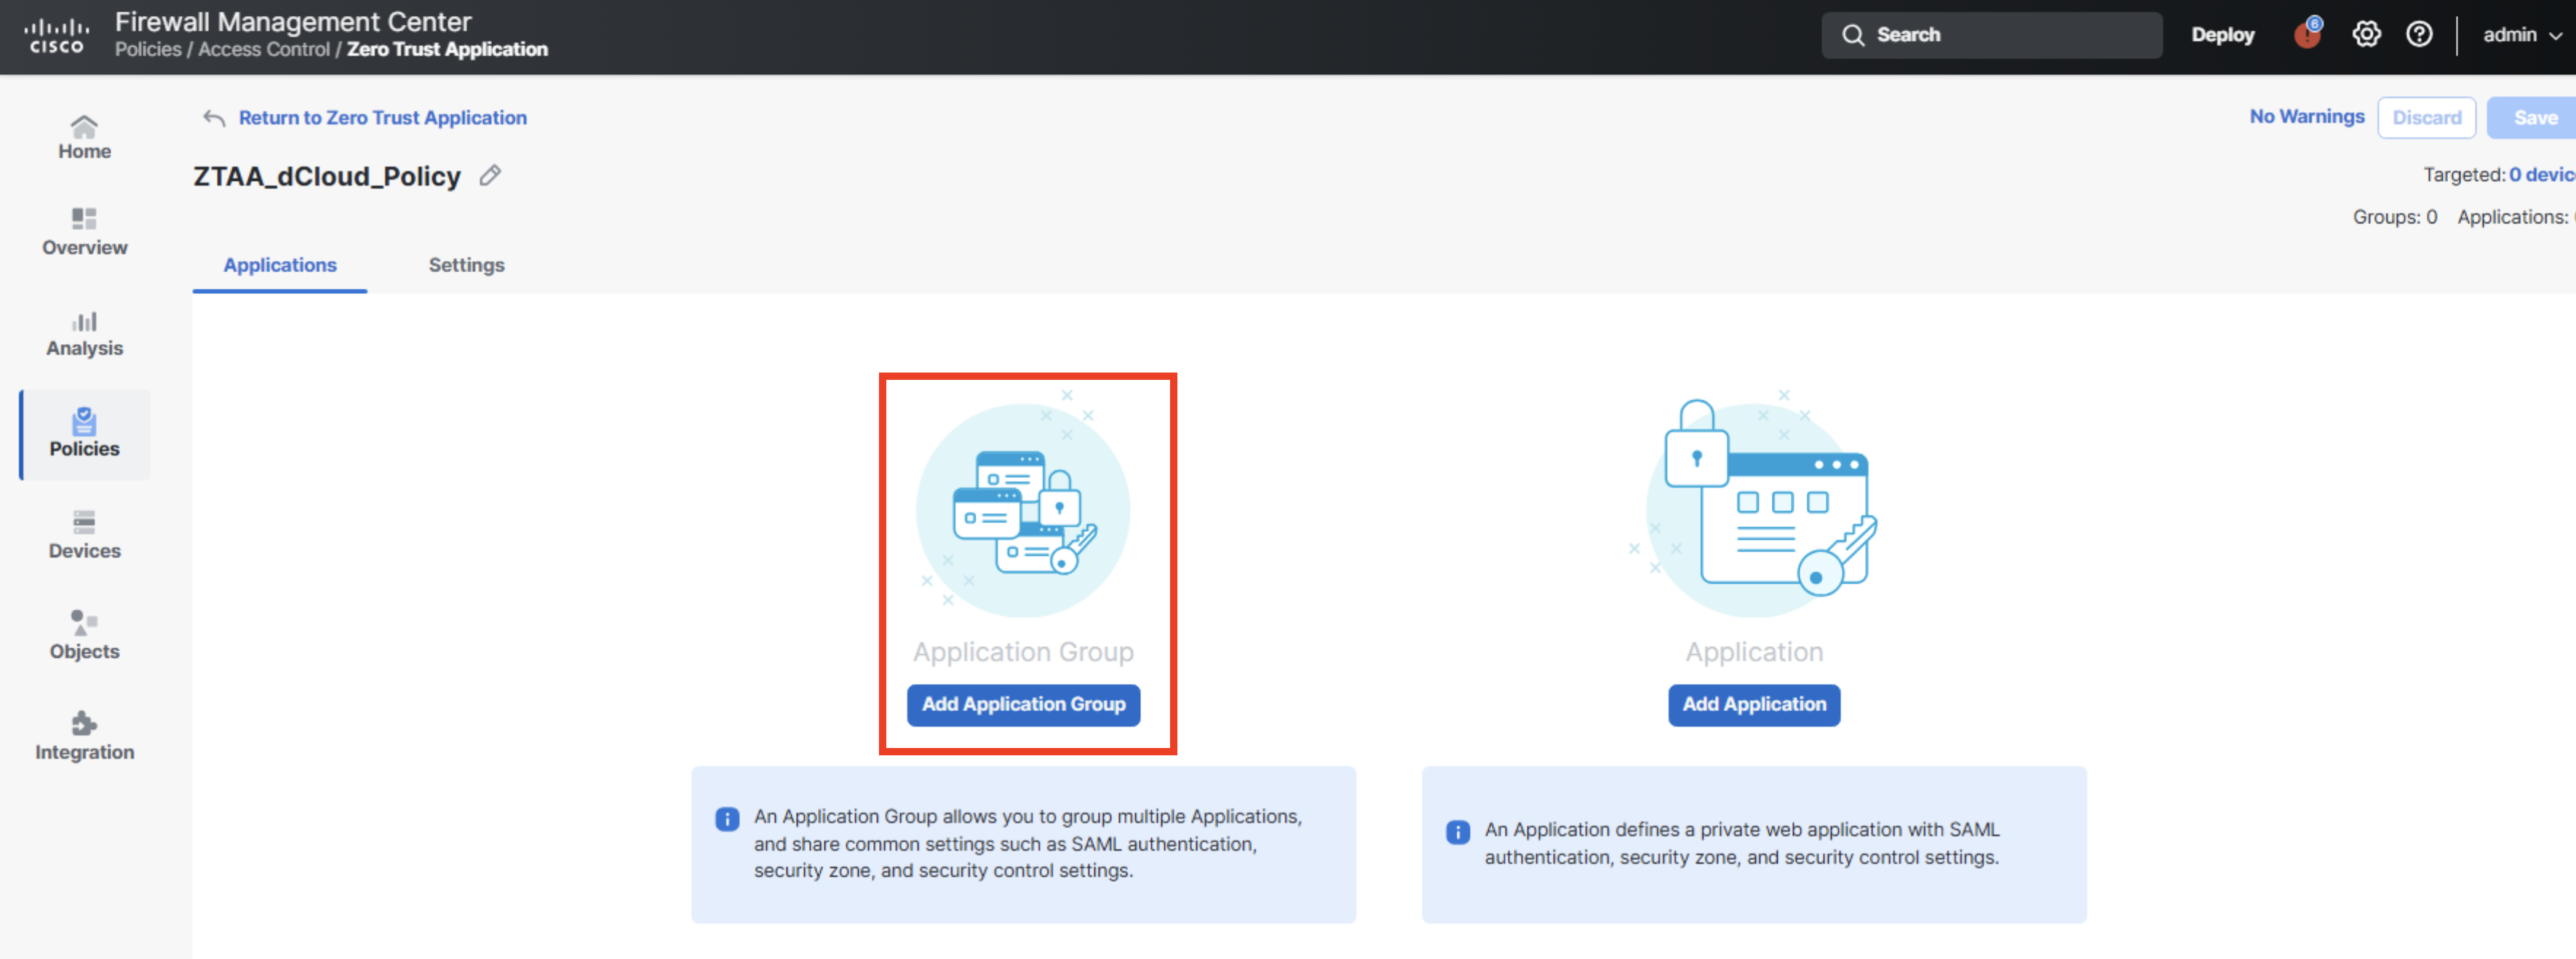
Next, you configure an Application Group.
With an Application Group you share the same SAML IdP configuration among multiple applications. An application that is part of the group inherits the SAML configuration. The user authenticates when accessing any of the applications added to the group for the first time. Once authenticated, the user access all applications in that group without being redirected to the SAML Identity Provider.
Click Add Application Group.
-
Configure the settings as per below:
- Application Group: dCloud-ZTAA-Group

- Have a look at the SAML Service Provider Metadata.
Notice, the Entity ID and Assertion Consumer Service URL is constructed from configuration elements you provided in the previous steps:
- Application Group name: dCloud-ZTAA-Group
- Domain name (configured in global policy settings): ztaa.dcloud.local
The SAML SP Metadata of our sample application had been pre-configured in Azure for this integration to work in the dCloud environment.

In the SAML Identity Provider (IdP) Metadata section, provide the following details:
- Entity ID: https://sts.windows.net/f08472d0-ecc2-4c40-8e70-6b531bd175a5/
- Single Sign-On URL: https://login.microsoftonline.com/f08472d0-ecc2-4c40-8e70-6b531bd175a5/saml2
- IdP Certificate: Azure_AD_SAML_cert
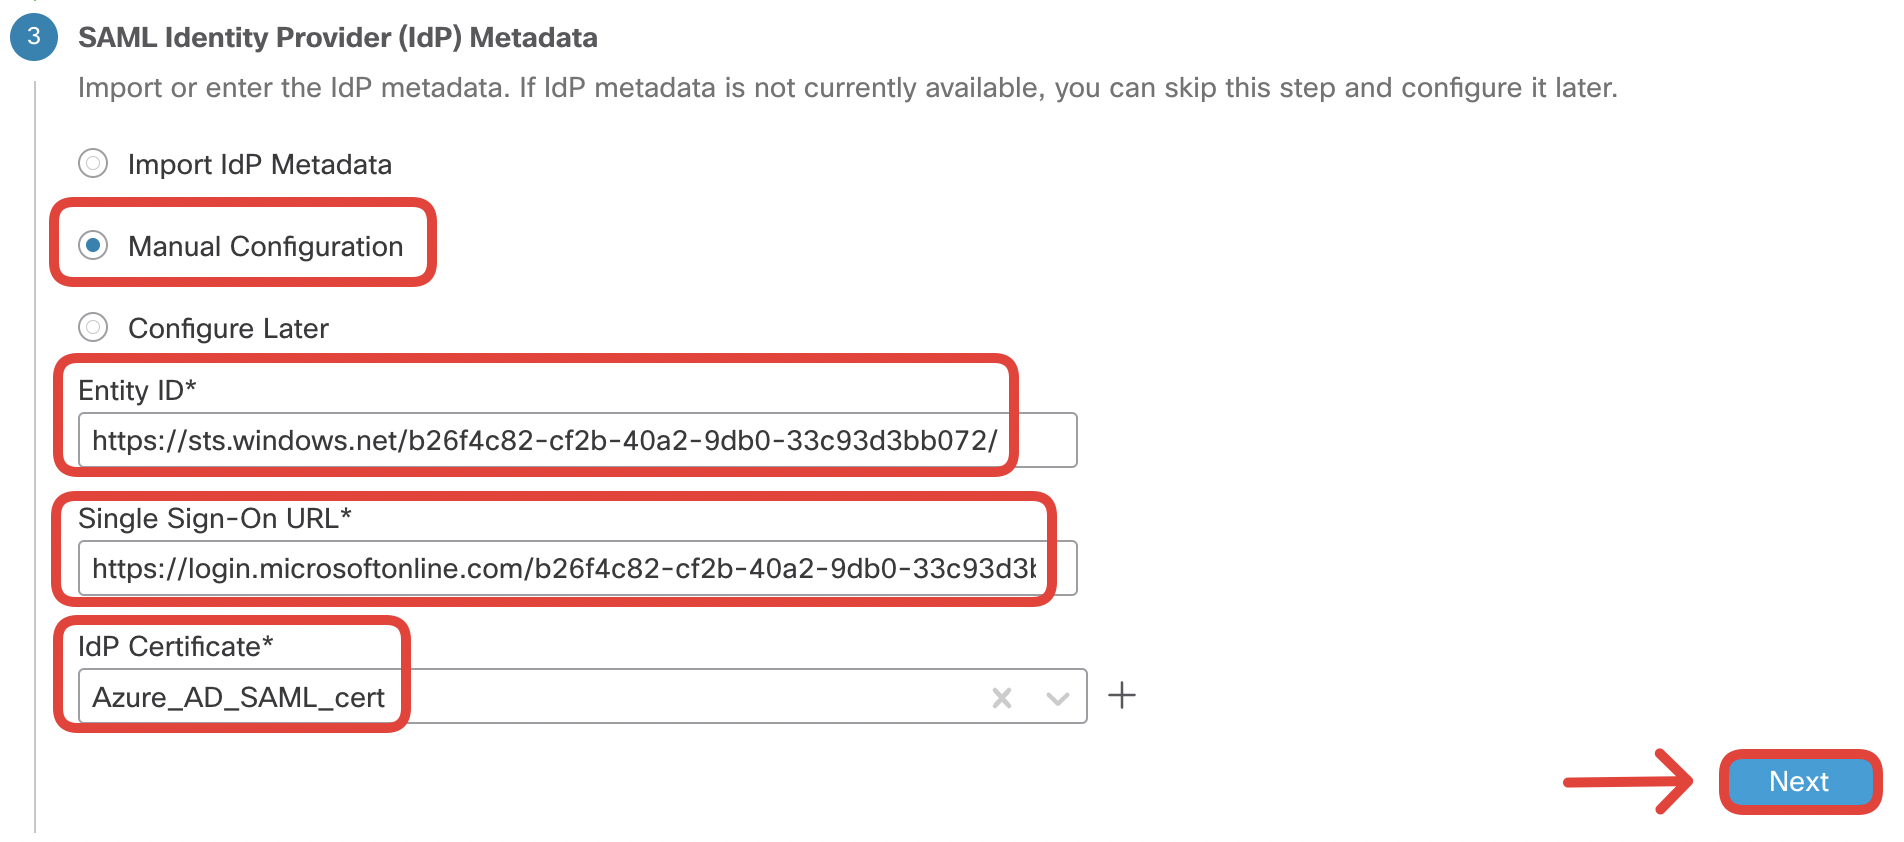
The SAML IdP metadata is available when you configure your SAML provider. The integration had been pre-configured in Azure for this dCloud environment.
In the Re-Authentication Interval section, leave the defaults:
- Timeout Interval: 1440

In the Security Zones and Security Controls section, leave the default configuration that inherits the settings from the global policy.
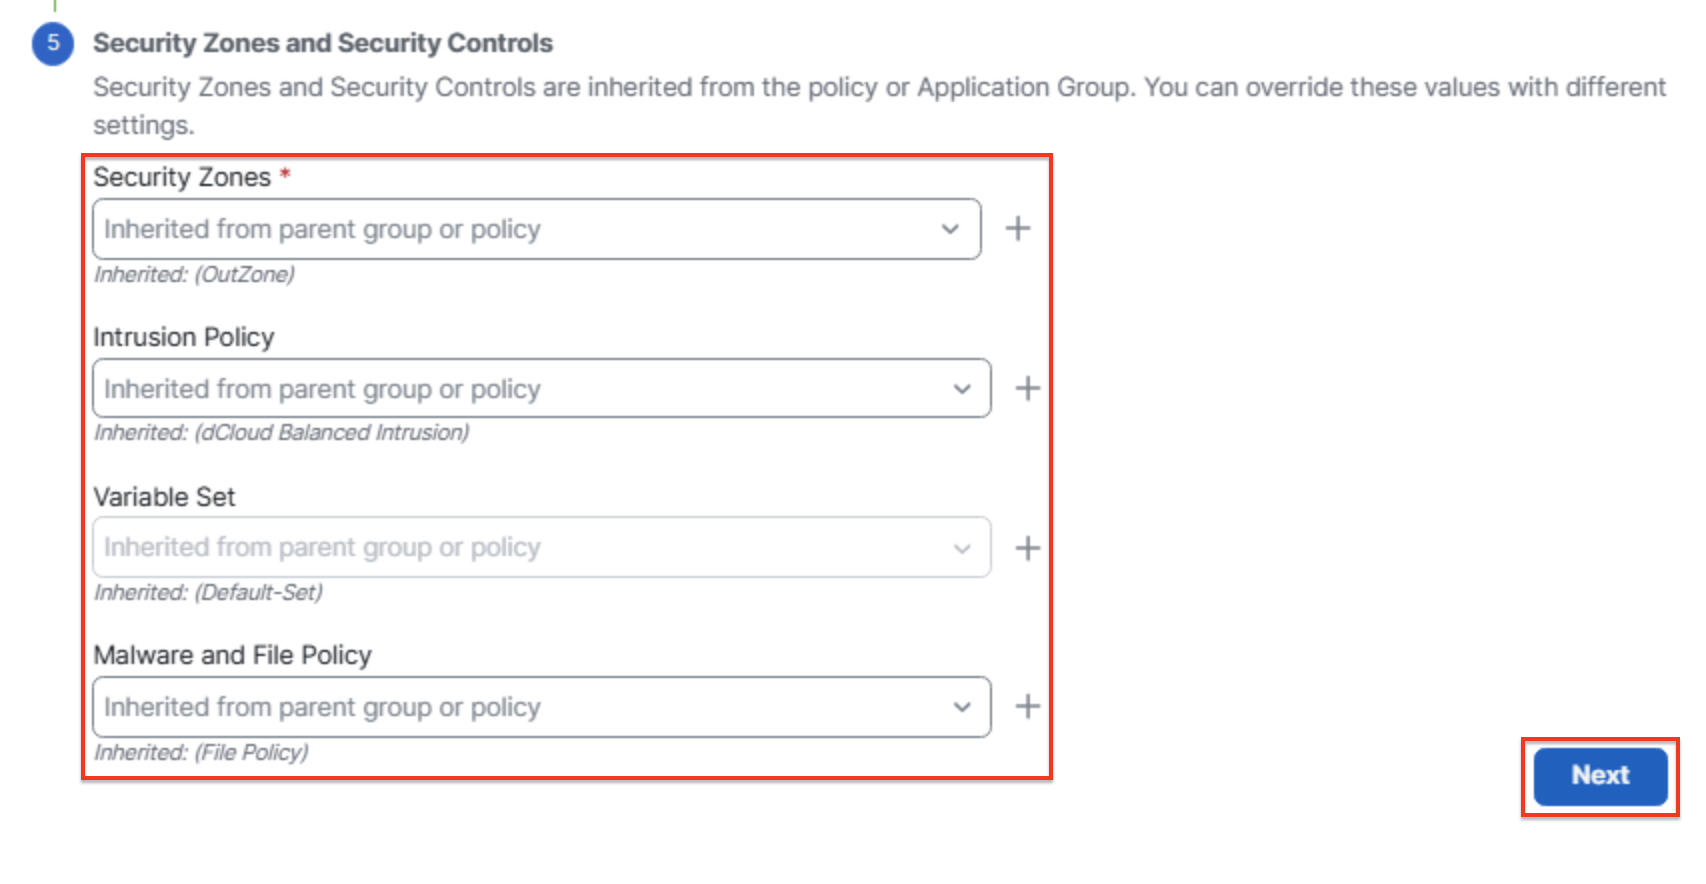
-
Review the summary and double-check for any typos. Click Finish.
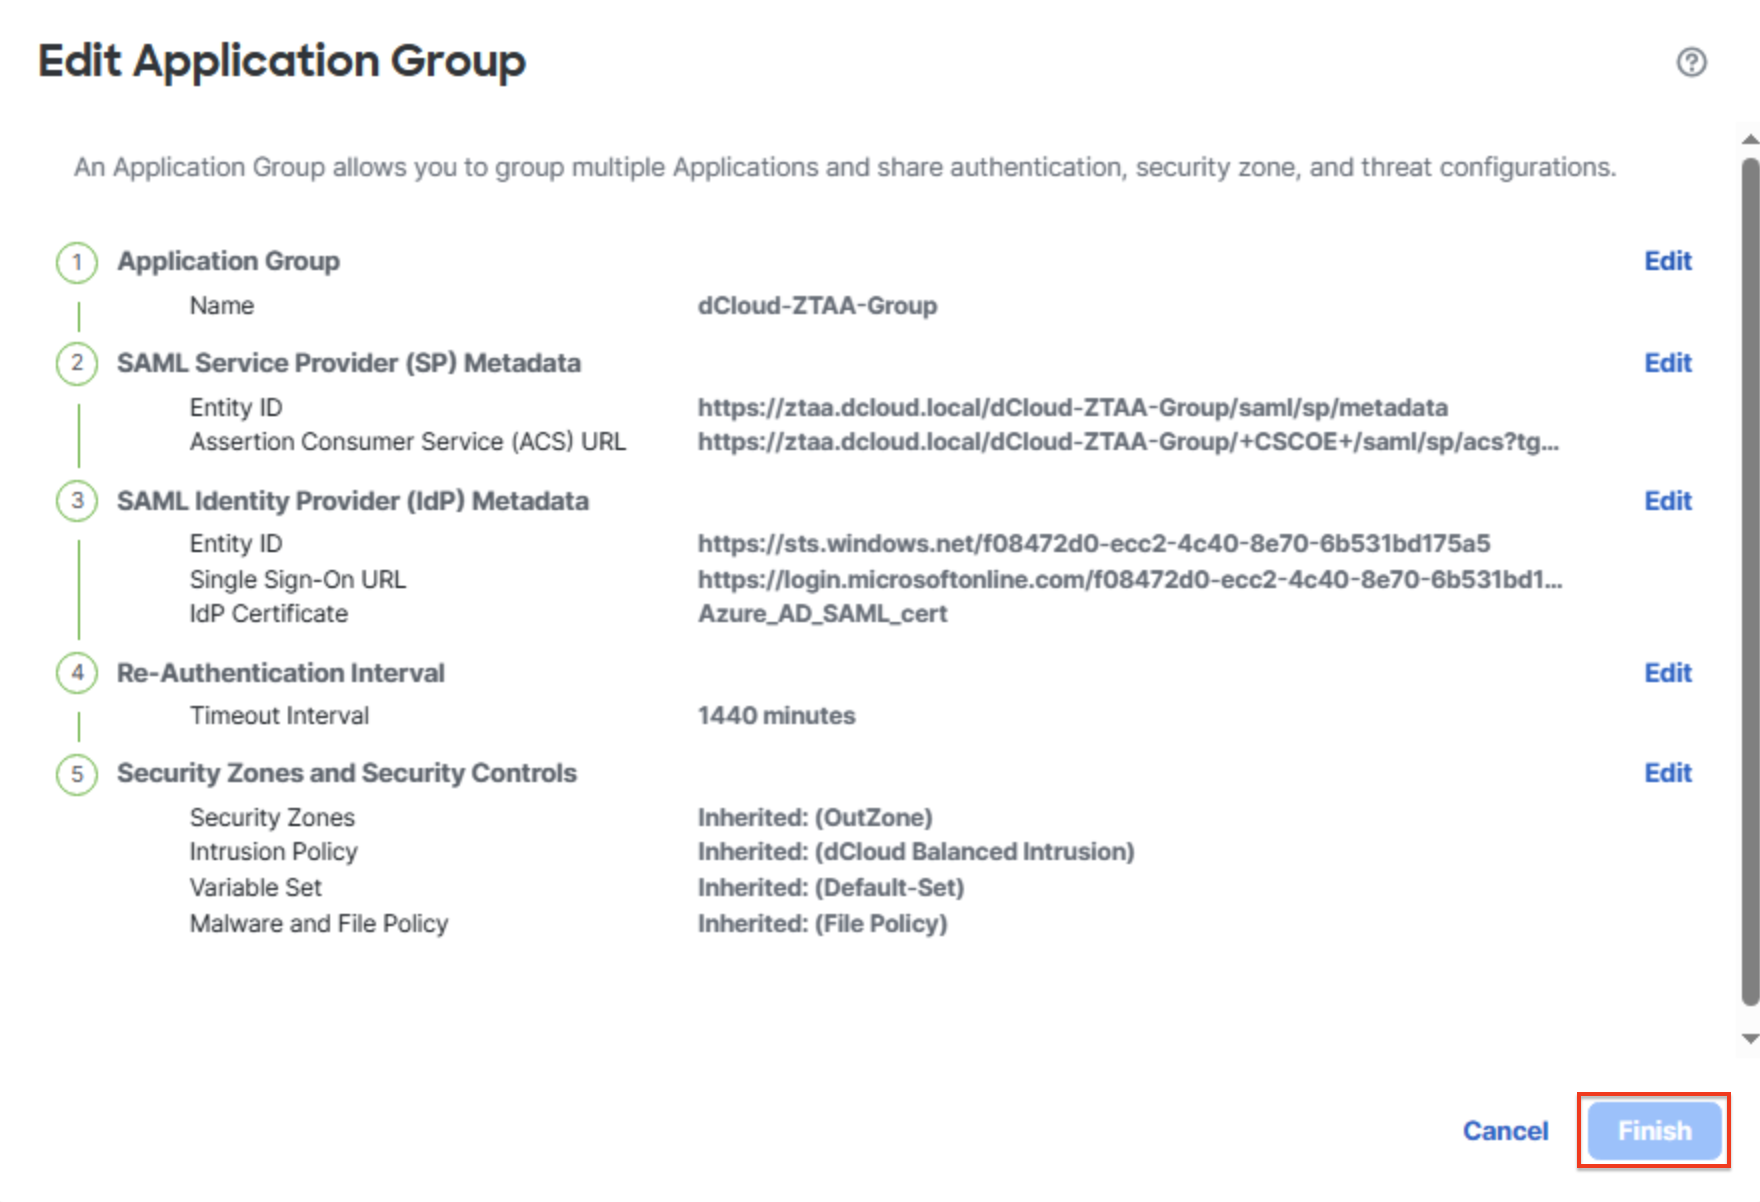
-
Finally, add an application to the ZTAA group. Click Add Application and configure the settings as below:
- Application Name: ZTAA_ISE_GUI_Access
- External URL: https://ise-external.dcloud.local
- Application URL: https://ise.dcloud.local
In this laboratory scenario we use different internal and external URLs for demonstration purposes. In a real-life scenario, it is more likely you would use the same internal/external URLs. In such a case you need to make sure that:
- on the outside network, the user's browser resolves the application FQDN to the client-facing firewall interface.
- on the protected network, the FTD resolves the application FQDN to the real IP address, in order to build proper Port Address Translation entry in the xlate table.
- Deselect Use External URL as Application URL
- Application Certificate: ZTAA_ISE_GUI (this is the internal certificate containing the private key you imported in step X. It will be used for known-key decryption of the communication between the user and application).
- Application Group: dCloud-ZTAA-Group
Click Next.
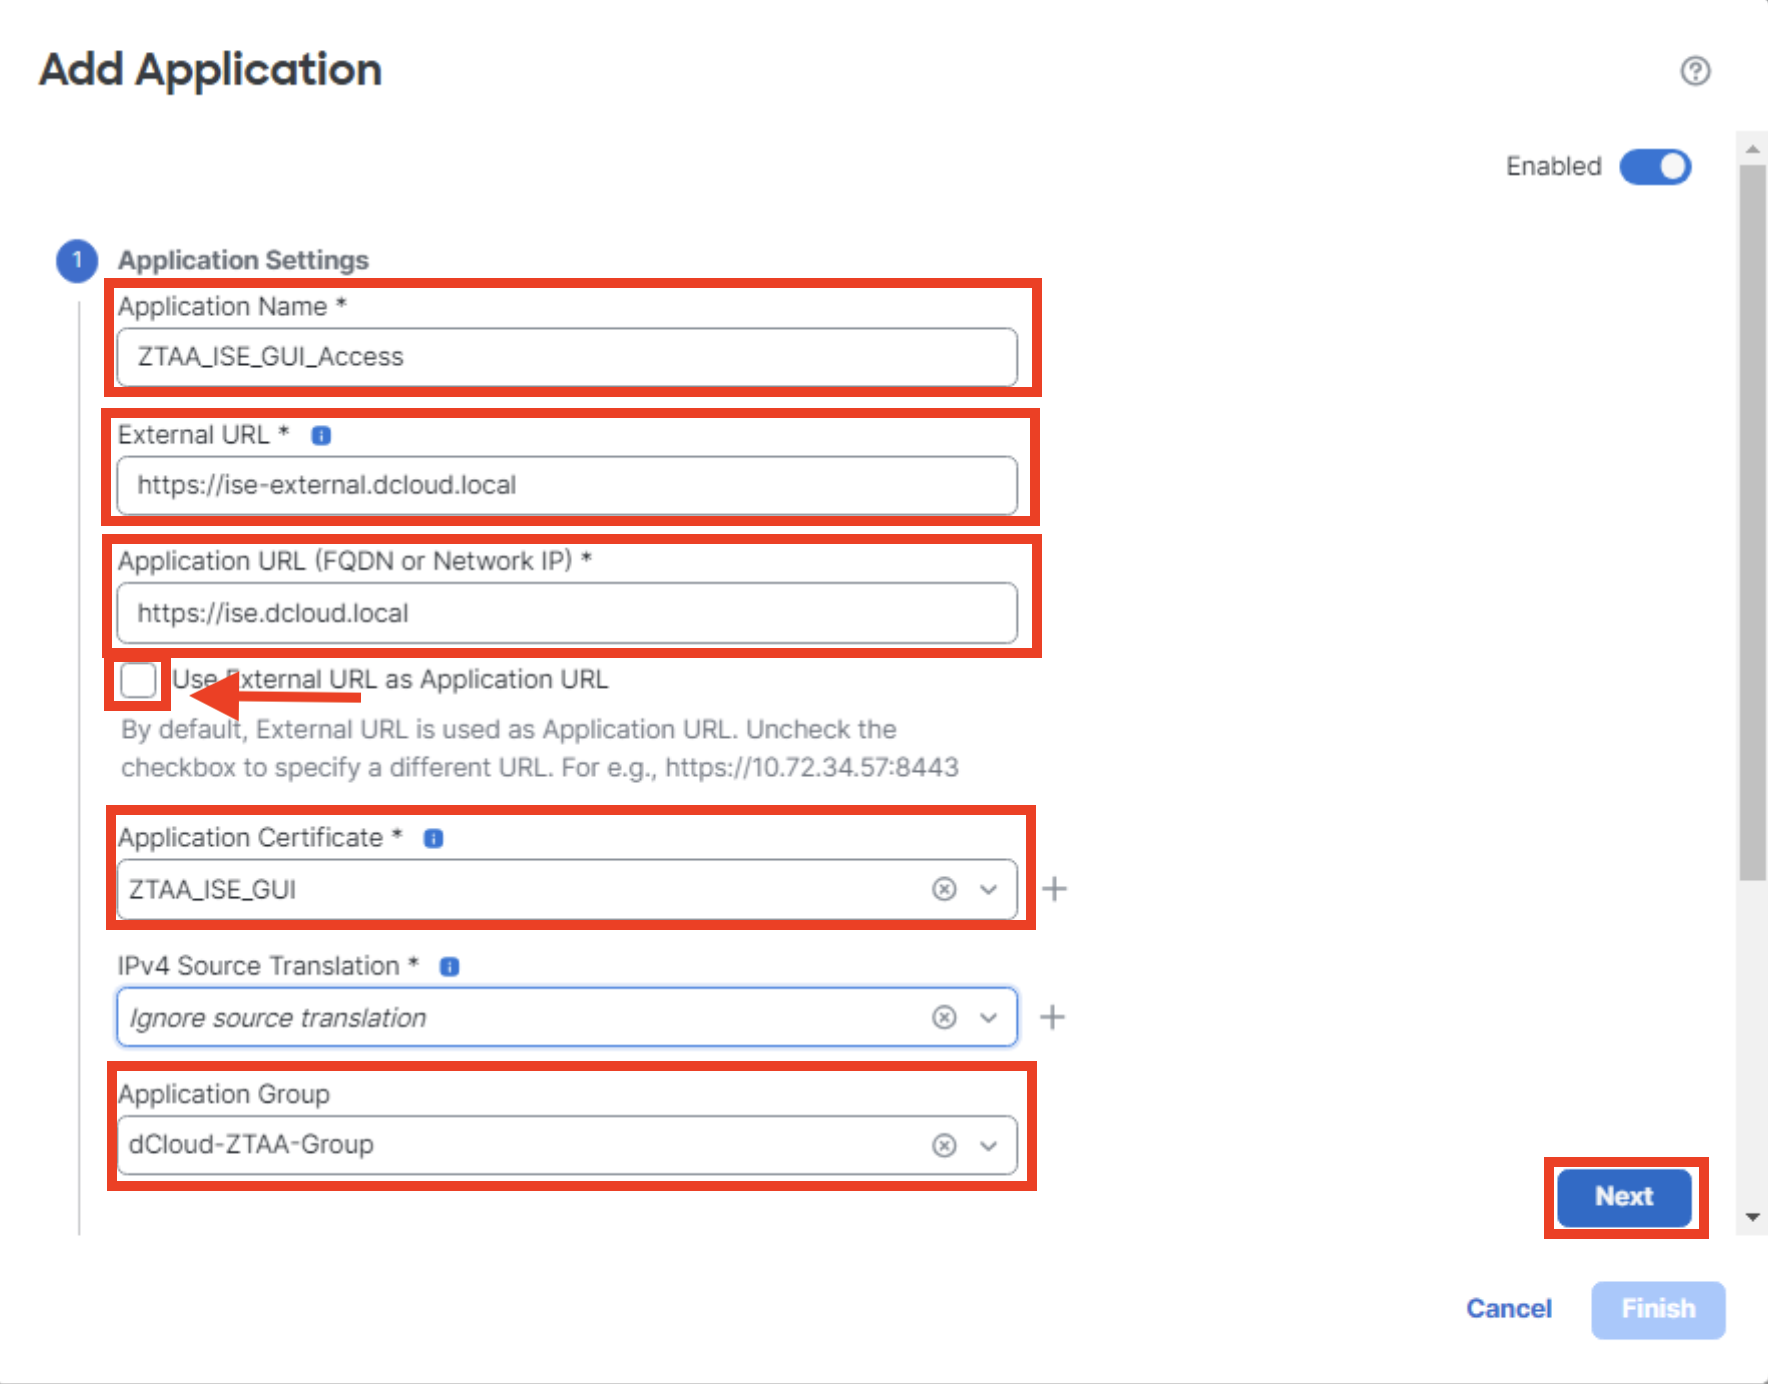
-
On the summary page, ensure the new application is Enabled and double-check you typed in the correct values. Notice the SAML and security configuration is derived from the dCloud-ZTAA-Group. Click Finish.
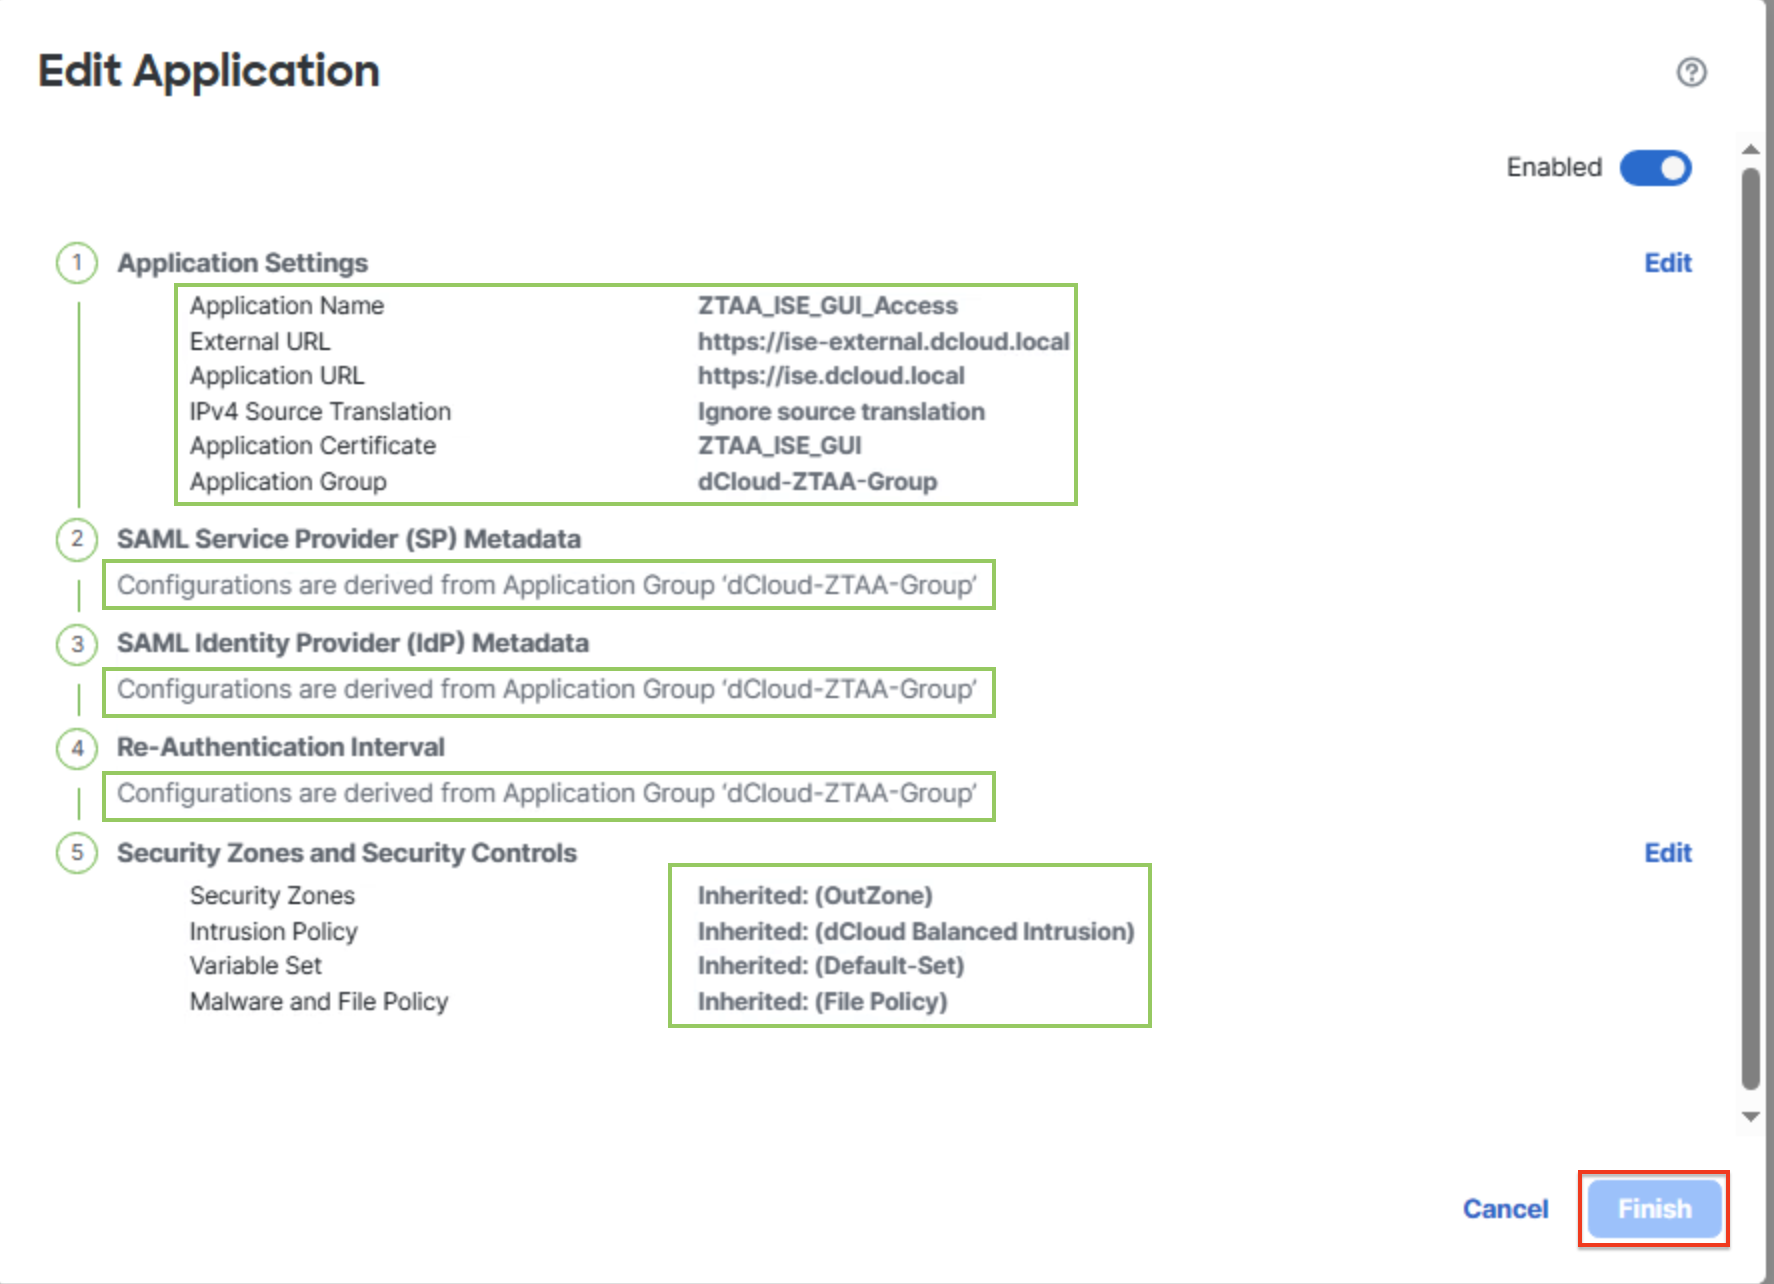
-
Click on the 0 devices link next to Targeted.

-
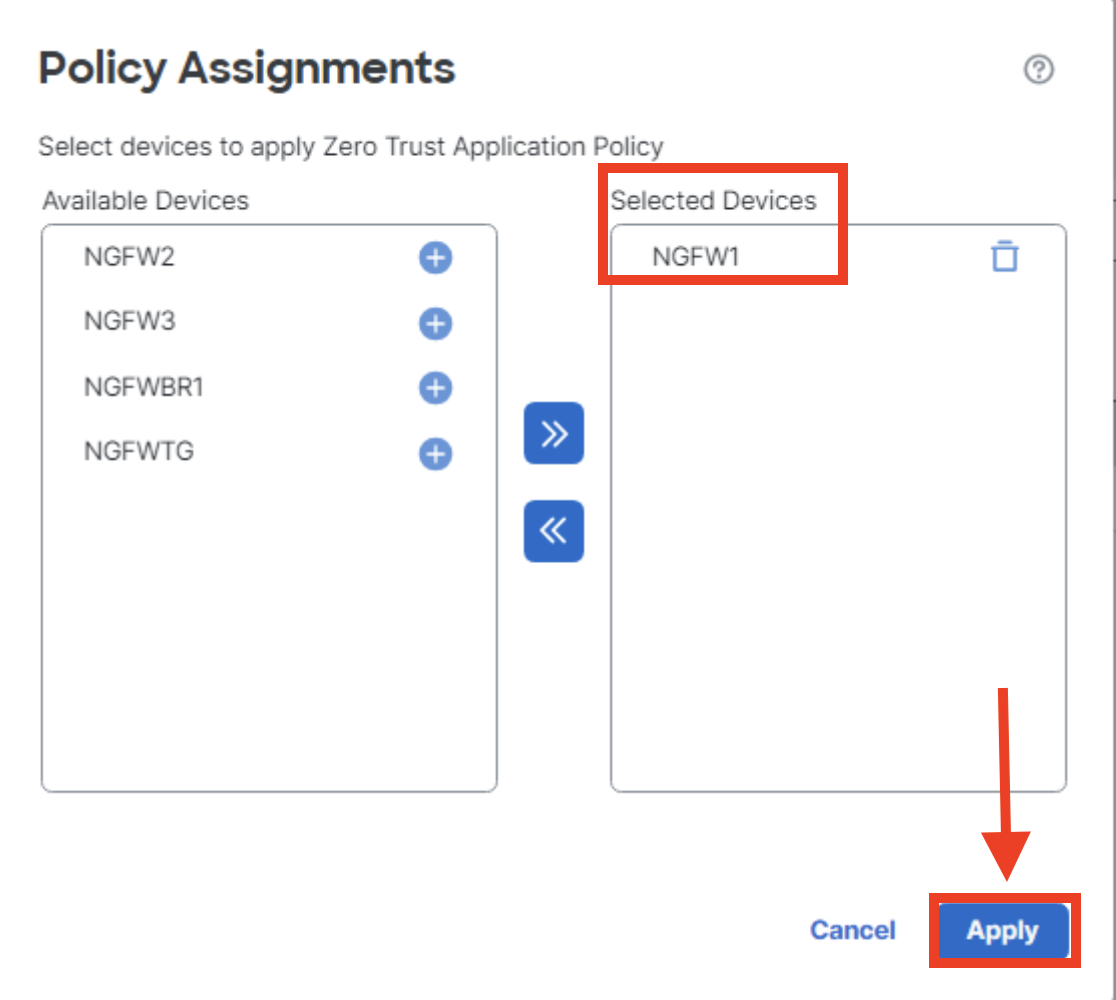
Assign the newly created Zero Trust Application Policy to the NGFW1 firewall. Click Apply.
-
Save the changes in the policy by clicking Save.

-
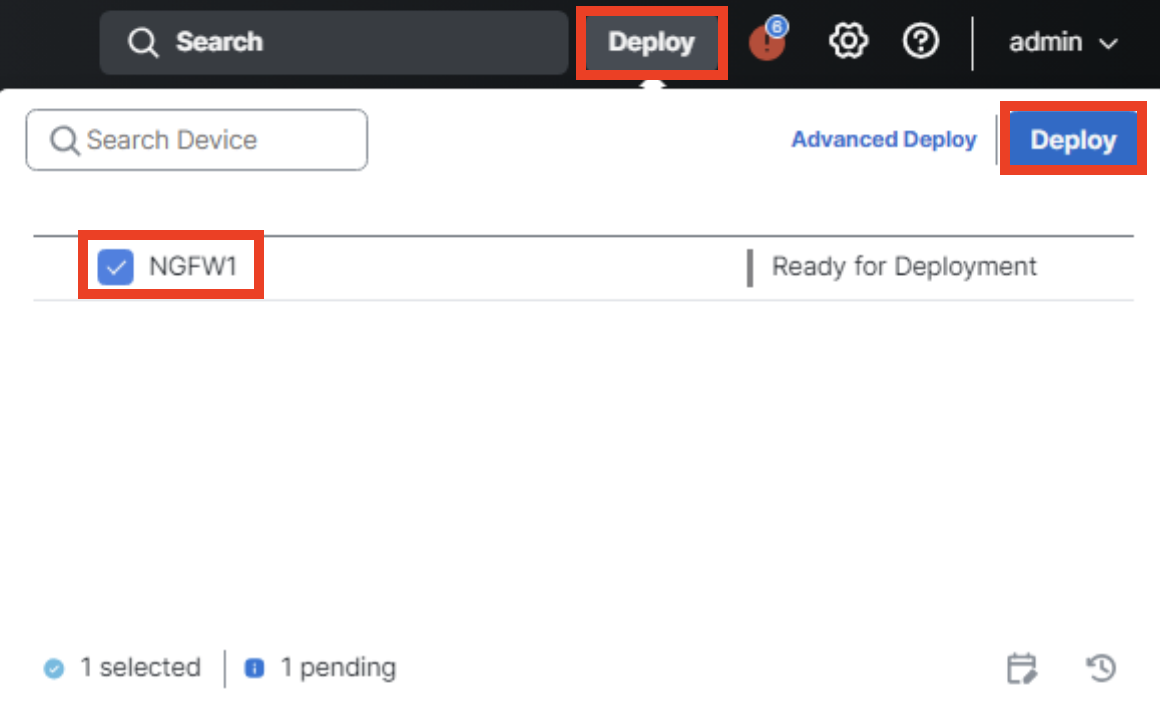
Push the new policy to the NGFW1 using the Deploy button.
-
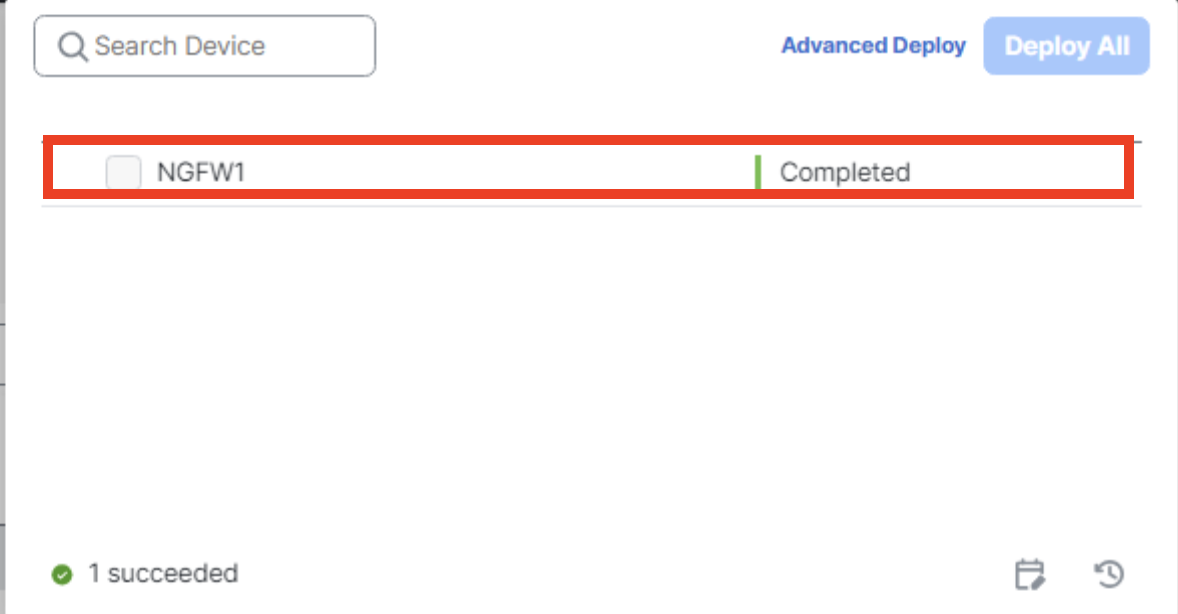
Confirm the policy is successfully deployed.
Task 3 - Verify Zero Trust Access
In this section, you verify the ZTA configuration and observe end-user experience during authentication and application access, as well as the administrator's side of the process.
-
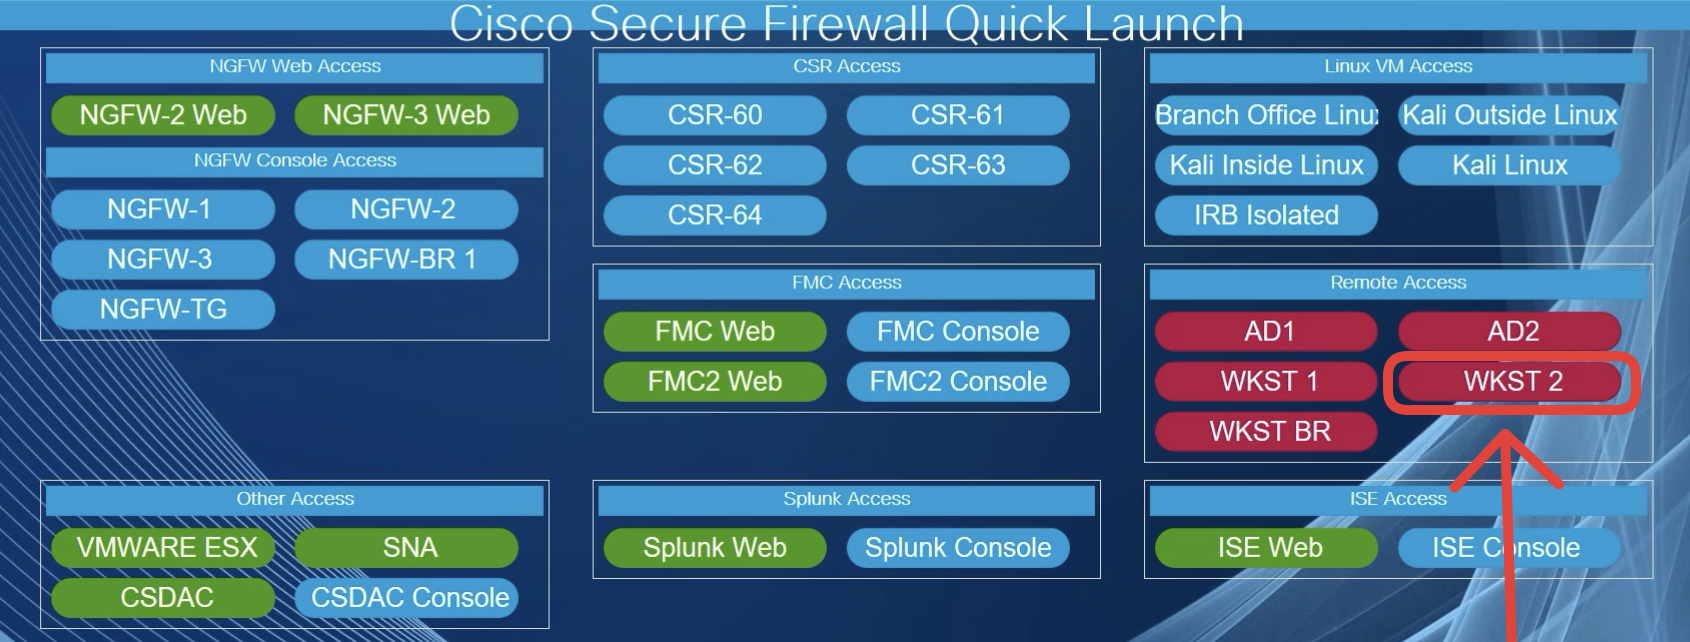
Using the Quick Launch connect to the WKST2 using Remote Desktop Protocol. Login as Administrator/C1sco12345.
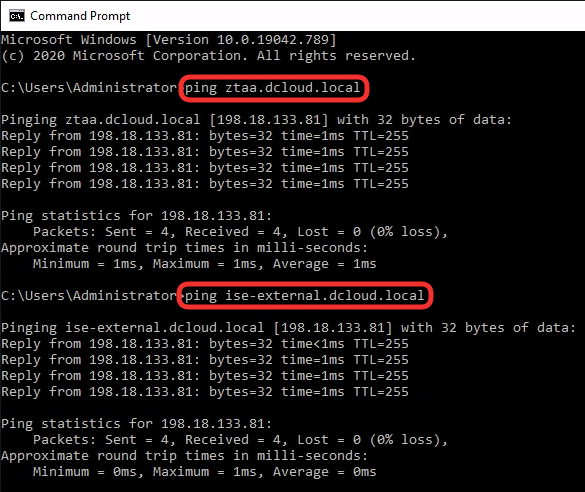
Open a Command Prompt window. Ping ztaa.dcloud.local and ise-external.dcloud.local. The DNS names should resolve to the IP addresses of the NGFW1 outside interface (198.18.133.81).
-
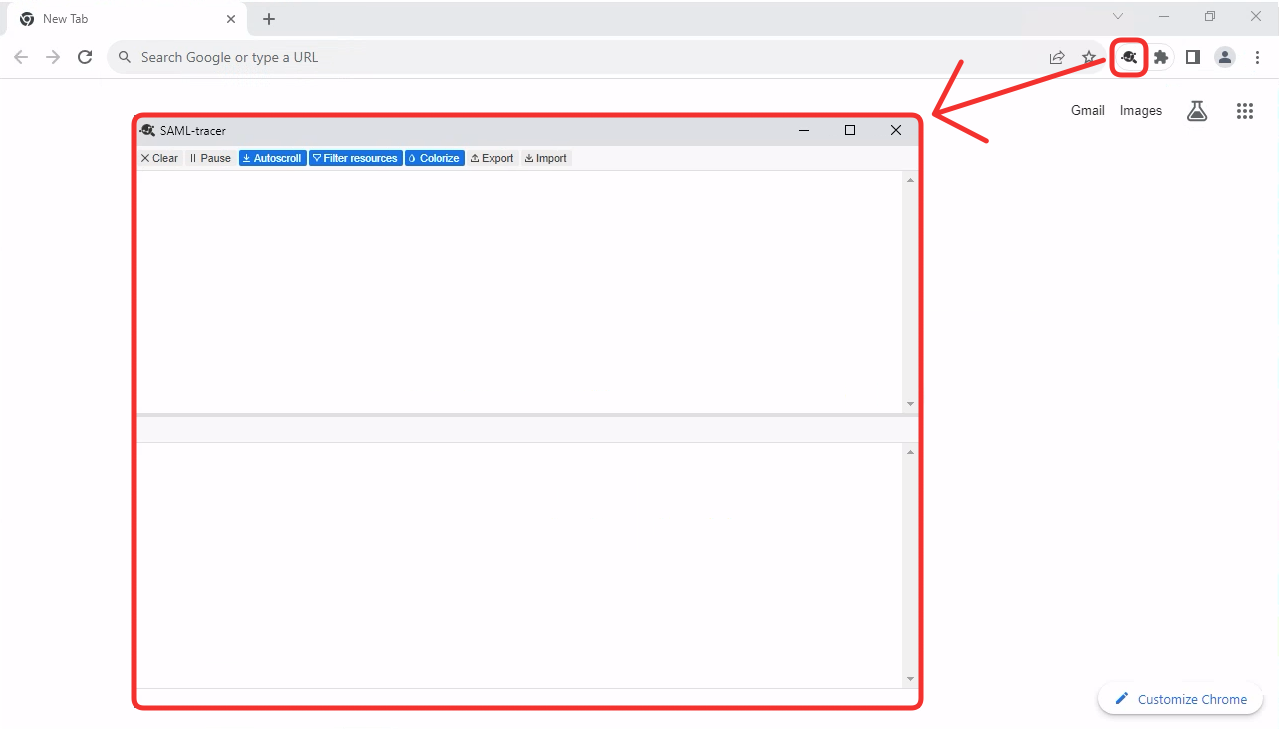
On Wkst 2, open the Chrome browser, and before you type in any address, enable the SAML-Tracer plugin. Push the SAML-tracer window to the background and pull the Chrome window back to the front.
-
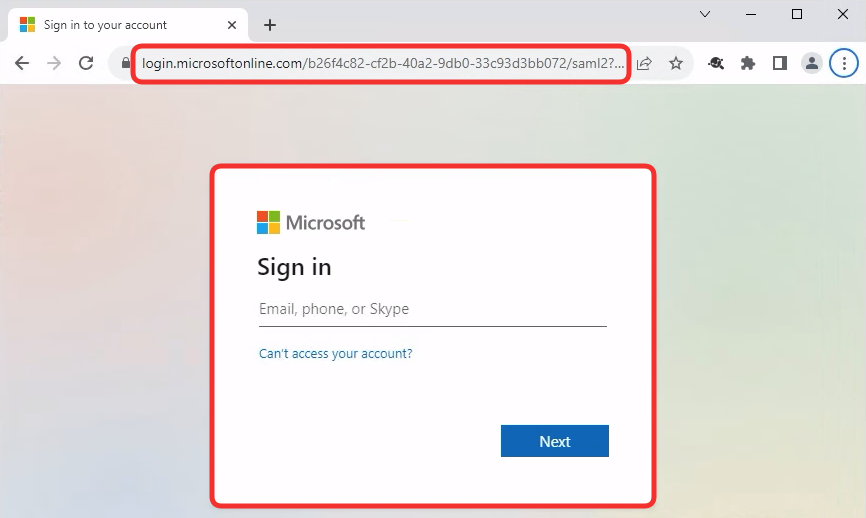
Having SAML-tracer running in the background type in https://ise-external.dcloud.local in Chrome address bar. You'll be redirected to authenticate against AzureAD. Log in using the following credentials:
Pick a random user number between 1 and 9
There are 9 accounts configured in Azure AD to be used in parallel, in order to reduce the likelihood of authentication throttling. The username is [email protected] where X is a number of the account.
Pick a random number between 1 and 9 and use respective user in upcoming task. For example if you choose 3, your username would be [email protected].
- Username: [email protected]
- Password: ZTAAisC00L <-note 00 are zeros
-
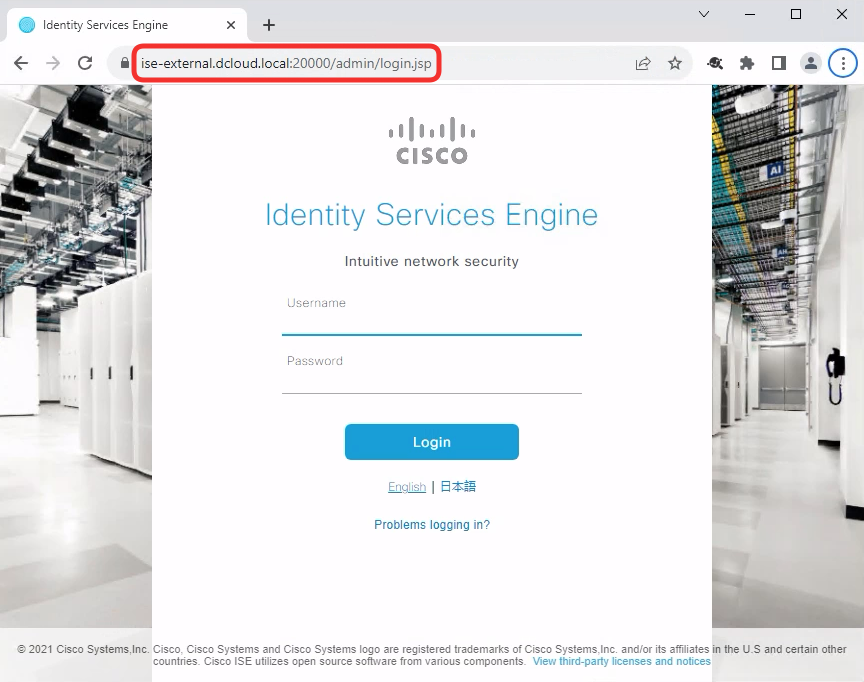
Once authenticated, you'll be redirected back to the firewall. The firewall verifies the SAML assertion in the request. If successful the browser receives two cookies:
- Group level cookie valid for ztaa.dcloud.local domain. This cookie gives access to all applications being members of dCloud-ZTAA-Group.
cscozt_token=FB89EB2D4DF4C3BF5C0E8121F35166DE; expires=Fri, 15 Sep 2023 11:20:46 GMT; path=/dCloud-ZTAA-Group; secure; HttpOnly- Application level cookie valid for ise-external.dcloud.local domain. This is an application-specific cookie allowing access to ISE GUI.
cscozt_token=F8D694463BB6A39AD53CEBF962676F74; expires=Fri, 15 Sep 2023 11:20:46 GMT; path=/; secure; HttpOnlyThe user is redirected to a high port from the Global Port Pool configured in step X.
-
Before logging in to ISE GUI, switch back to SAML-tracer and click Pause. This will prevent dumping the upcoming ISE requests into the tracer.

-
Go back to ISE GUI in Chrome and log in with admin/C1sco12345 credentials.
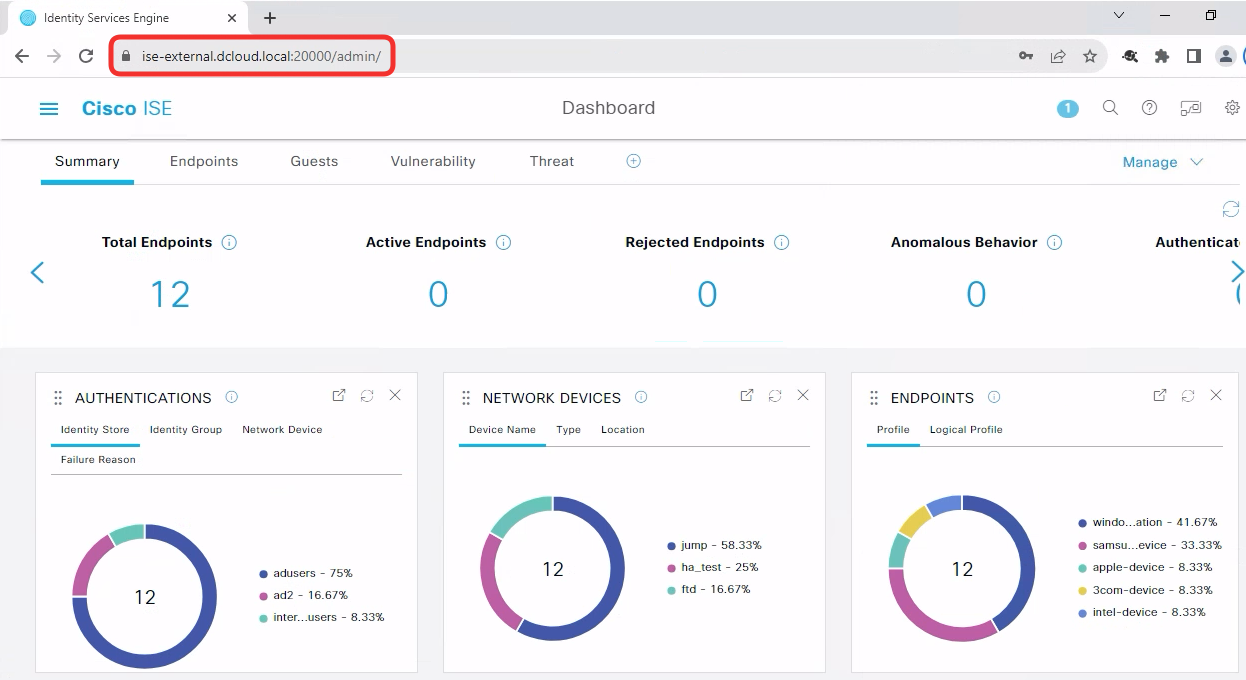
-
The connection to ISE GUI is fully decrypted by the firewall using known-key technique. This enables the firewall to perform security checks on the clear text traffic transmitted inside the TLS connection. In the following steps, you will test the IPS function of the ZTAA solution by uploading a malicious CSV file into ISE.
In ISE GUI click on the "hamburger" settings menu icon in the top left.
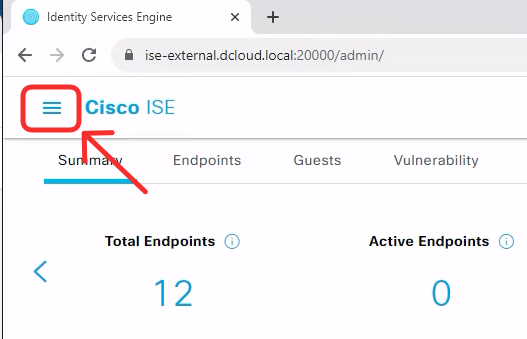
-
Navigate to Context Visibility -> Endpoints.
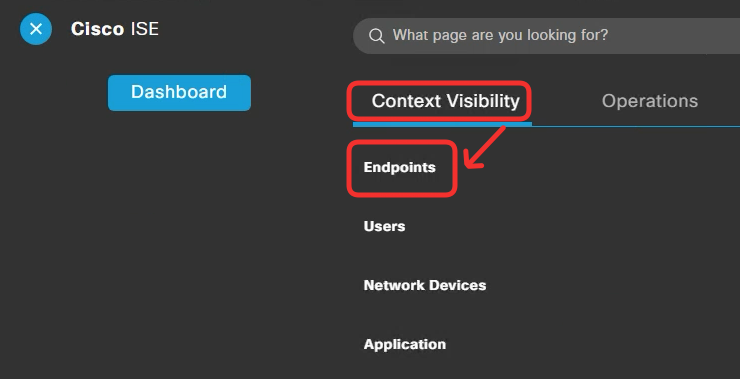
-
Scroll down to the list of the endpoints and click on Import -> Import From File.

-
Click Choose File.
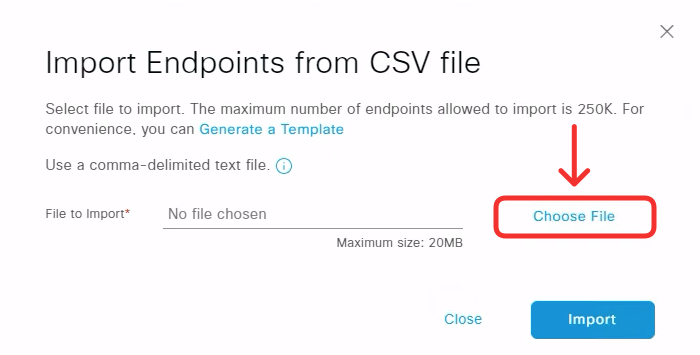
-
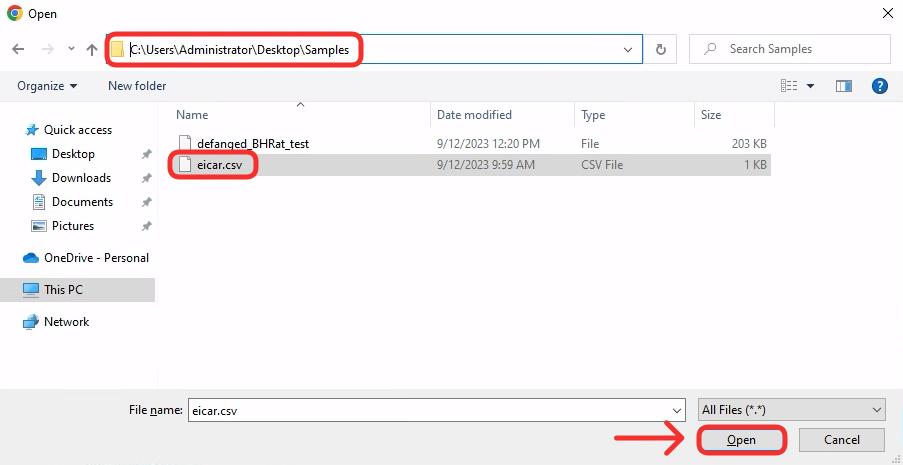
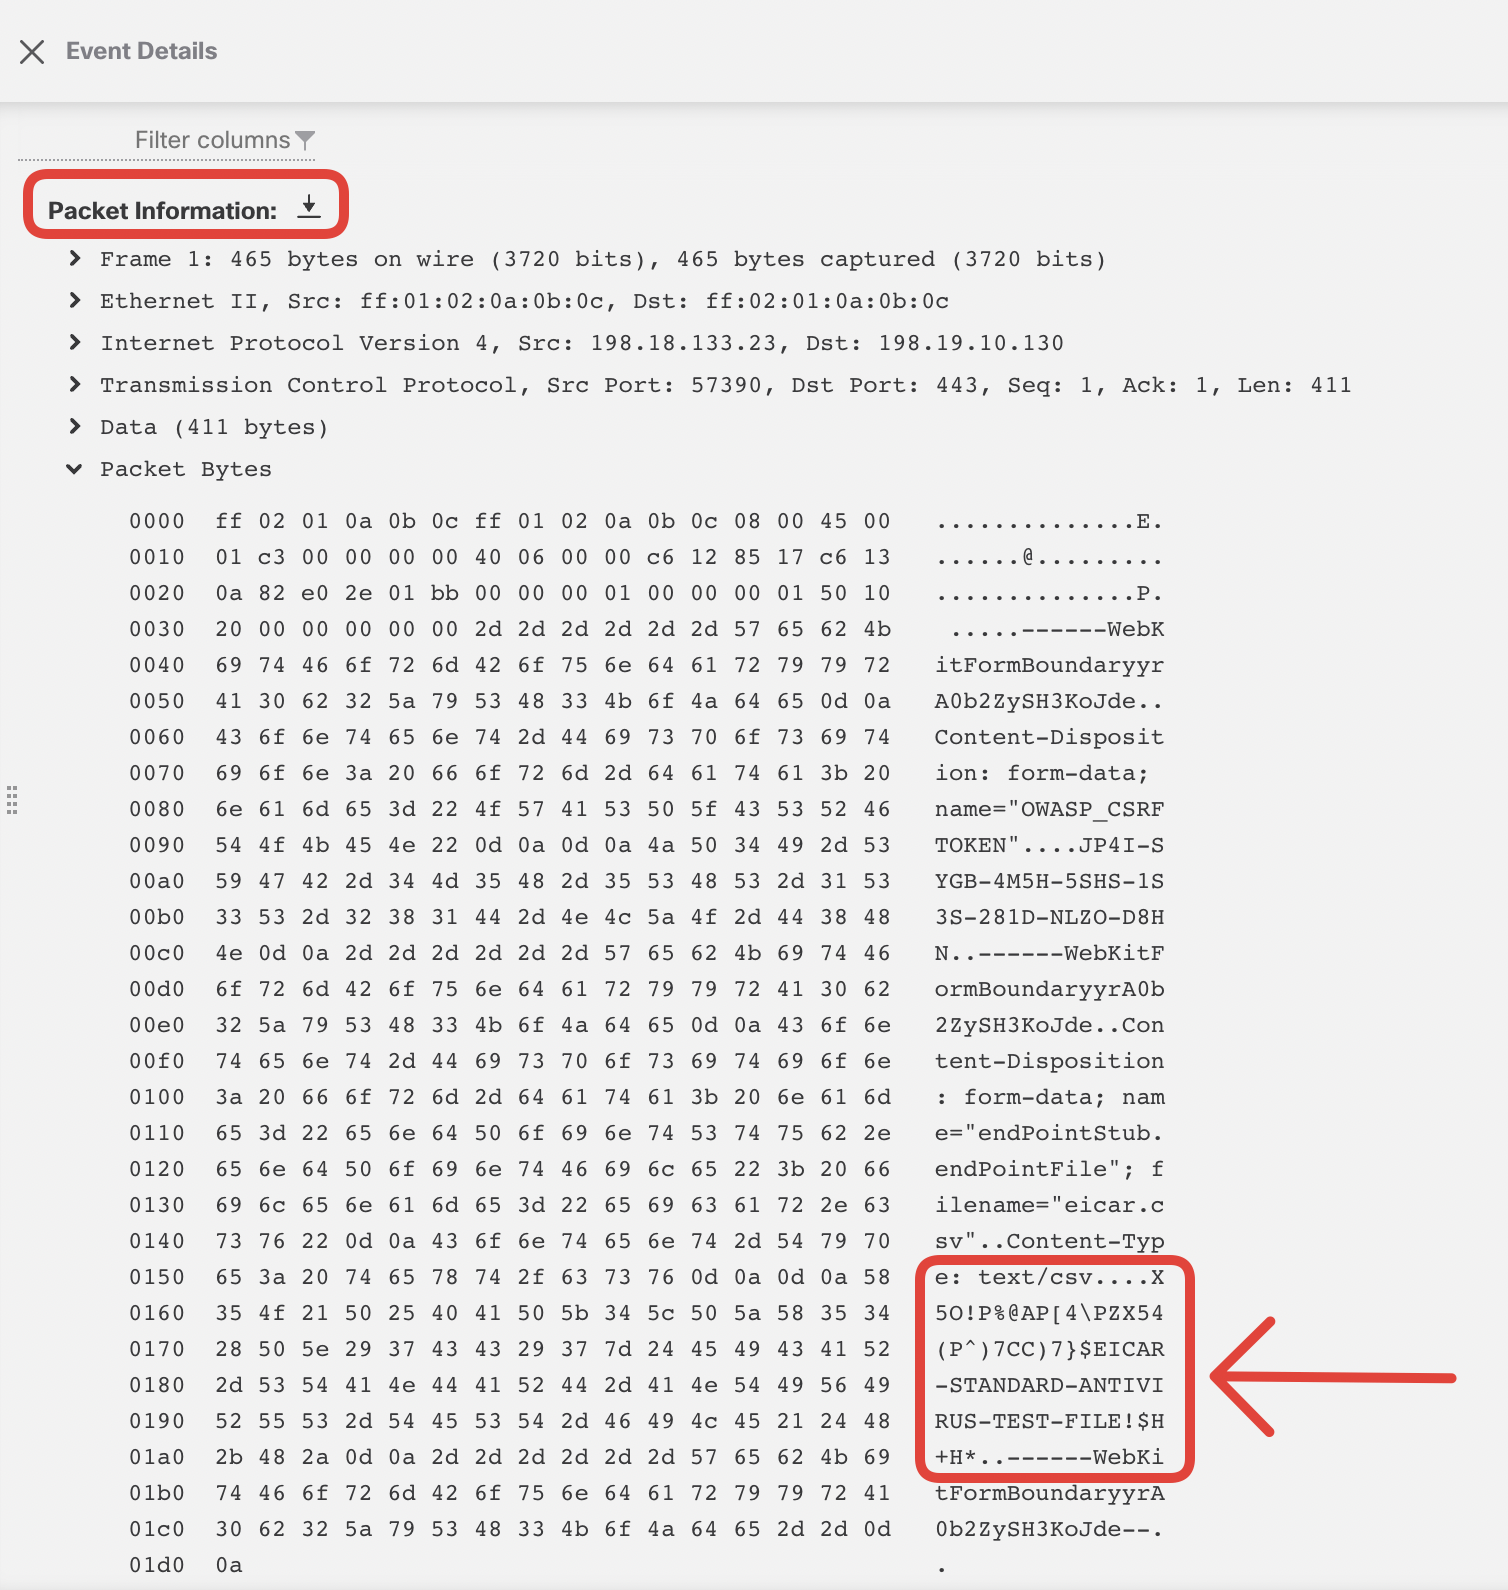
In the Samples directory on the WKST2 Desktop you will find a file named eicar.csv, containing EICAR test string: "X5O!P%@AP[4\PZX54(P^)7CC)7}$ GAP EICAR-STANDARD-ANTIVIRUS-TEST-FILE!$H+H*".
Click Open.
-
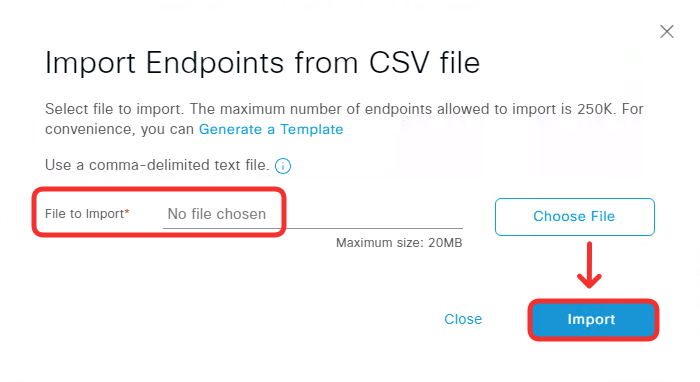
The File to Import may say No file chosen. Nevertheless, click Import.
-
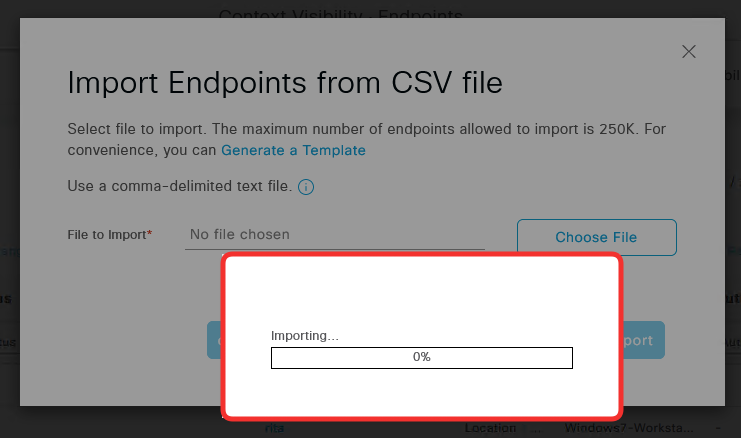
You will notice the import progress is stuck at 0%. Note: You may not see the progress bar below but the upload should still fail.
-
Go back to the Firewall Management Center interface and navigate to Analysis -> Unified Events. In the search bar, set the filter Event Type = Intrusion and click Apply.

-
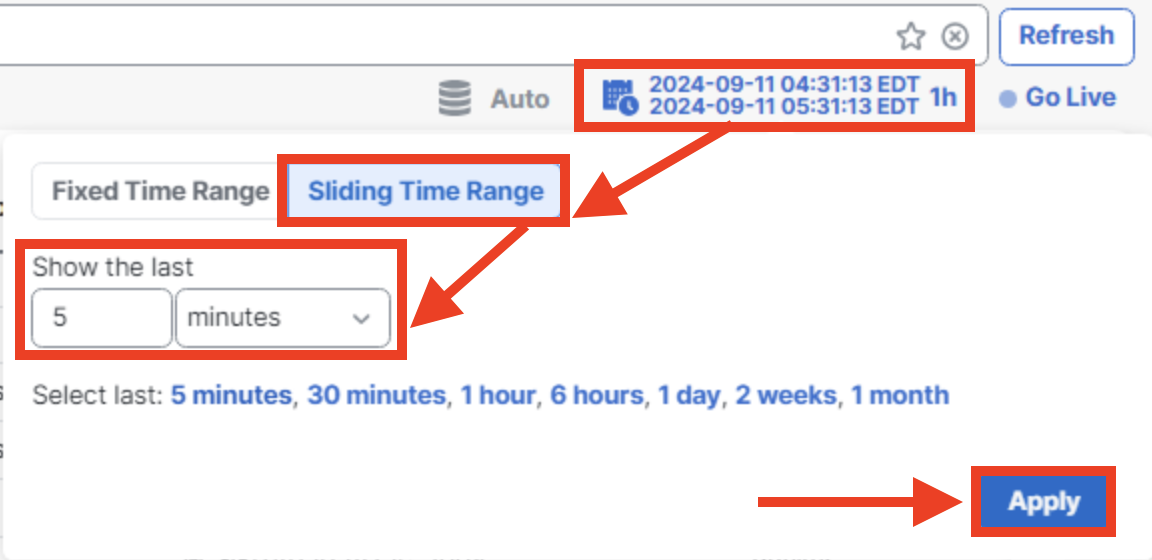
Set the display Sliding Time Range to show the last 5 minutes.
-
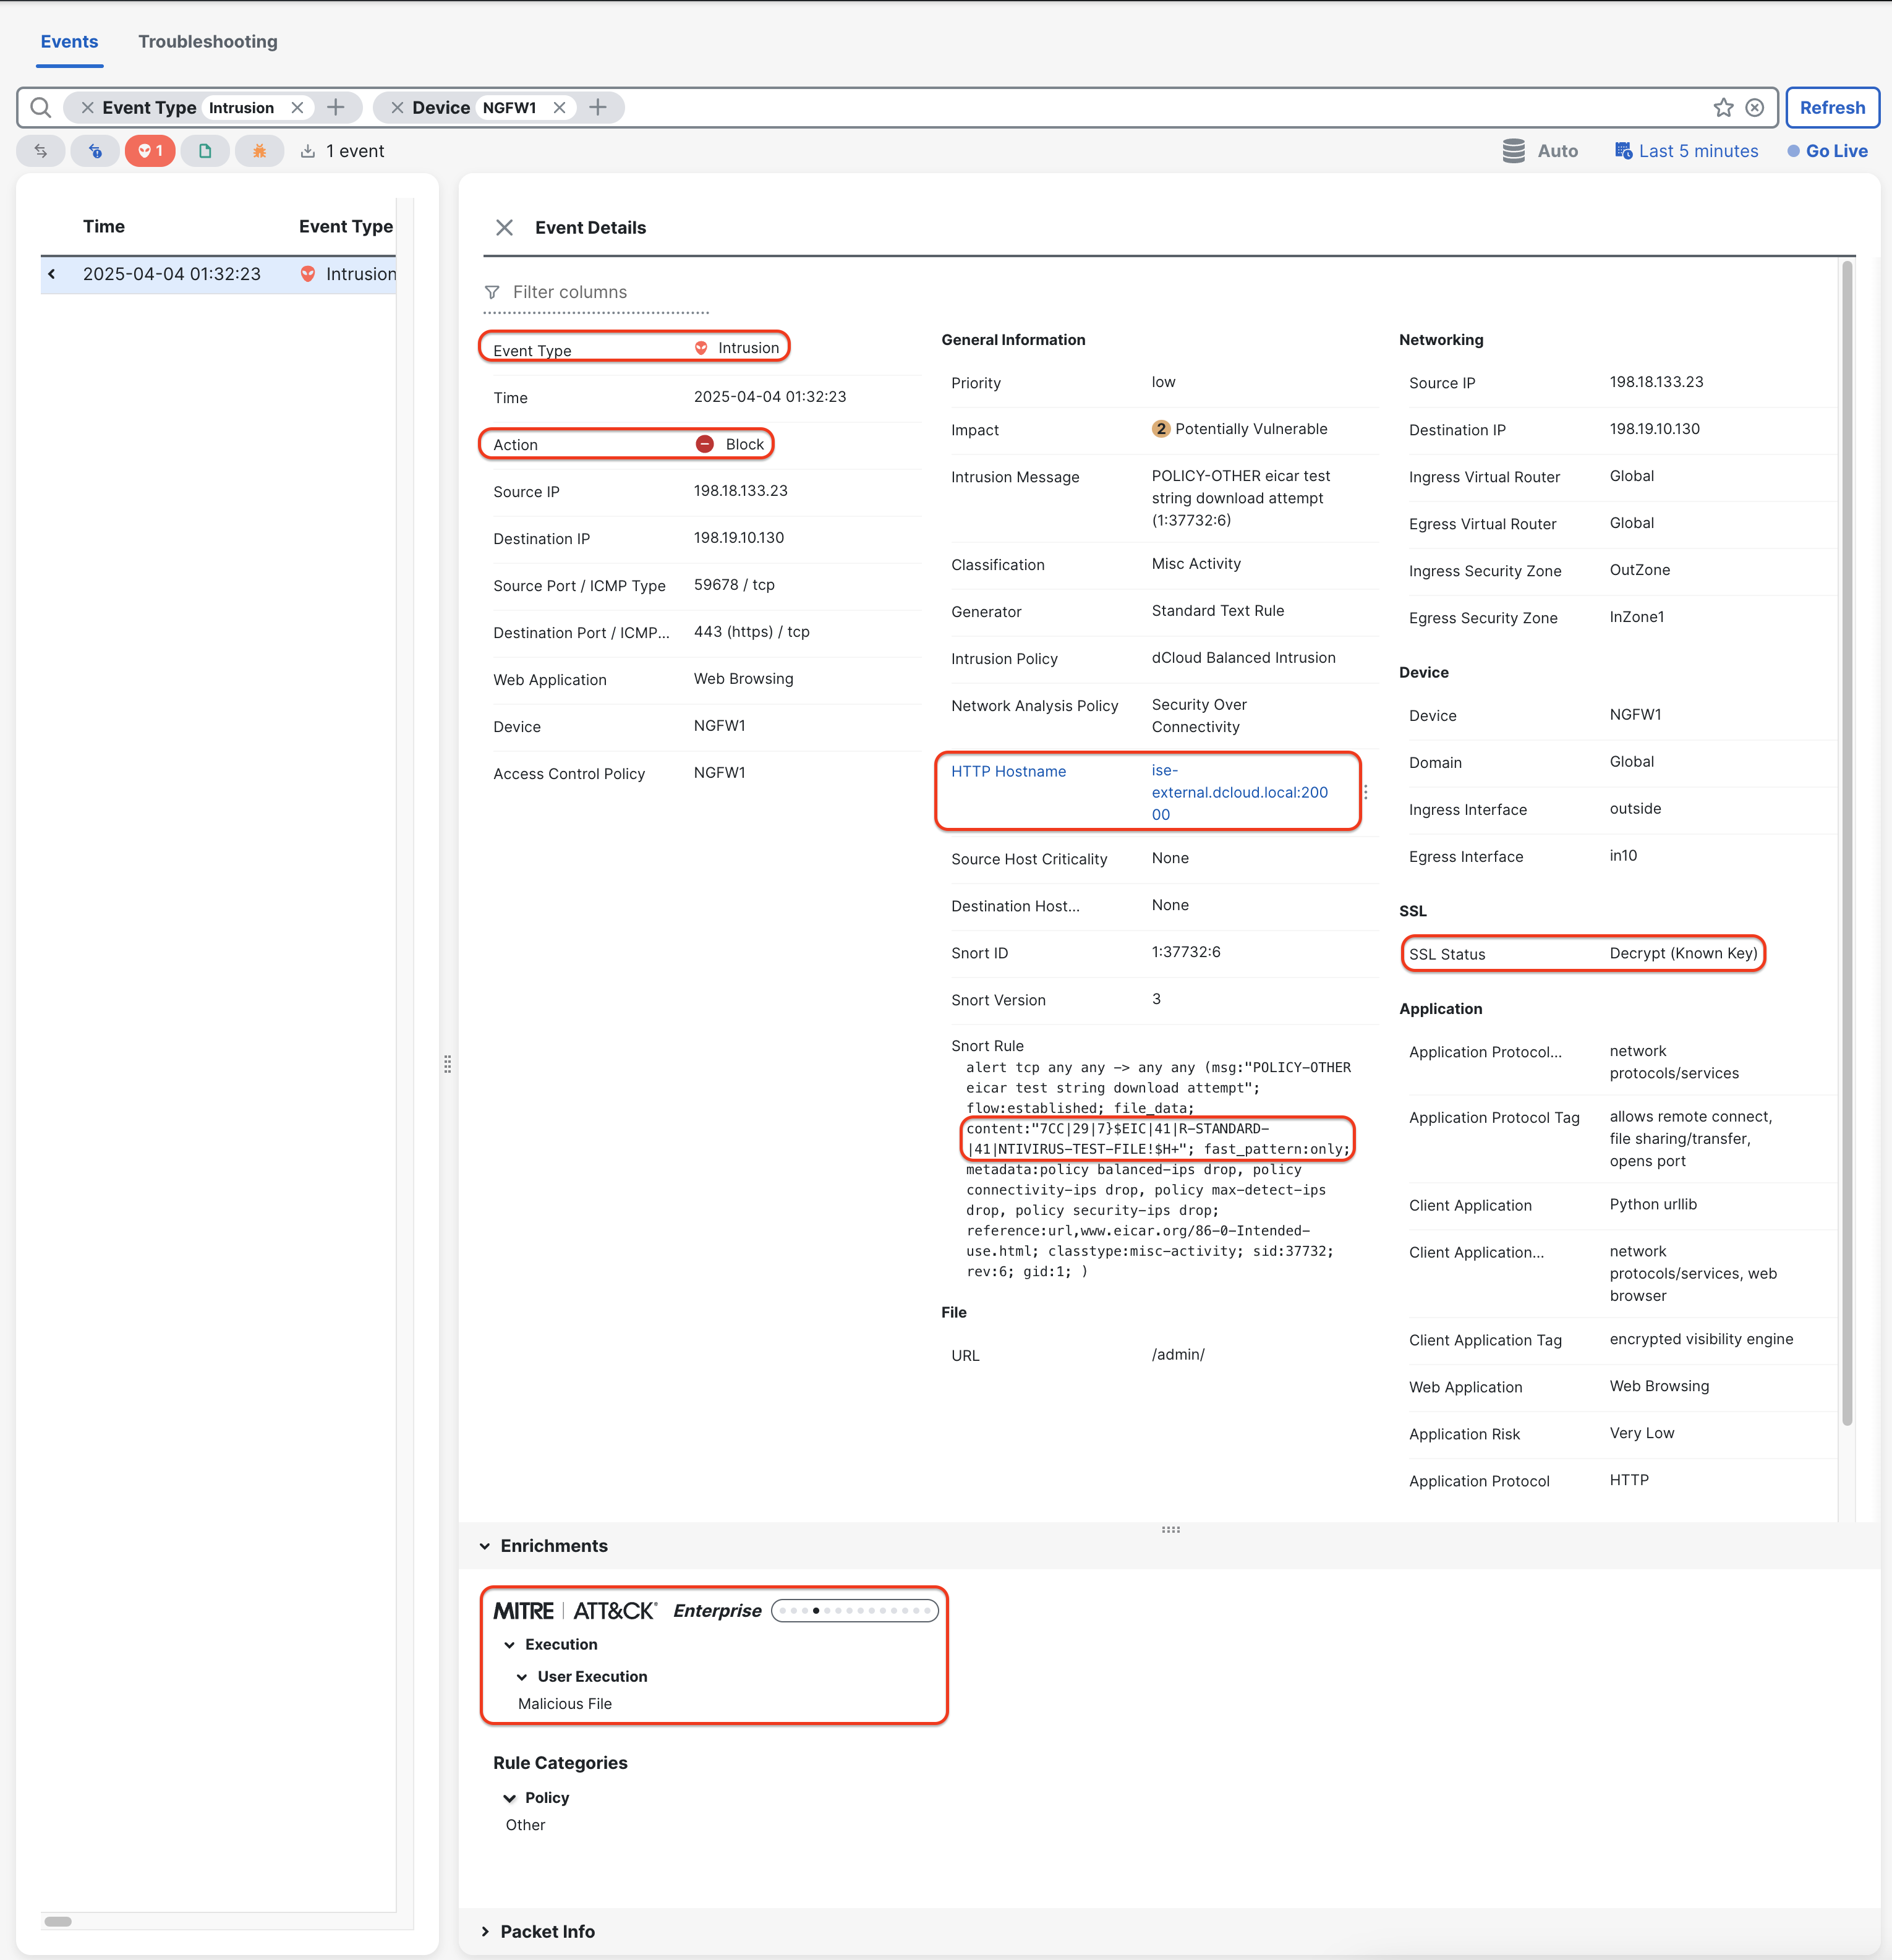
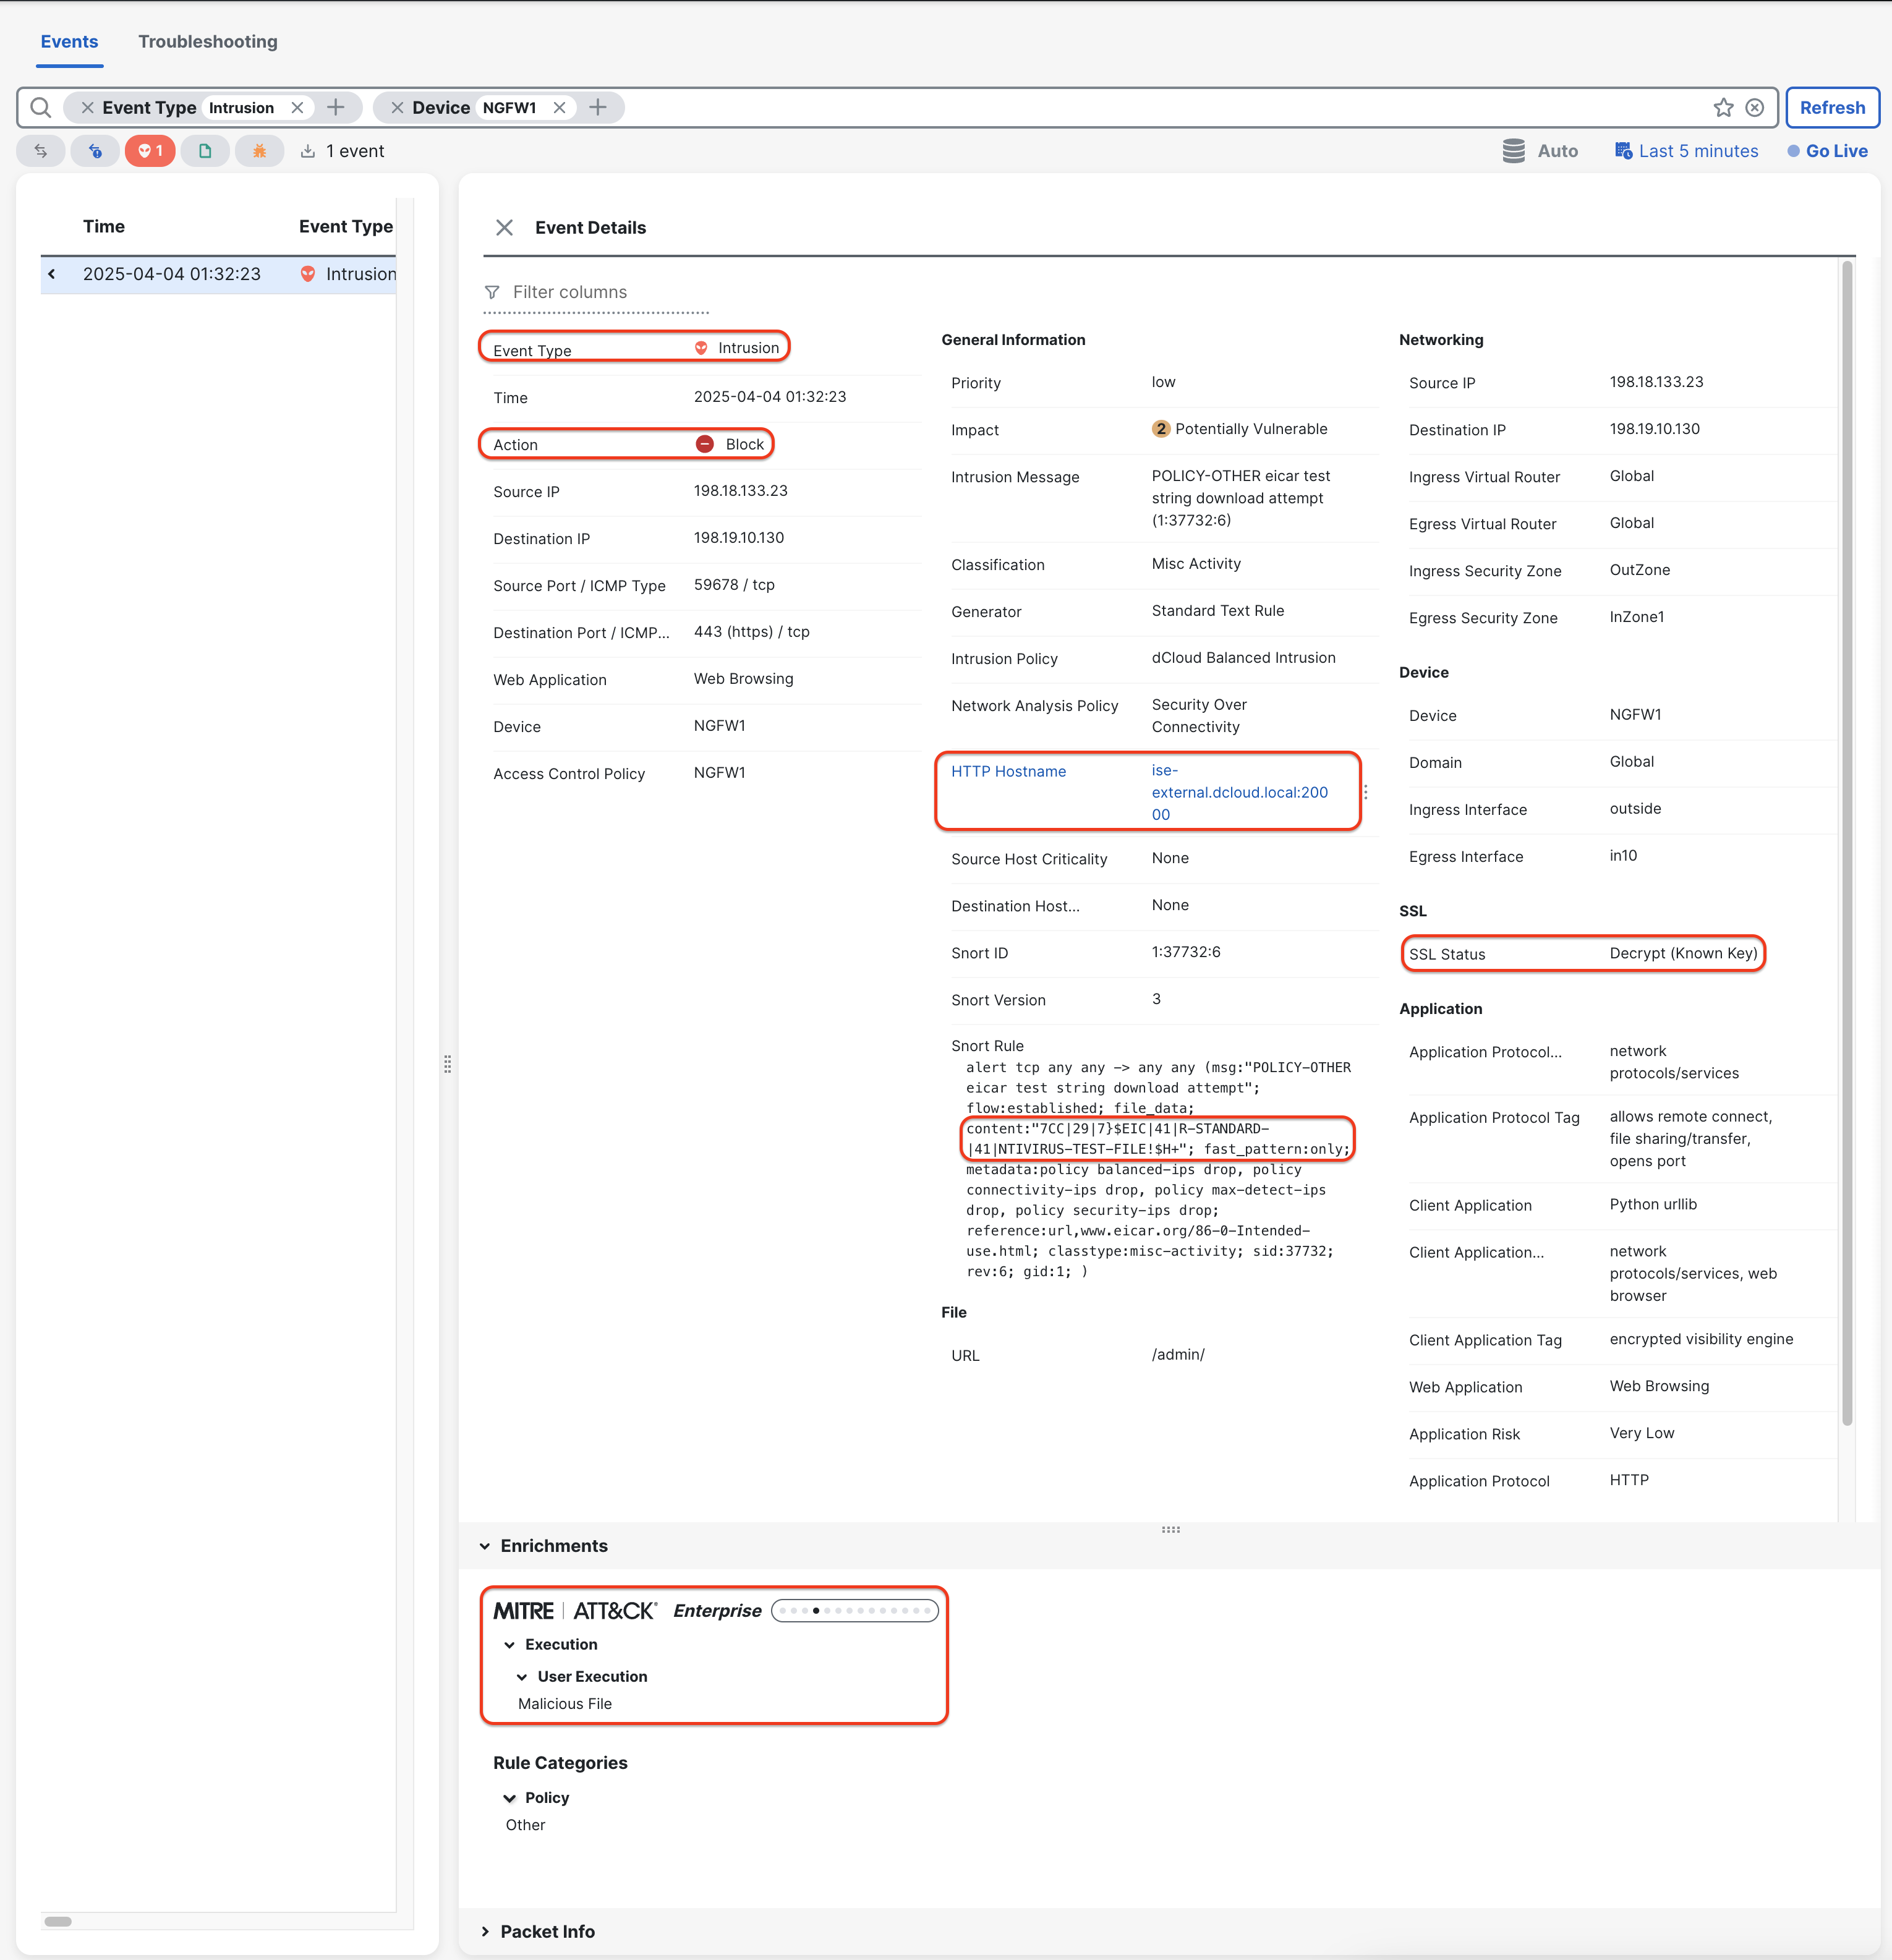
Look for an Intrusion event sourced from 198.18.133.23 source IP towards 198.19.10.130 destination IP. Click on the > sign on the left side of the log, to display the details. Notice the following:
- Action: Block
- SSL Status: Decrypt (Known Key)
- MITRE: ATT&&ACK Framework > Enterprise > Execution > User Execution > Malicious File
- HTTP Hostname: ise-external.dcloud.local:20000
- Snort Rule: content: matching EICAR string
-
Scroll down to Packet Information and expand Packet Bytes. Look for the EICAR string in the packet dump.
-
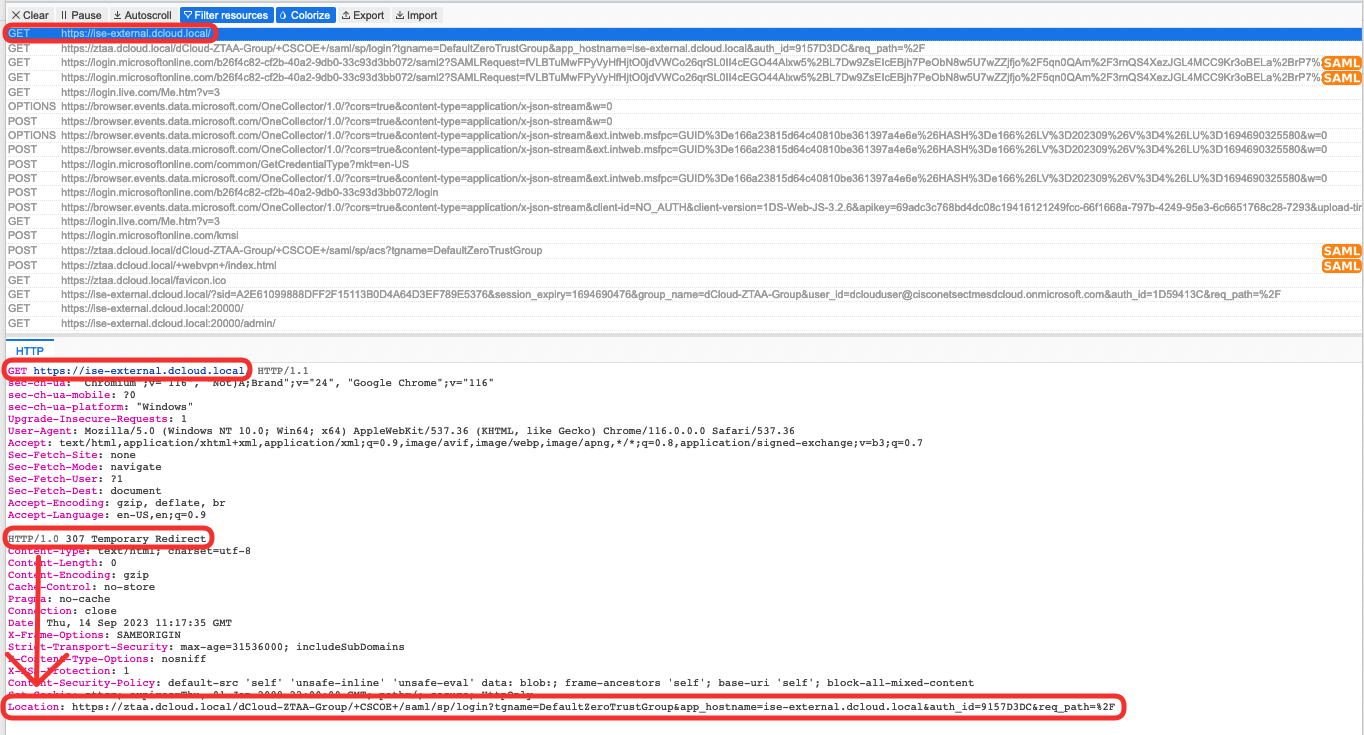
(optional) Review the SAML-tracer dumps. Try to answer the following questions:
- Look at the initial GET request from the client to https://ise-external.dcloud.local. What is the Location where the firewall redirects the browser?
- Can you find the SAML AuthnRequest issued by FTD to AzureAD?
- Have a look at the Issuer value. Can you recall where in the ZTAA configuration have you seen it before?
- Look at the Destination value. Where have you seen it before?
- Can you find the SAML Response?
- Look at the Destination or Recipient values. Where have you seen it before?
- Can you find the NameID value?
- What other user attributes are returned in AttributeStatement?
- Find the firewall's response to the POST request from the client to https://ztaa.dcloud.local/+webvpn+/index.html. Can you see the cscozt_token cookie set? Is that a Group or Application level cookie?
- Find the request where the firewall sets the cookie cscozt_token for the Application.
-
In the following steps, you will check the experience of the user that is not authorized by AzureAD to access applications in dCloud-ZTAA-Group ZTAA Group.
In the Zero Trust Access flow, the firewall trusts the authorization decision made by the SAML IdP. Recall that during ZTA policy setup, you haven't configured any conditions determining who has access to the ISE GUI application.
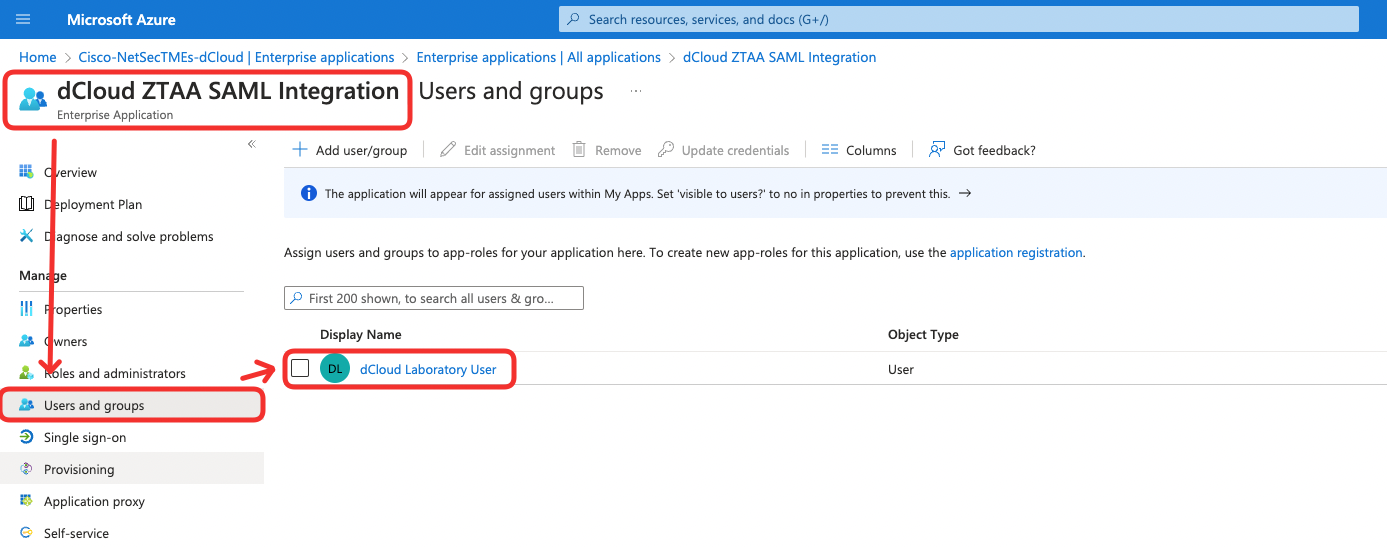
The screenshot below illustrates the User and Groups configuration of the Enterprise Application in AzureAD associated with dCloud-ZTAA-Group. The only user authorized to access this application is dCloud Laboratory User (dclouduser), which you used to test the ZTAA flow in the previous tasks. Now, you will try to access the ISE GUI application using a non-authorized user dCloud Guest User (dcloudguest).
-
Switch back to the WKST2 and open a New Incognito Window in Chrome. This new session does not have the ZTAA cookies allowing the user to skip SAML authentication.

-
In the new window type in https://ise-external.dcloud.local again. This time log in using the following credentials:
There is a common dcloudguest user to be used in this step. Please don't append the number to the guest username as you did in the previous tasks.
- Username: [email protected]
- Password: ZTAAisC00L

-
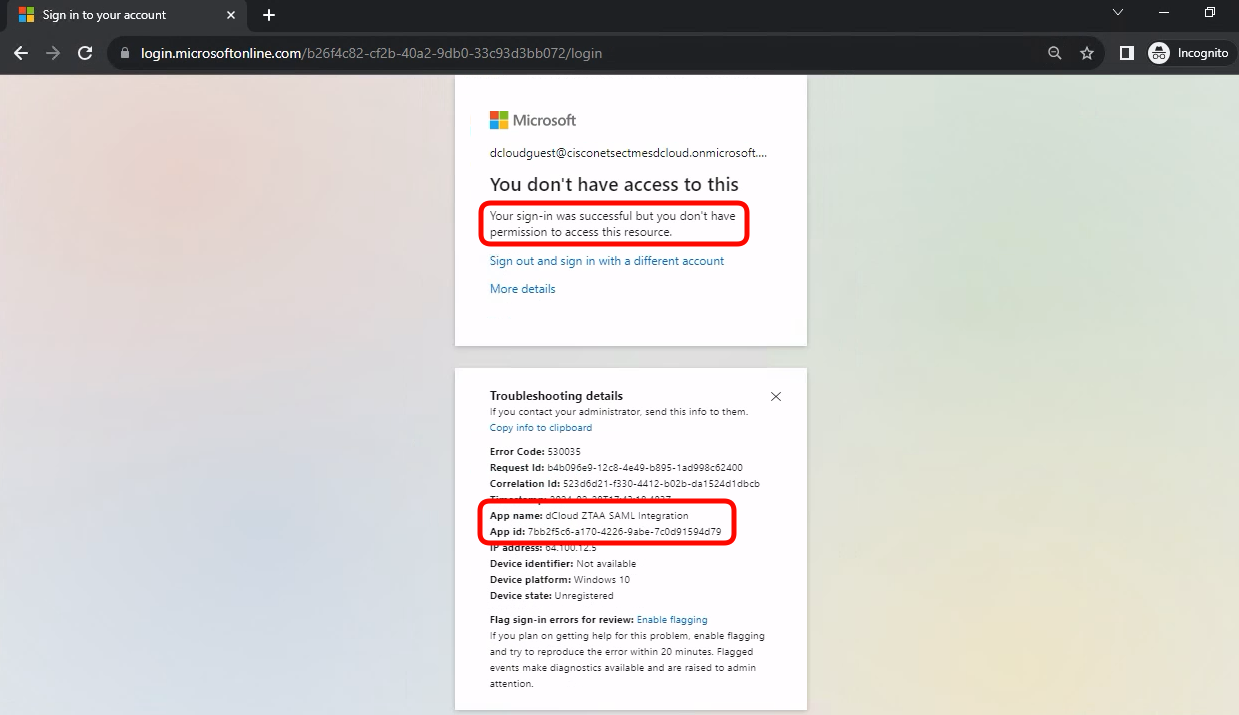
The access is denied by AzureAD. Notice the message informing that the user is not granted access to the application.
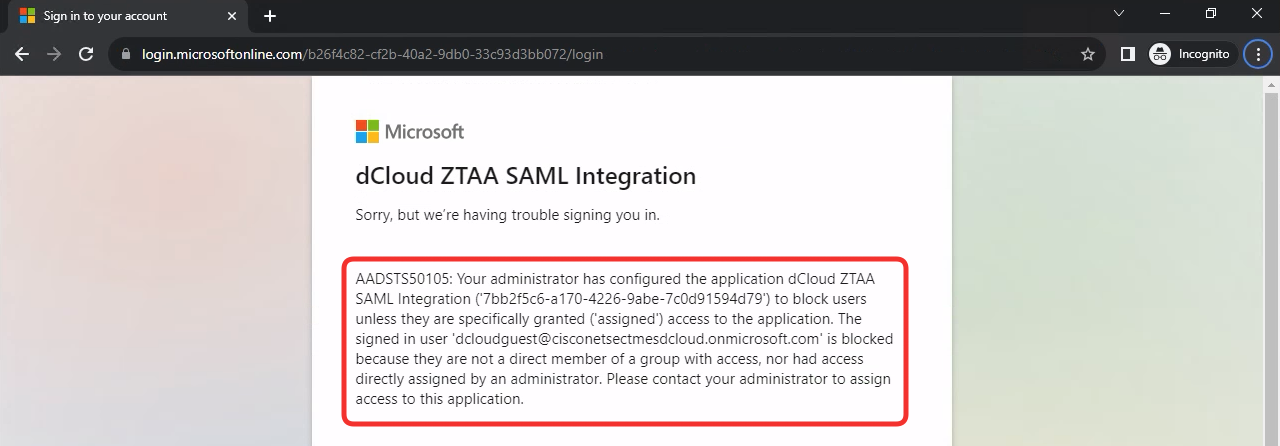
The older output from AzureAD looked as follows:
Updated 10 months ago
