
Malware and File Policy
Cisco Secure Firewall Malware and File Policy Guidance
Introduction
Cisco Secure Firewall can detect, capture and analyze files. If a file is found malicious, the solution can track and analyze the Malware, and optionally block further transmission in a network. In the Firewall Management Center (FMC) web interface, this feature is called Advanced Malware Protection (AMP) for Networks. This document describes how to configure a Malware & File policy to detect files, identify malware, and dynamically obtain threat data from the Cisco cloud.
Malware and File Policy
A Malware & File policy is a set of configurations that the Secure Firewall uses to control file transmission and protect a network from malware. It is part of the overall access control configuration. Associating a file policy to an access control rule ensures that before the system passes a file in traffic that matches an access control rule's conditions, it first inspects the file.
Depending on the license type applied on a Secure Firewall, its malware and file protection capability varies. The table below provides a summary:
| Purpose | License Required |
|---|---|
| Block or allow all files of a particular type (for example, block all .exe files) | Threat |
| Selectively allow or block files based on a judgment that it contains or is likely to contain malware | Threat, Protection, Malware |
| Store files | Threat, Protection, Malware |
Table 1: License requirements to enable file control and malware protection capabilities
Configuration
To enable file detection and malware protection capabilities in a Secure Firewall, an administrator needs to work with two policies, the Malware & File Policy, and the Access Control Policy.
Malware & File Policy
Step 1: Login to the FMC. Navigate to the Policies > Access Control > Malware & File. The Malware & File policy page appears.
Step 2: Click the New File Policy button to create a new policy. The New File Policy pop up window appears.
Step 3: In the New File Policy window, enter a name for the new policy, then click the Save button. The policy editor page appears.

Figure 1: A New File Policy Window
Step 4: In the policy editor page, click the Add Rule option to create Malware and File policy rules. The Add Rule window appears.
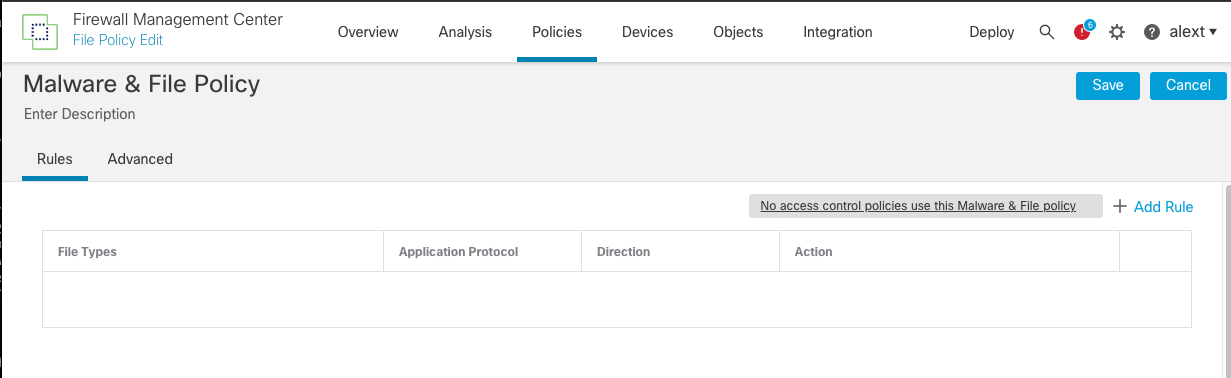
Figure 2: File Policy Add Rule Option
Step 5: Use the Action dropdown to instruct the FTD on what to do with the file when there is a match.

Figure 3: Available options in the Action dropdown
File rules allow granular control over files. Each file rule has an associated action that determines how the system handles traffic that matches the rule's conditions. Below are the functions of the file rule actions:
| Actions | Functions |
|---|---|
| Detect Files | Log the detection of specific file types to the database, while still allowing their transmission |
| Block Files | Block specific file types. In addition, when a file transfer is blocked, the connection can be reset, and files can be captured. |
| Malware Cloud Lookup | Obtain and log the disposition of files traversing network, while still allowing their transmission. |
| Block Malware | Calculate the SHA-256 hash value of specific file types, query the AMP cloud to determine if files traversing the network contain malware, then block files that represent threats. |
Table 2: Rule actions available for a file rule
Step 6: Select the File Types required. The following three figures demonstrate the creation of three file rules using three different actions for particular file types.

Figure 4: A block file rule (this example uses the Disk Image file type)

Figure 5: A block malware rule (this example uses the PDF file type)

Figure 6: A enable malware cloud lookup rule (this example uses the Microsoft execution file type)
Step 7: Once all the rules are created, click Save in the policy editor to save the policy changes.

Figure 7: The three file rules within the policy
Access Control Policy
The second part of the file policy configuration is to add the file policy into the access control policy deployed to the Secure Firewall. To associate a file policy with an access control rule, follow the steps below:
Step 1: Go to the Policies > Access Control page. The list of access control policies appears.
Step 2: Next to the Access Control policy name, find the pencil icon. Click the icon to open the policy on an editor.
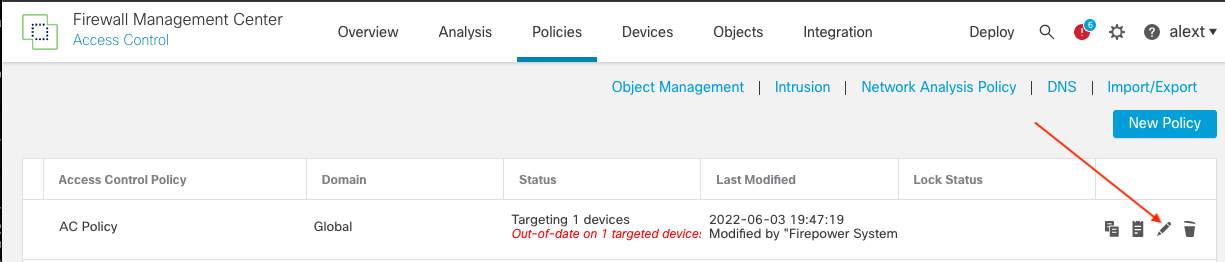
Figure 8: Pencil icon represents the option to edit a policy
Step 3: In the access control policy editor, edit an existing access rule to associate the new file policy. If this is a new access control policy, add a new access rule to match the desired traffic and associate the new file policy with the access rule. To add a new rule, click the Add Rule button. The Add Rule window appears.
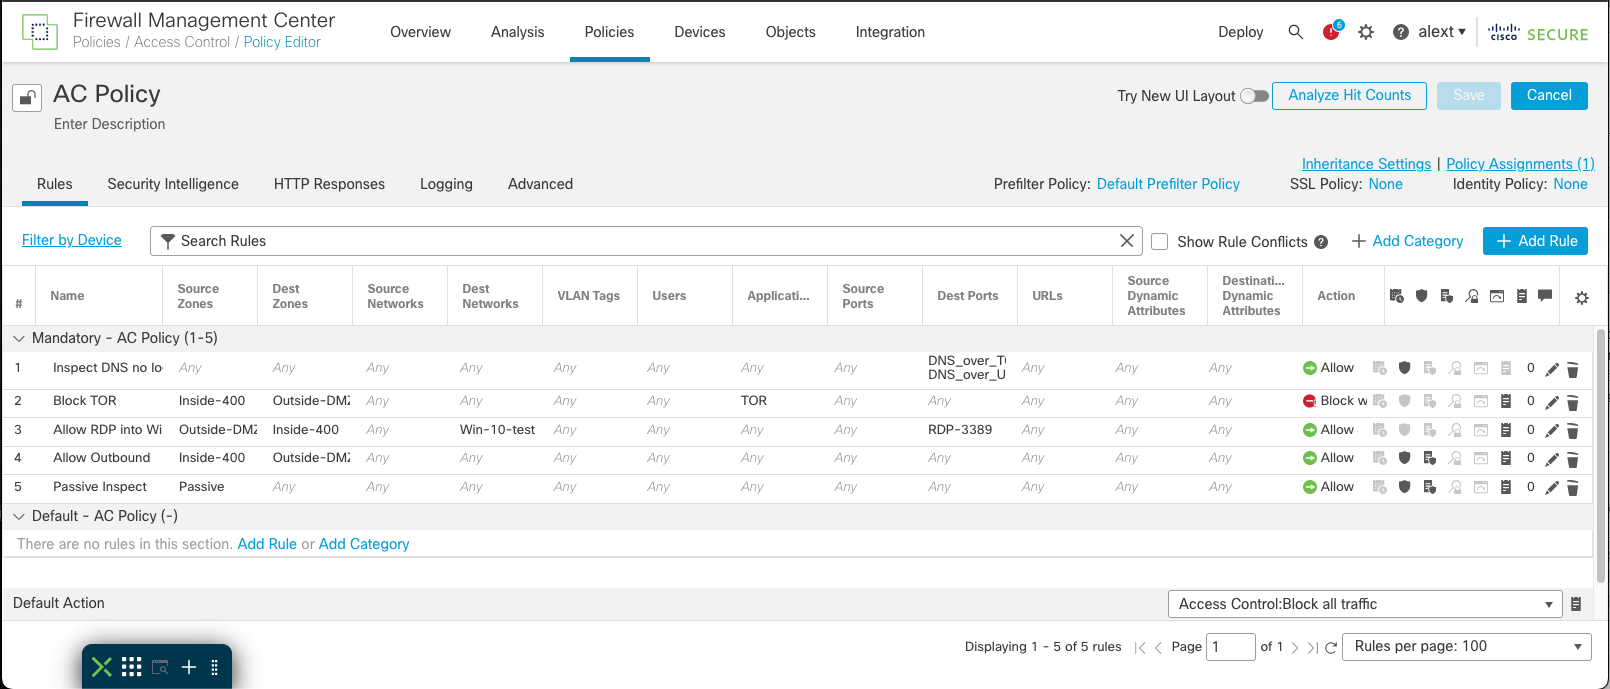
Figure 9: Access control policy editor page
Step 4: On the Add Rule window, go to the Inspection tab to associate a file policy with this access rule. A single file policy can be associated with an access control rule whose action is Allow, Interactive Block, or Interactive Block with reset.
Step 5: Use the File Policy dropdown to select the file policy that was created earlier.

Figure 10: The Inspection tab shows the association of a file policy with an access control rule
Step 6: Go to the Logging tab and enable Log Files. It enables logging of file or malware events.

Figure 11: The Logging tab provides the options to enable logging for the file event rule
Step 7: Click Add to create the rule. The GUI returns to the access control policy editor page.
Step 8: Click Save to save the access control policy.
Note
A file policy cannot be chosen as the default action for an access control policy.
Step 9: Click Deploy to deploy the policy to the desired FTD device(s).
Verification
File and Malware Events
When a file policy generates a file or malware event, or captures a file, the system also logs the end of the associated connections to the FMC database. The FMC event viewer also shows a file's composition, disposition, threat score, and dynamic analysis summary report for further insight into the malware analysis. This data helps a security analyst to address any adverse impact and block future attacks. To review the detail of captured files as well as malware and file events, go to the Analysis > Files menu.
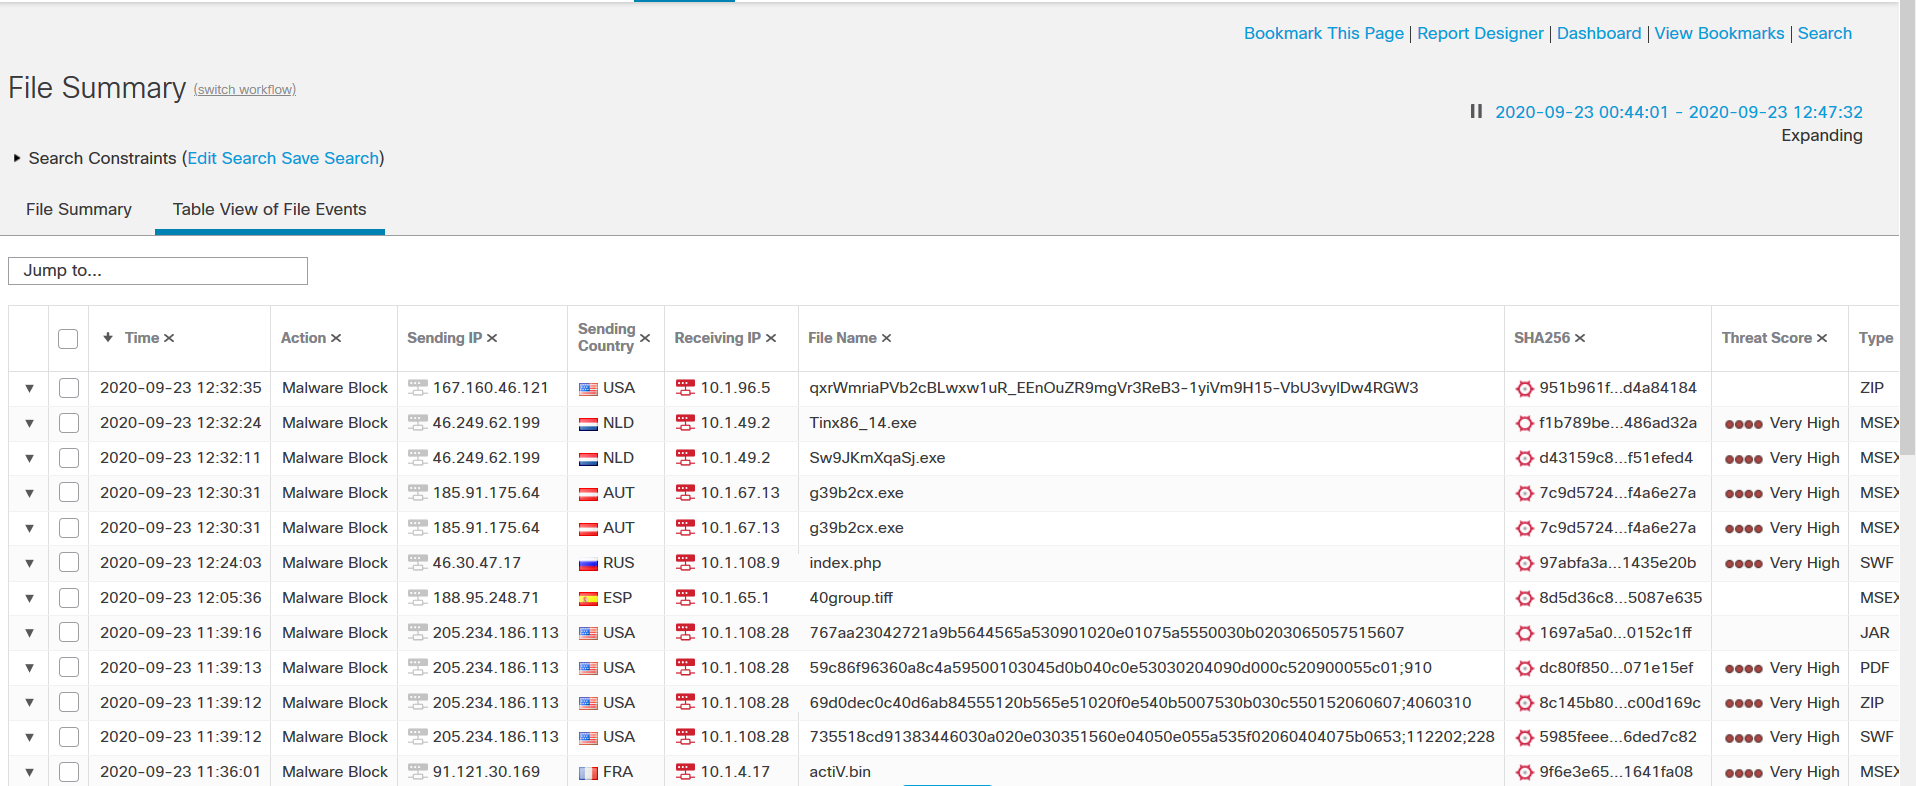
Figure 12: An example of the file summary page
Network File Trajectory
To further analyze the malware events, go to the Analysis > Network File Trajectory menu to view a malware file's trajectory (a map of how the file traversed the network, passing among hosts, as well as various file properties) to track the spread of an individual threat across hosts over time. This insight allows a security analyst to concentrate on outbreak control and prevention efforts where most useful.
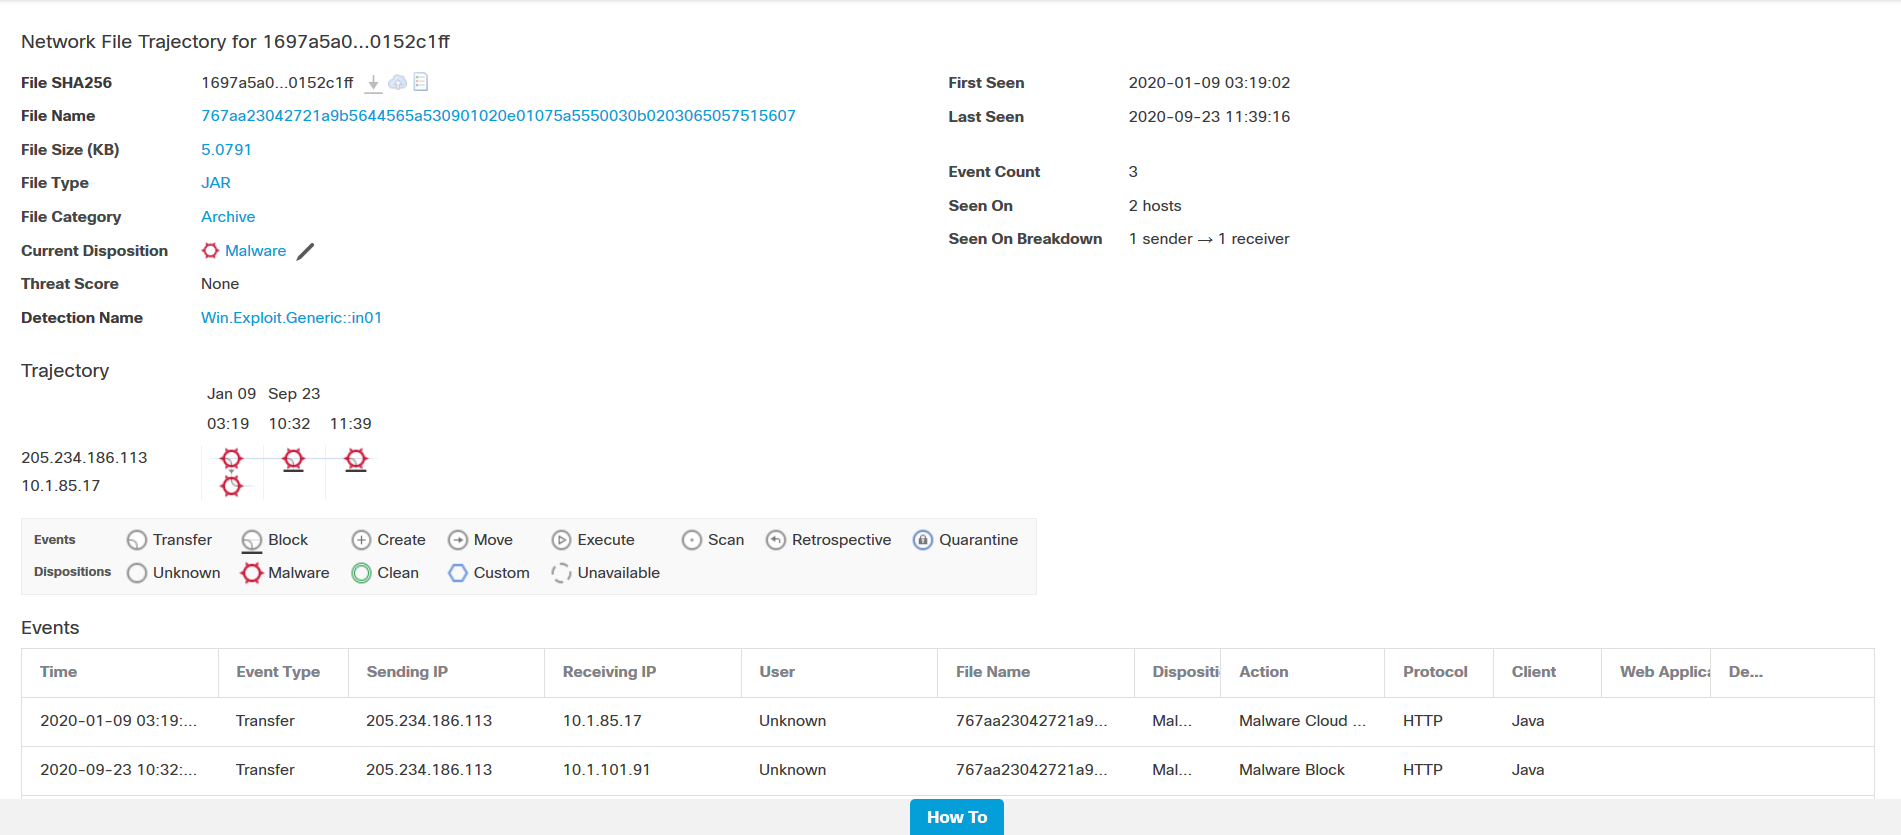
Figure 13: Network File trajectory provides malware details for analysis
Summary
AMP for Network is just one of the most widely deployed technologies to protect a network using Secure Firewall. The Cisco Firewall Management Center (FMC) also supports the integration of AMP for Endpoints which can import records of scans, malware detections, and quarantines, as well as indications of compromise (IOC). Powered by the security intelligence of Cisco's Talos team, the AMP technologies enable a Cisco Secure Firewall System to provide a complete picture of malware on a network.
📚 Additional Resources
To learn more about the File Policy on the Cisco Secure Firewall, refer to the following publication:
Updated about 4 years ago