
Policy-Based Routing with Path Monitoring
Cisco Secure Firewall PBR with Path Monitoring
Introduction
Policy-based routing (PBR) path monitoring was added in the latest releases. This document discusses this enhancement for both Cisco Secure Firewall ASA (ASA) and Cisco Secure Firewall Threat Defense (FTD).
Related Routing Features
Let us briefly consider the path-monitoring feature in the context of related features and recent releases.
- Release 6.0.1 provided Service Level Agreement (SLA) Monitor to the FTD which was ASA legacy functionality.
- SLA Monitor can detect a static route failure and remove a static route from the route table.
- To configure SLA Monitor on FTD, in the Firewall Management Center (FMC) navigate to Objects > Object Management and select SLA Monitor. Once you create the SLA Monitor object, you can add it to a static route by editing the static route in the device configuration.
- Release 7.0 added FMC native support for equal-cost multipath routing (ECMP). Prior to 7.0, you had to use FlexConfig to configure this feature.
- Releases 7.1/9.17.1 enhanced PBR support.
- Release 7.1 added native support for PBR to the FMC. Prior to 7.1, you had to use FlexConfig to configure this feature.
- Releases 7.1/9.17.1 added application-based routing. The next section of this document discusses this enhancement.
- Releases 7.2/9.18.1 added path-monitoring to PBR so the ASA and FTD can choose the best route based on dynamic metrics. Path-monitoring is the focus of this document.
Application-Based Routing
Before we focus on the path-monitoring feature, it is worth reviewing the application-based routing related feature added to PBR in 7.1/9.17.1.
Route-Maps and Extended Access Lists
At a high level, the PBR application-based routing is straightforward. PBR uses a route-map applied to the ingress interface. The route-map can reference an extended access control list.
You create extended access control lists the way you did prior to 7.1/9.17.1.
- For ASA, with the access-list command
- For the FMC, from the Objects > Object Management page
However, 7.1/9.17.1 added an important enhancement to extended access control lists by creating a new object type called network-service. These objects and object-groups can represent applications. The next section describes these objects.
Note
When you configure PBR on the ASA, you create the route-map with the route-map command.
When you configure PBR on the FTD, the FMC auto-generates the route-map and applies it to the specified ingress interface. This route-map is not accessible from the FMC UI, even though other route-maps are accessible from the Objects > Object Management page. To see the auto-generated route-maps, run show running-config route-map from the FTD CLI
Network-Service Objects and Object-Groups
You can configure network-service objects and object-groups and use them in extended access control lists referenced in policy-based routing route maps and access control groups.
Network-service objects and object-groups may include IP subnets (layer 3), protocol and port specifications (layer 4), and DNS domains.
Identifying Domain Membership Based on IP address
The firewall must make the routing decision based on the layer 3 and layer 4 information present in the first packet of the flow. The firewall may need to match this packet to a domain specified in a network-service object or object-group.
To identify the domain based on the IP address, the firewall uses DNS snooping. This DNS snooping relies on responses from trusted DNS servers passing through the firewall. See the section Trusted DNS Servers below for details.
Note
Domain-based network-service objects and object groups are different from FQDN-based network objects. ASA and FTD resolve FQDN-based network objects by periodically querying DNS servers. But the firewall cannot query a DNS server for an entire domain. That is why the network-service object feature uses DNS snooping.
Identifying the Application
Because of DNS snooping, we can match an IP address to the network-service object or object-group on the first packet. To identify an application requires mapping these objects to applications.
- For ASA, you must create these mappings manually, and create network-service objects and object-groups with names that suggest the application.
- For FTD, the FMC extracts approximately two thousand network-service objects from the VDB updates and deploys them to the firewall. You cannot modify this set of objects. These names appear in the FMC extended ACL page in the Application tab.
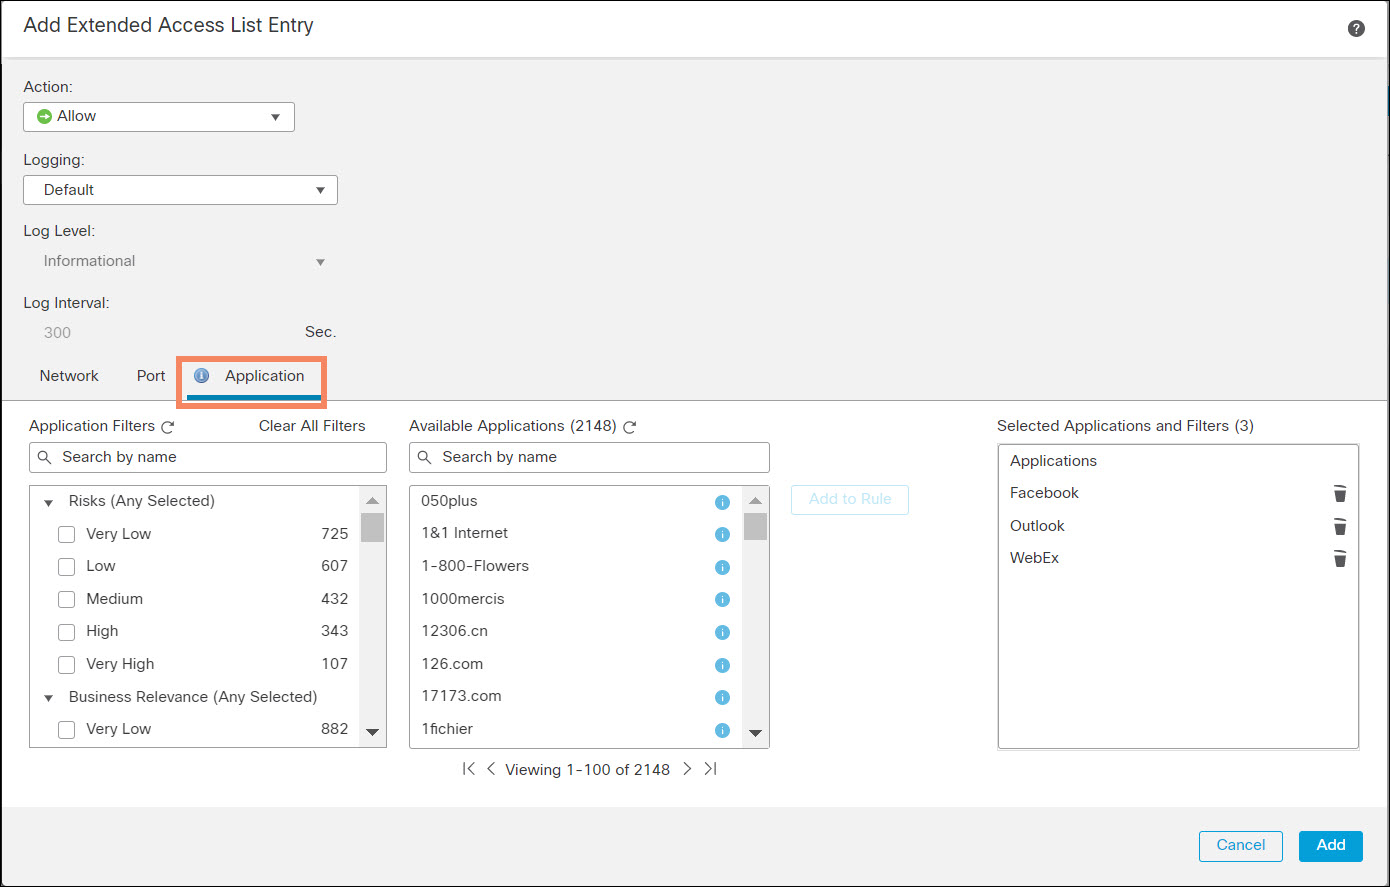
Figure 1. Extended ACL Applications Tab
The FMC creates a network-service object group for each ACE that uses applications.
Network-service objects and network-service object-groups support the dynamic key word. The dynamic keyword means that the running configuration never contains the object. You can only see the object with the show object command. This is particularly useful for the FTD because of the large number of predefined network-service objects.
Note
Here are the network-service object-group and network-service objects the FMC auto-generates for a simple PBR configuration. You cannot access these objects in the FMC UI.
> show running-config object-group network-service
object-group network-service FMC_NSG_30064775131
 network-service-member "Facebook"
 network-service-member "Outlook"
 network-service-member "WebEx"
> show running-config object
> show object network-service
object network-service "ADrive" dynamic
 description Online file storage and backup.
 app-id 17
 domain adrive.com (bid=0) ip (hitcnt=0)
...
object network-service "iTop VPN" dynamic
 description VPN/anonymizer app.
 app-id 4916
 domain itopvpn.com (bid=0) ip (hitcnt=0)
>
Trusted DNS Server
The firewalls use DNS snooping to map IP addresses to domains. However, DNS snooping can be subject to spoofing by malicious DNS servers. Therefore, this 7.1/9.17.1 releases introduced a feature called trusted DNS servers. Application-based routing only uses trusted DNS servers to resolve domains.
On ASA, use the dns trusted-source command:
dns trusted-source {configured-servers | dhcp-client | dhcp-pools | dhcp-relay | ip_list}
In the FMC, select the Platform Settings DNS section. You will notice a tab added in Release 7.1 or higher labeled Trusted DNS Servers.
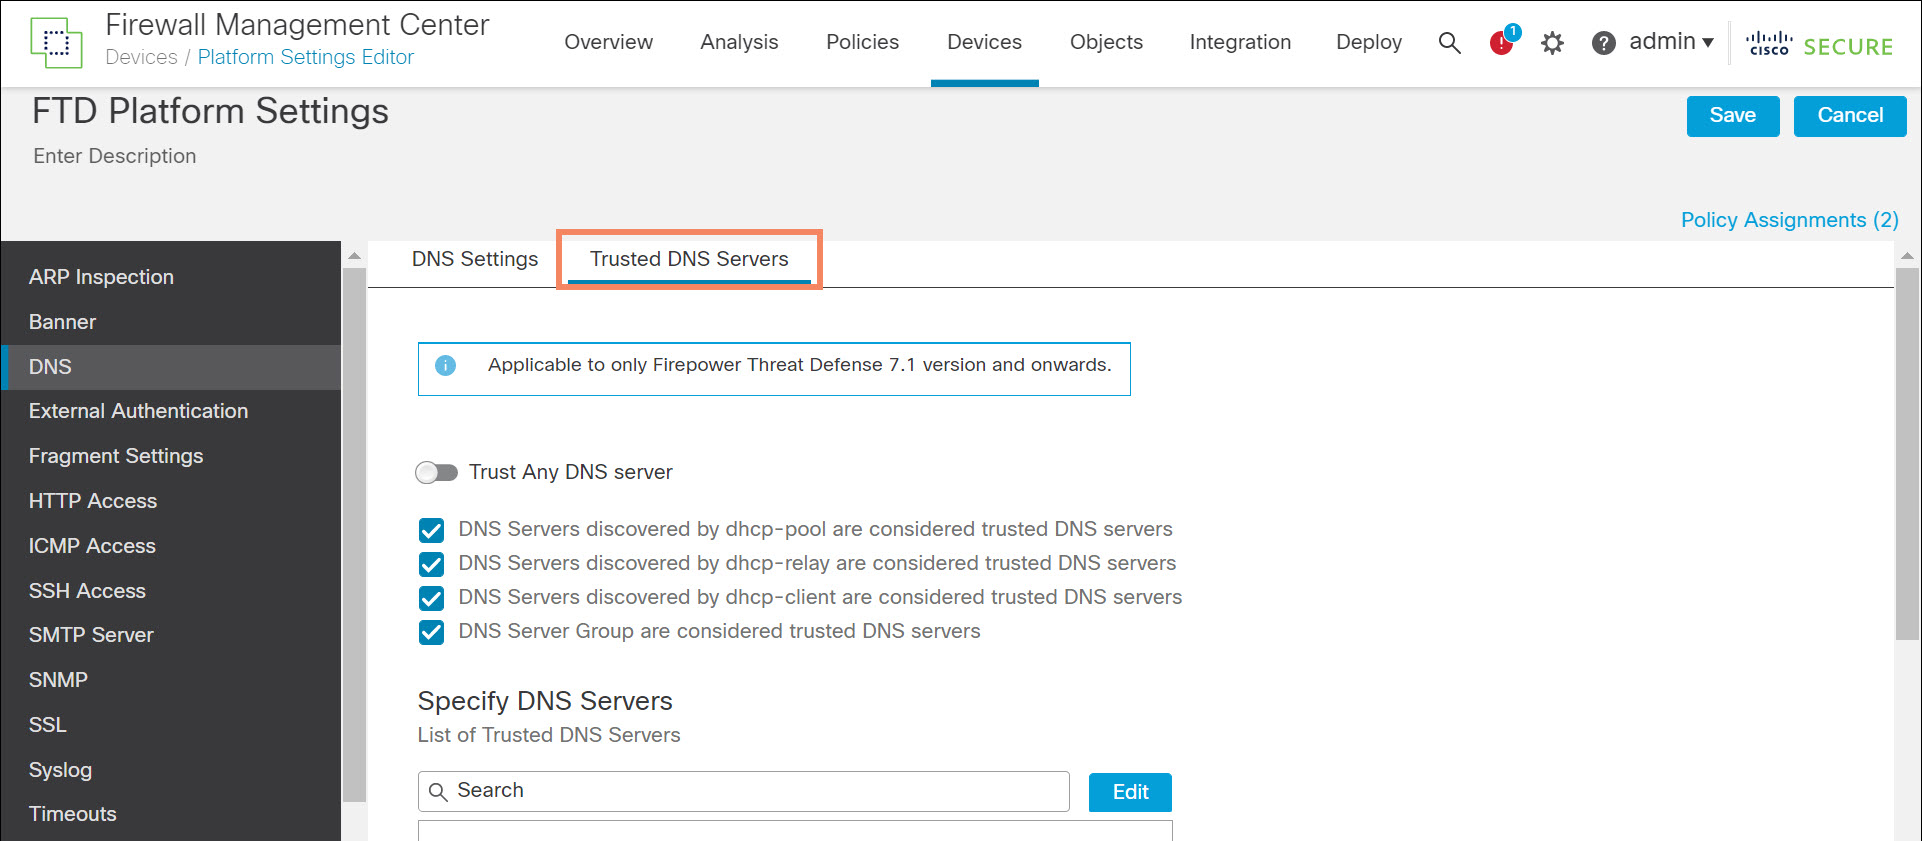
Figure 2. Trusted DNS Servers
Path Monitoring Support
Releases 7.2/9.18.1 introduces interface path monitoring. The ASA and FTD can monitor four metrics:
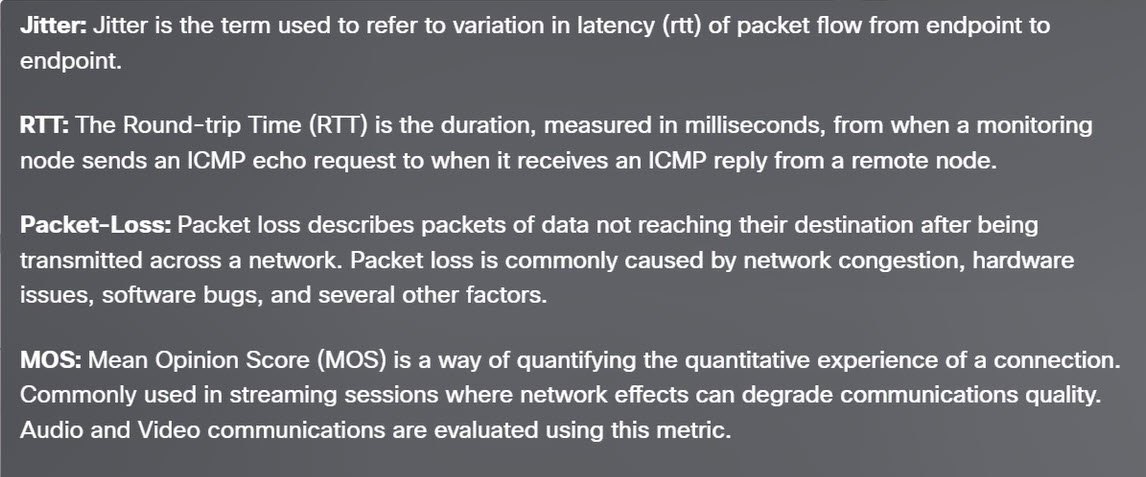
Figure 3. Path Monitoring Metrics
Note
You may also use the legacy options for interface selection:
- Interface Priority – a static configurable priority for each interface. In the ASA interface configuration, interface priority is policy-route cost.
- Order – the order of interfaces in the interface list.
Supported Platforms and Licensing
The FMC and managed device must be running at least 7.2. If the managed device is not running 7.2 or above, the FMC will not expose elements of this feature when editing the managed device. Therefore, it is not possible to accidentally configure this feature on a device running an older version.
The ASA supports this feature, provided it is running 9.18.1 or above. ASDM 7.18.1 and above, and CSM 4.25 and above, include this feature.
This feature requires no feature licensing.
Configuration Details
To configure this feature, navigate to Devices > Device Management and edit the appropriate device requires three steps.
- Create one or more extended ACL. Even if you want to match all traffic, you must specify an any-any extended ACL.
- Configure path-monitoring on all egress interfaces. You do not specify the metric. The firewall calculates all four metrics for each configured egress interface.
- Create and enable a PBR policy. Configuration changes take effect after deployment.
Note
You can instead create the required extended ACL before or during Step 2 by cross-launching to the New Extended Access List Object page. This option is typical of the FMC workflow.
1. Create Extended ACLs
For ASA, create extended ACLs with the access-list command. Example:
access-list PBRDemo extended permit ip any object-group-network-service DemoNSG
For FTD, navigate to Objects > Object Management in the FMC. Select Access List > Extended and click Add Extended Access List. Provide a name and add at least one ACE for each extended ACL.
2. Enable Path Monitoring on All Egress Interfaces
For ASA, add the following line to the interface configuration on each egress interface you wish to monitor:
policy-route path-monitoring {auto | IPv4 or IPv6 address | auto4 | auto6}
For FTD, navigate to Devices > Device Management in the FMC and edit the appropriate device. Select the Interfaces tab. Edit each egress interfaces you wish to monitor. When editing each interface select the Path Monitoring tab and check Enable Path Monitoring.
You must select how to determine the metrics. Metrics are determined using ICMP every 30 seconds to either the next-hop or an explicit IP:
- Auto – send ICMP probes to the IPv4 default gateway of the interface. If the IPv4 gateway does not exist, path monitoring sends the probes to the IPv6 default gateway of the interface.
- Peer IPv4 – send ICMP probes to the specified peer IPv4 address for monitoring. If you select this option, enter the IPv4 address in the Peer IP To Monitor field.
- Peer IPv6 – send ICMP probes to the specified peer IPv6 address for monitoring. If you select this option, enter the IPv6 address in the Peer IP To Monitor field.
- Auto IPv4 – send ICMP probes to the default IPv4 gateway of the interface.
- Auto IPv6 – send ICMP probes to the default IPv6 gateway of the interface.
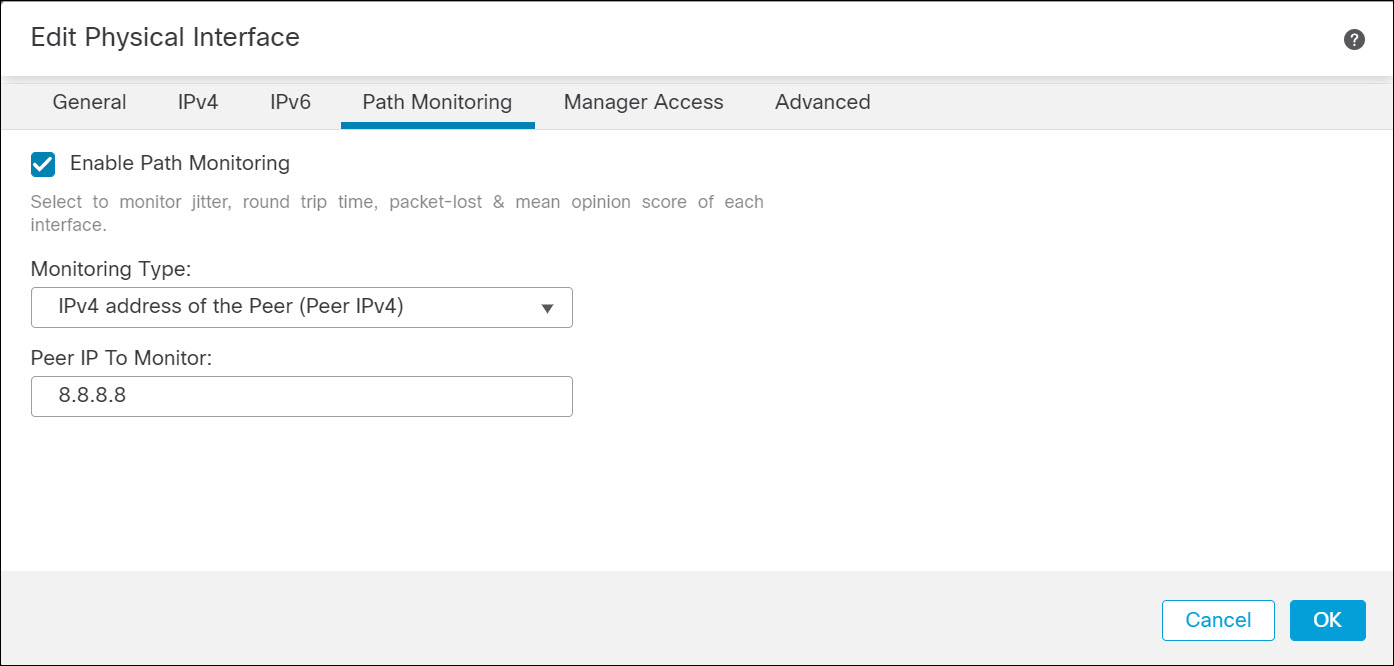
Figure 4. Enable Path Monitoring
3. Create a PBR Policy
For ASA, you first create a route map. There is a new set option:
set adaptive-interface {cost | jitter | lost | mos |rtt}
You configure cost with the following interface mode command:
policy-route cost <1-65535>
The FMC UI refers to cost as interface priority.
You then assign the route-map to the ingress interfaces with the interface command:
policy-route route-map route-map name
For FTD, select the Routing tab and select Policy Based Routing from the left navigation pane. Select one or more ingress interfaces, and then click Add.
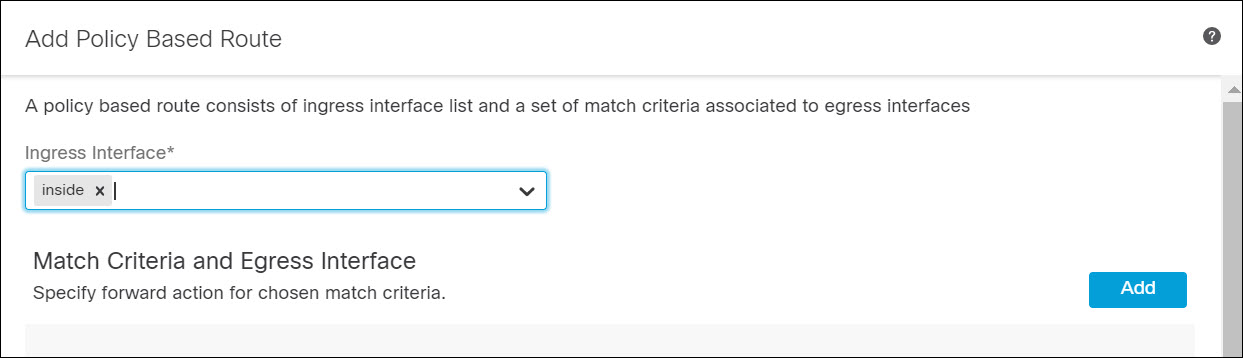
Figure 5. Create PBR Policy
Select the Match ACL. Leave Send To set to the default Egress Interface. Select the desired metric from the Interface Ordering drop-down list. Select one or more egress interfaces. Click Save.
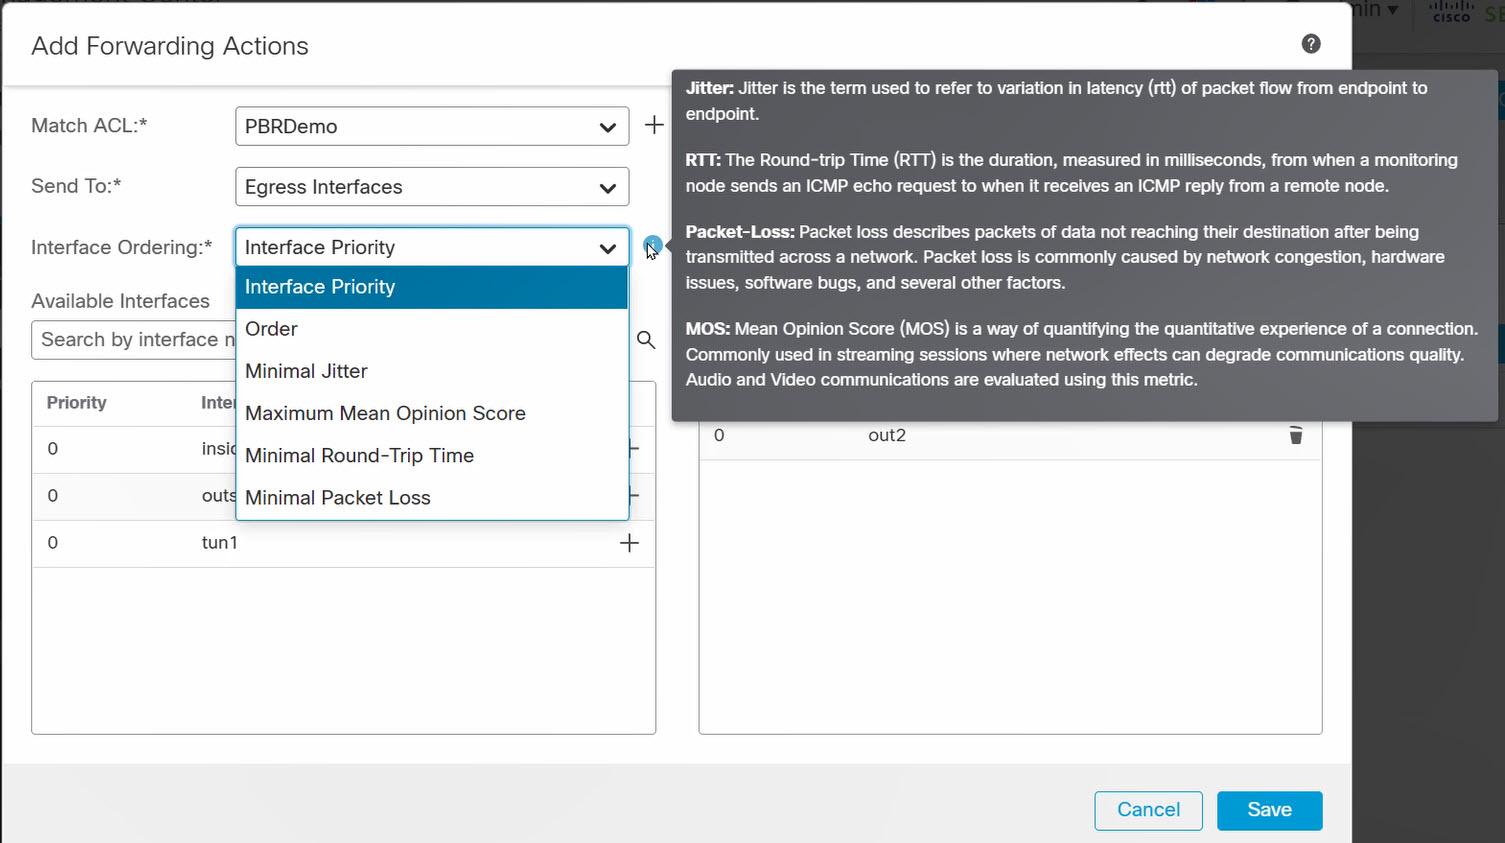
Figure 6. Configure PBR Policy
Limitations
Virtual tunnel interface (VTI) path monitoring cannot use next-hop options (auto, auto4, or auto6). Path monitoring must use explicit IP (peer IPv4 or peer IPv6).
VNI interfaces do not support path monitoring.
FMC REST API
The path monitoring feature does not introduce any new URLs. The feature lead to the modification of the following URL:
api/fmc_config/v1/domain/{domainUUID}/devices/devicerecords/{containerUUID}/routing/policybasedroutes
The forwardingActions attribute has four new values: SET_EGRESS_INTERFACE_BY_MOS, SET_EGRESS_INTERFACE_BY_JITTER, SET_EGRESS_INTERFACE_BY_RTT, and SET_EGRESS_INTERFACE_BY_LOST_PKTS
Verification and Troubleshooting
Show Commands
Use the show access-list command to determine if the hit count of the access-control list.
> show access-list PBRDemo
access-list PBRDemo; 1 elements; name hash: 0x140ee756
access-list PBRDemo line 1 extended permit ip any
object-group-network-service FMC_NSG_30064775131 (hitcnt=0) 0x2e1a3cdc
>
The show route-map command shows information about the path-monitoring, including the current value of the relevant metric on the path-monitoring enabled interfaces.
> show route-map
route-map FMC_GENERATED_PBR_1656543926677, permit, sequence 5
  Match clauses:
    ip address (access-lists): PBRDemo

  Set clauses:
    adaptive-interface jitter outside1 (49) outside2 (35)
>
The show path-monitoring command shows all four metrics for all the path-monitoring enabled interfaces.
> show path-monitoring
Interface: outside1 (TenGigabitEthernet0/0)
Remote peer: 10.100.200.1 (auto)
    Version: 2037
    Remote peer reachable: Yes
    RTT average: 200 microsecond(s)
    Jitter: 49 microsecond(s)
    Packet loss: 0%
    MOS: 4.40
    Last updated: 4 second(s) ago
...
>
Debug Command
Use the debug policy-route command to troubleshoot unexpected behavior. You can use the packet tracer to generate the debug commands.
The logs below show the successful case where PBR selects the route.
pbr: policy based route lookup called for 101.1.1.1/0 to 101.1.1.2/0 proto 1 sub_proto 8 received on interface outside_3, NSGs, nsg_id=none
pbr: First matching rule from ACL(-1)
pbr: route map rtt-test, sequence 10, permit; proceed with policy routing
pbr: policy based routing applied; egress_ifc = outside_2 : next_hop = 20.0.0.4
If PBR is not able to find the adequate route, it falls back to normal route lookup. The log resembles the following.
pbr: policy based route lookup called for 100.1.1.1/0 to 100.1.1.2/0 proto 1 sub_proto 8 received on interface outside_3, NSGs, nsg_id=none
pbr: First matching rule from ACL(-1)
pbr: route map mos-test, sequence 10, permit; proceed with policy routing
pbr: no route to 100.1.1.2 on adaptive-interface outside_2
pbr: no route to 100.1.1.2 on adaptive-interface outside_1
pbr: no route to 100.1.1.2 on adaptive-interface outside_0
pbr: policy based routing could not be applied; proceeding with normal route lookup
If a monitored remote address goes down and path monitoring marks Remote peer reachable as No for that specific address, then the PBR displays this log where it excludes the interface from adaptive-interface list. The interface becomes eligible for adaptive PBR routing once the path monitoring module declares it reachable.
pbr: policy based route lookup called for 100.1.1.1/0 to 101.1.1.2/0 proto 1 sub_proto 8 received on interface outside_3, NSGs, nsg_id=none
pbr: First matching rule from ACL(-1)
pbr: route map rtt-test, sequence 10, permit; proceed with policy routing
pbr: Path Monitoring Ifc Down : adaptive-interface outside_1 Excluded from PBR routing
pbr: policy based routing applied; egress_ifc = outside_2 : next_hop = 40.0.0.4
📚Additional Resource
- This section of the Cisco Secure Firewall Management Center Device Configuration Guide, 7.2 covers PBR configuration using the FMC, including path monitoring: Chapter: Policy Based Routing
- This section of CLI Book 1: Cisco Secure Firewall ASA Series General Operations CLI Configuration Guide, 9.18 covers ASA PBR configuration: Chapter: Policy Based Routing
- This YouTube video demonstrates policy-based routing with path monitoring: Policy Based Routing with Path Monitoring
Updated almost 2 years ago