
Intrusion Policy
Cisco Secure Firewall Snort 2 and Snort 3 Intrusion Policy Guidance
Introduction
This document discusses the key components of Cisco Secure Firewall’s intrusion detection and prevention features and provides best practice guidance for configuration. It covers both Snort 2 and Snort 3 policies.
Policy Overview
The intrusion policy consists of a set of configurations that control Snort’s traffic inspection. This primarily consists of which rules are enabled and whether they are set to Alert or Drop/Block. Snort rules can be used to detect security or policy violations as well as malicious inbound or outbound traffic. In inline deployments, the system can also block malicious traffic. Intrusion policy is implemented for various traffic flows via Allow rules in the Access Control policy.
The Network Analysis Policy is another policy that impacts Snort. If you were to look at an open-source Snort installation, you would not find two policies. Instead, you would find one or more configuration files. These configuration files control all the settings used by Snort. However, in the Secure Firewall, these configurations have been separated into Network Analysis and Intrusion policies.
The Network Analysis Policy controls the more advanced settings such as preprocessors (Snort 2) or Inspectors (Snort 3). These components are critical to the detection/inspection process because they decode and normalize network traffic. The primary purpose is to present the packet/flow data to the Snort rules engine so rule writers don’t have to deal with evasions or various types of data encoding.
The most important thing to remember about the Network Analysis Policy is that it should use the same base policy as your Intrusion policy. Base policies are explained below. Each policy type, Intrusion, and Network Analysis are available with the same four Talos base policies. They are designed to work together, so always select the Network Analysis policy that matches your Intrusion policy.
As mentioned above, the Intrusion policy consists mainly of enabled rules and their action upon matching traffic. We will first create a Network Analysis Policy, which uses the same base policy as the Intrusion policy. After that, we will move on to the Intrusion policy, which is the primary focus of this document.
New in Release 7.3
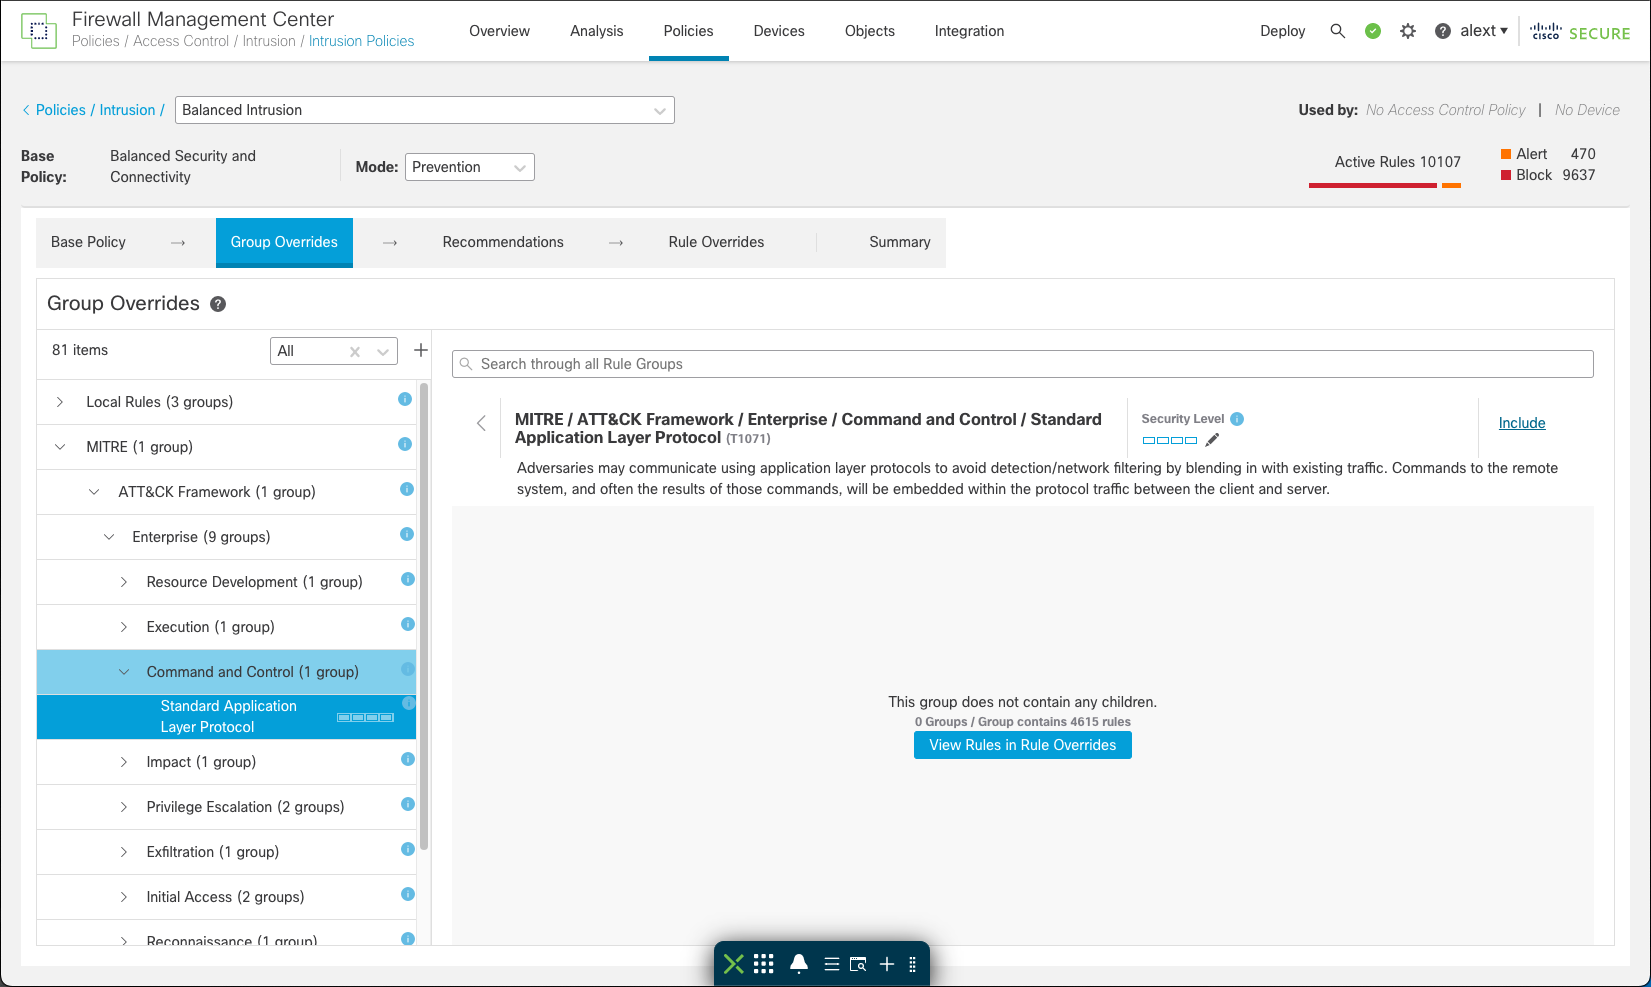
The Secure Firewall Release 7.3 brings new extended group capability to the Snort 3 Intrusion policy. This expands the previous rule group capability and adds hierarchy to the group structure to facilitate more detailed policy configurations and enable admins to create finer grained and targeted rule sets.
The new extended groups organize rules according to the MITRE ATT&CK (Adversary Tactics Techniques and Common Knowledge) framework. This allows users to customize policies according to specific attacker tactics and techniques.
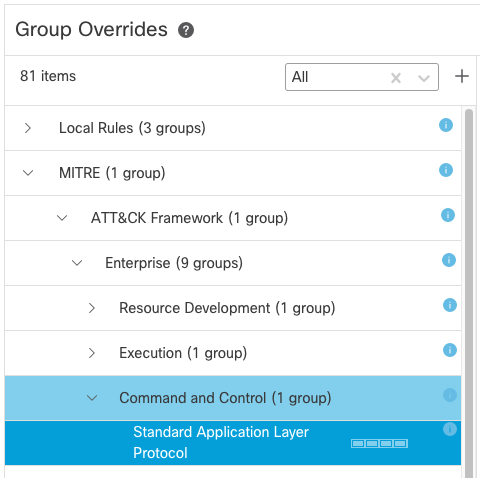
MITRE Categories
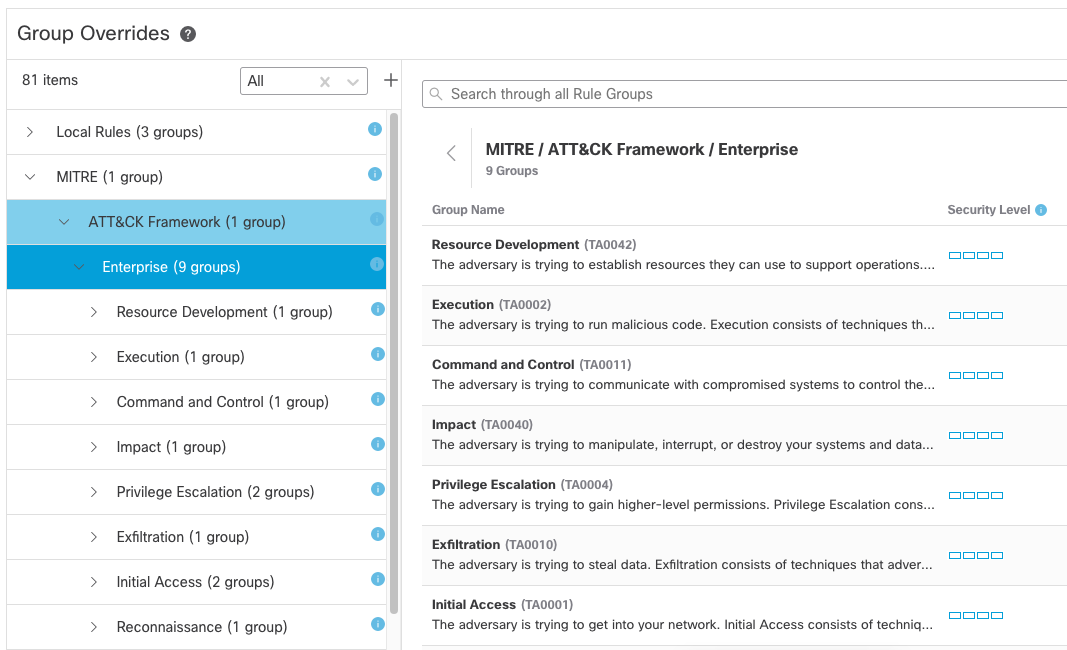
MITRE Tactics
MITRE Techniques
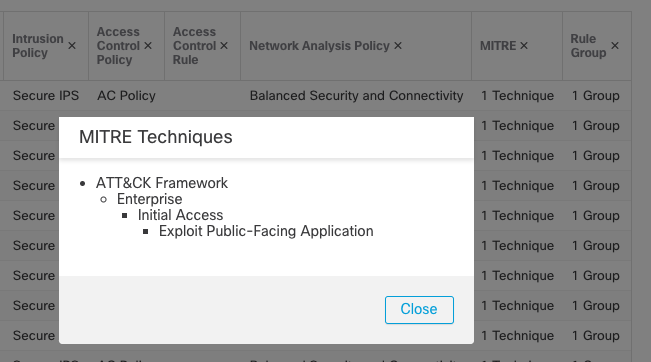
Along with these policy changes, there are two new fields available in an intrusion event - MITRE and Rule Group. These fields contain the MITRE technique that is associated with the rule as well as the rule group.
Intrusion Event Table View
Network Analysis Policy Creation
To create a Network Analysis policy, login to your Firewall Management Center (FMC) and follow the steps below.
Step 1: Navigate to Policies > Intrusion and then click the Network Analysis Policies tab.
Step 2: Click Create Policy. The Create Network Analysis Policy window appears.

Figure 1: Create Network Analysis Policy
Step 3: Enter a unique Name. Optionally, enter a Description.
Step 4: Select an Inspection Mode. For an inline deployment select Prevention. For a passive deployment or if you do not want to allow the policy to drop traffic select Detection.
Step 4: Choose an initial Base Policy. Start with a base policy that reflects the company’s security posture. If you plan to use Balanced Security and Connectivity as the base policy for the intrusion policy, also choose Balanced Security and Connectivity in the Network Analysis policy.
Step 5: Save your policy
This creates both Snort 2 and Snort 3 versions of your policy. When you finish creating your Network Analysis and Intrusion policies you will use the Access Control Policy rules to determine which traffic to inspect with which Intrusion policy.
For now, add your new Network Analysis policy to your existing Access Control policy
Step 6: Navigate to Policies > Access Control. Edit your existing Access Control policy.
Step 7: Click the Advanced tab and click the pencil icon by Network Analysis and Intrusion Policies.

Figure 2: Advanced Tab
There are two important configurations on this page. The first is Intrusion Policy used before Access Control rule is determined. Here, you specify an intrusion policy to inspect traffic while the system is performing application identification. This is important if you plan on using any Application Identification rules in your Access Control policy. Even if you are not planning this now, Cisco recommends selecting an Intrusion policy in case you decide to add Application rules in the future.
The second configuration is to select your custom Network Analysis policy.
Step 8: Select your desired base policy in the Intrusion Policy used before Access Control rule is determined drop down. If in doubt, select Balanced Security and Connectivity.
Step 9: In the Default Network Analysis Policy drop down, select the Network Analysis policy you created above. Click OK and save your Access Control policy changes.
Note that we did not do any Network Analysis Policy customization apart from setting the Base Policy. This ensures the base for the Network Analysis and Intrusion policies is the same is the most important consideration. Advanced users may find a need to customize the Network Analysis policy, however, it is beyond the scope of this document.
Intrusion Policy Creation
The Intrusion policy consists of active Snort rules along with their actions. A rule action triggers when the inspected traffic matches all the keyword parameters in a rule. Snort rules can merely alert on the presence of certain traffic, or they can block or even modify traffic as it passes through the device. The primary considerations for an Intrusion policy are which rules should be enabled and what action should they take?
Generally speaking, the more rules enabled in a policy, the more traffic inspection occurs. That may seem obvious but it’s not as simple as saying more rules equals better security. As with many security devices, Intrusion policy configuration represents a balance of security and connectivity. This balance should drive your decision-making as you configure and tune the Intrusion policy.
The Cisco Secure Firewall provides several methods to make policy configuration easier than attempting to go through the entire rule set one at a time and decide whether each rule should be enabled or not.
Step 1: Navigate to Policies > Intrusion.
Step 2: Click Create Policy. The Create Intrusion Policy window appears.

Figure 3: Create Intrusion Policy
Step 3: Give your policy a Name and optional Description.
Step 4: Select a Base Policy (see description below) and Save your new policy.
Base Policy Selection
The first, and most important decision, is the base policy selection. The Secure Firewall includes several default base policies; each provides a different balance of security and connectivity. These are continuously updated by the Cisco Talos Intelligence Group based on the current worldwide threat landscape.
Select the policy that reflects your organization’s priorities for security and connectivity. Keep in mind that policies with more enabled rules will likely require more tuning after deployment to reduce False Positive alerts.
The base policies are:
-
Connectivity Over Security
A policy for customers who favor connectivity over security with a minimal set (about 600) of enabled Snort rules. -
Balanced Security and Connectivity
The most popular policy represents a balance of security and connectivity that typically enables about 15,000 rules. -
Security Over Connectivity
A policy for customers who what the strongest security and are willing to potentially spend extra time tuning false positive alerts. This policy may increase the load on the firewall and reduce its overall throughput. This policy includes about 19,000 enabled rules. -
Maximum Detection
A policy for lab use and not recommended for production deployment due to the extremely high rule count. Customers are likely to experience low throughput, a high number of false positives and an impact on production traffic. This policy enables over 37,000 rules.
As with the Network Analysis policy, you have now created two Intrusion policies, one for Snort 2 and one for Snort 3. When you deploy to your devices, they will receive the Intrusion and Network Analysis policy specific to the Snort version running. Each device can only run one Snort version.
Upon initial creation or upgrade from a 6.x to a 7.x release, your Snort 2/3 policies will be the same (minus any custom rules which are not automatically migrated to Snort 3). If you decide to run both Snort versions in your environment, it is essential to ensure that you keep the two versions of each policy as close to each other as possible to ensure each policy has equivalent protection.
The two policy versions will be discussed separately below.
Variable Sets
A common component of both Snort versions is variables. Variables have existed since Snort was just a lowly intrusion detection system and sensor interfaces were always in passive promiscuous mode. Because there was no way to filter traffic sent to the Snort process, variables were used to ensure rules only inspected traffic for which they were designed. For example, rules designed to inspect attacks against your web servers should only inspect inbound traffic. This provided benefits like reduced false positives and improved inspection efficiency.
Variables are used in the Snort rule header as criteria for traffic inspection to control aspects such as the source/destination IP and port(s) that the rule inspects. While the Snort 3 header can now use application protocols like HTTP, Snort 3 rules still use variables in the same way as Snort 2 rules. In addition, variables are still important today. This is true even though we use Access Control rules to specify traffic for intrusion inspection rather than always using a promiscuous interface. A Variable Set is simply a collection of variables.
You will find Variable Sets on the FMC under Objects > Object Management > Variable Set. Here you can edit the Default-Set or create your own custom Variable Sets.

Figure 4: Variable Set
While there are several default variables in the default variable set. There are two that stand out, $HOME_NET and $EXTERNAL_NET. These are used in the vast majority of Talos rules, in addition, several of the other variables are based on these. They are defined as follows:
- $HOME_NET – the protected network, your network, the target of threat actors
- $EXTERNAL_NETWORK – location of the threat, the source or destination of threat traffic
These variables are in nearly every rule because rules are typically designed to inspect traffic that is either targeting or egressing hosts in your home network. Thus, when you see a rule header like:
alert tcp $HOME_NET any -\> $EXTERNAL_NET $HTTP_PORTS
You know that this rule is designed to inspect traffic outbound from your network. (Source is $HOME_NET and destination is $EXTERNAL_NET) Rules with headers such as:
alert tcp $EXTERNAL_NET any -\> $HOME_NET any
Are designed to inspect traffic targeting hosts on your home network.
The default value for both variables is “any” which means any IPv4 or IPv6 address. While this ensures complete traffic inspection, it is not as efficient and may result in additional false positive detections. Because of this, you should consider customizing one or both variables.
$HOME_NET
The most important configuration is to ensure that $HOME_NET includes your protected hosts. Since a variable set can be configured in each Access Control Allow rule, the $HOME_NET can differ for different rules even if the Intrusion policy is the same. However, to reduce complexity, most customers use a single Variable Set for all rules on a device, and many use a single Variable Set across their entire deployment.
To do this, many customers simply include the system object group IPv4-Private-All-RFC1918 in their $HOME_NET variable. This is appropriate assuming you do not use any public address space in your networks. For a firewall protecting a DMZ, you might also include any public address space assigned to your DMZ hosts.
$HOME_NET is specific to the firewall device. It’s the home/protected network from that device’s perspective. Because of this, $HOME_NET may be different across your different devices if they are protecting different address ranges. However, it is easy to get carried away here and too specific in your variable definition. Including the entire RFC1918 range in all your internal devices is a common and accepted practice.
Including more addresses than are in your home network does not negatively impact detection efficacy. For example, if you only have 192.168.0.0/16 in your internal network but use the IPv4-Private-All-RFC1918 group as your $HOME_NET you will not negatively impact performance or efficiency. However, it protects in cases when another group within your organization decides to use additional private IP address ranges such as 10.0.0.0/8. If this happens, existing devices will automatically treat these ranges as protected networks.
$EXTERNAL_NET
When it comes to defining $EXTERNAL_NET there are two options. 1) Leave it to the default of “any”, 2) exclude $HOME_NET.
The first option of leaving it to the default is the least likely to result in a False Negative (missed) detection. It means all networks will be considered external. While this sounds like a concern, it really means “any network which could be a source or destination of an attack on my home network.” This includes the home network itself. By leaving this to “any,” you can detect attacks originating from your home network and targeting your home network – internal attacks. The downside of this setting is that you will likely have more false positives.
The second option of excluding the home network is valid as well. It is mainly used when the firewall device is at the edge of the network and only has visibility to inbound/outbound traffic. These devices have no visibility to traffic within the home network; therefore, they cannot protect against internal attacks. Because of this, there is no need to include the home network in the $EXTERNAL_NET variable.
If you have too many false positives with the first option, you may want to use the second option, even for an internal firewall device. This works because Talos rules designed to detect internal (lateral) attacks usually have “any” in the rule header for source and destination networks. This means that even if you exclude your home network from $EXTERNAL_NET, these rules still work, avoiding those dreaded false negatives.
You might want to start with $EXTERNAL_NET left at the default “any” for maximum visibility. If you are getting too many false positives on your internal devices, consider modifying the $EXTERNAL_NET variable to exclude $HOME_NET.
Recommendations
The Recommendations feature automatically tunes the Snort rule set based on host data collected through passive discovery. How does this work? First, the Management Center builds a database of hosts on your network including IP address, hostname, operating system, services, users and client applications. Second, based on this information, the system maps vulnerabilities to each discovered host. The Recommendations feature uses this host database to determine which Snort rules apply to your environment.
The Recommendations feature enables additional rules or tunes the current rule set by disabling rules for vulnerabilities that are not present in your network. If you use this feature, there are a couple of important considerations to remember.
-
You must have accurate host data.
Because of the passive nature of Network Discovery, your firewall devices must be positioned as close as possible (logically) to your protected hosts to allow them to “see” more network traffic to and from these hosts. In this way, you will get the most accurate and complete picture of the applications, services and vulnerabilities present on your network. If your firewall deployment consists only of edge devices, they probably do not have exposure to enough internal host traffic to provide accurate host data. Therefore, using a dedicated firewall closer to the internal hosts specifically for discovery or updating the host database with updates from a vulnerability management solution using the host input API is recommended. -
You should update Recommendations periodically.
If you do decide to use the Recommendations feature, you should keep it updated. Recommendations are based on dynamic data such as Snort rules, vulnerabilities and host attributes. As each of these changes, your Recommendations should keep pace by updating your Recommendations periodically. You can create a scheduled task to update recommendations automatically.
Configure Cisco Recommendations (Snort 2 policy)
To configure Cisco Recommendations for a Snort 2 policy, follow the
steps below:
Step 1: On the FMC, navigate to Policies > Intrusion. Click on the Snort 2 Version link for the policy you want to edit.
Step 2: Click Cisco Recommendations on the left under Policy Information
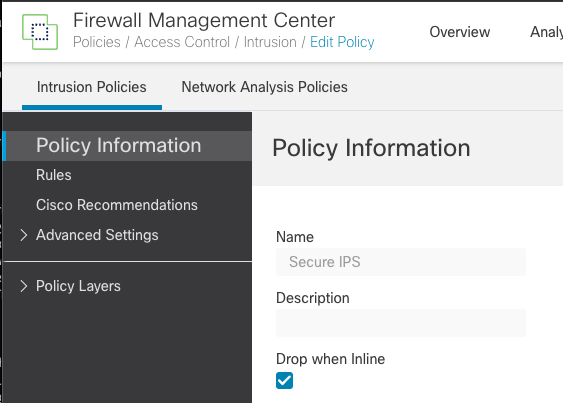
Figure 5: Cisco Recommendations
Step 3: Expand Advanced Settings
This expands the Cisco Recommended Rules Configuration options
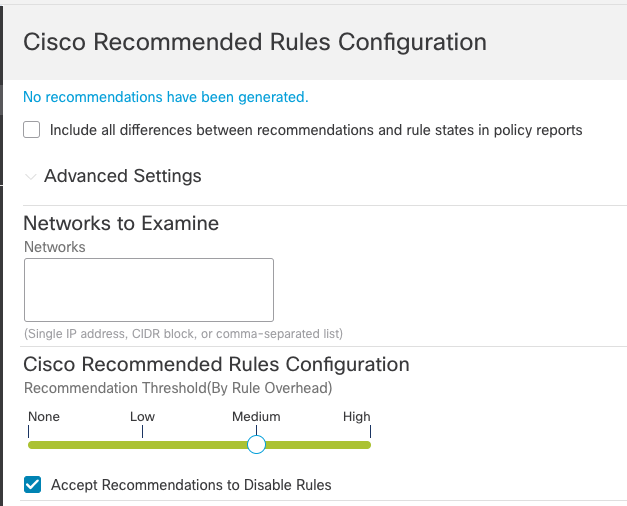
Figure 6: Cisco Recommended Rules Configuration
Leave Networks to Examine blank. This means Recommendations consider all the hosts in your network map. If your policy will be deployed to device(s) located in a non-standard network segment you can limit recommendations to hosts in these networks by entering subnet ranges here. However, most often considering all hosts is the best choice.
The Recommendation Threshold slider allows you to select the rule set on which to base Recommendations. The slider settings correspond with Talos base policies (rule sets).
- None – No Rules Active
- Low – Connectivity Over Security
- Medium – Balanced Security and Connectivity
- High – Security Over Connectivity
The slider defaults to Medium in the screenshot above because the base policy is based on Balanced Security and Connectivity, which means that Recommendations only consider rules active in this Talos policy. Because the current Intrusion policy already uses this as the base rule set, running Recommendations in this configuration will not enable any additional Snort rules.
Note
Even if you use the corresponding Recommendation Threshold as your current base policy (for example, Medium and Balanced Security and Connectivity) you may see additional rules enabled. These are preprocessor rules (GID 100+) that are not enabled by default in Talos policies.
If you wanted Recommendations to enable additional rules, move the slider to High, in this case, to consider active rules in the Security Over Connectivity policy to enable additional rules from this policy based on vulnerabilities found in your host database.
The Accept Recommendations to Disable Rules option allows Recommendations to disable rules written for vulnerabilities not found on hosts in your network. Only enable this option if you need to trim your rule set due to a high number of alerts or to improve inspection performance.
Step 4: Once you have configured your Recommendations settings, you can use the Generate Recommendations or Generate and Use Recommendations buttons. The former generates Recommendations but does not add the Recommendations layer to the policy. Use this if you only want to see what rules would be impacted. Use the Generate and Use Recommendations button to put the rule state changes into effect to generate and then add a Recommendations layer to the policy just above the base layer.
Step 5: Once your Recommendations are generated, review the added/removed rules to ensure your policy still provides the desired level of protection. You will see a summary of the rule state changes on the Recommendations screen. Click the View links on the right to see which rules are now set to generate, drop and generate, or disabled.
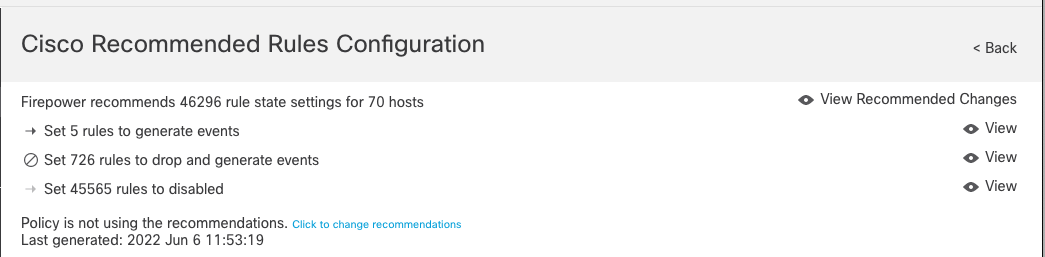
Figure 7: Cisco Recommended Rules
Note
When using Snort 2, additional rules enabled by Recommendations will always be set to Generate events (alert). If the policy is designed for an inline/routed/bridged device, consider increasing your base policy rule set if you want additional drop rules enabled.
Step 6: When you are finished reviewing, click on Policy Information in the upper left corner and then click the Commit Changes button to save the policy.
Step 7: To effectively use Recommendations they should be updated periodically. To do so, navigate to System (gear icon) > Tools > Scheduling. Click Add Task and add a Job Type of Cisco Recommended Rules as shown below.

Figure 8: Sample Recommended Rules Task
Schedule this job to run every one or two weeks as desired to update your Recommendations with any changes to hosts on your network, new Snort rules, or new vulnerability updates.
Configure Recommendations (Snort 3 policy)
Warning
Recommendations is an FMC in release 7.1 or higher supported feature for Snort 3, and it is not available in release 7.0.
To configure Recommendations for a Snort 3 policy, follow the steps below:
Step 1: On the FMC, navigate to Policies > Intrusion. Click on the Snort 3 Version link for the policy you want to edit.
Step 2: Click the Not in use button next to the Recommendations layer near the top of the policy.
You will see the Secure Firewall Rule Recommendations dialog.
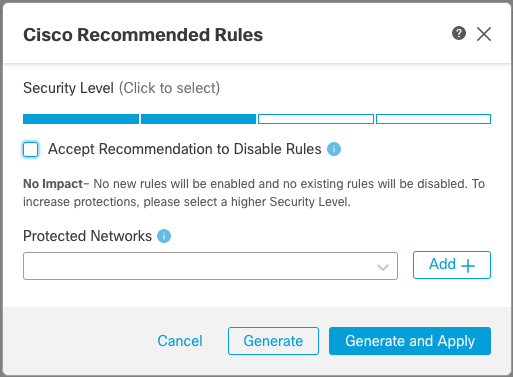
Figure 9: Snort 3 Rule Recommendations
Recommendations operate largely the same in Snort 3 as in Snort 2. There are a few minor differences noted below.
Instead of using Overhead, Snort 3 Recommendations use Security Level. Security levels correspond with Talos policies as follows:
- Level 1 – Connectivity Over Security
- Level 2 – Balanced Security and Connectivity
- Level 3 – Security Over Connectivity
- Level 4 – Maximum Detection
Note
The two differences from Snort 2 Recommendations. First, the No Rules Active option has been removed as it would result in zero recommendations, and second, the Maximum Detection rule set is available as Security Level 4.
The other options for Recommendations work the same as in Snort 2. For a complete explanation, refer to the Snort 2 Recommendations section above. As with Snort 2, leaving the Protected Networks blank includes all IPv4 and IPv6 addresses.
You have the option to Generate or Generate and Apply from this dialog. Selecting either will generate recommendations, while the Generate and Apply will add the Recommendations layer to the policy.
Note the message below the Security Level which informs you if your selection will impact the rule set. In the example above, the policy uses the Balanced Security and Connectivity rule set. Because of this, selecting Security Level 2 will not result in any additional rules being enabled.
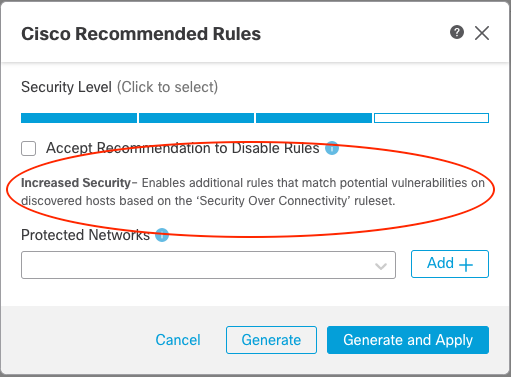
Figure 10: Security Level Message
By selecting the Security Over Connectivity policy (Security Level 3) you can now see the message indicates this will result in increased security (more enabled rules). Of course, this is dependent on the hosts in your network map and their associated vulnerabilities.
Another difference between Snort 2 and Snort 3 is that additional rules enabled by Recommendations will inherit their rule state from the Talos policy rather than always being set to Generate (alert), as is the case with the Snort 2 policy. Because most enabled Talos rules are set to Block, this means your security posture in an inline/routed/bridged environment will be stronger with Snort 3 Recommendations.
You may see other messages depending on how you configure your Recommendations parameters.
| Security Level | Disable Recommendations? | Message |
|---|---|---|
| Same as current base policy | Checked | Higher Efficiency |
| Unchecked | No Impact | |
| Higher than current base policy | Checked | Focused Security |
| Unchecked | Increased Security | |
| Lower than current base policy | Checked | Lower Security |
| Unchecked | No Impact |
Table 1: Recommendations Messages
By experimenting with the various settings, you can arrive at a Recommendations configuration that fits your security and efficiency goals.
Step 3: Once you have decided which settings to apply, click the Generate or Generate and Apply buttons.
Once you click one of the buttons, you will see a change in the Recommendations layer at the top of the policy - the "Not in use" button is now gone. Selecting this layer will now display the recommended rule states.
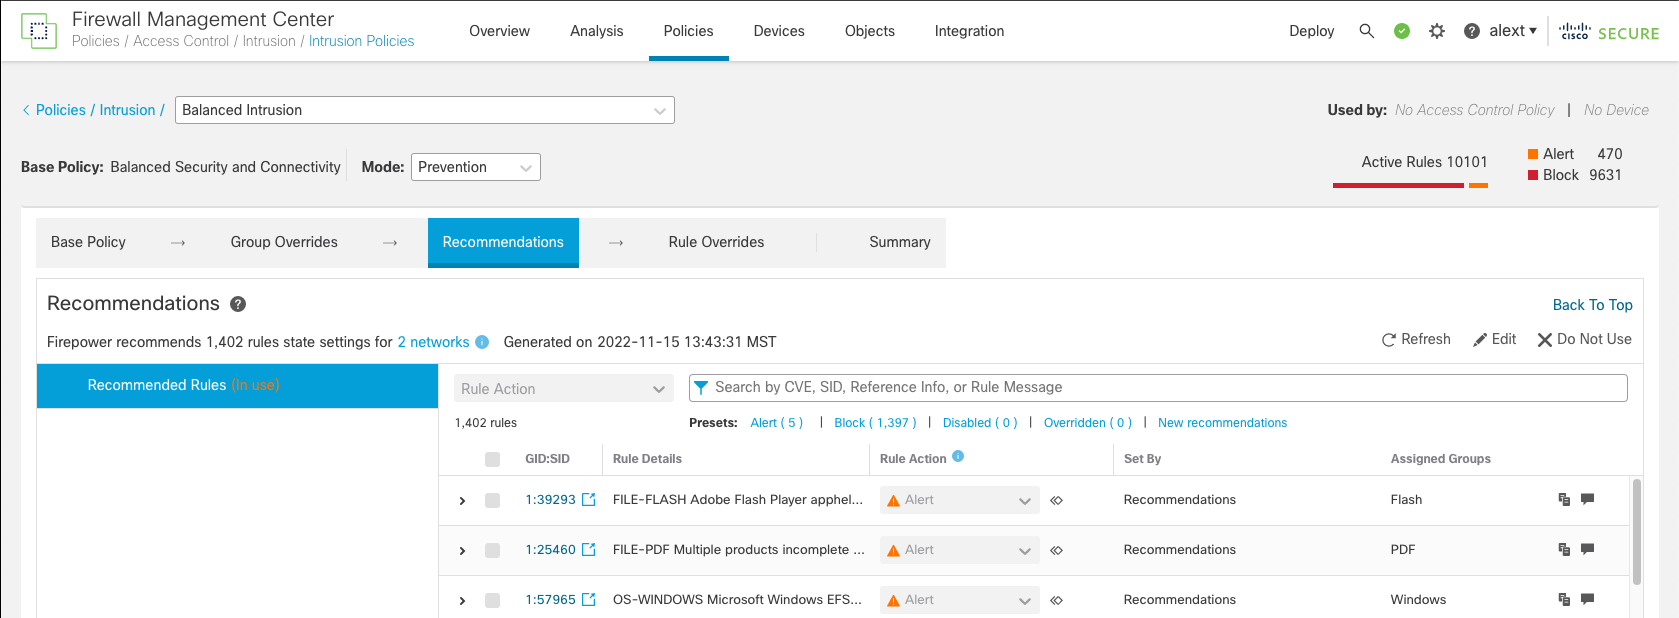
Figure 11: Recommended Rules Layer
This layer specifies (In use) or (Not in use) depending on whether you selected Generate or Generate and Apply. Selecting this layer displays some additional controls in the upper right.

Figure 12: Additional Group Controls
These controls provide the following functions:
- Accept – activate the Recommendations layer
- Refresh – update Recommendations using existing settings
- Edit – display the Recommendations dialog to adjust settings
- Discard – remove the Recommendations layer
Note
The Accept button will only be available if you select Generate. This activates the layer, enabling the Recommendations changes. Otherwise, if you select Generate and Apply the layer is already active.
Step 4: Once you select the Recommended Rules layer, review the rule states and determine if they are appropriate for your policy. You can then use the Accept, Refresh, Edit or Discard buttons as desired.
Step 5: To effectively use Recommendations they should be updated periodically. To do so, navigate to System (gear icon) > Tools > Scheduling. Click Add Task and add a Job Type of Cisco Recommended Rules as shown below.
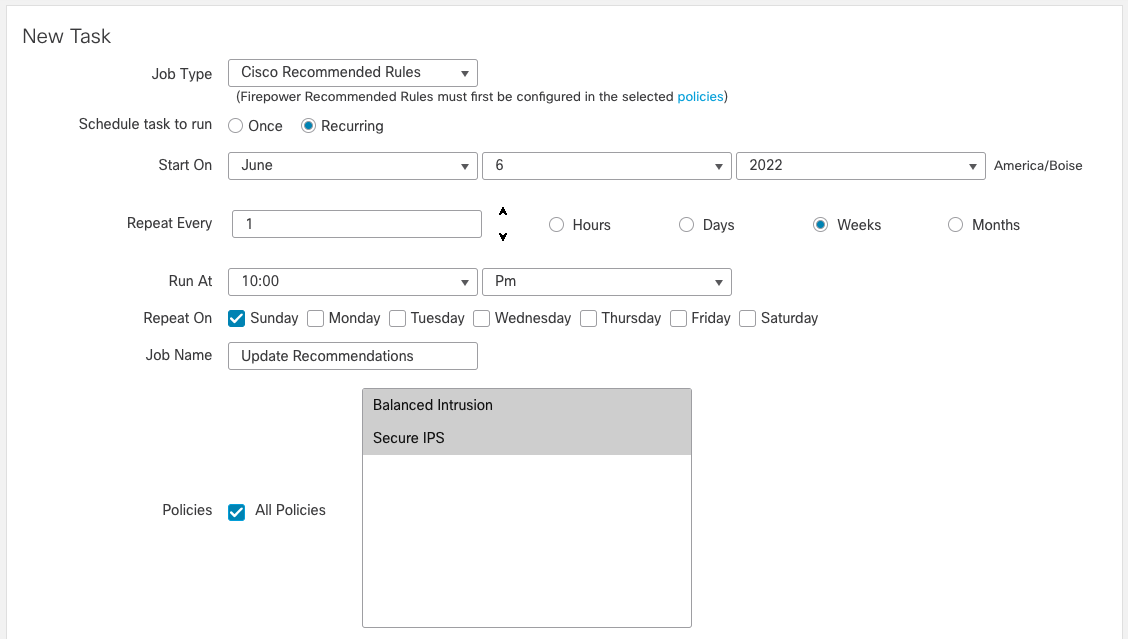
Figure 13: Cisco Recommended Rules Task
Schedule this job to run every one or two weeks as desired to update your Recommendations with any changes to hosts on your network, new Snort rules or new vulnerability updates.
Snort 3 Intrusion Policy Specific Features
Rule Group Overrides
One of the new Snort 3 features is rule group security levels. Snort 3 rules can be grouped according to several criteria. As mentioned above, the 7.3 release brings a new extended rule grouping feature and adds MITRE groups. There are also Rule Categories such as Browser, Server, Malware, Operating System, etc. Within these sections are the groups. For example, in the Browser section, you’ll find groups like Webkit, Firefox, Chrome, and Internet Explorer.
Each of these groups has an associated Security Level (1-4). These security levels correspond with the base policies mentioned above.
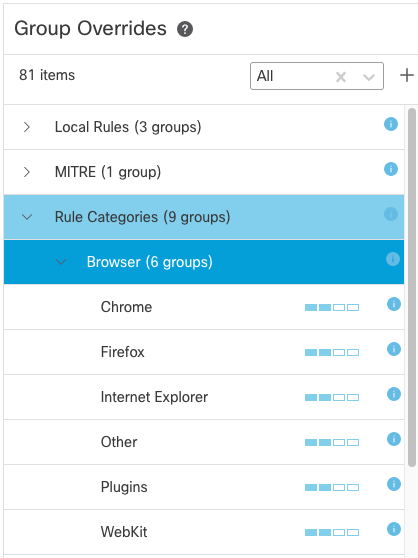
Figure 14: Rule Group Security Levels
Each Rule Group is set to the same security level as the base on initial policy creation. For example, if you selected the Balanced Security and Connectivity policy as your base, all your rule groups would be set to Security Level 2.
Rule Groups not only provide a way to view similar rules but the also allow you to customize the security level for a group. For example, if your organization does not use Internet Explorer, you could reduce the security level for that rule group. This means fewer Internet Explorer specific rules will be enabled. If you use the Balanced policy as your base, you could reduce the Internet Explorer Rule Group Security Level from two to one. You could also remove the group from your policy altogether if desired. At the same time, if your organization standardizes on the Chrome browser you may want to increase the security level for that rule group.
Modifying the Security Level for a group allows you to customize your protection but still take advantage of regular Talos rule updates. Another alternative (and the only one with Snort 2) would be manually overriding individual rule states in a group. The disadvantage is that once a rule state is overridden, it is permanent. By modifying the Security Level instead, you can customize your security and still leverage the research and expertise of Talos to determine which specific rules are enabled for a given Security Level.
Individual Rule Overrides
After using one or more of the methods above to build your policy, you may still need to enable or disable individual rules. This is often the case if you have a specific rule that is frequently generating false positive alerts and you determine that the rule does not apply to your environment. You can edit your policy and override a specific rule state in these cases to enable a rule (set it to block, drop, alert, etc.) or disable it as needed. Keep in mind that this overridden rule state is permanent in your policy. If you manually enable rules, you should revisit them regularly to ensure they are still needed based on the current threats in your network.
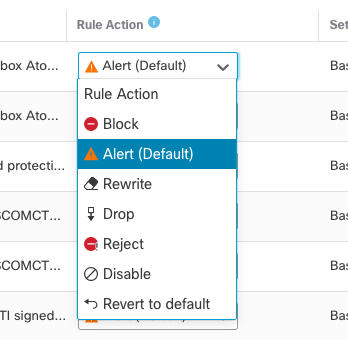
Figure 15: Rule Action
Note
The image above shows the rule actions for release 7.3 and above.
Summary
This document provided a short overview of Intrusion policy configuration and best practices for the Cisco Secure Firewall Threat Defense. It should help intrusion/firewall administrators quickly configure basic Intrusion policies for their deployments.
📚 Additional Resources
For more information about the Cisco Secure Firewall, please see the following resources:
Updated over 3 years ago