
Port Scan Detection
Cisco Secure Firewall Port Scan Detection
Introduction
Port scanning is a common attacker reconaissance activity. Malicious actors use port scanning to discover open ports on a firewall as well as port sweeps to discover listening ports/services on a host. Previous releases of Secure Firewall include port scan detection in the Intrusion policy as part of the Snort 2 and Snort 3 detection engines. However, this detection is lacking because Snort distributes connections across threads or CPU cores. The system uses a hash of several connection attributes, including source/destination IP and port, to assign a connection to a CPU or thread. Due to the nature of a port scan, the hashing algorithm causes this activity to be split across several CPUs on the device. This means no single CPU/thread has access to all the port scan activity from a given scanner, thus reducing the effectiveness of this feature.
To address this, release 7.2 moves the port scan detection capability from Snort to Lina. By moving this capability, the device can now detect port scans more effectively as the port scan detection process has visibility of all the scan traffic for a given scanner. This visibility also holds true for distributed port scans where there are multiple scanners and single or multiple targets, and port sweeps.
As part of this move, the port scan detection configuration parameters are now in the Access Control policy. This new port scan detection capability is only available on 7.2 or higher devices using the Snort 3 detection engine.
Configuration
Port scan detection is configured in the Advanced tab of the Access Control policy. This means the configuration applies to all traffic on a given device. To enable port scan detection, follow the steps below on your FMC.
Step 1: Navigate to Policies > Access Control, click the pencil icon by the poilcy you wish to edit.
Step 2: Click the Advanced tab, then click the pencil next to Threat Detection.
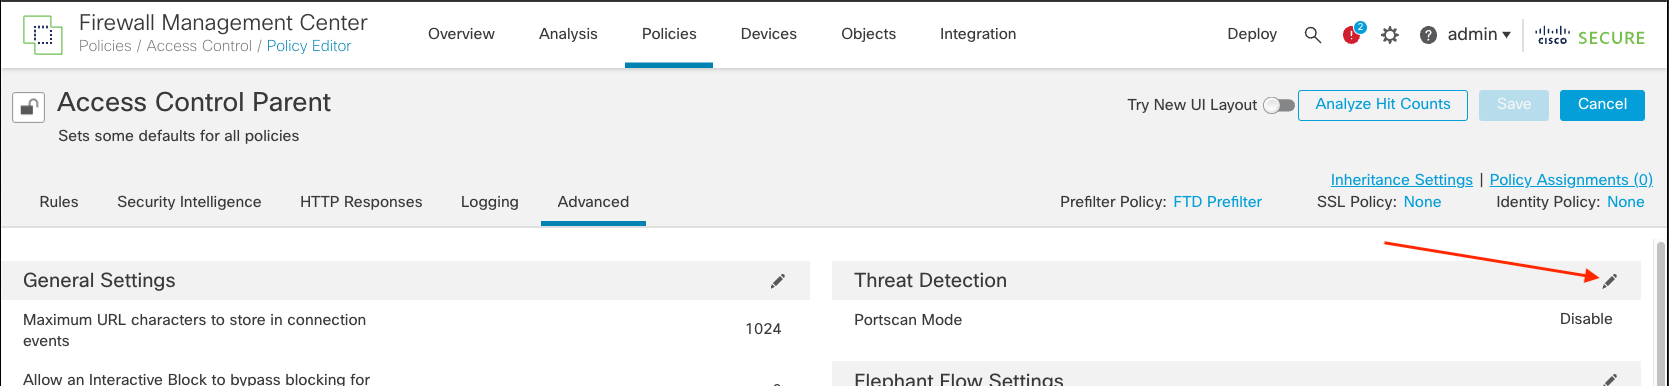
Advanced Tab Threat Detection
This will bring up the Threat Detection dialog where you can enable port scan detection.

Threat Detection Dialog
Notice that port scan detection is disabled by default.
Step 3: Select the Portscan Mode.
Your choices include:
- Disable - the default setting, no port scan detection is performed.
- Detection - detect port scan activity but do not block scanners.
- Prevention - detect and block port scanners.
Select either Detection or Prevention to enable the rest of the dialog.
️ Note
If you pick Prevention you will see the warning dialog below. This is included to ensure users realize the ramifications of selecting Prevention mode. You should be aware that if a scan is detected, the scanner IP could be blocked at the firewall device. If the detection is a false positive it can result in legitimate traffic being blocked. Because of this, Cisco strongly advises that you start out in Detection mode and tune your scan detection settings prior to enabling Prevention.
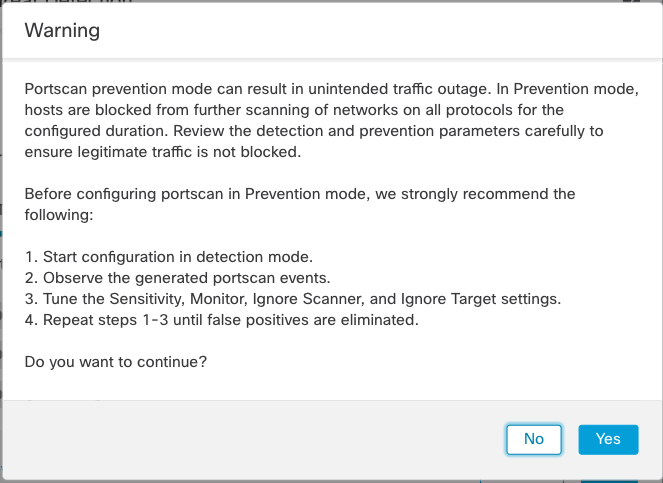
Prevention Warning Dialog
Once you make a selection you will see the dialog below. In this case we selected Prevention so there are three tabs in the dialog, Traffic Selection, Configuration, and Prevention.
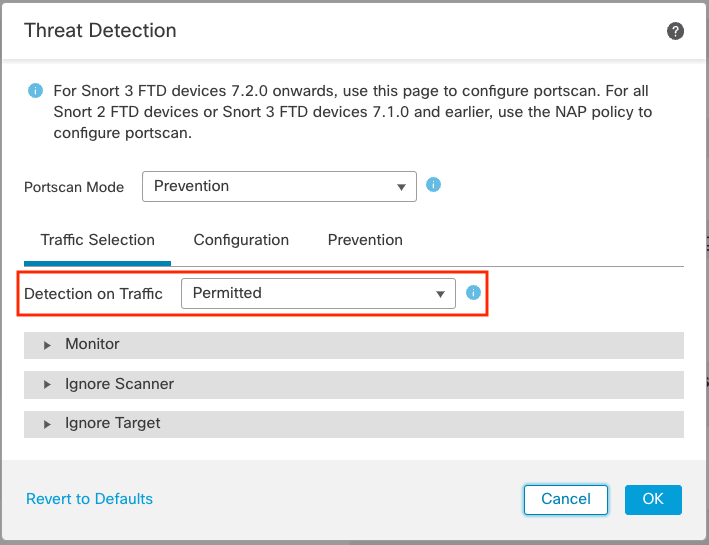
Detection on Traffic Selection
Step 4: Click theDetection on Traffic drop-down to select the type of traffic to detect scans.
Here you have a drop-down to select the type of traffic in which to look for scans. Your options are:
- Permitted - this is any traffic that is allowed to pass through the device.
- Denied - only traffic which is blocked by the firewall device. This means a port scan is attempted but the traffic is blocked by the firewall rule set.
- All - evaulate all traffic for scan activity regardless of whether it's permitted or denied.
Step 5: Populate the Monitor, Ignore Scanner, and Ignore Target lists. These are Network objects and groups which define:
- The networks/hosts monitored for scans.
- The networks/hosts to disable (ignore) scanner detection.
- The networks/hosts to ignore as scan targets.
By default the system looks for port scans on all networks without ignoring any scanners or targets. When you are tuning your settings, pay particular attention to the Ignore Scanner settings as this is where you will add objects to ensure you don't block legitimate traffic in Prevention mode.
Step 6: To adjust your scan sensitivity, click the Configuration tab.
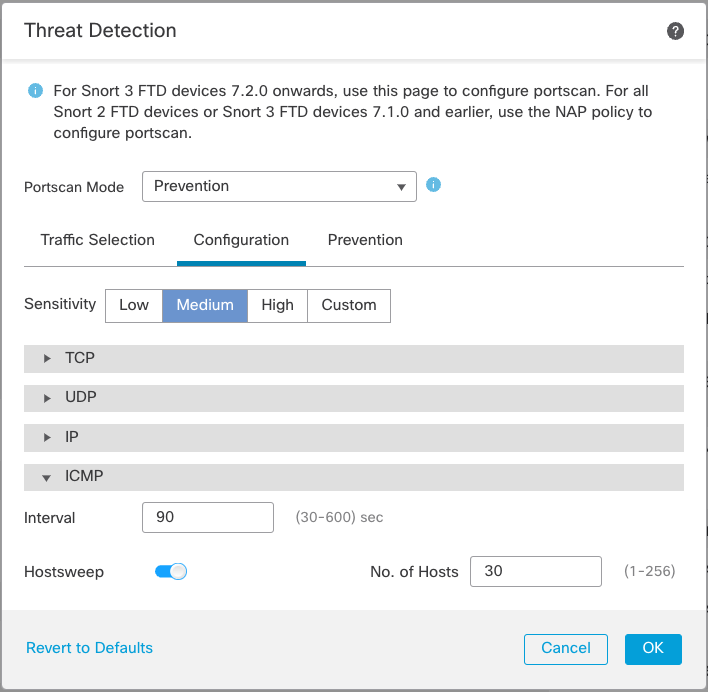
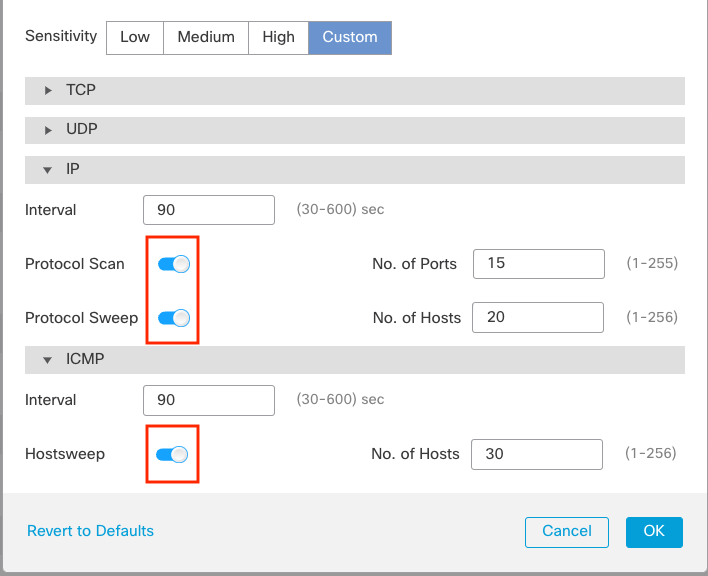
Scan Type and Sensitivity Configuration
There are three built-in sensitivity levels on this tab. Once you modify any of the pre-configured settings the Sensitivity mode changes to Custom. Most users will find that a custom setting is required for a proper sensitivity balance and to avoid false positive detections. However, you may need to start with one of the built-in sensitivity levels and monitor your Intrusion events for a while before you know what settings to adjust.
You can adjust settings like interval, number of ports, number of hosts, etc.. You can also enable or disable scan types by clicking the swiches by the scan name as shown below.
Scan Type Selection
Step 7: If you selected Prevention for the Portscan Mode then you can adjust the host shun timer by clicking the Prevention tab.
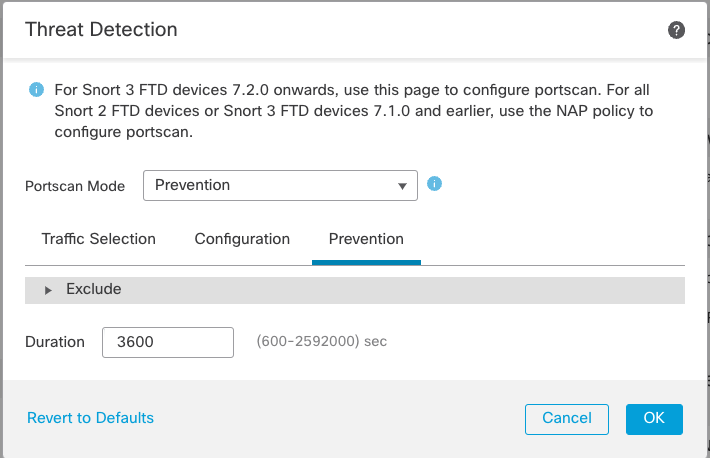
Scan Prevention Setting
The default time to shun traffic to/from a scanner is 3,600 seconds (60 minutes). This time can be adjusted between 600 and 2,592,000 seconds.
Step 8: Click OK to save your port scan settings, then Save your Access Control policy and Deploy changes to your device(s).
Port Scan Events
Once you have configured and enabled port scan detection, when scan activity is detected, the FMC registers intrusion events. These events look identical to events generated in previous releases by the port scan preprocessor/inspector.
A sample of possible event types include:
- TCP portscan (122:1)
- TCP portsweep(122:3)
- TCP distributed portscan (122:4)
- UDP portsweep (122:19)
- ICMP sweep (122:25)
Note
While there are Snort 3 intrusion rules for the portscan inspector (GID:122) these rules do NOT have to be enabled for these intrusion events to trigger. Changing the rule action in the Snort 3 Intrusion policy for GID:122 rules has no impact on alerting or port scan detection behavior.
The list above is not exhaustive, an example of port scan events is shown below.
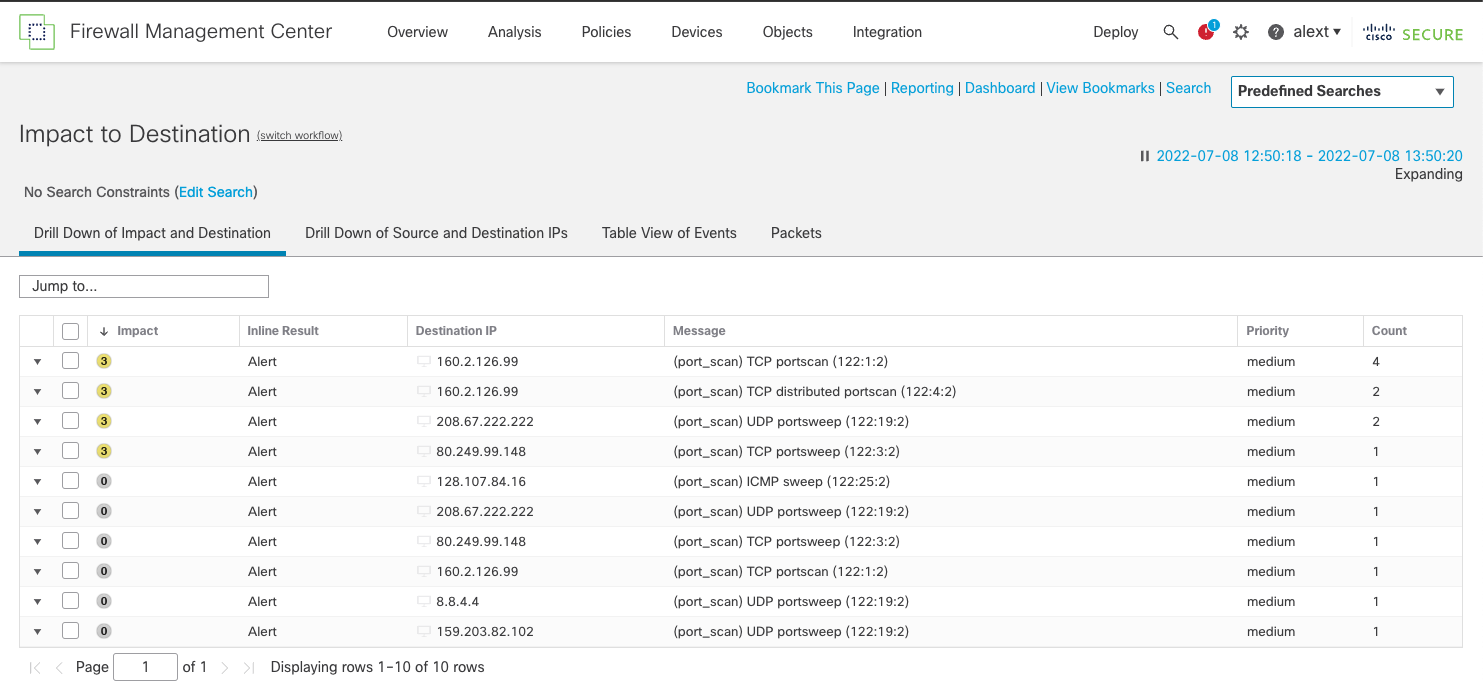
Port Scan Events
Drilling into the packet view of a portscan event will show the typical information for any intrusion event including the Packet Information.
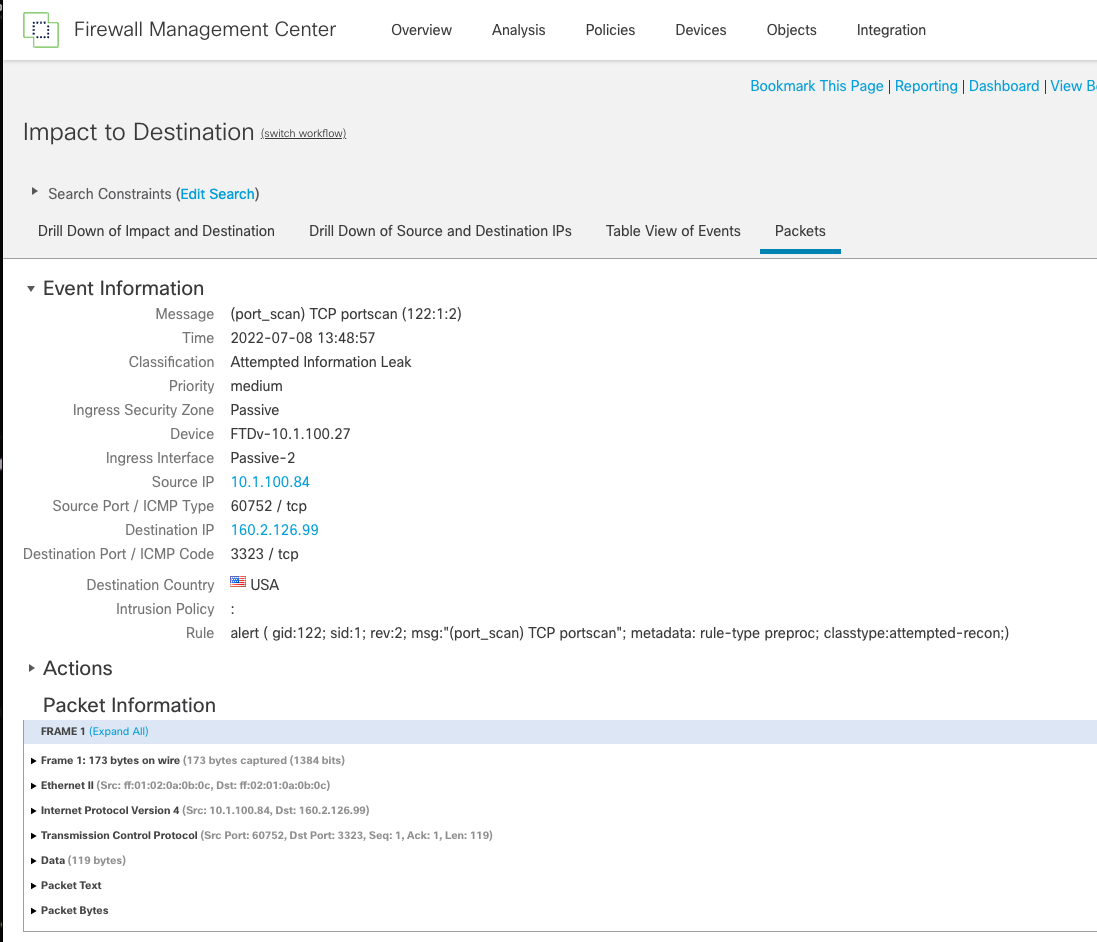
Port Scan Event Packet View
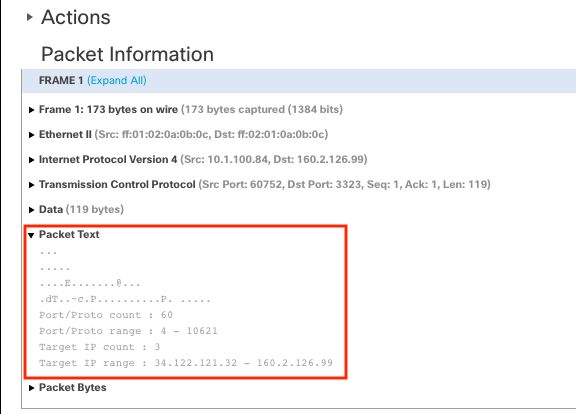
However, while this looks like a normal intrusion event, it is not. If you consider that a port scan is a behavior and not a single packet or flow event then you may wonder how we can show a packet capture of a single packet when a port scan is detected? This is not an actual packet, this is called a pseudo packet. When the port scan event is triggered, the system generates a simulated packet containing fields such as the source/destination IP, port, protocol, etc. This packet also contains data.
Expanding the Packet Text field shows the human readable contents of the packet data.
Pseudo Packet Text
The source IP in the intrusion packet will be the scanner. The Packet Text gives information about the scan event including the port and target IP count and range. This information may vary somewhat for different types of port scan events.
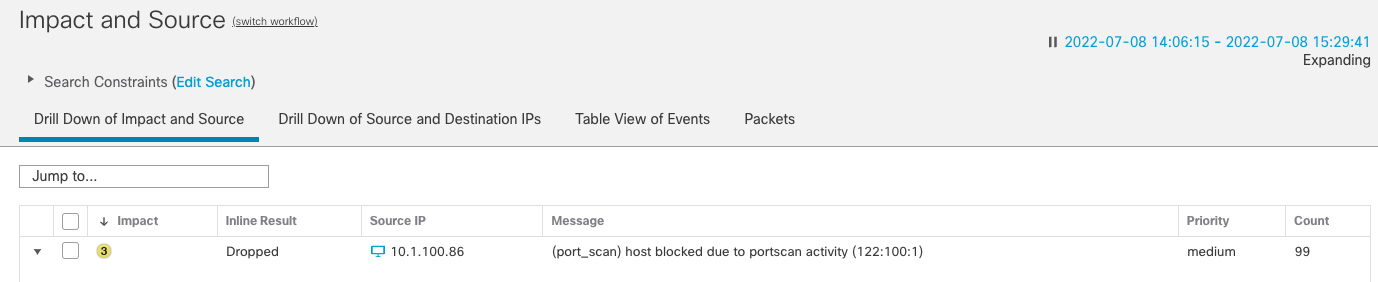
If you have enabled Protection in the port scan configuration then you may see intrusion events indicating a host has been blocked. These events will be similar to the ones shown below.
Port Scan Block Events
When you see events like the above you know the host(s) identified as the scanner (source IP) are being actively shunned on the device according to the shun time setting in the Access Control policy.
Troubleshooting
In the event that you accidentally block a critical host and need to manually remove the shun from the device there are device level CLI commands to do so. Note that this is a somewhat complex process that requires access to the device CLI.
To check the shuns on a given FTD device.
Step 1: Connect to the device CLI via SSH or the serial console. Login as admin.
Step 2: Run the command show threat-detection portscan

This shows the attacker and target list as well as if there are currently any shunned hosts.
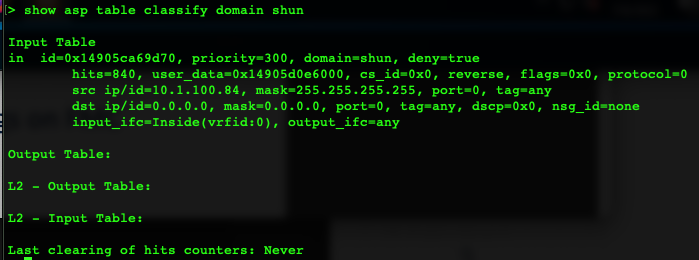
You can also use the command show asp table classify domain shun for more information.
Step 3: To remove the shun for a given host, use the command clear threat-detection portscan attacker <IP_address> 255.255.255.255

After this you can re-run the show threat-detection portscan command to confirm the IP is no longer shunned.
️ Note
Removing a shun via the CLI is a temporary solution. As long as the portscan settings remain unchanged the IP can be blocked again. Manually removing an IP shun should be followed up as quickly as possible with deployment of a modified port scan configuration to prevent recurrance of the unwanted shun.
Summary
The port scan detection feature in release 7.2 brings new capabilities to customers allowing reliable detection as well as blocking of port scan activity.
📚Additional Resources
Updated almost 4 years ago