Scenario 12 - Access Control Policy Settings
Access Control Policy is the central clearing house for nearly all traffic processed by the Secure Firewall. It is what determines whether traffic is allowed, blocked, trusted or inspected. In this scenario we will configure the Access Control policy threat inspection and other settings.
Lab Tasks
These are the tasks in this scenario. If you are familiar with the Secure Firewall you may do these on your own, or for step-by-step instructions see below.
- Task 1 - Edit the Global Parent policy, add Decryption policy, configure logging, enforce specific inheritance settings.
- Task 2 - Enable Security Intelligence to block all Talos threat feeds for IP, URL and DNS
- Task 3 - Configure Global Parent policy recommended Advanced Settings
- Task 4 - Configure NGFW1 policy Advanced Settings
Task 1 - Edit Global Parent Policy
- From the FMC2 UI navigate to Policies -> Access Control
We have our Global Parent and NGFW1 policies previously created. We will start by configuring the Global Parent settings.
Click the pencil icon to edit the Global Parent policy.
At the top of the policy click on Decryption and select our Decrypt Outbound policy.
Check Early application detection and URL categorization
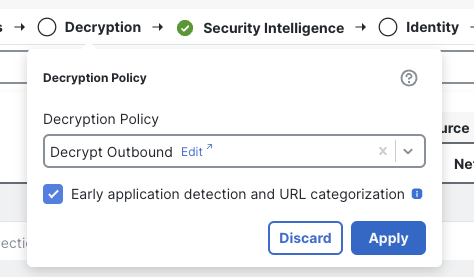
Enable Decryption Policy
Click Apply
- Click More then Logging
This page allows using a specific syslog alert or using the settings in the Platforms Settings policy. We will configure the system to send syslog alerts from the device using the Platform Settings we configured earlier.
Check the box marked Use the syslog settings configured in the FTD Platform Settings policy deployed on device
Check the two boxes below to enable syslog messages for IPS and File and Malware events.
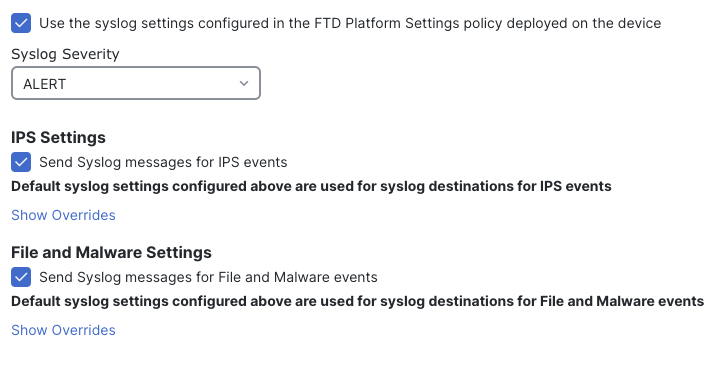
Logging Settings
The More drop-down above has now changed to Logging, click it and select Inheritance Settings
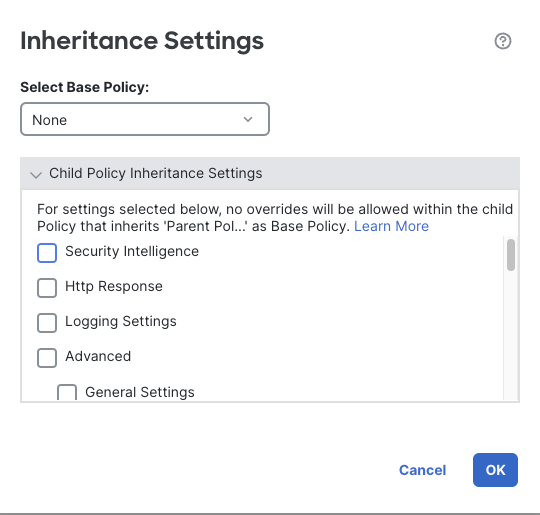
Inheritance Settings
This dialog behaves differently for base and child policies. For base policies like this one it determines what settings will be enforced with no overrides allowed for child policies. If this was a child policy it would allow selection of the base policy.
Since this is a base policy, check the following boxes to ensure all child policies inherit the selected settings.
- Security Intelligence
- Logging Settings
- TLS Server Identity Discovery
- Network Analysis and Intrusion Policies
- Files and Malware Settings
- Encrypted Visibility Engine
Click OK
Task 2 - Enable Security Intelligence
- Click on Security Intelligence
Security Intelligence consists of three types of protection.
- IP
- URL
- DNS
We will configure blocking for all three SI types above for all of the Talos feed categories.
On the left, under Networks scroll down and select all of entries between Attackers and Tor_exit_node. The easiest way to do this is click on Attackers and then scroll to the bottom, hold Shift and click Tor_exit_node.
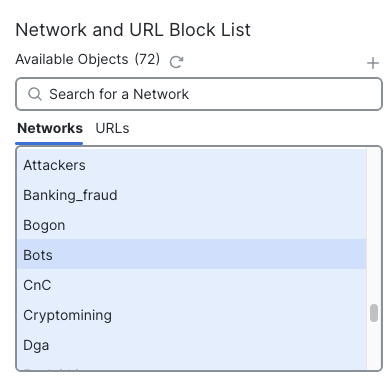
Selecting All Network SI Categories
Ensure Any is selected under Available Zones
Click Add to Block List 24 items should now be added to the Block List

SI IP Block List
Click the page icon next to Networks
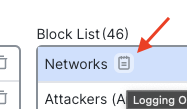
Notice that Block List connection attempts are logged to the FMC automatically.
Check the Syslog Server box to log these events to the syslog server in addition to the FMC.
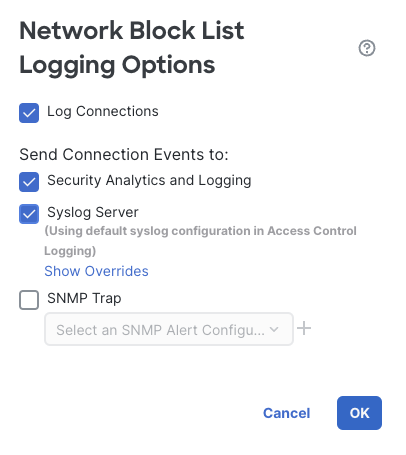
Block List Logging
Click OK
On the left side of the page, click the URLs tab under Available Objects
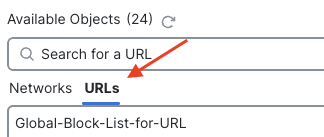
SI URL List
In the same manner as above, scroll down and select all entries between URL Attackers and URL Tor_exit_node
Click Add to Block List
You will find the URLs under the Block List on the right below the IP categories.
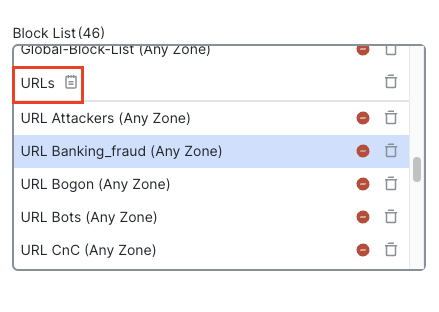
URLs Block List
As with the IP list above, click on the page icon against URLs and enable logging to the syslog server.
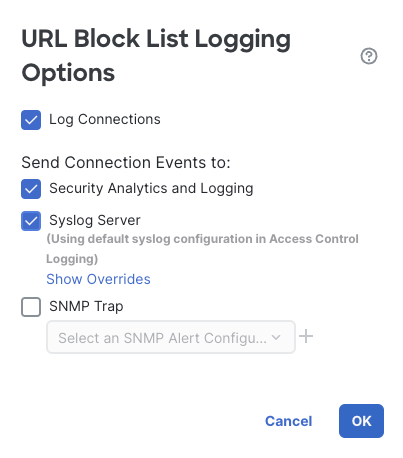
URL Logging Options
Click OK
The last type of Security Intelligence is for DNS queries. This has its own policy. In the upper left corner under DNS Protection click the pencil icon to edit the Default DNS Policy. This will open the policy in a new browser tab.
DNS Security Intelligence offers more options than just blocking DNS lookups. We can Alert, return a Domain Not Found response or even return a Sinkhole response. For our device we will configure a Domain Not Found response for all of the Talos categories.
Click the + Add DNS Rule link to add a rule.
Name the rule Block Bad DNS
For Action select Domain Not Found
Click the DNS tab, select all but the two Global entries i.e., from DNS Attackers to DNS Tor-exit-node and click Add to Rule
Click Add to add the rule.

Default DNS Policy
Click Save to save the DNS policy.
Close the browser tab and return to the Access Control policy.
Click the page icon next to DNS Policy and configure logging to syslog as with the other two SI types above.
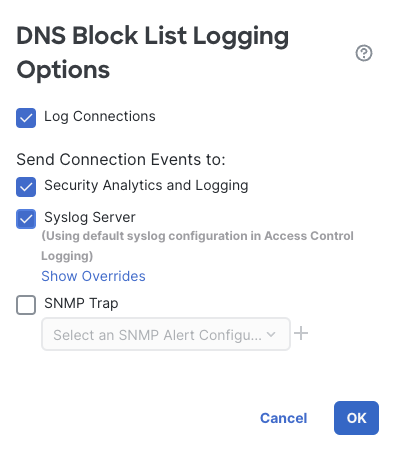
DNS Logging Options
Click OK
Click the Save button to save your Access Control policy. This will ensure we don't lose our changes since we will continue editing the policy.
You can see why it's easier to configure Security Intelligence in a base policy rather than to repeat these steps for each new Access Control policy. Also, any future changes to Security Intelligence only need to be changed here to affect all child policies.
Task 3 - Configure Advanced Settings
- Click More then Advanced Settings
Earlier, we selected four areas in Advanced Settings that would not allow overrides from the base policy. We will now configure these so they can be inherited by the child policy.
- TLS Server Identity Discovery
- Network Analysis and Intrusion Policies
- Files and Malware Settings
- Encrypted Visibility Engine
Locate the TLS Server Identity Discovery feature on the left side of the page. Note that this is already Enabled. This is because we checked this option when we configured the Decryption policy earlier.
Further down on the left you will see the Network Analysis and Intrusion Policies settings.
Click the pencil icon to edit these settings.
Click the drop-down titled Intrusion Policy used before Access Control rule is determined
Under --User Created Policies-- select Balanced Intrusion
This setting is important if your device will be inspecting outbound traffic and you have ANY application identification rules in the policy. It means traffic that passes through the firewall while the application is being identified will still be inspected by Snort rules.
Under Intrusion Policy Variable Set
Select dCloud-Snort-Variables
Under Default Network Analysis Policy
Select dCloud Balanced NAP
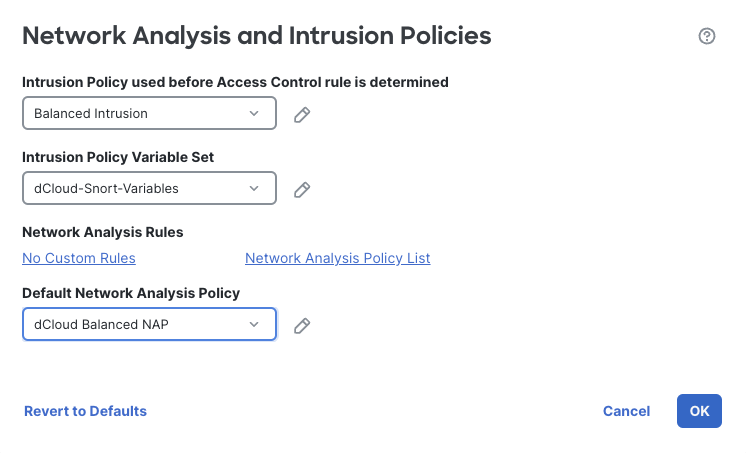
Network Analysis and Intrusion Settings
Click OK to save the changes.
Click OK to acknowledge the Warning regarding Access Control rules, we will configure these soon.
Further down on the left you will find File and Malware Settings
Click the pencil to edit this section.
These settings control the various options for the Malware & File Policy. We will adjust them to increase the size of files evaluated. Note that while this will result in higher efficacy there could be a performance impact depending on the device and the number of files inspected.
Under Maximum file size for advanced file inspection and storage
Change the default of 1048576 to 10485760 by adding another zero to the end.
Under Maximum file size for dynamic analysis testing
Change the default of 1048576 to 10485760 by adding another zero to the end.
For more information on what these numbers mean and the ranges allowed, click the ? icon in the upper right corner of this dialog.
Your settings should look like the figure below.
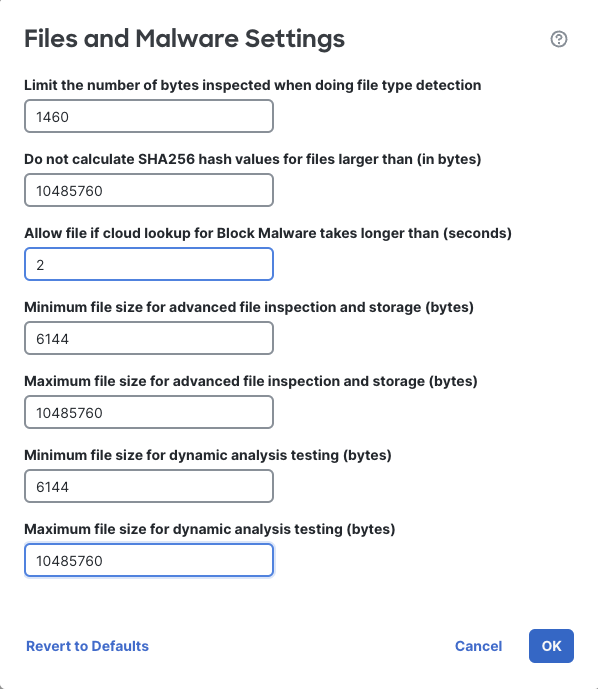
FIle and Malware Settings
Click OK to save these settings
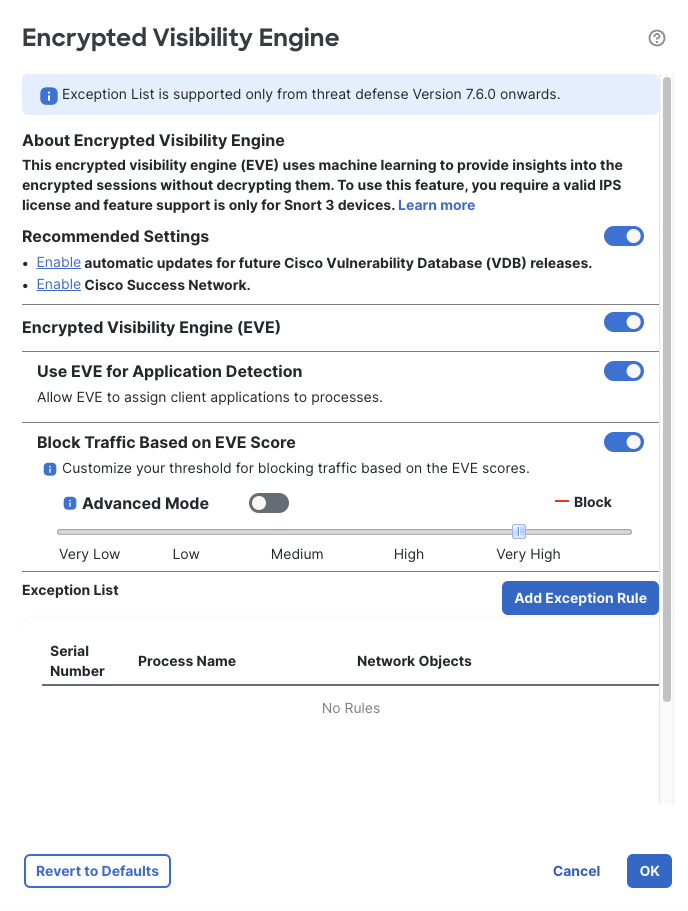
On the right side of your screen, locate the section named Encrypted Visibility Engine
Click the pencil icon to edit these settings.
Enable this feature by clicking the switch next to Encrypted Visibility Engine (EVE)
Enable EVE blocking by clicking the switch next to Block Traffic Based on EVE Score
The slider allows tuning the value which will cause a connection to be blocked based on the Encrypted Visibility Engine threat score. Clicking on Advanced Mode will allow a more granular selection if desired.
For now, leave the slider at the Very High option.
Note
For an actual production deployment, click the links under Recommended Settings and:
- Create a daily scheduled task to download the latest VDB update
- Create a weekly scheduled task to install the latest VDB update (during a weekly maintenance window)
- Enable the Cisco Success Network and Support Diagnostics
Click OK to save the settings.
Click the Save button to save your Access Control policy.
Task 4 - Configure Advanced Settings in NGFW1 Policy
-
While we can configure rules in the Global Parent policy, any rules added here would apply to all child policies as well. At this stage of our policy creation, we will only create rules in the NGFW1 policy. However, if we have a need for rules that apply across all devices we can add them to the Global Parent policy later if desired.
Click Return to Access Control Policy Management to return to the policy list.

Return to policy list
Click on the pencil icon to edit the NGFW1 policy.
Notice that in this policy we have a Decryption policy specified. This is inherited from the Global Parent policy.
Click More -> Logging
Note that these settings are all locked by the Global Parent policy.
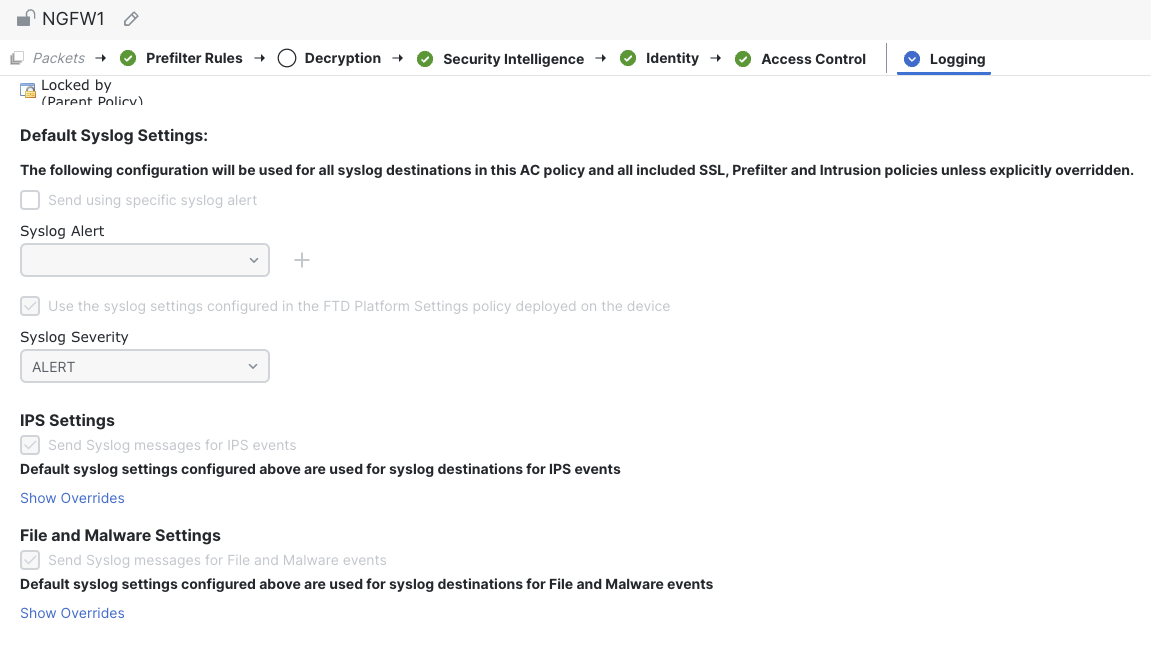
Logging Settings
Click Logging -> Advanced Settings
Scroll down and note the areas that are locked due to our inheritance settings in the Global Parent. The other settings have been inherited from the Global Parent as well however these can be overridden in this policy if desired.

Advanced Settings Inheritance
For this policy, we will enable port scan detection on the NGFW1 device.
On the right, click the switch icon next to Threat Detection this will allow us to configure this feature locally rather than inherit it from the Global Parent.
Click the pencil icon to edit the settings.
This section configures the Portscan detection feature.
Click the Portscan Mode drop-down and select Detection
Note there are Traffic Selection and Configuration tabs. These configure what traffic to evaluate for portscan activity, the types of traffic and sensitivity.
We will start with the default detection settings and tune later as needed.
Note
Ensure you use Detection mode to tune your portscan detection before changing the Portscan Mode to Prevention. Take some time to eliminate false positive portscan detections. Blocking a host using portscan Prevention mode can have serious negative consequences.
Click OK to save changes.
Click Save to save the NGFW1 policy
Tell us how we are doing
We are doing our best to ensure the scenarios in this lab guides are useful, clear and work as expected.
Please share your thoughts to help us improve or fix any problems you may run into..
Click here to provide your feedback or report an issue with this guide
Updated about 1 year ago
To move on to Access Control rules, click the link below.

