Scenario 7 - Device Interfaces
Now that our FTD device is registered we need to setup the interfaces and basic traffic routing.
Lab Tasks
These are the tasks in this scenario. If you are familiar with the Secure Firewall you may do these on your own, or for step-by-step instructions see below.
- Task 1 - Configure the interfaces as follows on NGFW1
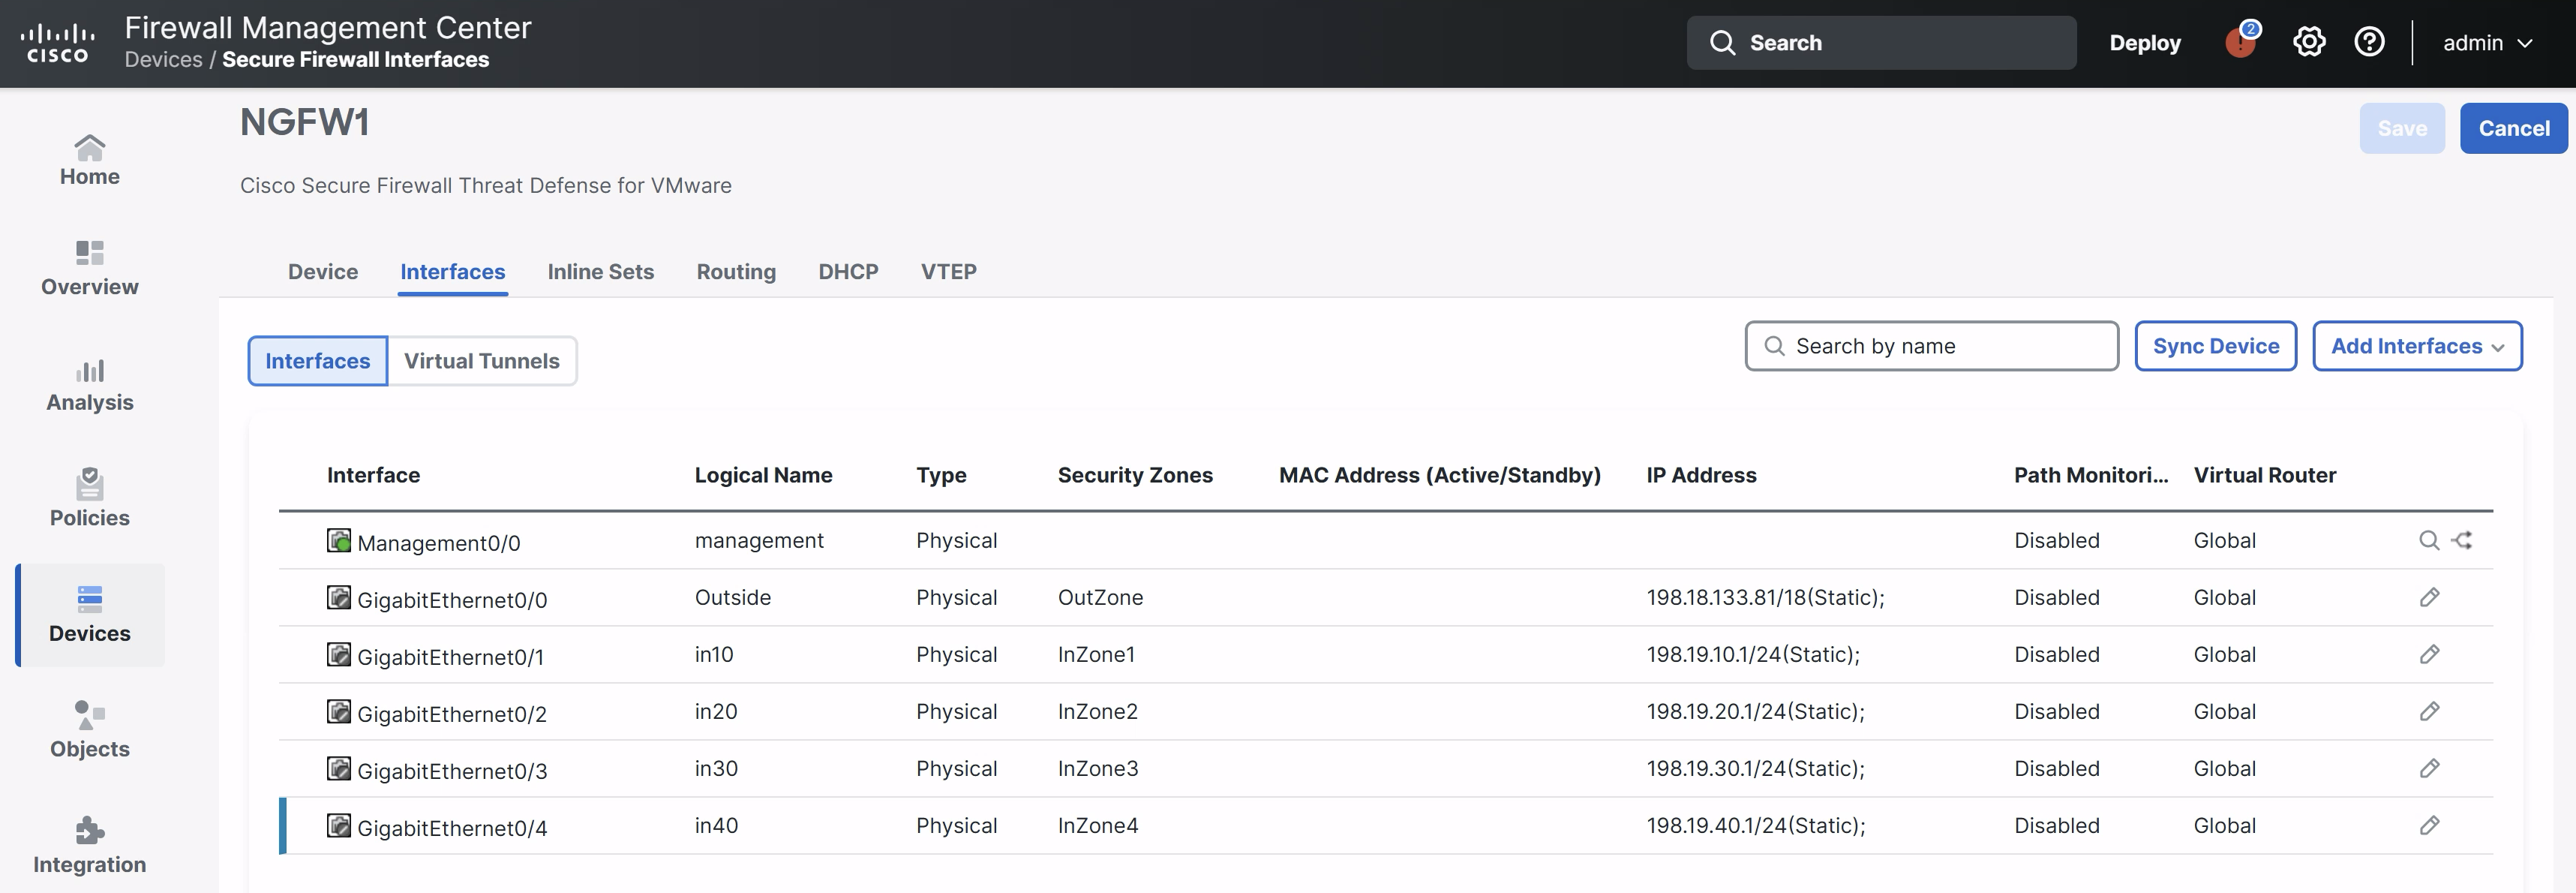
Interface Name Zone IP Address GigabitEthernet0/0 Outside OutZone 198.18.133.81/18 GigabitEthernet0/1 in10 InZone1 198.19.10.1/24 GigabitEthernet0/2 in20 InZone2 198.19.20.1/24 GigabitEthernet0/3 in30 InZone3 198.19.30.1/24 GigabitEthernet0/4 in40 InZone4 198.19.40.1/24
- Task 2 - Add a static default route for the Outside interface through the previously configured DMZ-Gateway network object
- Task 3 - Create a NAT policy named NGFW1 and create a single Dynamic Auto NAT rule to allow the Corp-LAN to access the Internet through the Outside interface.
- Task 4 - Add a rule to the NGFW1 Access Control policy allowing all of the InZone Security Zones to initiate connections outbound through the OutZone. Deploy policy and test the rule from the NGFW1 workstation.
Task 1 - Configure Interfaces
-
From the FMC2 management UI navigate to Devices > Device Management.
-
Click the pencil icon to the right of the NGFW1 device.
-
The Interfaces tab will be selected as the default page.
-
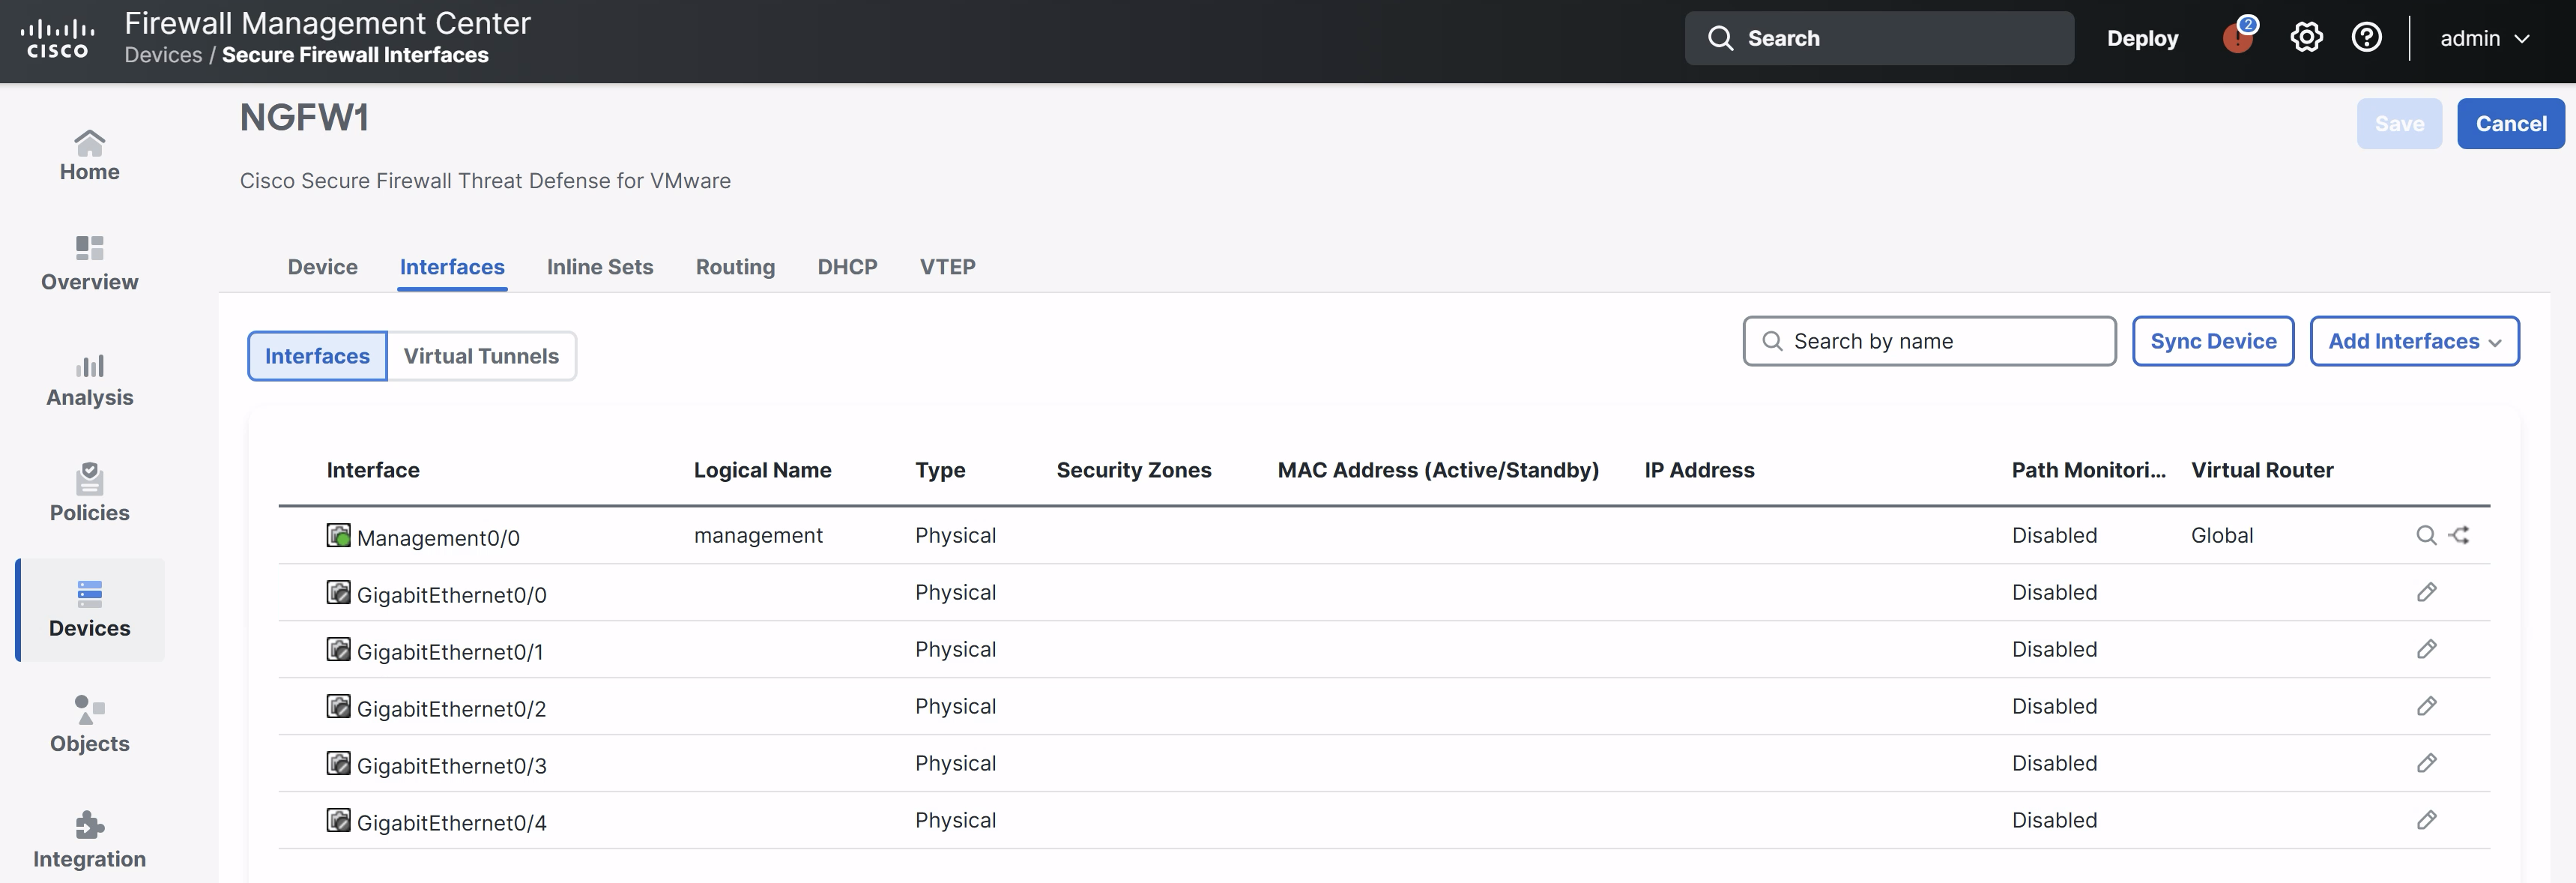
Your interfaces should not have any configuration as shown below:
-
-
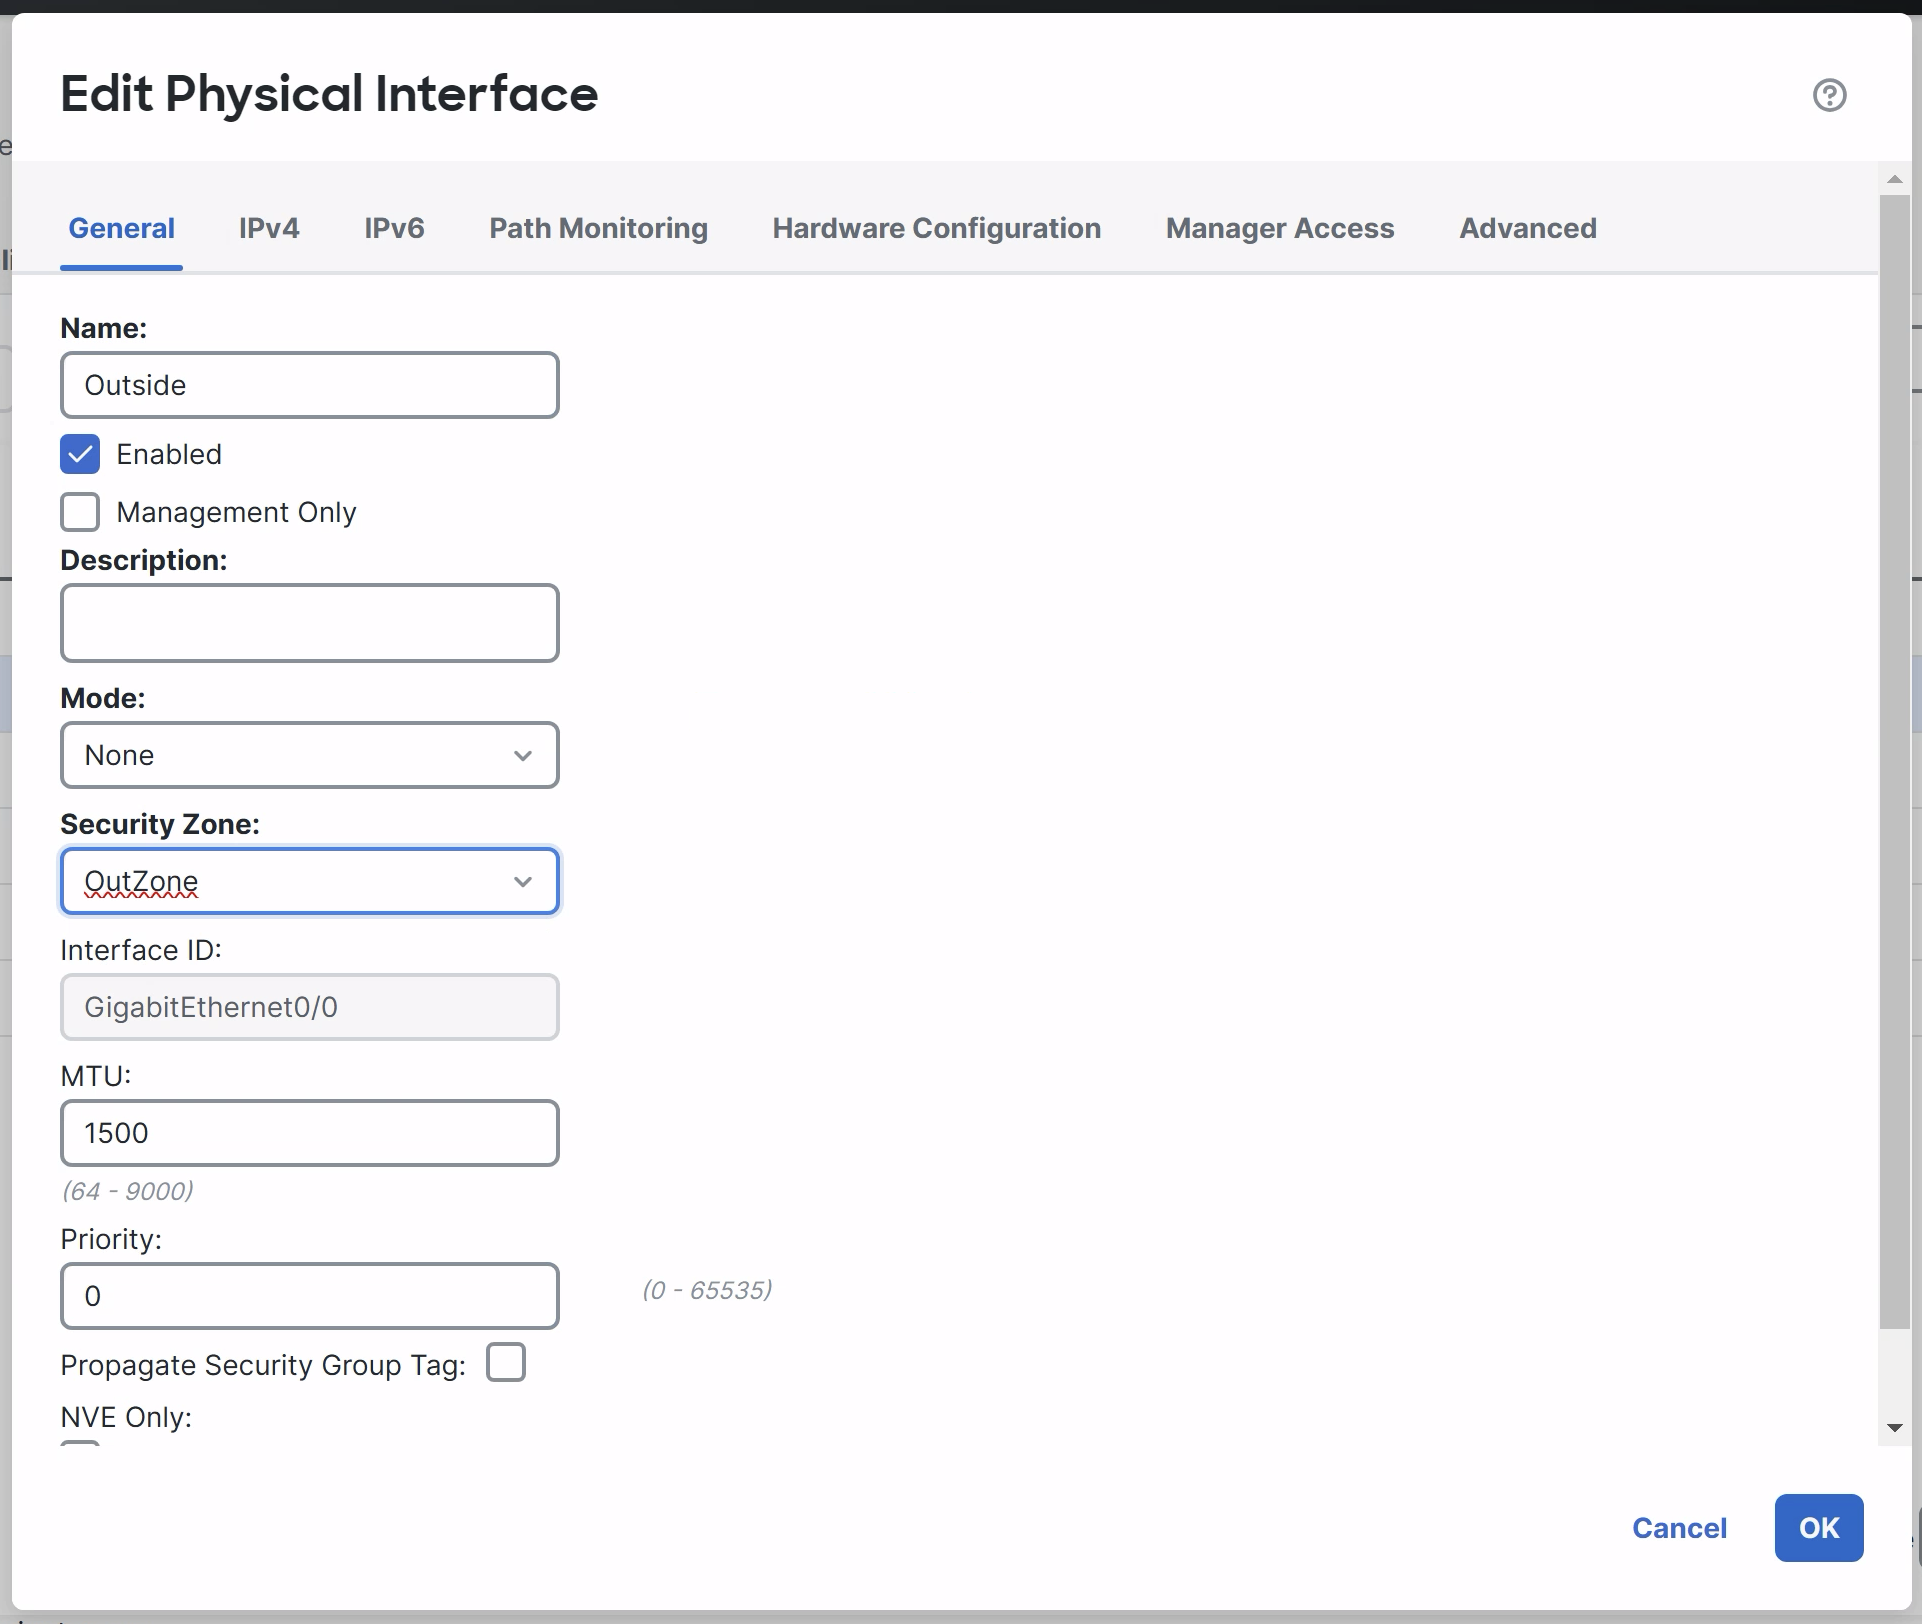
Start with GigabitEthernet0/0 by clicking the pencil icon to the right. In the General tab
-
Name: Outside
-
Enabled: Click the checkbox
-
Security Zone: OutZone
-
-
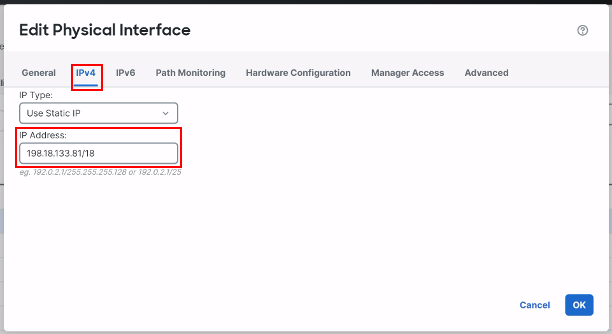
Click the IPv4 Tab:
-
IP Type: Use Static IP
-
IP Address: 198.18.133.81/18
-
-
Click OK to save.
-
Repeat the step above for the rest of the interfaces.
| Interface | Name | Zone | IP Address |
|---|---|---|---|
| GigabitEthernet0/1 | in10 | InZone1 | 198.19.10.1/24 |
| GigabitEthernet0/2 | in20 | InZone2 | 198.19.20.1/24 |
| GigabitEthernet0/3 | in30 | InZone3 | 198.19.30.1/24 |
| GigabitEthernet0/4 | in40 | InZone4 | 198.19.40.1/24 |
Note:
Please make sure "Enabled" checkbox is selected for all interfaces.
-
When you are finished, click the Save button in the upper-right to make the changes to the device. Note that the interfaces won't become active until the settings are deployed. Your interfaces should look like the figure below.
Task 2 - Add Routes
-
Next, we need to setup some basic routing on the outside interface to forward traffic to the external gateway.
-
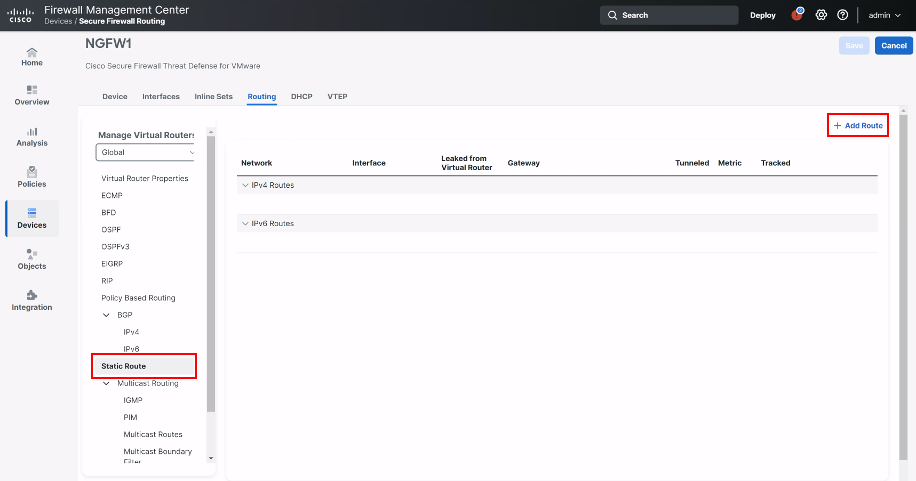
Click the Routing tab
-
Click Static Route in the left panel
-
Click + Add Route
-
-
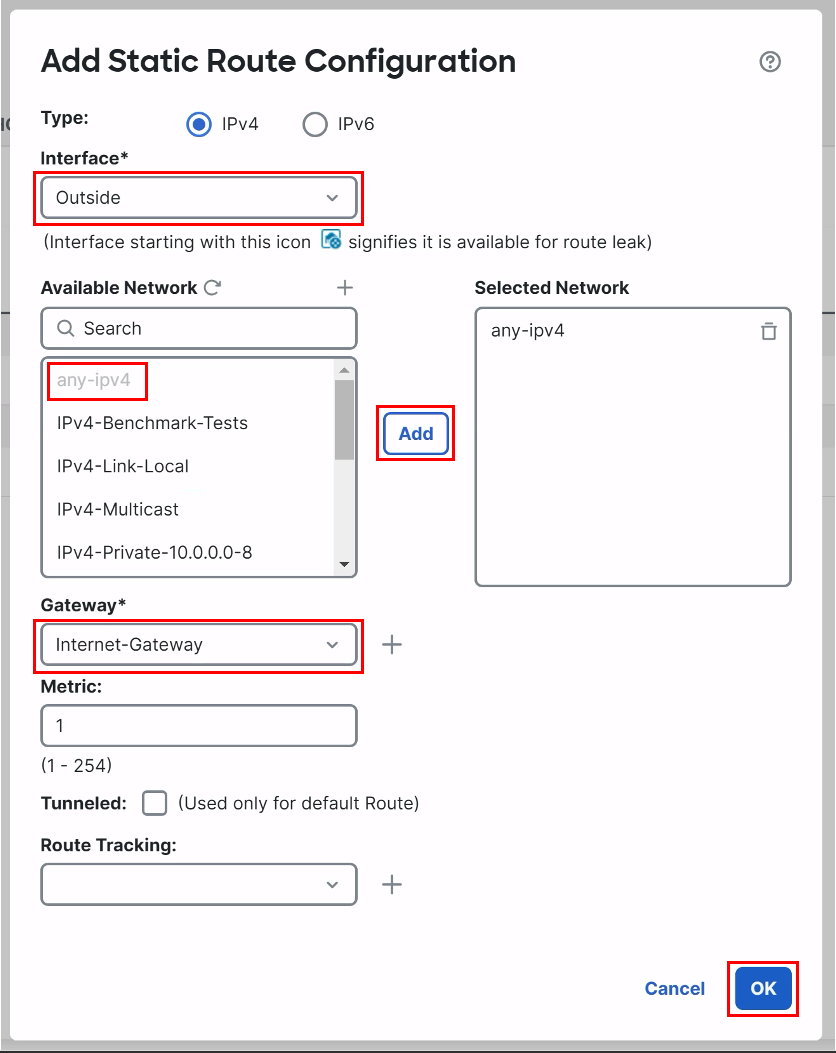
Add the following route:
-
Interface: Outside
-
Available Network: add any-ipv4 to the Selected Network
-
Gateway: Internet-Gateway
-
Click OK.
-
-
Click the Save button in the upper-right to save the route changes.
-
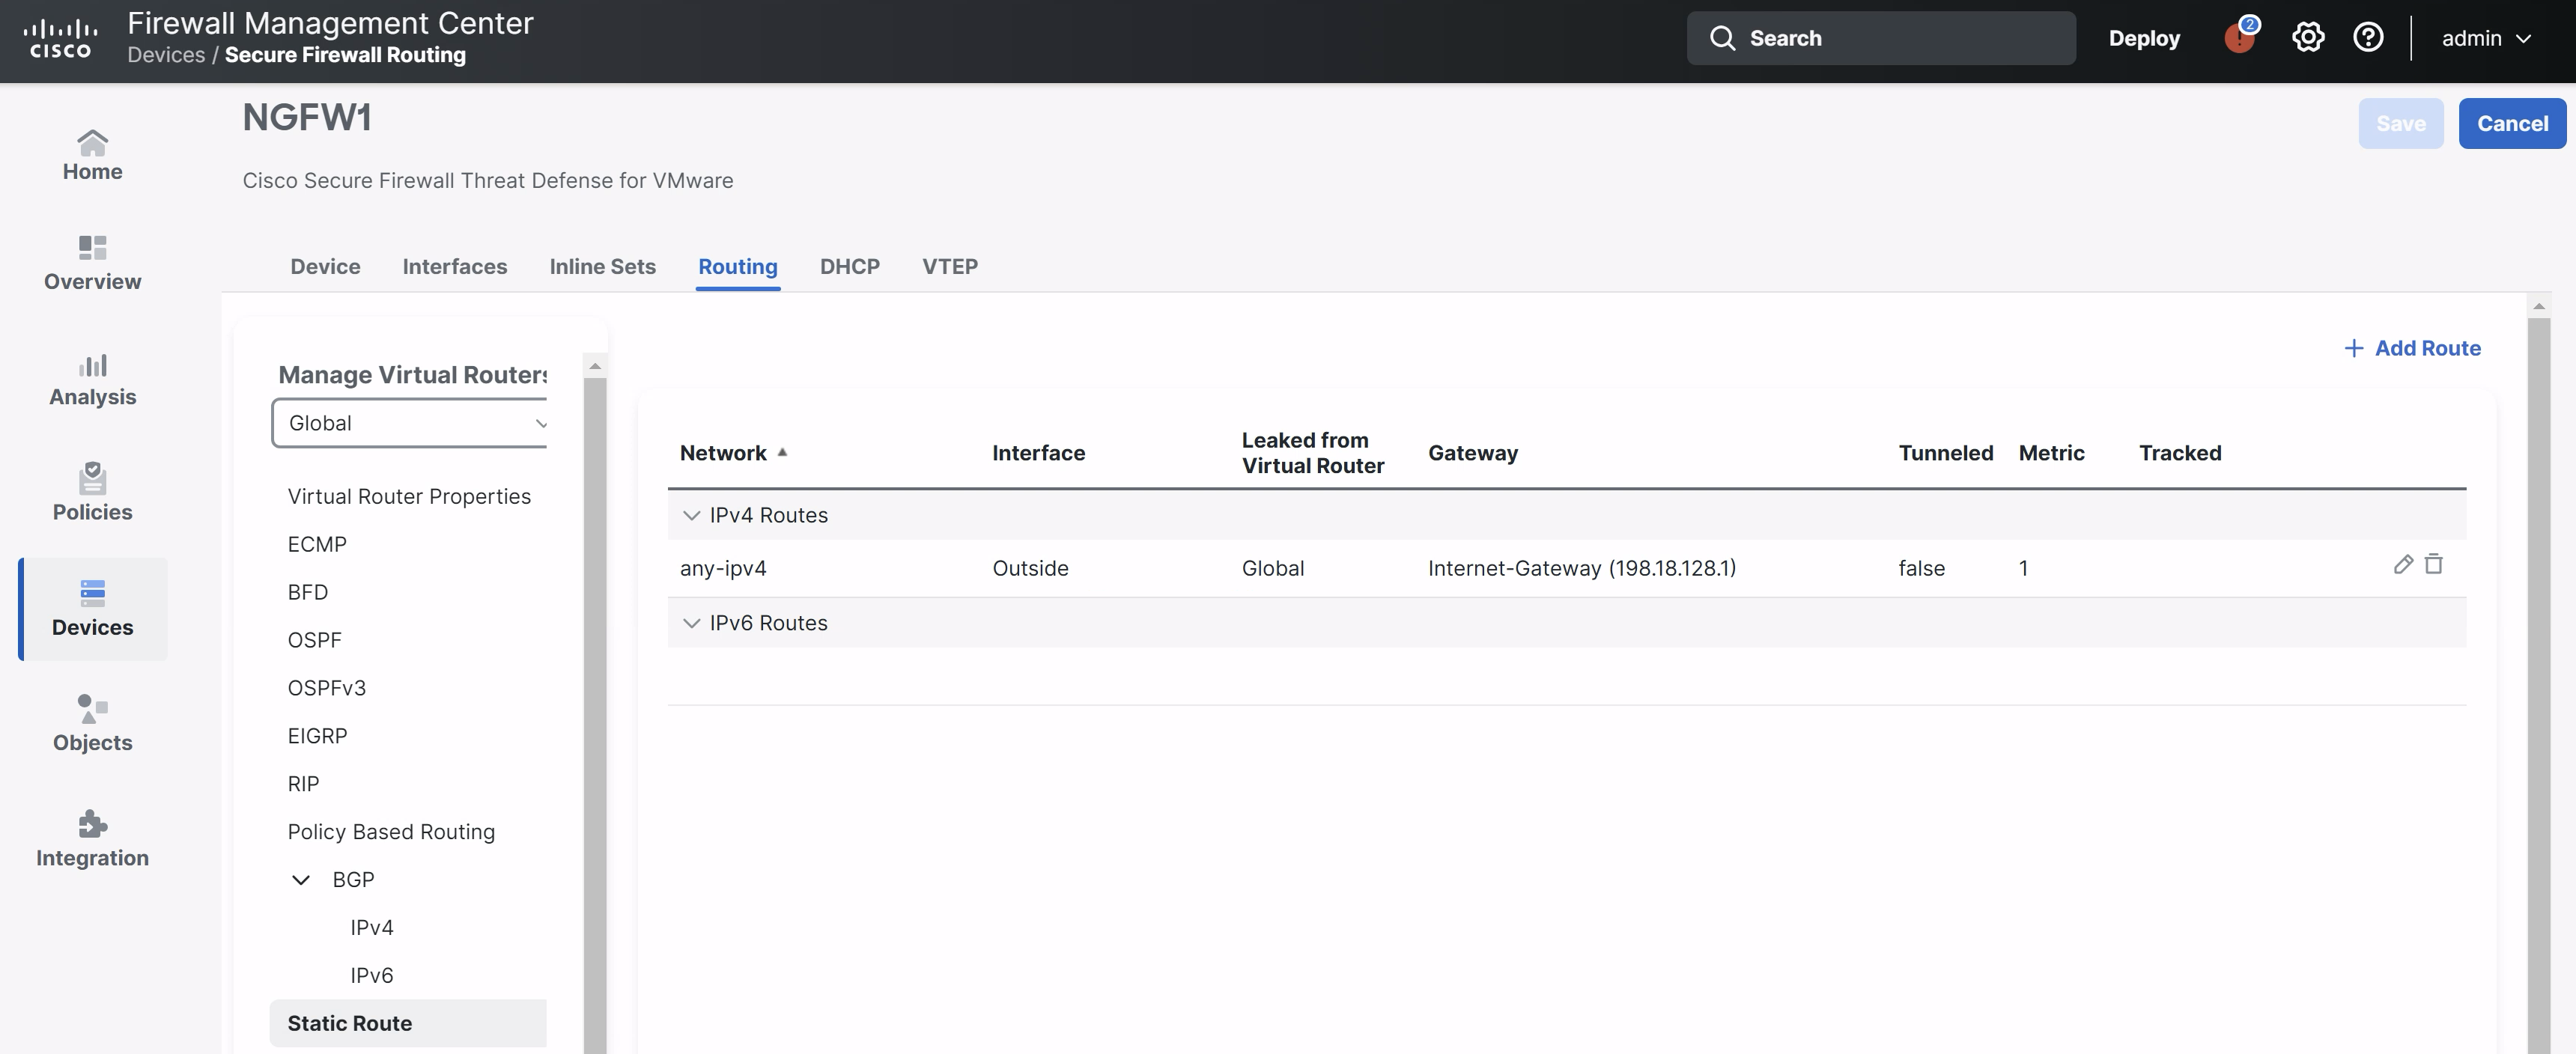
Your route should look like the figure below:
Task 3 - Configure NAT
We will setup a single outbound NAT rule to allow the corporate network to have Internet connectivity.
- Navigate to Devices > NAT.
- Click the New Policy button and select Threat Defense NAT for the policy type.

-
Name your policy NGFW1 and add the device to the policy as shown below.
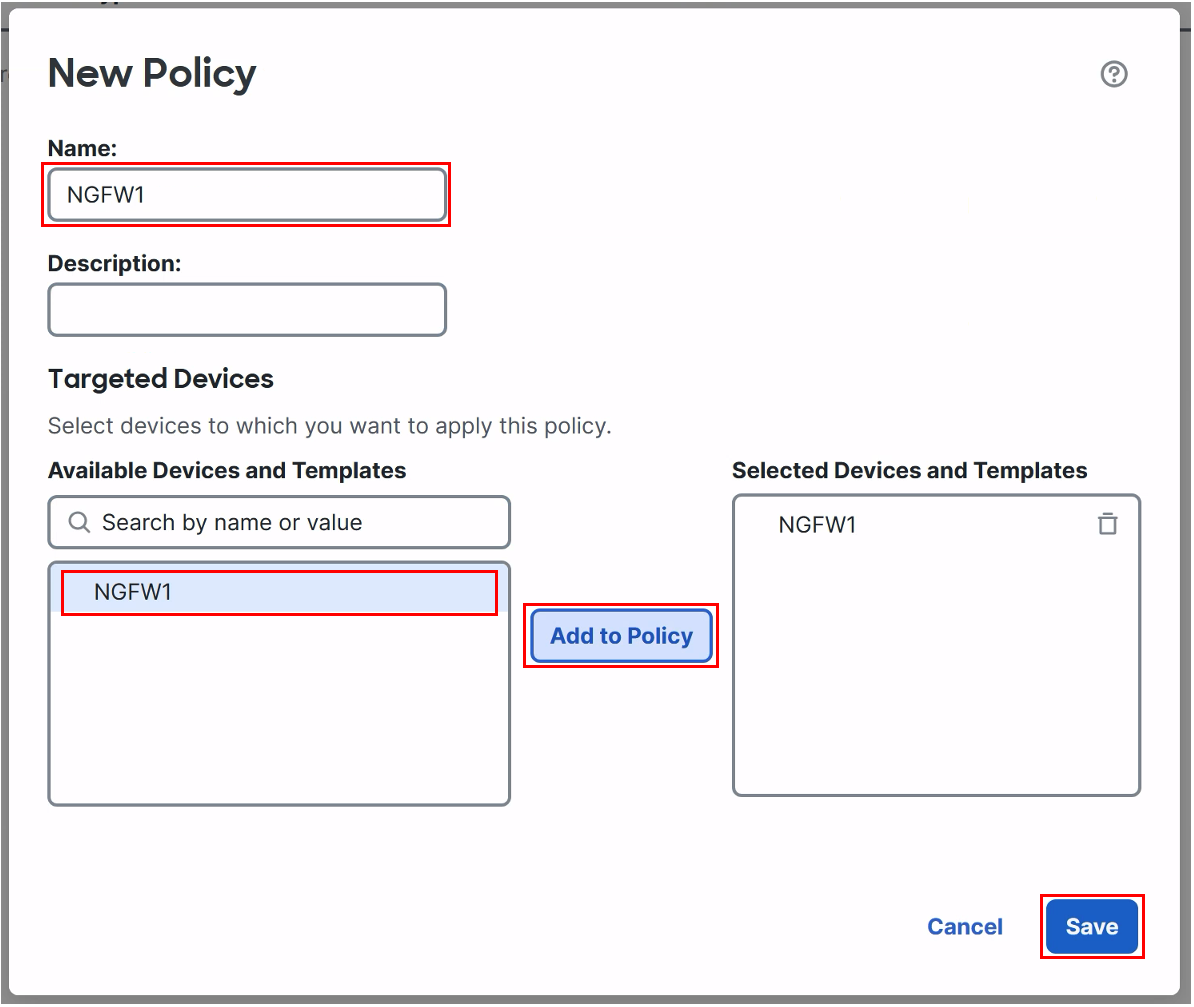
- Click Save to start editing the policy
-
We will use an Auto NAT Rule because these are easier to setup and recommended unless you need the flexibility of a Manual NAT Rule. Click the Add Rule button to add a new rule.
-
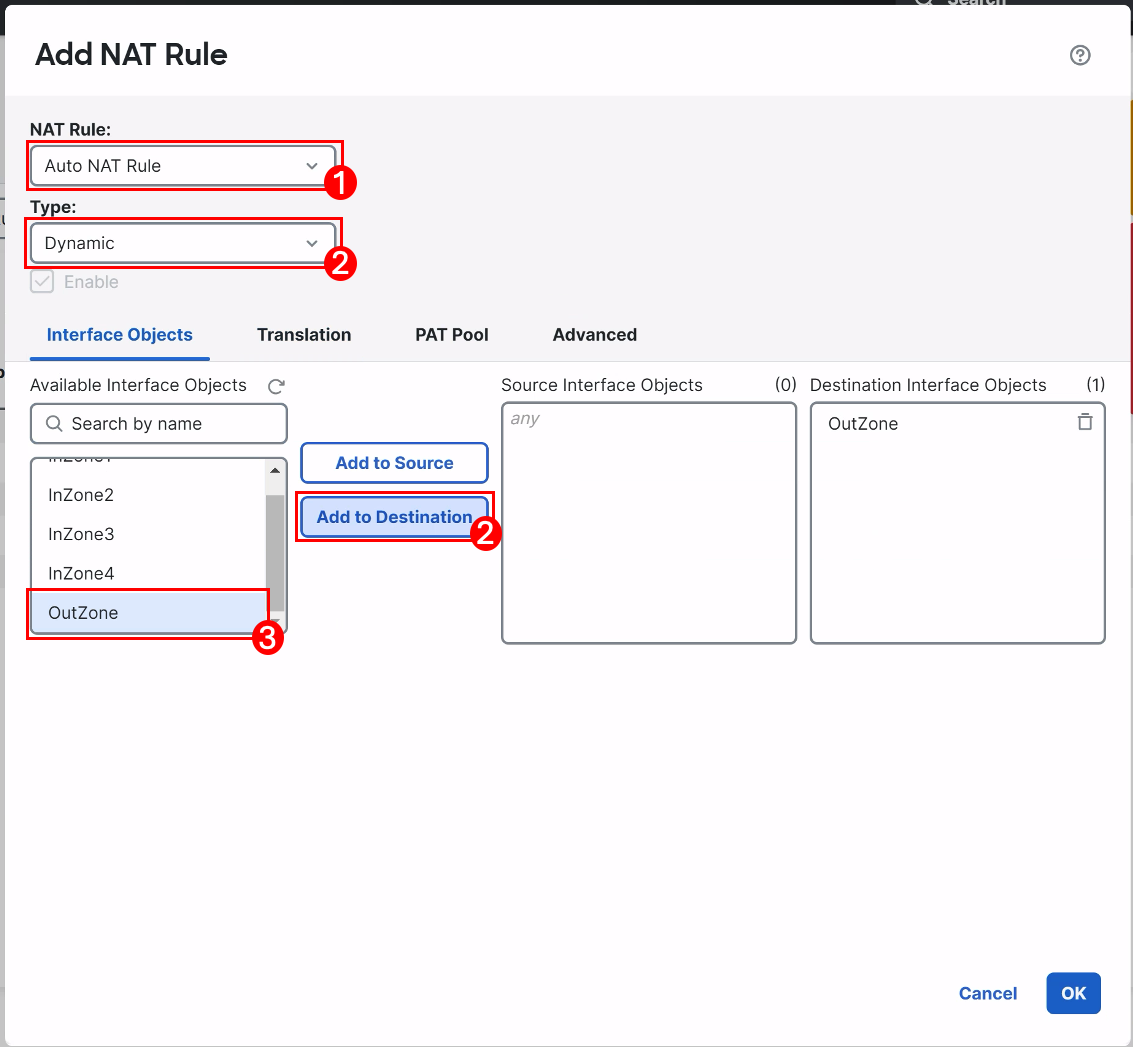
For NAT Rule configure the following parameters:
-
Select Auto NAT Rule from the drop-down.
-
Type: Dynamic
-
On the Interface Objects tab select OutZone and add to Destination Interface Objects.
-
-
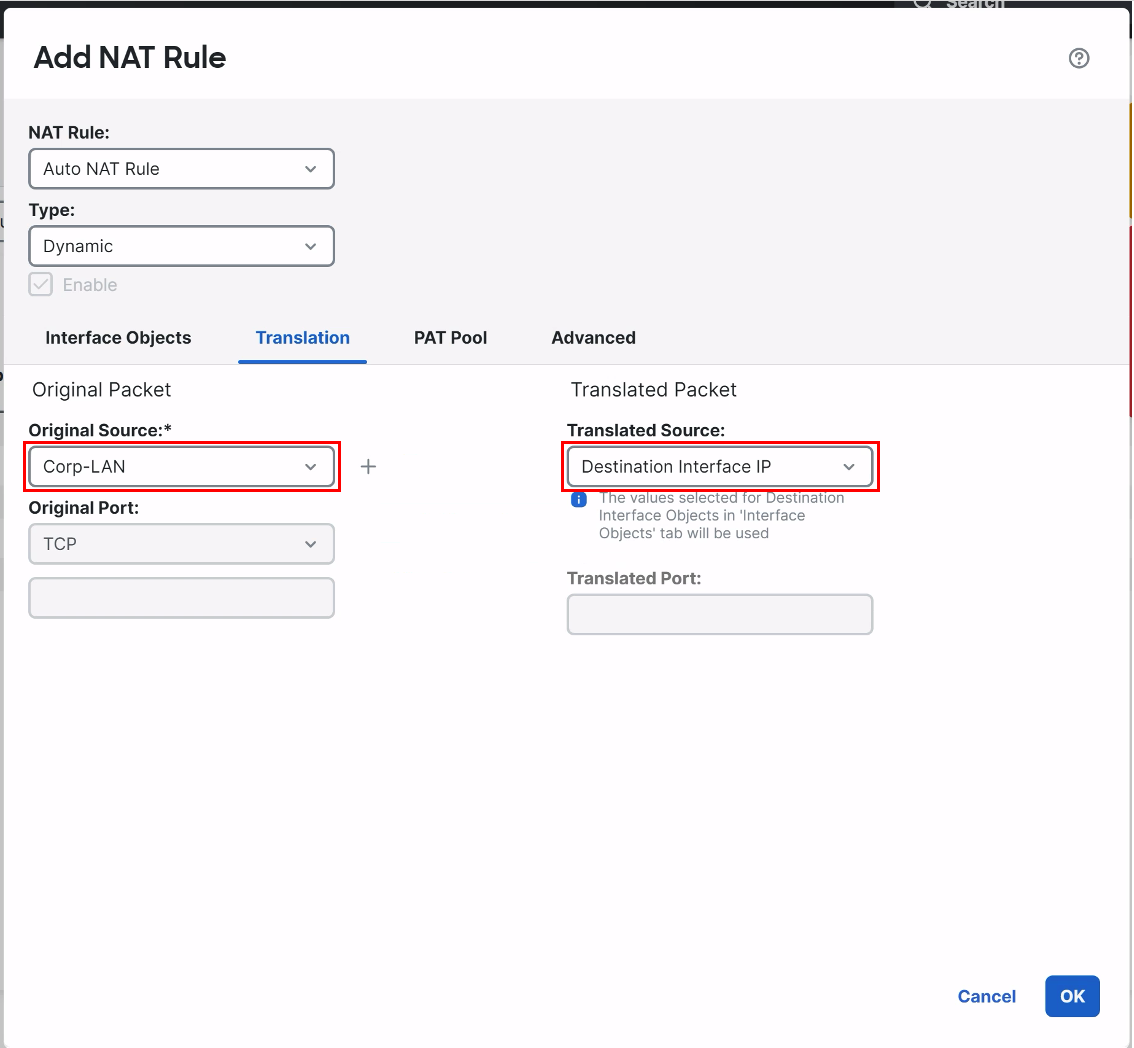
Click the Translation tab:
-
In the drop-down forOriginal Source configure theCorp-LANnetwork object.
-
In the drop-down for Translated Source configure the Destination Interface IP setting.
-
Click OK to save the rule.
-
Click Save to save the policy.
-
-
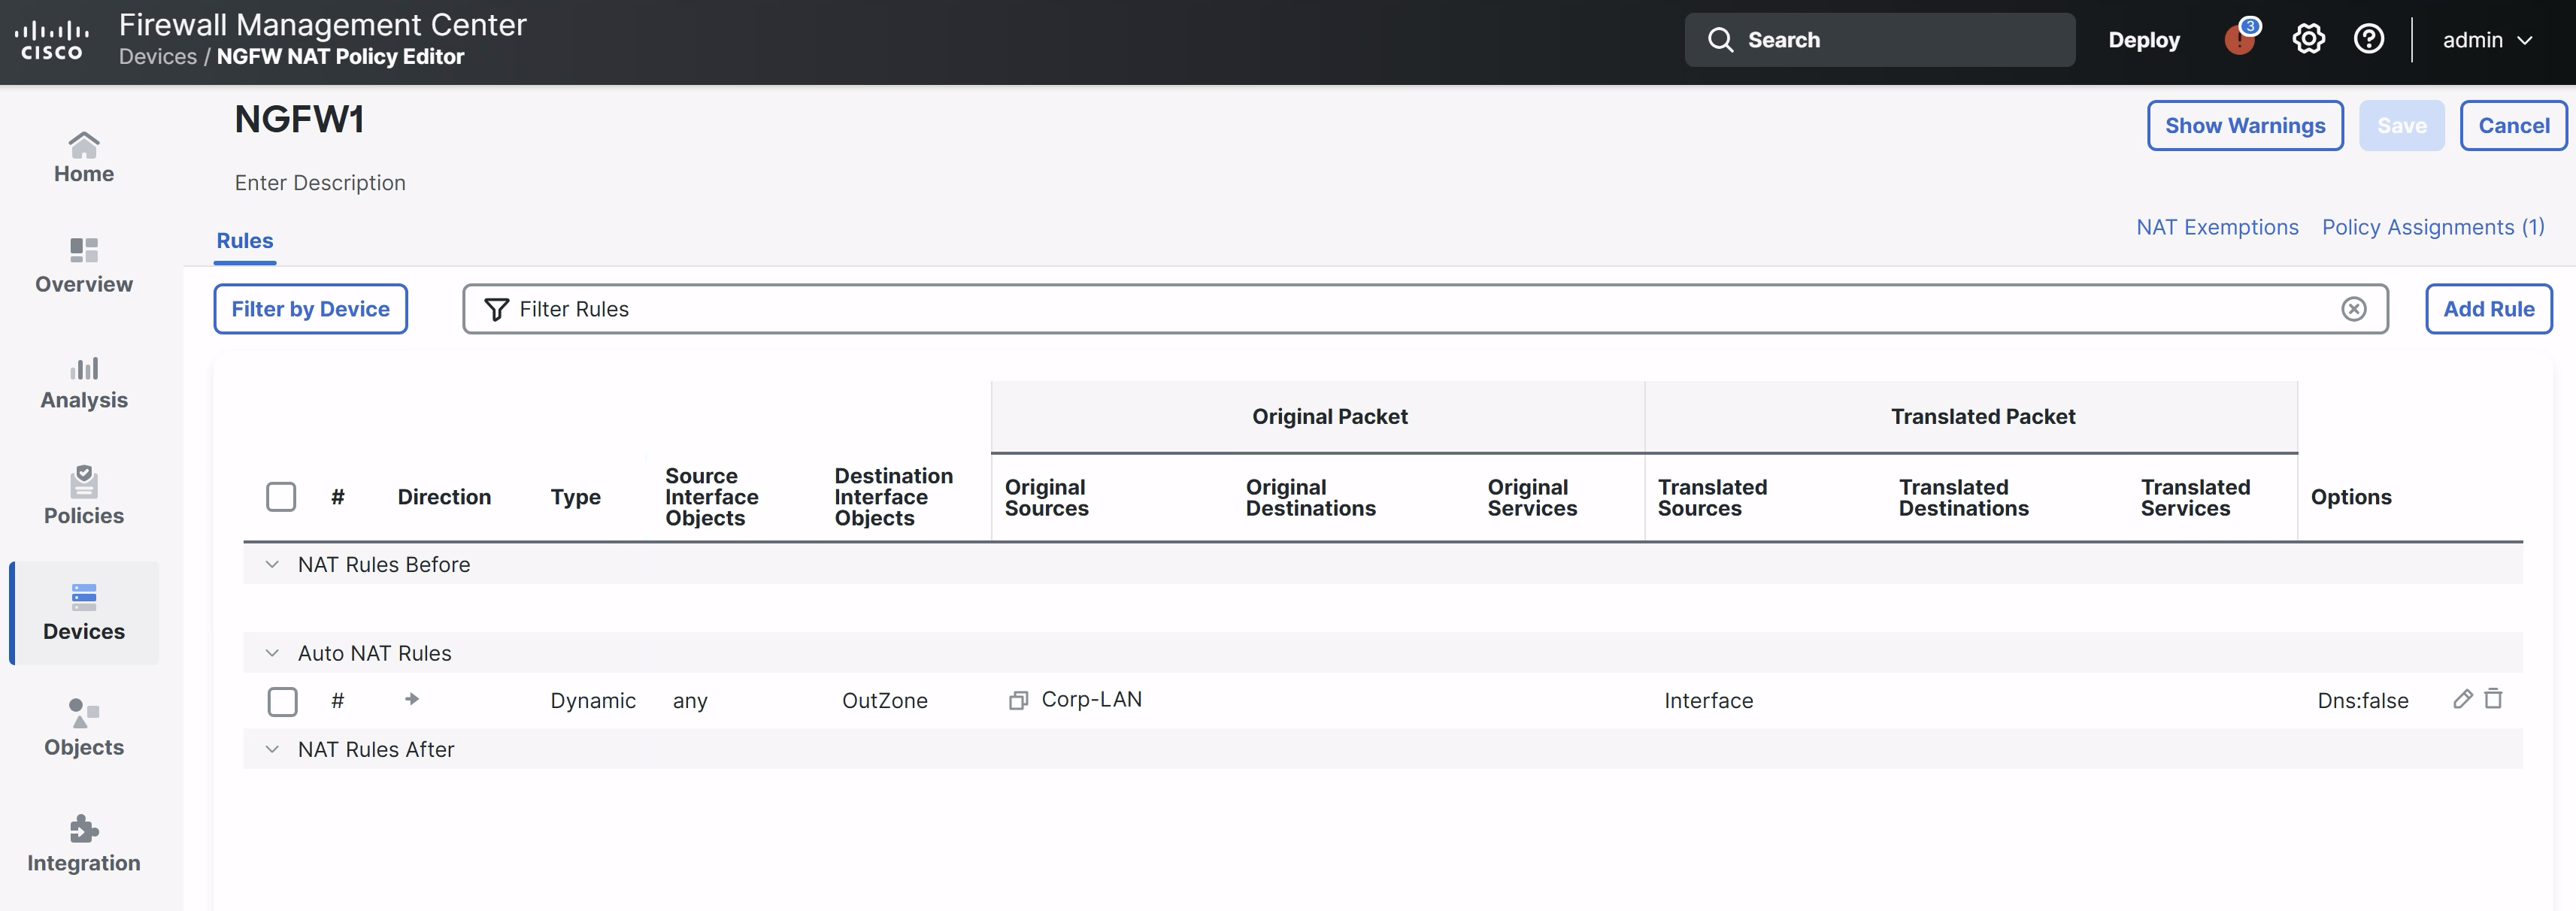
Your NAT Policy should look like the figure below:
Task 4 - Test Connectivity
We can now test the basic connectivity of our device. First, we will need to allow outbound connections in the Access Control policy.
-
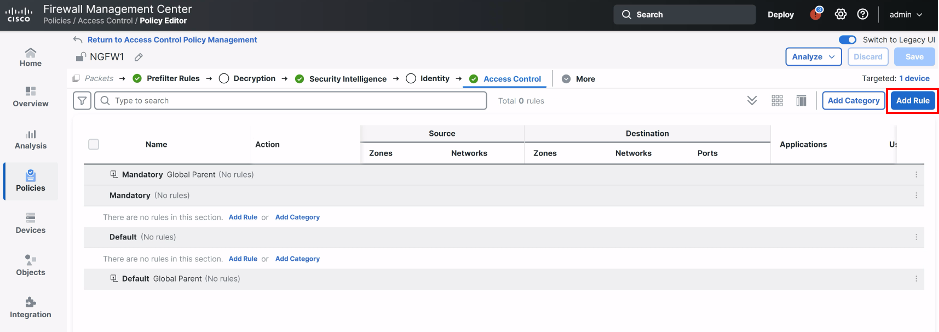
Navigate to Polices > Access Control > Access Control.
-
Edit the NGFW1 policy.
-
Click the Add Rule button on the right.
-
-
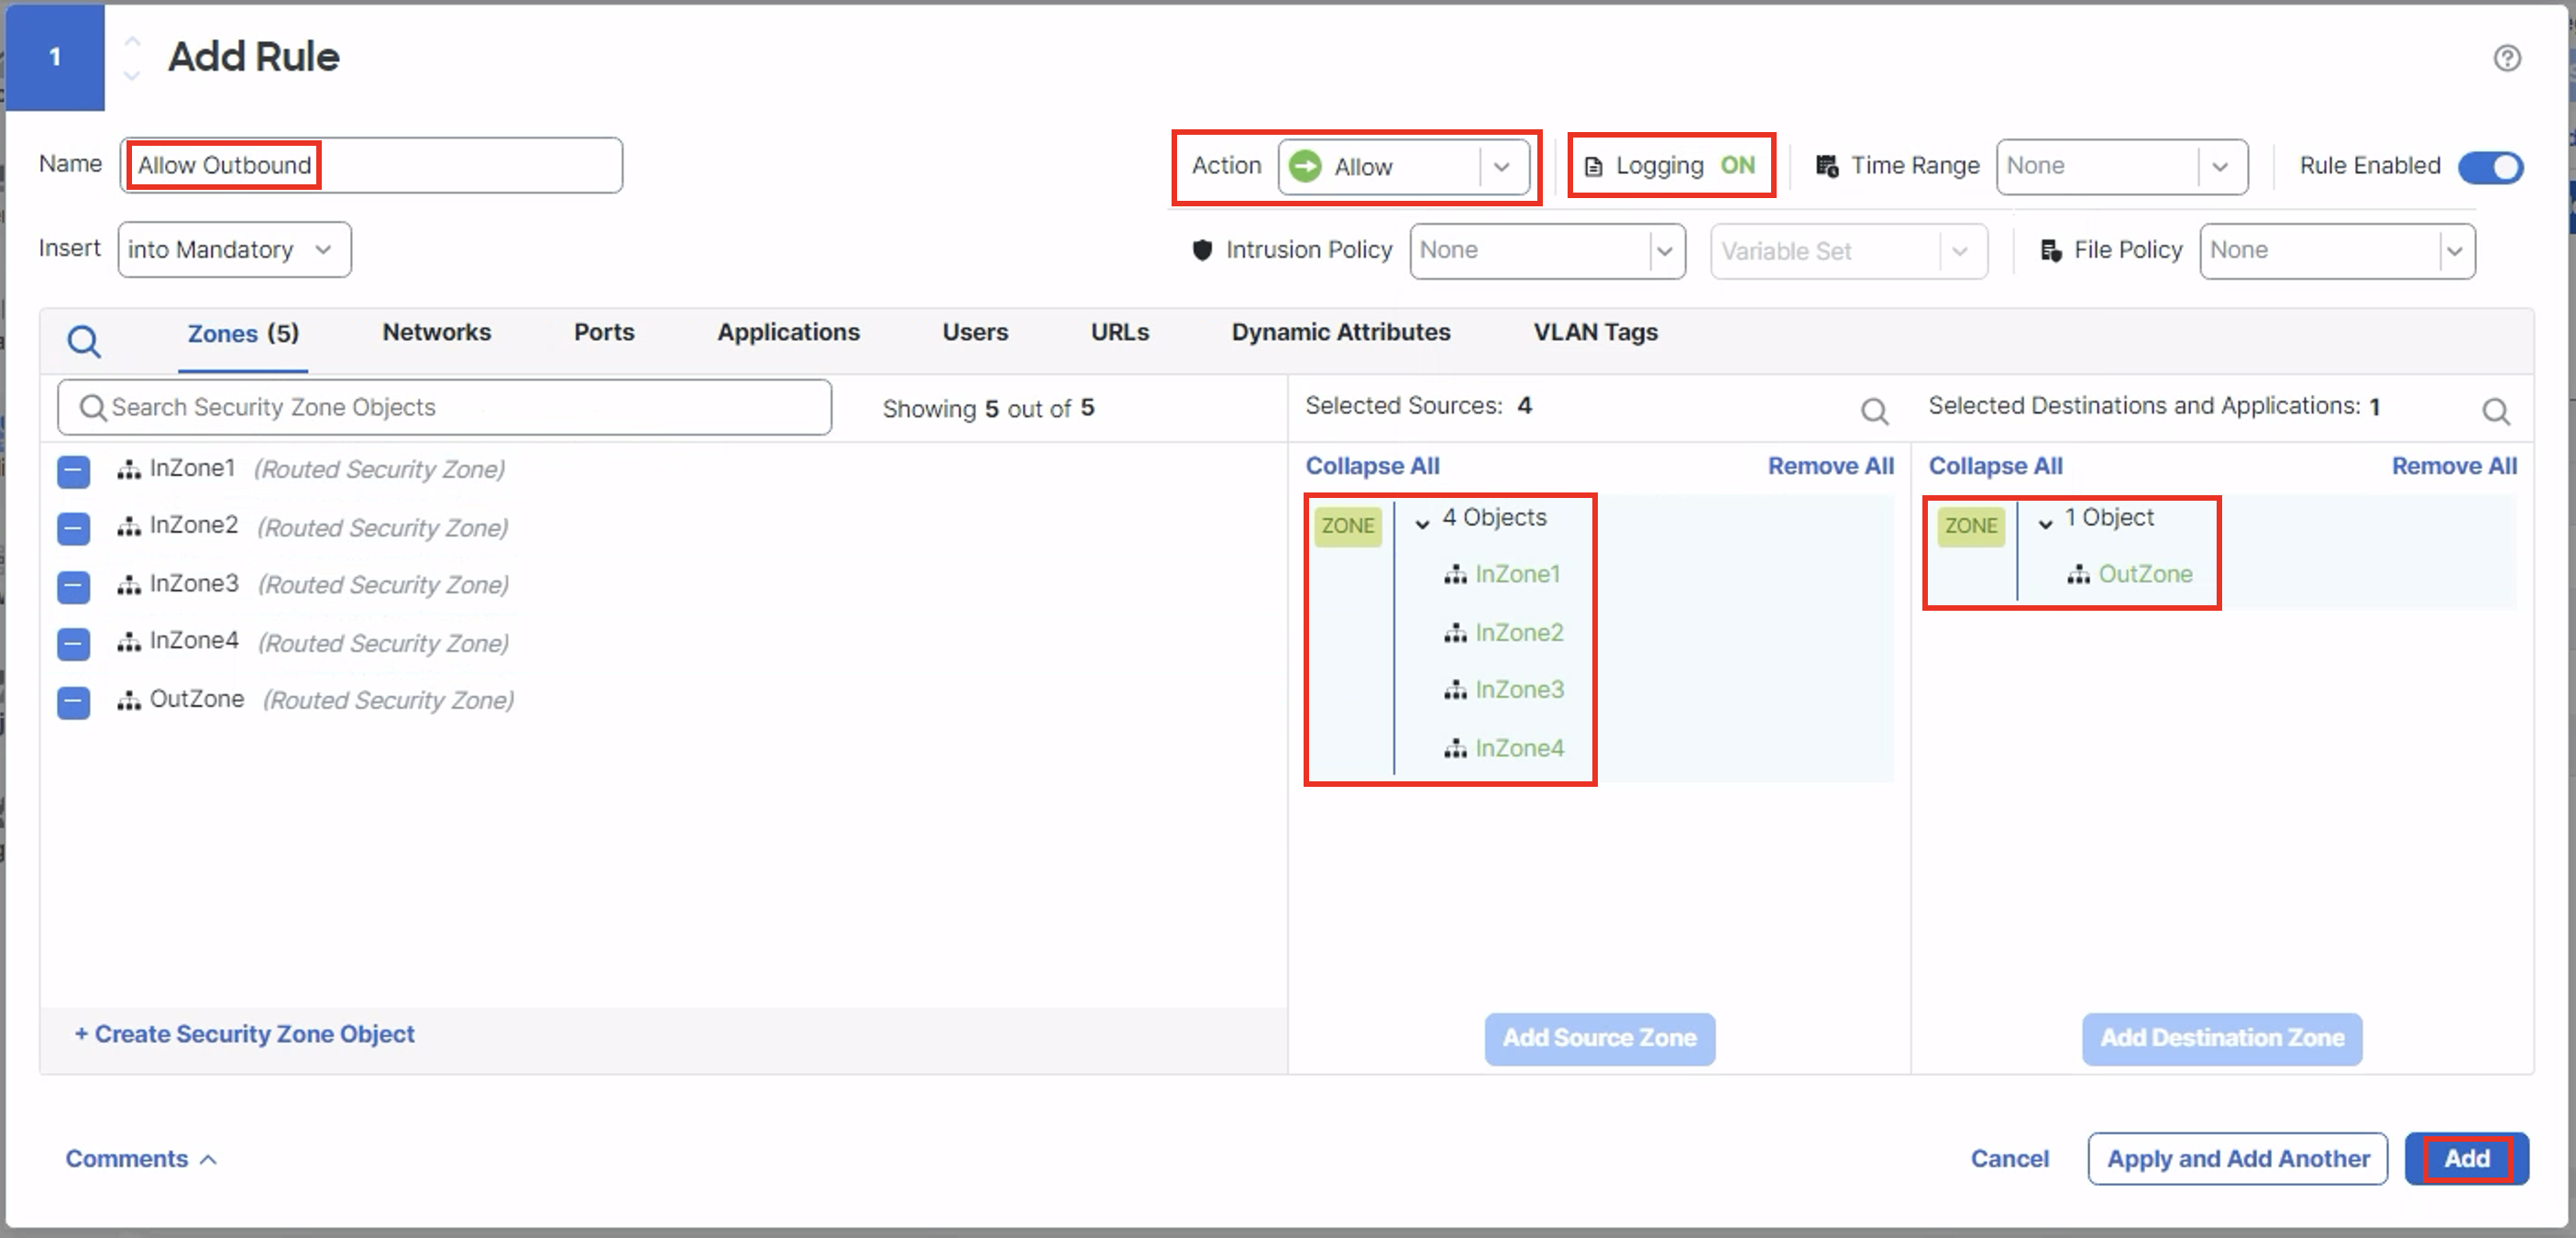
We will add a rule to allow all the internal zones access to the Internet. This will be a temporary test to ensure the routing is working on the firewall. Configure the rule with the following parameters:
- Name your rule Allow Outbound
- Action: Allow
- Add all the InZones to the Source Zone
- Add OutZone to the Destination Zone
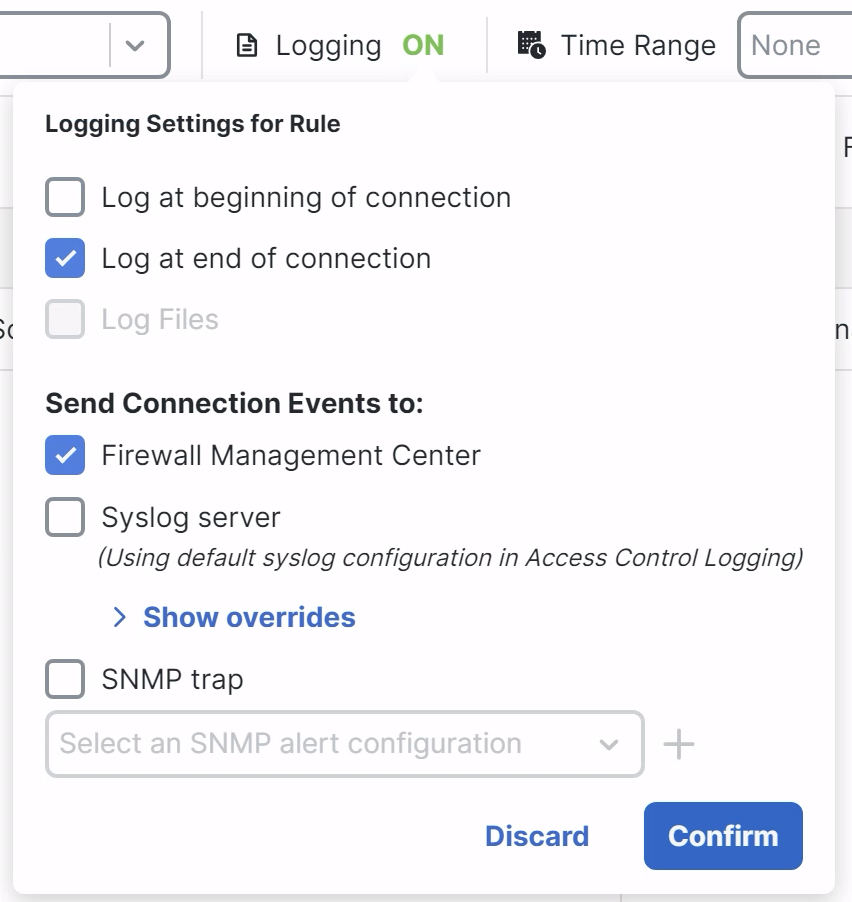
- Click Logging and check Log at end of connection then Confirm.
-
Your rule should look like the figure below:
- Click Add then Save your policy.
The dCloud jumpbox has several interfaces so it is not a good test of this rule. We will open an RDP session to a corporate workstation and confirm that our outbound settings are correct.
- From the Quick Launch click on WKST 1 in the Remote Access section.
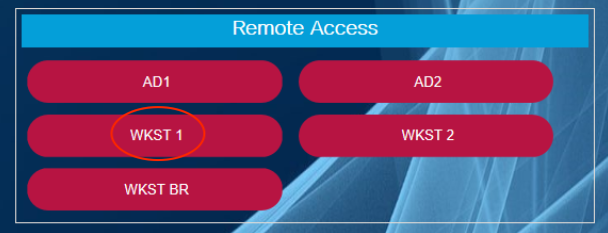
WKST 1 RDP
The password is C1sco12345
When you login, open a command prompt at try to ping 8.8.8.8
This ping should fail.
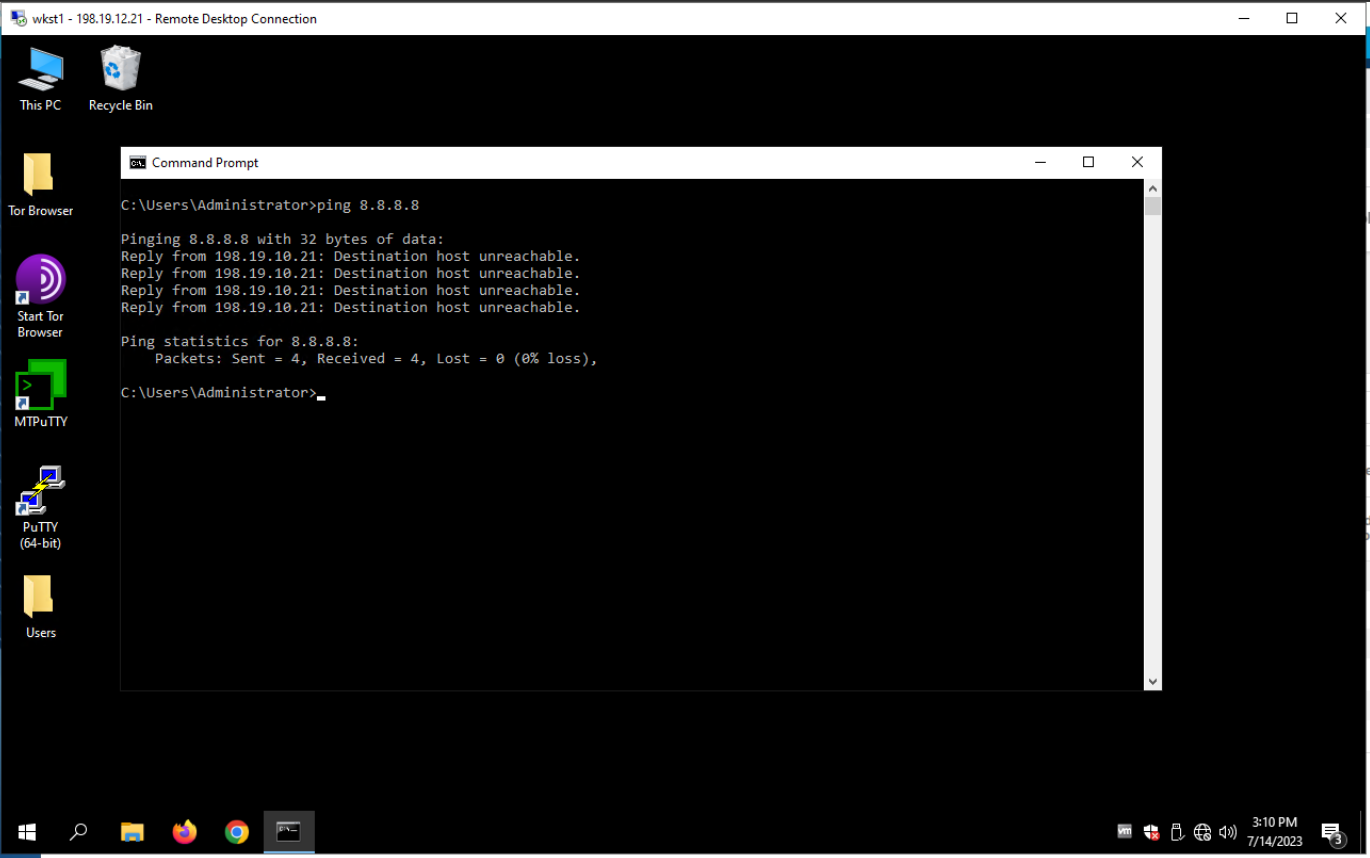
WKST 1 Ping Attempt
Start a continuous ping with ping 8.8.8.8 -t
Return to FMC2 and click the Deploy button in the top menu then Deploy All to deploy your changes.
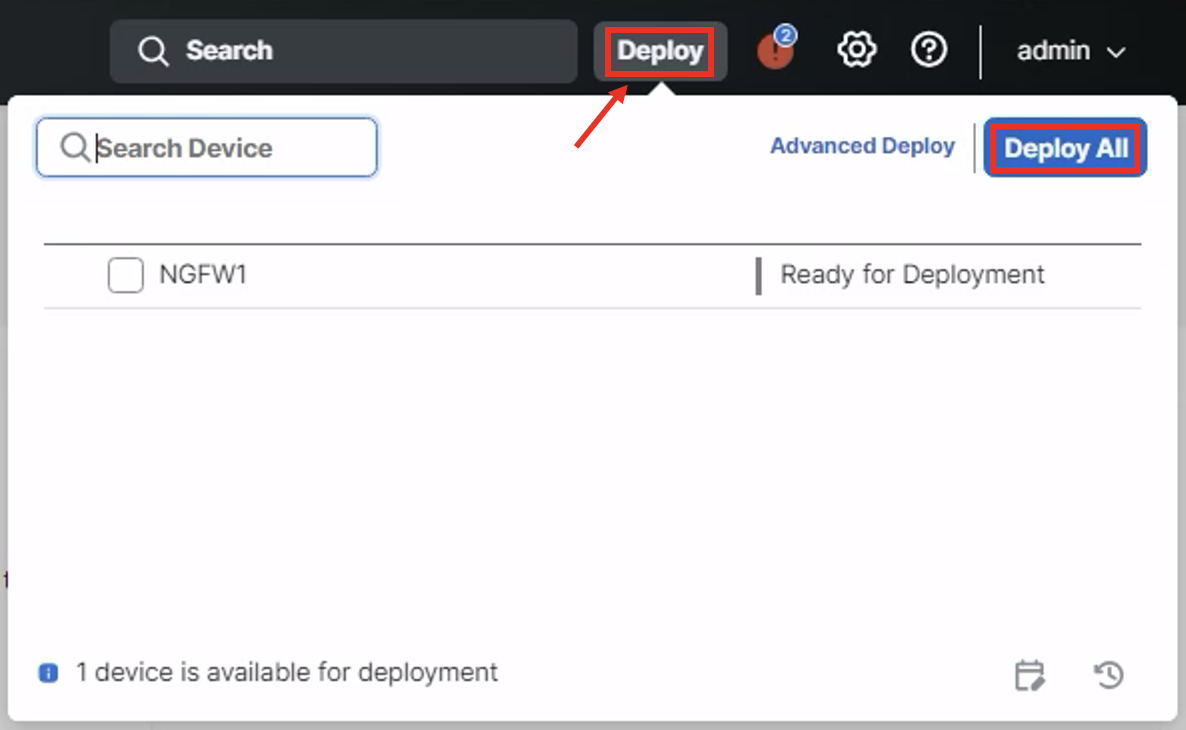
FMC2 Deploy Menu
Return to WKST 1 and note pings are successful as soon as the deployment completes.
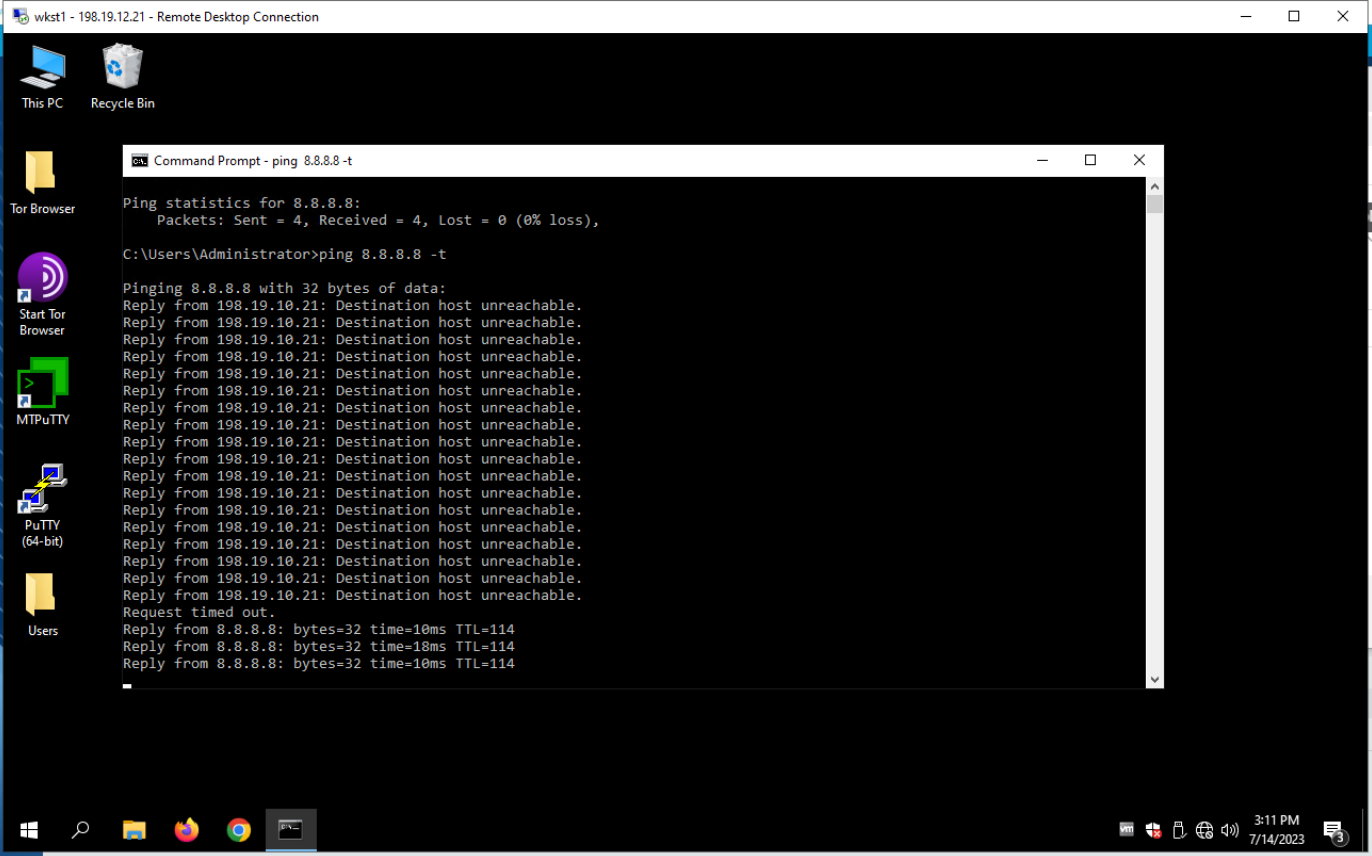
Ping Success!
Updated about 1 year ago
