Scenario 11 - AI Assistant & Policy Analyzer and Optimizer
Wait!
Completion of this guide assumes that you have already provisioned a CDO tenant and enabled cdFMC. In this guide you will find steps to create a tenant directly from the onboarding wizard or you can use this link and follow the steps on screen to perform the same actions - https://defenseorchestrator.com/provision.
Introduction
Cisco AI Assistant is a virtual companion for firewall, powered by generative AI and natural language processing abilities. AI Assistant helps in efficiently managing Secure Firewall devices, by providing insights into firewall policy configurations, creating firewall rules, and providing contextually-relevant guides for performing common administrative tasks. As a cloud-delivered component of Cisco Secure Firewall Management Center, AI Assistant's capabilities will continue to expand, providing even greater value for customers.
Policy Analyzer and Optimizer is a new feature that provides suggestions to improve the security and performance of managed firewalls. It does this by analyzing Access Control Policies to detect common design anomalies, including Duplicate Rules, Overlapping Objects, Expired Rules, and Mergeable Rules. It also provides an easy place for performing Policy Analysis of hit counts. As a cloud-delivered component of Cisco Secure Firewall Management Center, Policy Analyzer and Optimizer's capabilities will continue to expand, providing even greater value for customers.
The goal of this lab is to walk you through the steps to enable the AI Assistant and Policy Analyzer & Optimizer in Firewall Management Center and show you all the capabilities that comes with it.
Lab Tasks
These are the tasks in the scenario below. If you are familiar with the Secure Firewall you may do these on your own, or for step-by-step instructions see below.
- Task 1 - Integrate with Cisco Security Cloud
AI Assistant
- Task 2 - Use the AI Assistant
- Task 3 - Provide Feedback to the Response
Policy Analyzer and Optimizer
- Task 4 - Optimize a Policy (PAO Policy)
- Task 5 - Review a Healthy and Active Policy (Traffic Generator Policy)
Task 1 - Integrate with Cisco Security Cloud
- Using the Quick Launch or the Google Chrome browser connect to the FMC web UI.
Login as admin/C1sco12345. These credentials should be pre-populated in the browser.

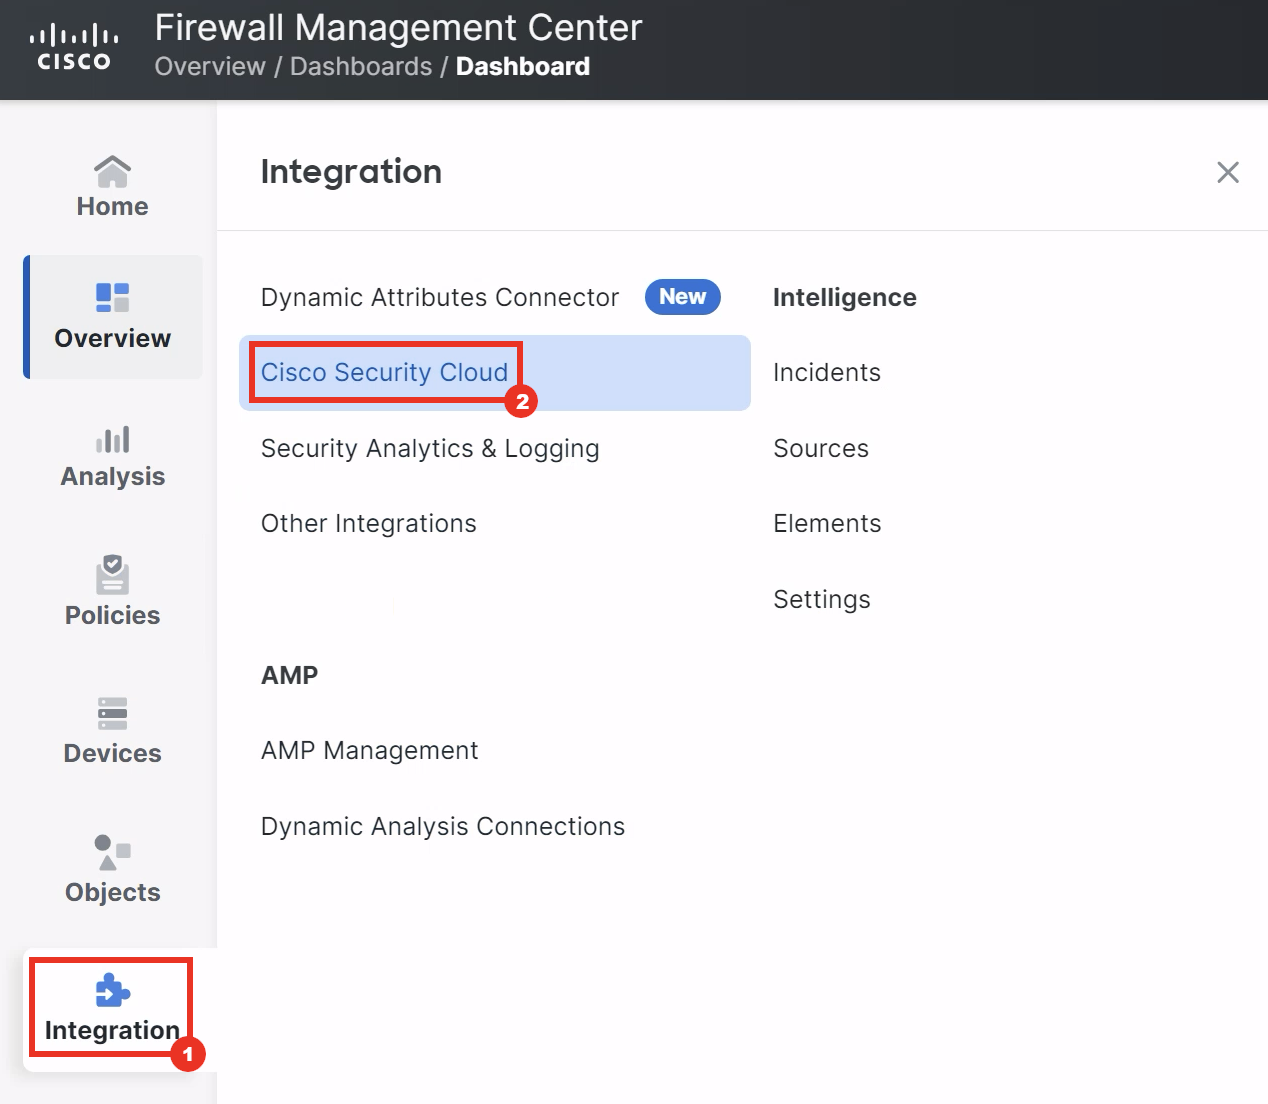
- Navigate to Integration > Cisco Security Cloud.
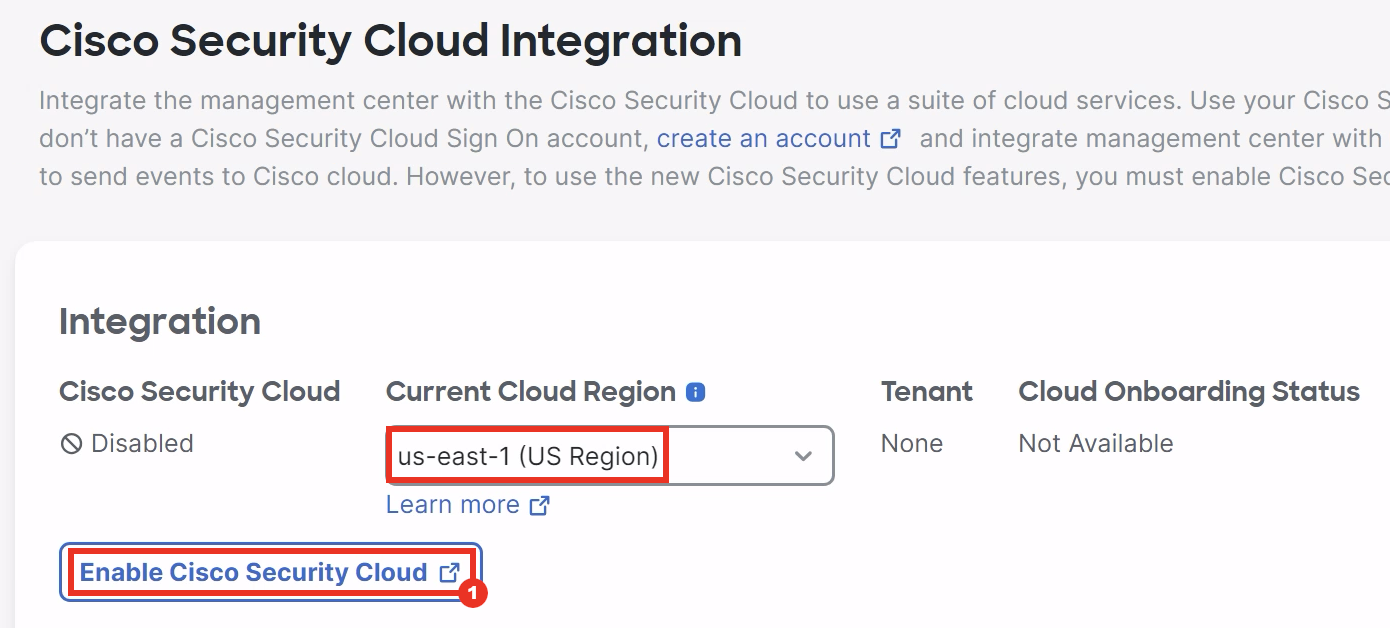
- Make sure that the Current Cloud Region is set to us-east-1 and click Enable Cisco Security Cloud.
-
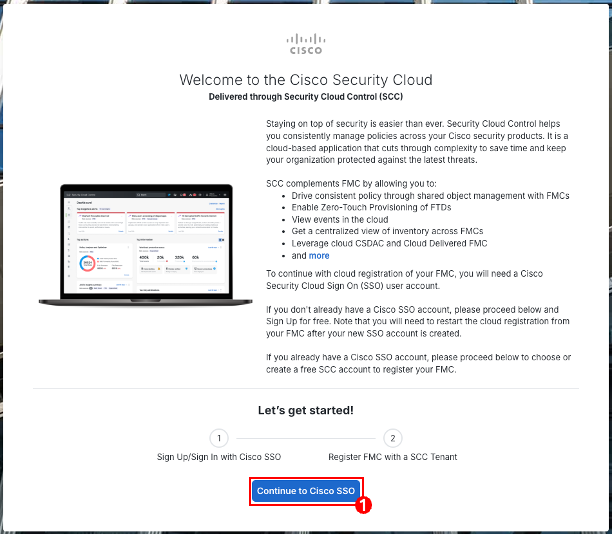
A wizard to register the Firewall Management Center with Cisco Defense Orchestrator tenant will be opened in a new tab. Proceed to the next step by clicking on Continue to Cisco SSO.
-
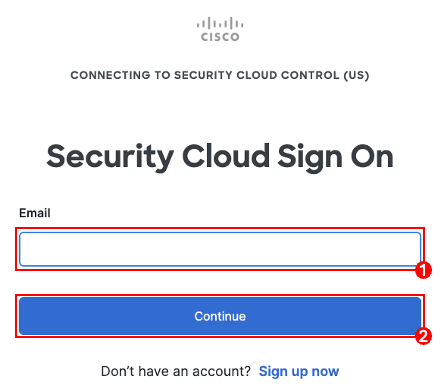
Login to Cisco Security Cloud using your Cisco SSO Account.
-
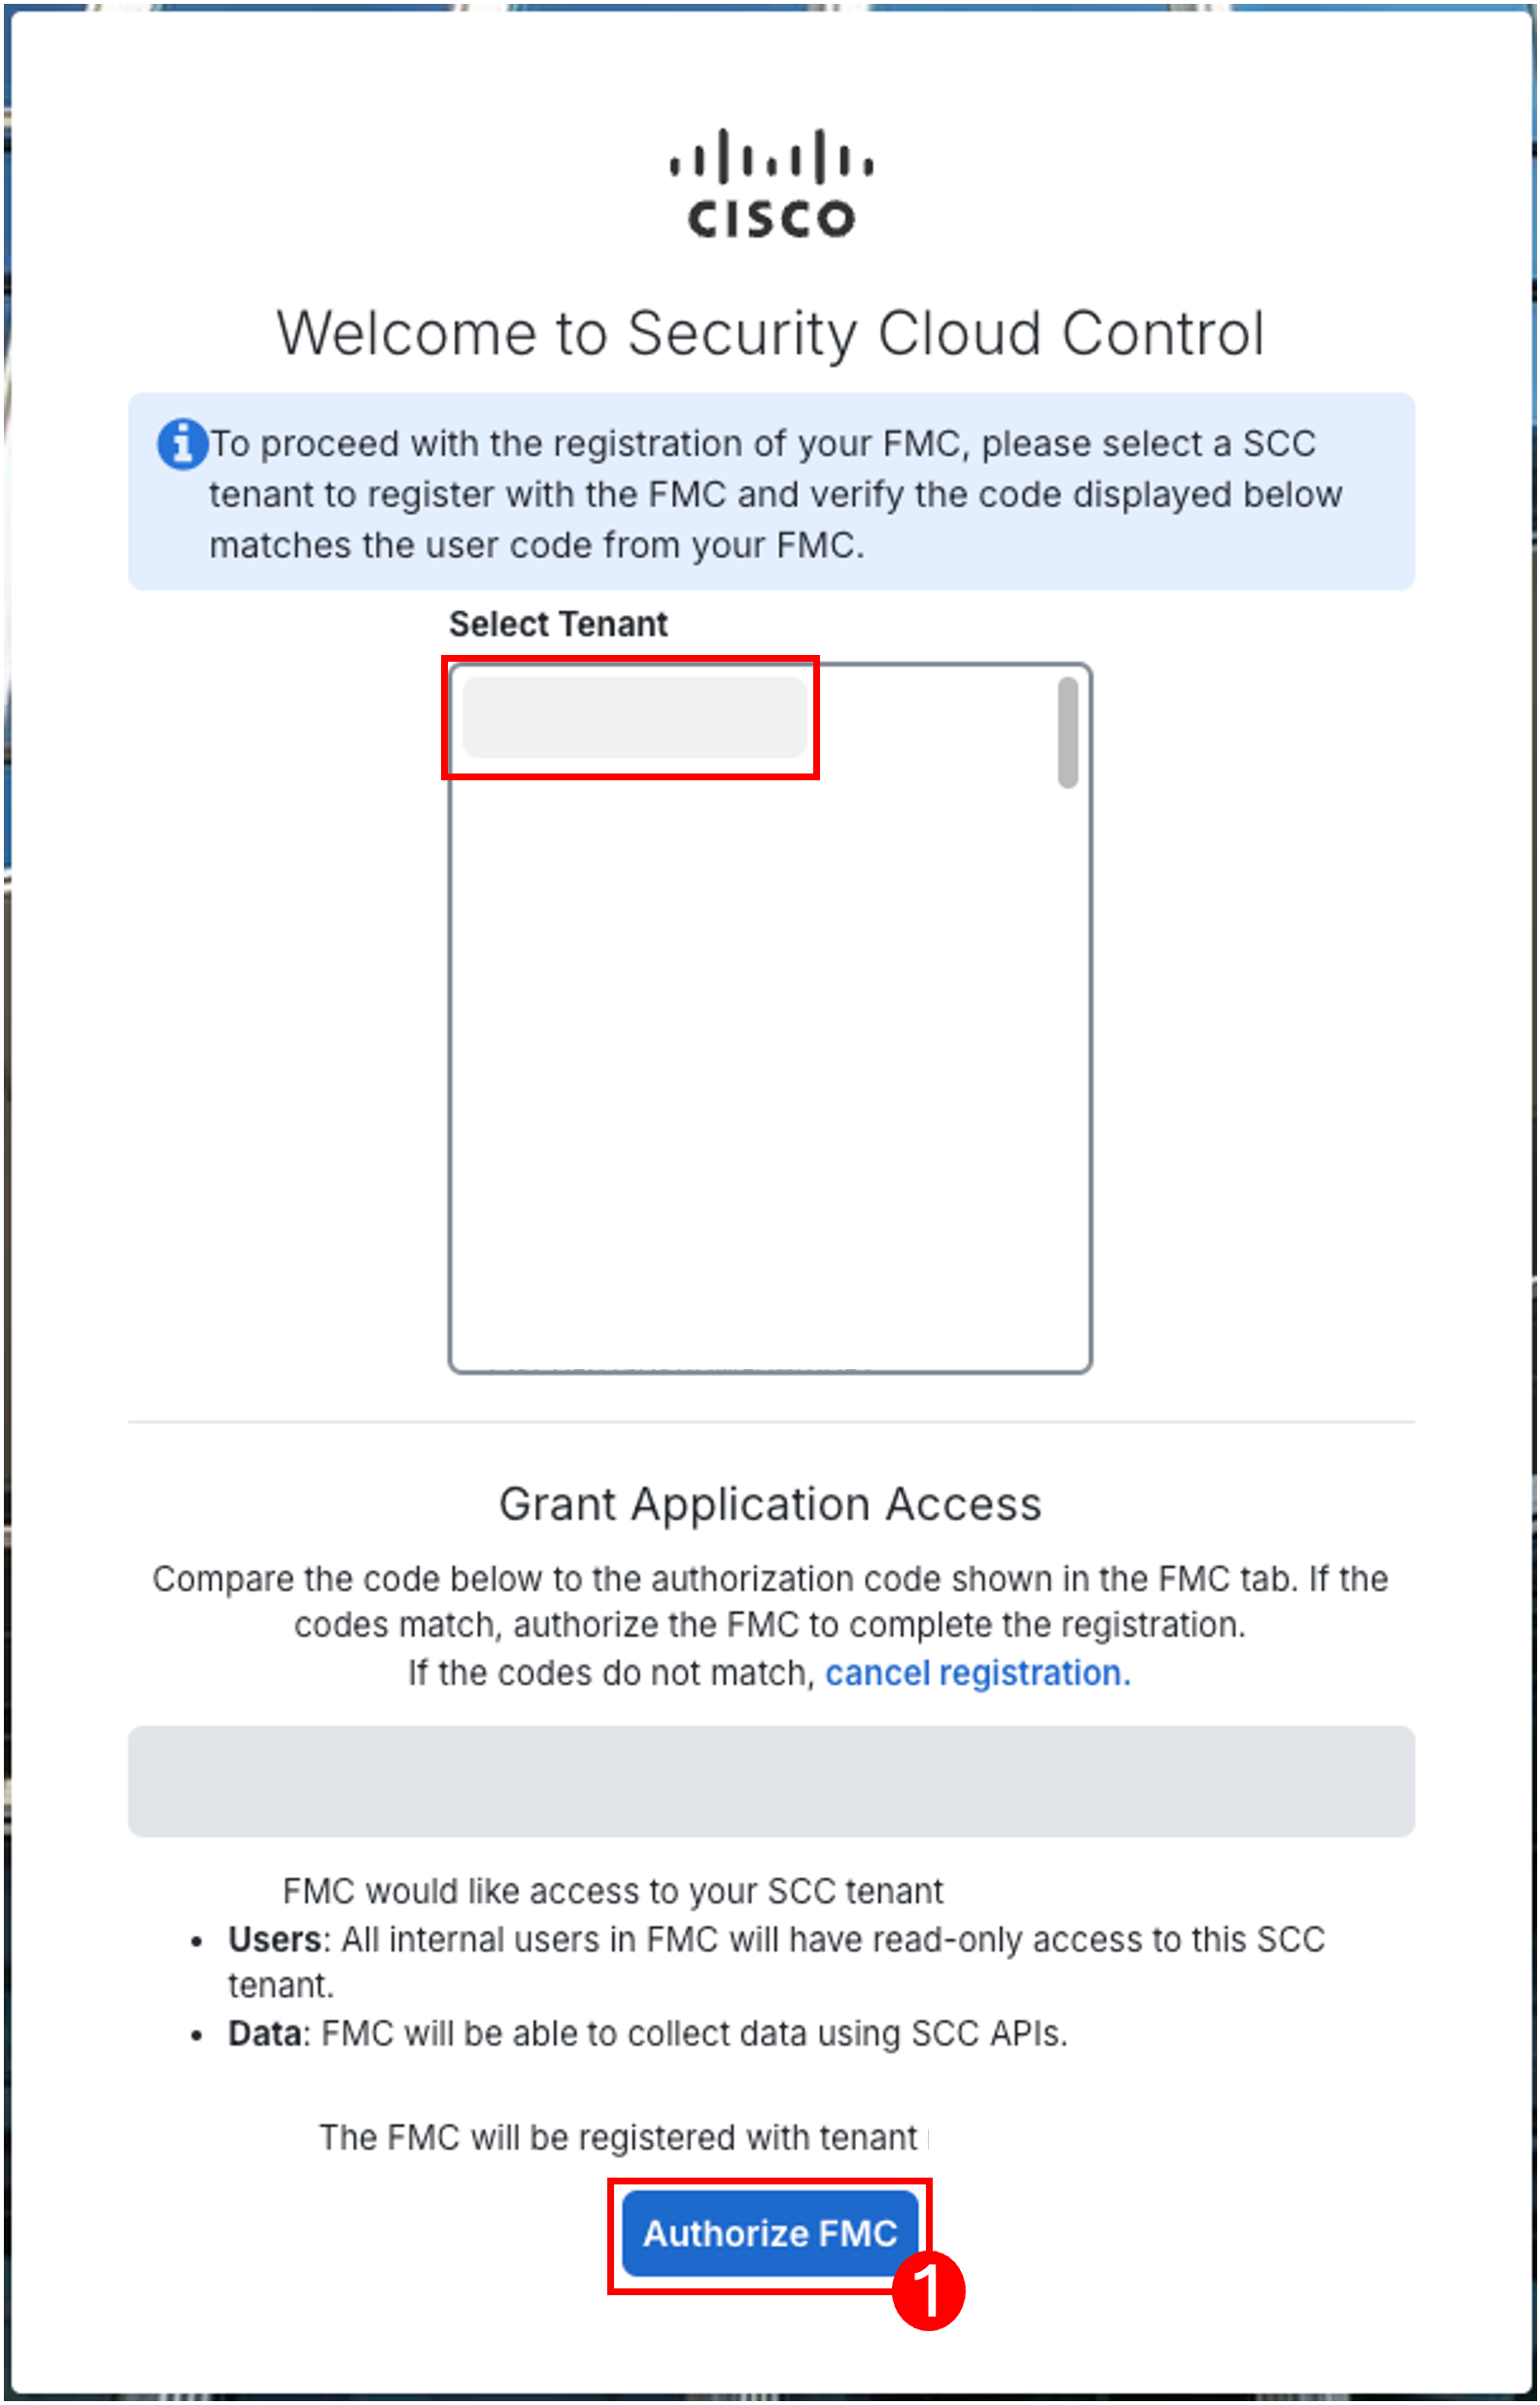
From the list of tenants choose the tenant you'd like to register the FMC, compare the authorization code shown on the wizard with the code displayed on FMC and make sure they are identical. Then click Authorize FMC.
If you do not have a CDO tenant...
Choose the Create Tenant option and enter the Tenant Name with your preferred name, compare the authorization code shown on the wizard with the code displayed on FMC and make sure they are identical. Then click on Authorize FMC.

-
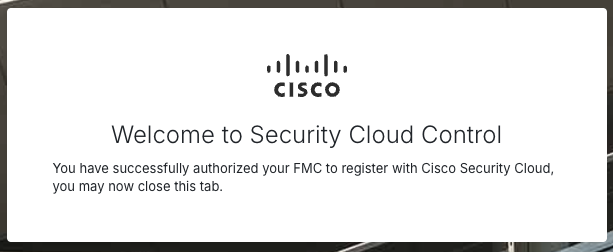
Once you see this message on the wizard, you can close the tab and head back to the FMC.
-
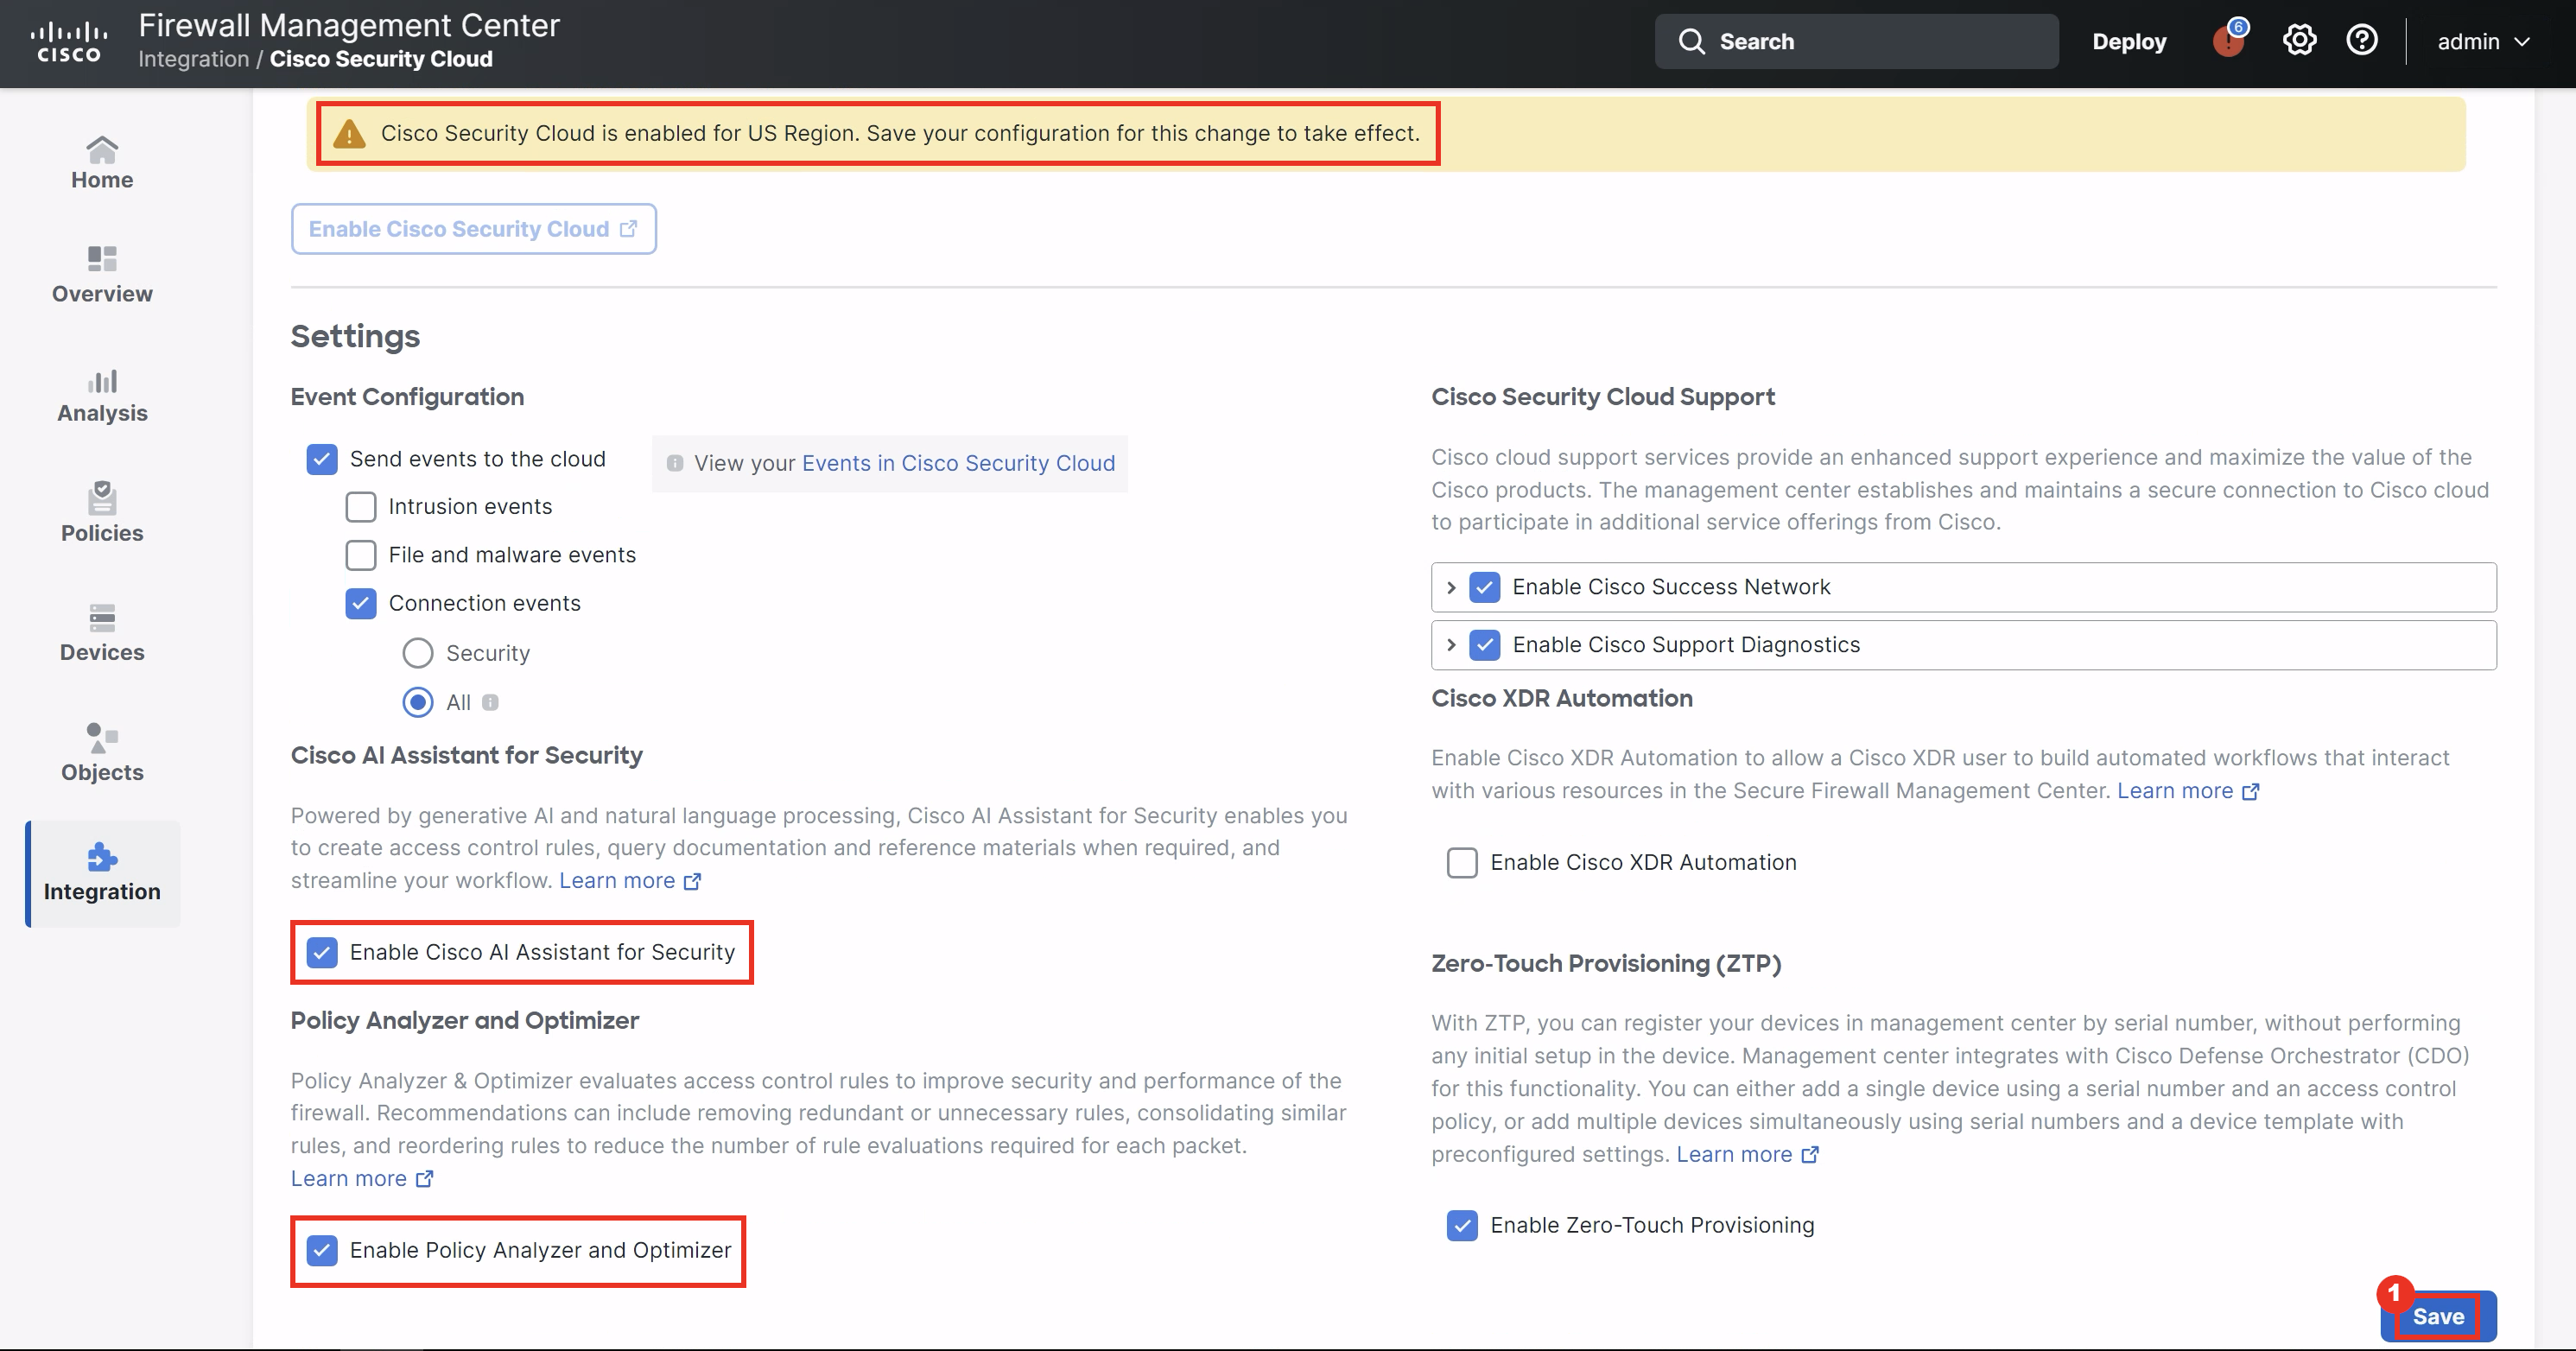
The changes are not applied yet, so verify that Enable Cisco AI Assistant for Security and Enable Policy Analyzer and Optimizer options are checked and then click Save for the changes to take affect.
Note
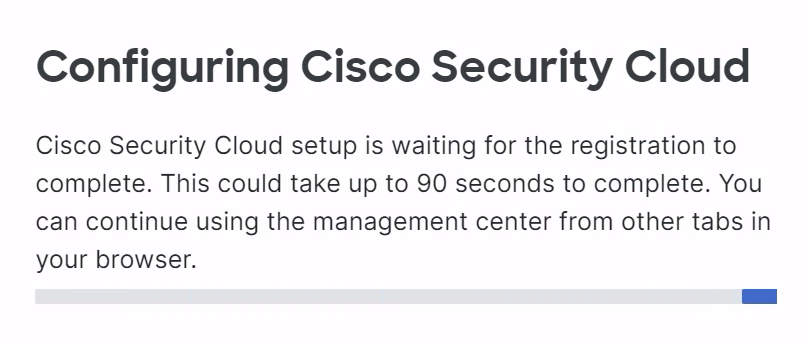
Upon clicking save, the initial provisioning can take up to 90-seconds to complete. During this time, you will see the following while the configuration is saved:
- Once the configuration is complete, you will notice that Cisco Security Cloud is marked as Enabled with CDO Tenant name populated and the Cloud Onboarding Status as Online.
Proceed to the next task by clicking on the AI Assistant Icon in the taskbar as the highlighted in the screenshot below.

Note
If the Cloud Onboarding Status has not changed to Online automatically, refresh the page to update the changes.
Introduction to the AI Assistant
AI Assistant's initial capabilities include Policy Inquiry (e.g. How many rules are disabled in my Access Control Policy?), Configuration Guidance (e.g. How can I set my Intrusion Rules to auto-update?), Troubleshooting Assistance (e.g. Why am I getting ASP Drop alerts?) and Rule Creation (e.g. Create a rule blocking access to Facebook for jdoe.).
As a cloud-delivered service, AI Assistant will continue to expand its capabilities rapidly over time. To determine what AI Assistant's capabilities are at any time, simply ask it!
Task 2 - Use the AI Assistant
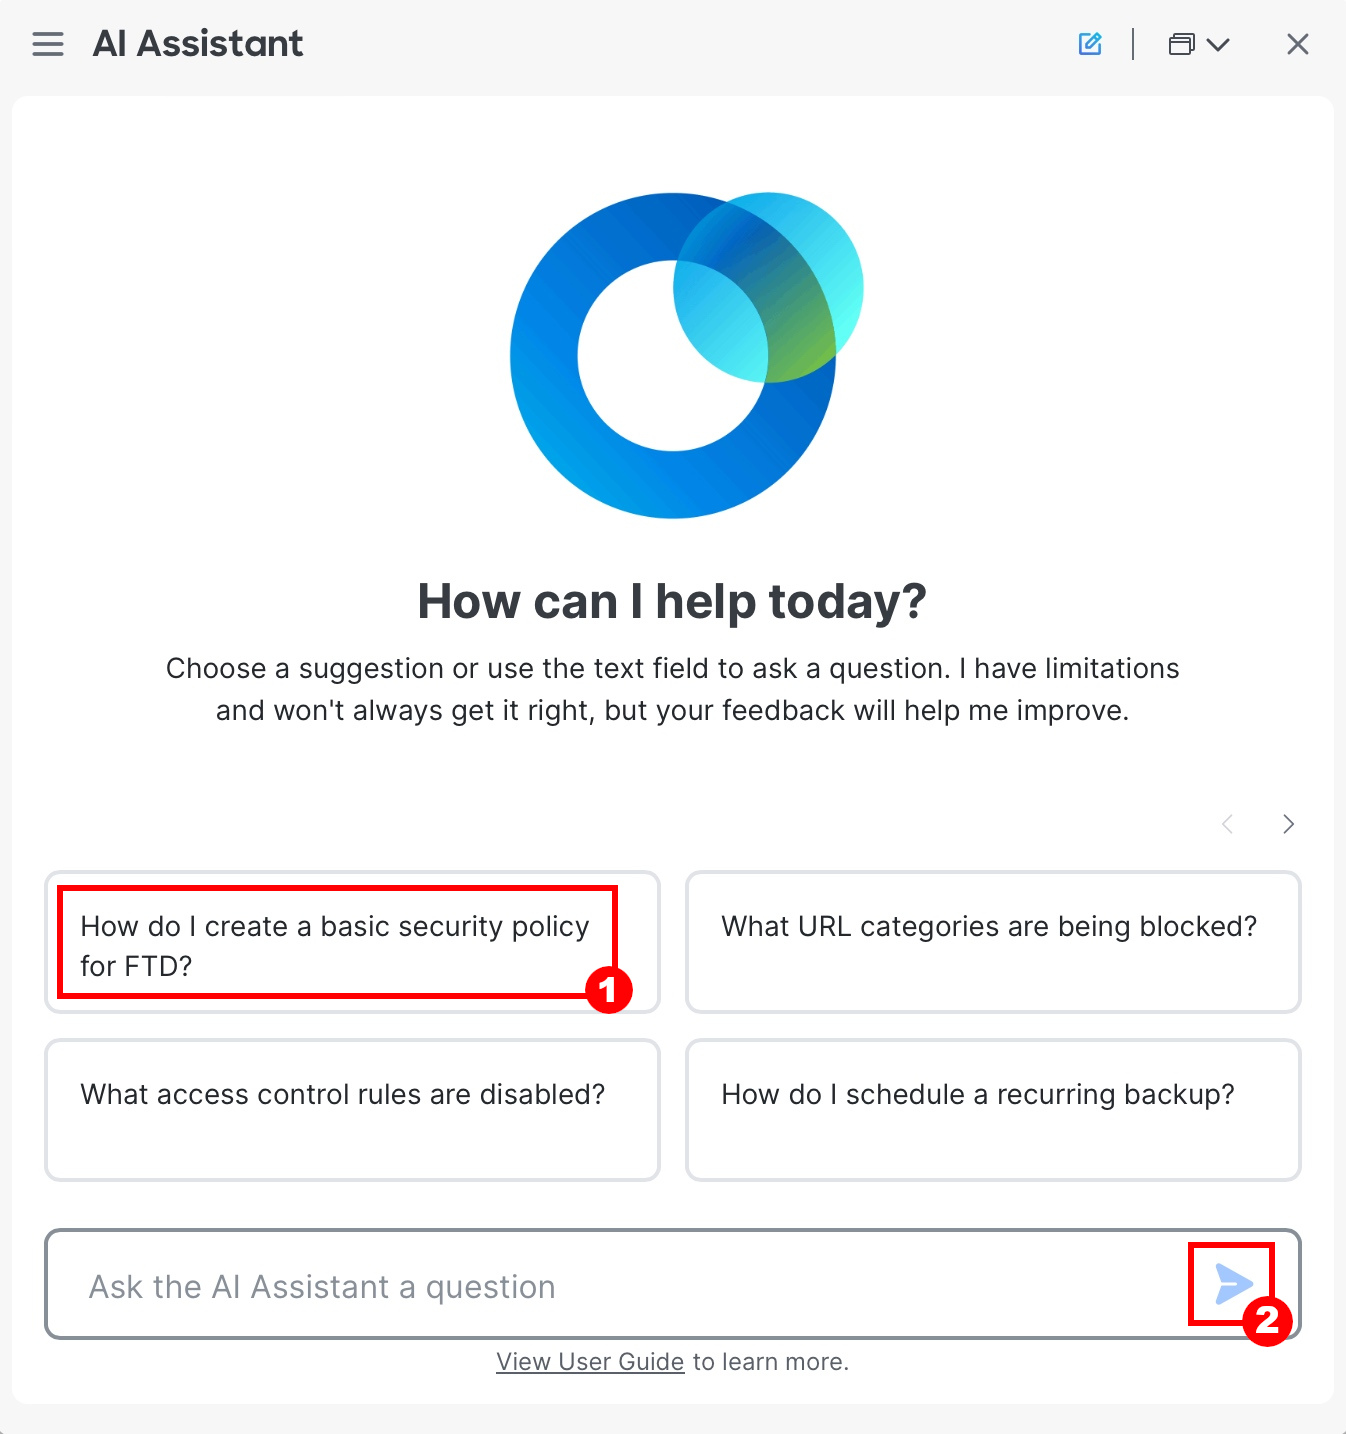
The first time opening AI Assistant, each user will be presented with a few welcome screens to click through. The screen then presents a series of sample questions and a prompt, allowing users to begin interacting.
- Click on any one of the sample questions, the question will get auto filled on the prompt. Then click on the Send icon to submit the question to the AI Assistant.
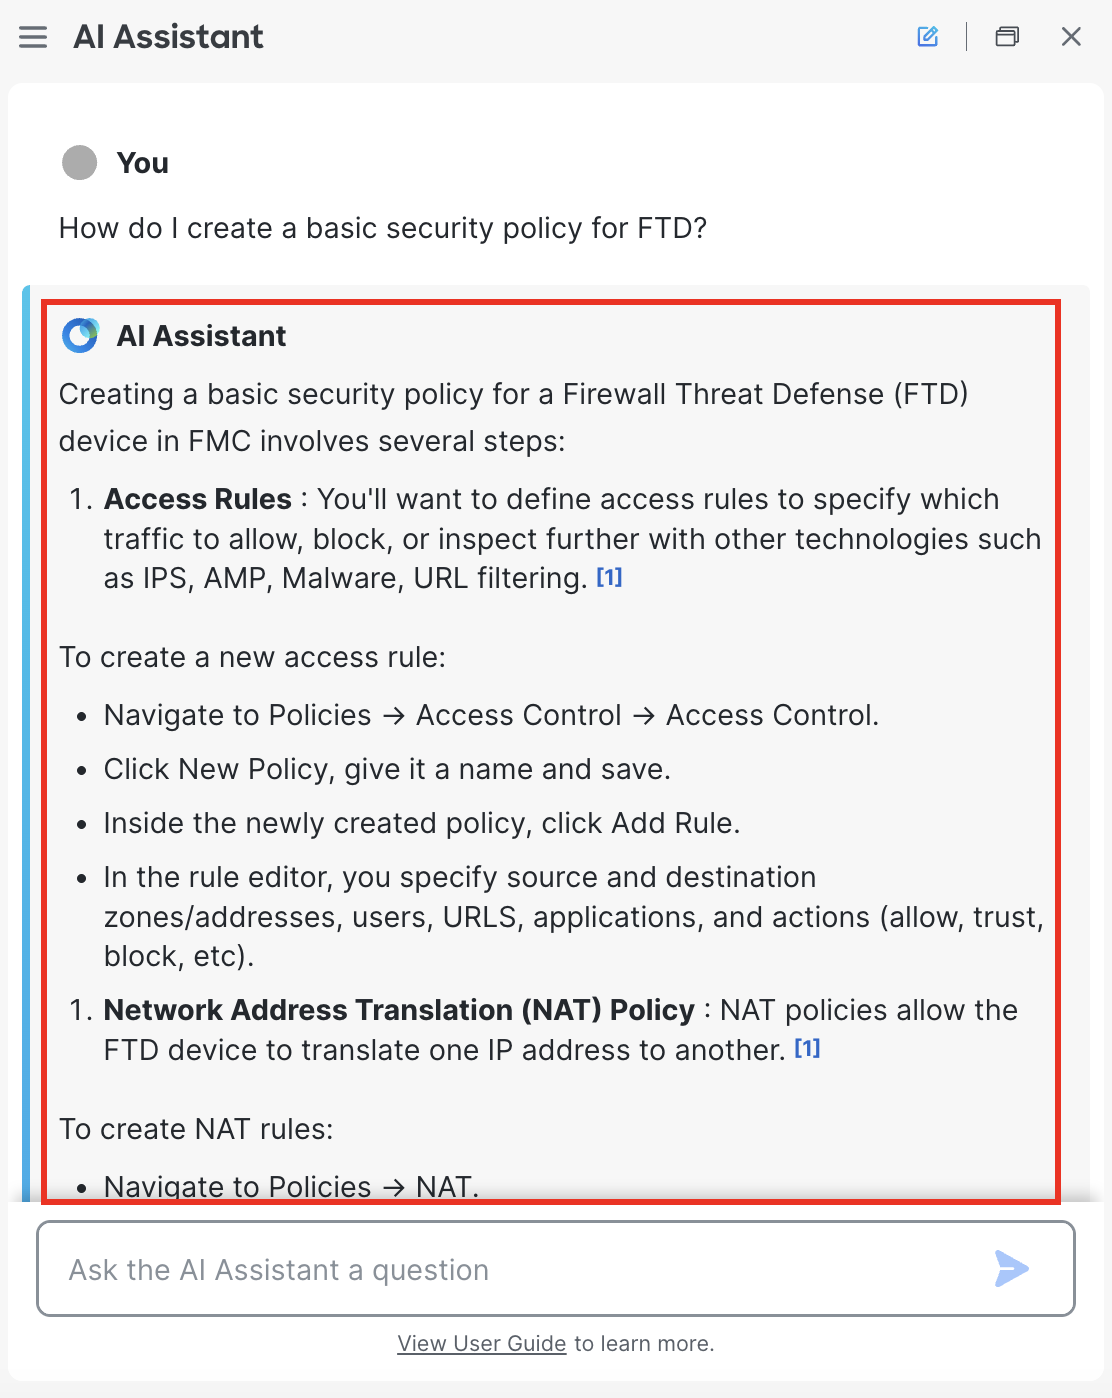
- You will receive a well summarised answer to the question along with sources cited.
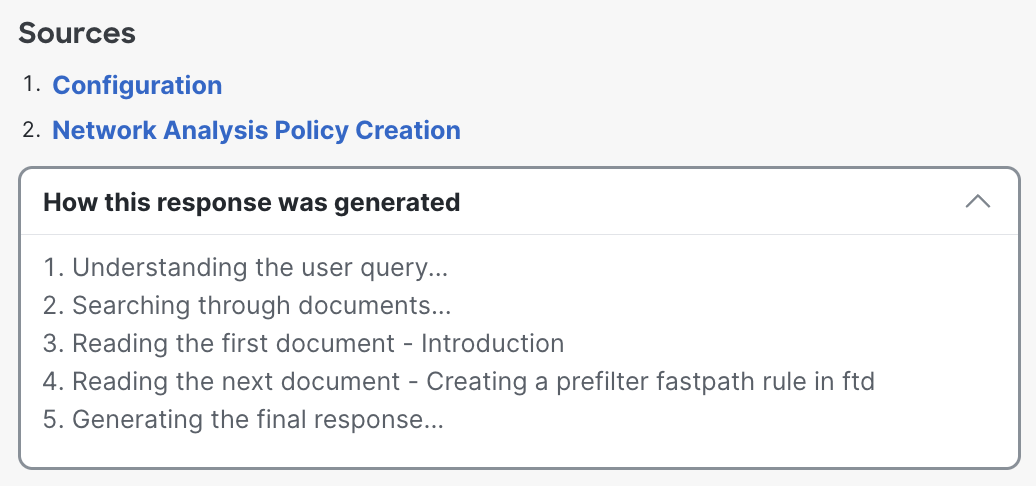
- Towards the end of the response, hyperlink to the sources are listed which you can refer to. You can also click on How this response was generated to reveal the steps that AI Assistant took to generate the response.
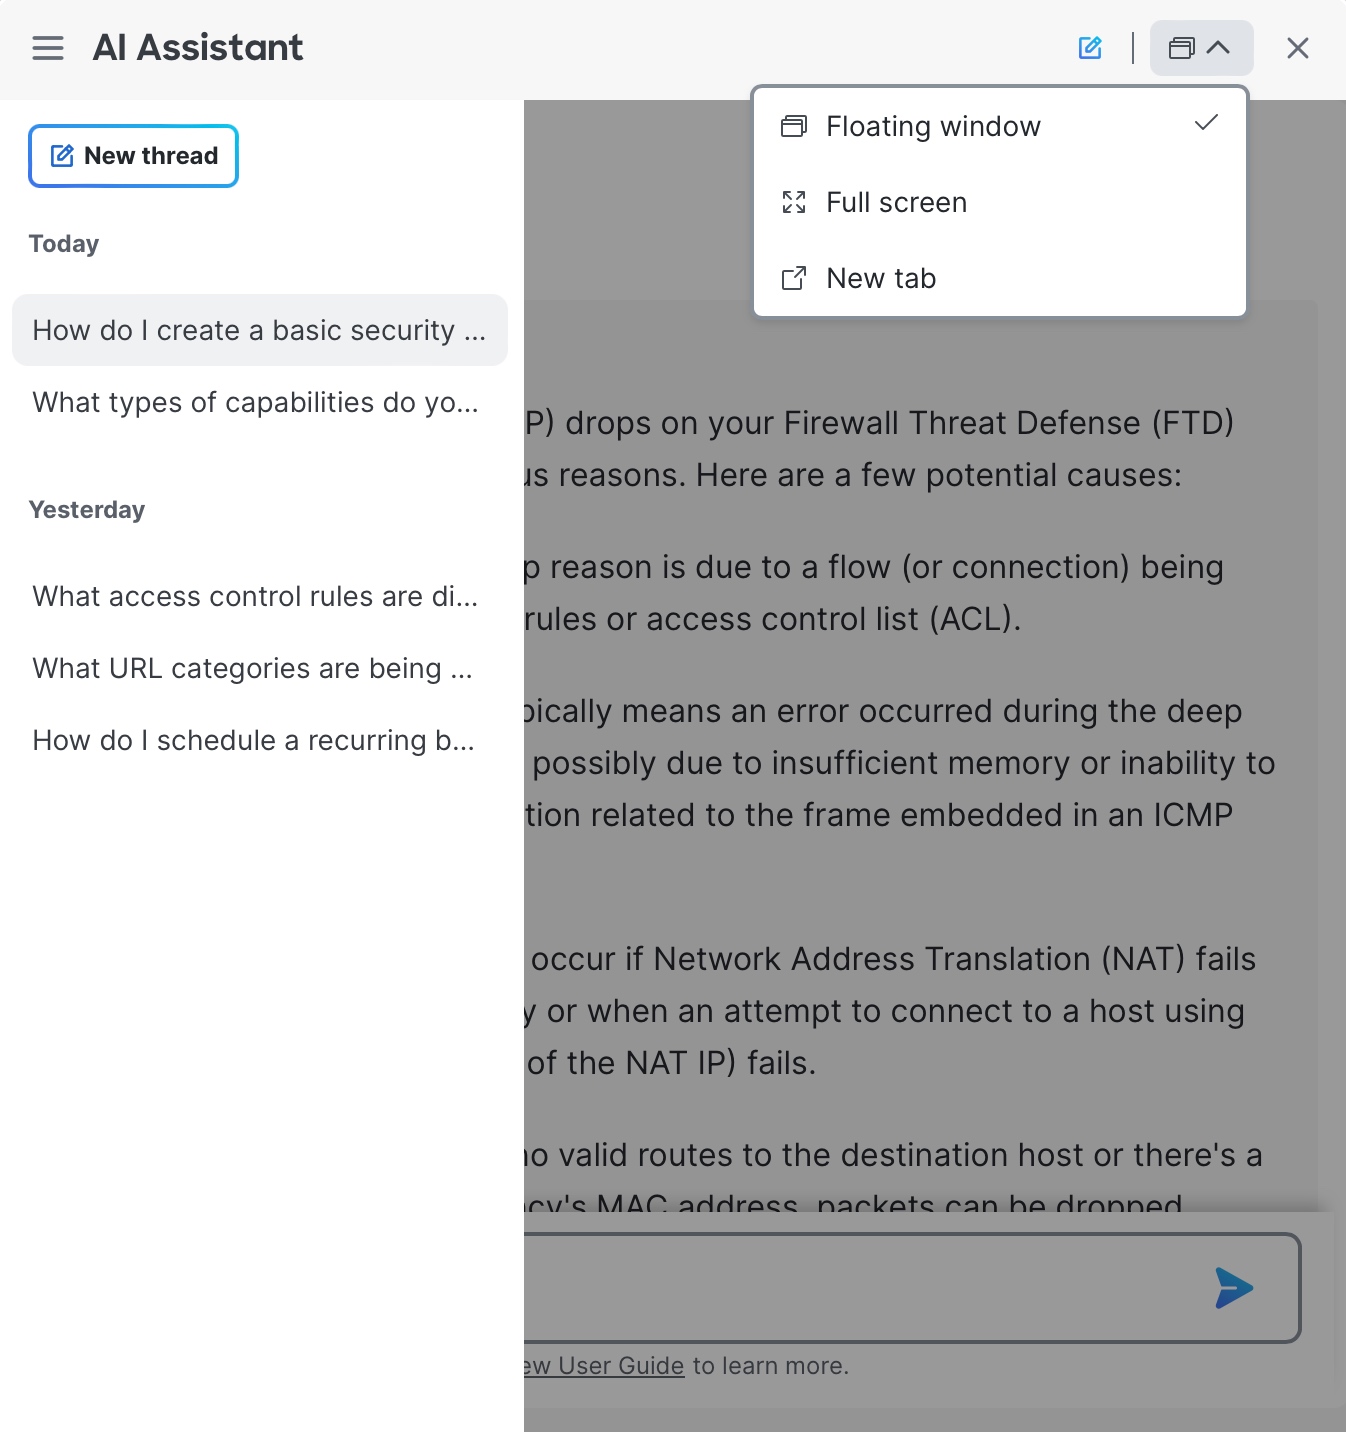
- On the left sidebar of the AI Assistant window you can see the history of usage. AI Assistant window can easily be resized or moved around the screen for ease of use. It is also possible to expand to a full-screen view or move AI Assistant into a new tab, allowing for a side-by-side experience with FMC.
Task 3 - Provide Feedback to the Response
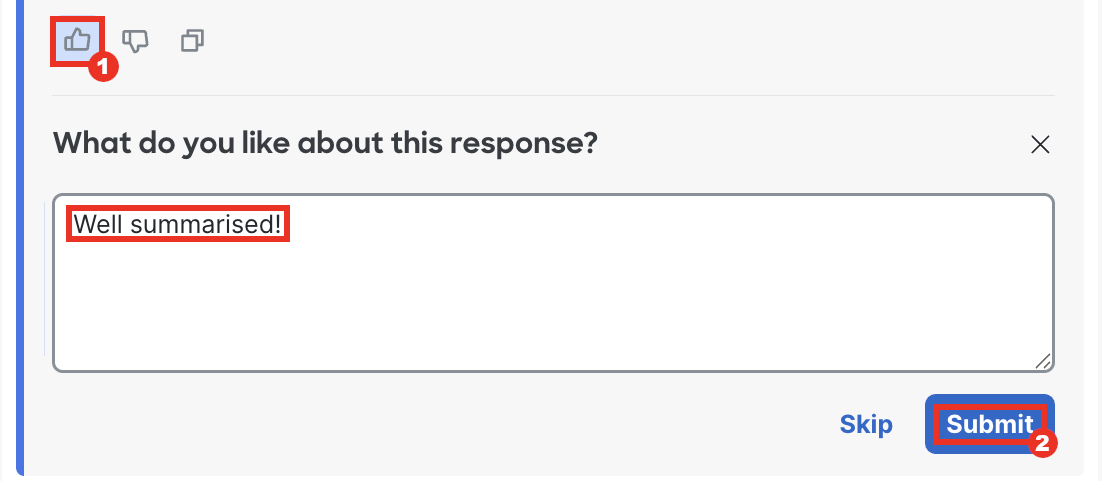
Like with other common LLMs, AI Assistant is trained on user feedback. Cisco highly encourages users to provide feedback on the quality of answers received.
- Below the response you'll see Thumbs Up and Thumbs Down icons which you can use to provide feedback to the response given by the AI Assistant. Click on either of them based on the response you receive and submit the feedback.
Policy Analyzer and Optimizer
Task 4 - Optimize a Policy
- Navigate to Policies > Access Control.
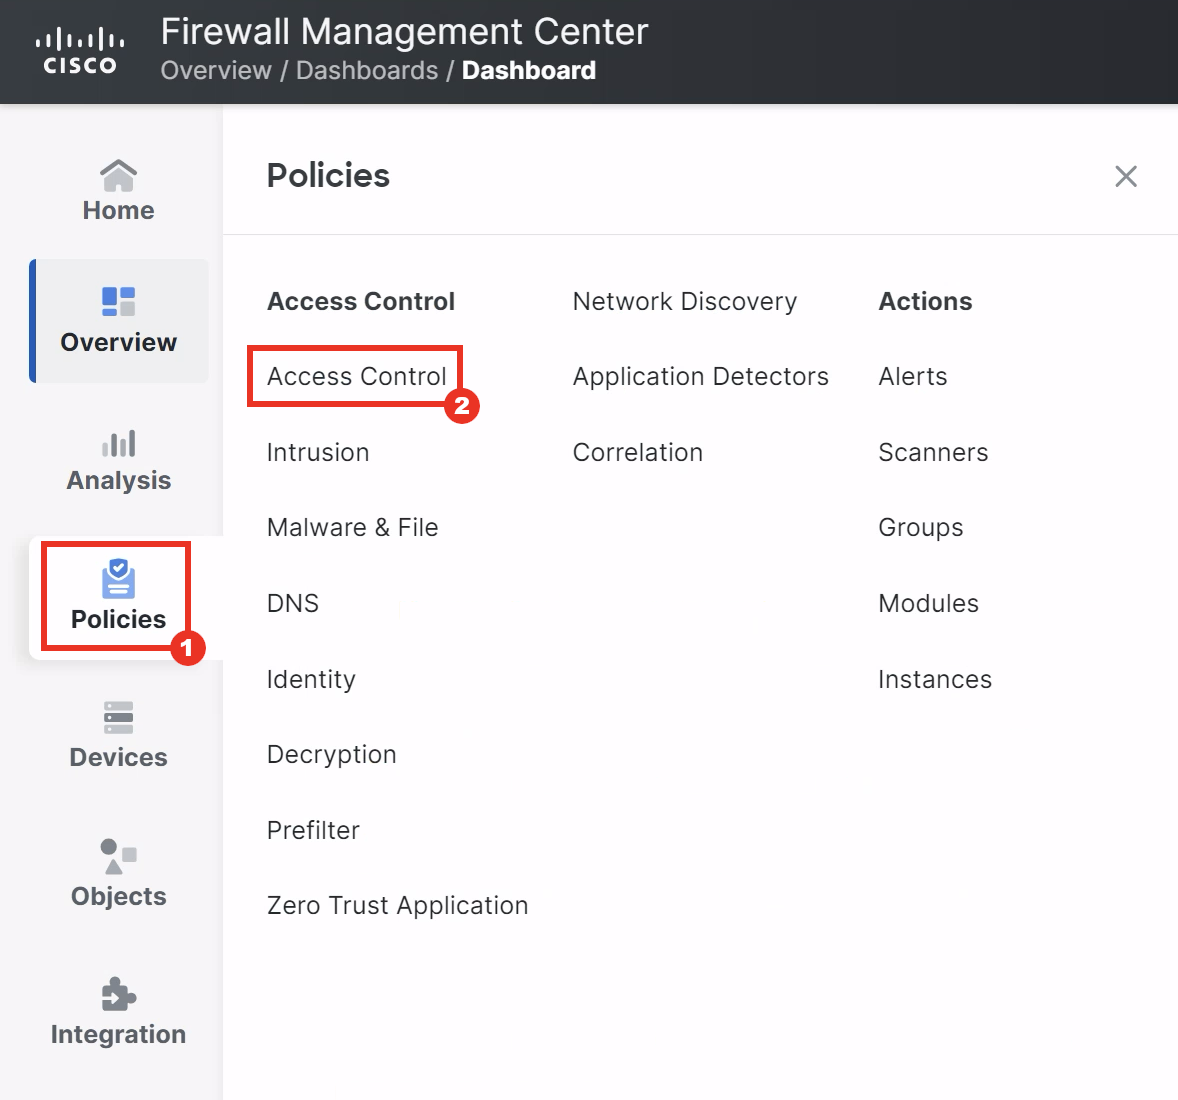
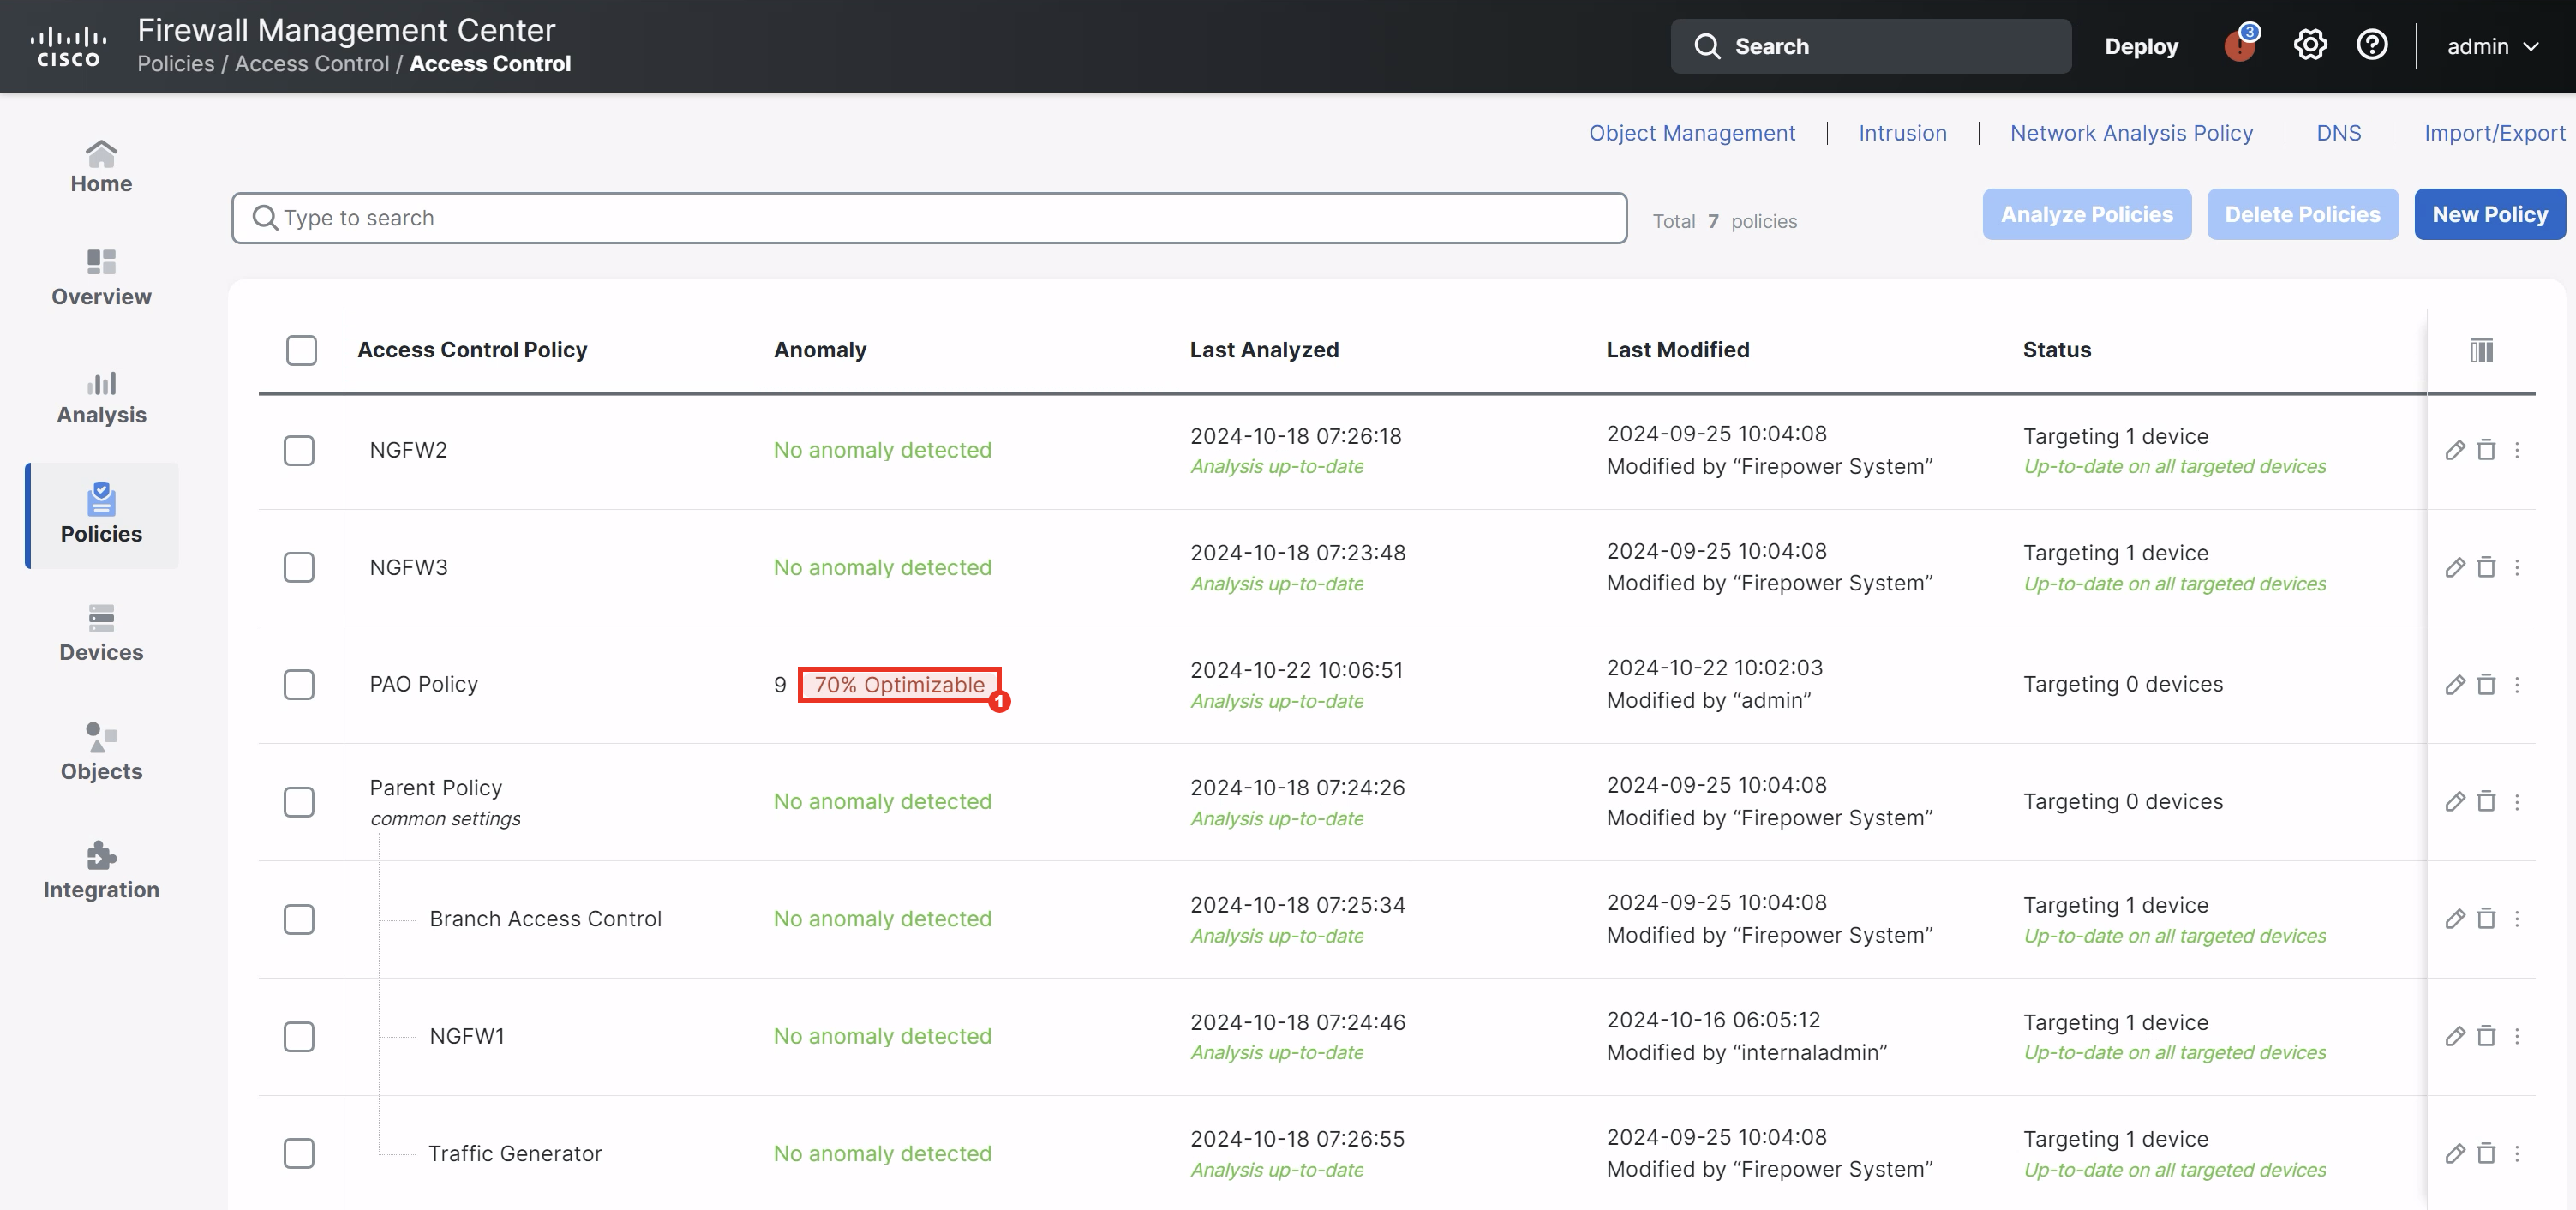
- Click on 70% Optimizable button in the PAO Policy. This will cross-launch the Policy Analyzer & Optimizer policy-level analysis page in Cisco Defence Orchestrator.
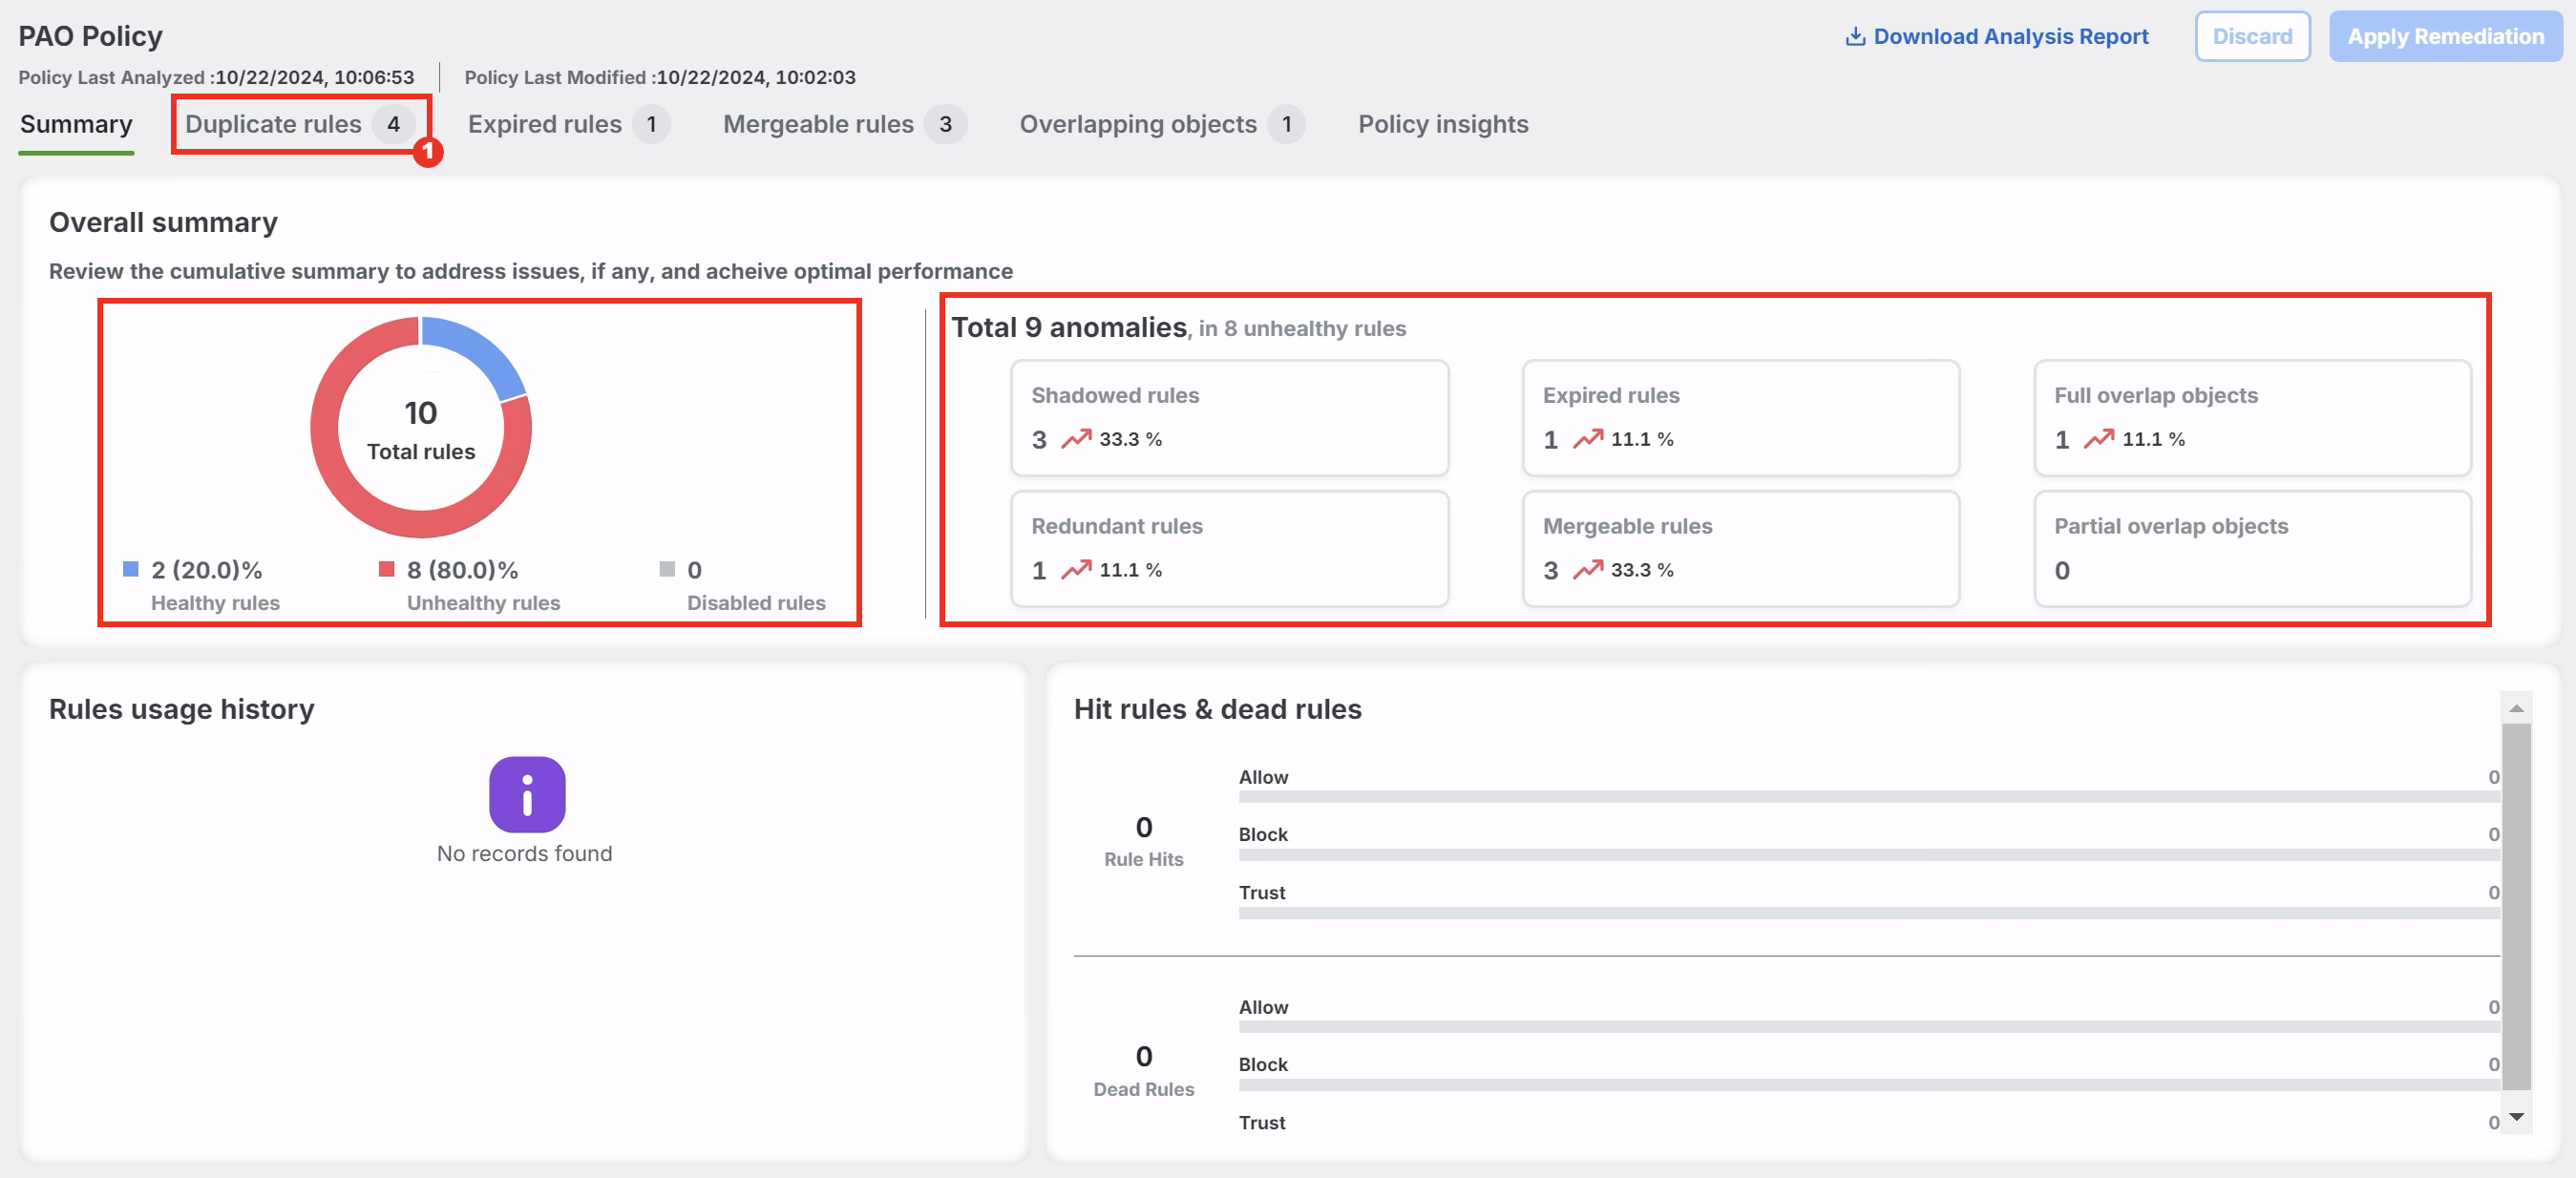
- The first tab within Policy Analyzer and Optimizer's policy-level analysis is a Summary tab, highlighting how many rules match each of the highlighted anomaly types.
Click on Duplicate rules before proceeding to the next step.
- Click Fully Shadowed rules(3) and Fully Redundant Rules(1) to expand them and view the observations.
Note
The Duplicate Rules tab highlights rules which duplicate the functionality of another rule in policy, such that they are not needed for proper traffic evaluation. There are two different types of duplicate rules highlighted by Policy Analyzer and Optimizer: a Fully Shadowed Rule is one which will never evaluate within policy because the traffic will always match the criteria of a higher rule in the policy. A Fully Redundant Rule is one whose criteria is a subset of another rule below in the policy. It is generally possible to remove either type of duplicate rule with no change in firewall traffic evaluation. Removing duplicate rules also improves performance as the effective policy running in firewall memory is reduced in size.
- To remediate these duplicate rules click on Disable All Fully Shadowed Rules and Disable All Fully Redundant Rules.
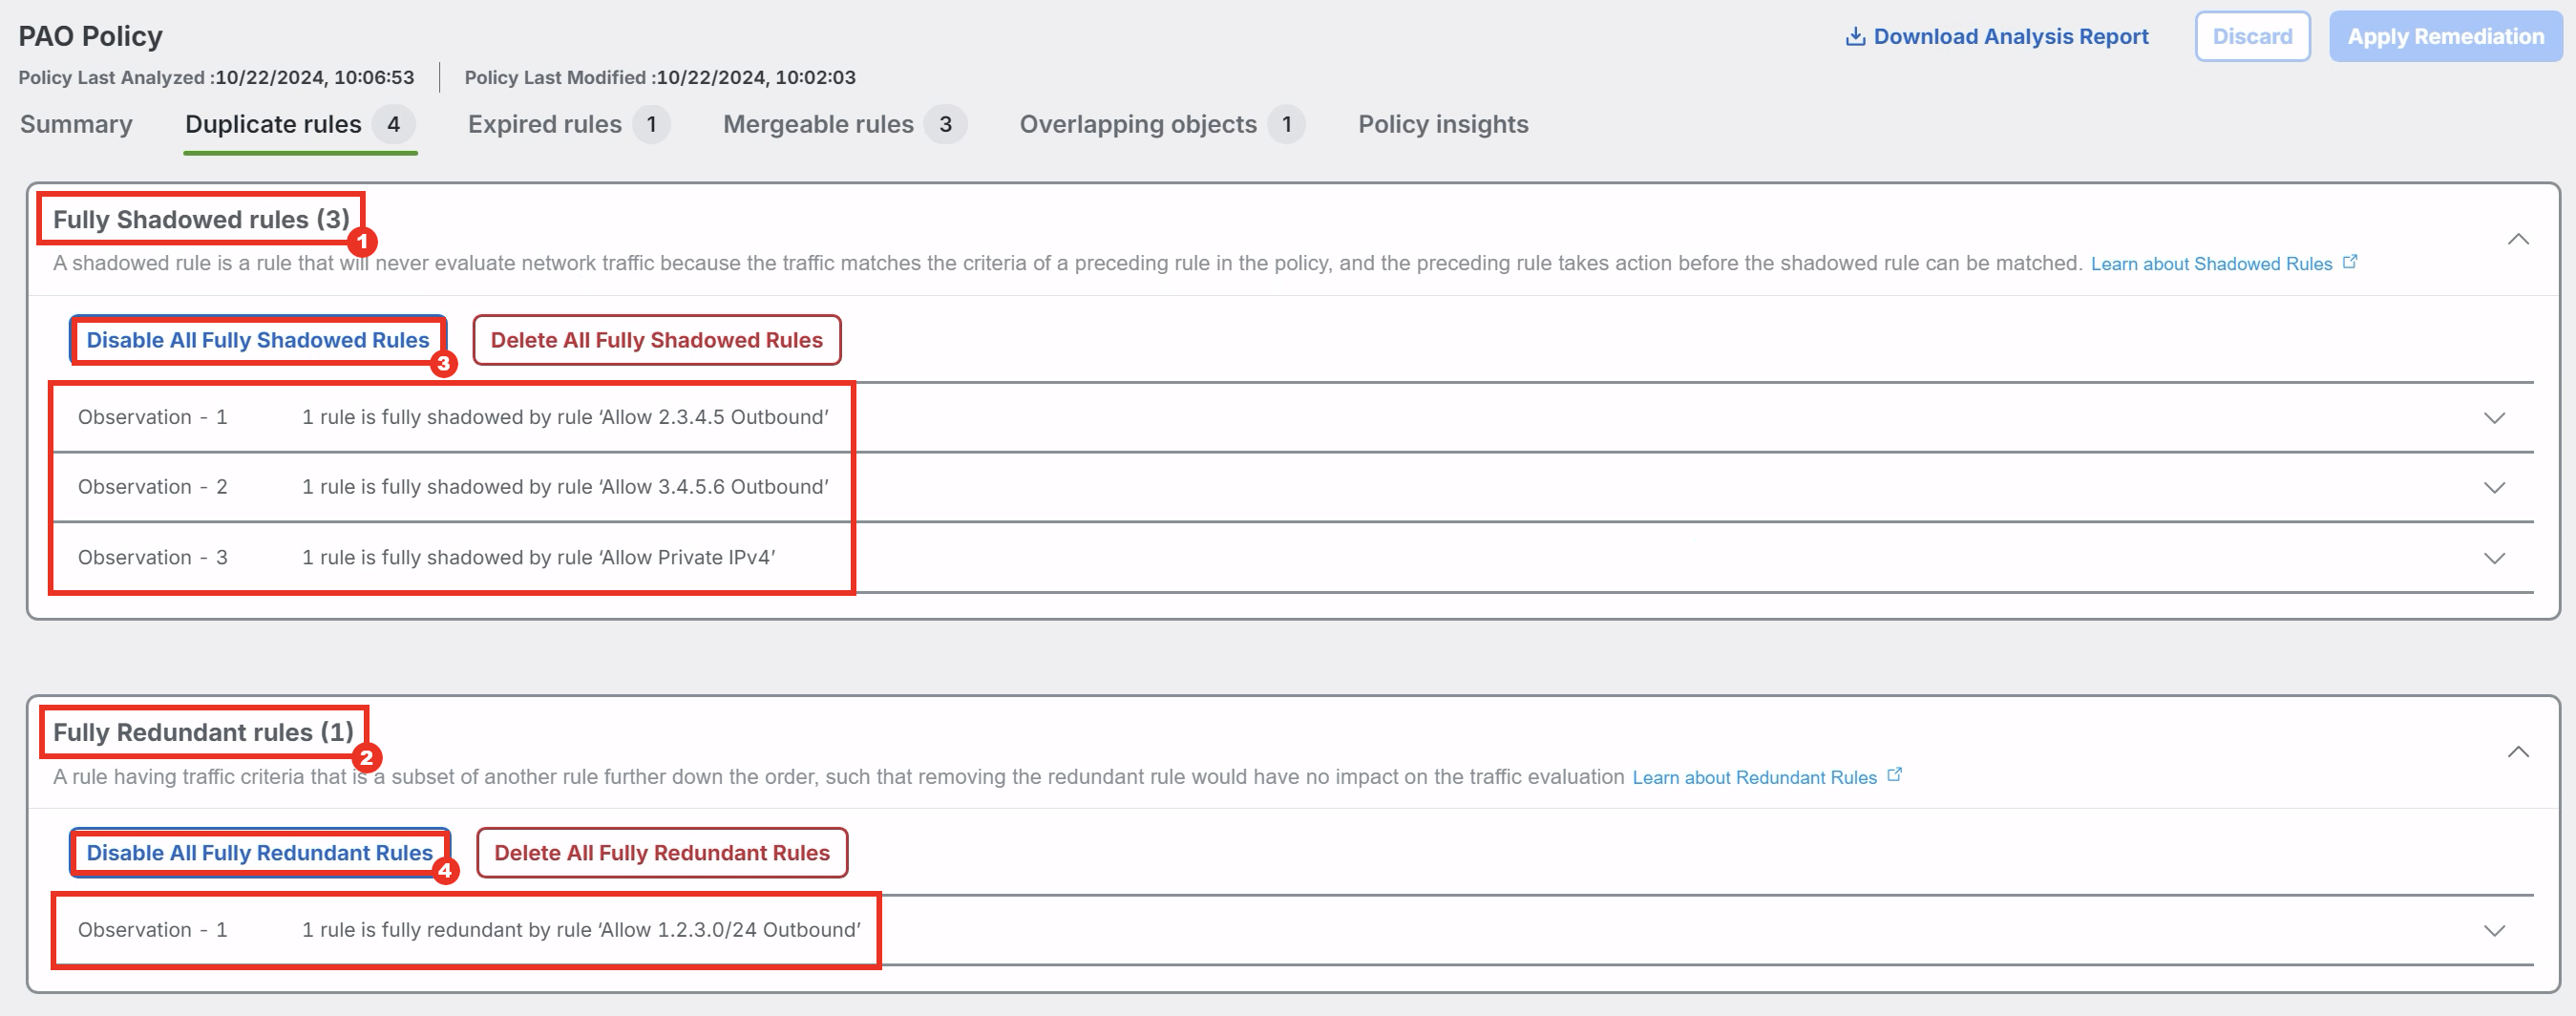
- After the rules are marked to be disabled, click on Expired rules before proceeding to the next step.

- Click Expired rules to expand it and view the details.
Note
If an Access Control rule is defined with a Time Object which sets an end date, the rule expires after the end date has passed and effectively acts in the same manner as a Disabled Rule, while still being compiled into the running firewall configuration. Disabling and removing Expired Rules improves firewall performance and is also a good maintenance task if the rule will not be used again.
- To remediate the expired rule click on Disable All Expired Rules.

- Once the previous step completes, click Mergable rules.

- Expand and view the observations.
Note
In many cases, several Access Control rules can exist which do the same thing for multiple sources or destinations. For example, there might be a rule blocking access to Social Media for multiple departments, each within their own Access Control rule. It is often possible to merge these rules into a single rule, combining the multiple source or destination objects into a single rule.
- To remediate the mergeable rules click Merge All Rules.

- Read the warning for the logging behavior and click Proceed.

- After the rules are marked to be merged, click on Overlapping objects before proceeding to the next step.

- Click on Full Overlapped objects(1) to expand it and view the details.
Note
When creating an Access Control rule, it is possible to add multiple objects which overlap one another within the same set of rule criteria. For example, entering a Network Object defined as 1.2.3.0/24 would fully overlap with a Host Object defined as 1.2.3.4. The rule's definition can be made more concise by removing the unnecessary object (in this case 1.2.3.4), which can also benefit firewall performance.
- To remediate the overlapping objects click on Remove All Full Overlapped Objects from Rules.
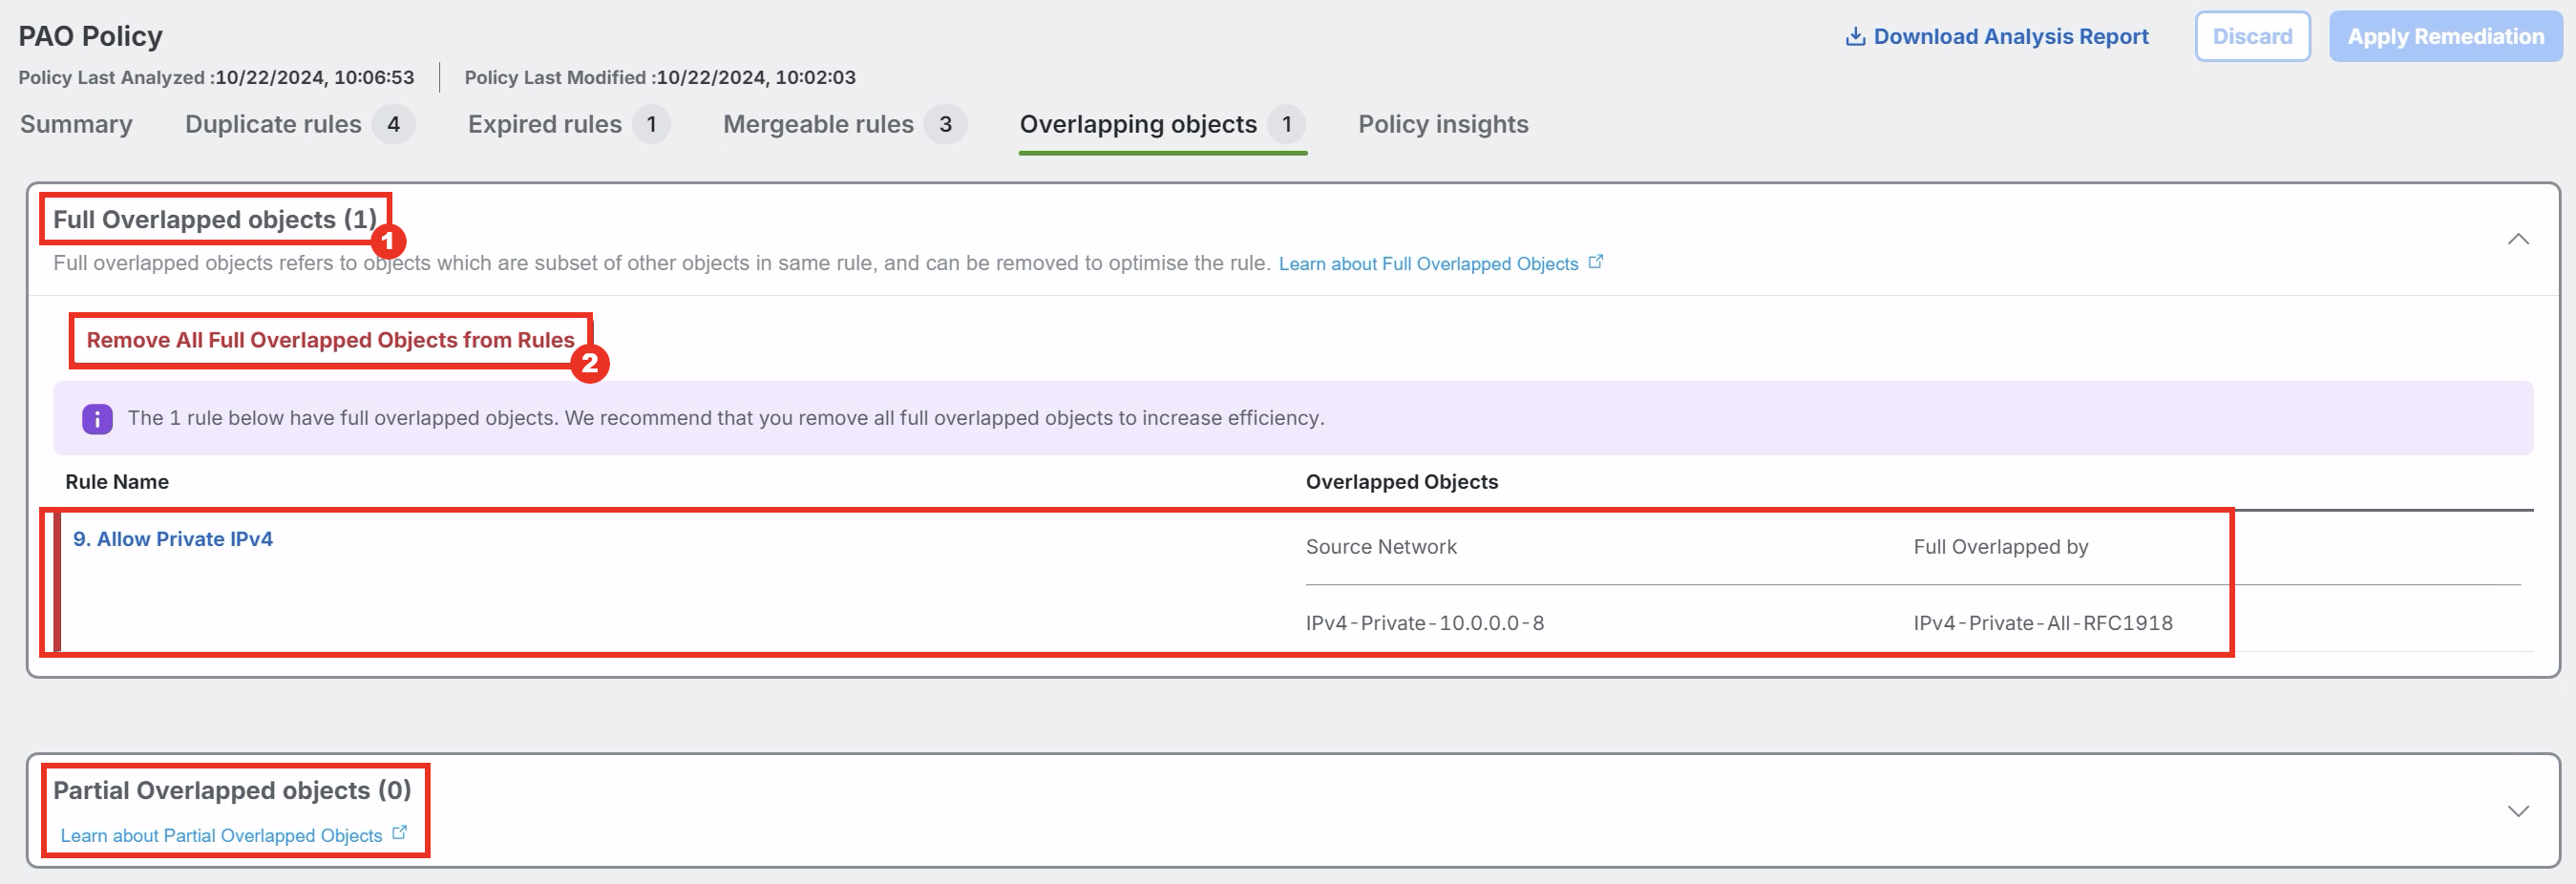
- After the objects are marked to be removed, click Apply Remediation.

- A confirmation window will pop up which recommends you to take a backup of your policy and lists the changes that will be applied to the policy. Click Apply to start the remediation.
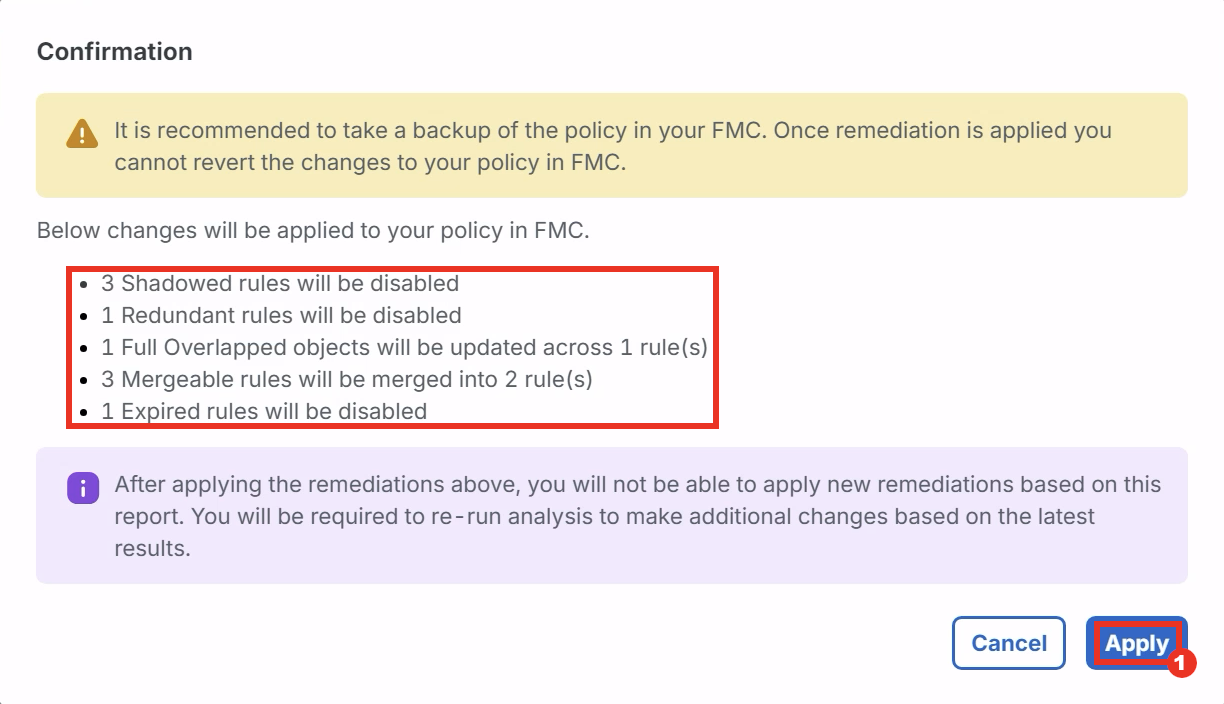
- After you get the confirmation that the remediation is complete. Navigate back to the FMC. If you refresh the page you'll notice that the Analysis for PAO Policy is out-of date. Click the three dots in the PAO Policy and click on Analyze Policy.
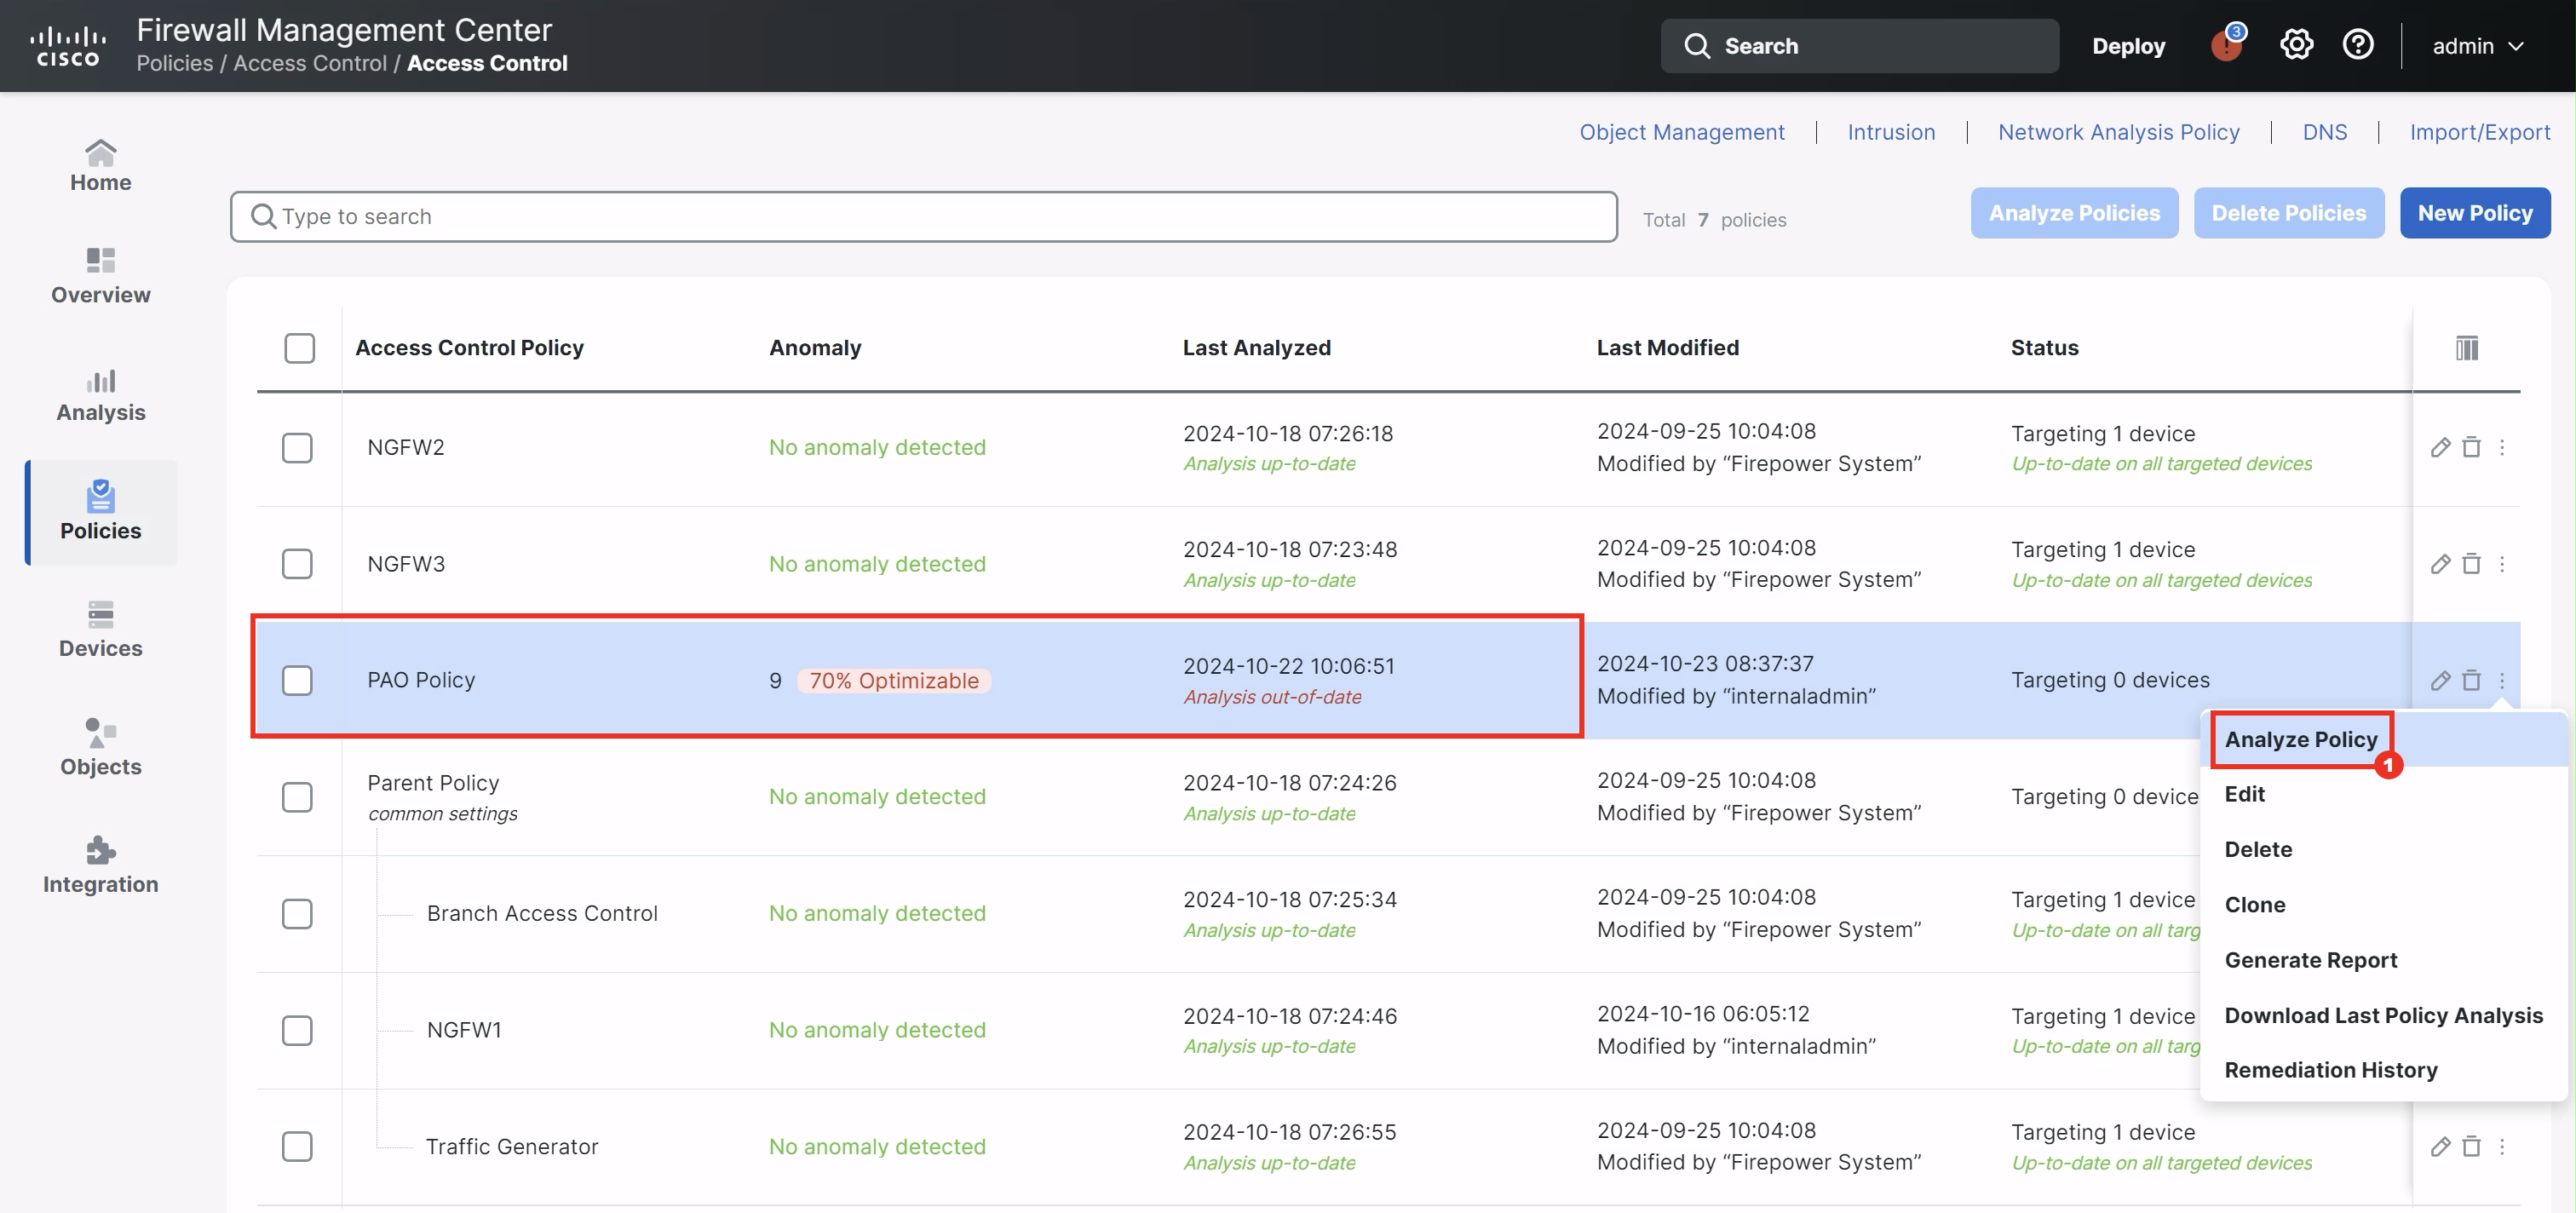
- Read the warning about auto-analysis and click Run now to run the analysis manually.
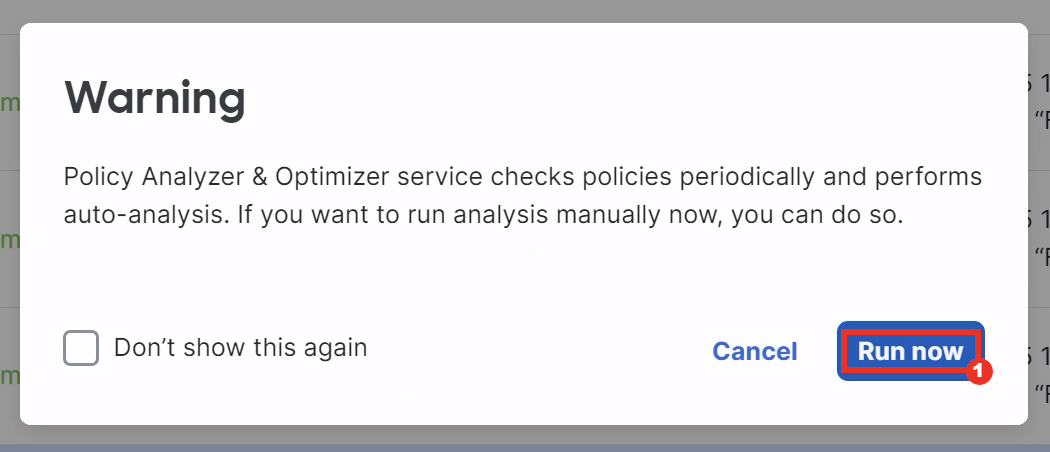
- Analysis will take a few minutes to complete. So proceed to the next task. Steps to verify the remediation are present at the end of the next task.
Task 5 - Review a Healthy and Active Policy
- Click on No anomaly detected button in the Traffic Generator Policy. This will cross-launch the Policy Analyzer & Optimizer analysis page in Cisco Defense Orchestrator.
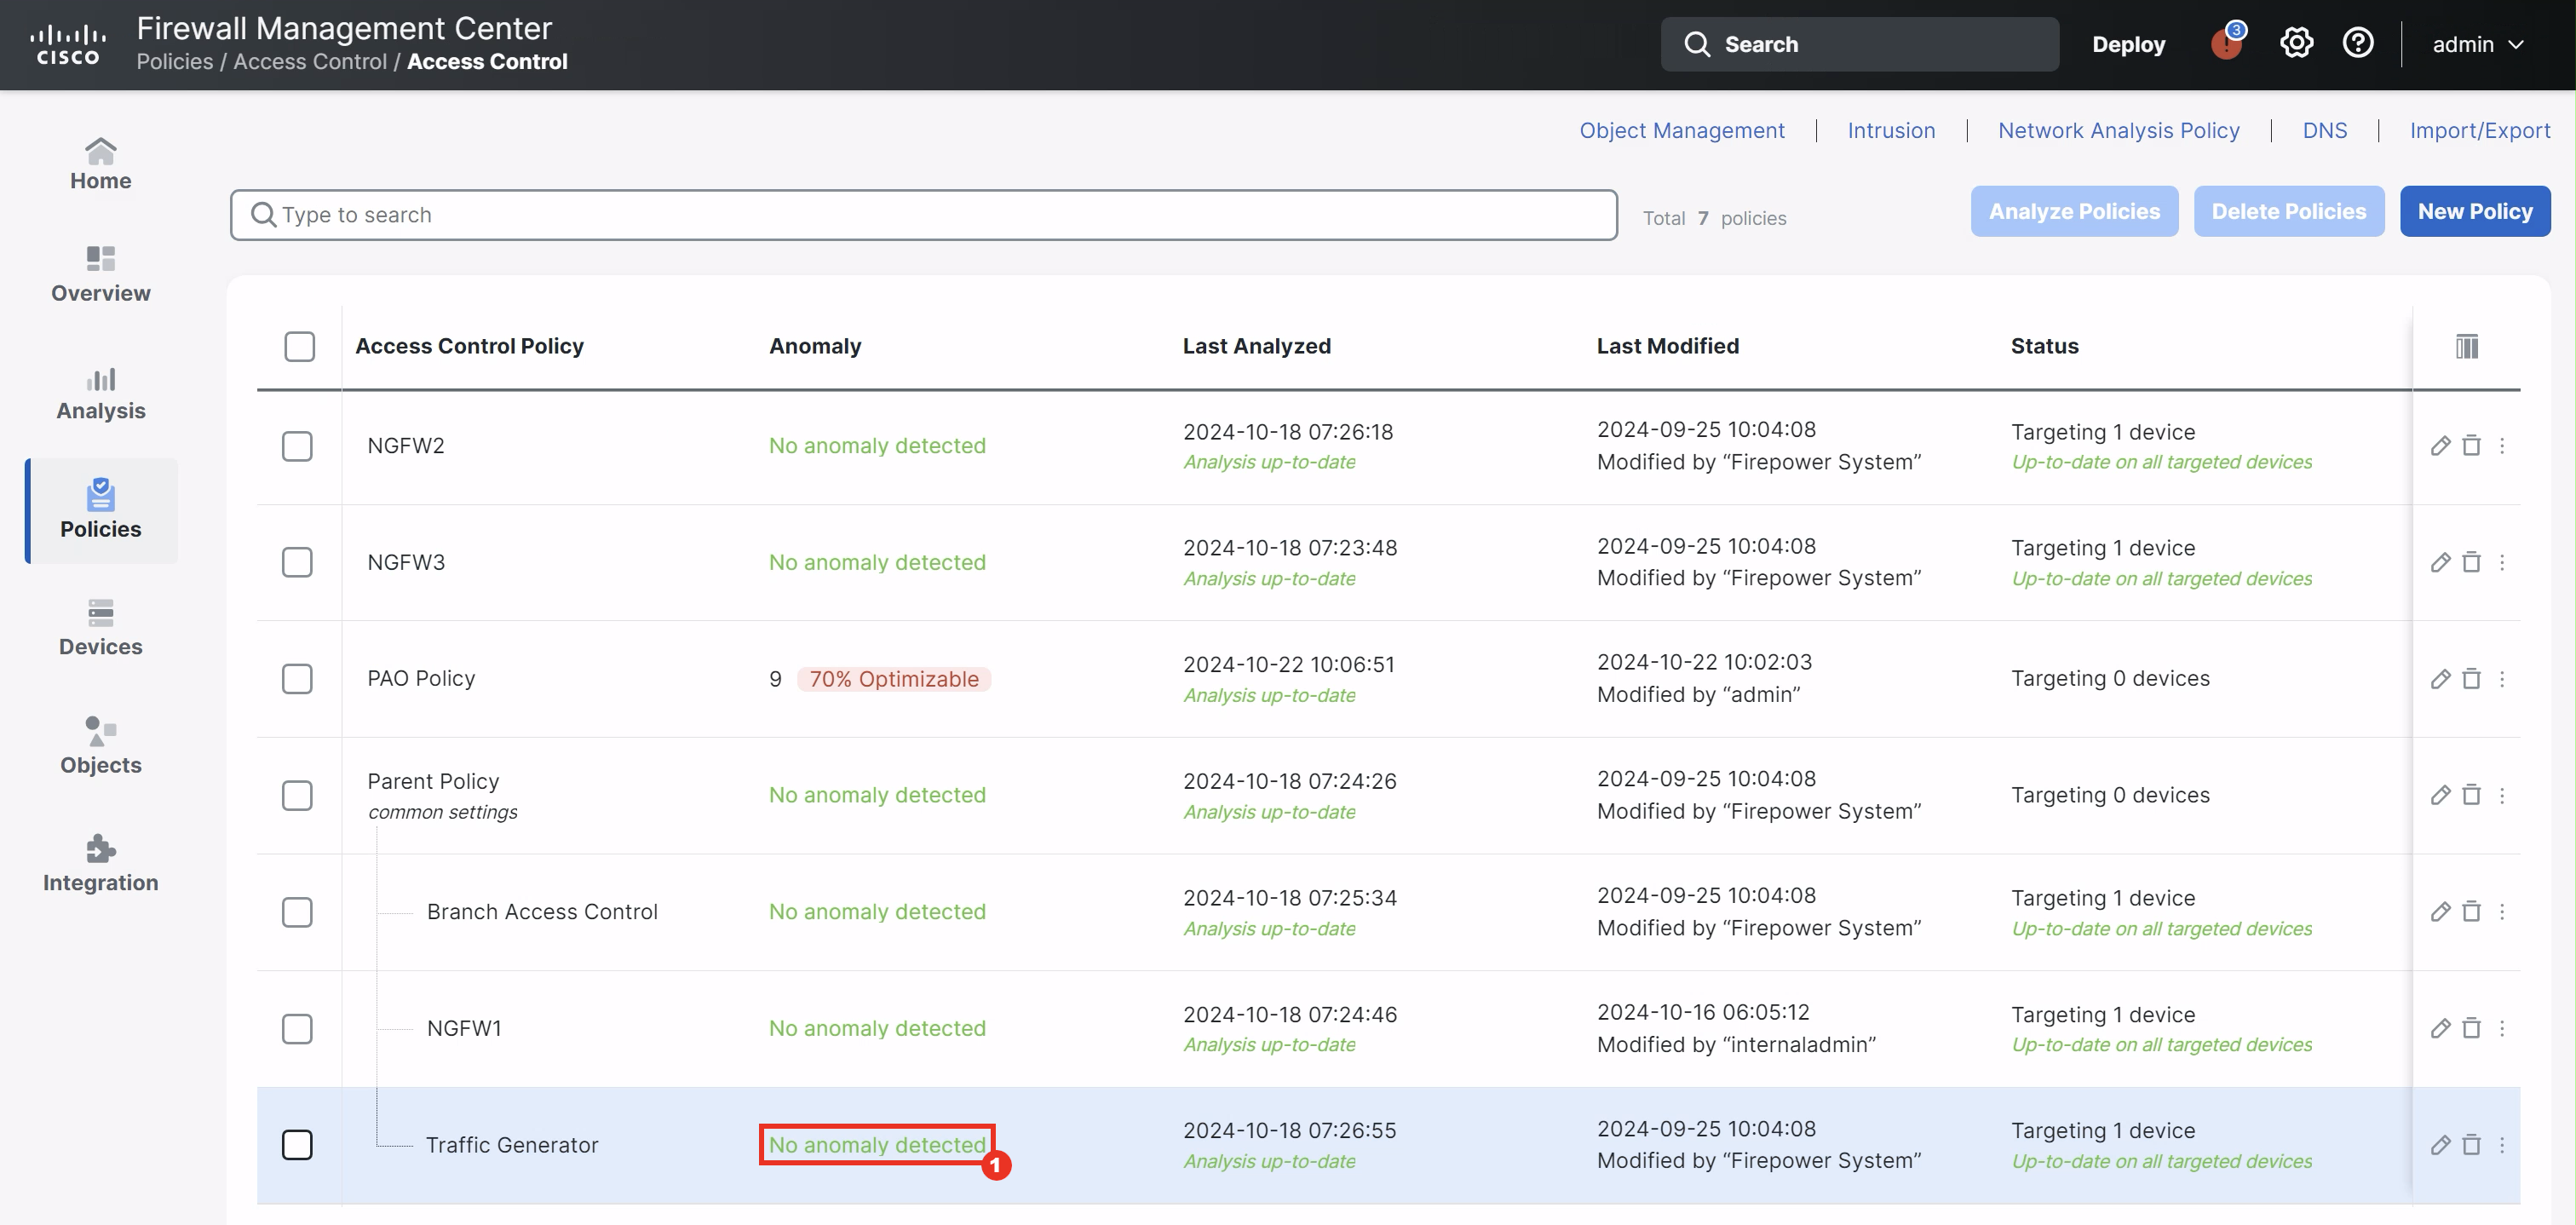
- In the summary tab you'll notice there are charts making it easy to see overall ruleset health. Scrolling down further, a Hit Count summary is shown, highlighting potentially dead rules, as well as top-hit rules.
- Click Policy Insights to look at the Hit count insights.
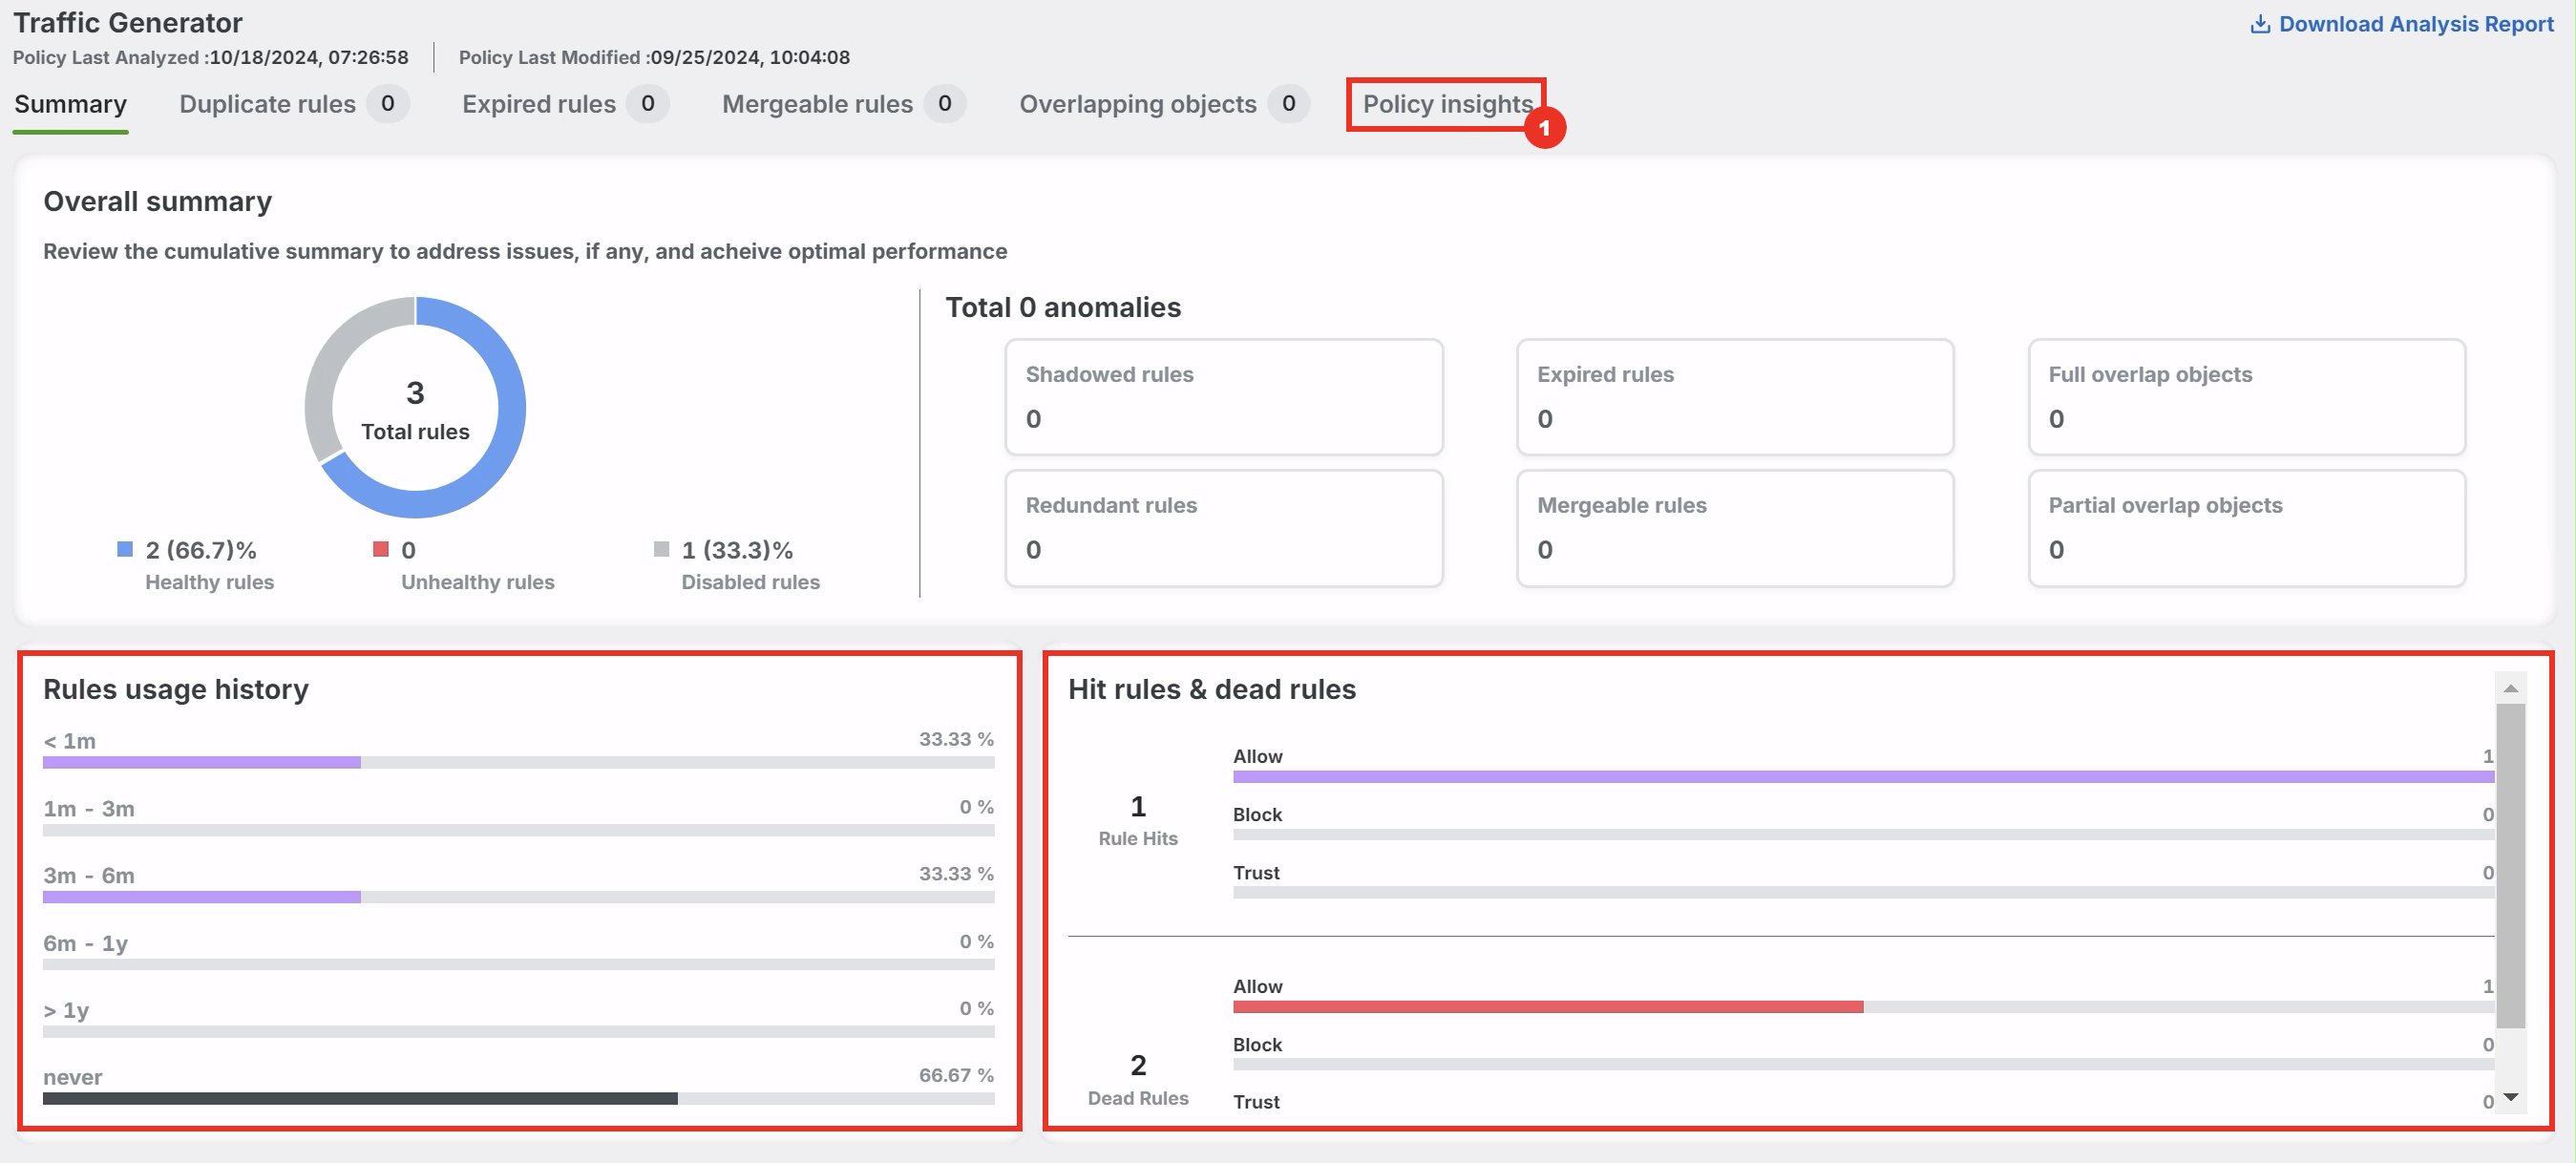
- Observe the highlighted fields to get insights into the Hit Counts of their firewall. Filtering by time you can understand which rules are hit often, which rules have not been hit during a certain time period, and which have never been hit at all. Disabling and removing dead rules can improve firewall performance and is a good maintenance practice.

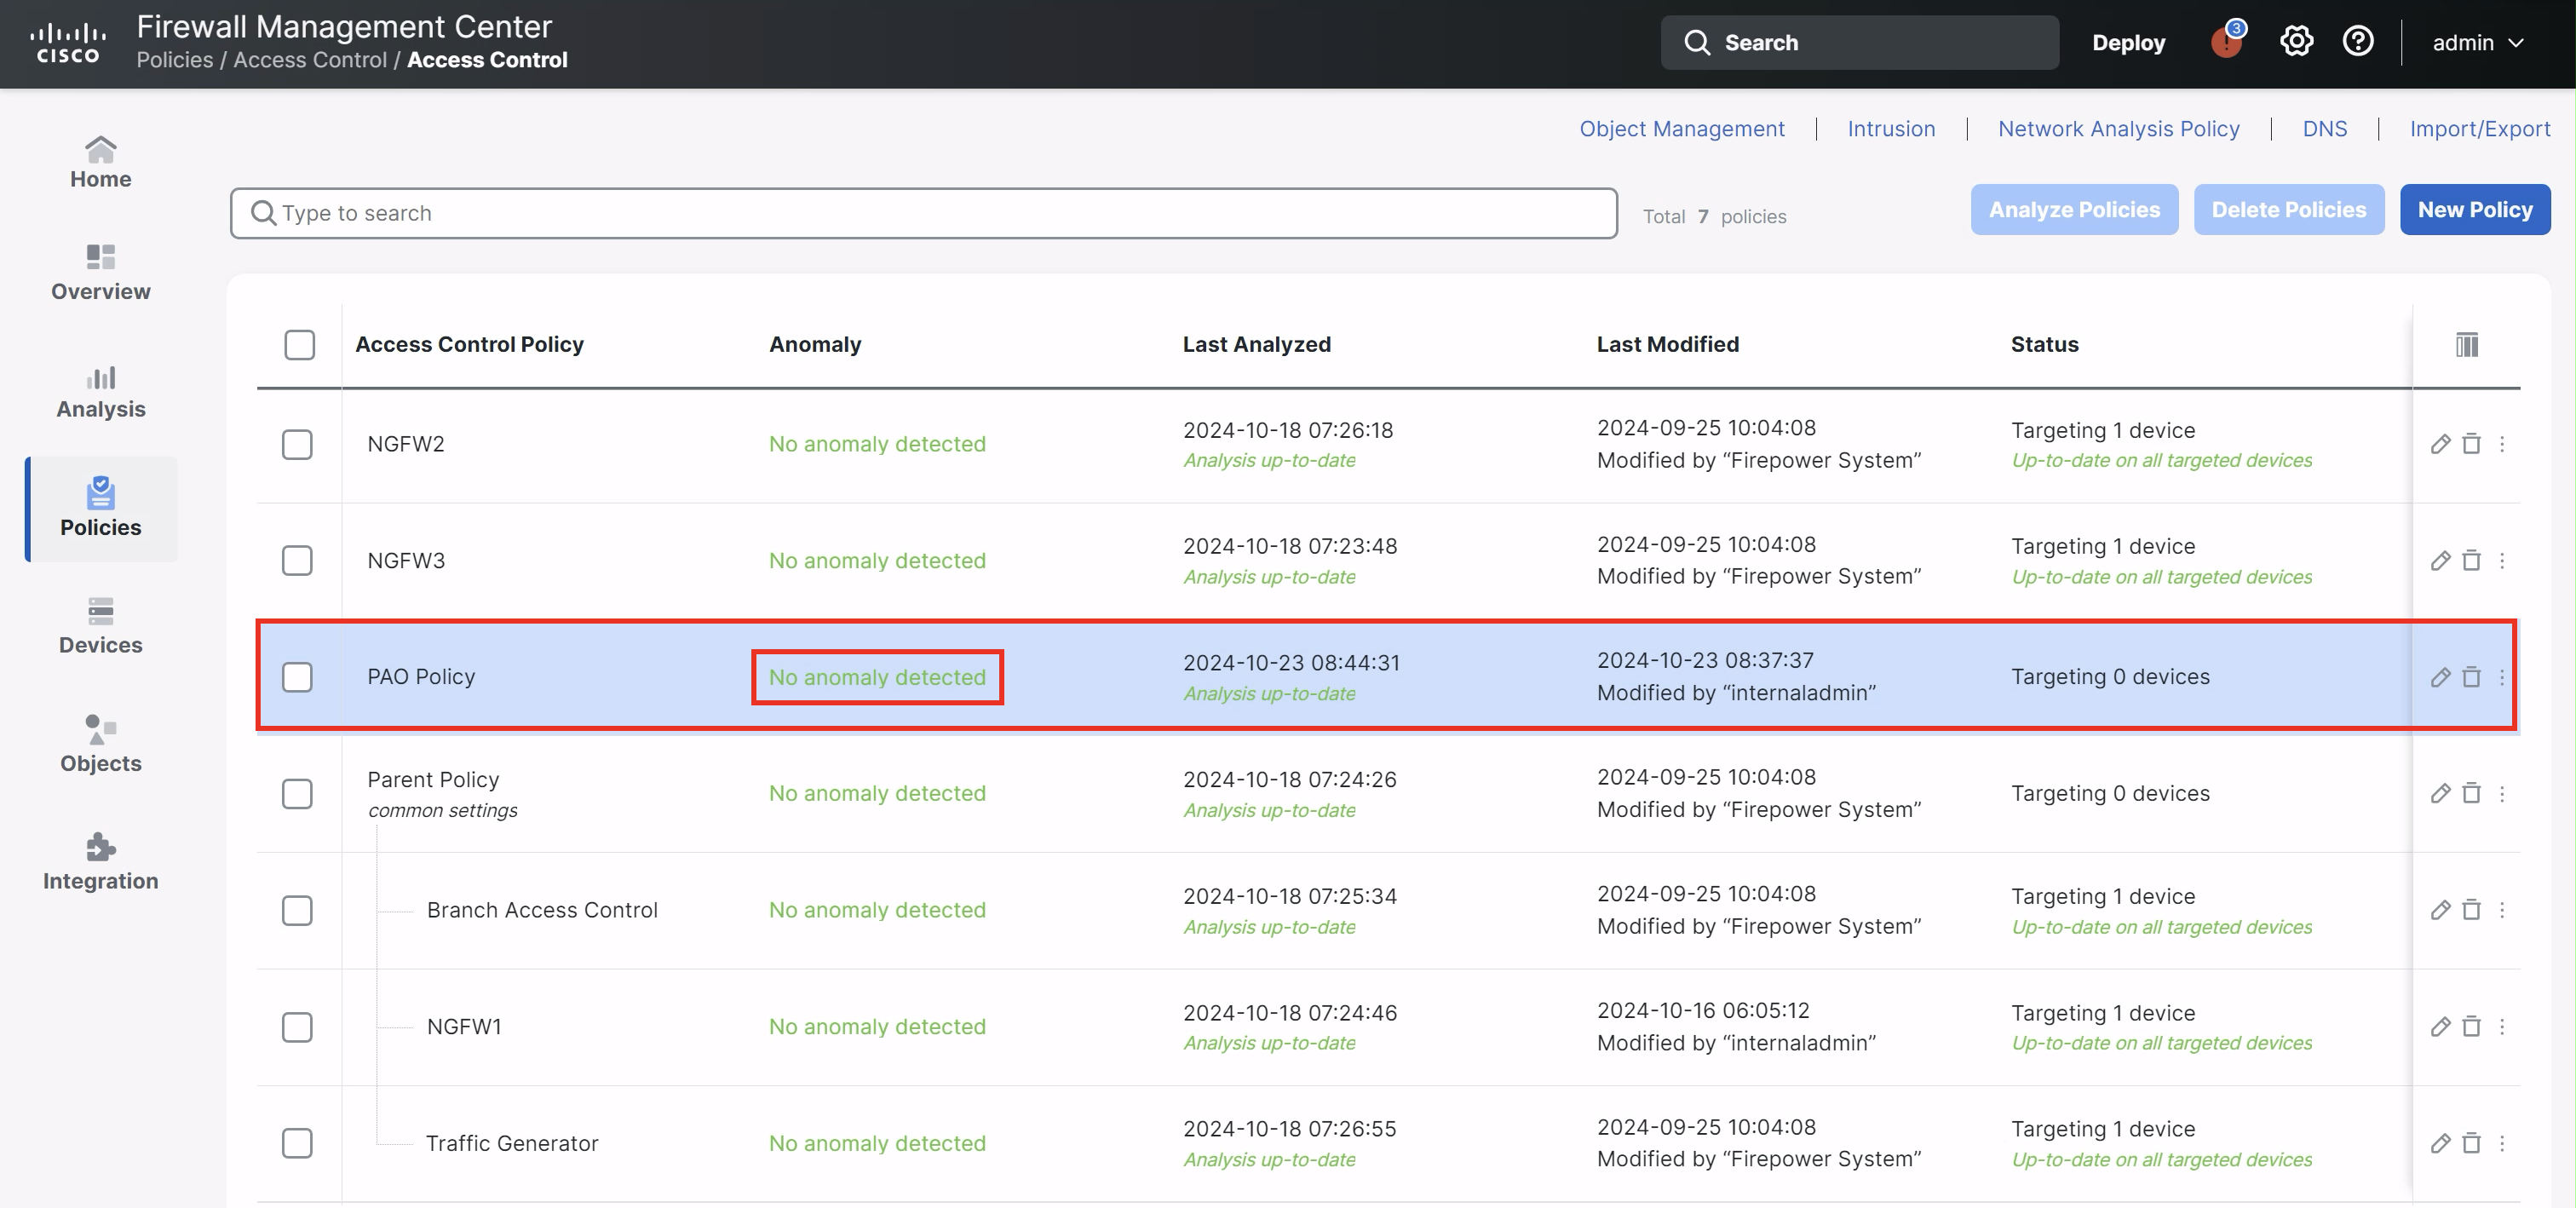
- Navigate back to the FMC and refresh the page to get the latest status on the policy analysis to verify that PAO Policy has No anomaly detected.
Success
Congrats you have completed the lab tasks for the AI Assistant and Policy Analyzer & Optimizer!
Tell us how we are doing
We are doing our best to ensure the scenarios in this lab guides are useful, clear and work as expected.
Please share your thoughts to help us improve or fix any problems you may run into.
Click here to provide your feedback or report an issue with this guide
Updated 11 months ago
You have completed the Advanced Lab - Capabilities Guide!

