Remote Access Virtual Private Network (RAVPN) [Optional]
Cisco Internal Use Only for Secure Firewall Roadshow Ignite Event
Remote Access Virtual Private Network (RAVPN) allows individual users to connect to your network from a remote location using a computer or other supported devices connected to the Internet. This allows mobile workers to connect from their home networks or a public Wi-Fi network.
In this lab guide we will be configuring RAVPN on the Firewall Threat Defence through Cloud-delivered Firewall Management Center.
Learning Objectives
Upon completion of this lab, you will be able to:
- Configure RAVPN with Split Tunnelling through the wizard.
- Monitor and Control RAVPN connections using the RAVPN Dashboard.
Topology:
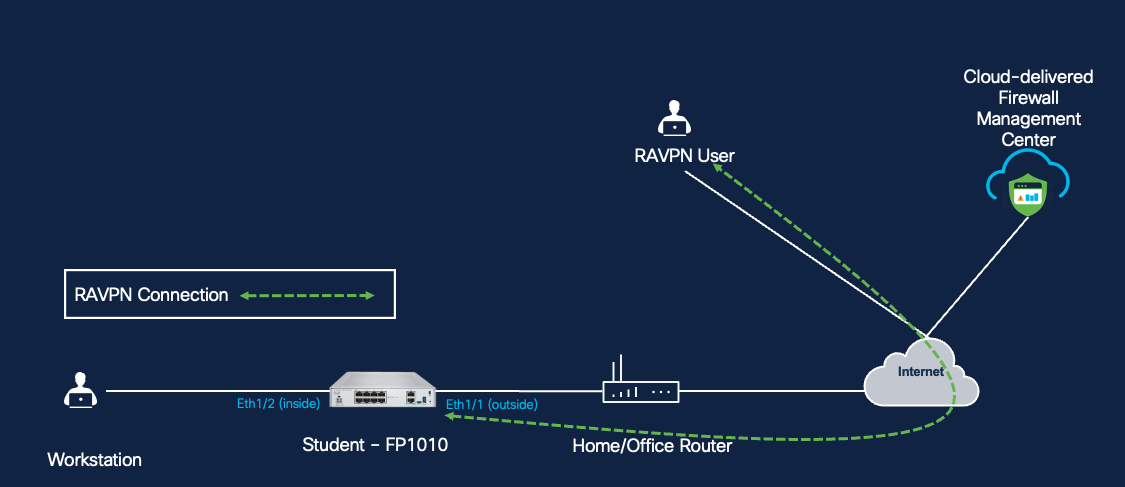
RAVPN Topology
Lab Tasks Overview
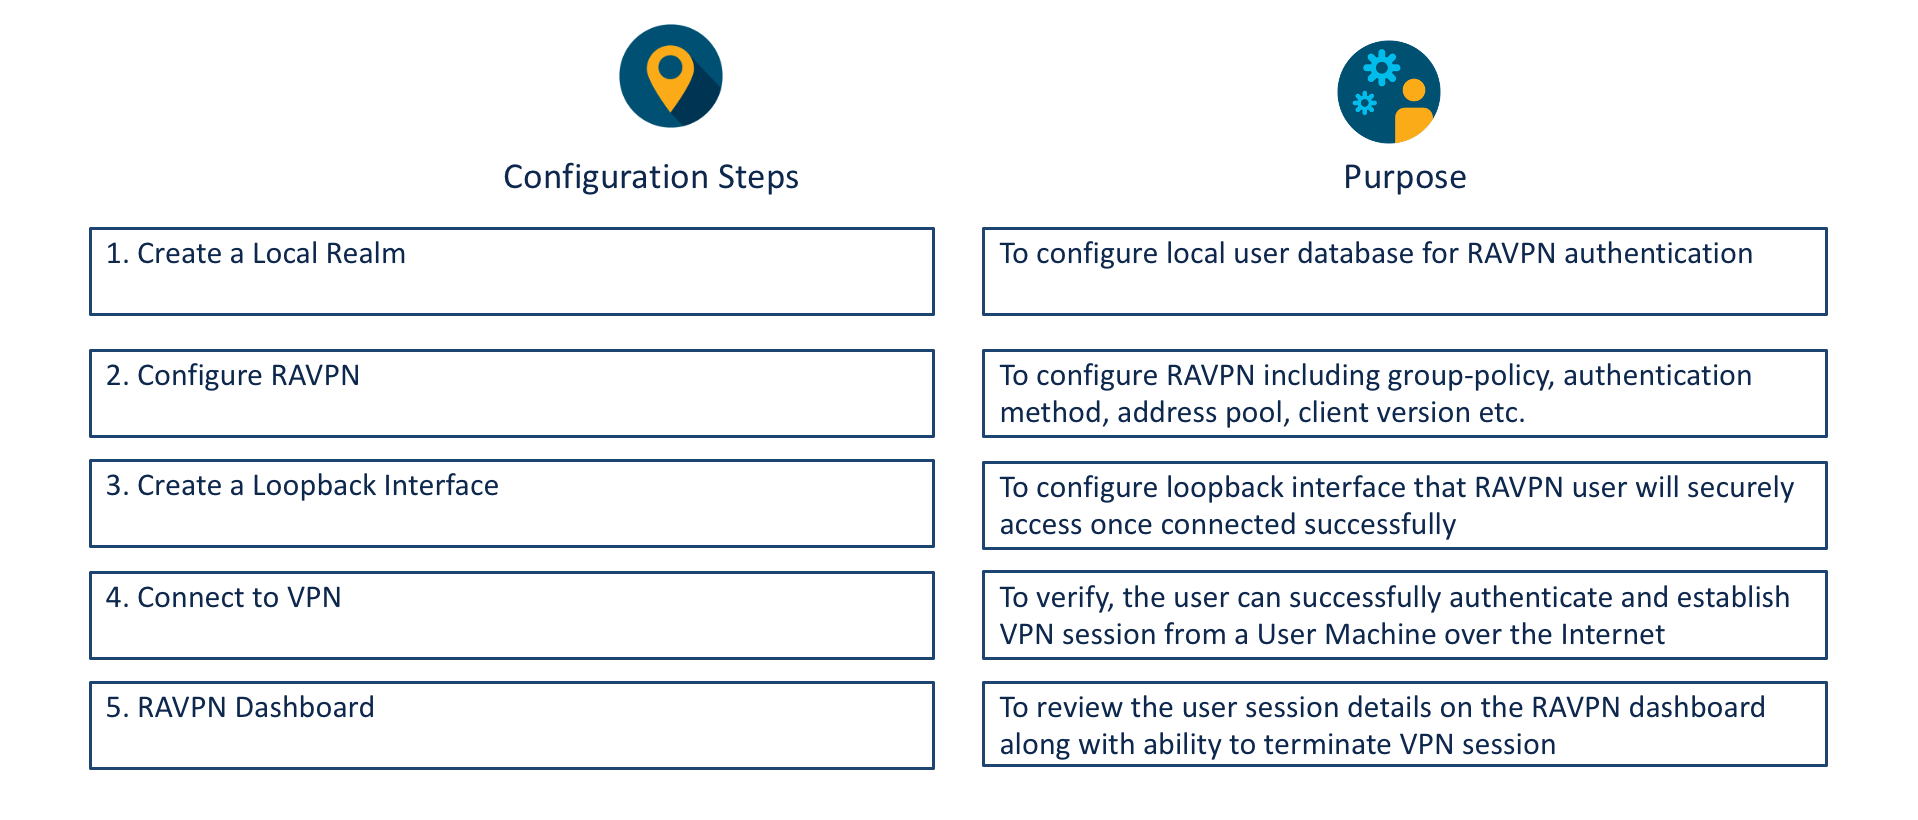
Note
Perform the following lab tasks either from your local workstation or the dCloud jumpbox. If you choose to download the necessary files to your local workstation, first connect to your dCloud session using the AnyConnect Credentials from your session details, then transfer the files to your workstation.
Task 1 - Create a Local Realm to be used as Authentication Server
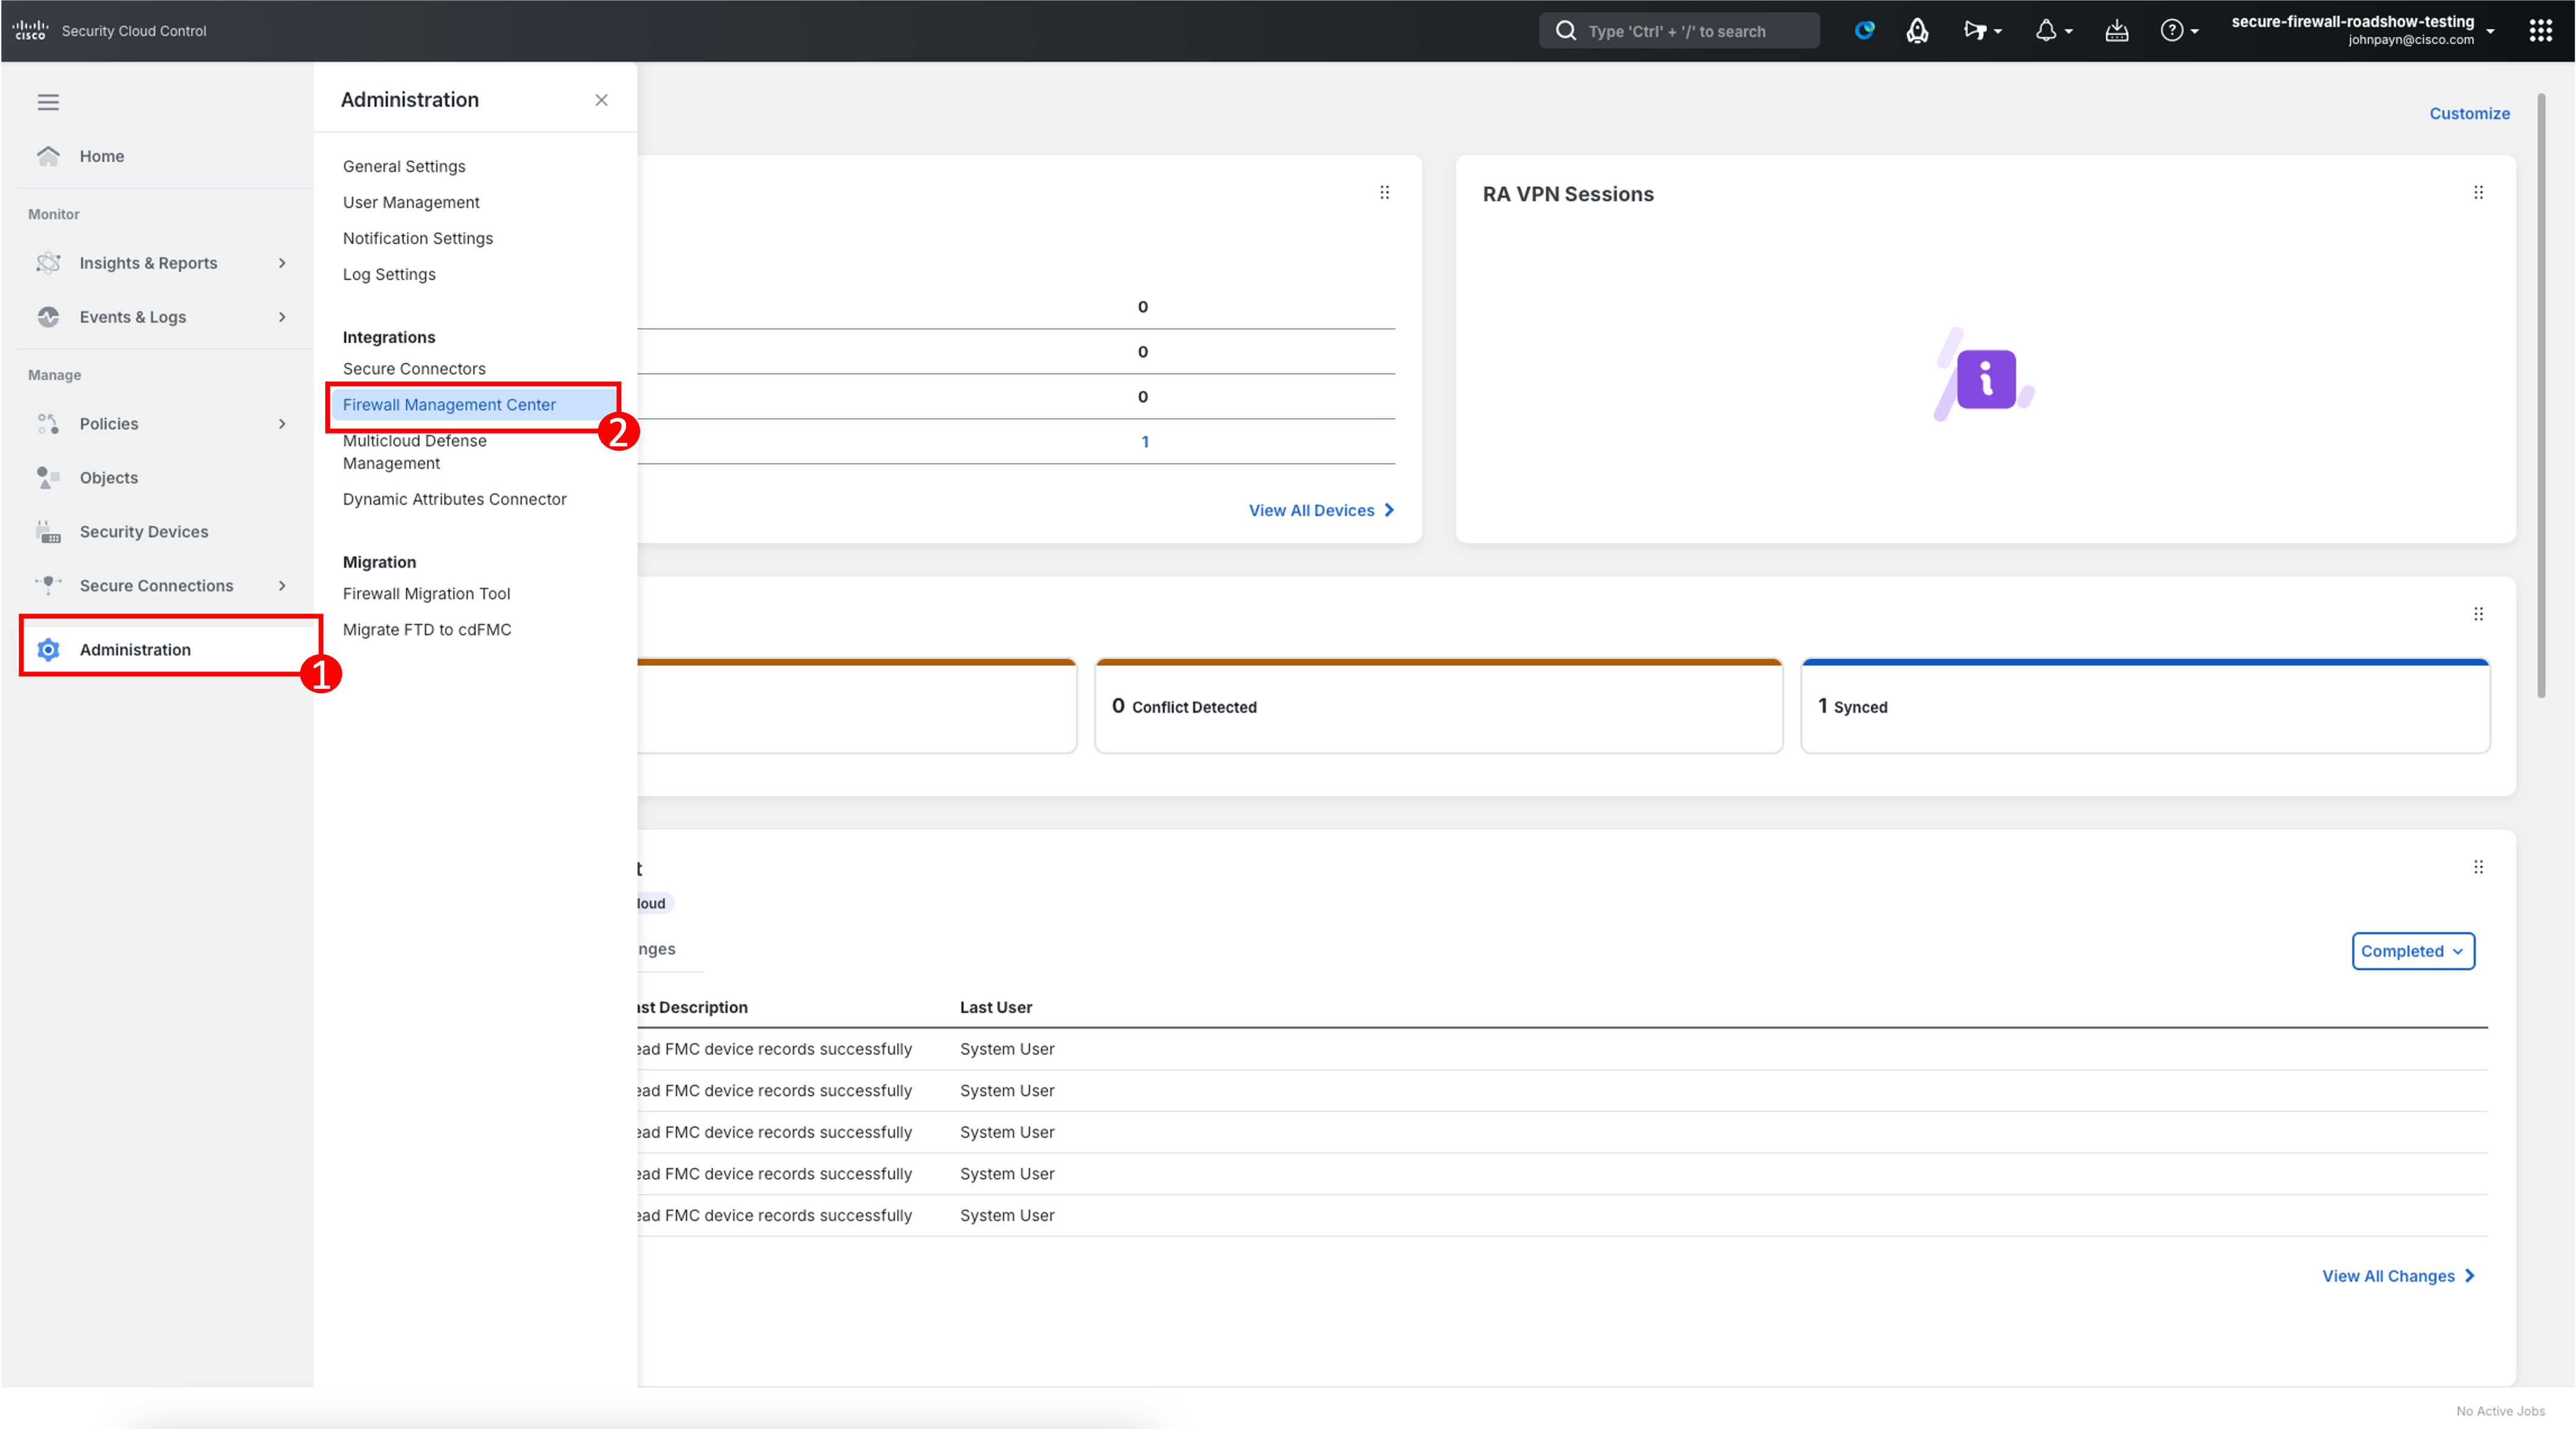
- Open your Security Cloud Control tenant and on the left bar navigate to Administration > Firewall Management Center.
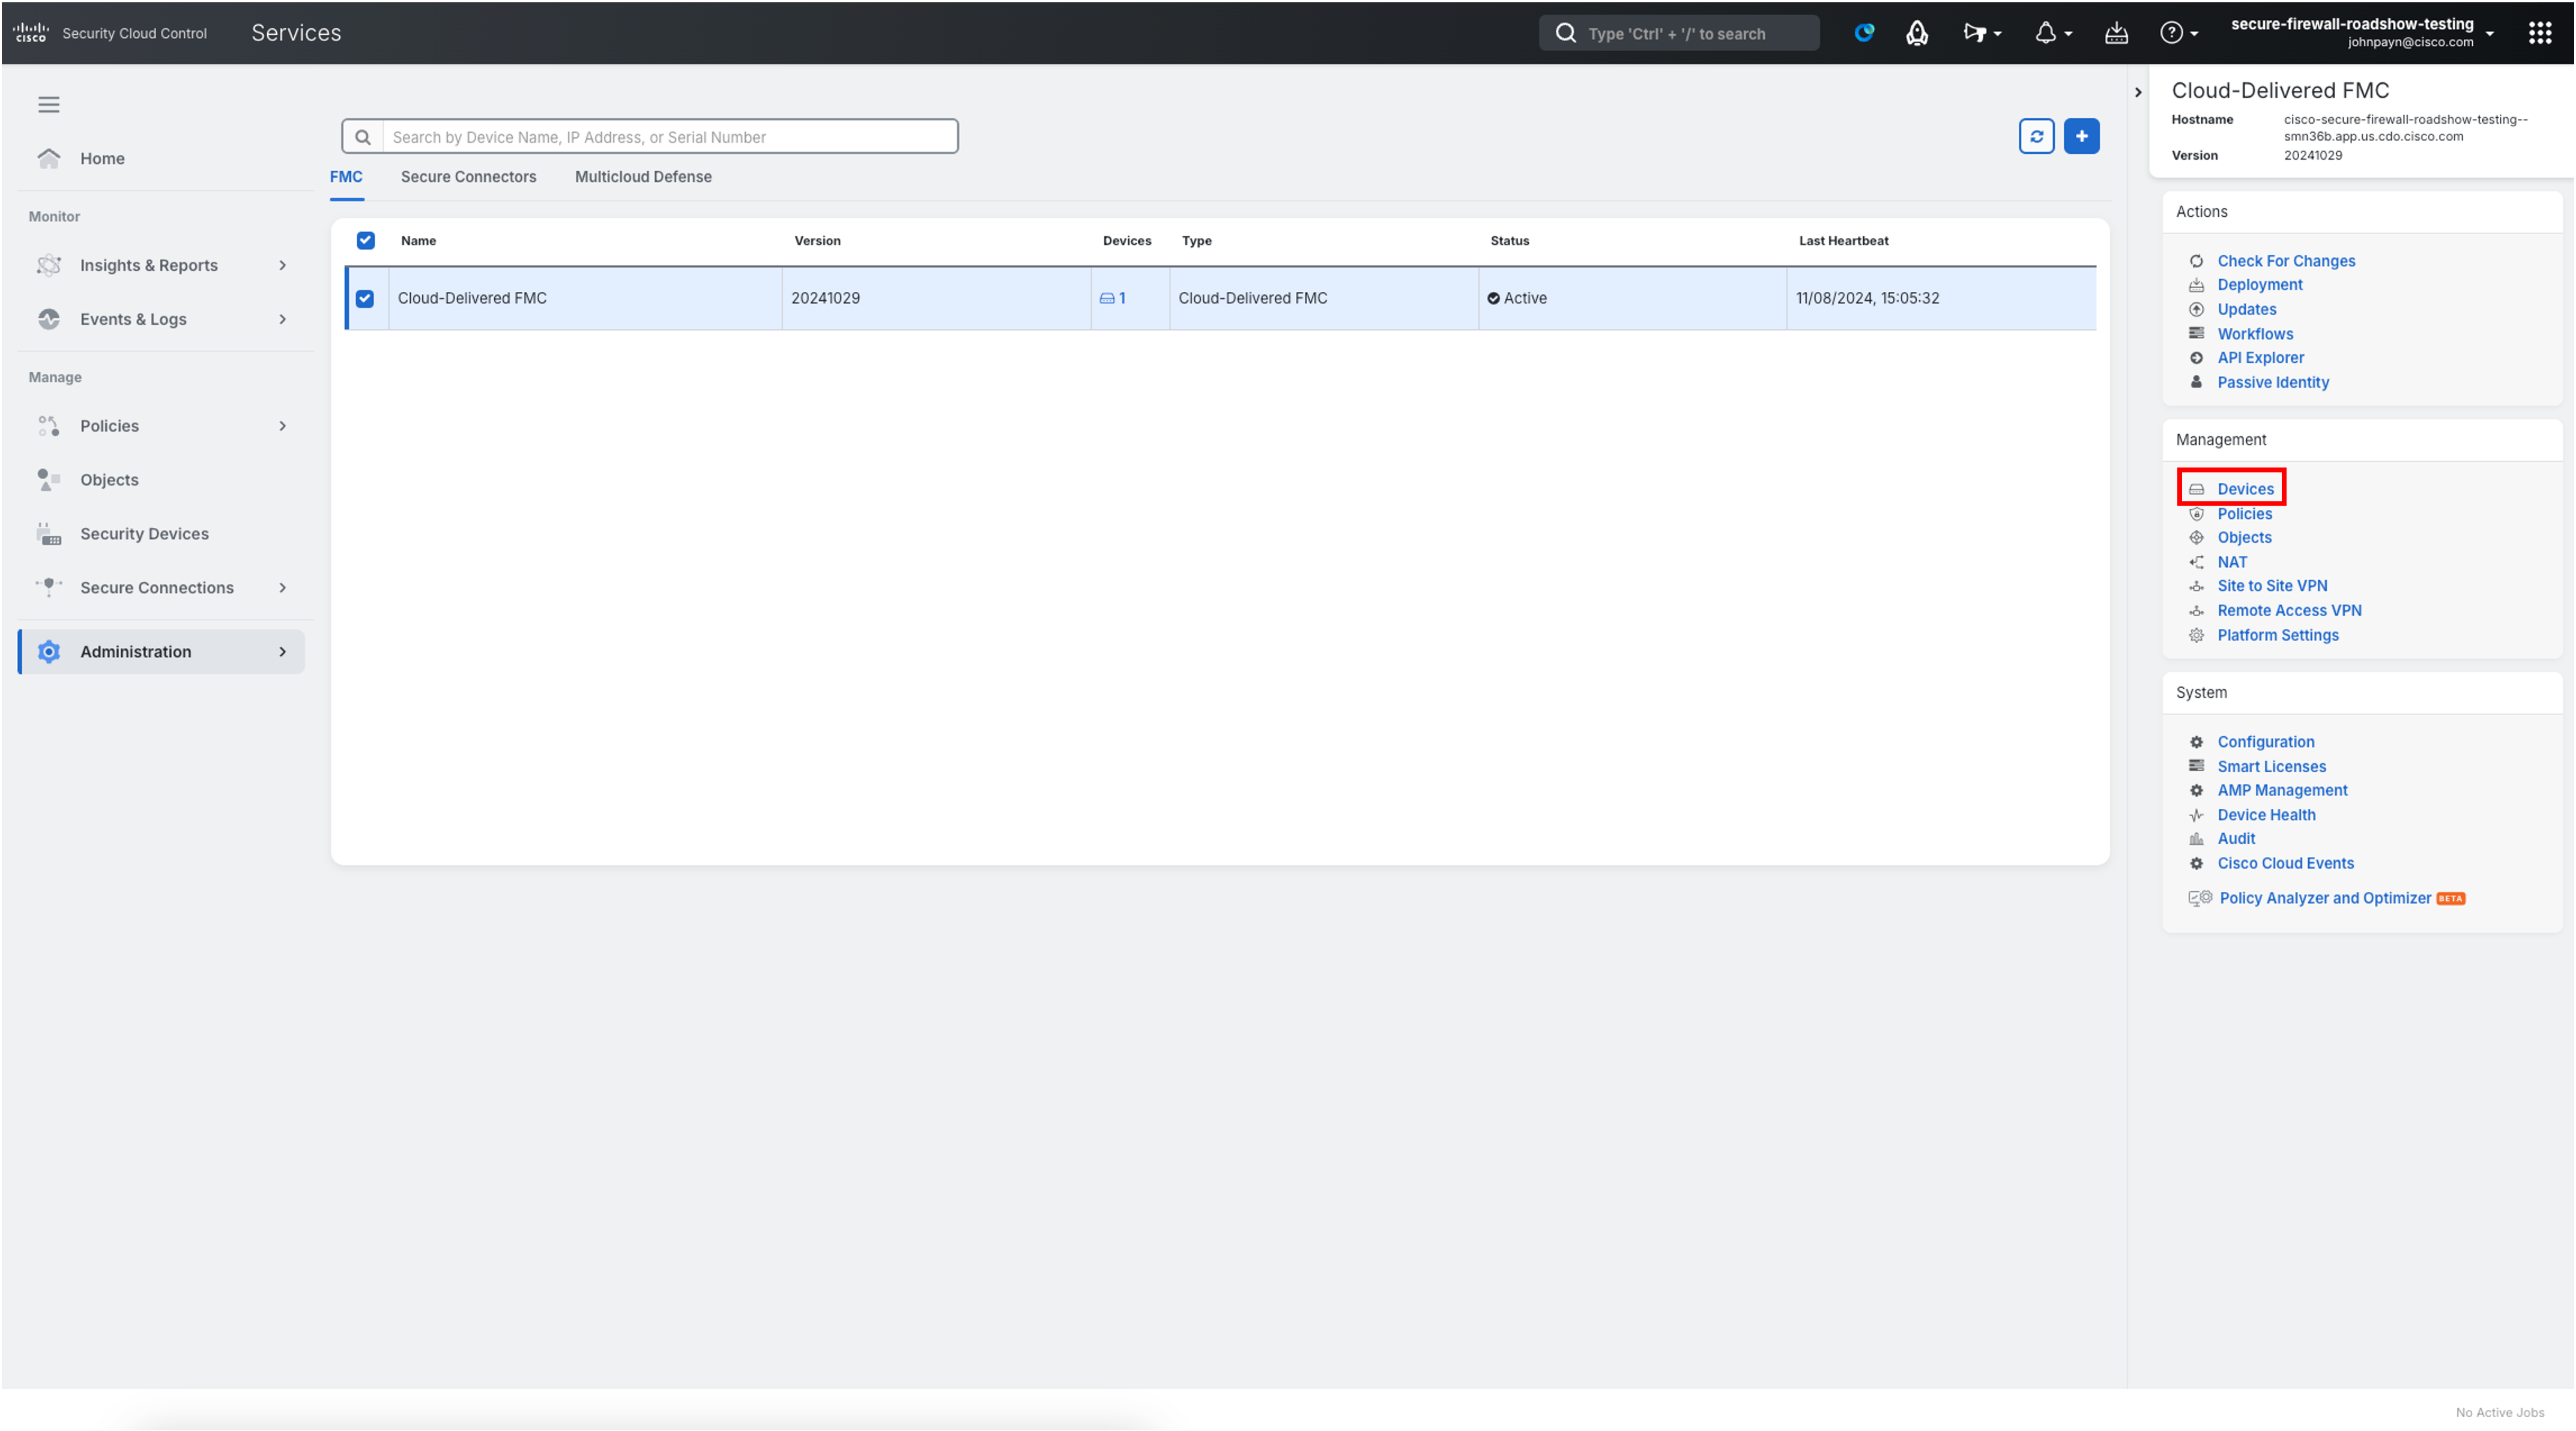
- On the right bar under Management section, click on Devices.
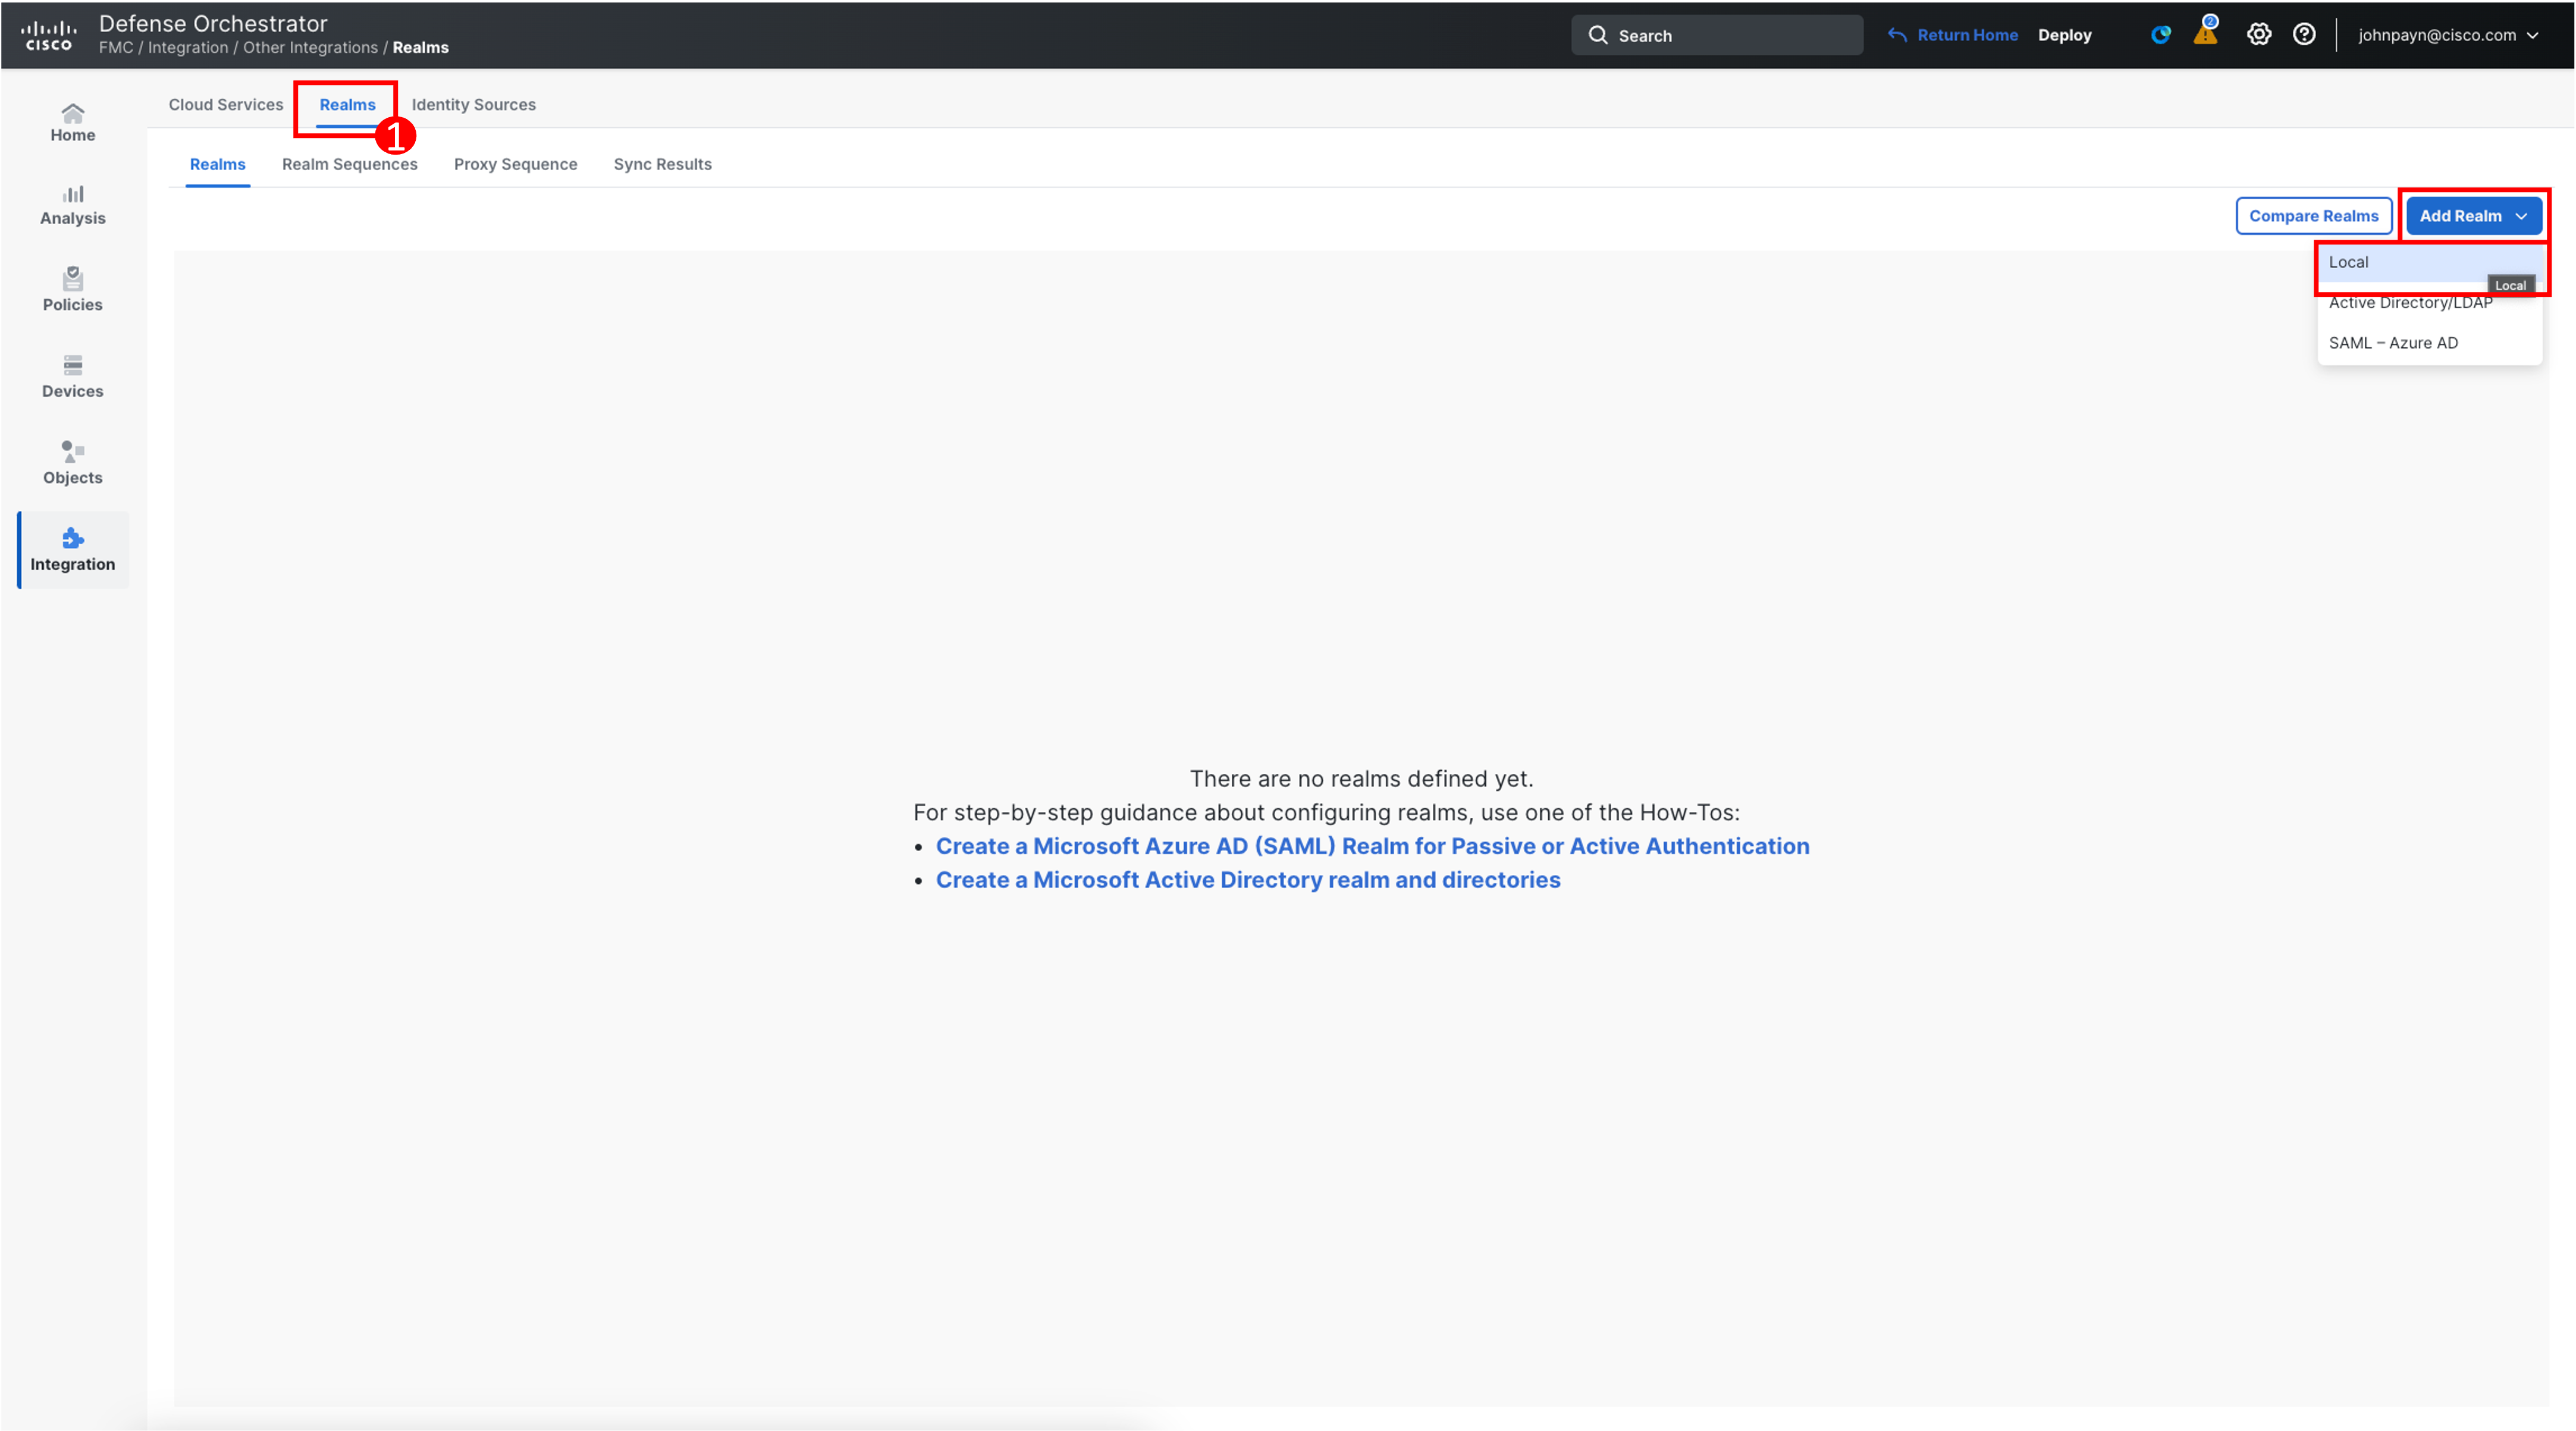
- Navigate to Integration > Other Integrations using the left navigation of the cdFMC.
- Switch to the Realms tab and click on Add Realm > Local to create a local realm.
-
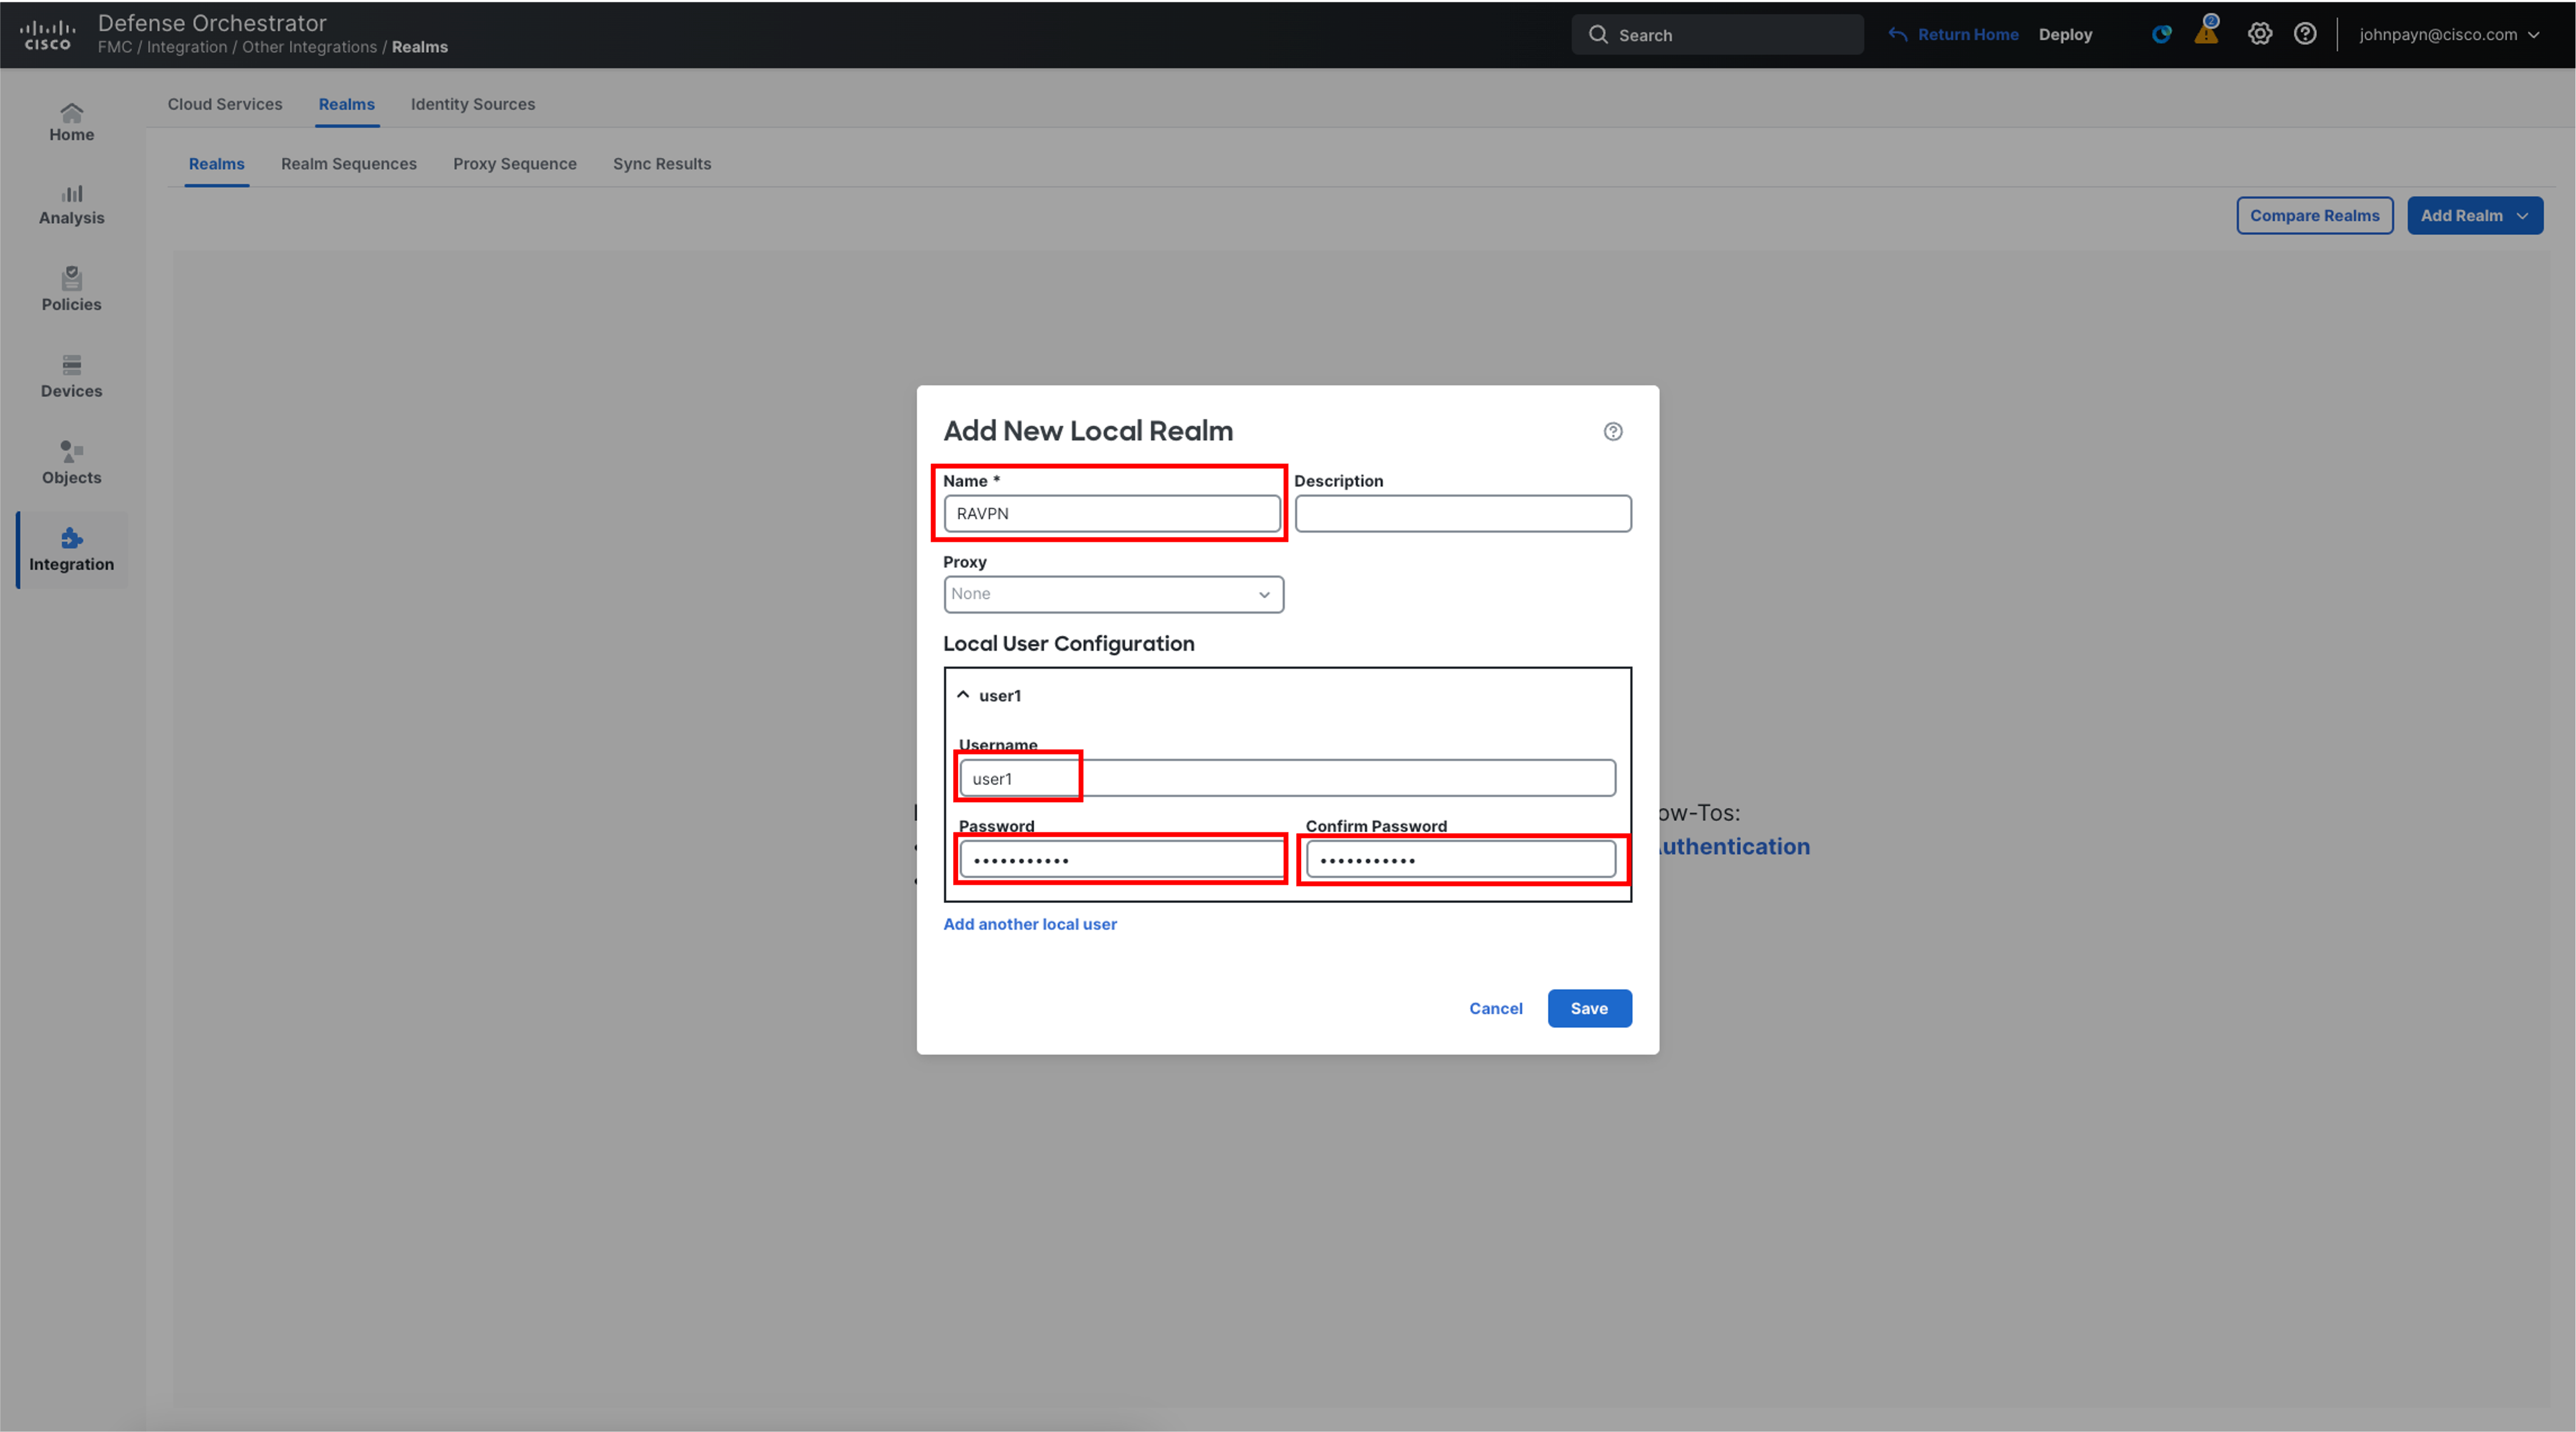
In the pop-up box, configure the Local Realm as follows:
- Name: RAVPN
- Under Local User Configuration,
- Username: user1
- Password & Confirm Password: C1sco12345!
-
Click Save.
Task 2 - Configure RAVPN
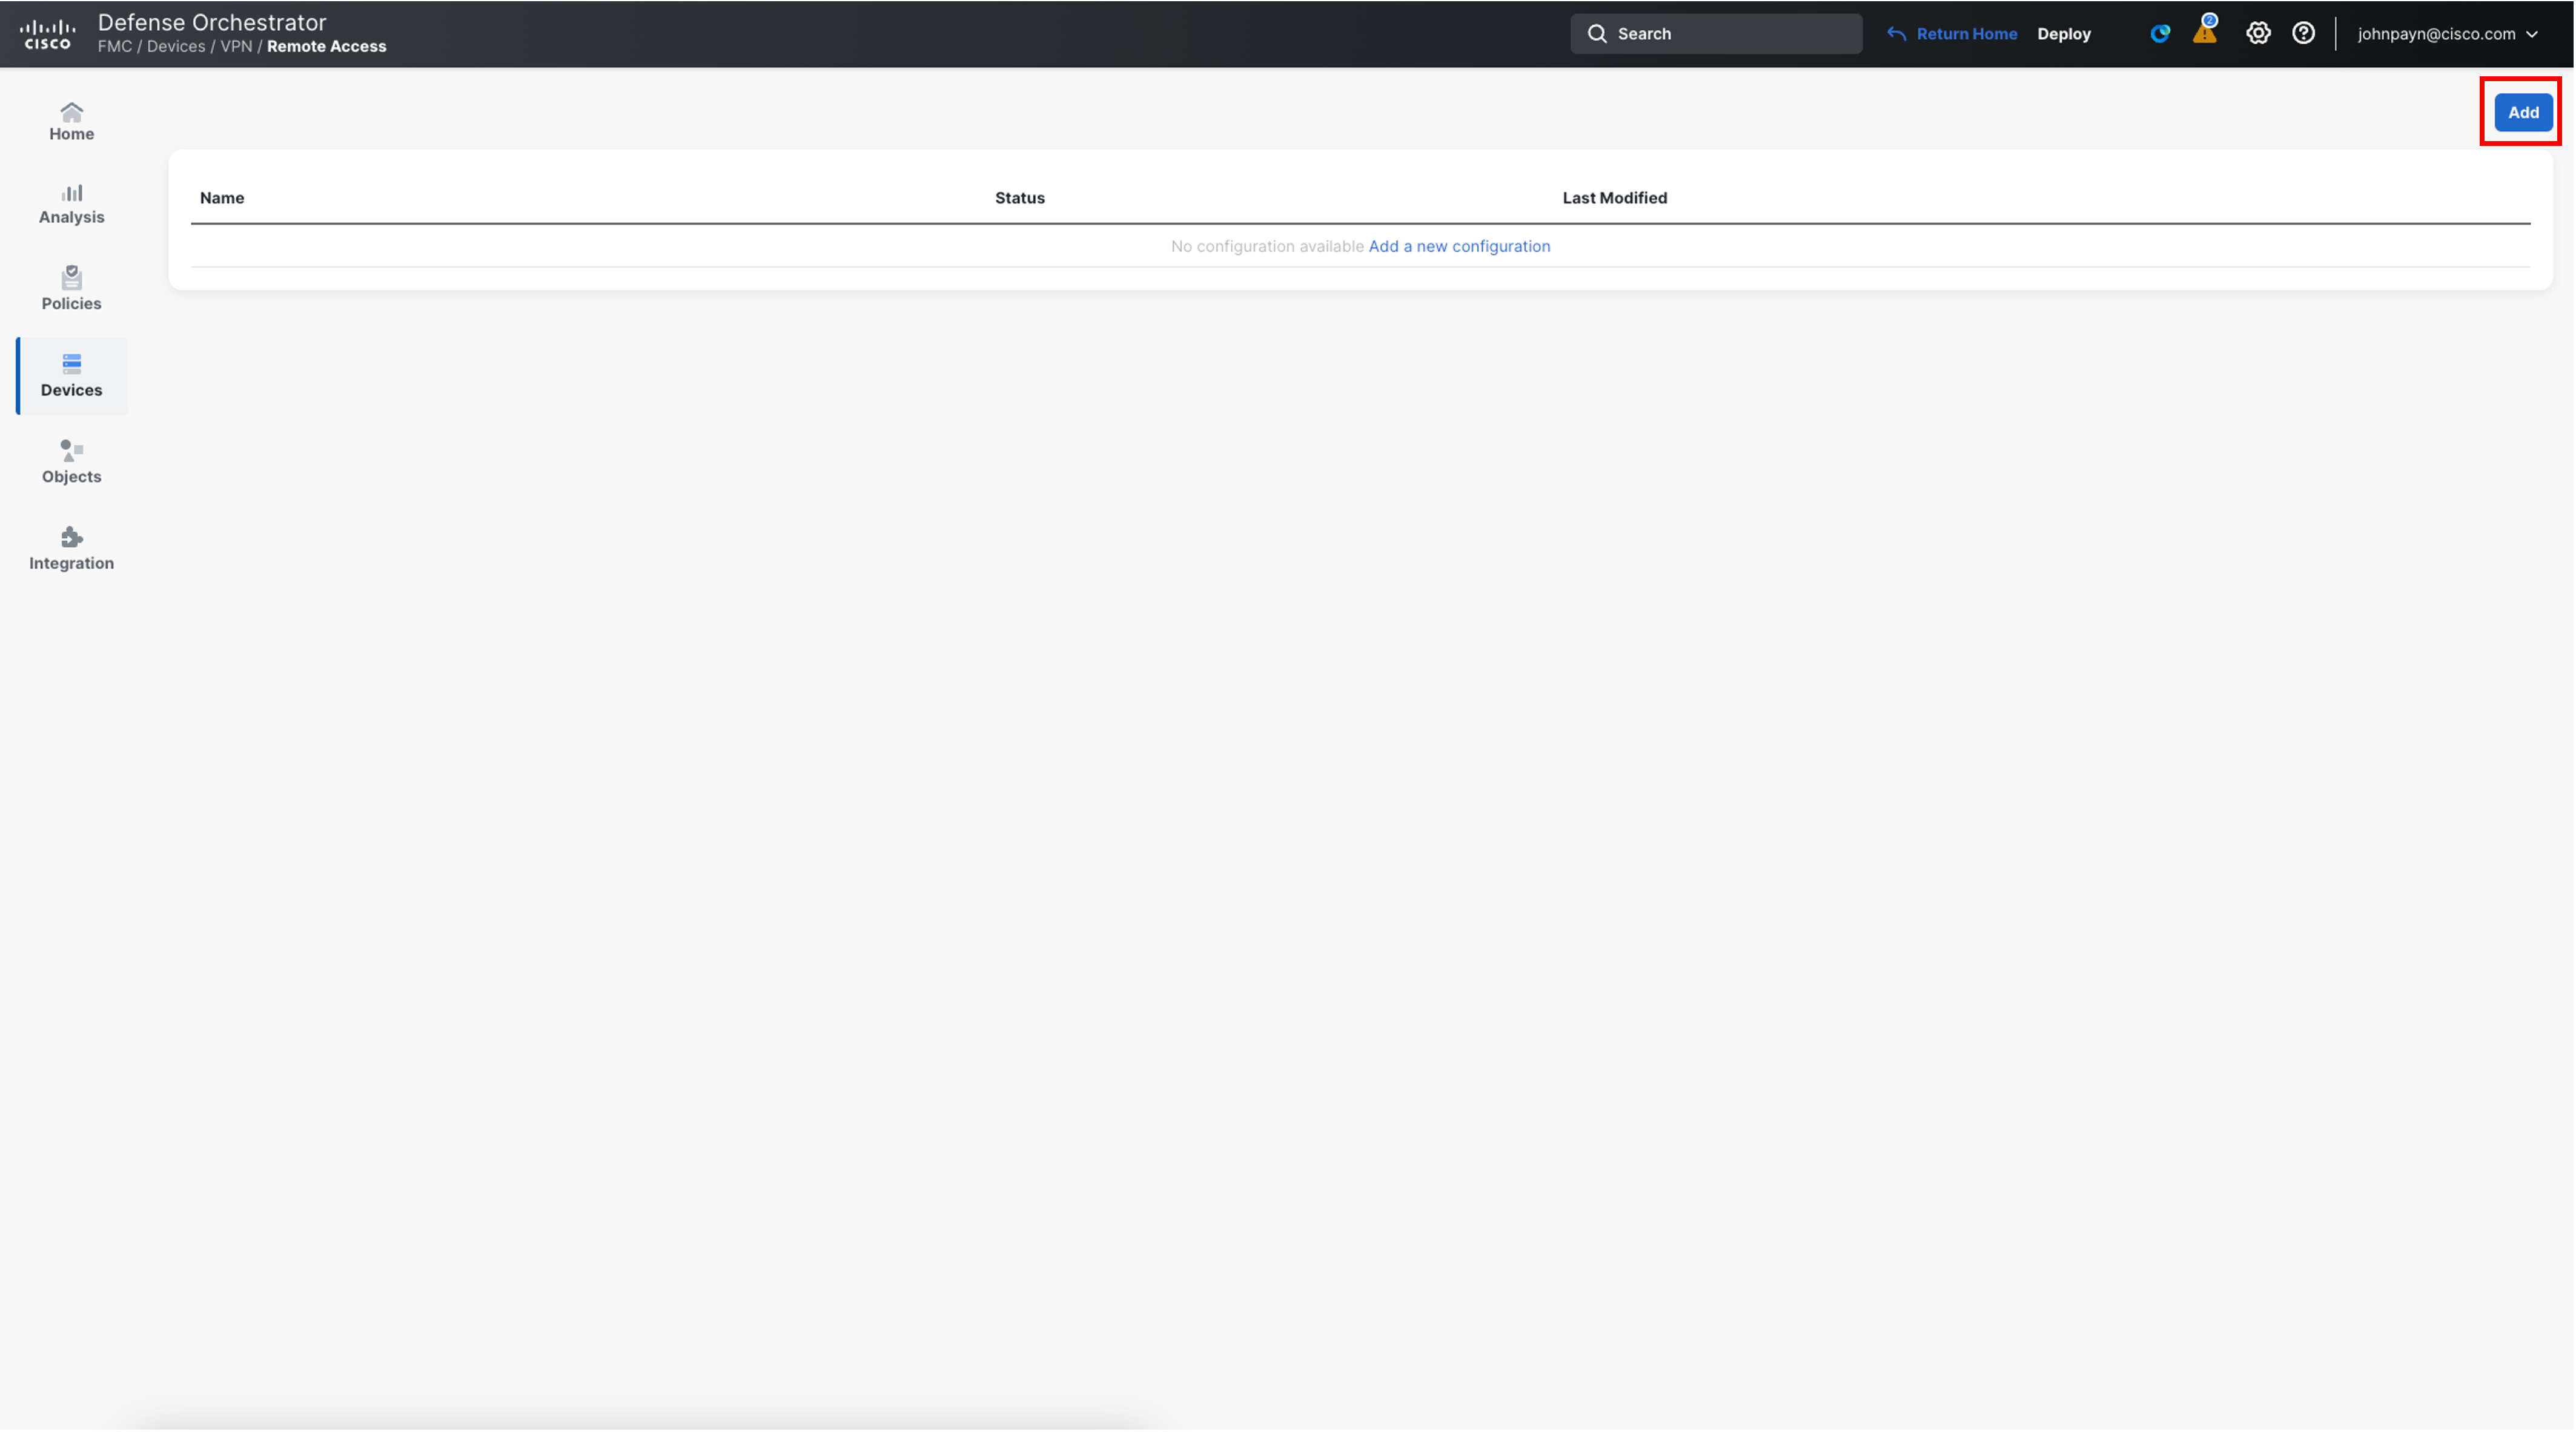
- Navigate to Devices > VPN > Remote Access.
- Click Add in the upper-right of the page.
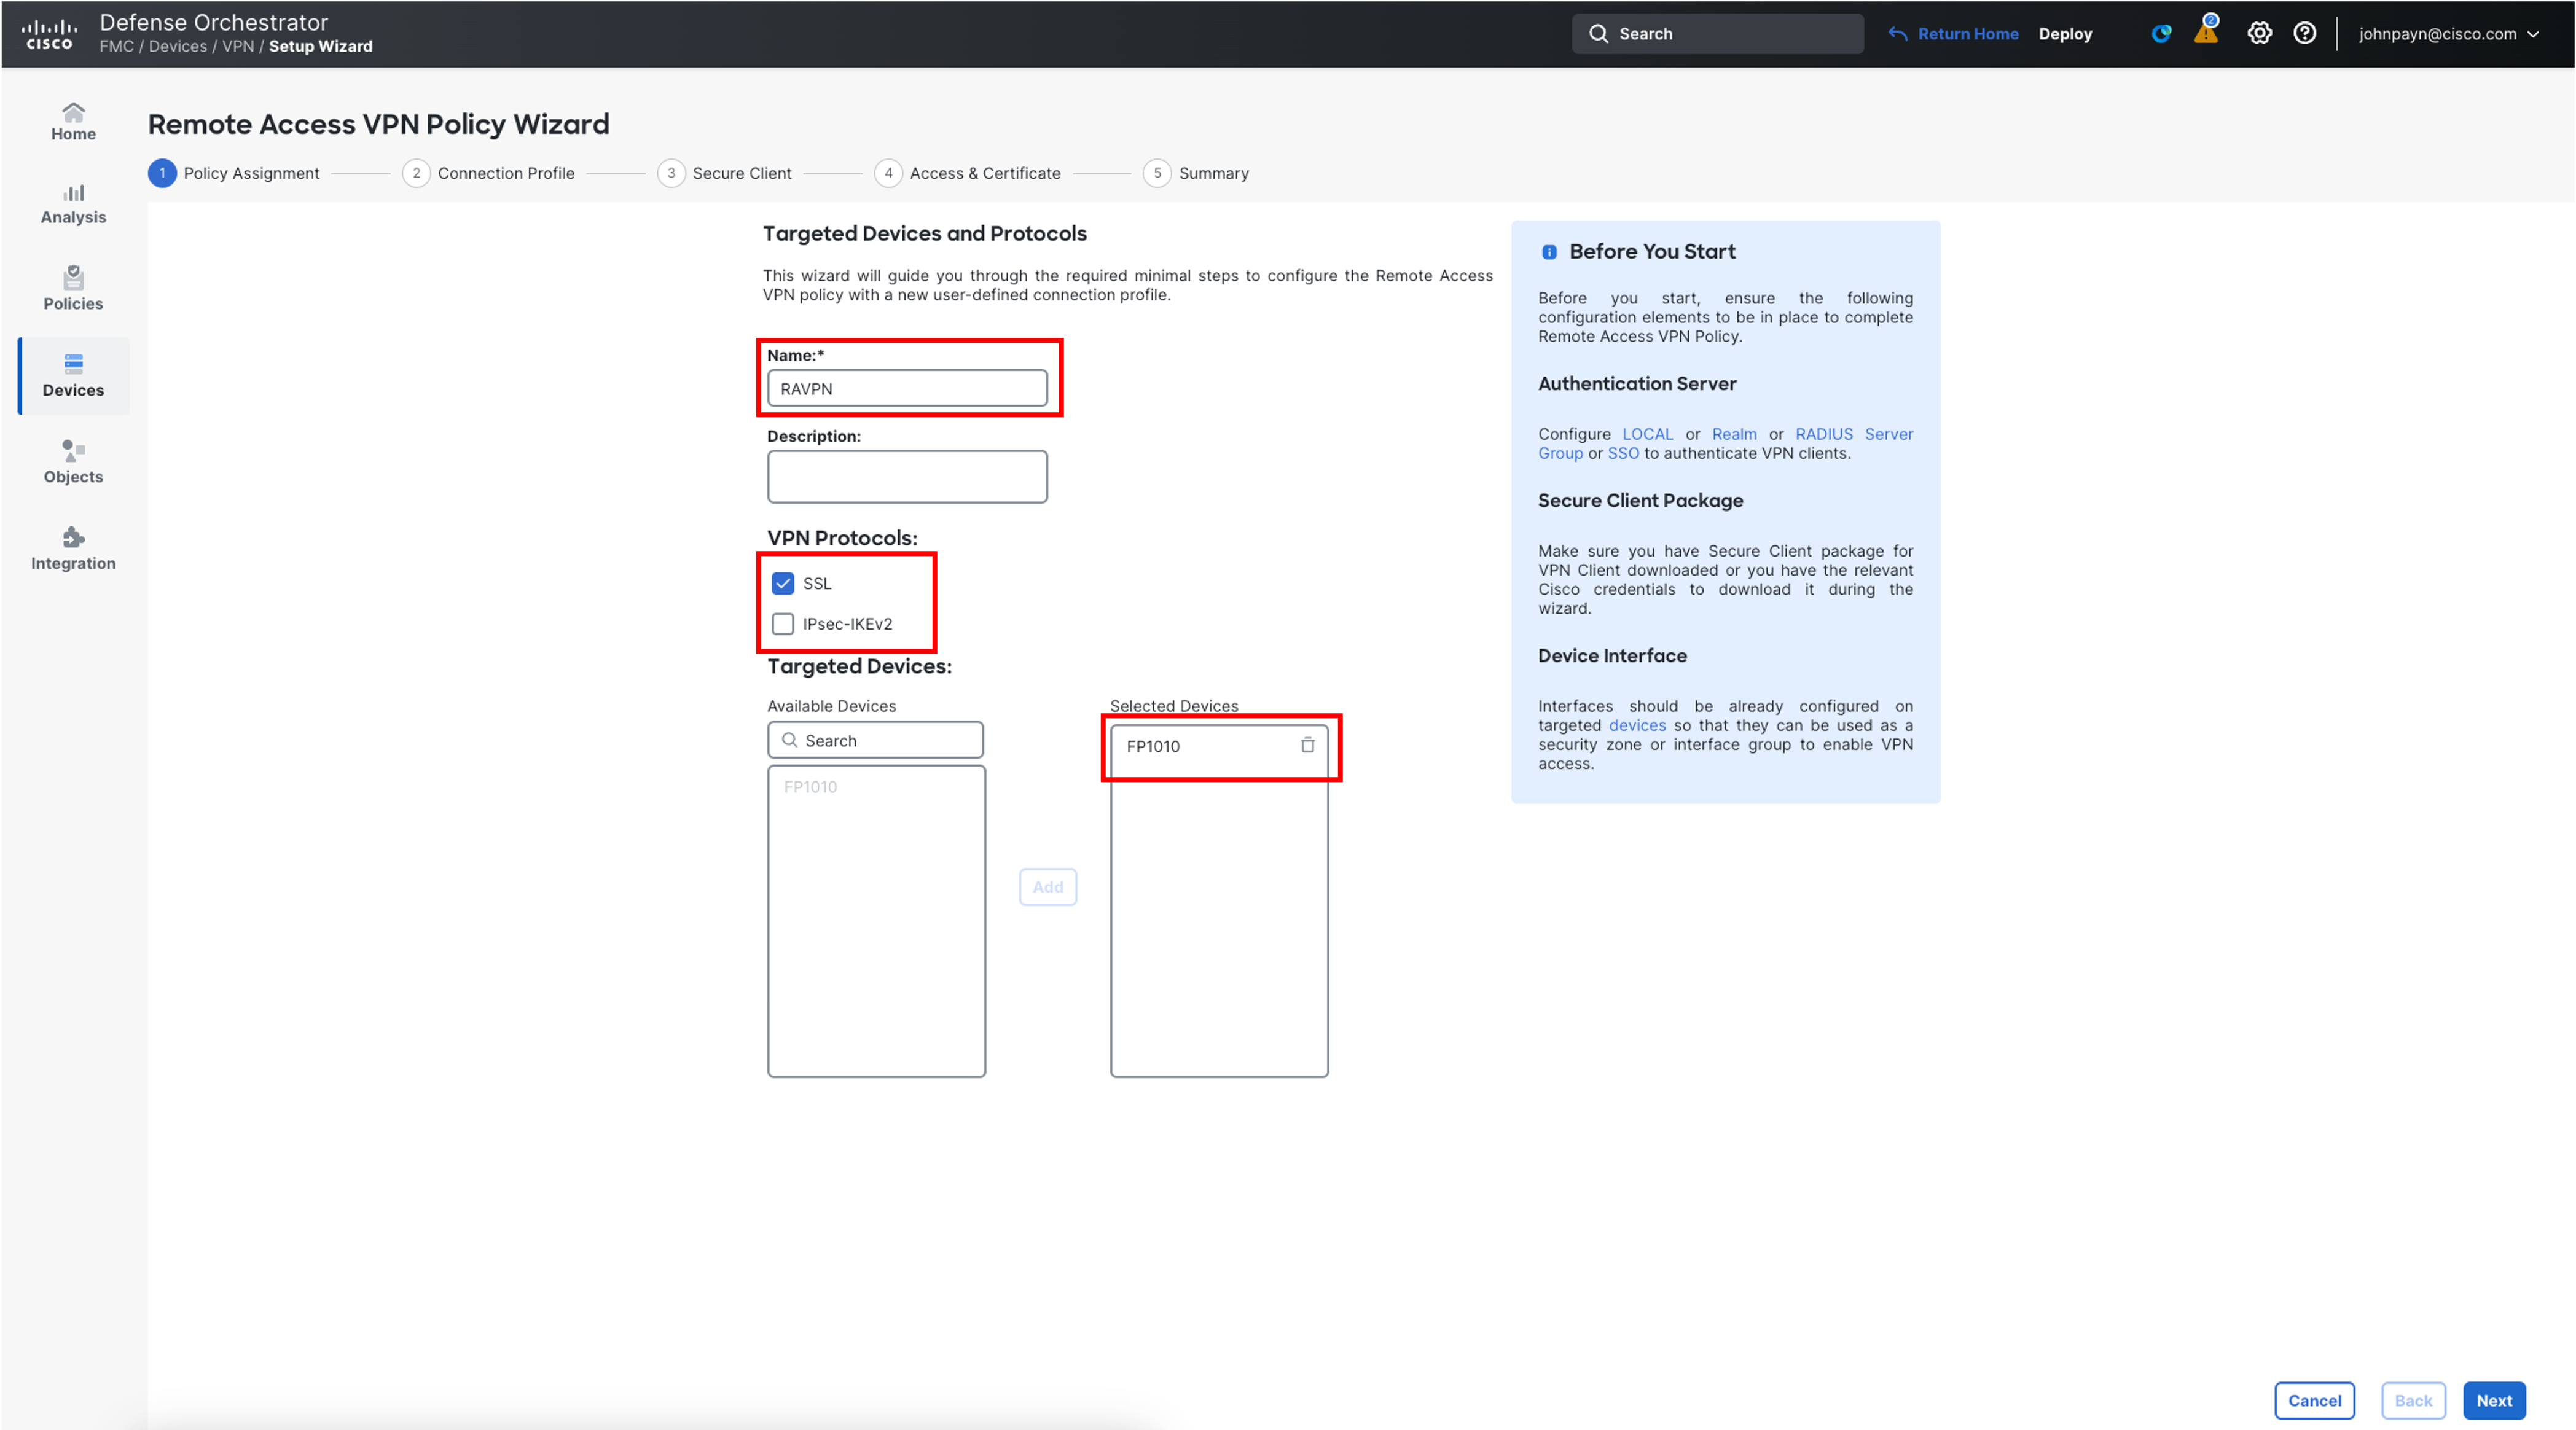
- In the wizard, configure the Policy Assignment as follows:
- Name: RAVPN
- Description: Can be left blank
- VPN Protocols: Uncheck IPsec-IKEv2 as this lab uses SSL and it enabled by default
- By default, both SSL and IPsec-IKEv2 are selected. You can select SSL or IPSec-IKEv2, or both the VPN protocols. FTD supports both protocols to establish secure connections over a public network through VPN tunnels.
- In the Targeted Devices Section, select FP1010, then click Add to move it to the Selected Devices section.
- Leave Other Settings as default and click Next.
- In the Connection Profile tab configure the details as below:
- Authentication Method: AAA Only
- Authentication Server: LOCAL
- Local Realm: RAVPN
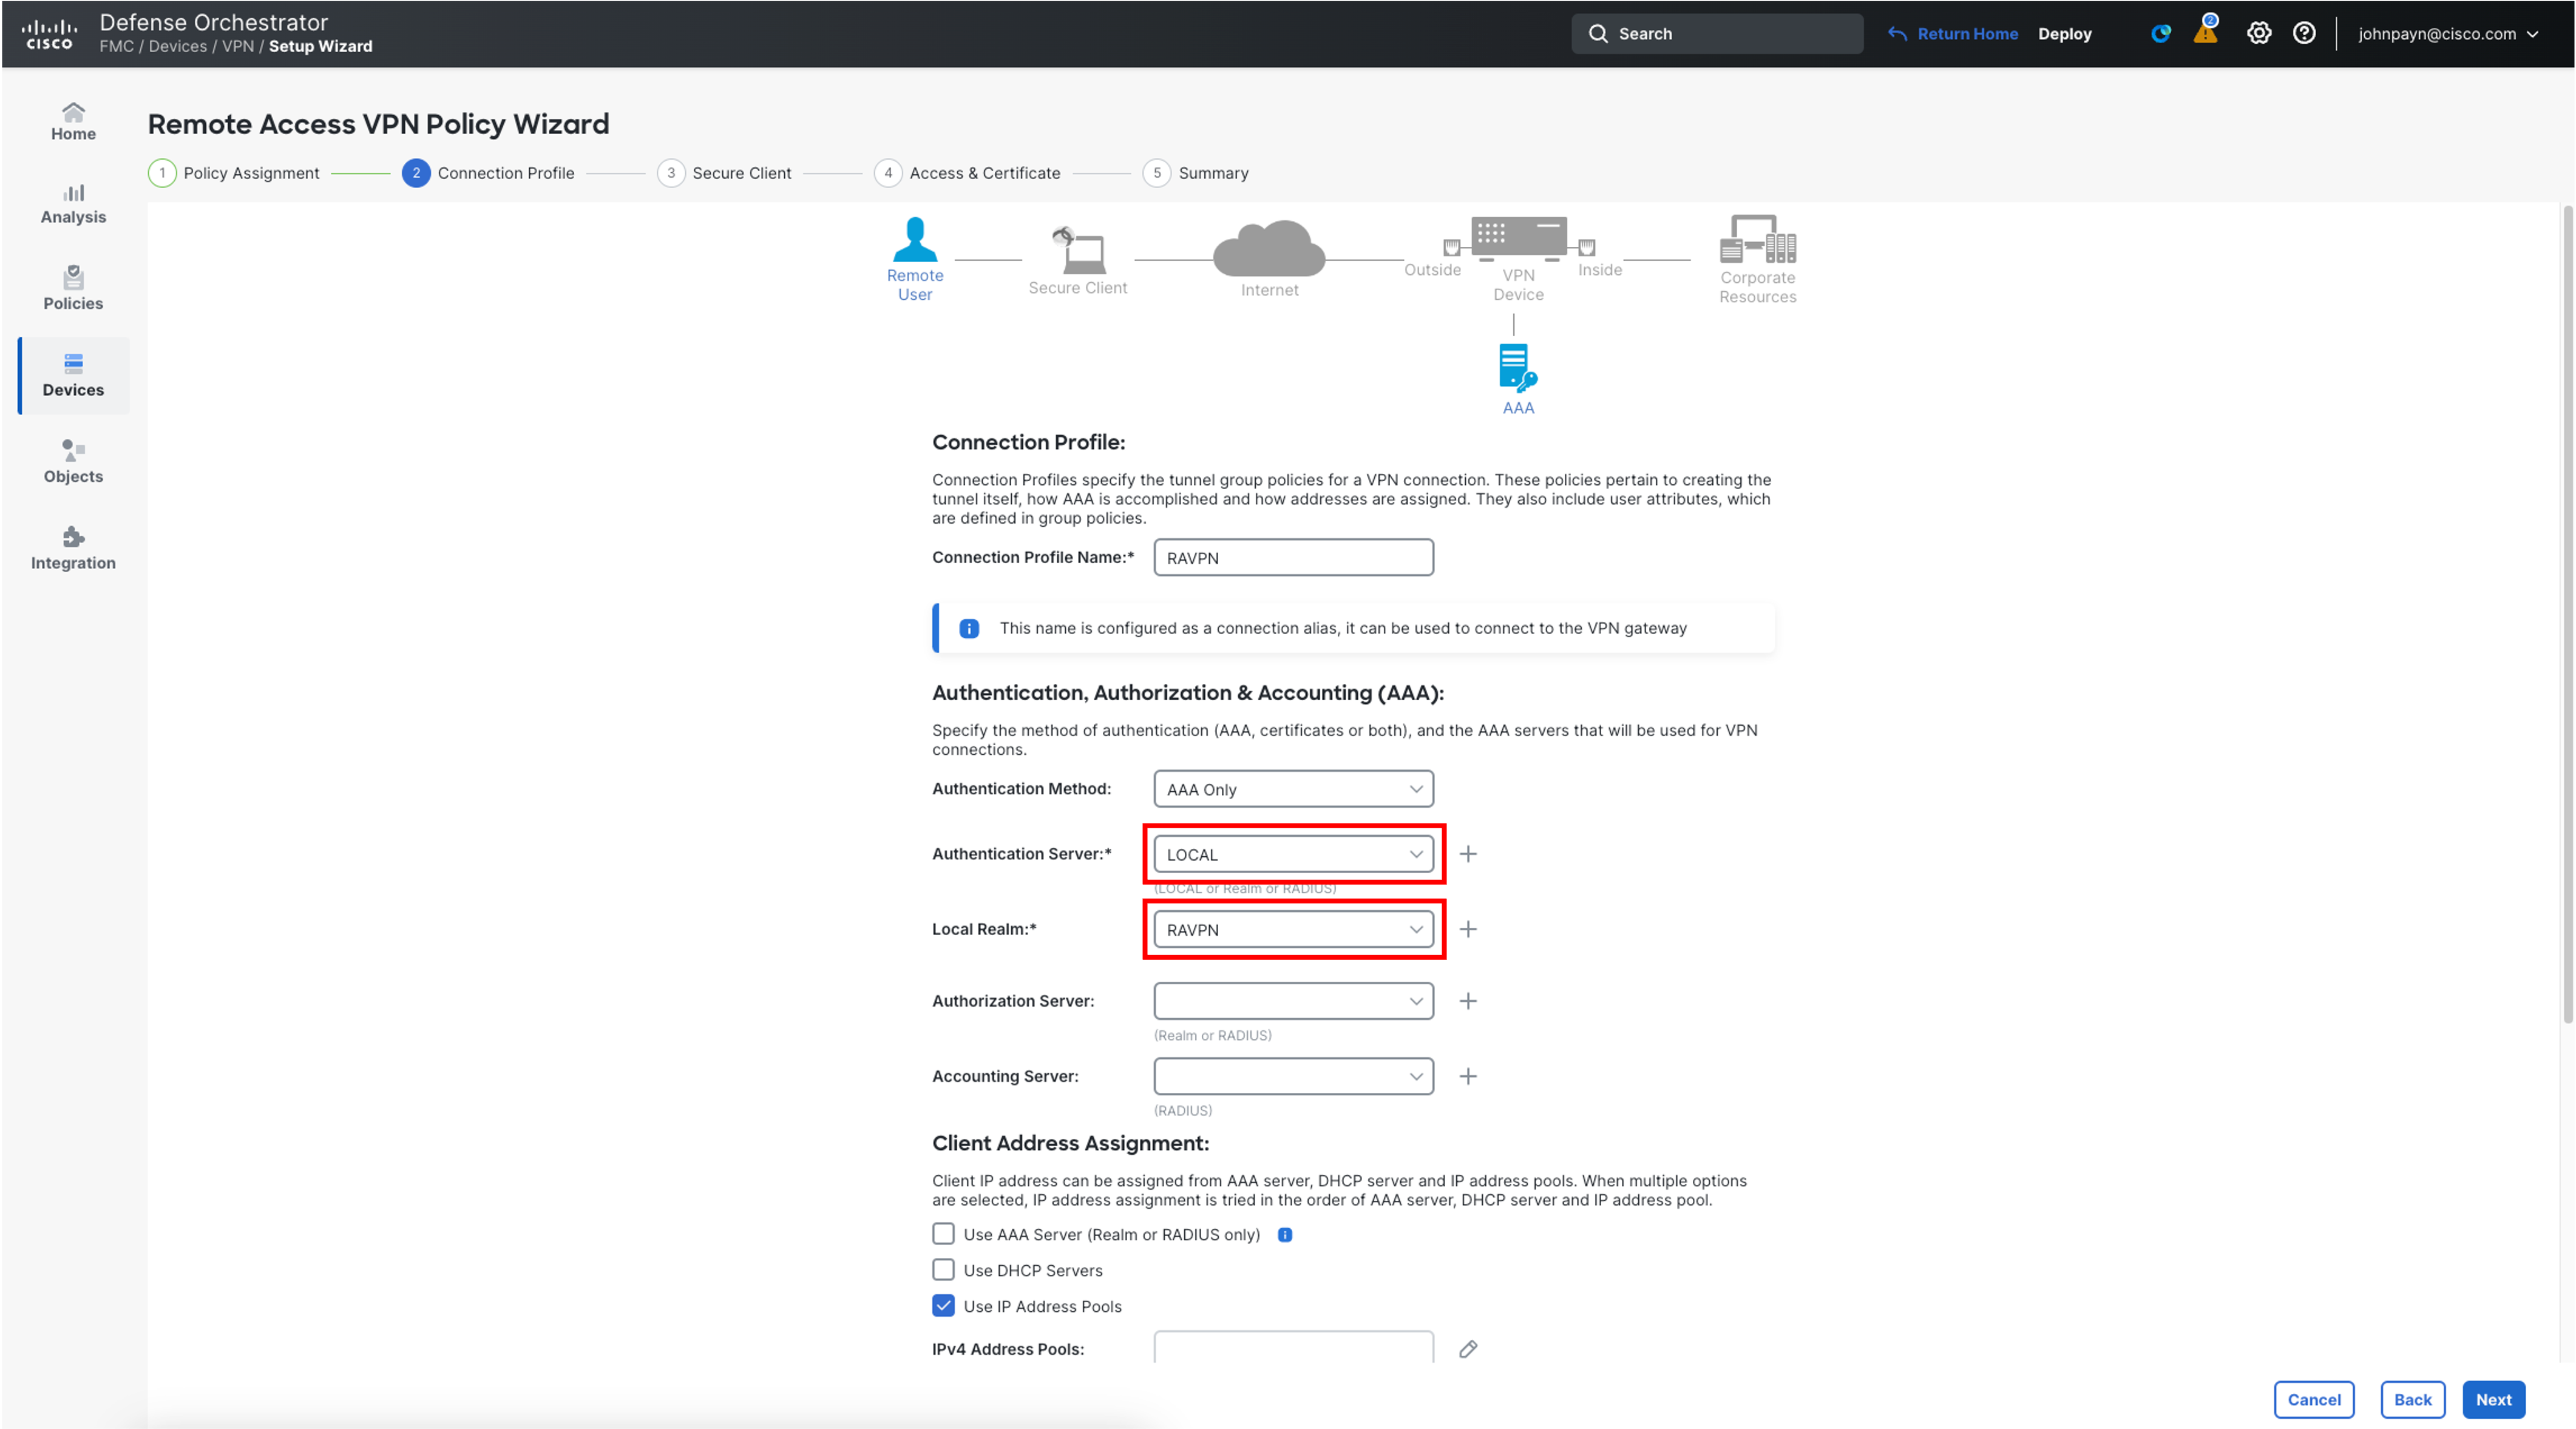
- In the Client Address Assignment section, the Use IP Address Pools checkbox will be selected by default. Click on the pencil icon next to IPv4 Address Pools.
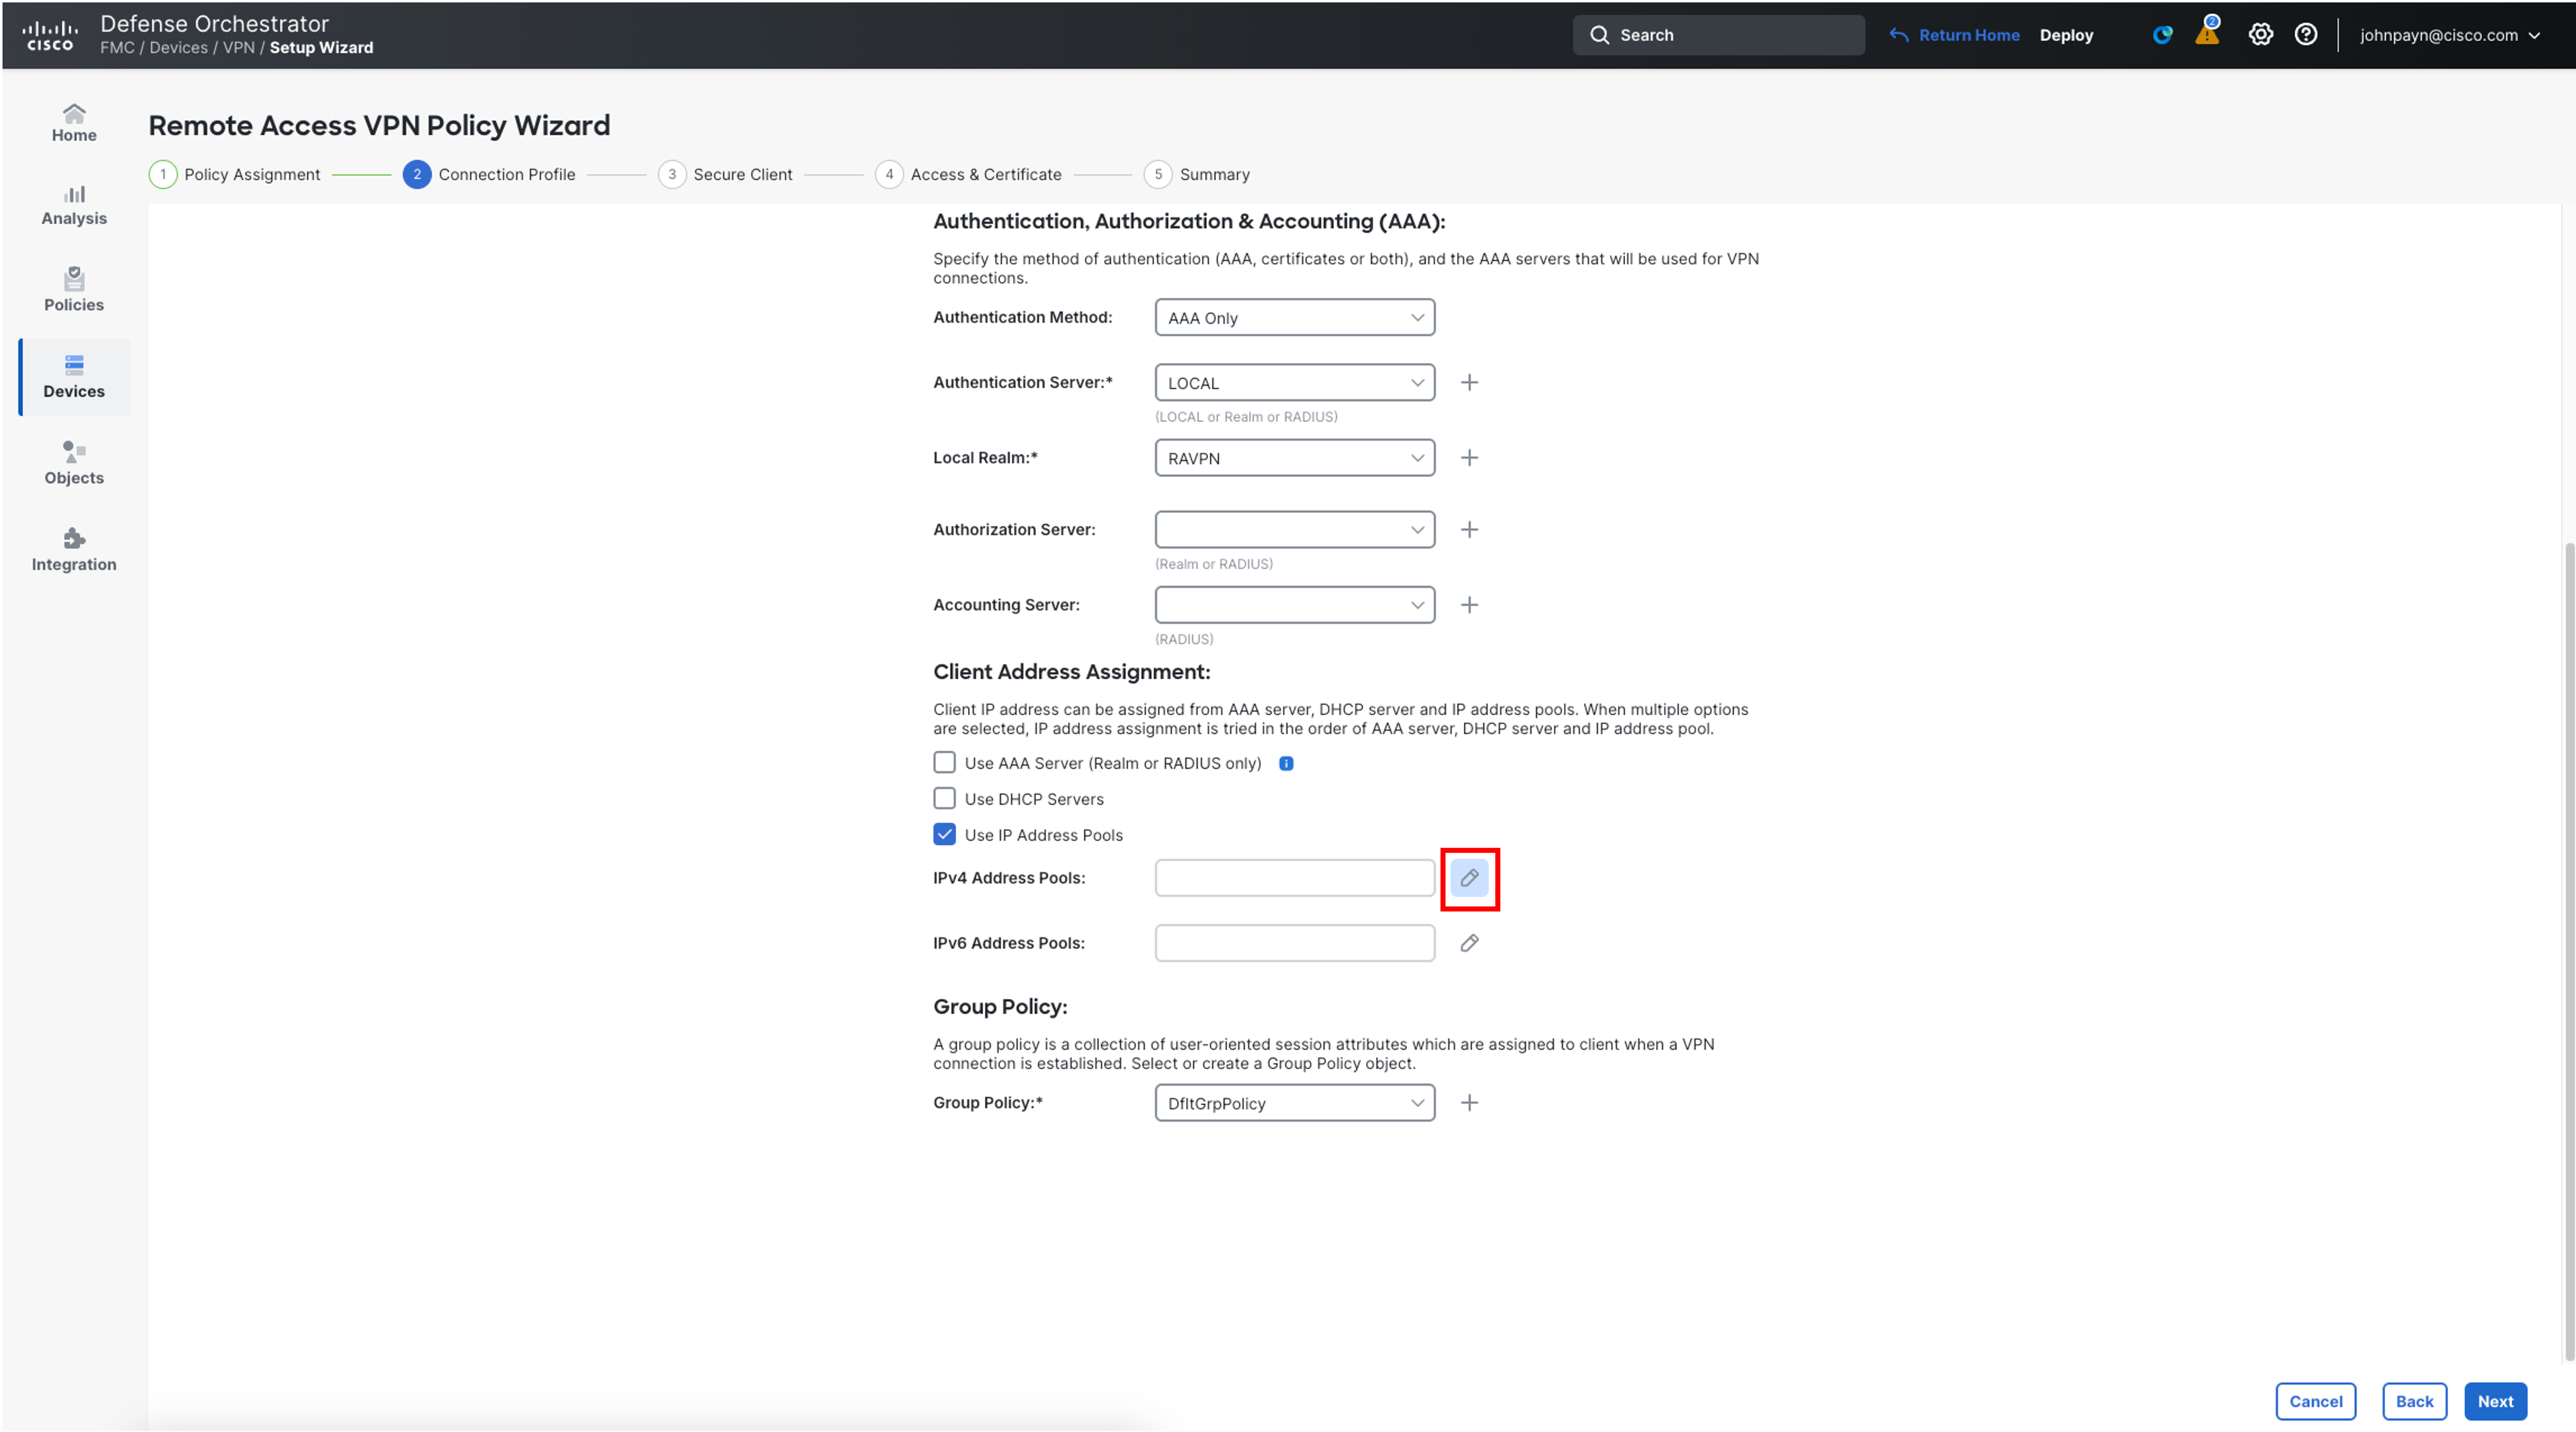
-
In the pop-up box, click on the + sign next to Available IPv4 Pools.
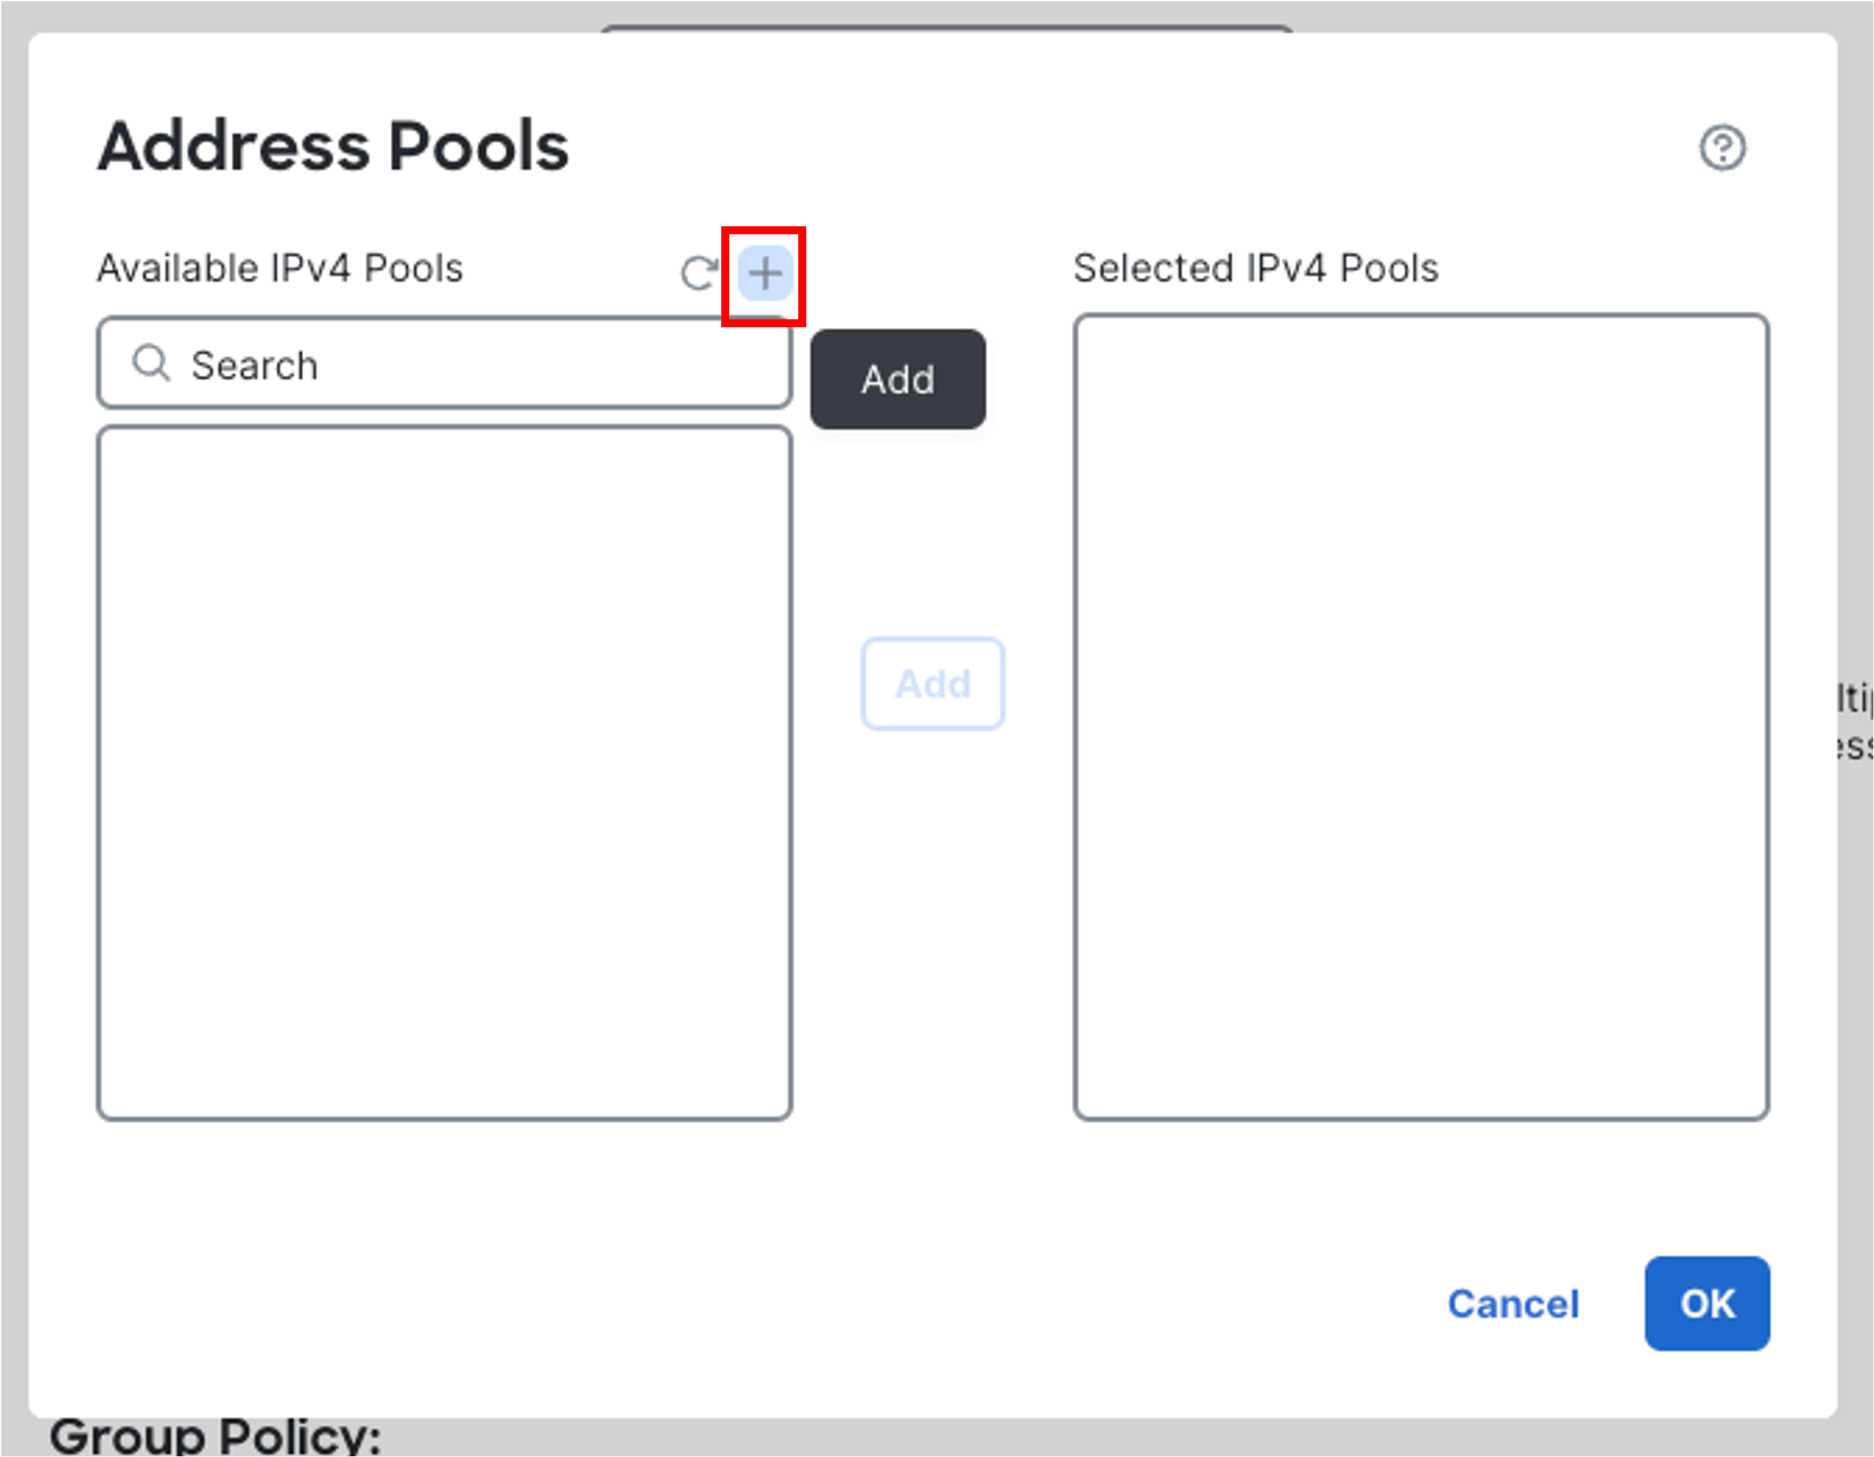
-
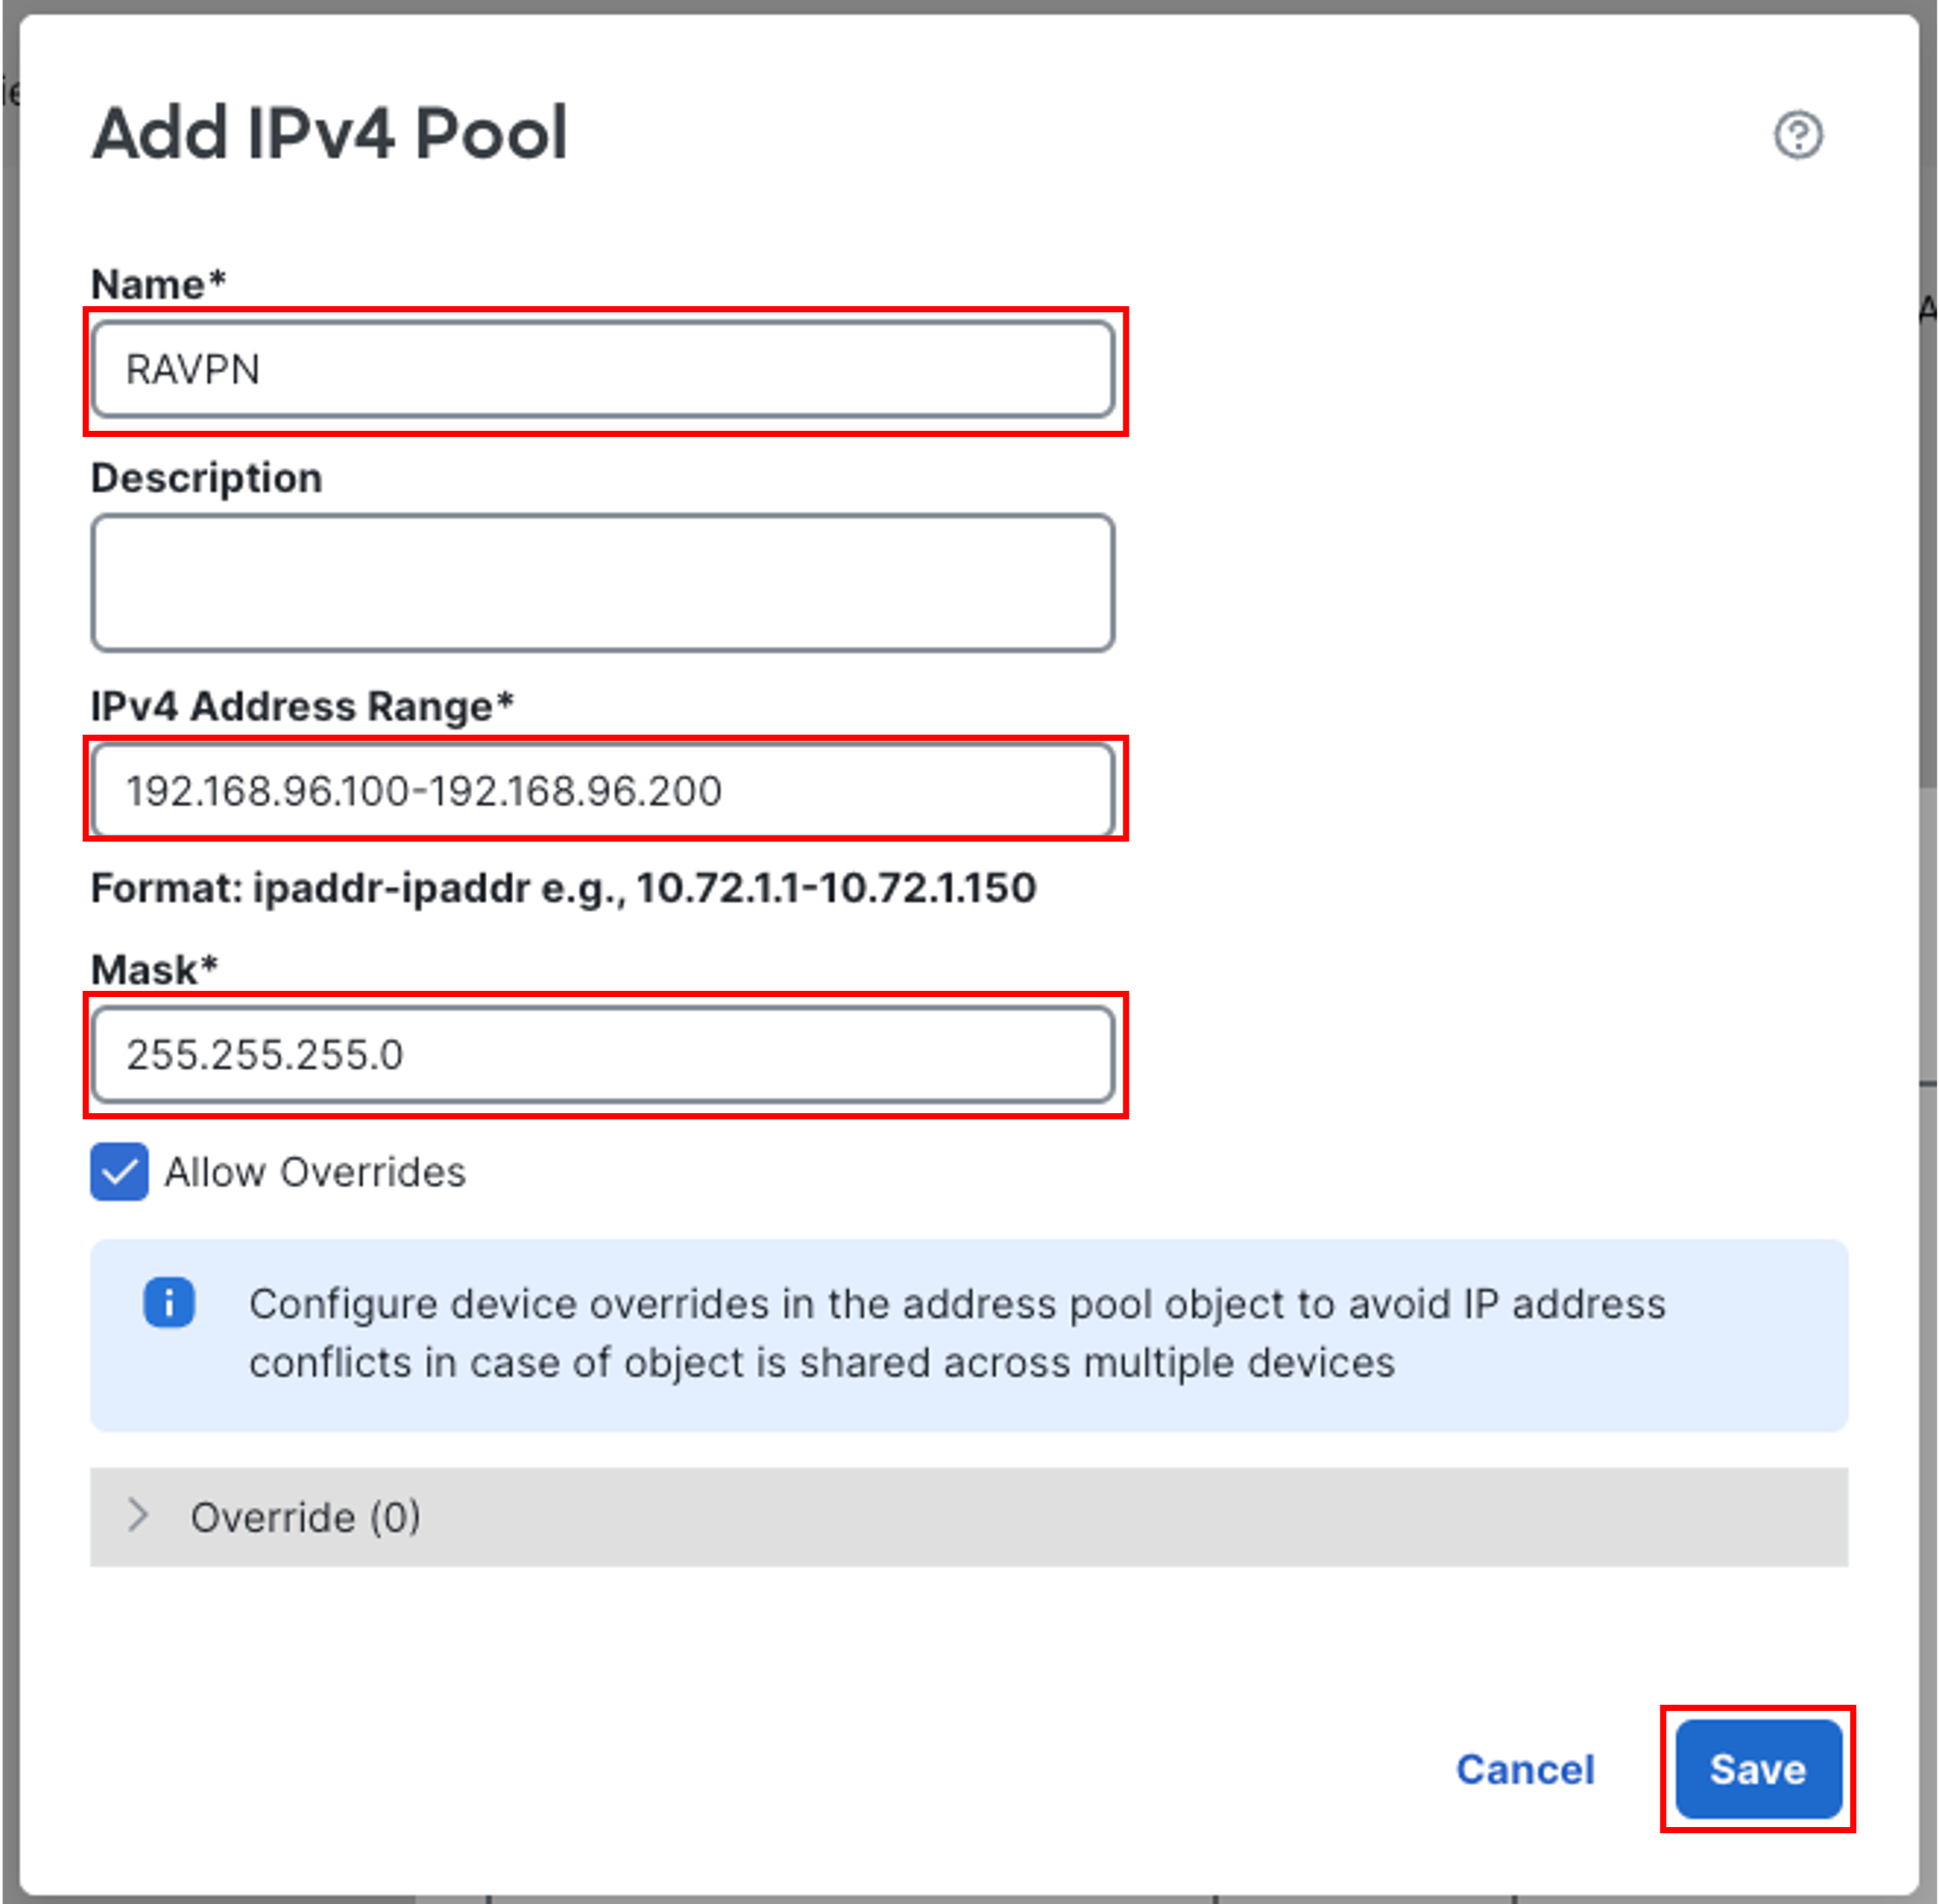
In the pop-up box, provide the following details:
-
Name: RAVPN
-
IPv4 Address Range: 192.168.96.100-192.168.96.200
-
Mask: 255.255.255.0
-
Leave other settings as default and click Save.
-
-
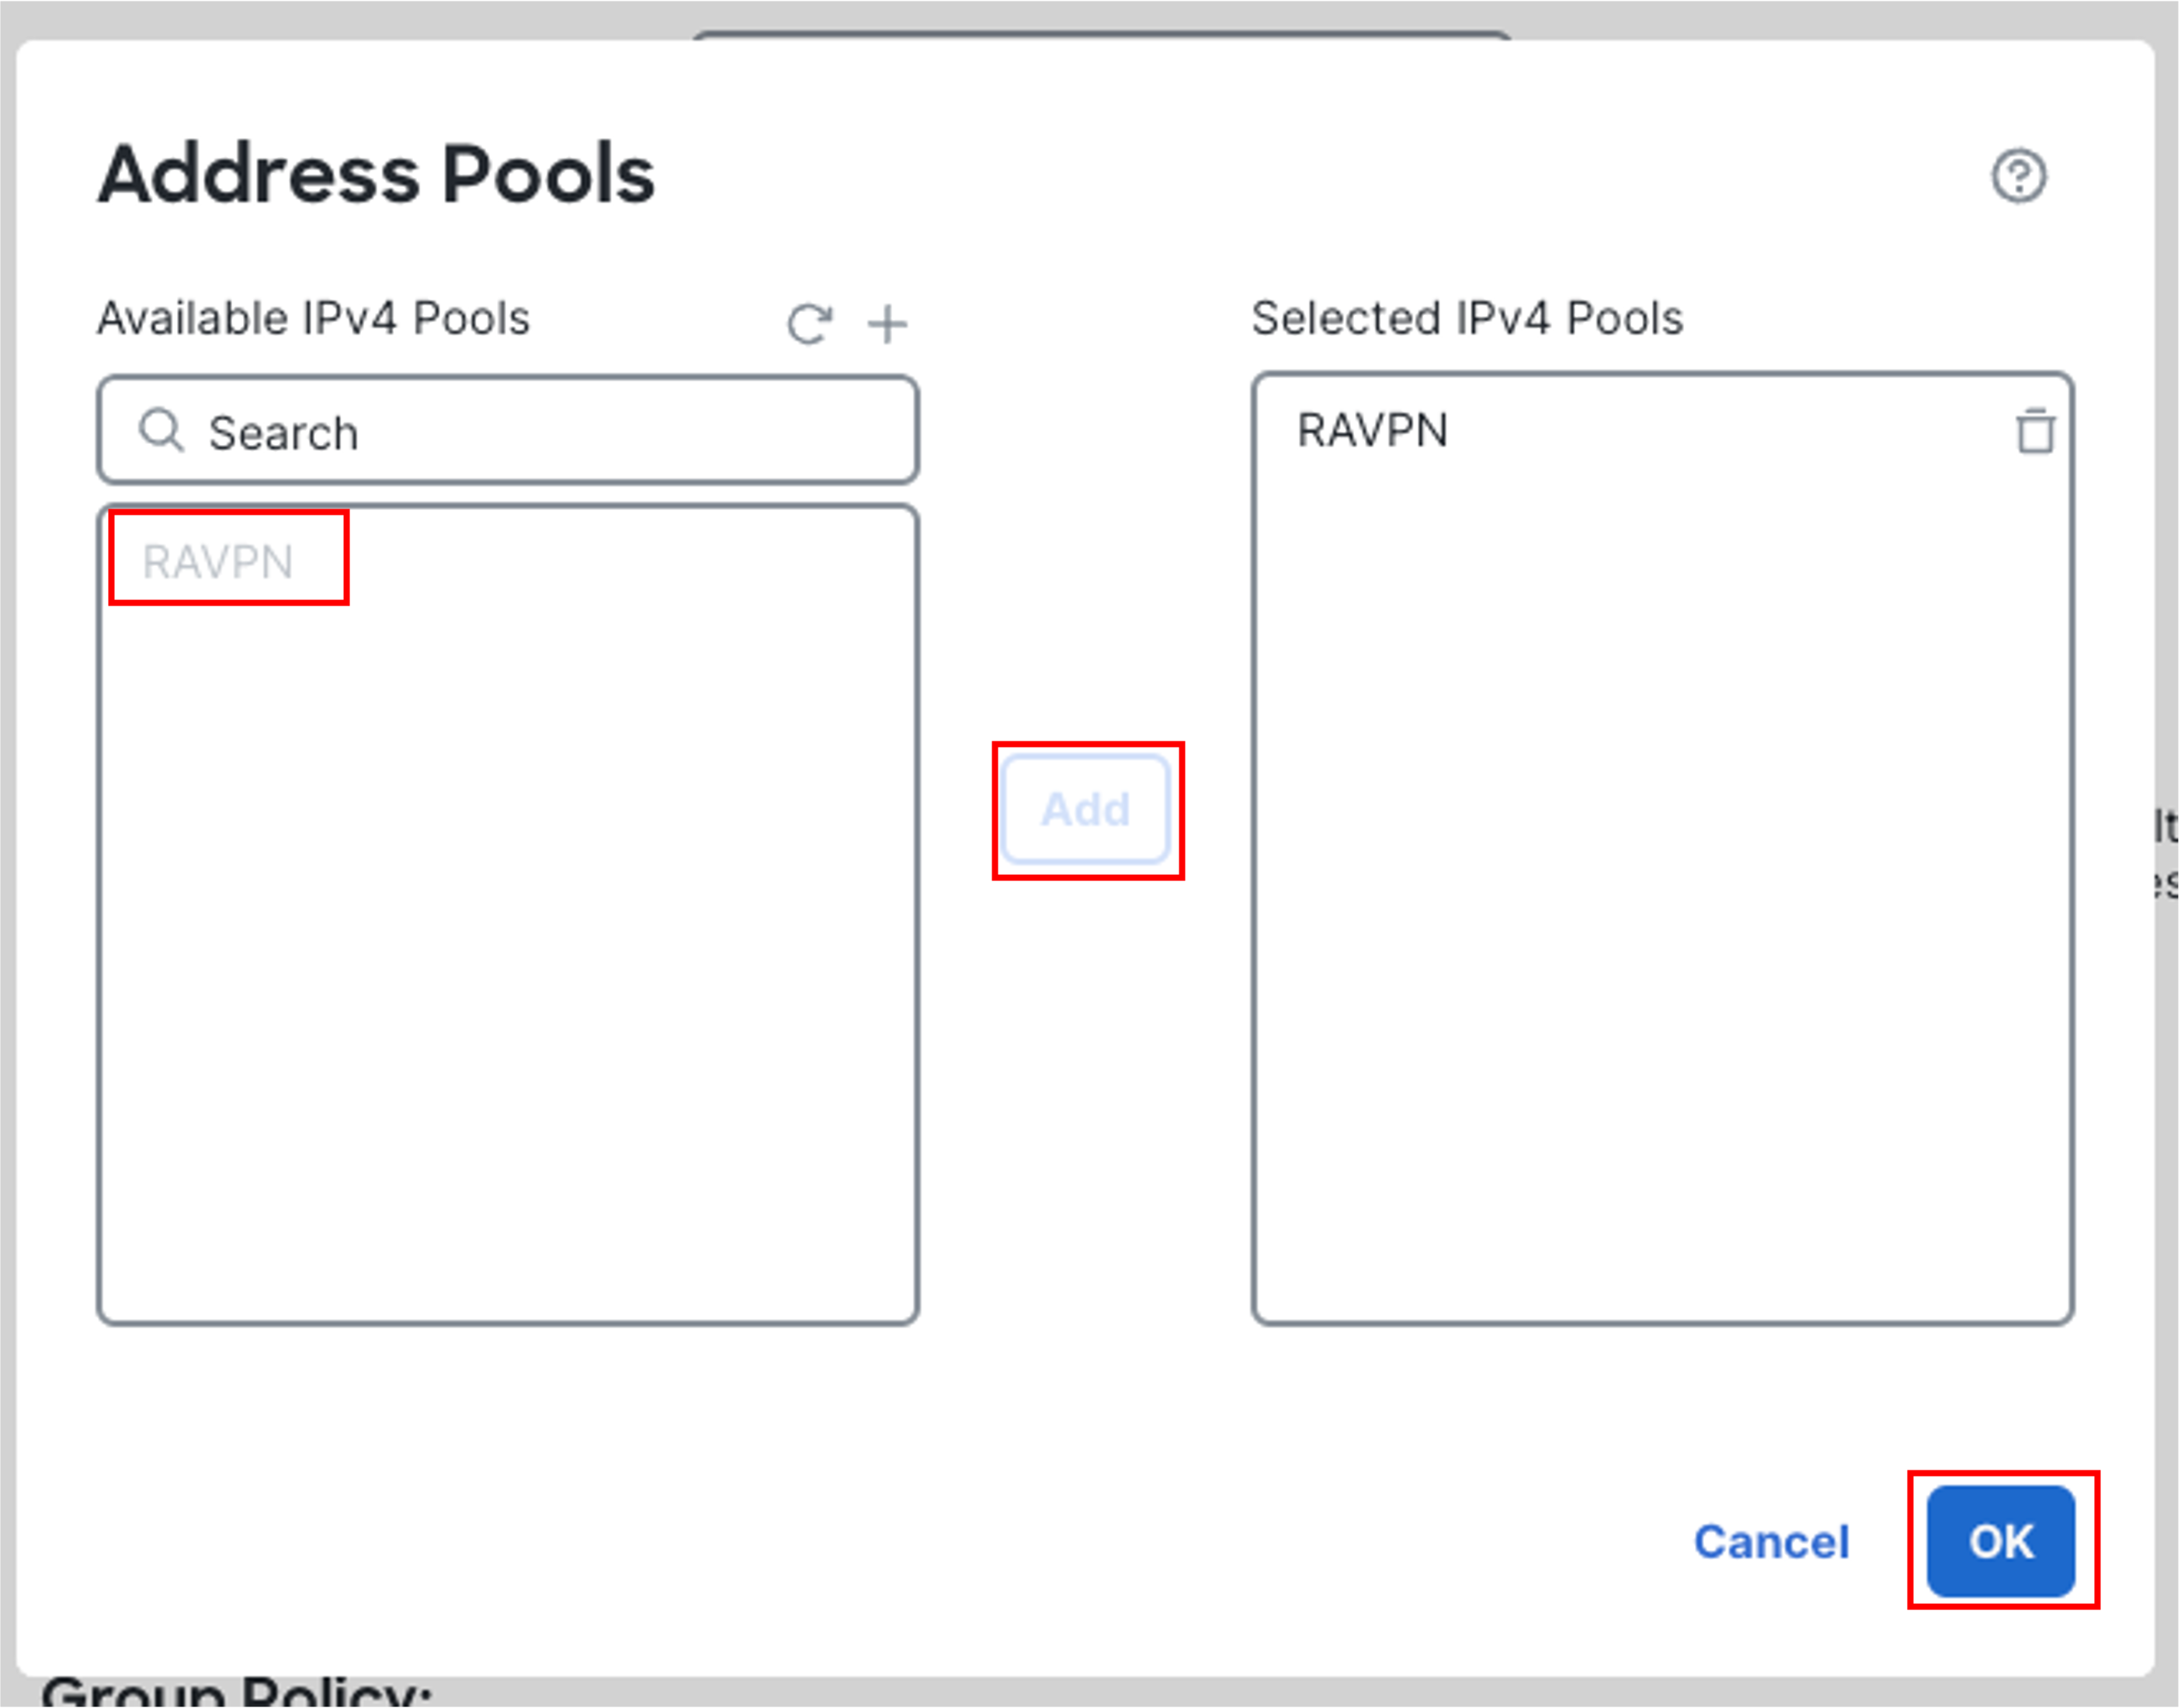
Select the newly created address pool and click on Add to move the pool to the Selected IPv4 Pools section. Then click on OK.
-
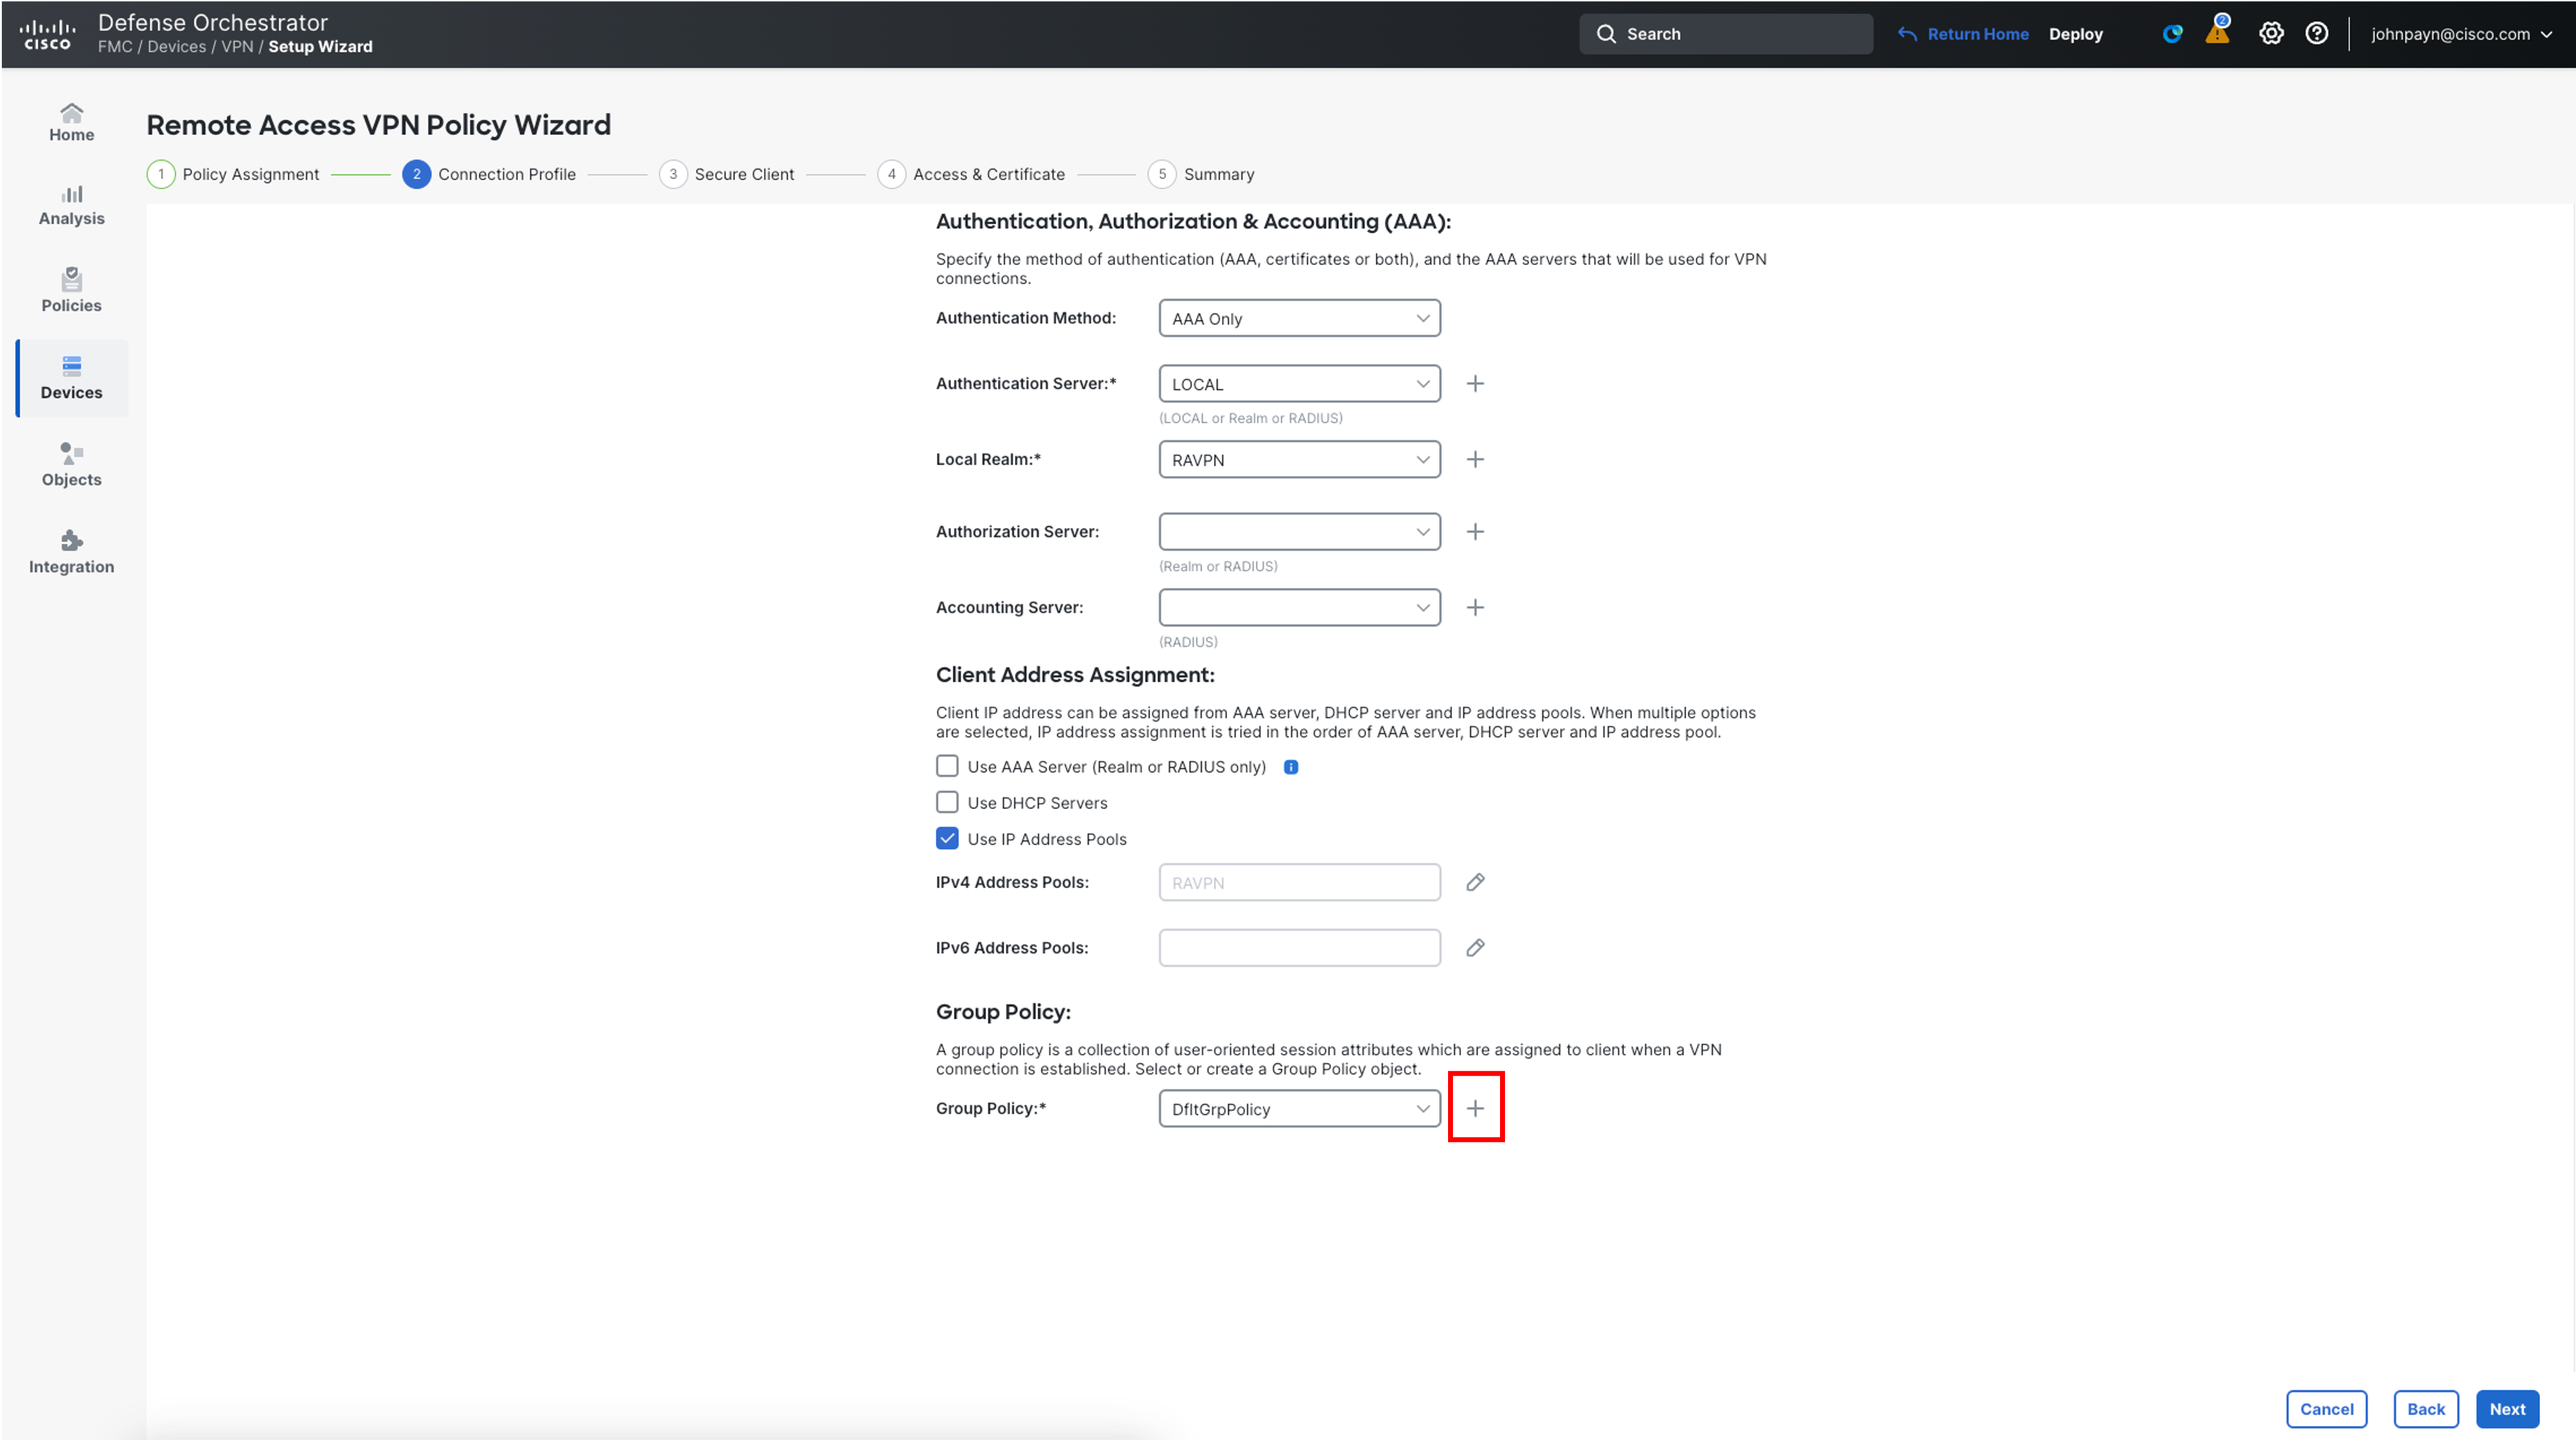
In the Group Policy section, click on the + icon next to Group Policy to create a new group policy.
-
In the pop up box, configure the following details:
- Name: RAVPN
- In the General tab:
- Go to Banner section on the left.
-
Enter your preferred text in the Banner Textbox.
Example: **YOU ARE CONNECTING TO FP1010. UNAUTHORIZED ACCESS RESTRICTED!**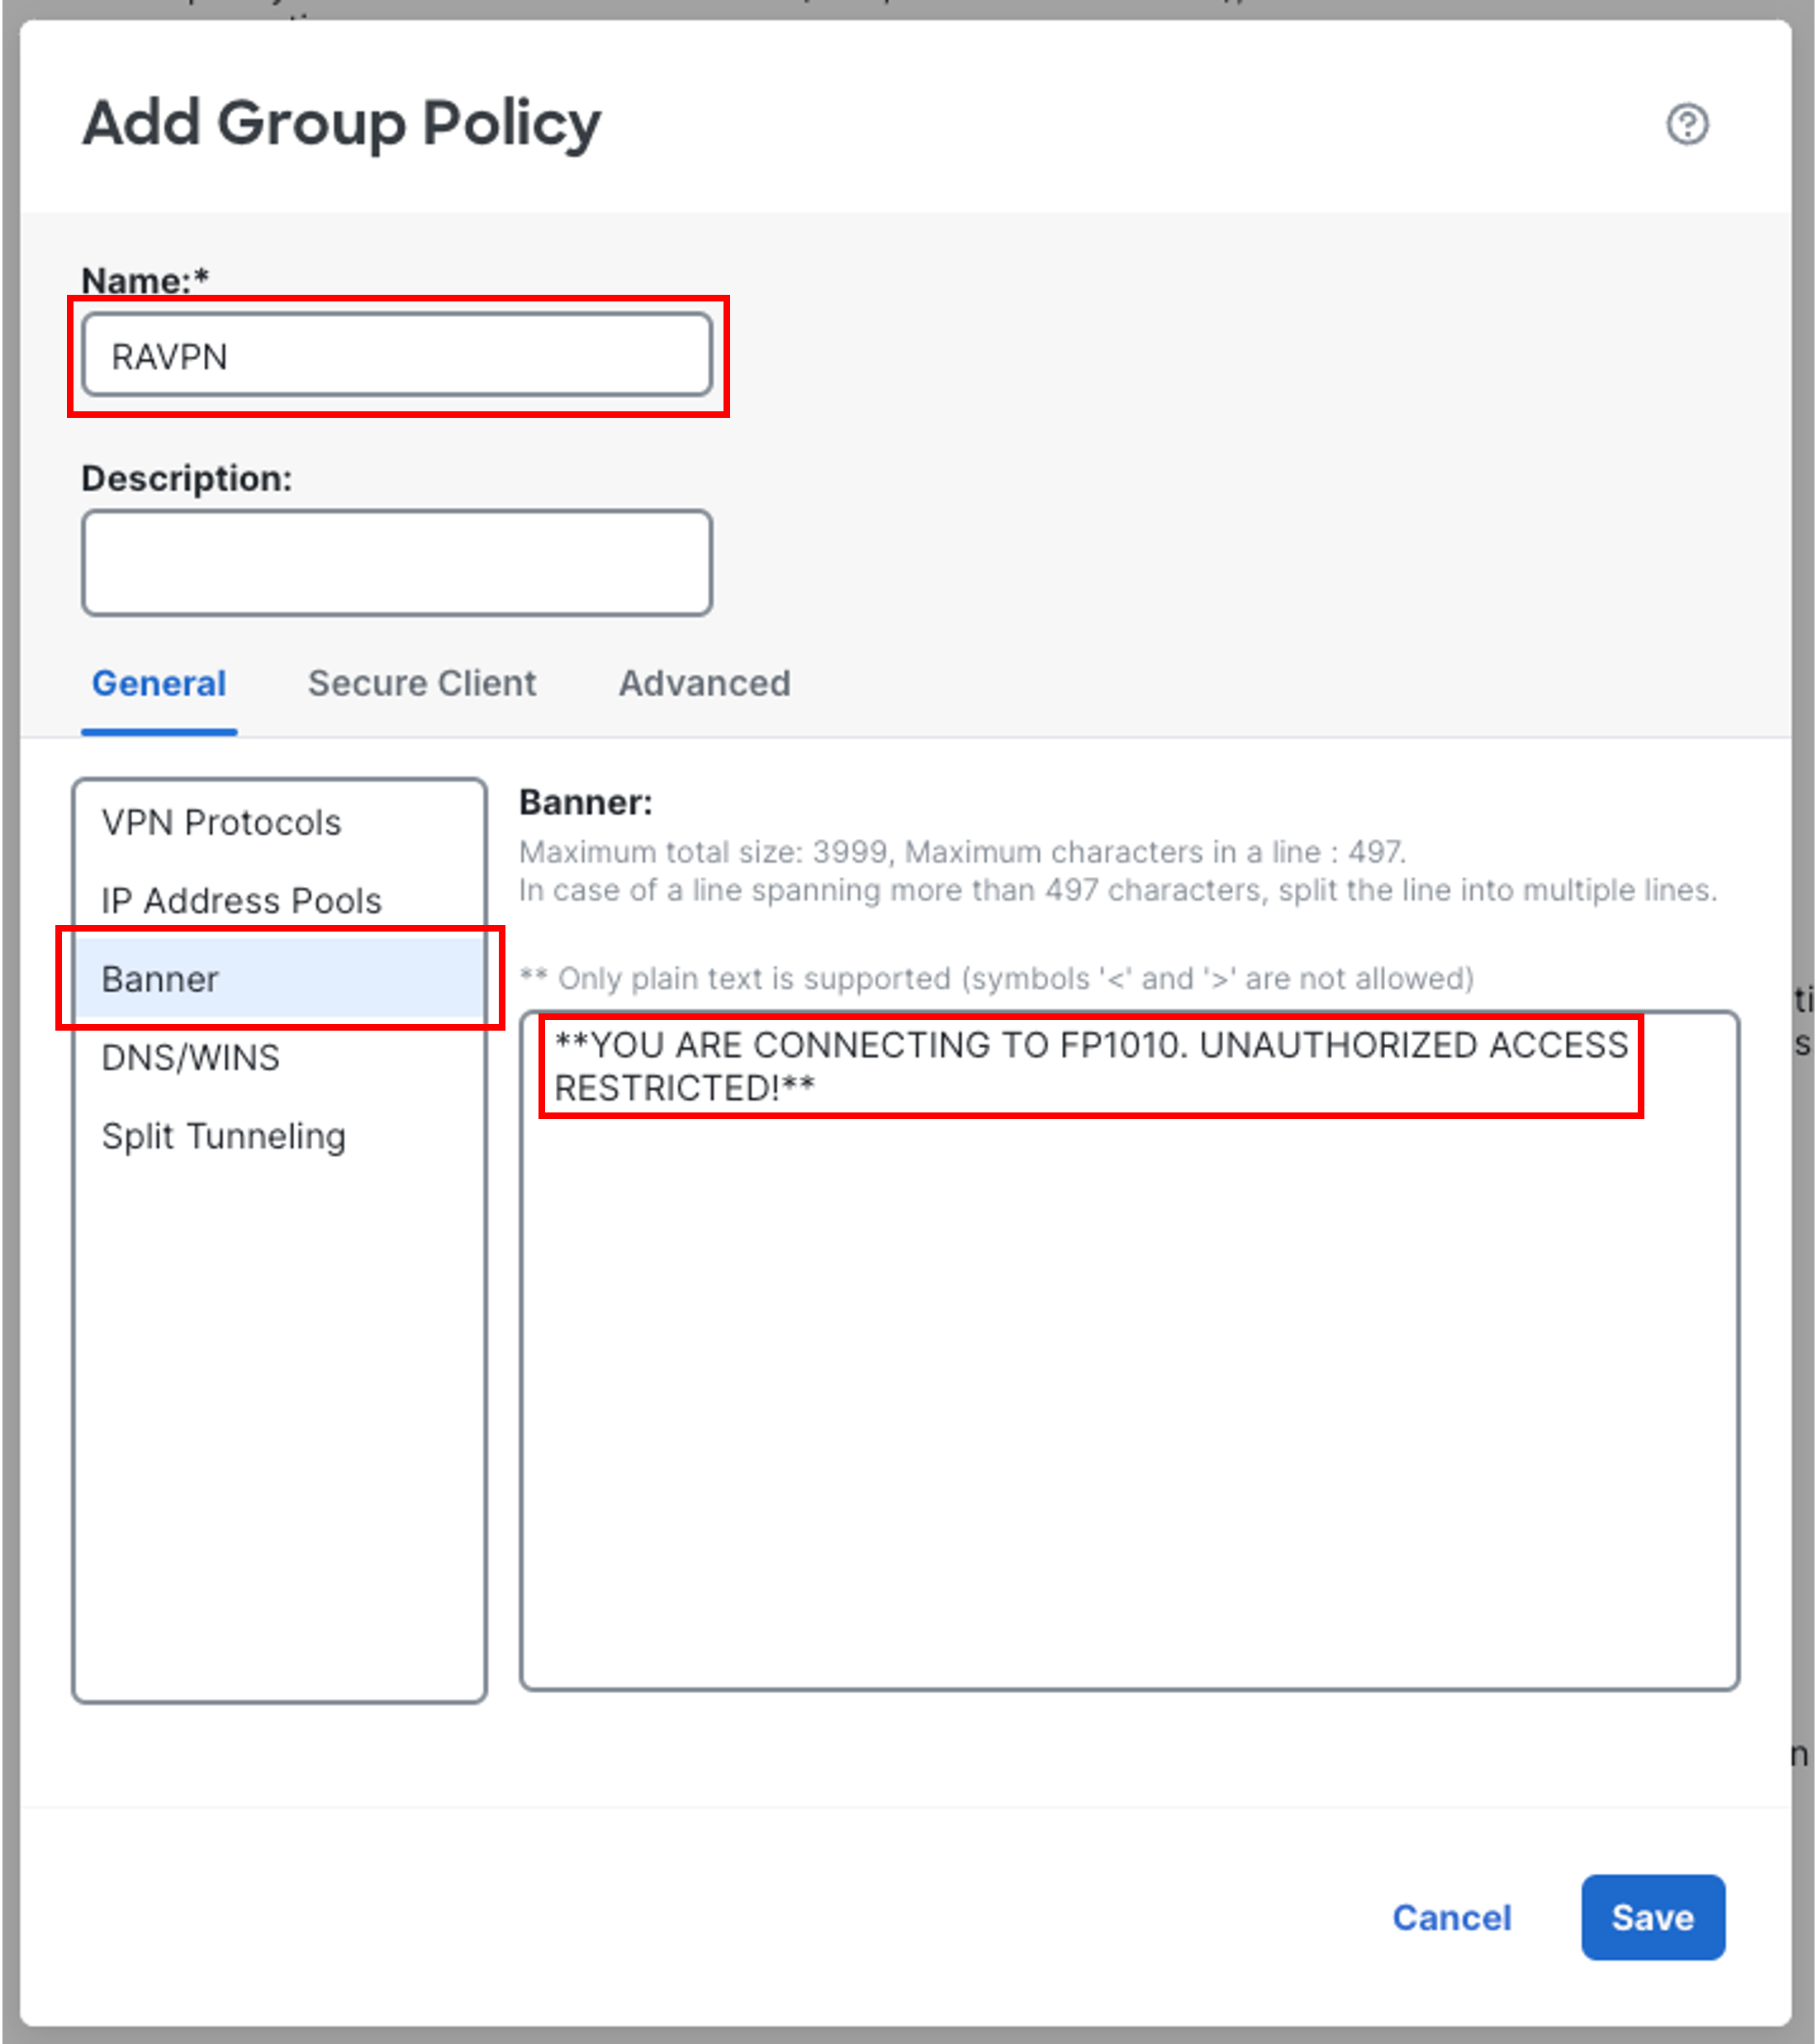
-
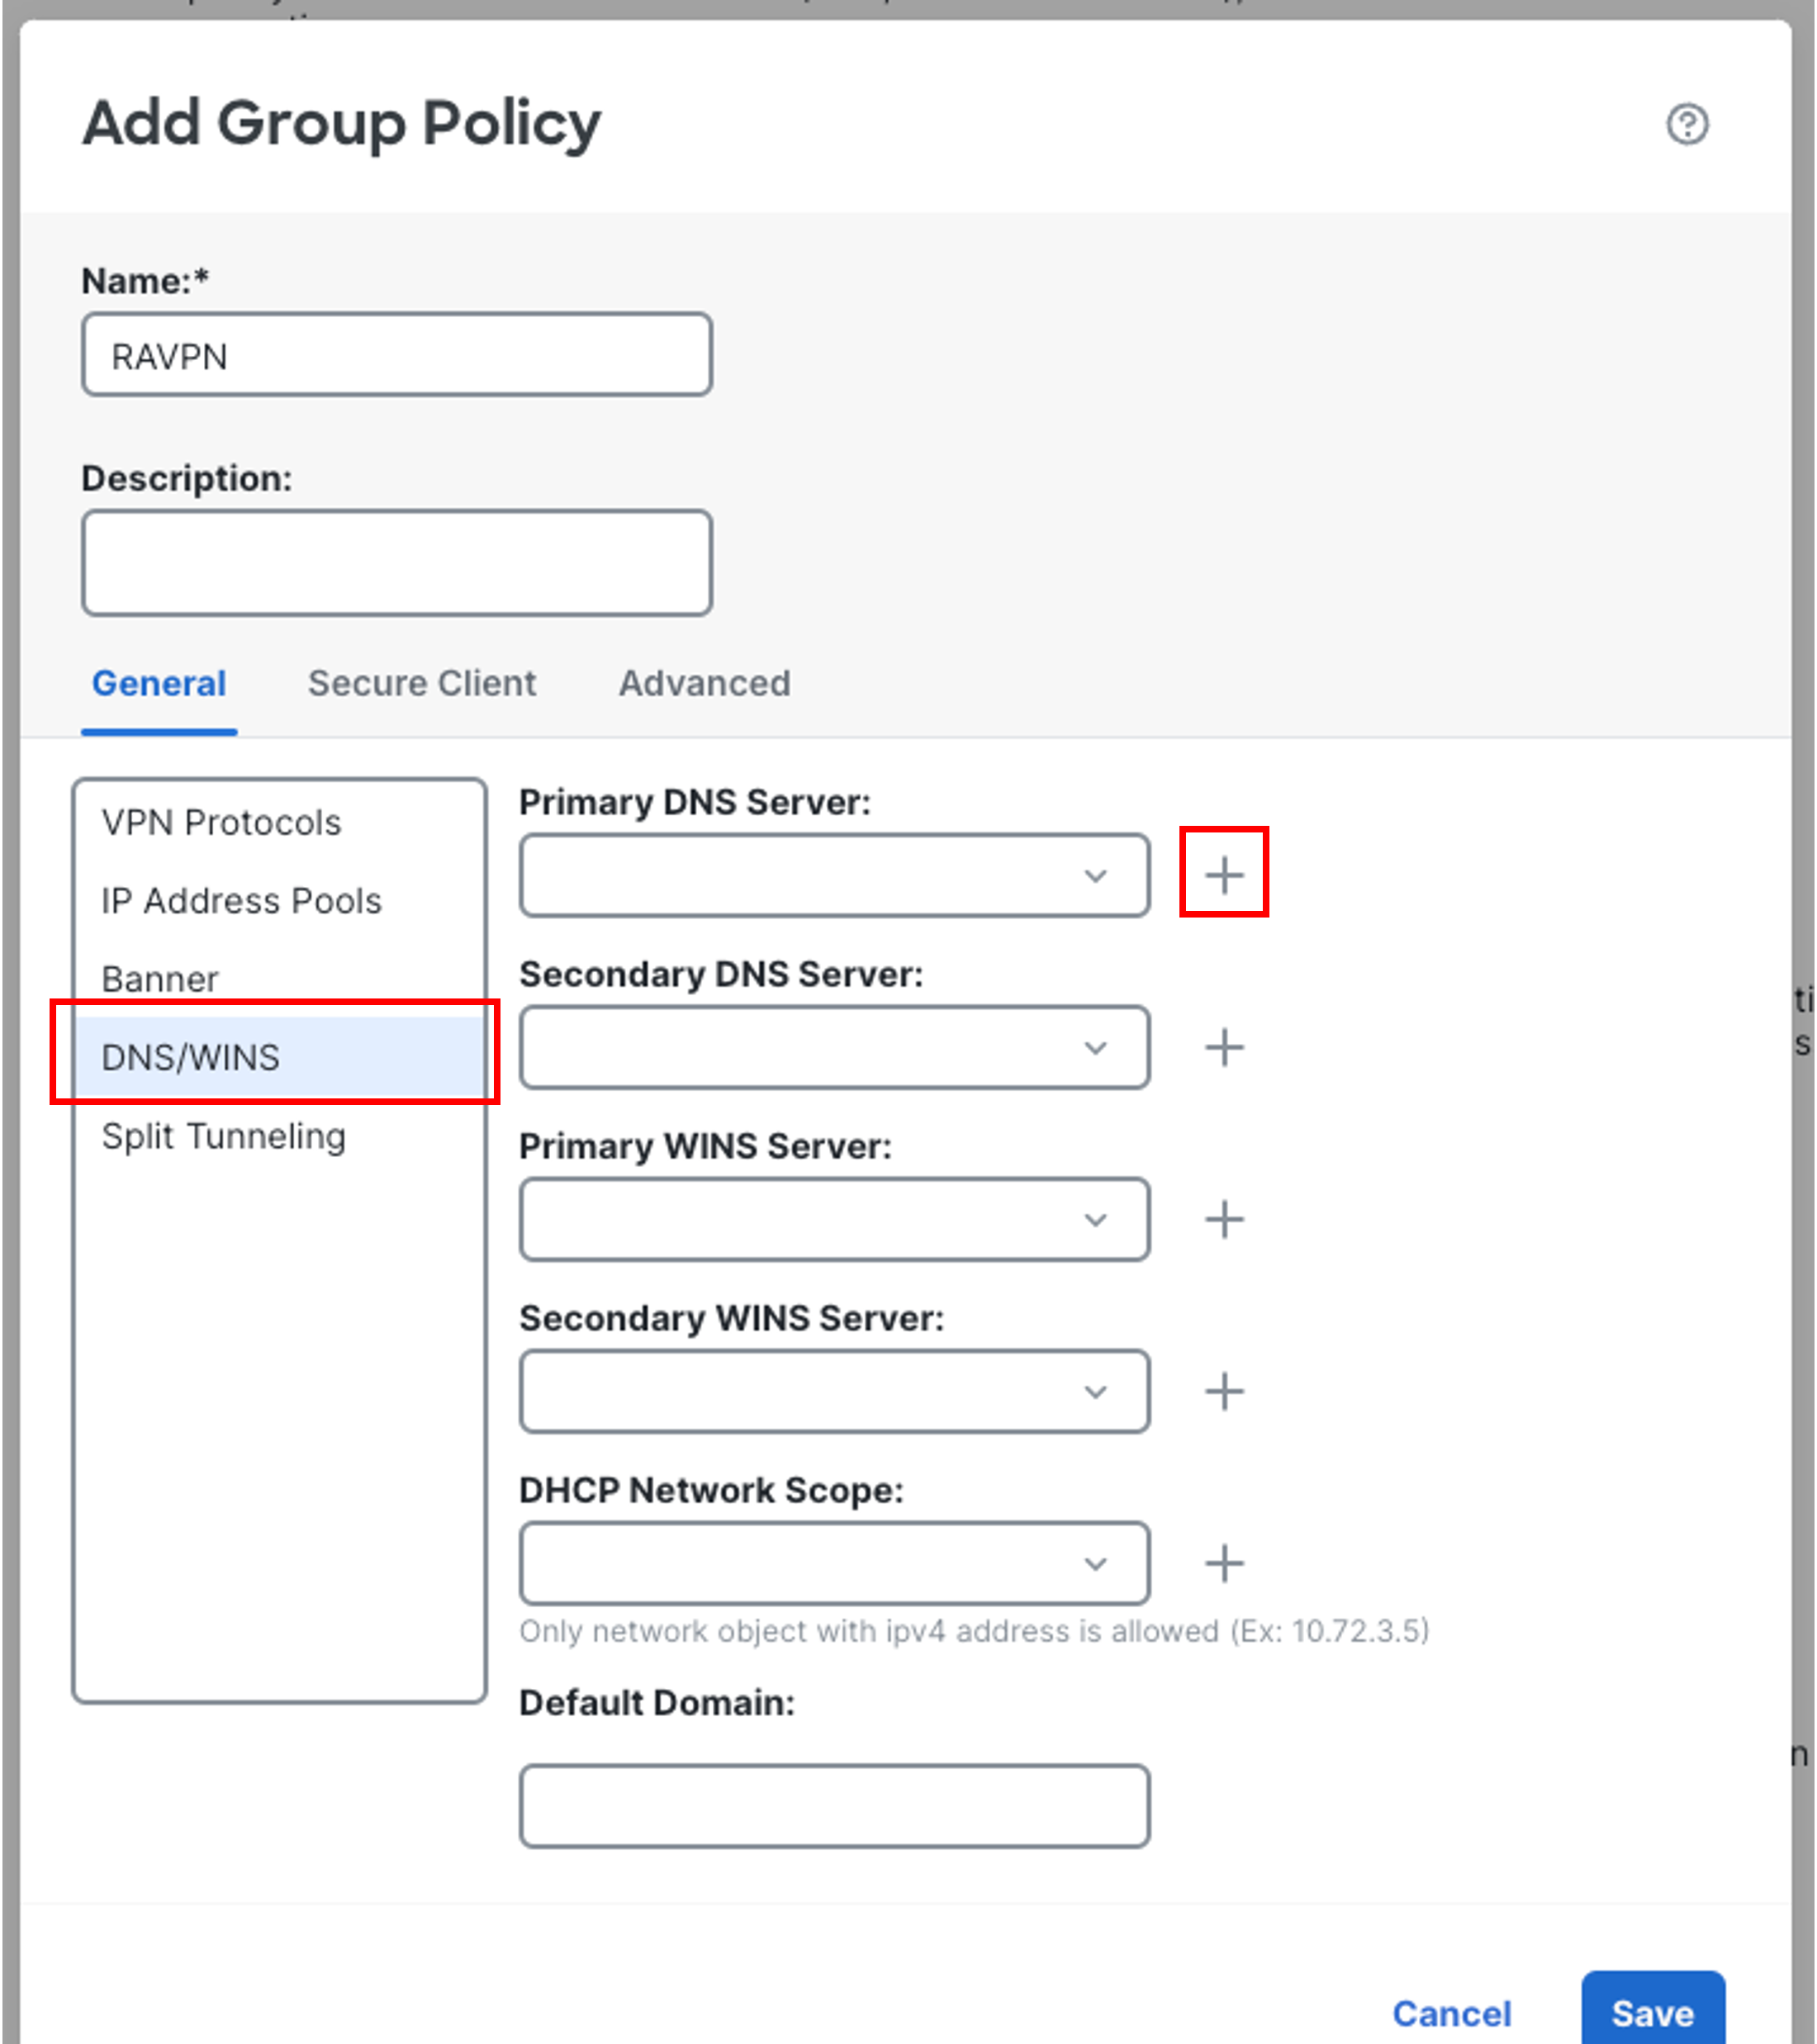
Go to DNS/WINS section on the left:
-
Click on the + sign next to Primary DNS Server to create a new network object.
-
-
In the pop-up box, configure the Network Object as follows:
-
Name: Umbrella-Primary
-
Network type should be Host by default.
-
Address: 208.67.222.222
-
Then click on Save.
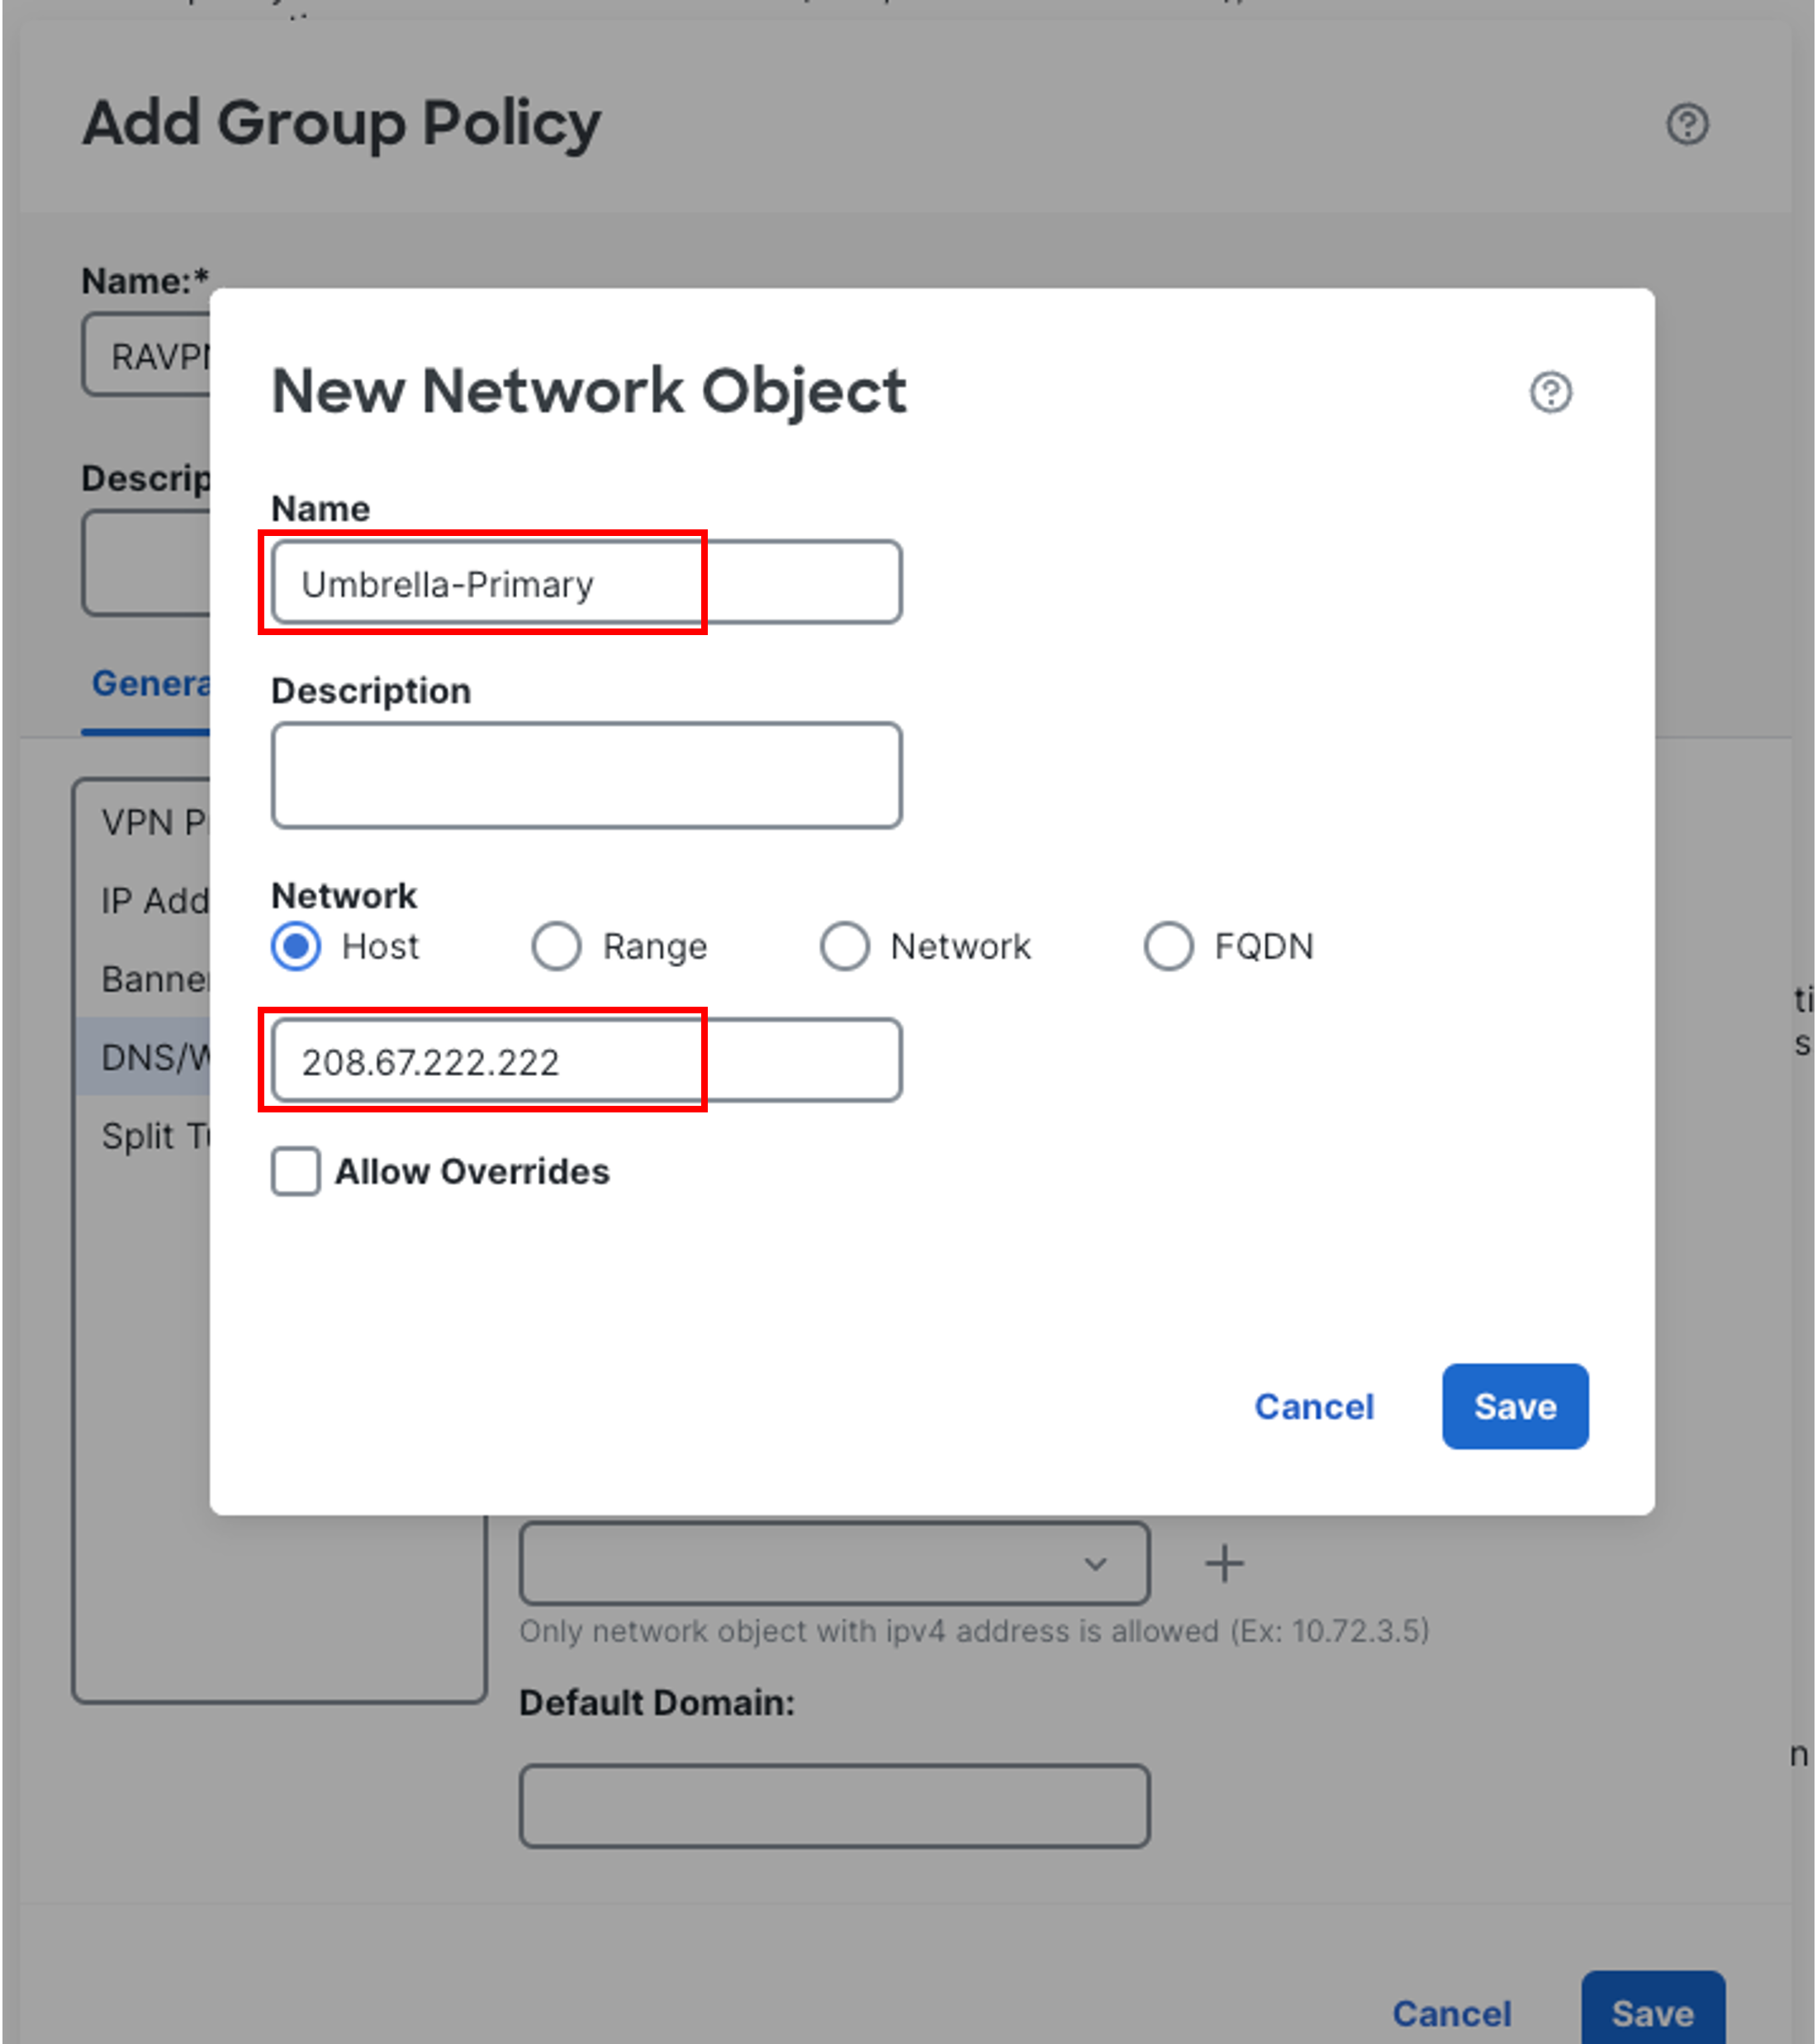
-
-
Click on the + sign next to Secondary DNS Server to create a new network object.
-
In the pop-up box, configure the Network Object as follows:
-
Name: Umbrella-Secondary
-
Network type should be Host by default.
-
Address: 208.67.220.220
-
Then click on Save.
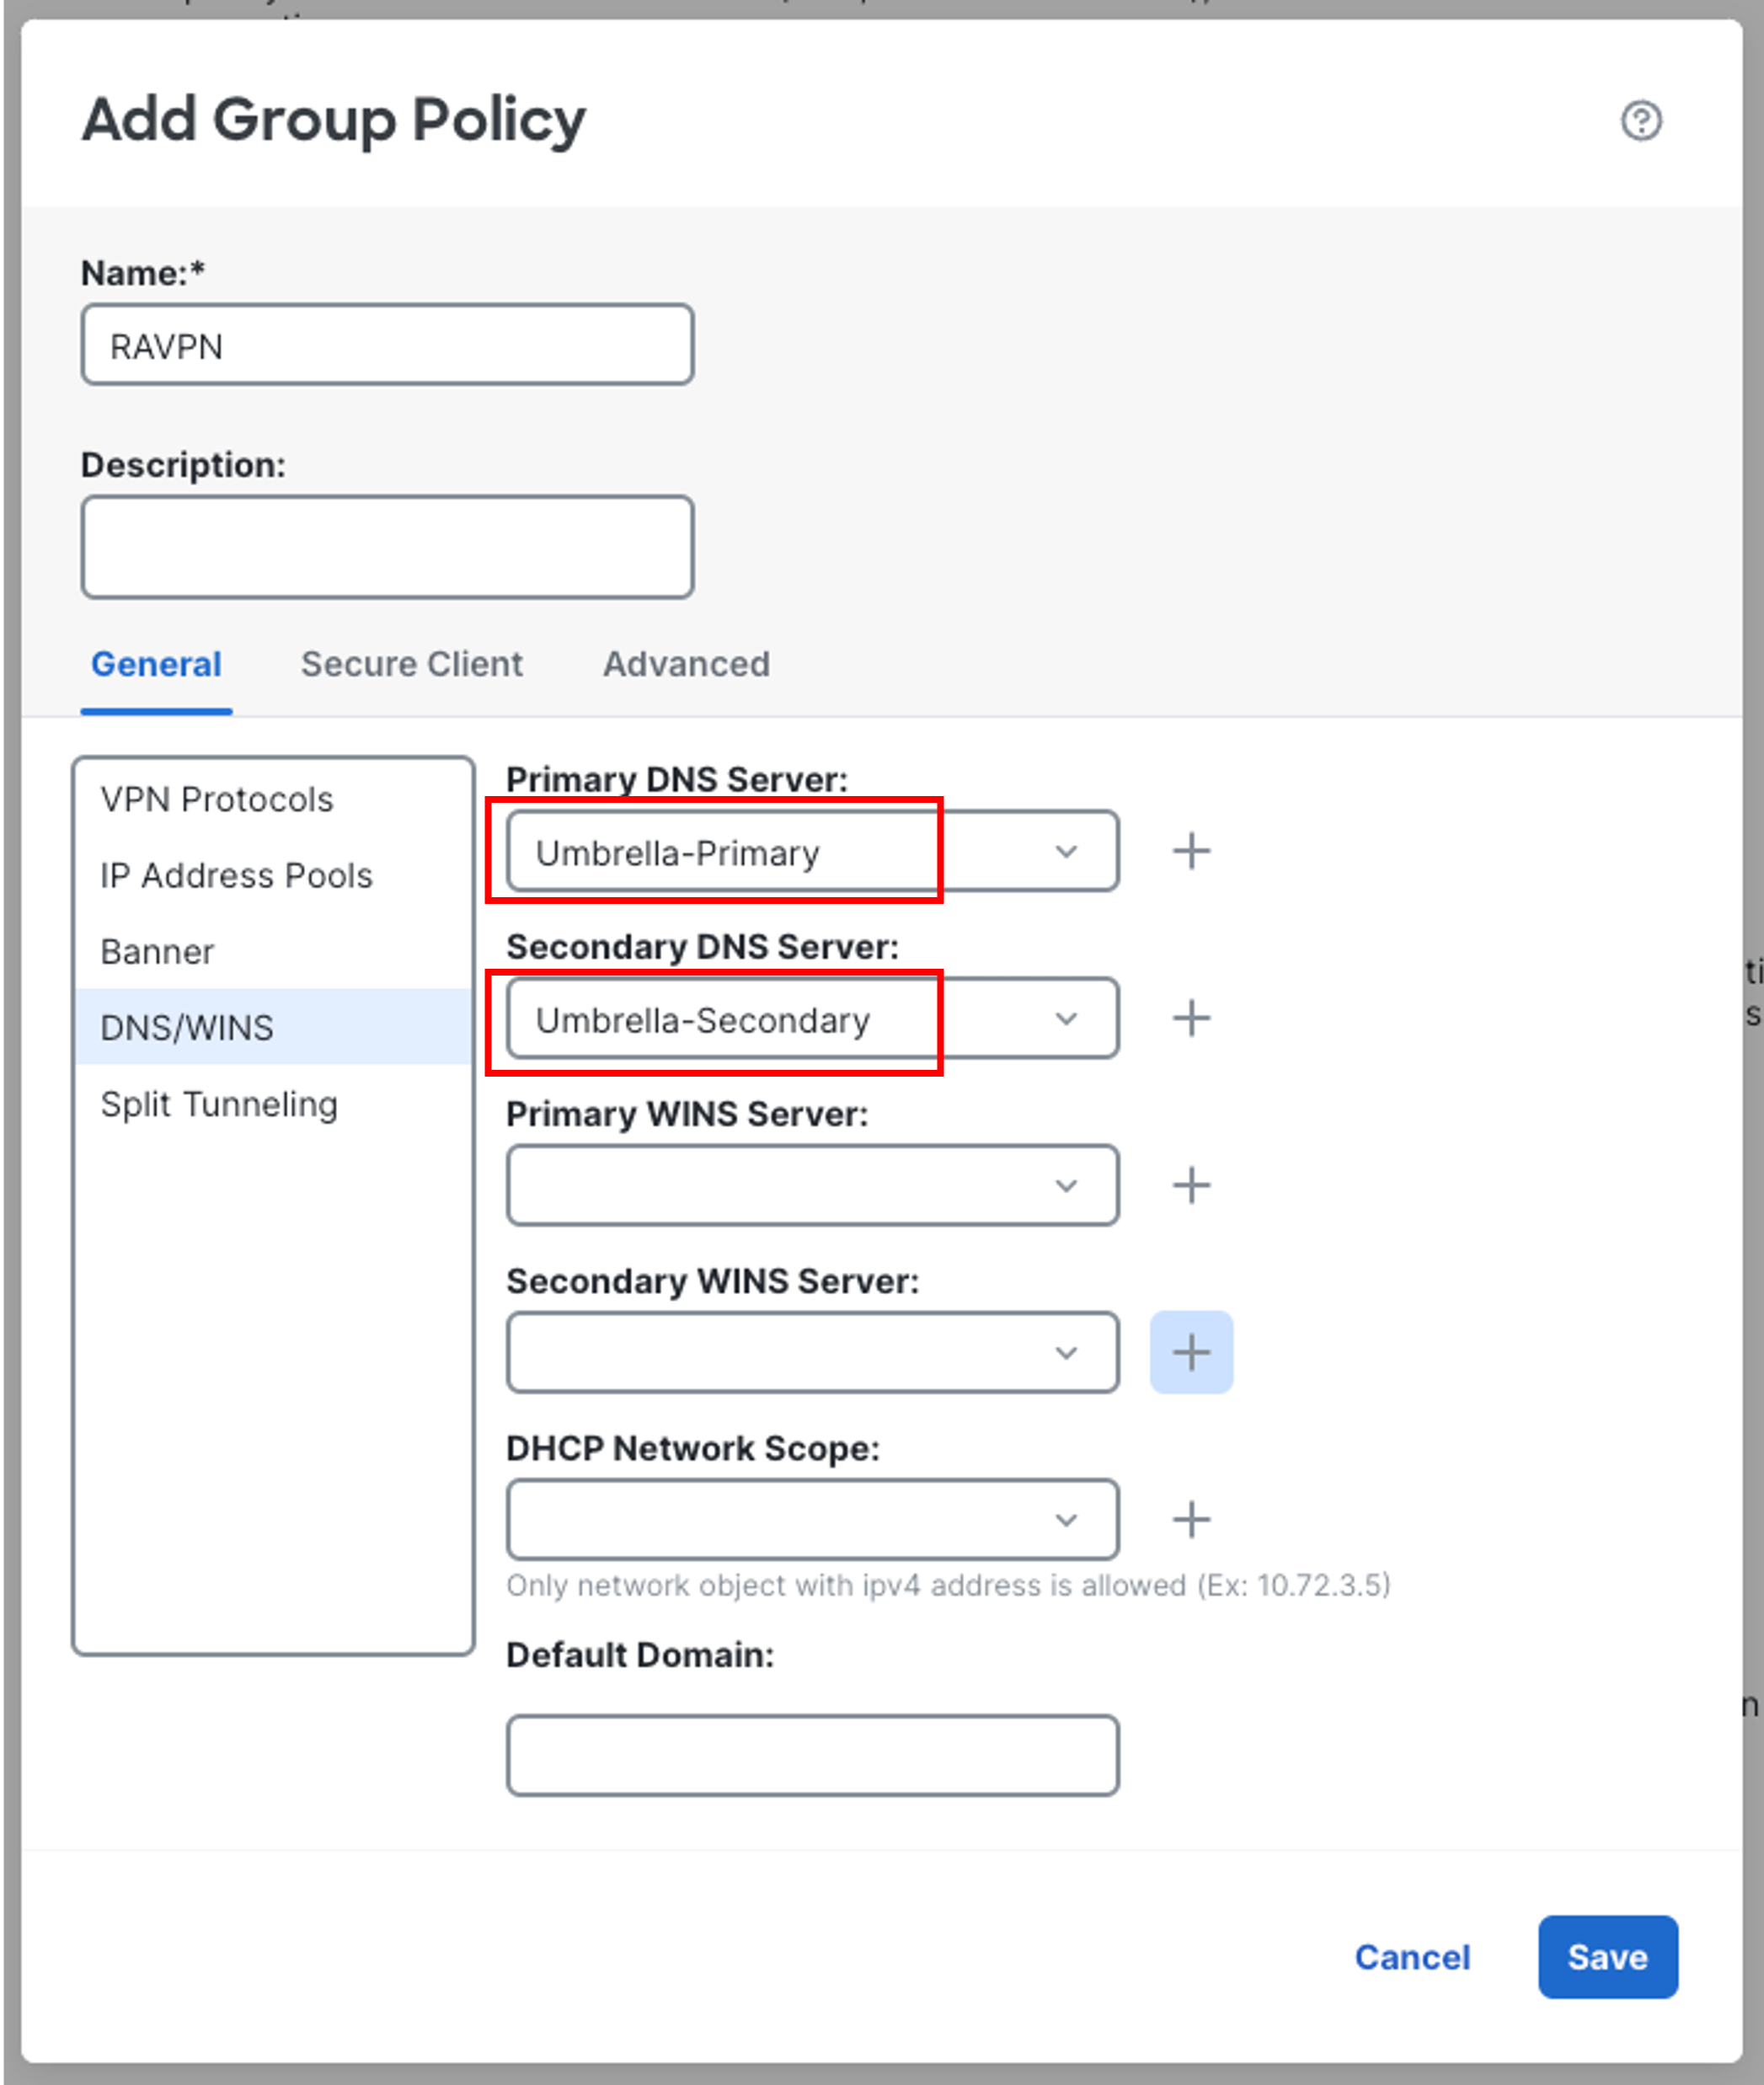
- Go to Split Tunneling section on the left:
-
Change IPv4 Split Tunneling to Tunnel networks specified below from the dropdown.
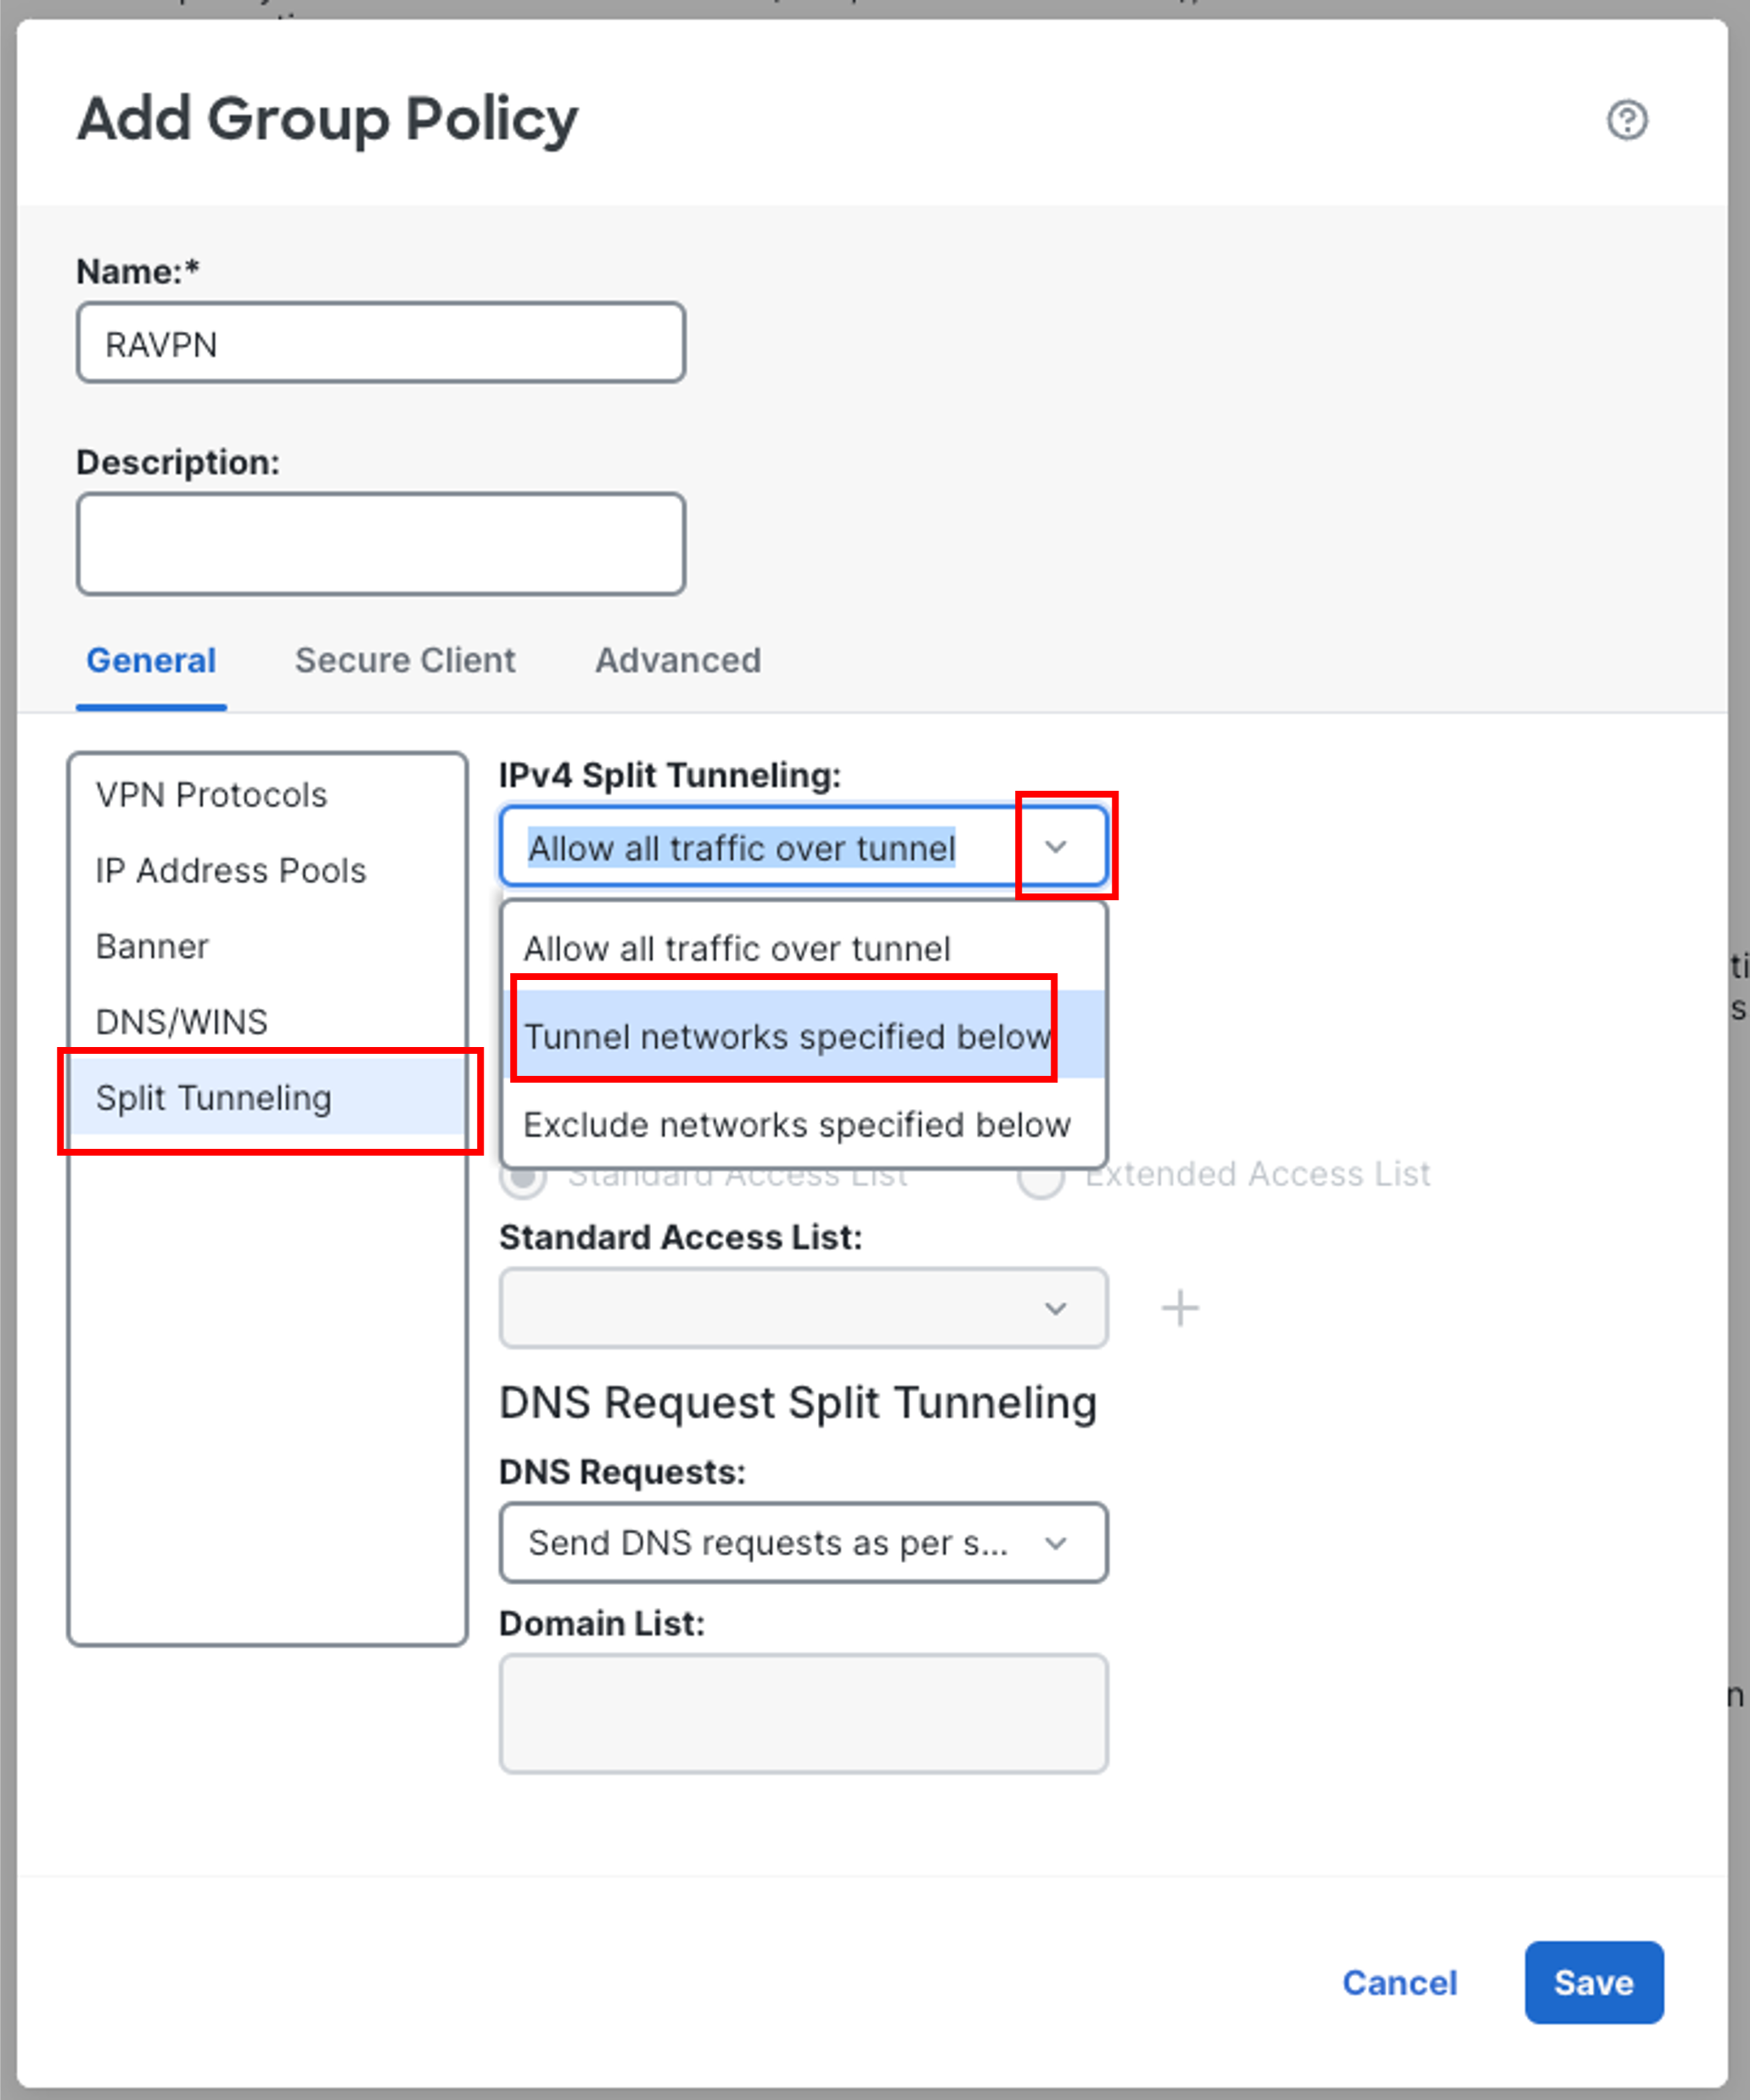
- Click on the + icon next to Standard Access List.
- In the pop-up configure the following details:
-
Name: RAVPN-Split
-
Click on Add to add a new access control entry.
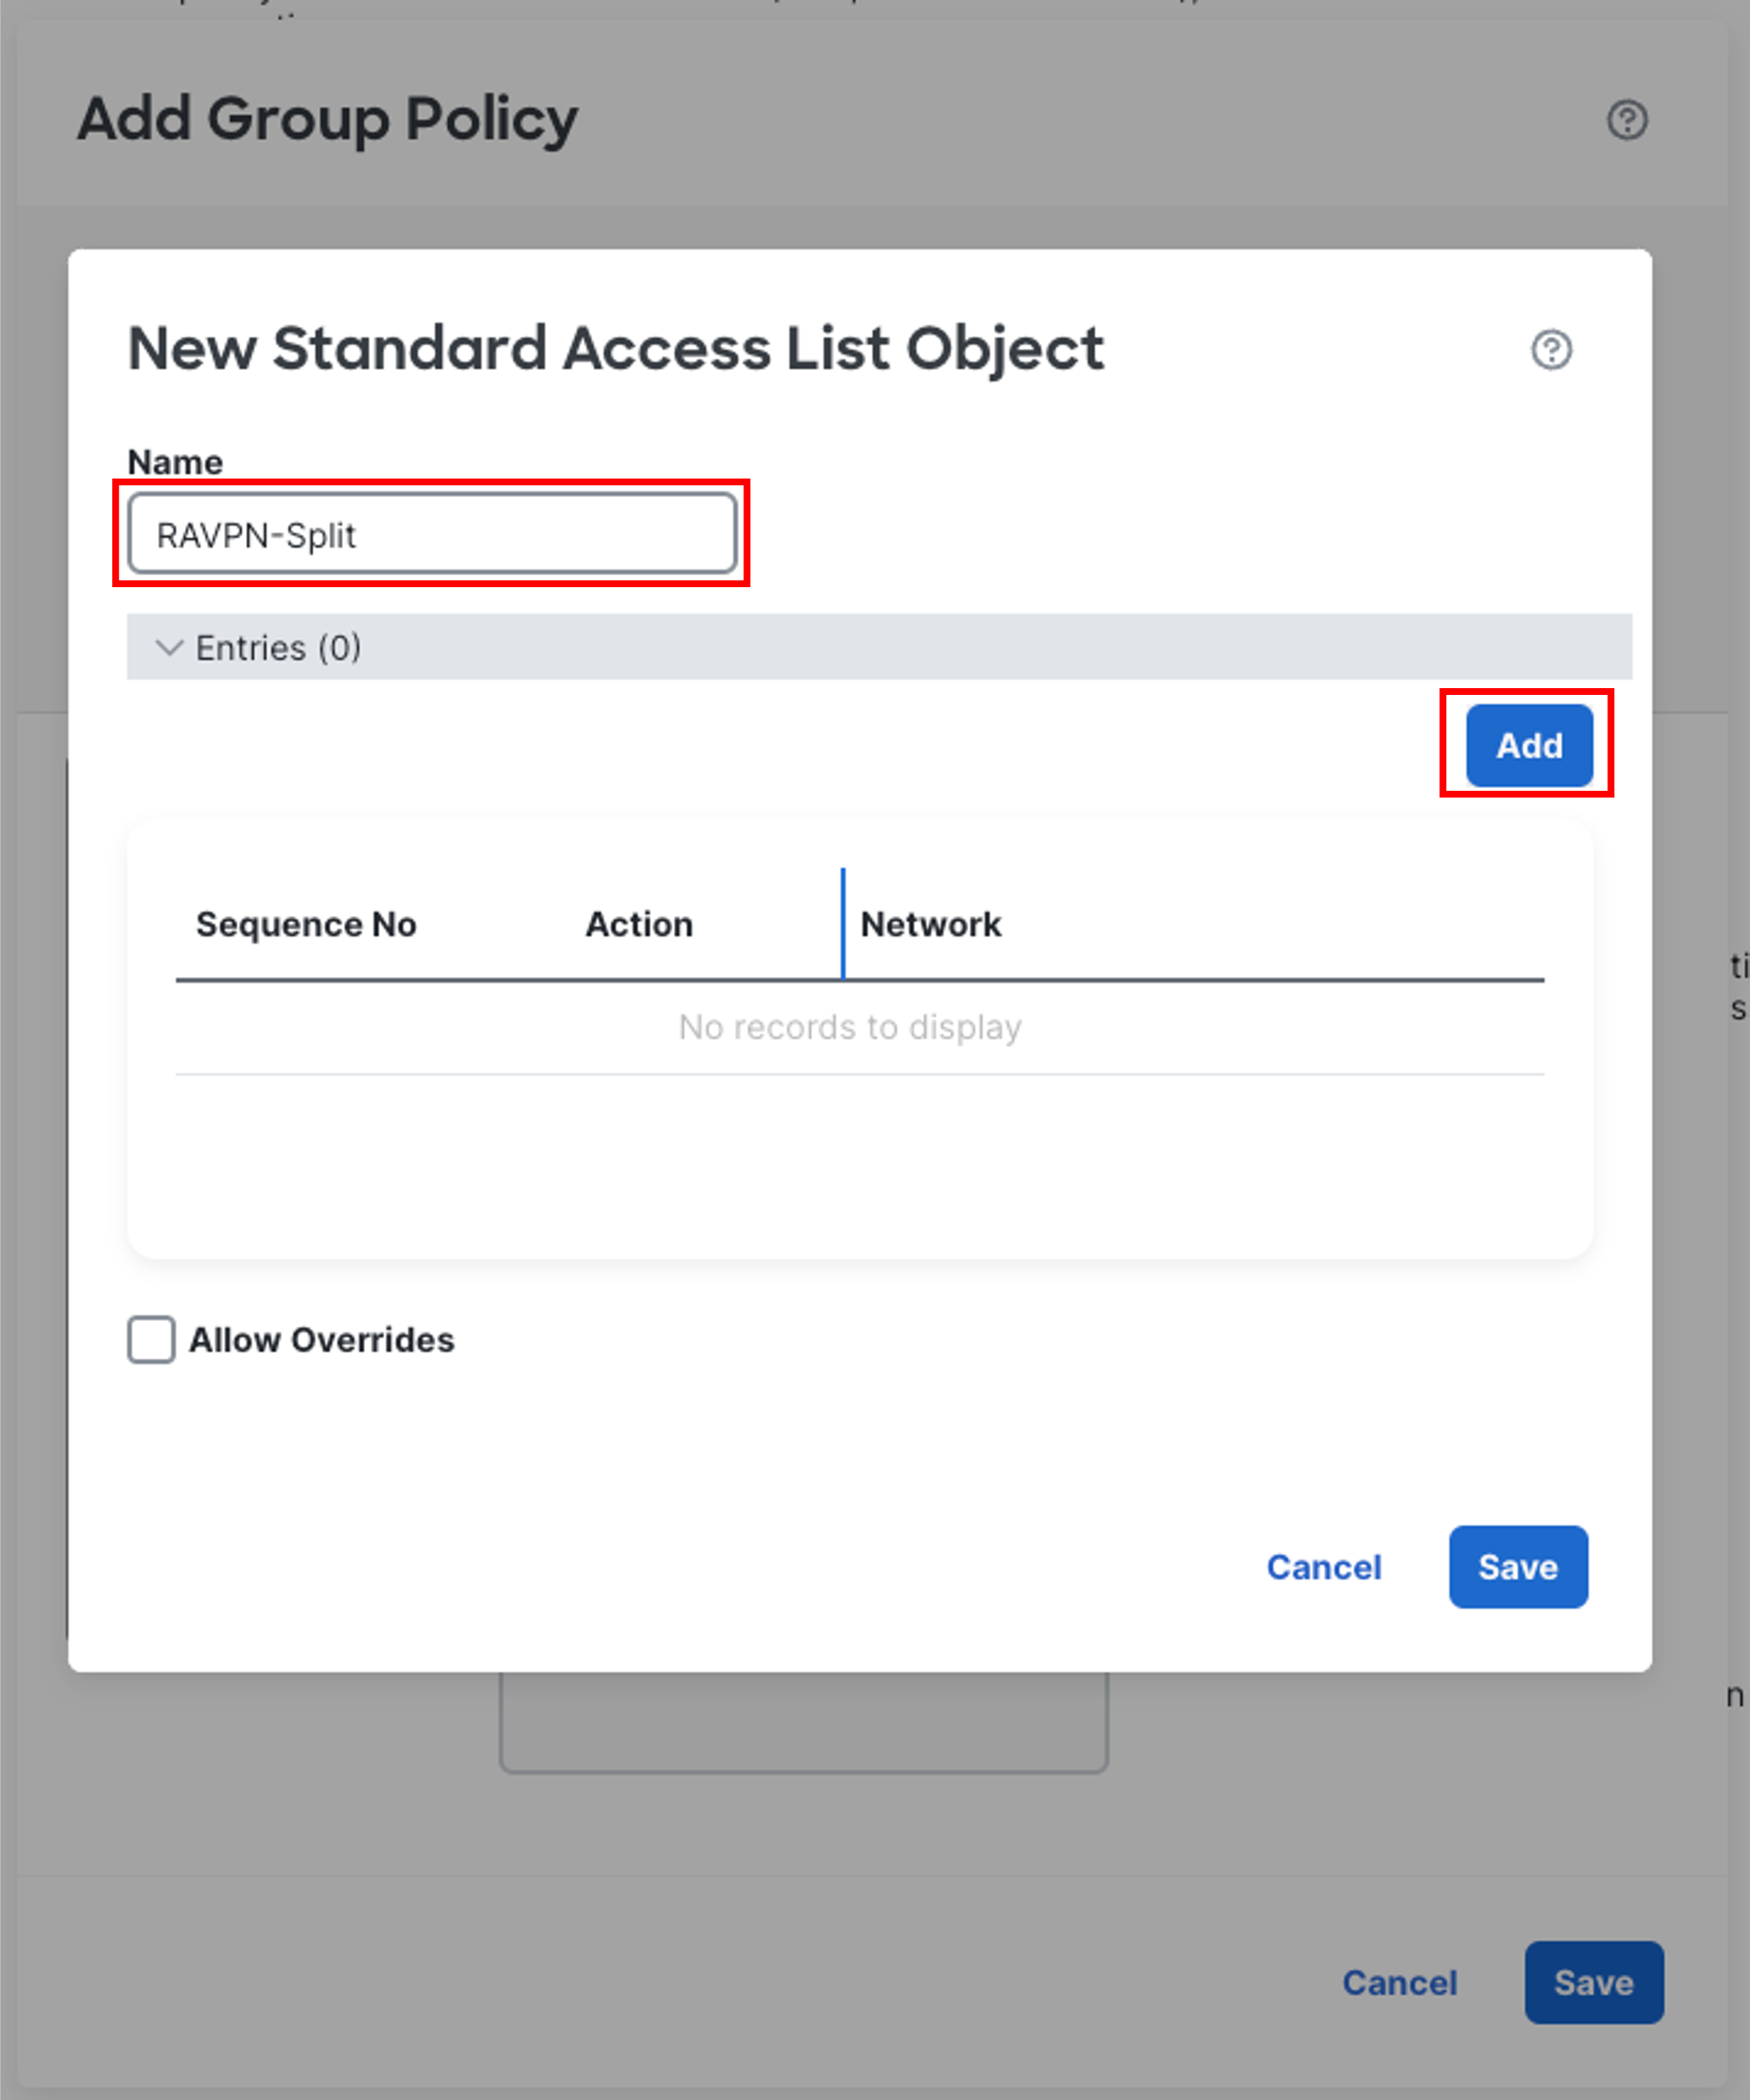
-
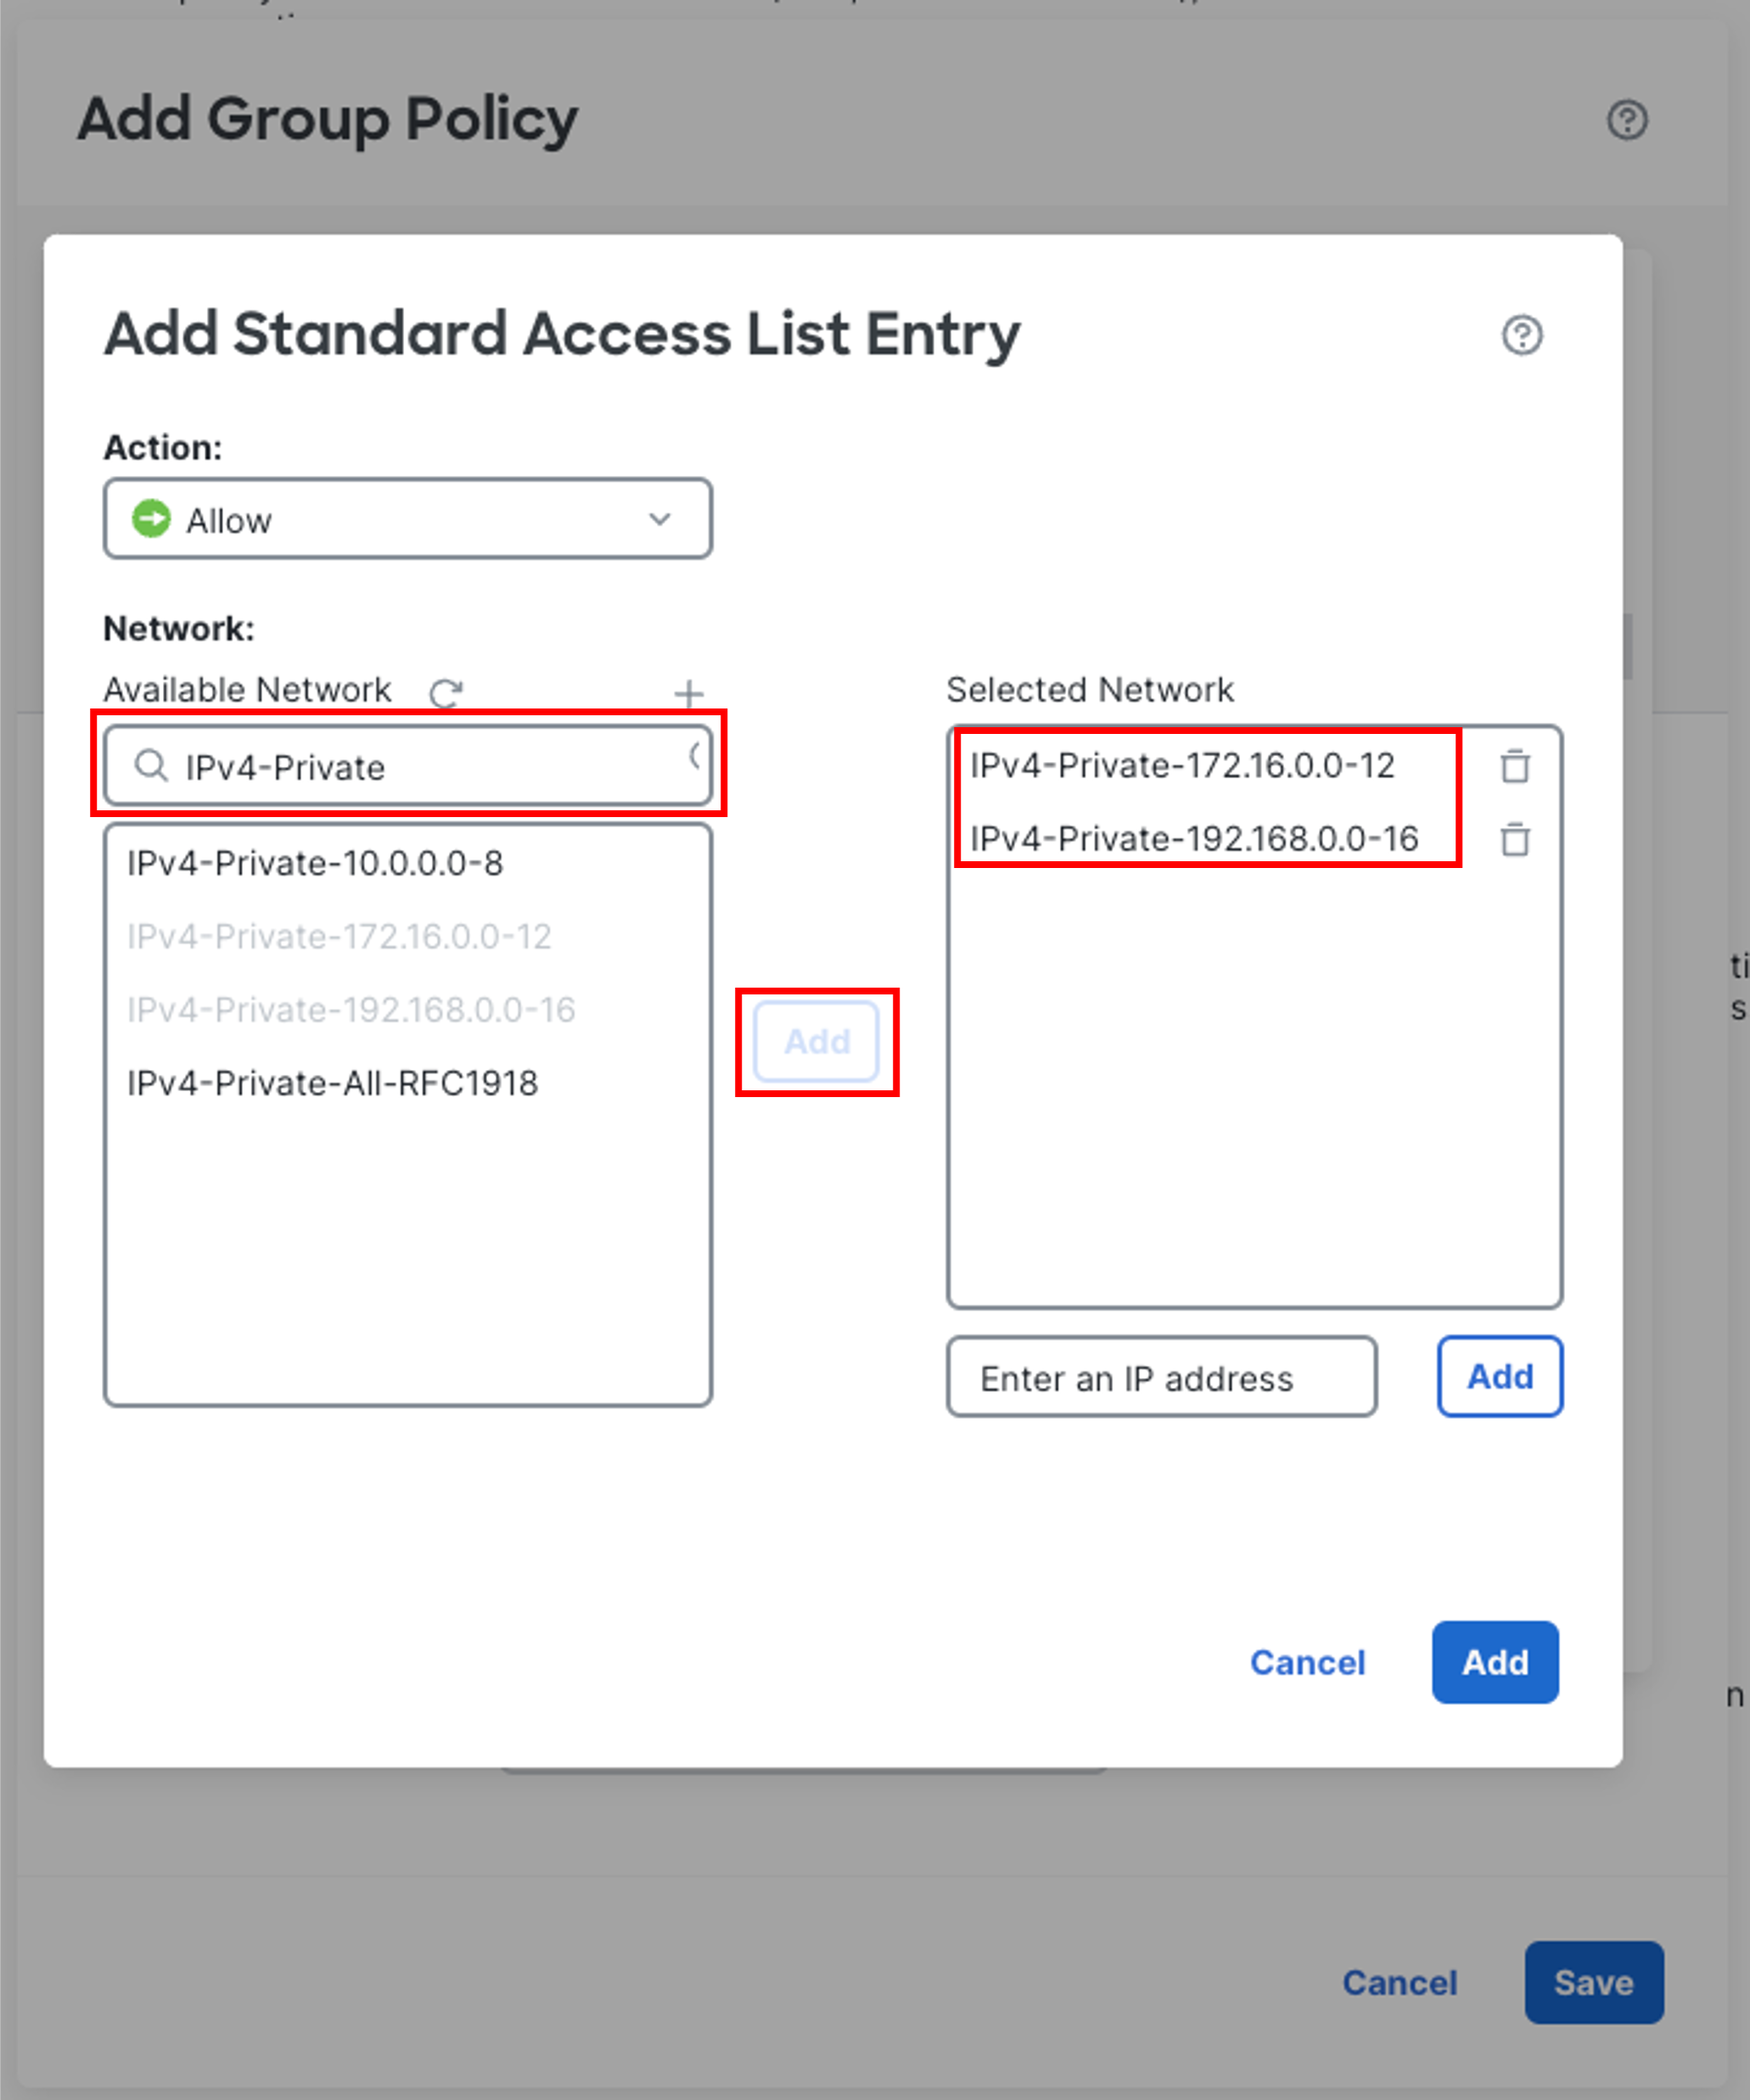
In the pop-up box, under Available Network select IPv4-Private-192.168.0.0-16 and IPv4-Private-172.16.0.0-12 then click on Add to move it to Selected Network.
-
Then click on the blue Add button.
-
-
Click Save to create the Standard ACL.
Warning
Do not click save on the group policy yet!
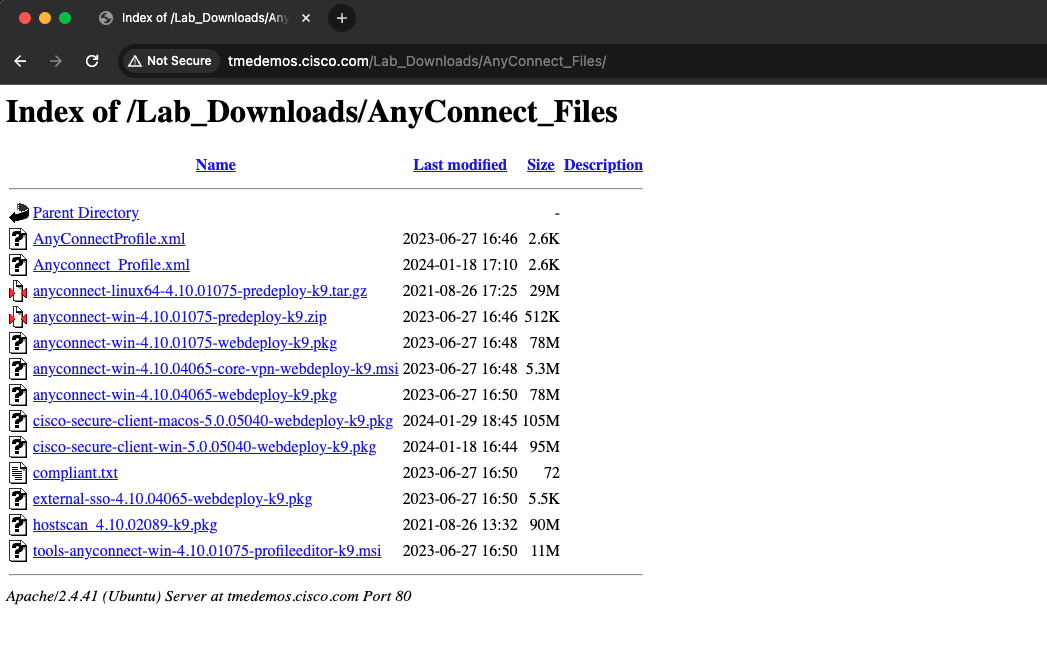
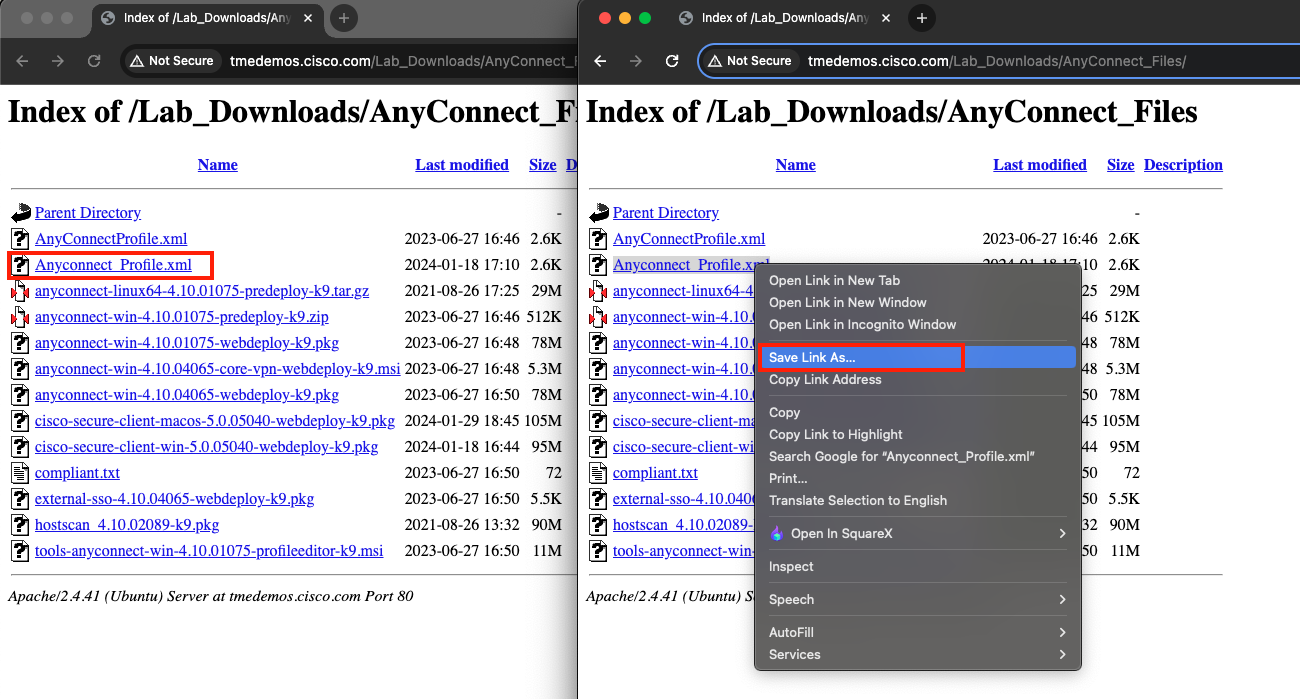
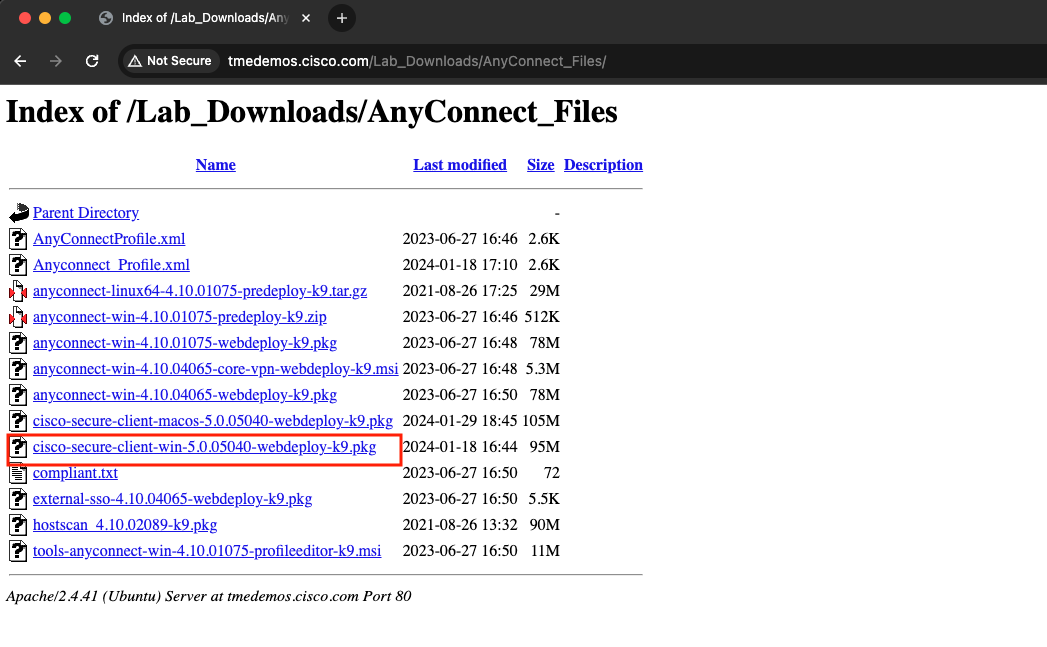
- In the upcoming steps you have to upload a Client Profile File named Anyconnect_Profile.xml and a Secure Client Image named cisco-secure-client-win-5.0.05040-webdeploy-k9.pkg to Firewall Management Center.
To download these files from your workstation browser, navigate to http://tmedemos.cisco.com/Lab_Downloads/AnyConnect_Files/
- First download the Anyconnect_Profile.xml by Right click and Save Link As the XML file.
Then download the cisco-secure-client-win-5.0.05040-webdeploy-k9.pkg file by clicking the highlighted link below:
Note
If you have a MAC OS based RAVPN user, please select cisco-secure-client-macos-5.0.05040-webdeploy-k9.pkg to download the MAC OS package.
-
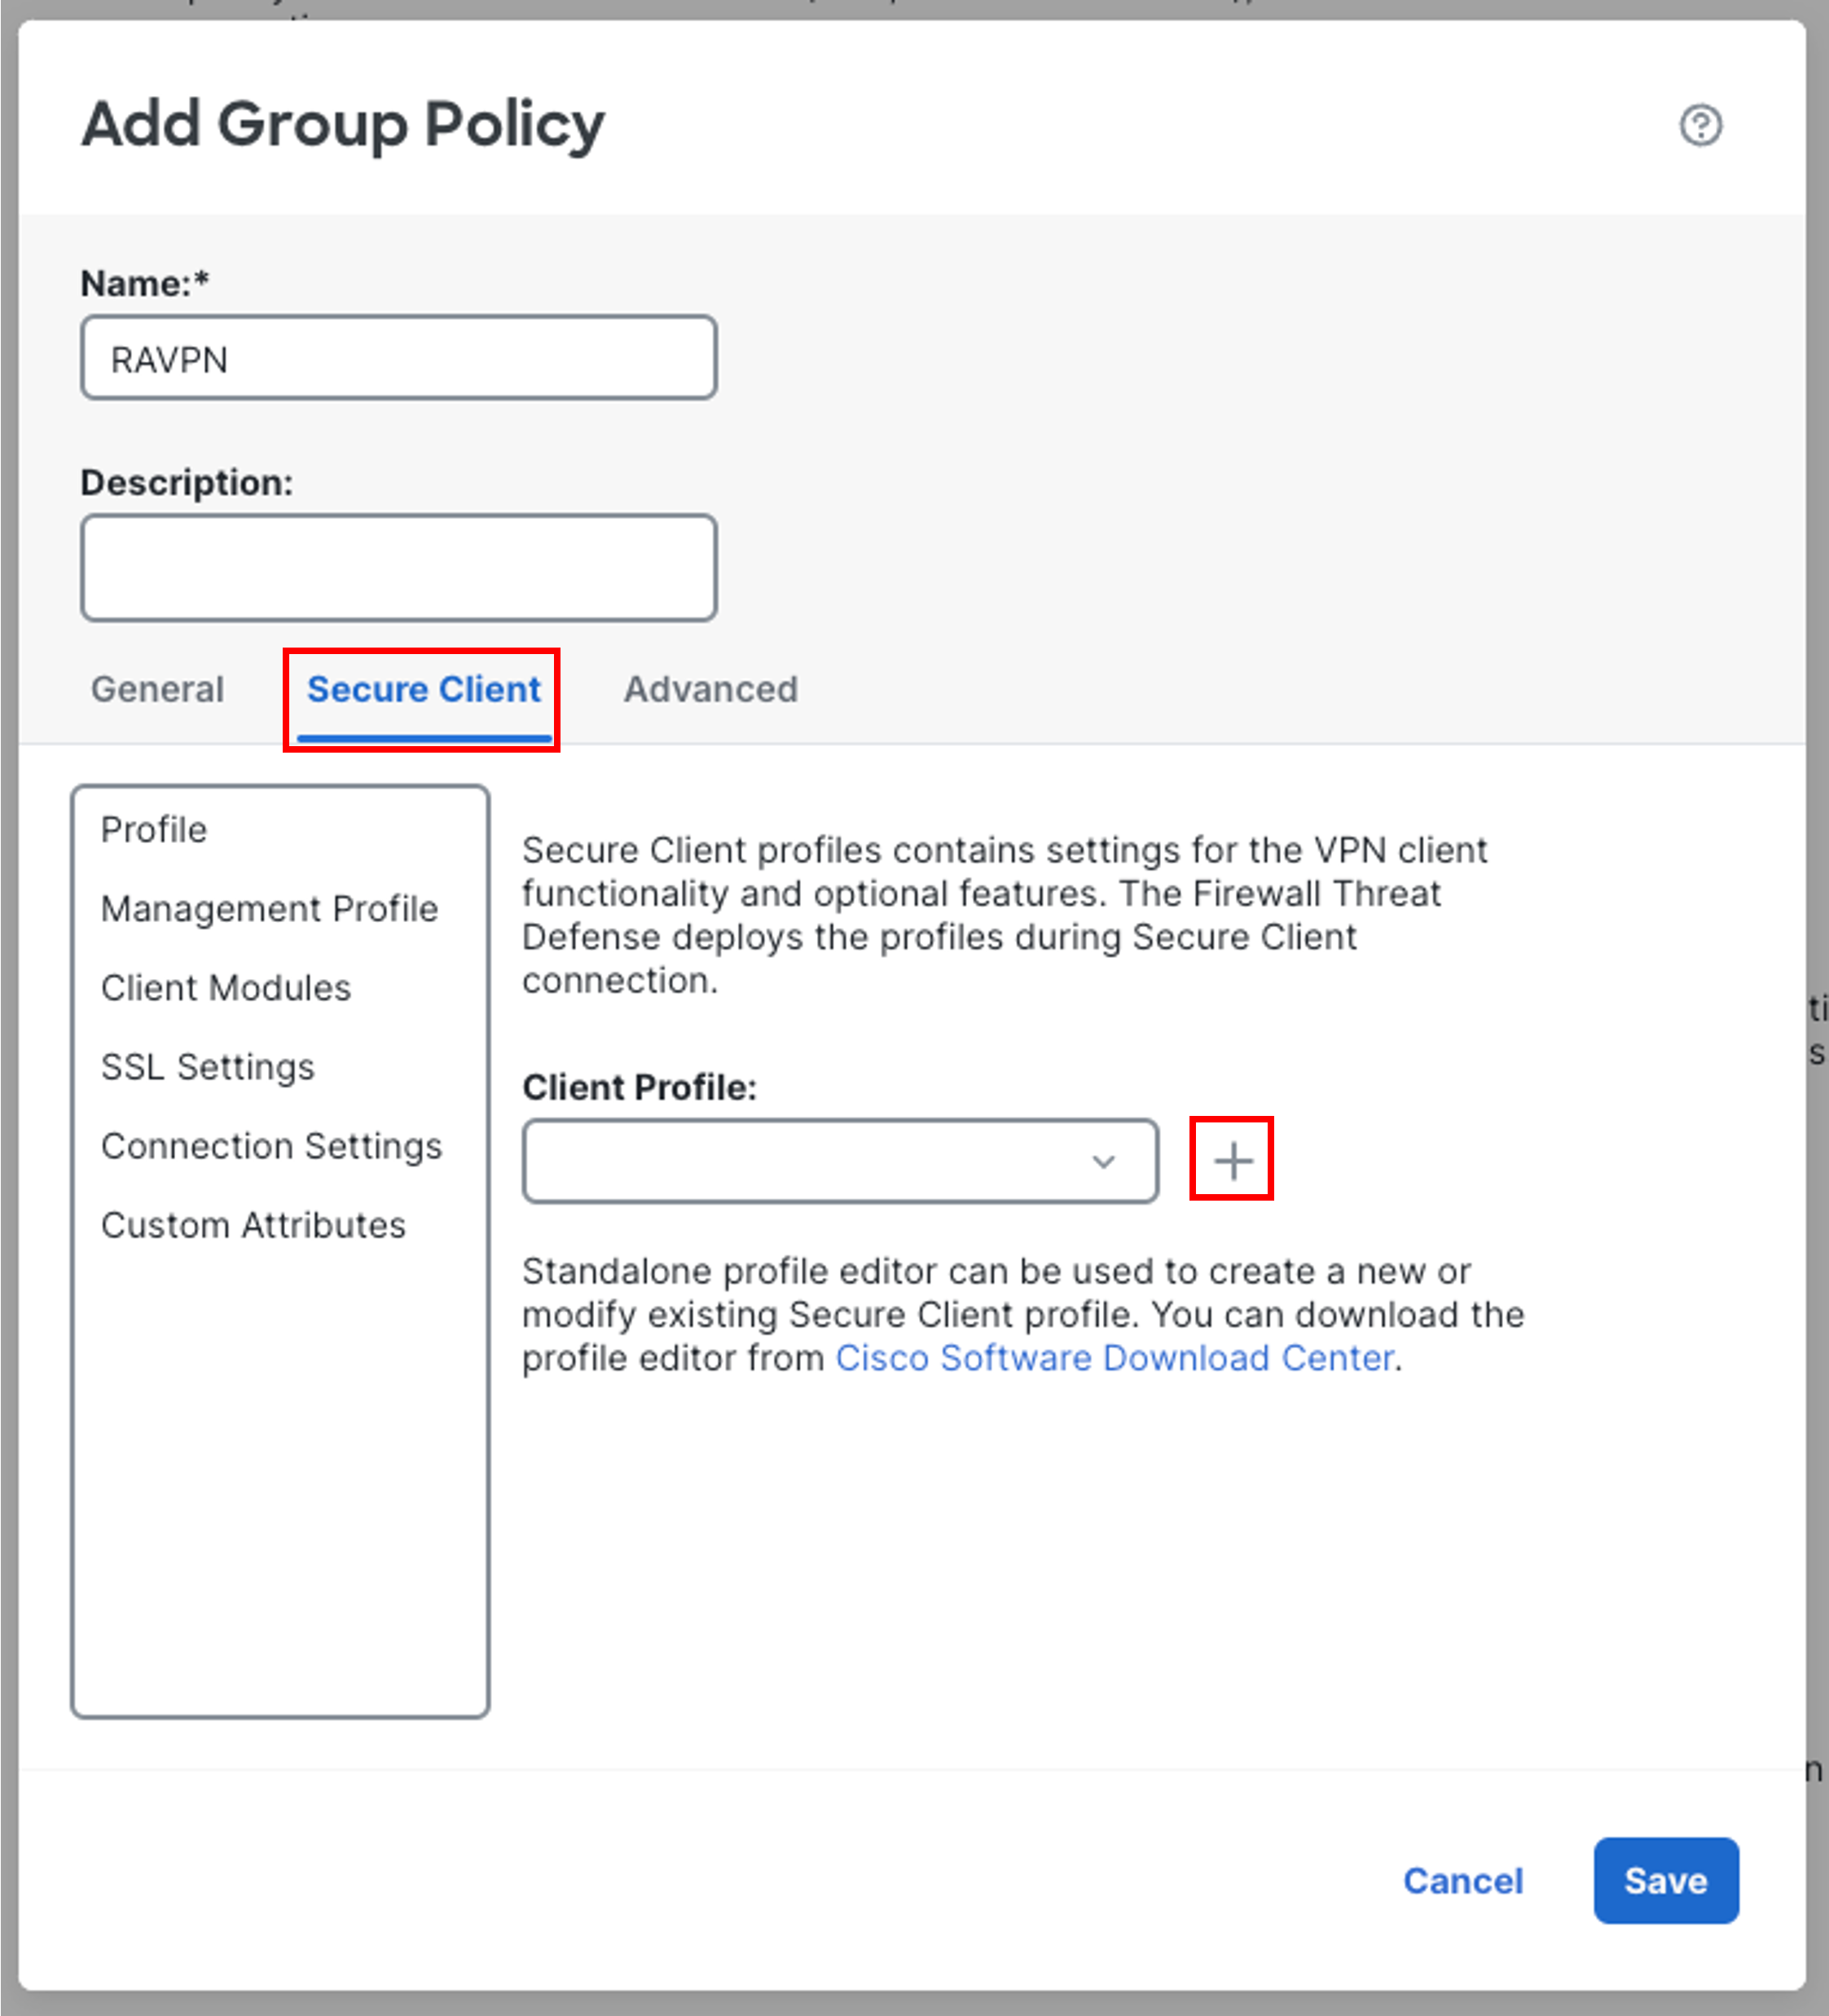
Now return back to the FMC UI and Go to Secure Client tab, click on the + sign next to Client Profile to upload a client profile.
-
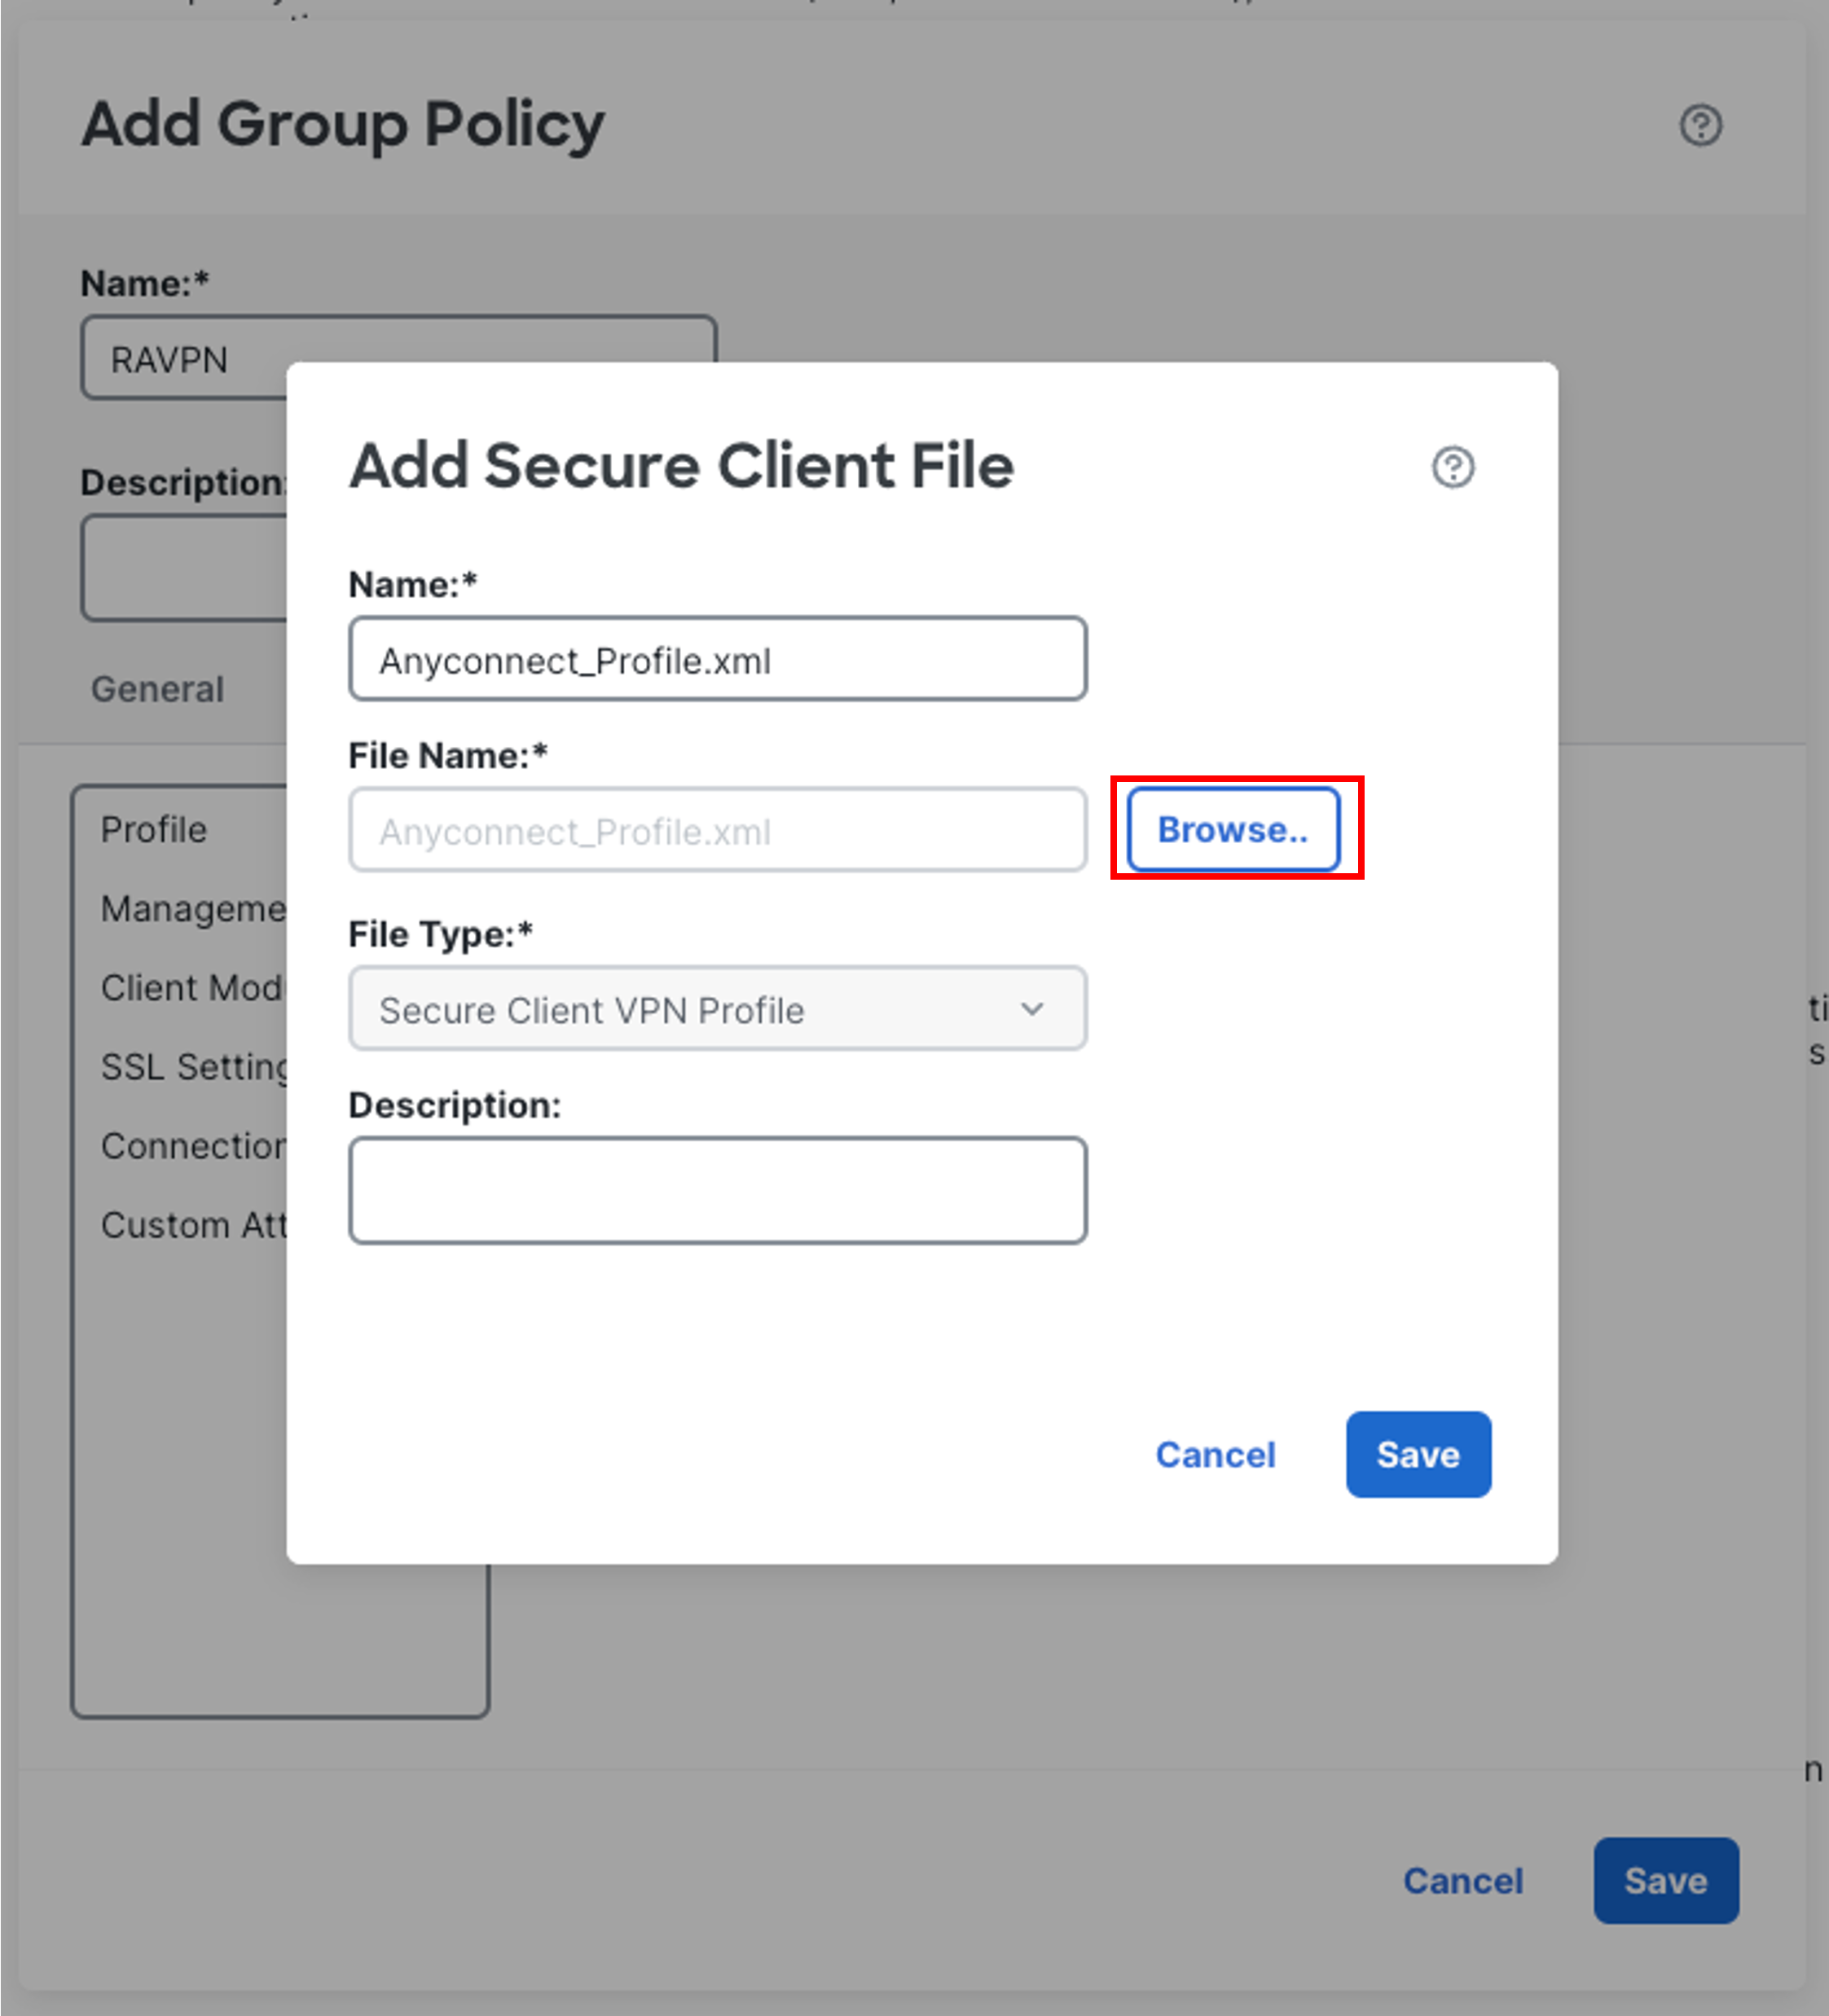
In the pop-up box, configure the Secure Client File as follows:
-
Click Browse.. and locate the Anyconnect_Profile.xml file downloaded in Step 21 and click Open.
-
Then click Save.
-
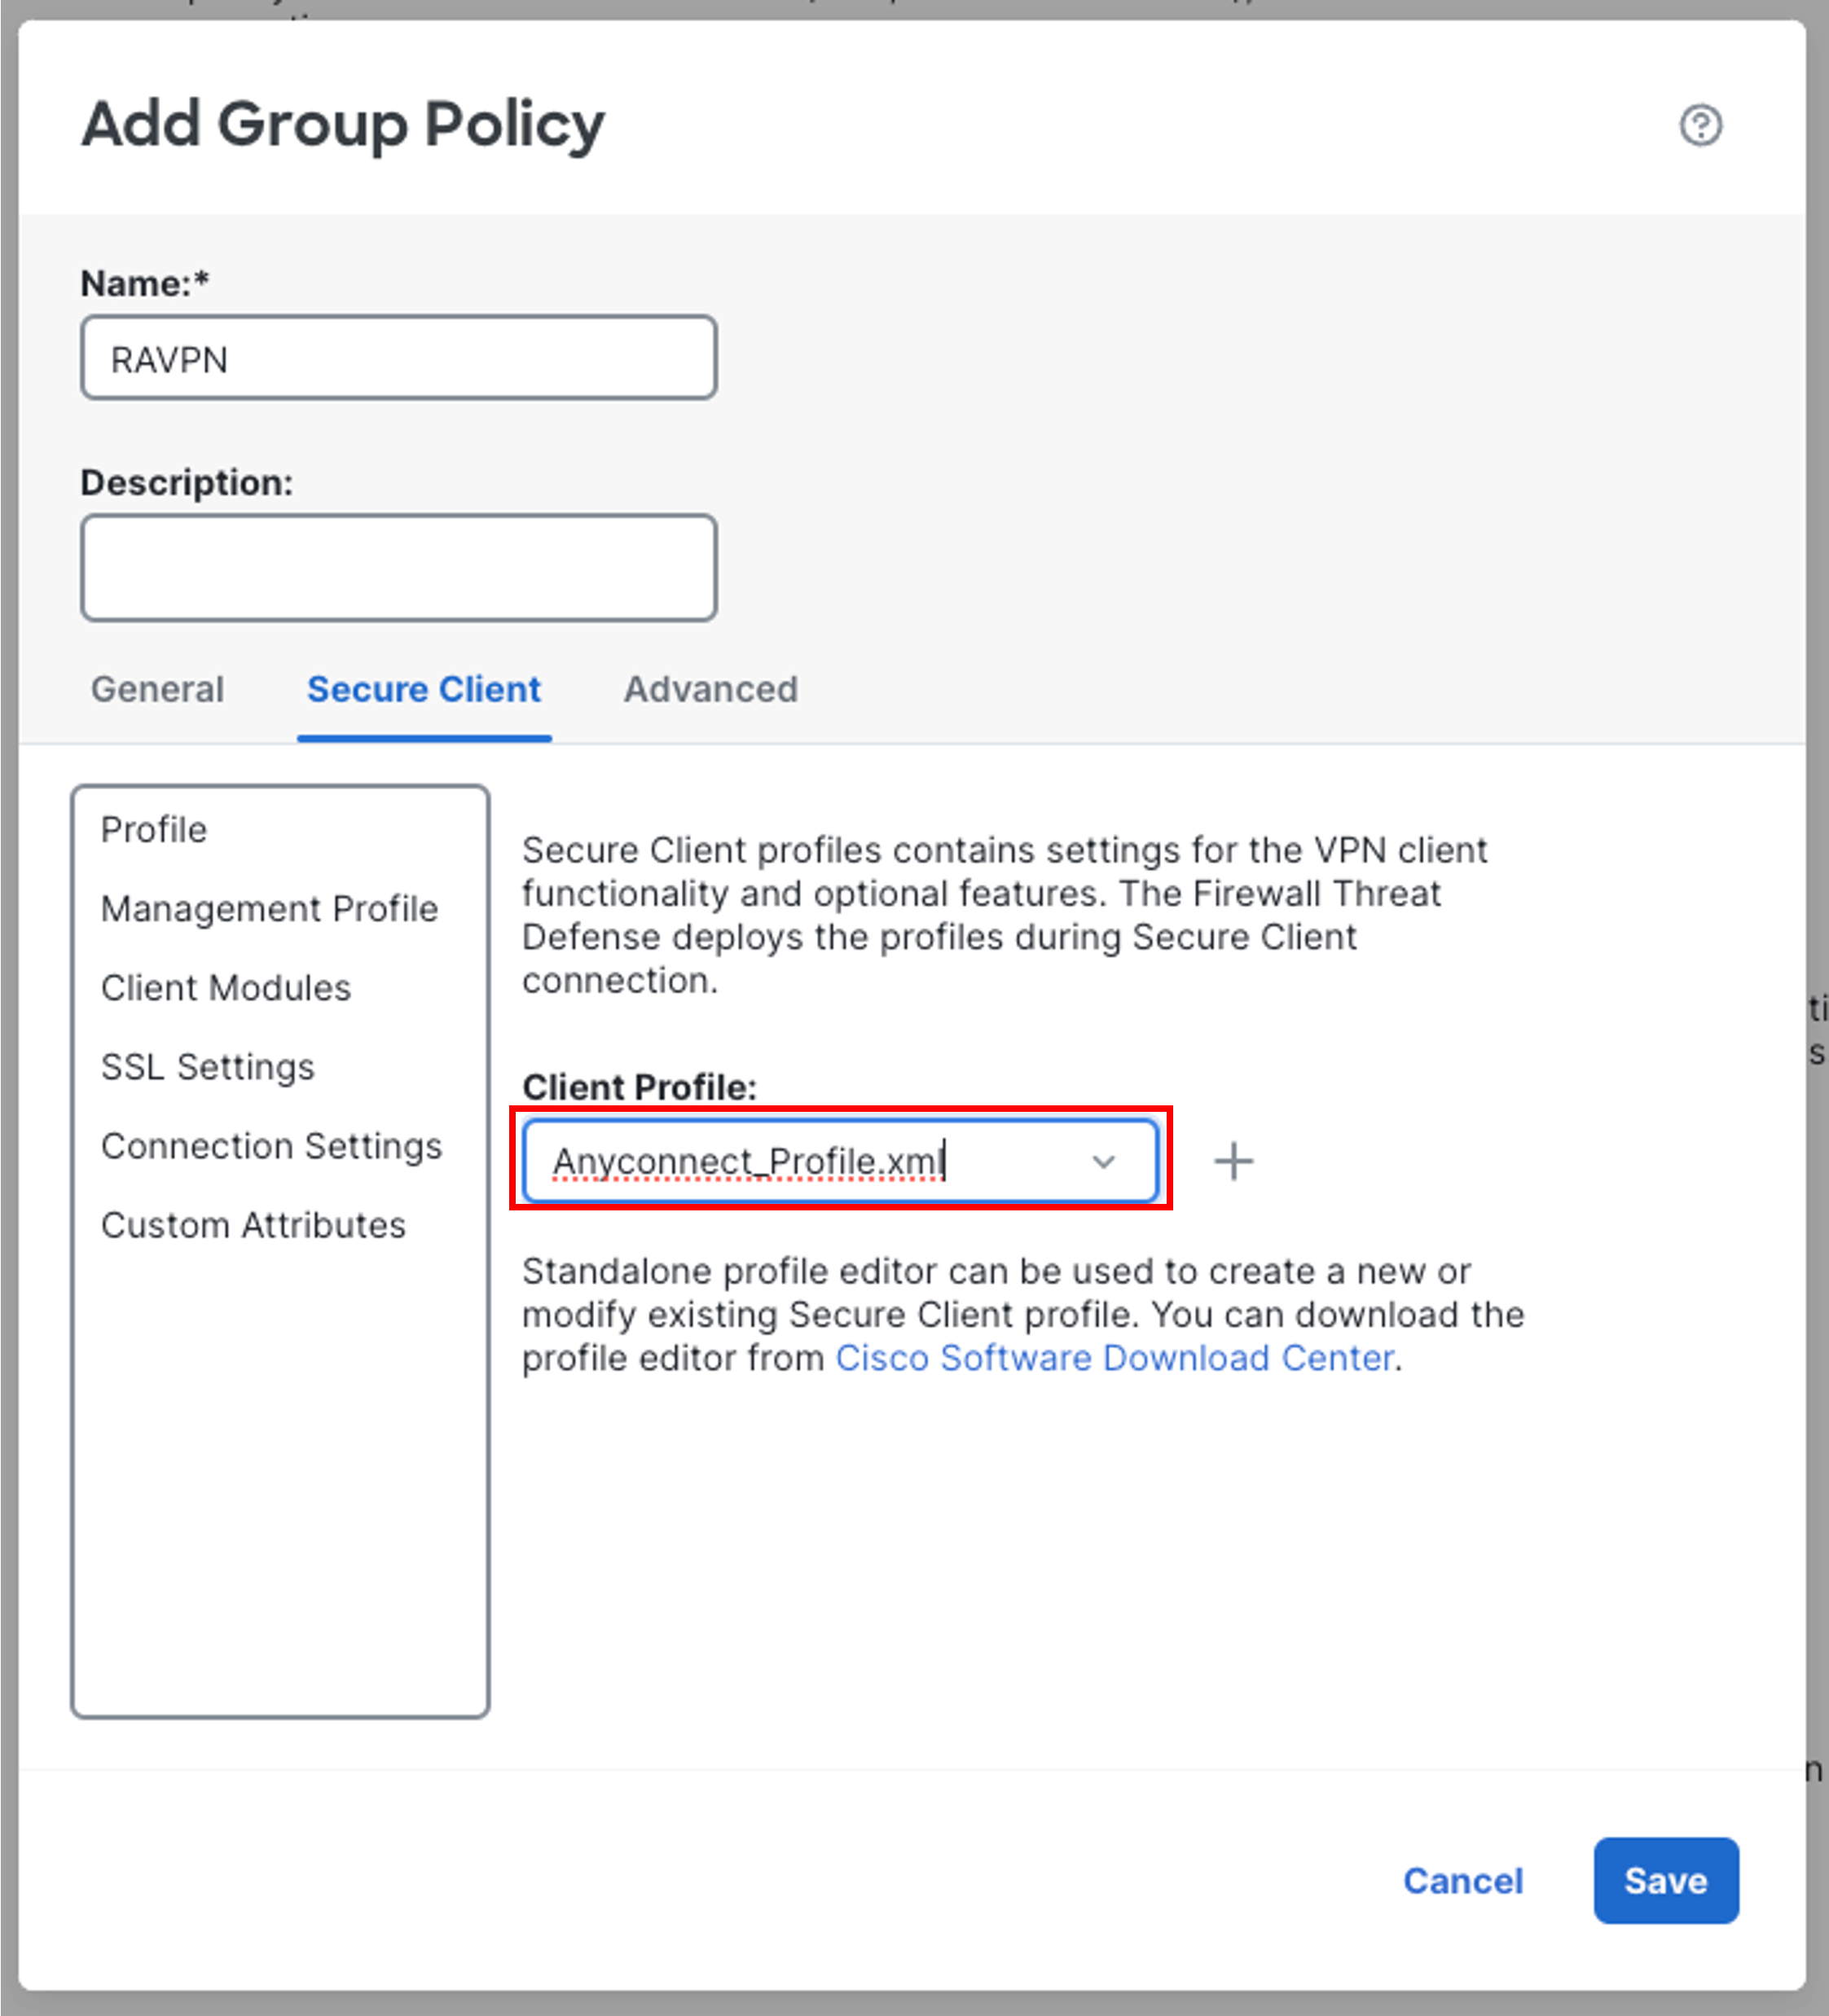
Make sure Anyconnect_Profile.xml is selected as Client Profile by clicking on drop down menu and selecting the profile. Click Save to create and choose the Group Policy RAVPN then click Next on the wizard screen.
-
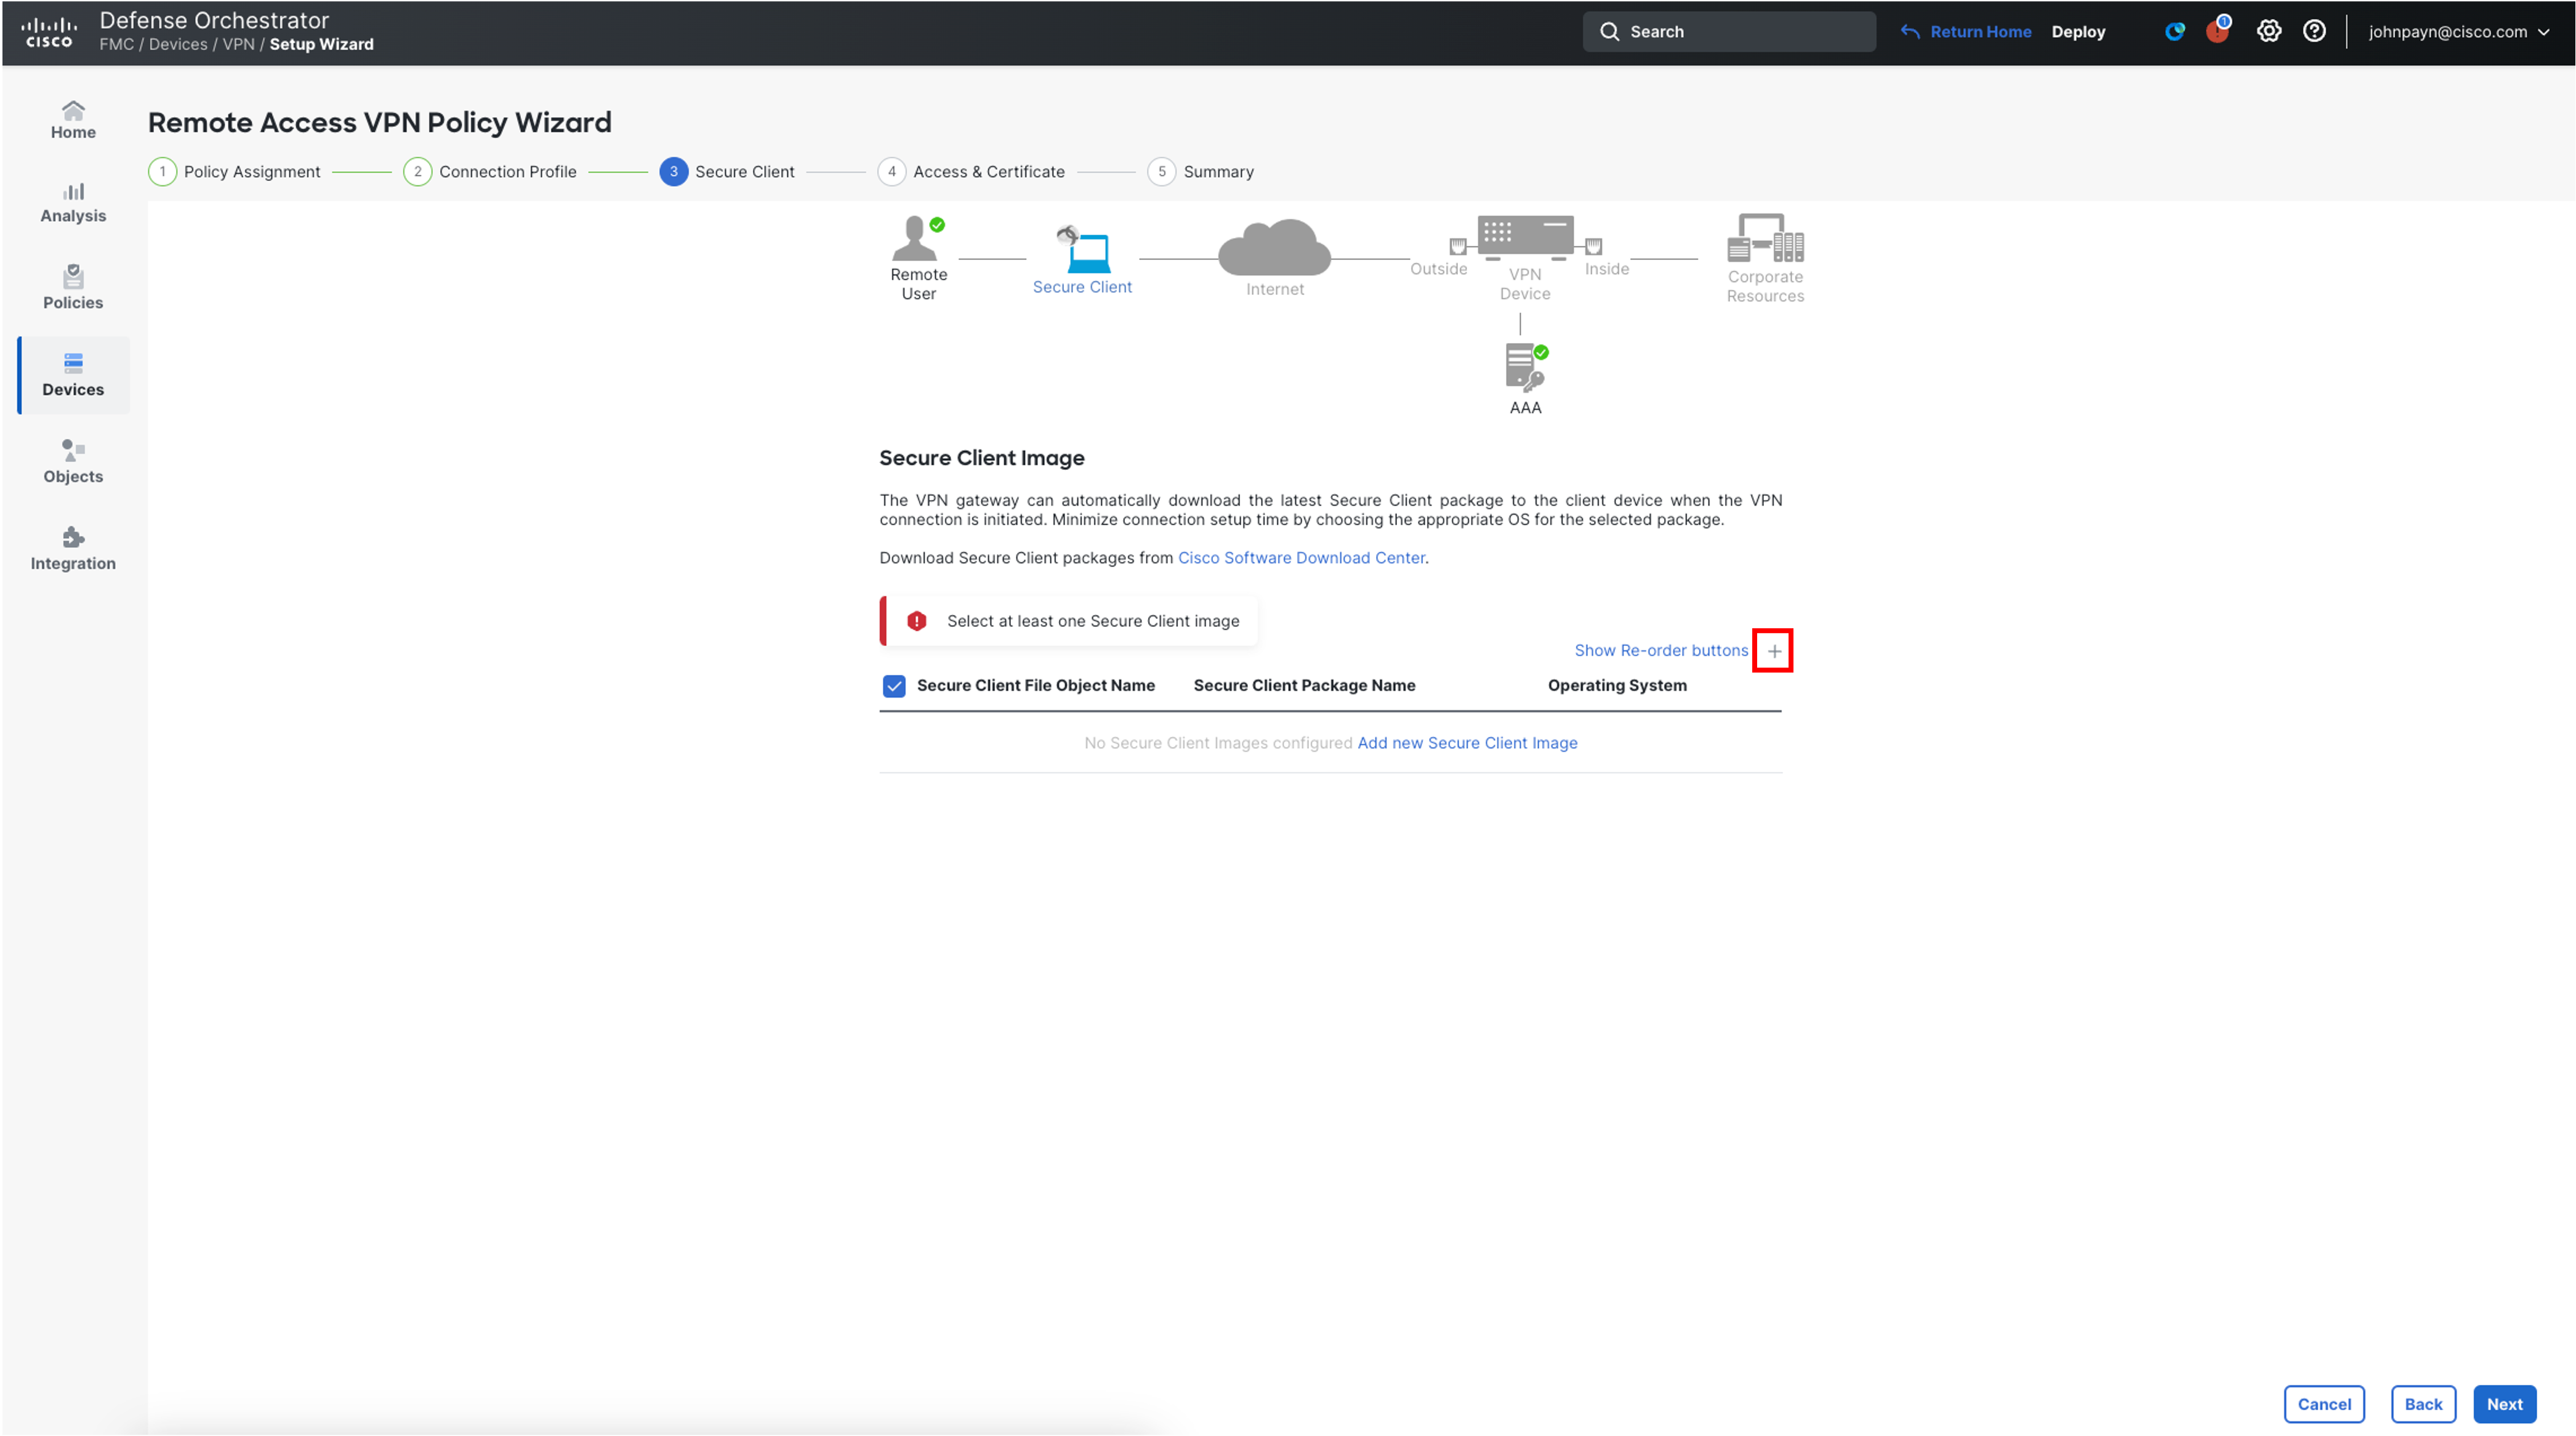
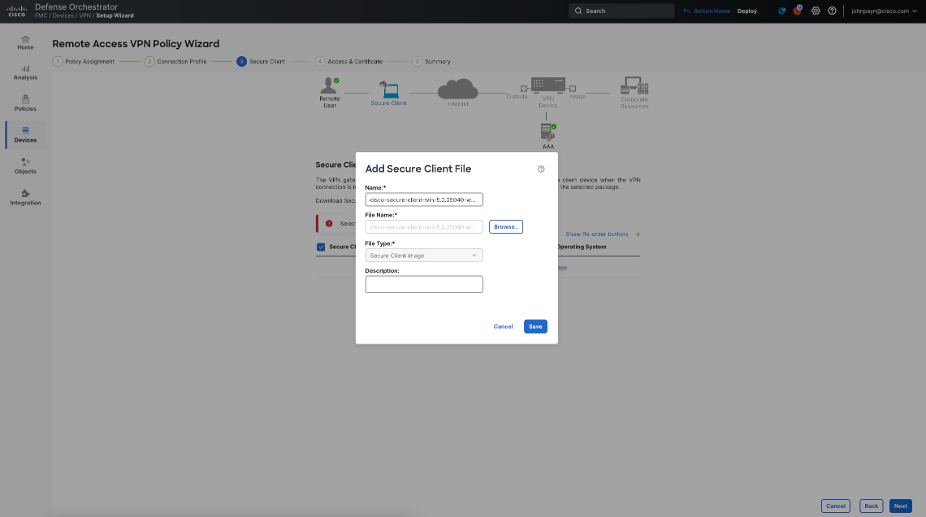
In the Secure Client Image section, click on the + sign to add an image.
-
In the pop-up box, configure as follows:
-
Click on Browse.. and locate the cisco-secure-client-win-5.0.05040-webdeploy-k9.pkg file downloaded in step 20 and click Open.
-
Then click Save.
-
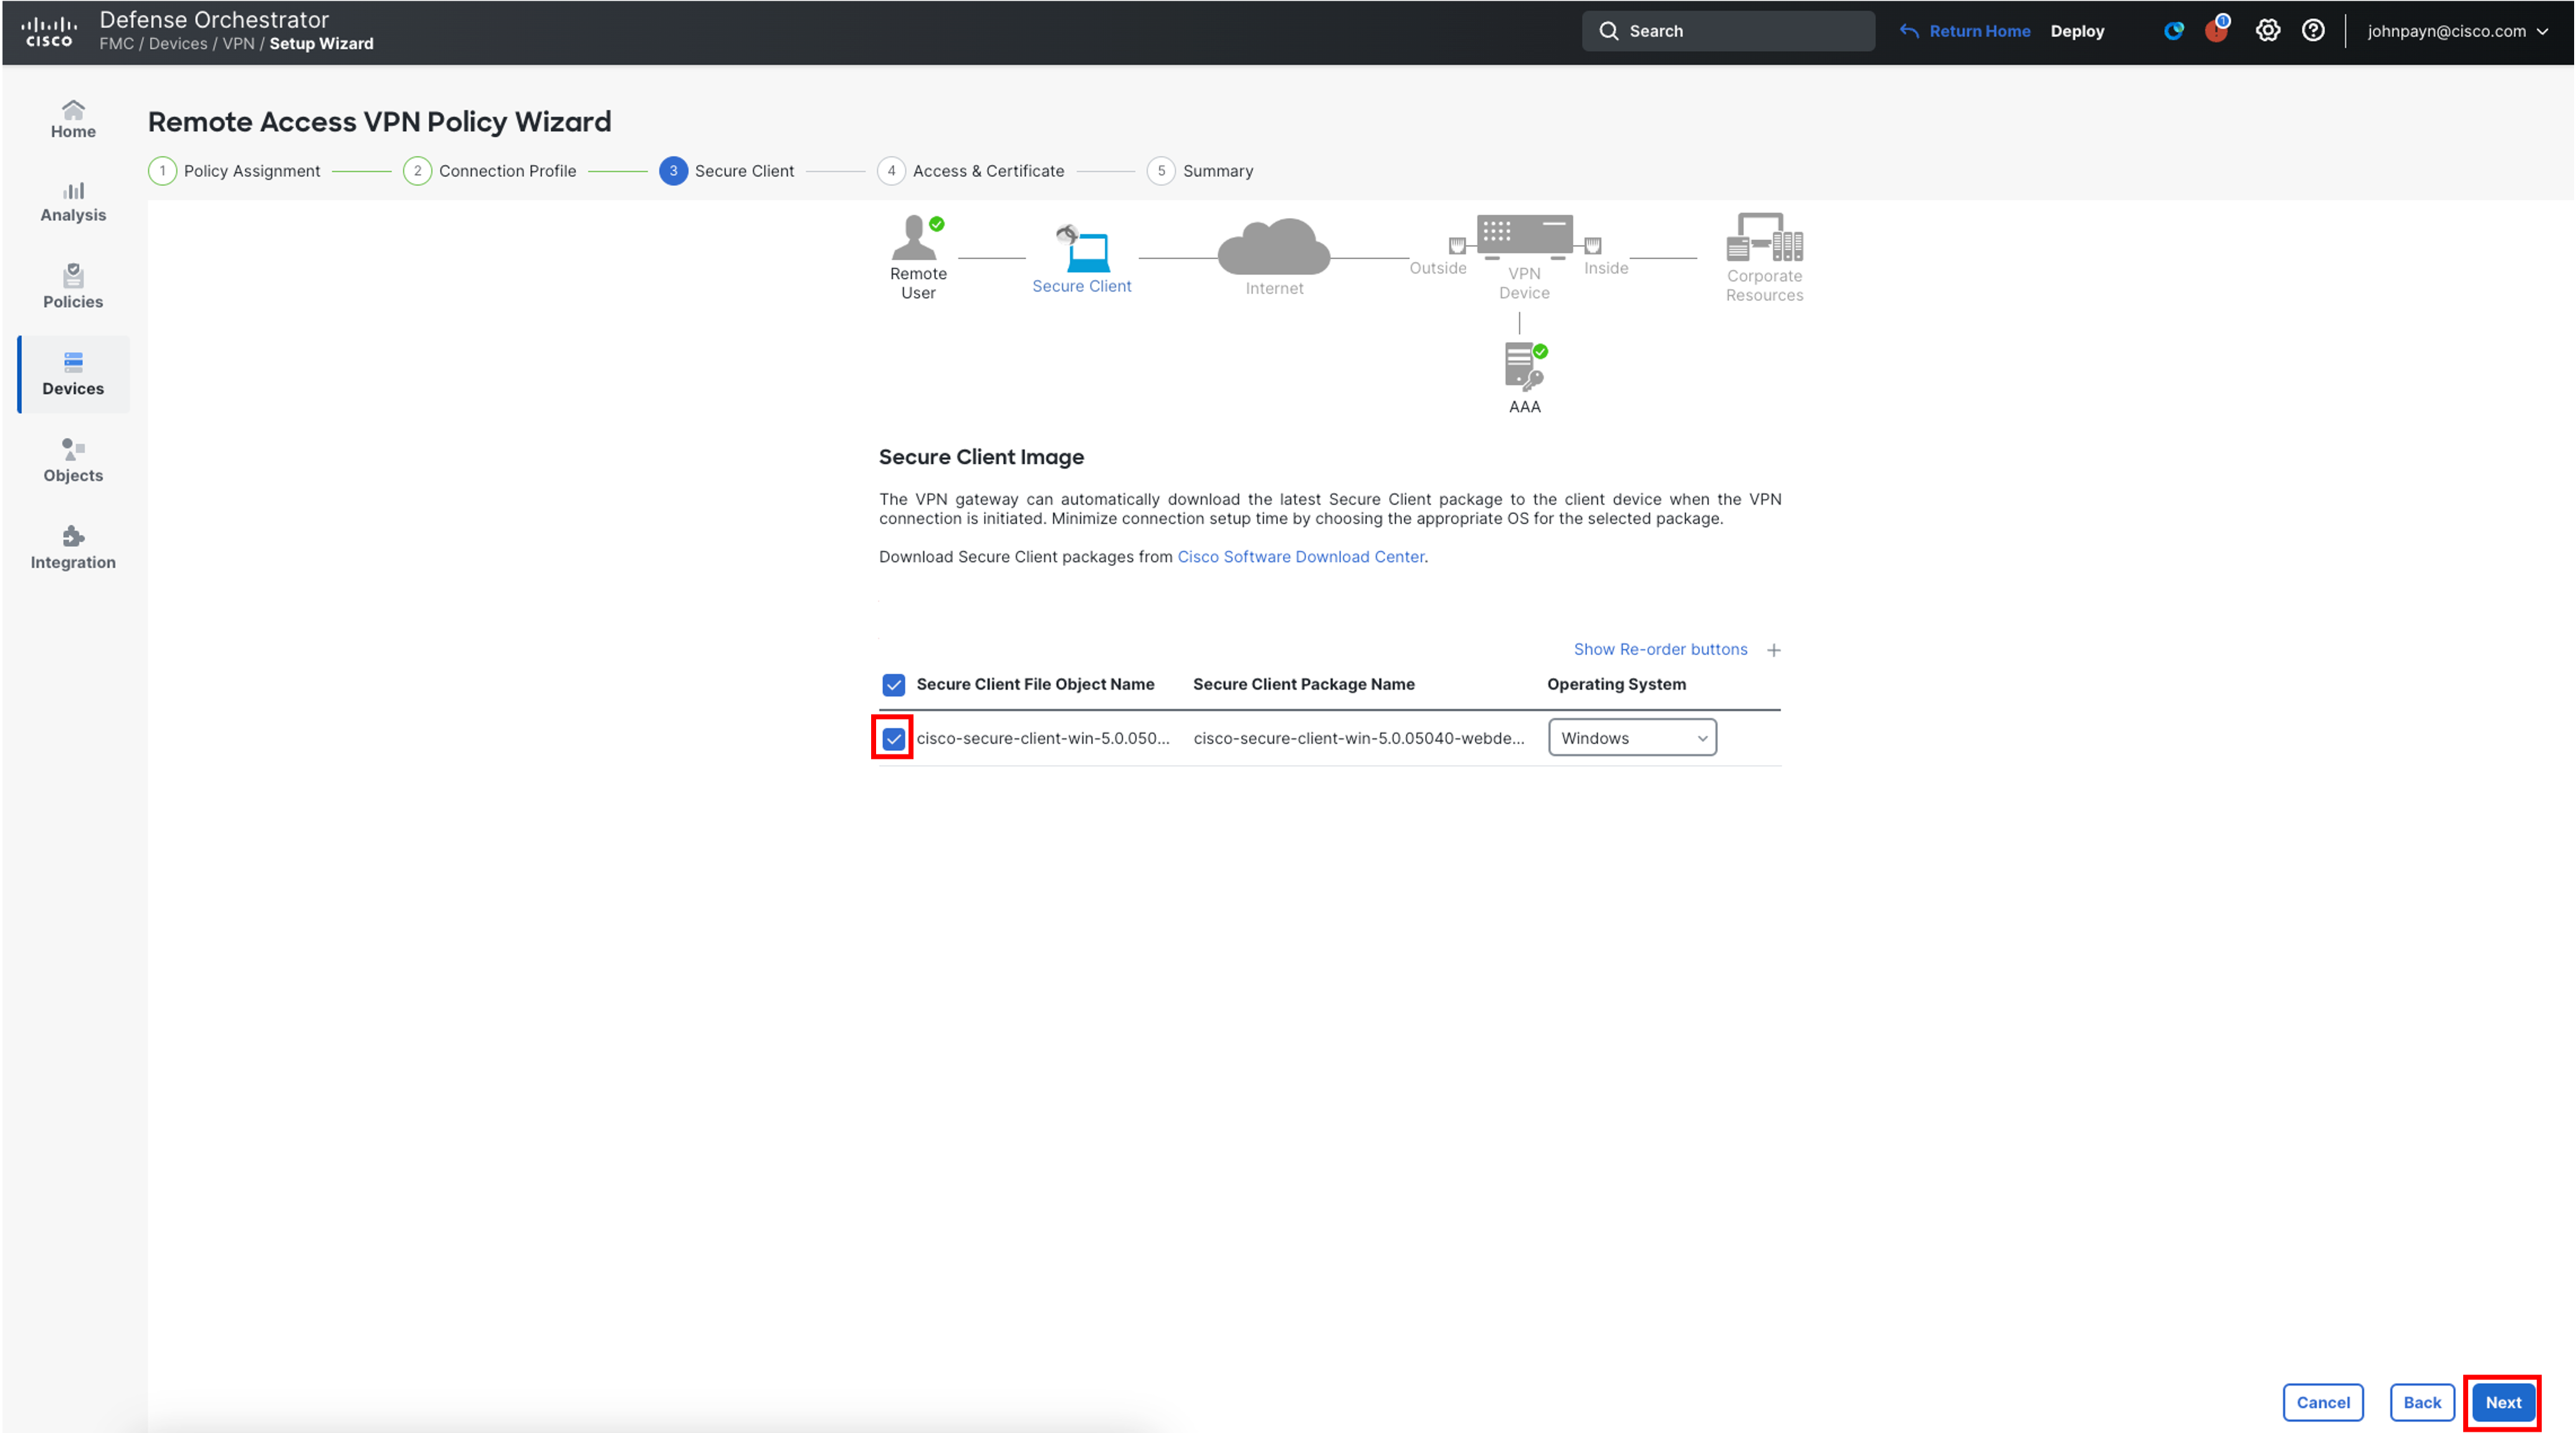
Tick the checkbox next to cisco-secure-client-win-5.0.05040-webdeploy-k9.pkg image and click on Next on the wizard screen.
-
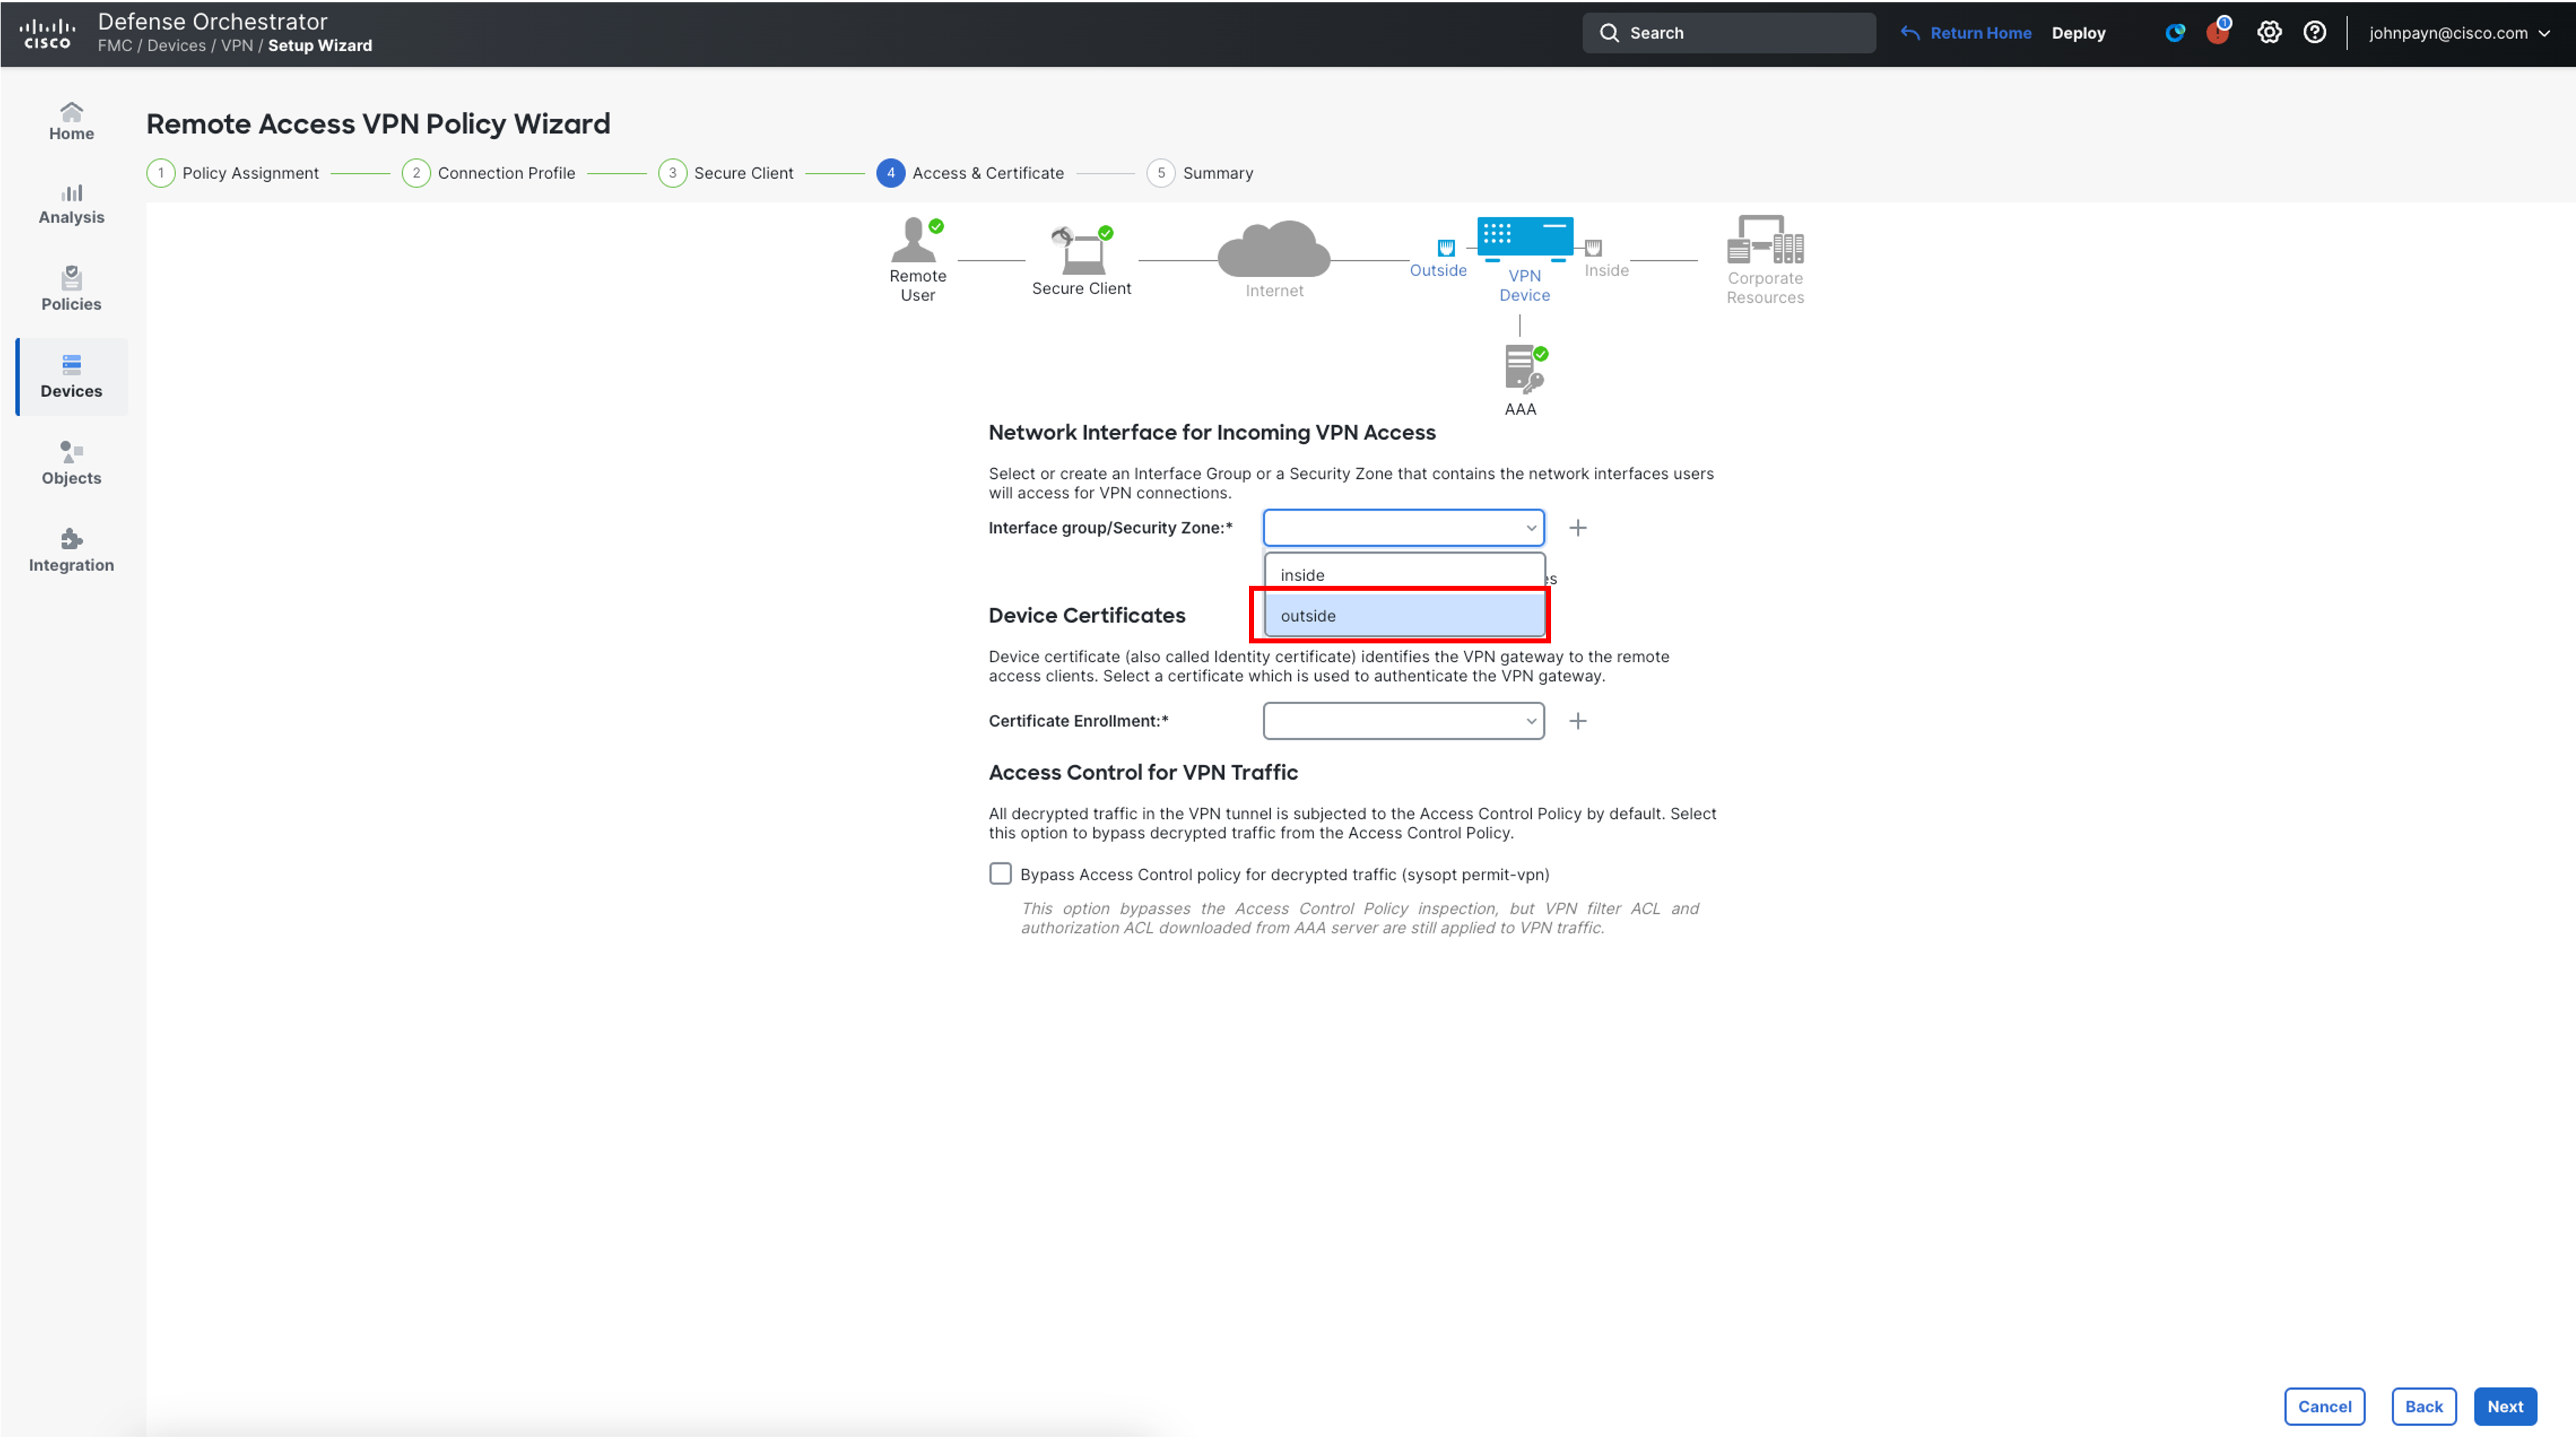
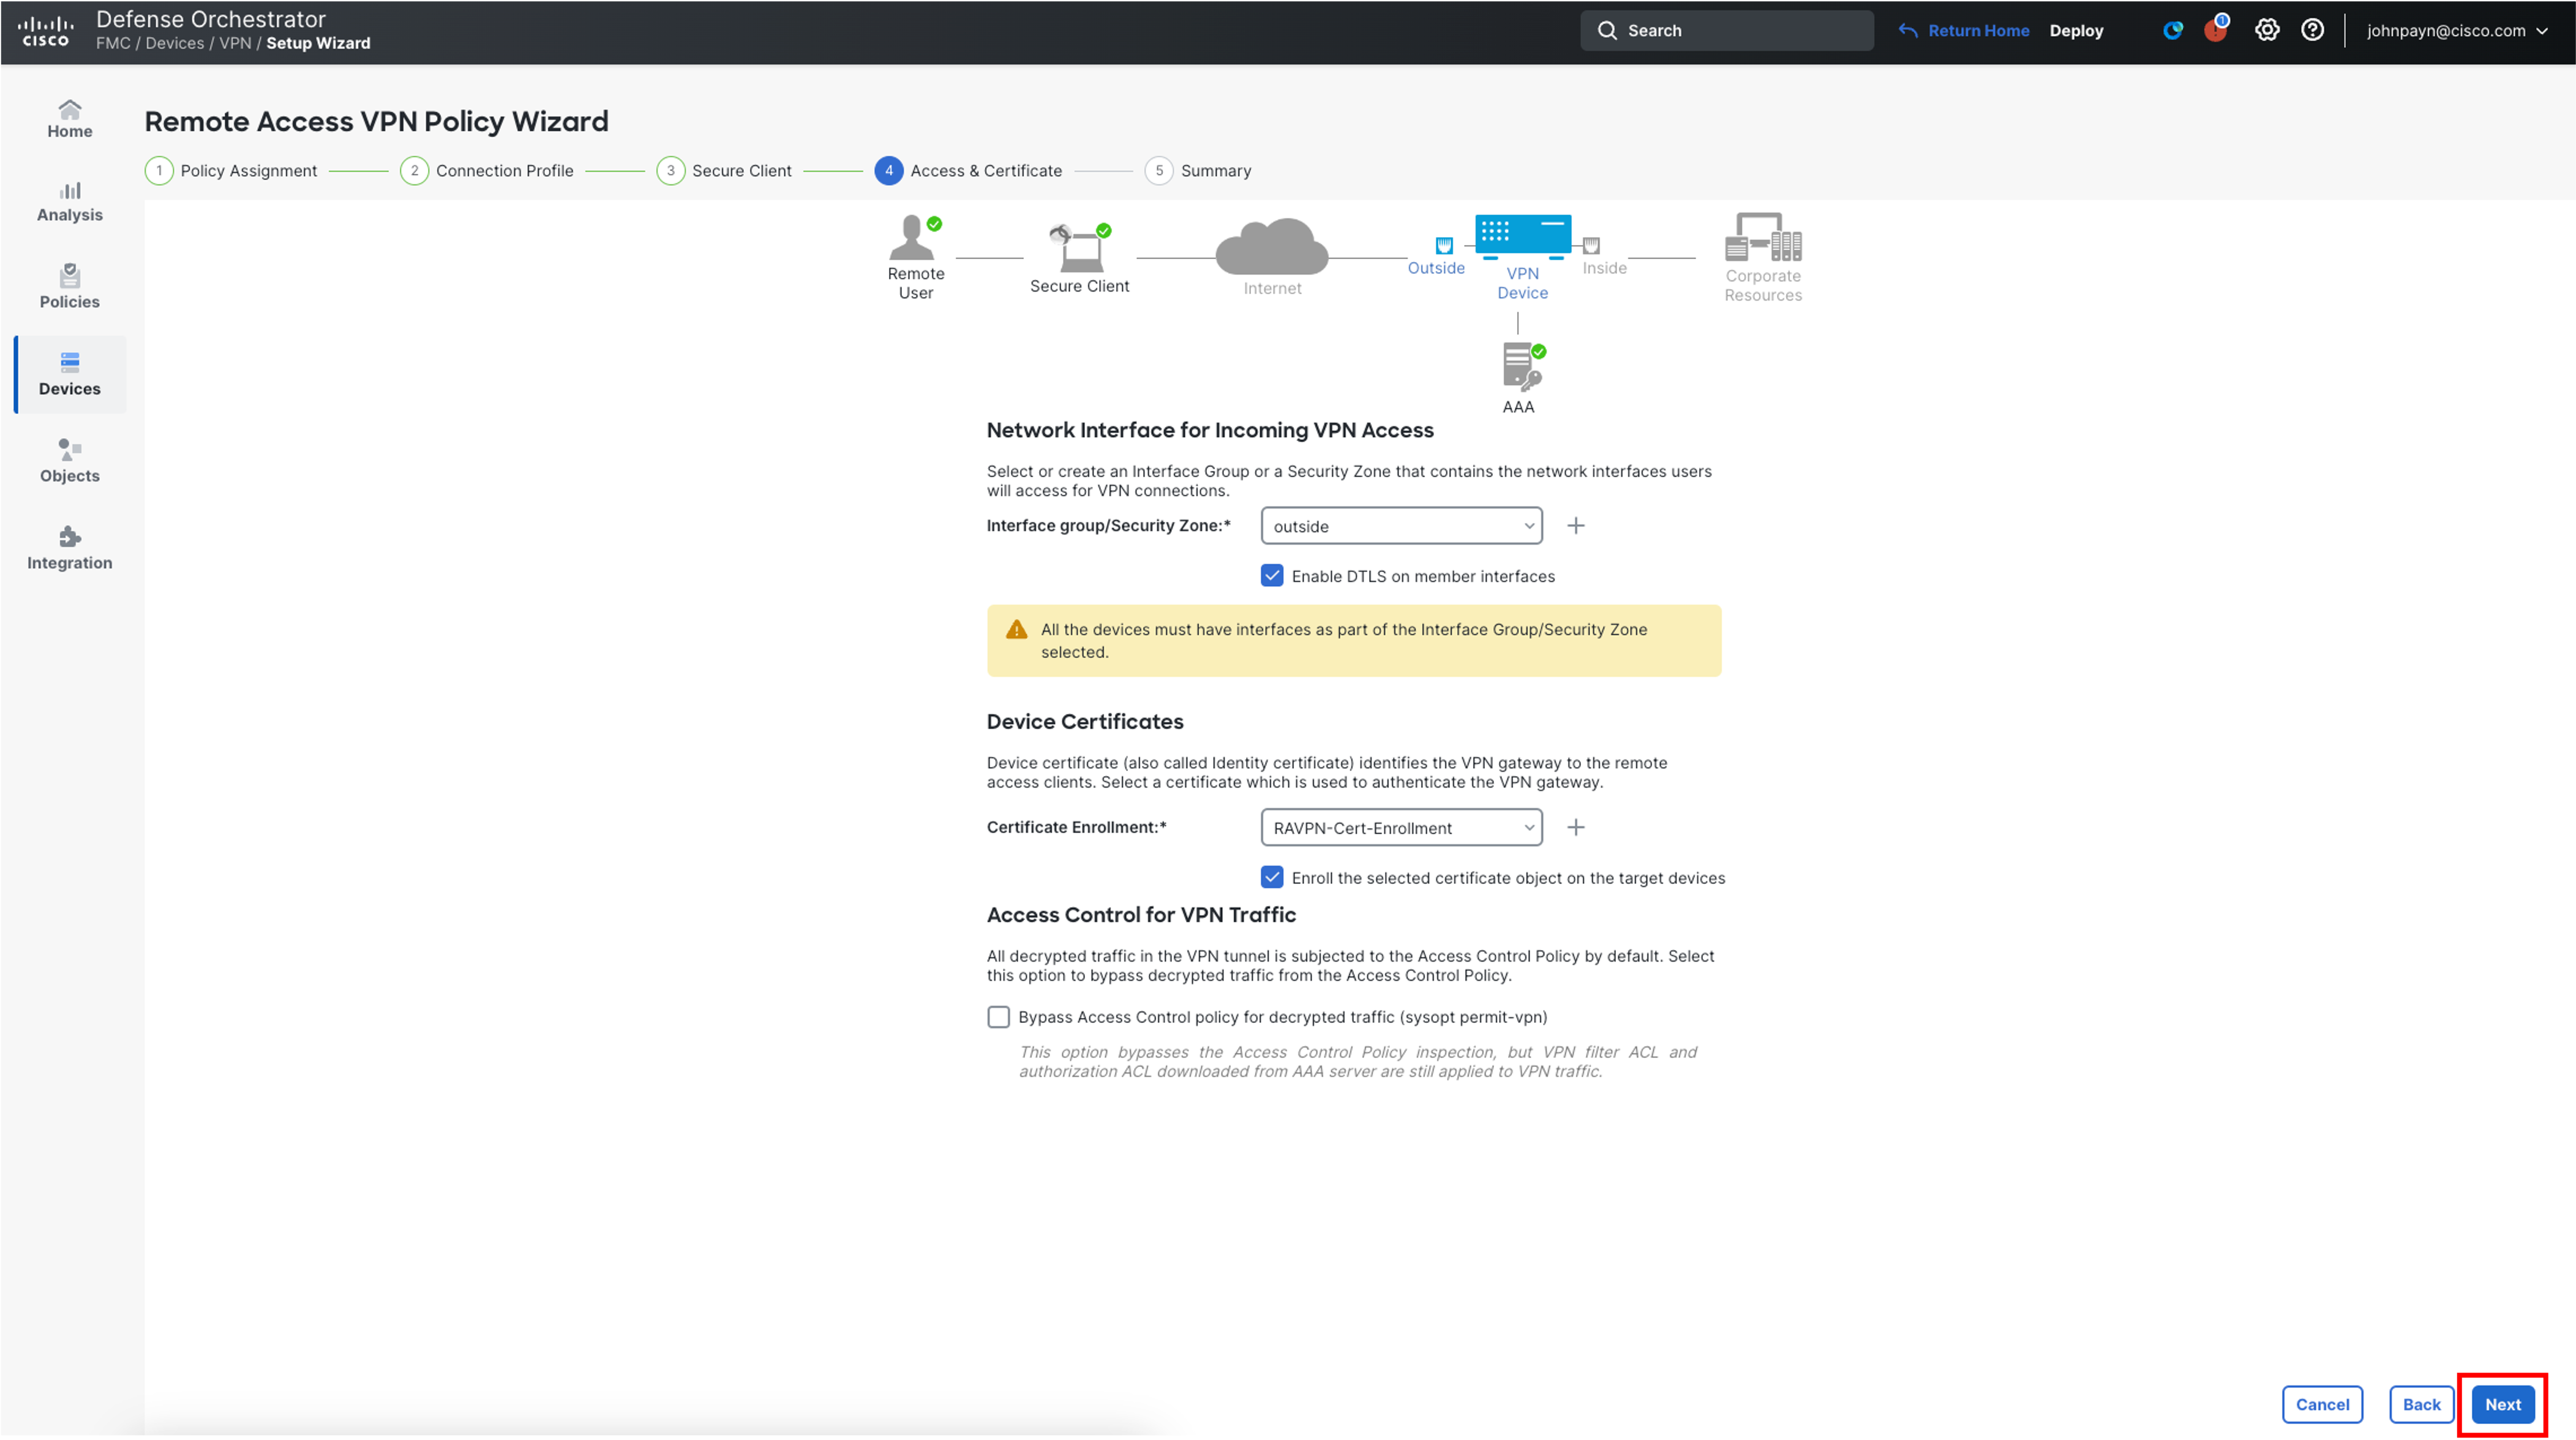
In the Network Interface for Incoming VPN Access section, for Interface Group/Security Zone choose the outside from the drop down.
-
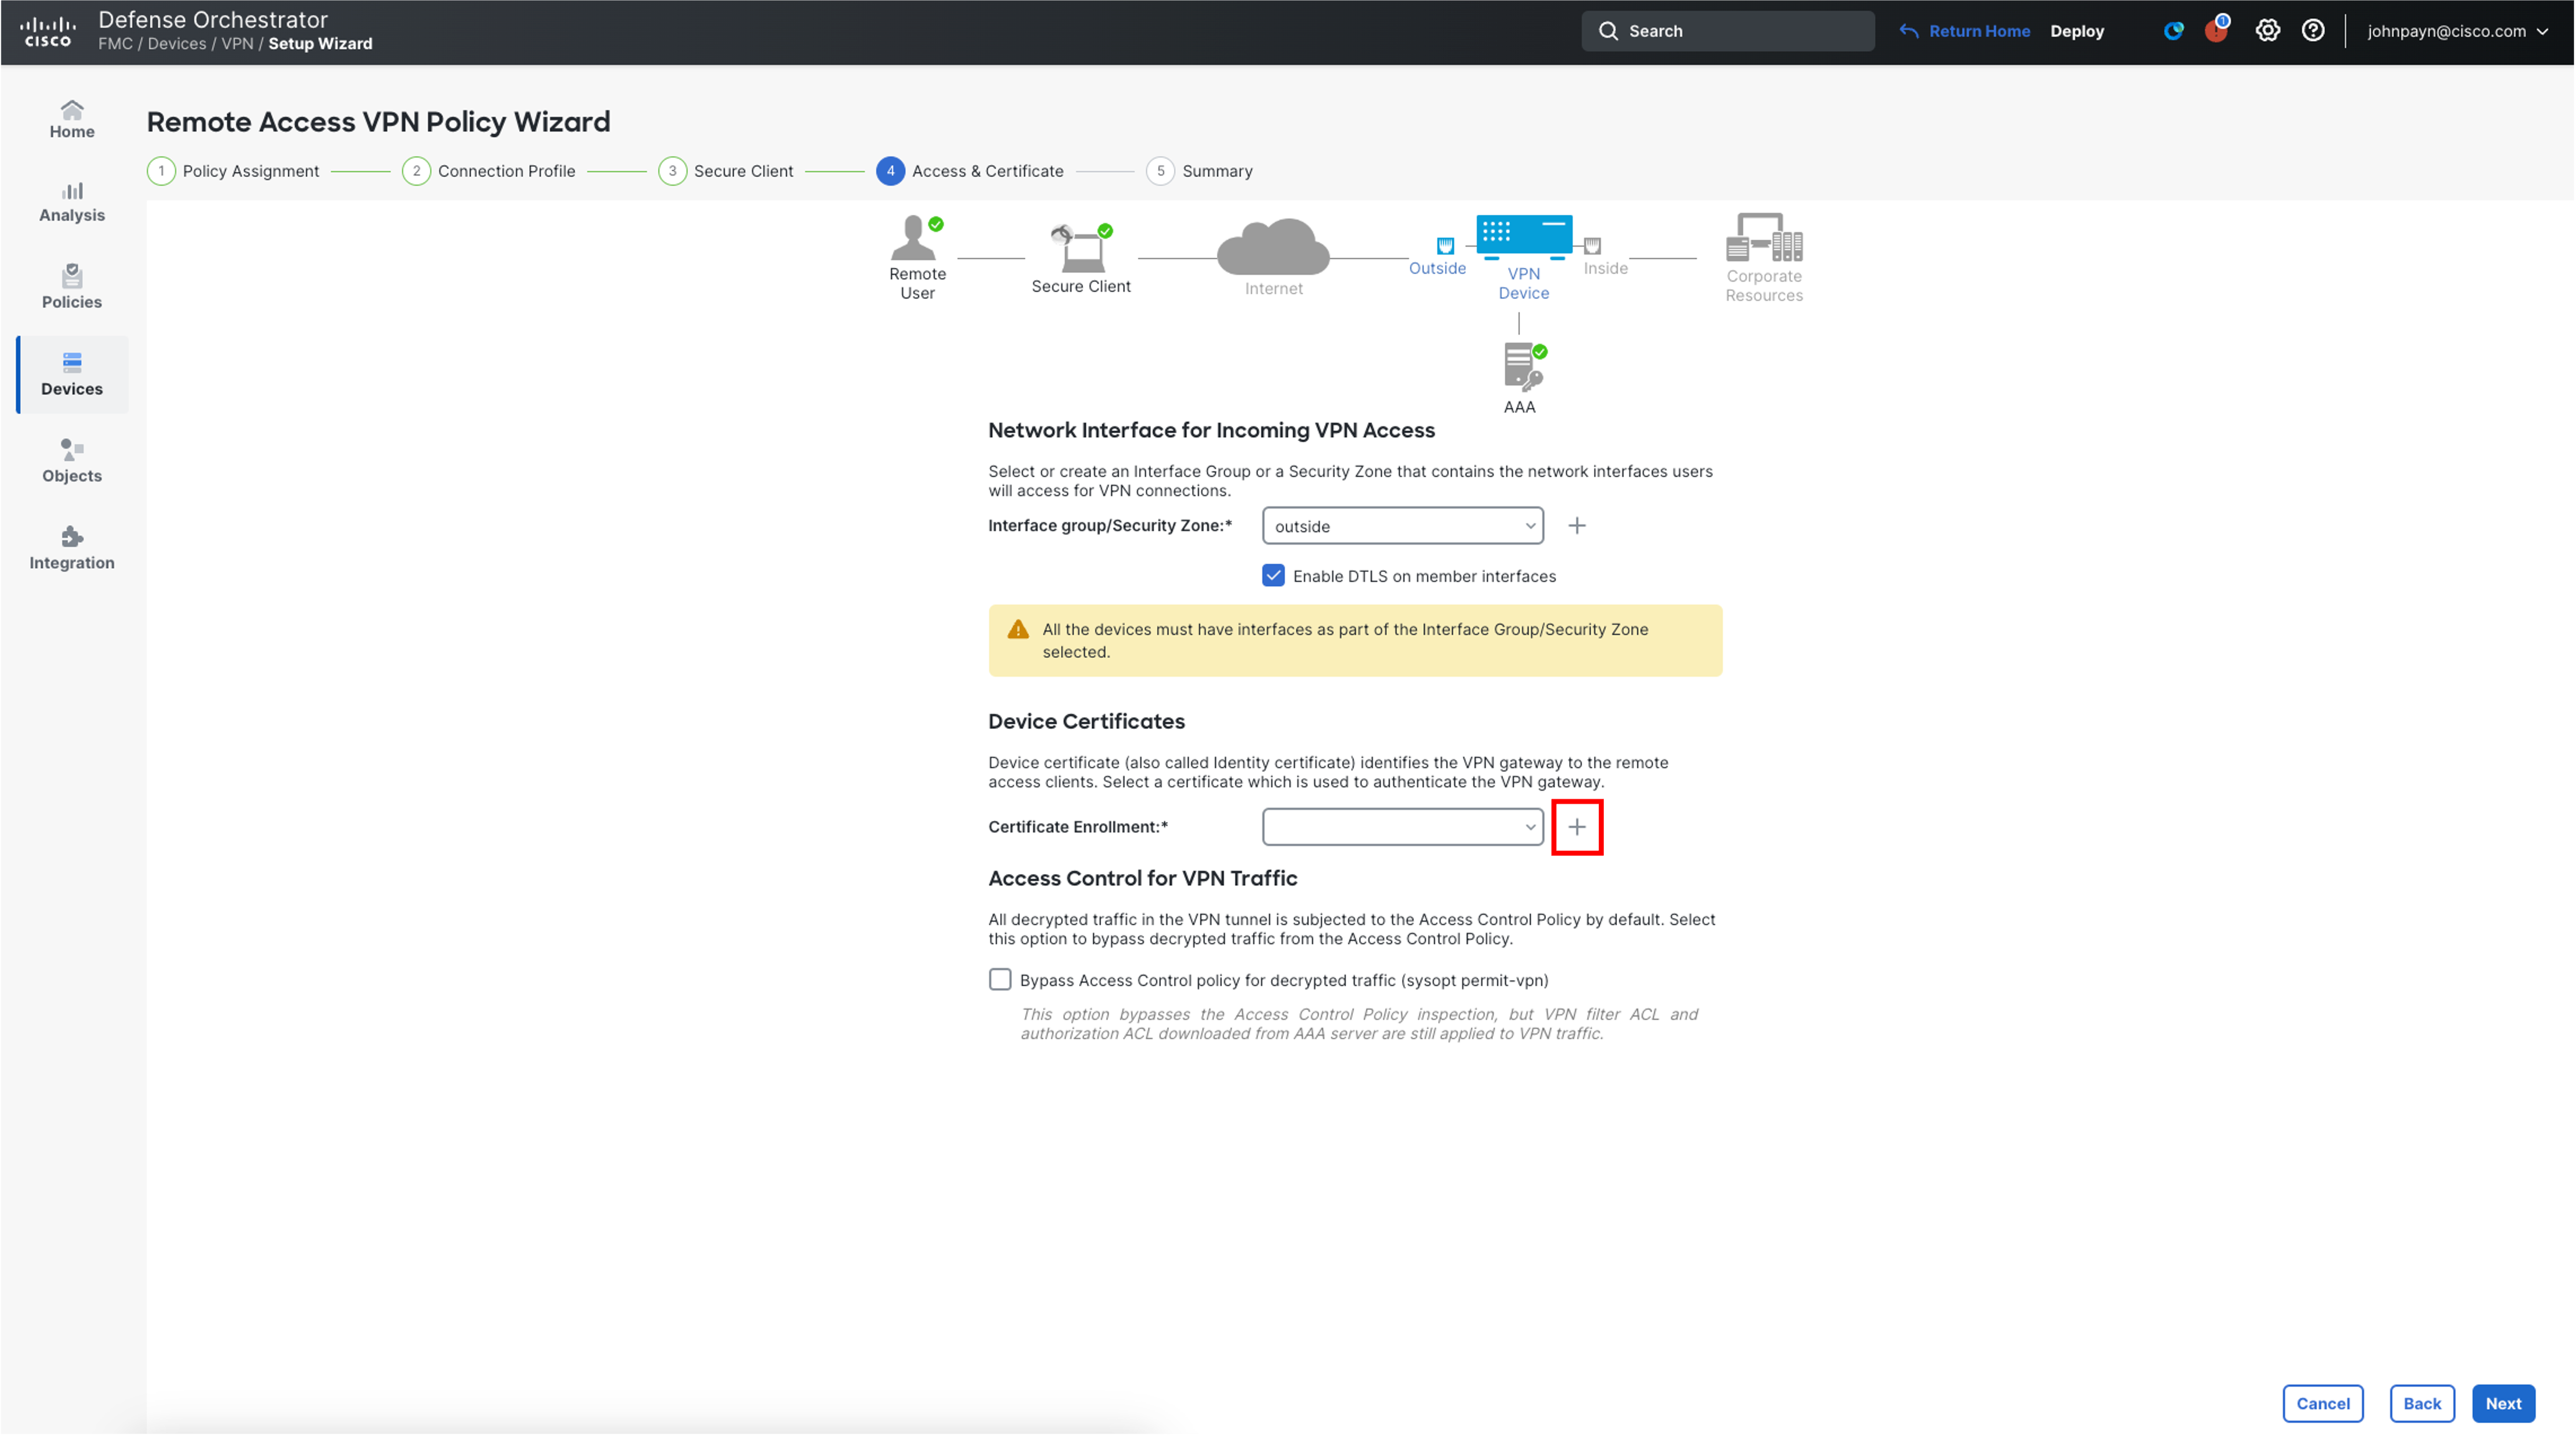
In the Device Certificates section, click on the + icon next to Certificate Enrollment to create a new one.
-
In the pop-up box, configure as follows:
-
Name: RAVPN-Cert-Enrollment
-
In CA Information tab:
-
Change Enrollment Type to Self Signed Certificate from the dropdown.
-
Validation Usage: Uncheck IPsec Client as this lab uses SSL Client and it is already enabled
By default IPsec Client and SSL Client are selected.
You can select according to your RAVPN Protocol configuration.
IPsec Client- Validate an IPsec client certificate for a site-to-site VPN connection.
SSL Client- Validate an SSL client certificate during a remote access VPN connection attempt.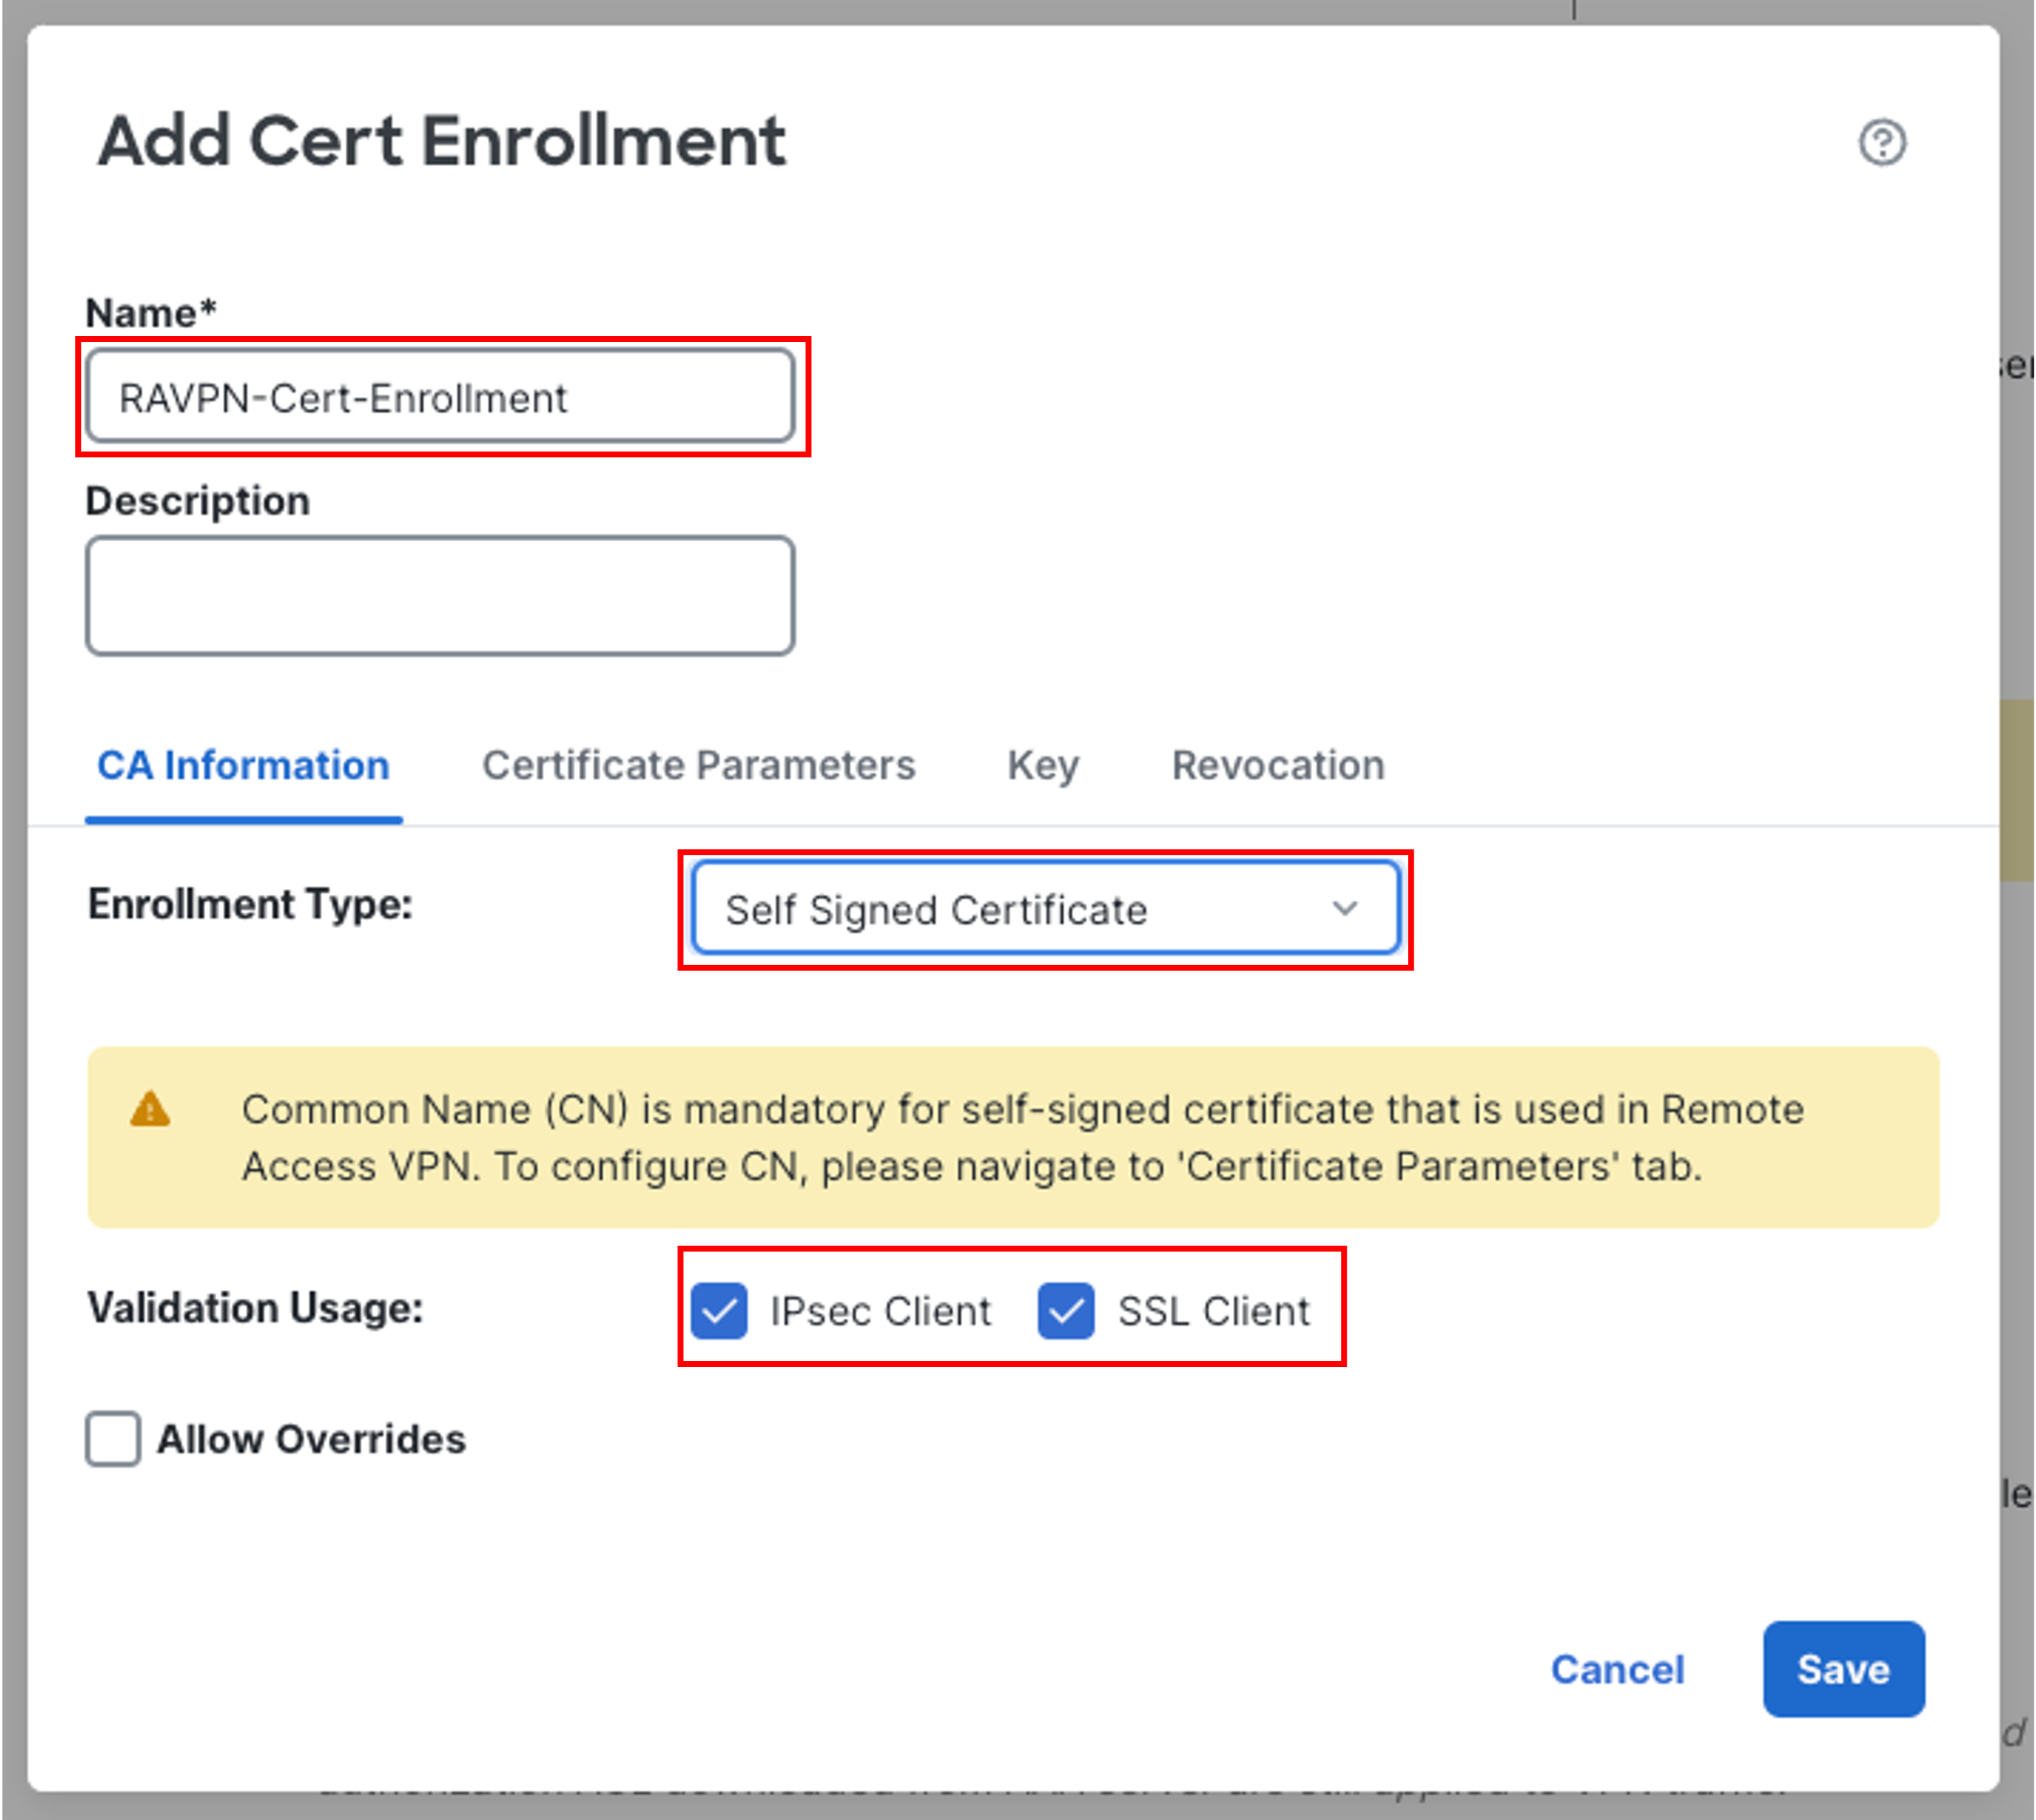
-
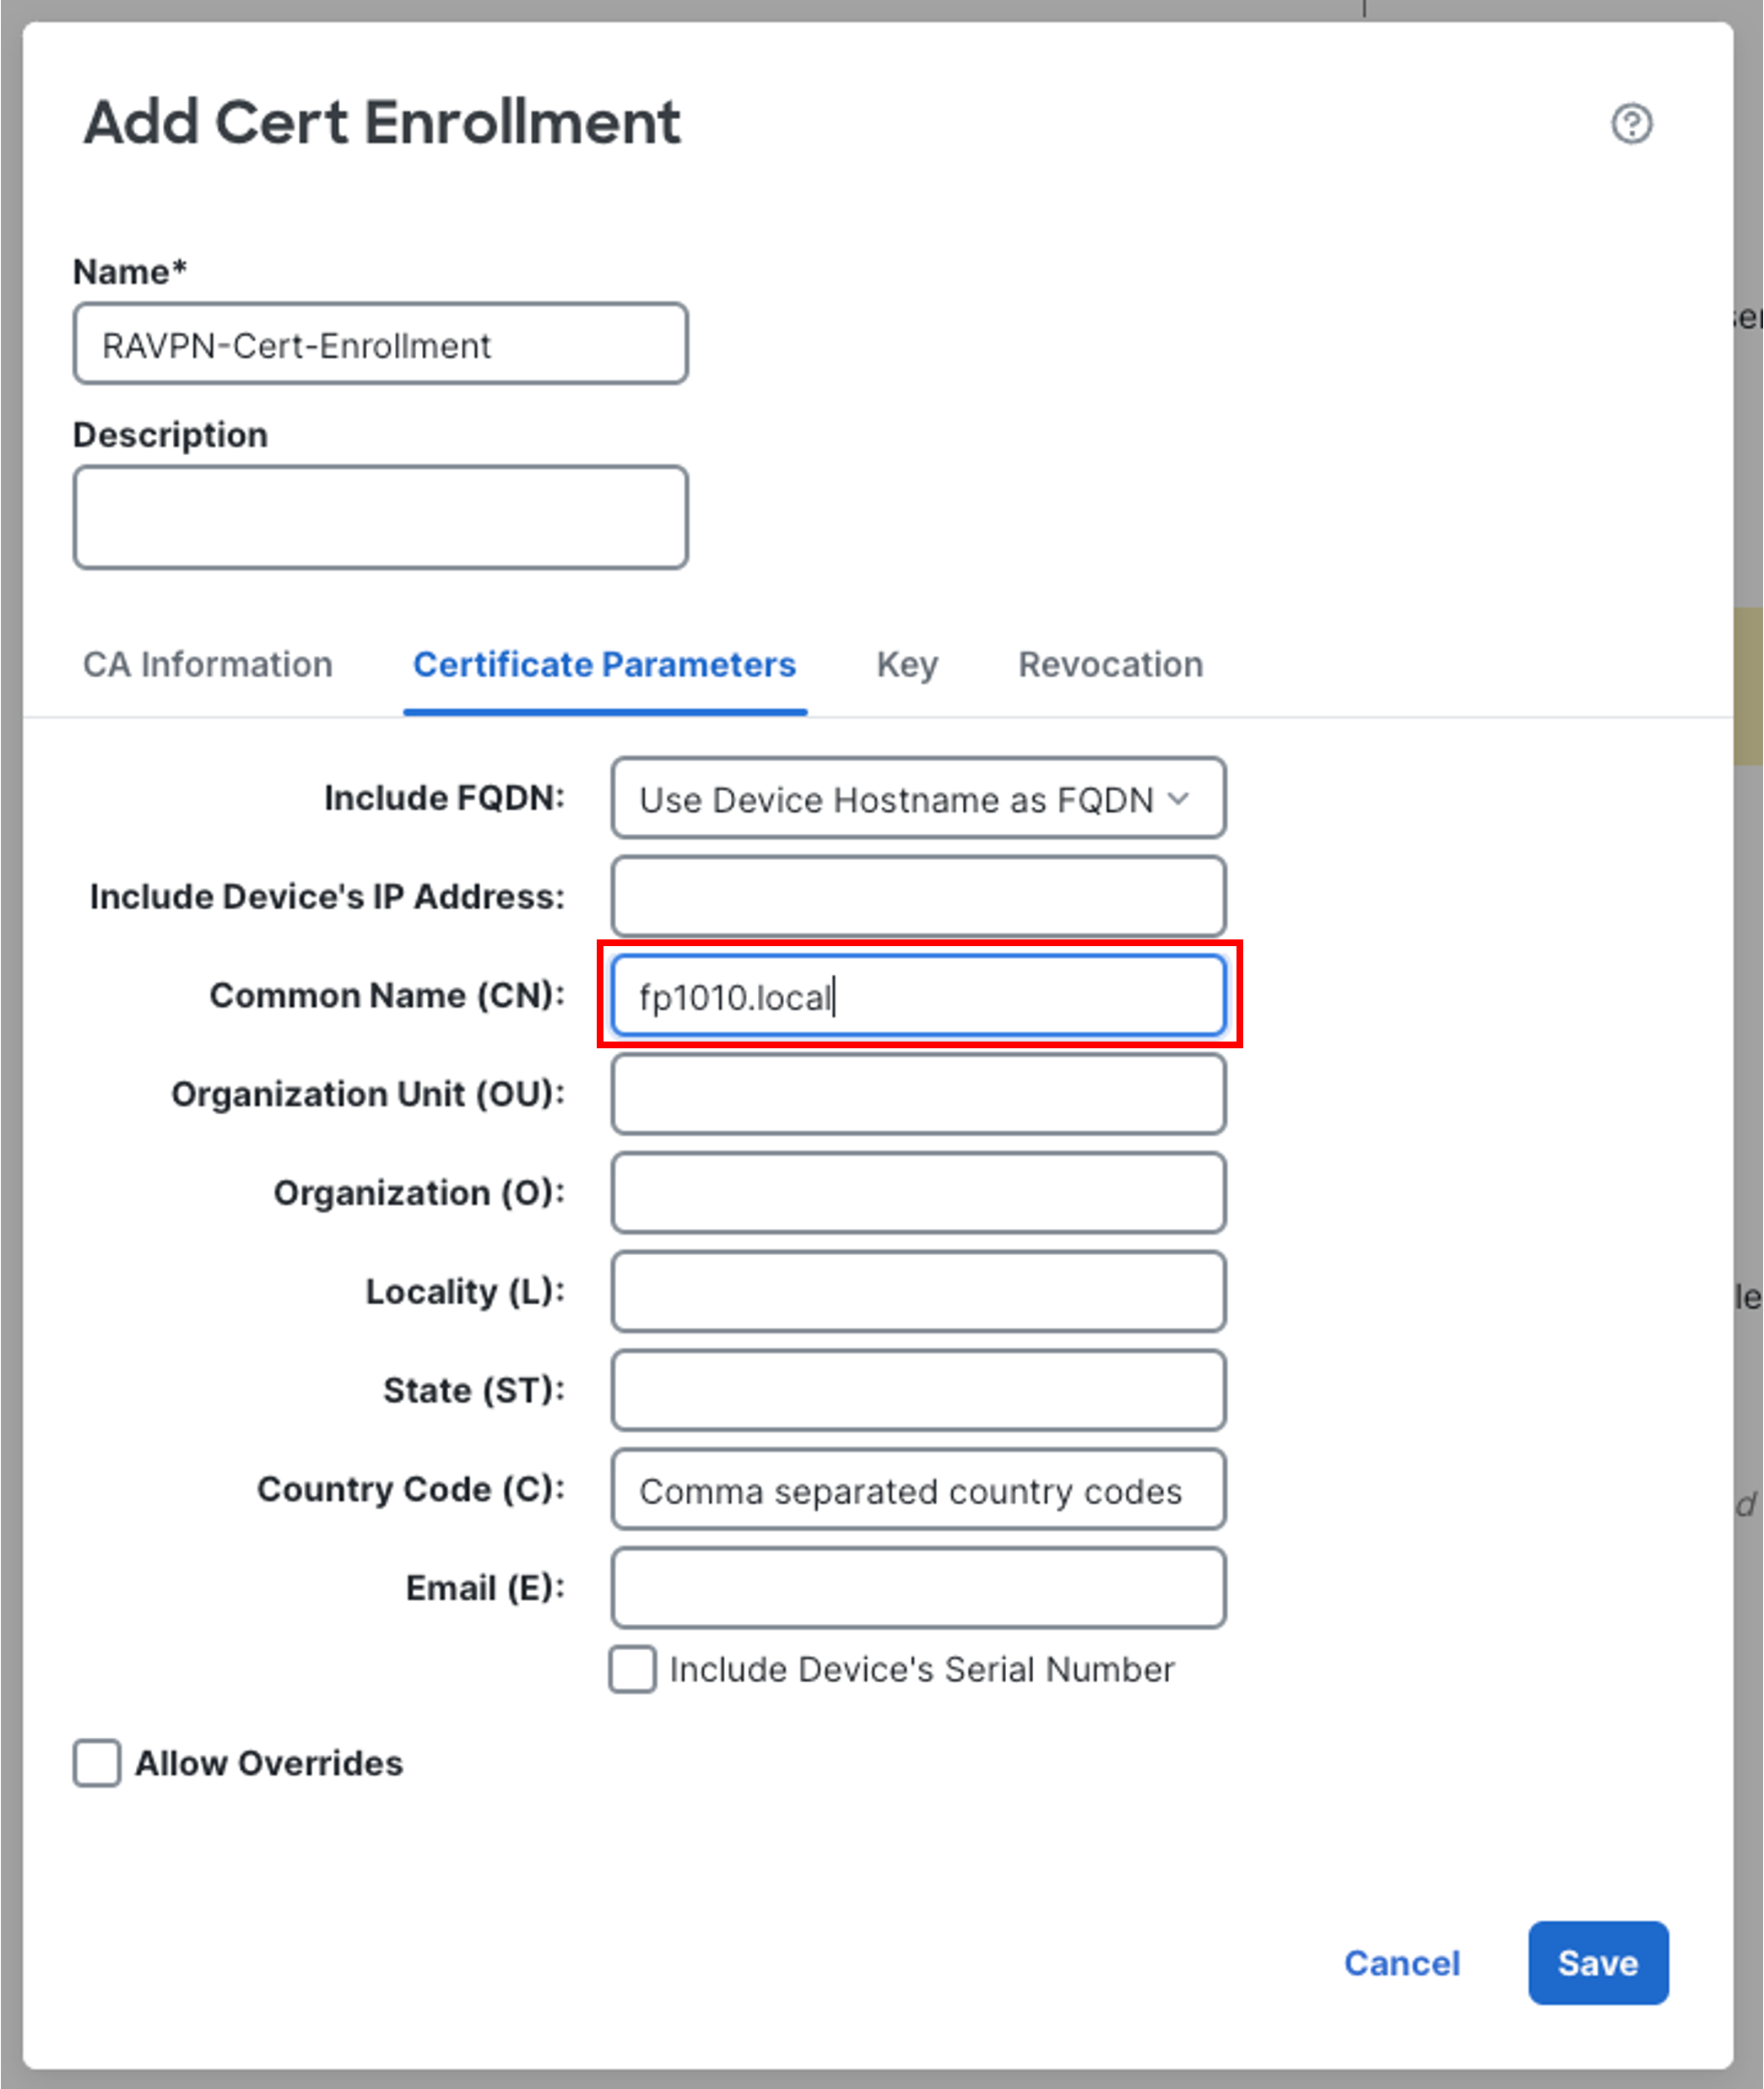
- In the Certificate Parameters tab, configure as follows:
-
Common Name(CN): fpr1010.local
-
Leave the rest of the fields default and click Save.
Note
In this lab, we are configuring a sample FQDN i.e. fpr1010.local as a common name (CN).
In a production environment, you'd configure the actual FQDN associated to your public IP mapped to the outside interface.For testing RAVPN from the workstation to the above FQDN, make sure your workstation can resolve DNS requests for fpr1010.local to the IP address on 1010's Ethernet1/1.
-
Then click Next on the wizard screen
Note
Firewall Management Center allows an admin to bypass access control policy (using sysopt permit-vpn) for tunnel traffic. For more info, check the option in the Access & Certificate section in the wizard:
-
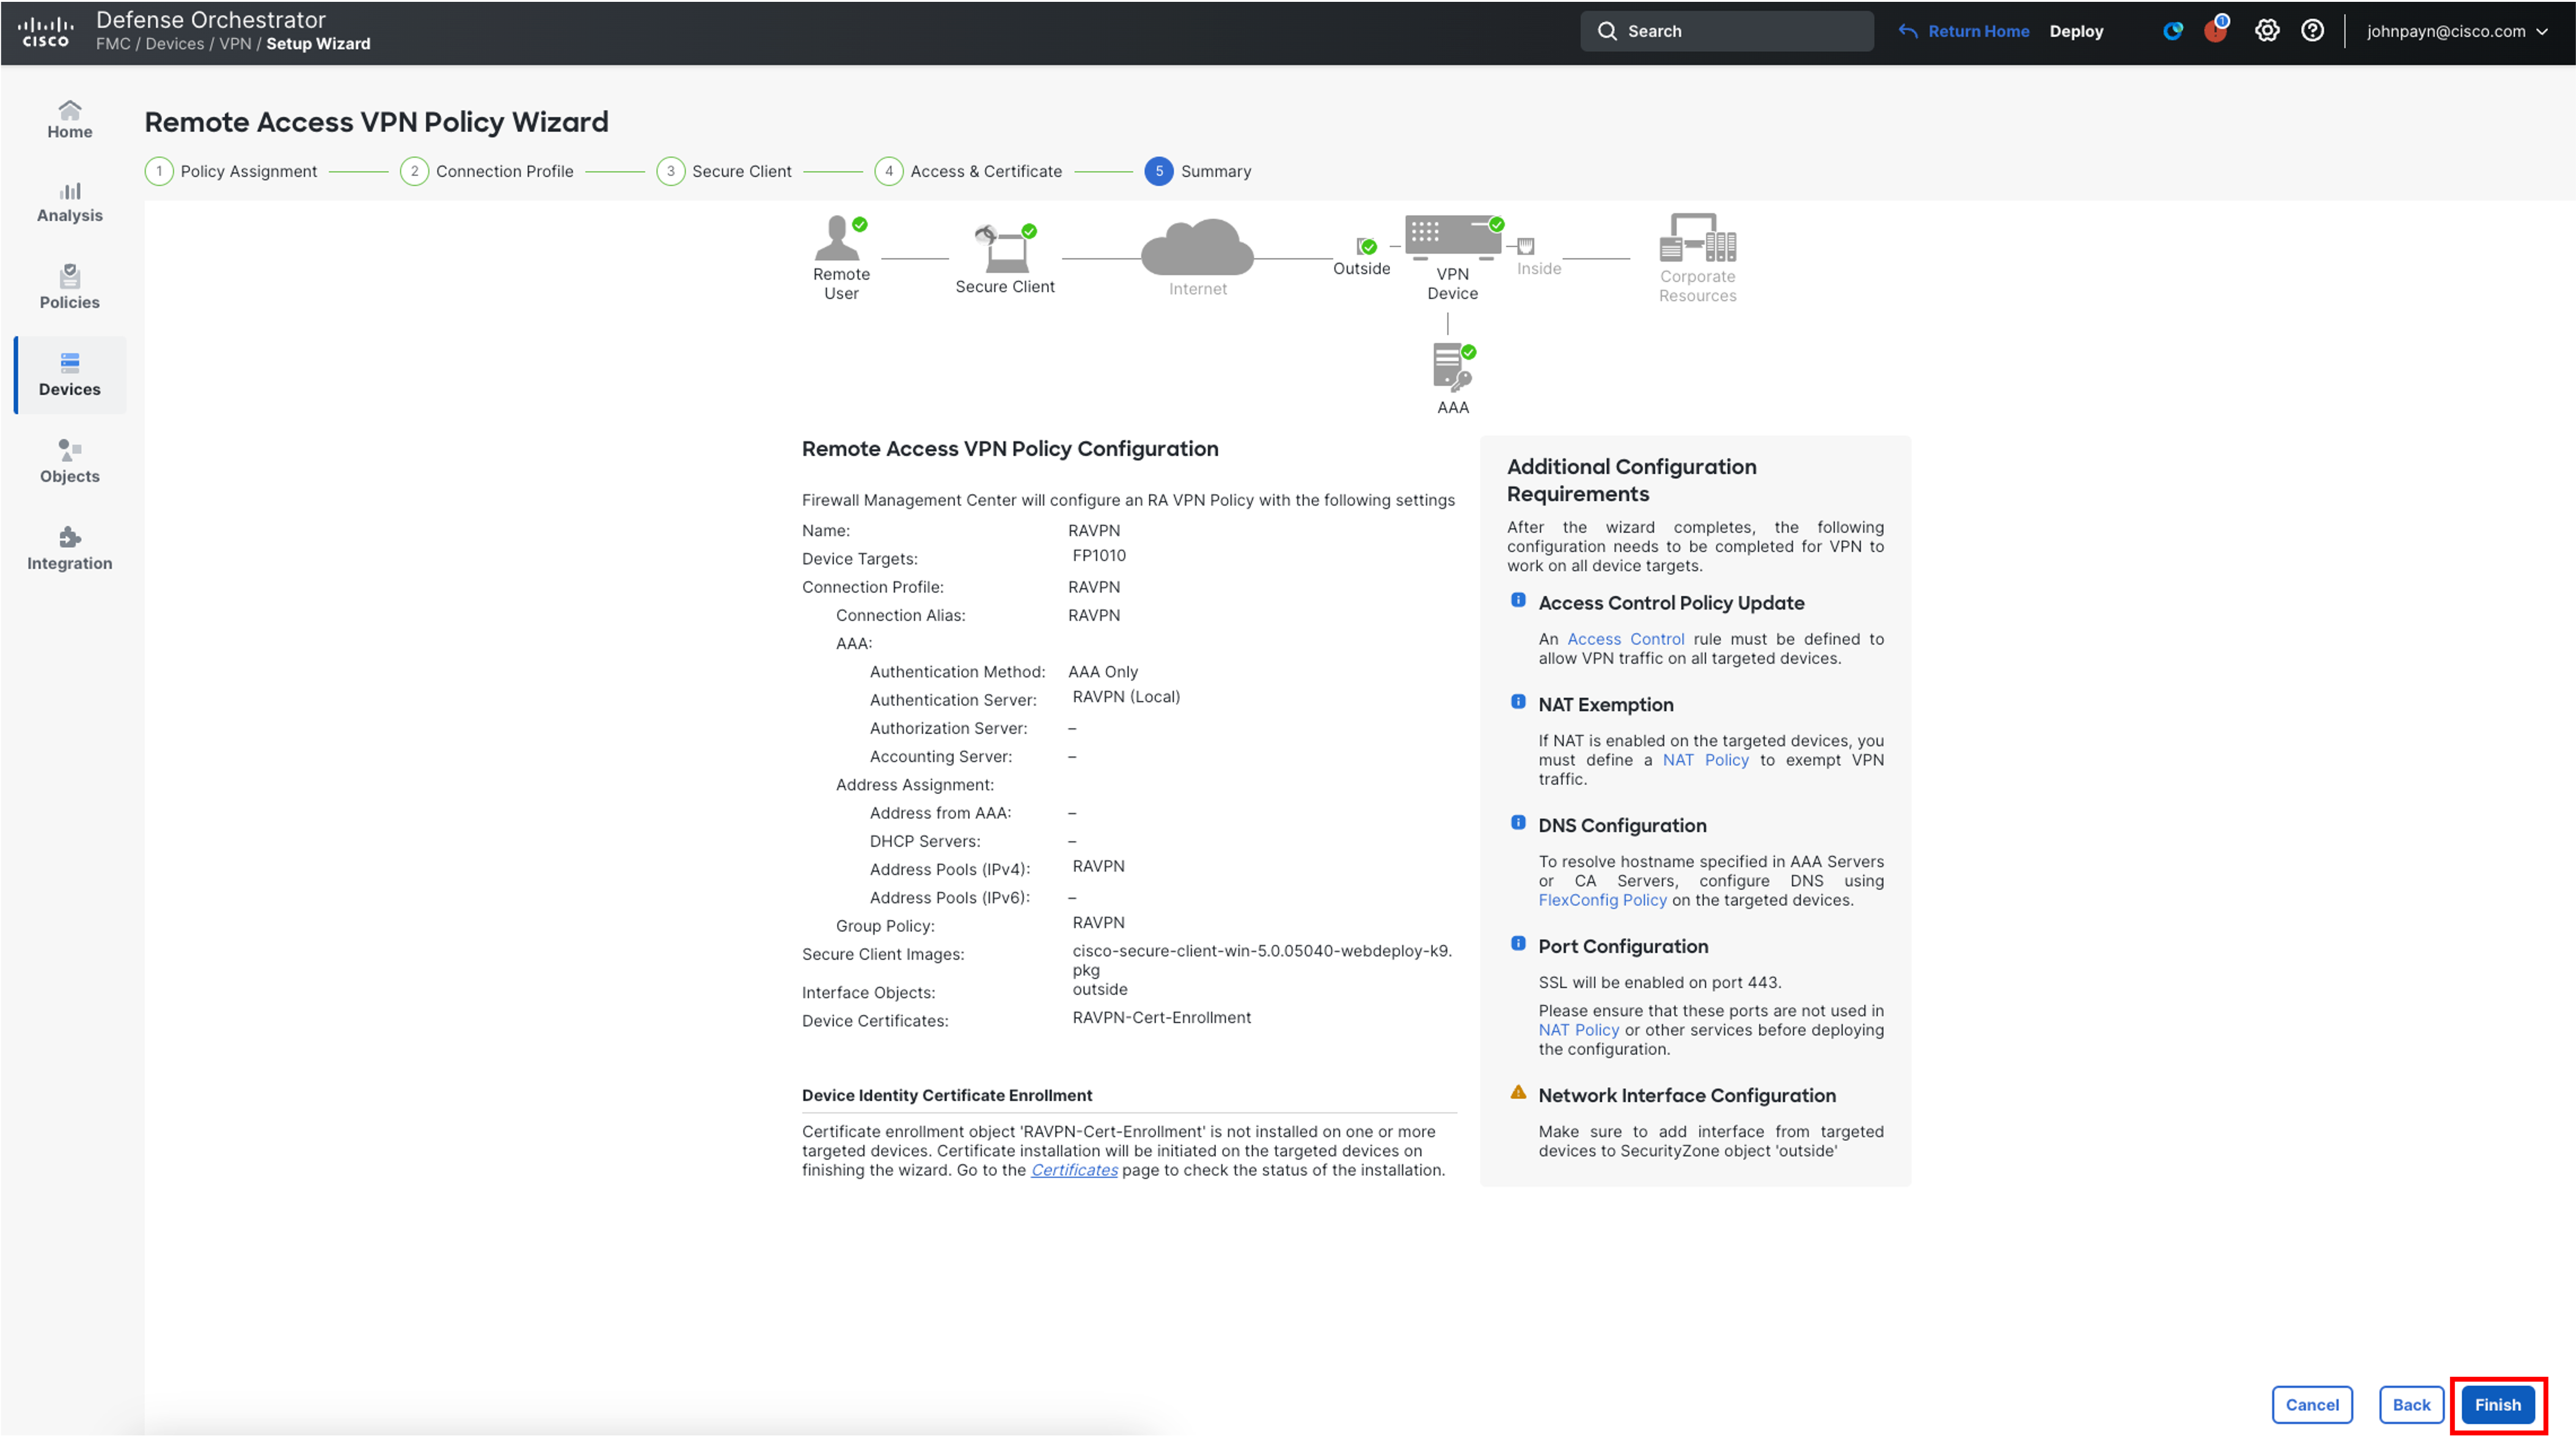
Click on Finish to complete the RAVPN Configuration.
Task 3 - Create a Loopback Interface on Firepower 1010
A loopback interface is a virtual interface that is always available and reachable until the administrator shuts it down manually and it can be reached through any of the physical interfaces on the device, depending upon the routing in your network.
We'll be configuring a loopback interface to emulate an internal network in order to verify if the RAVPN connection made from the workstation to the loopback IP was successful or not.
- Navigate to Devices > Device Management using the left navigation.
- Click the pencil icon next to the FP1010 device. Then in the Interfaces tab click on Add Interfaces > Loopback Interface.
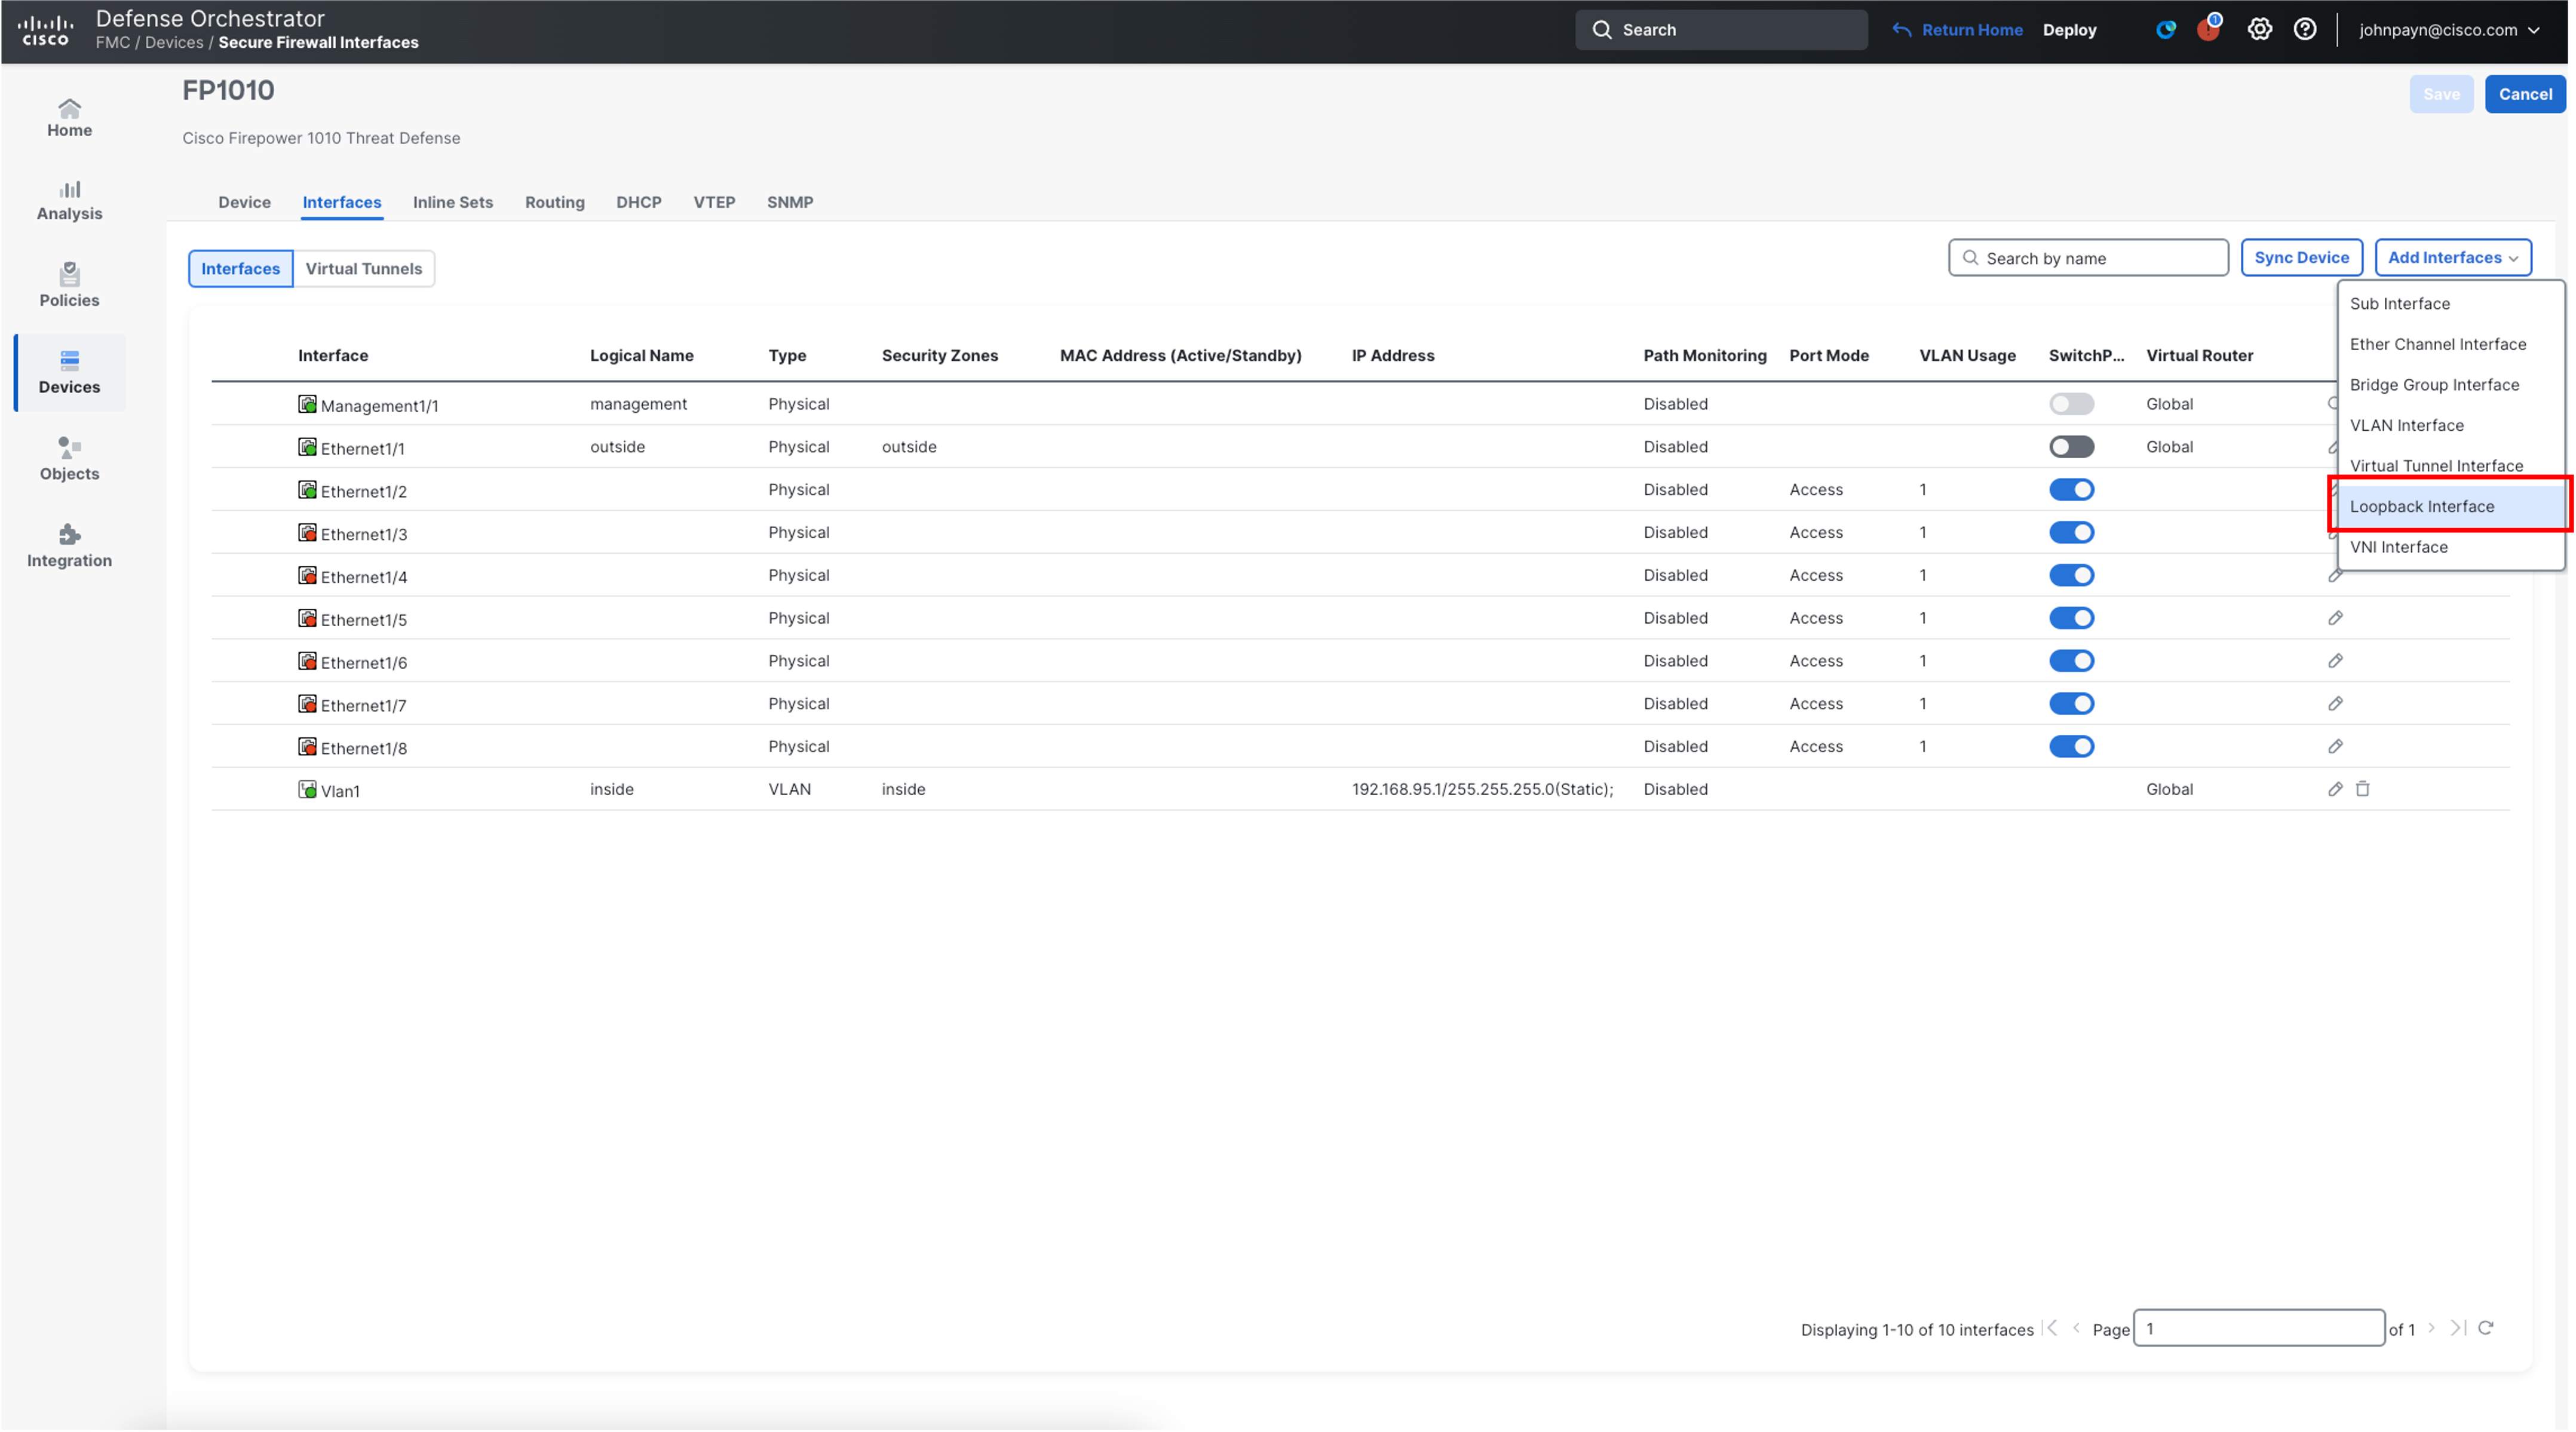
-
In the pop-up box, configure the Loopback Interface as follows:
-
Name: RAVPN-Loopback
-
Loopback ID: 5
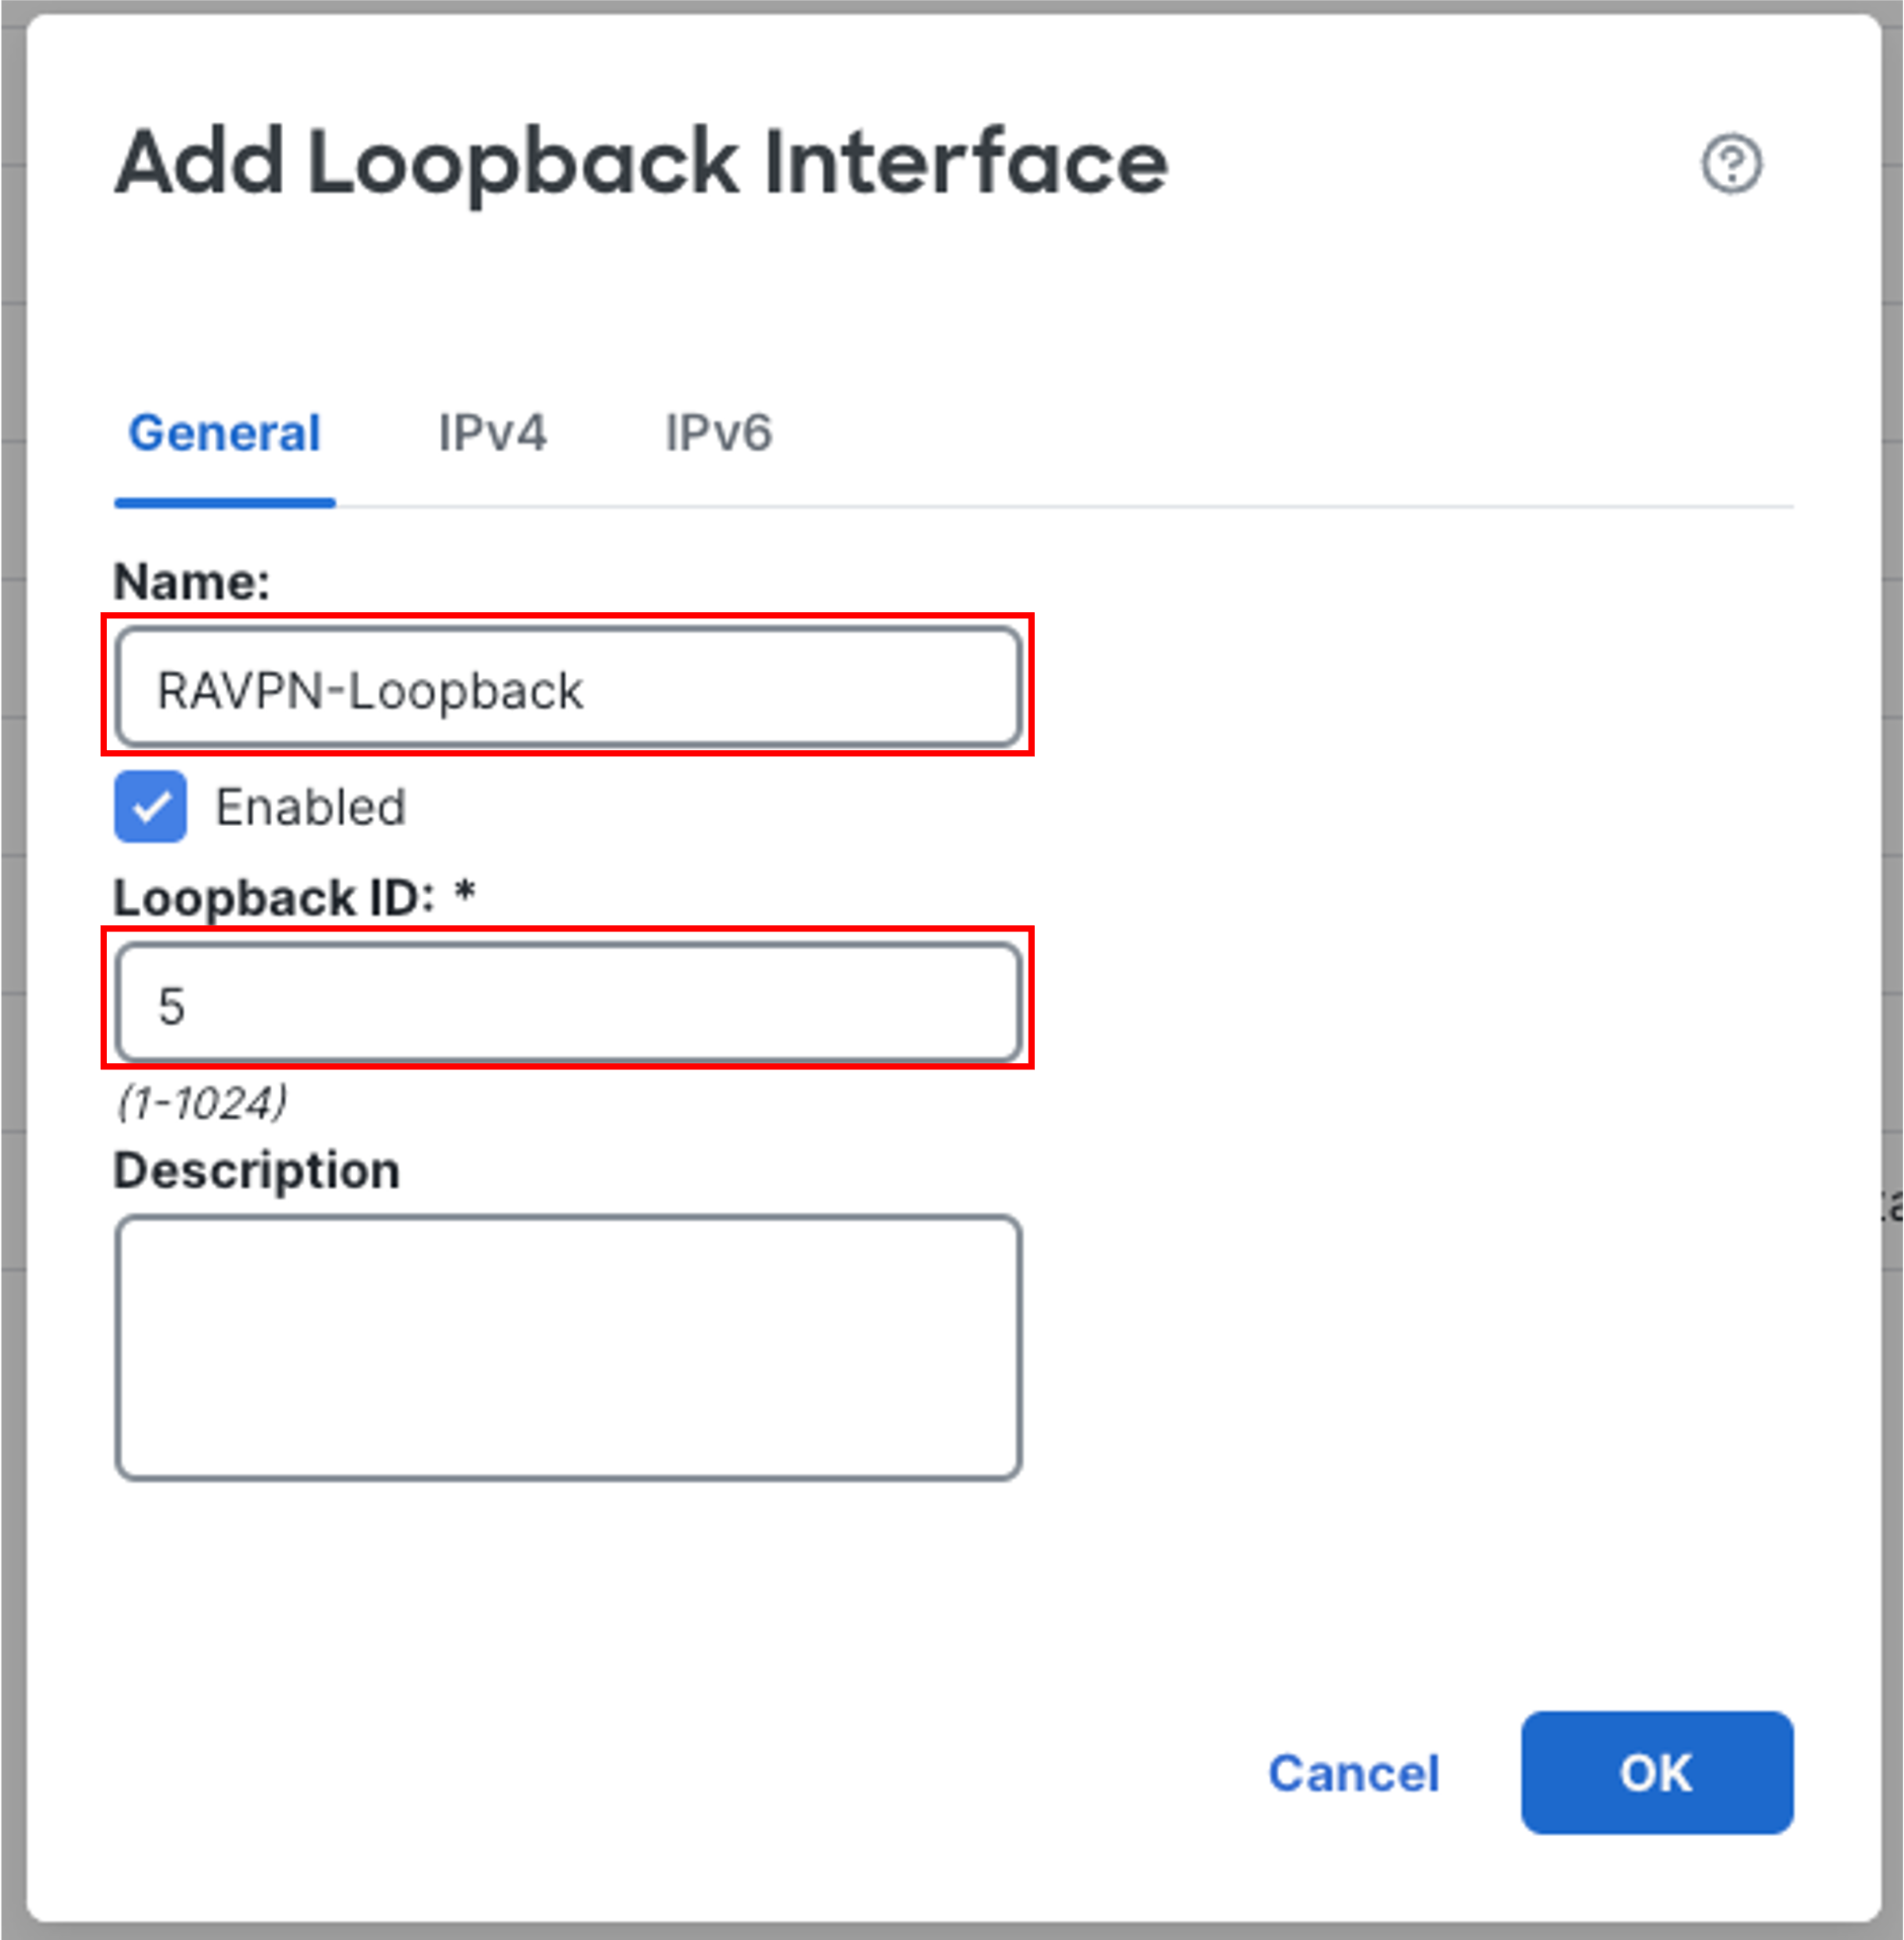
-
-
In the IPv4 tab, configure:
-
IP Address: 172.16.40.1/32
-
Then click OK
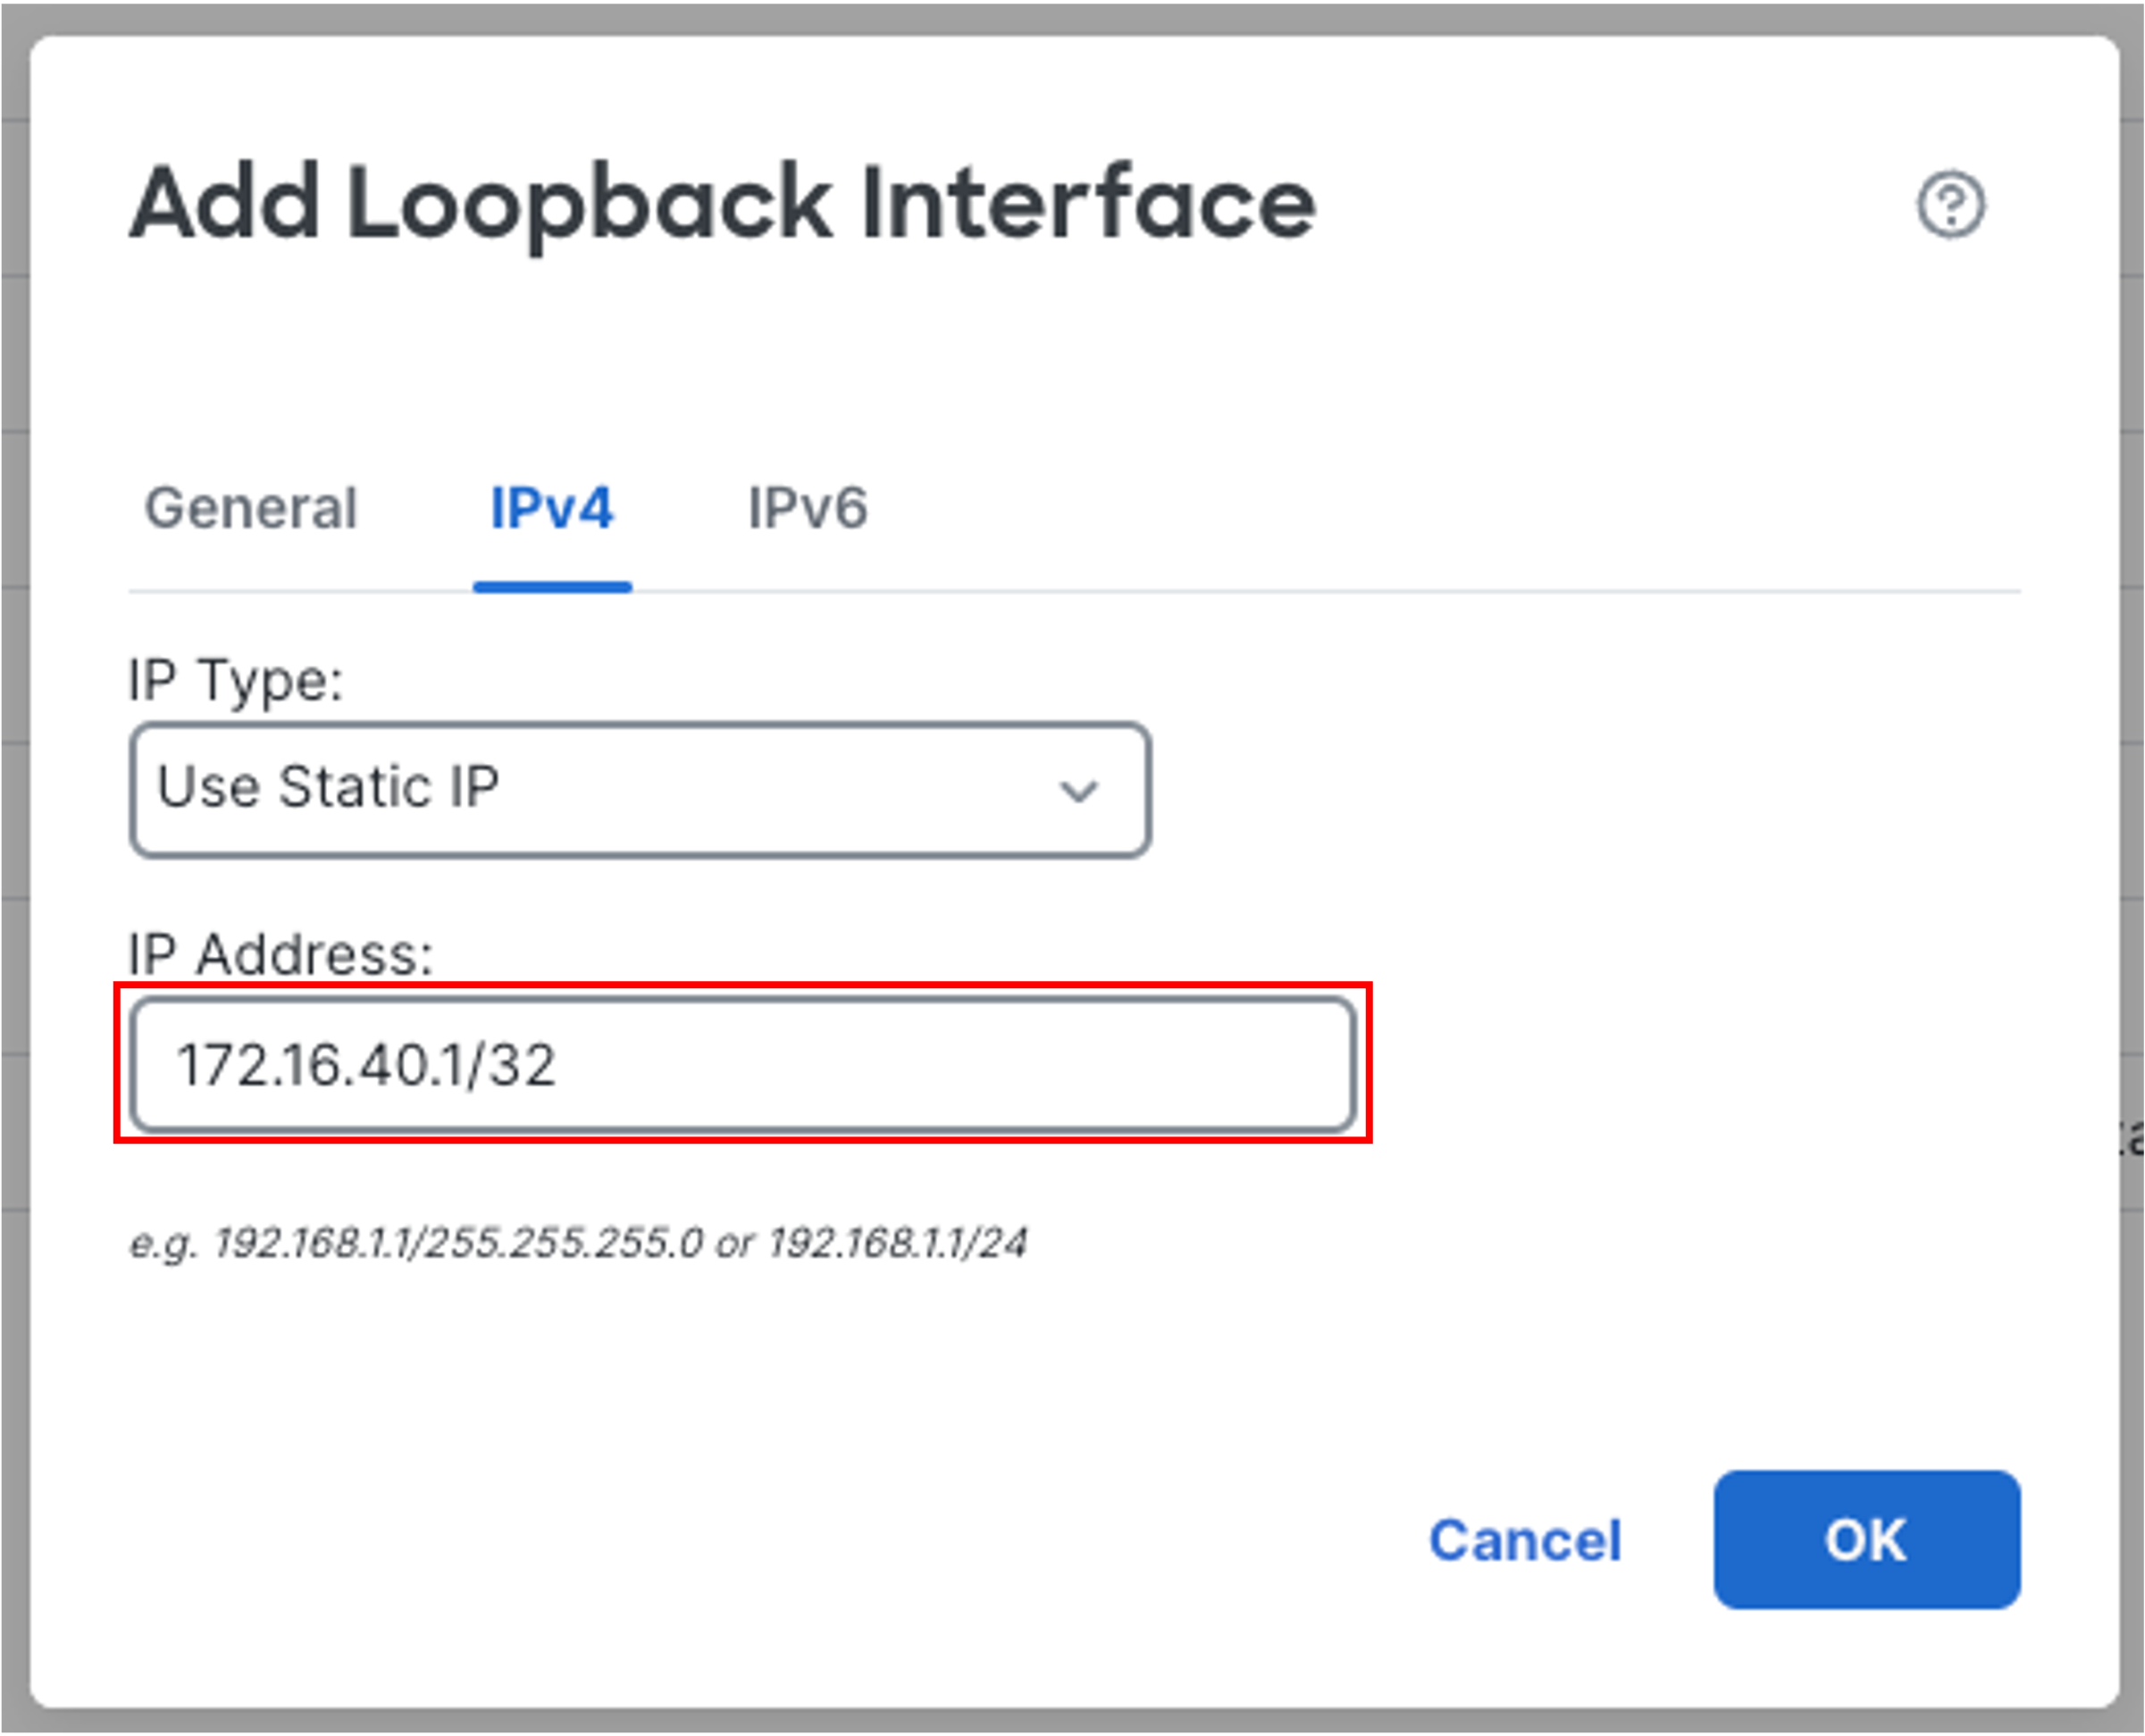
-
-
Click on Save and then click Deploy in the upper-right.
-
Click Deploy All and wait till it's complete.
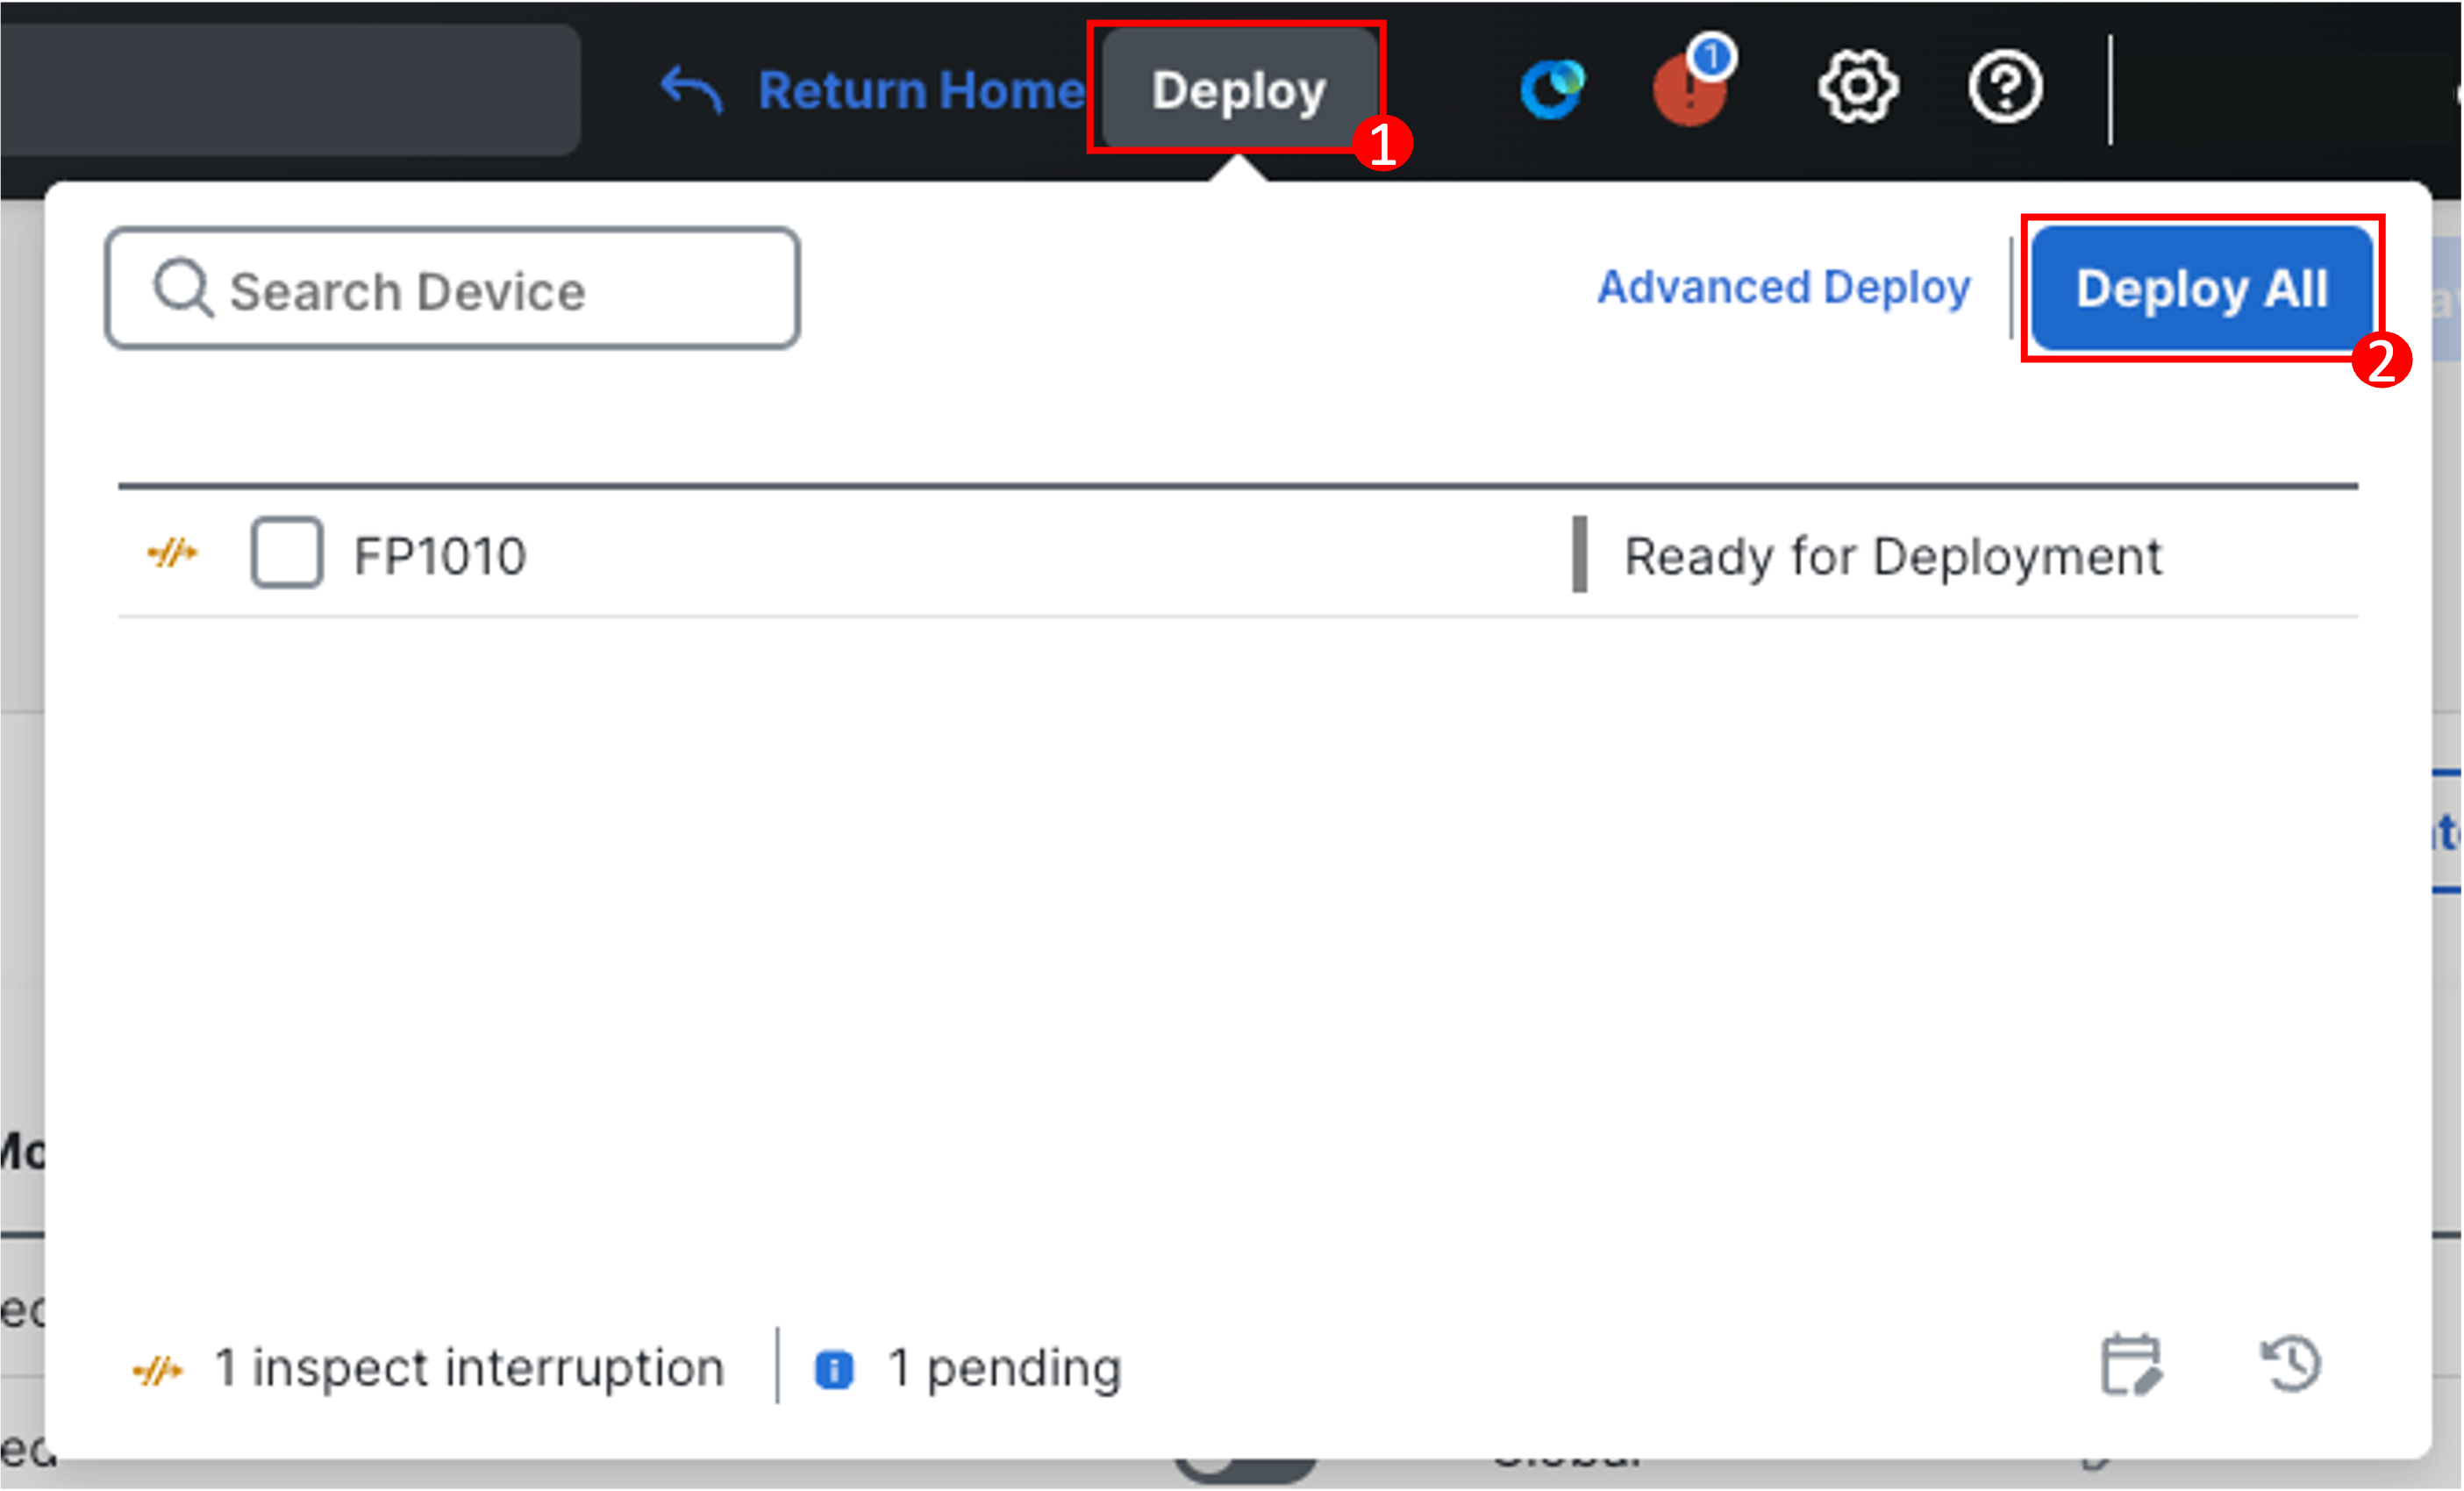
Warning
- If you face any warnings during deploy, check the Ignore warnings checkmark and hit Deploy again.
- Wait until the deployment is complete before proceeding further.
Task 4 - Connect to VPN from Workstation and Verify Connectivity
-
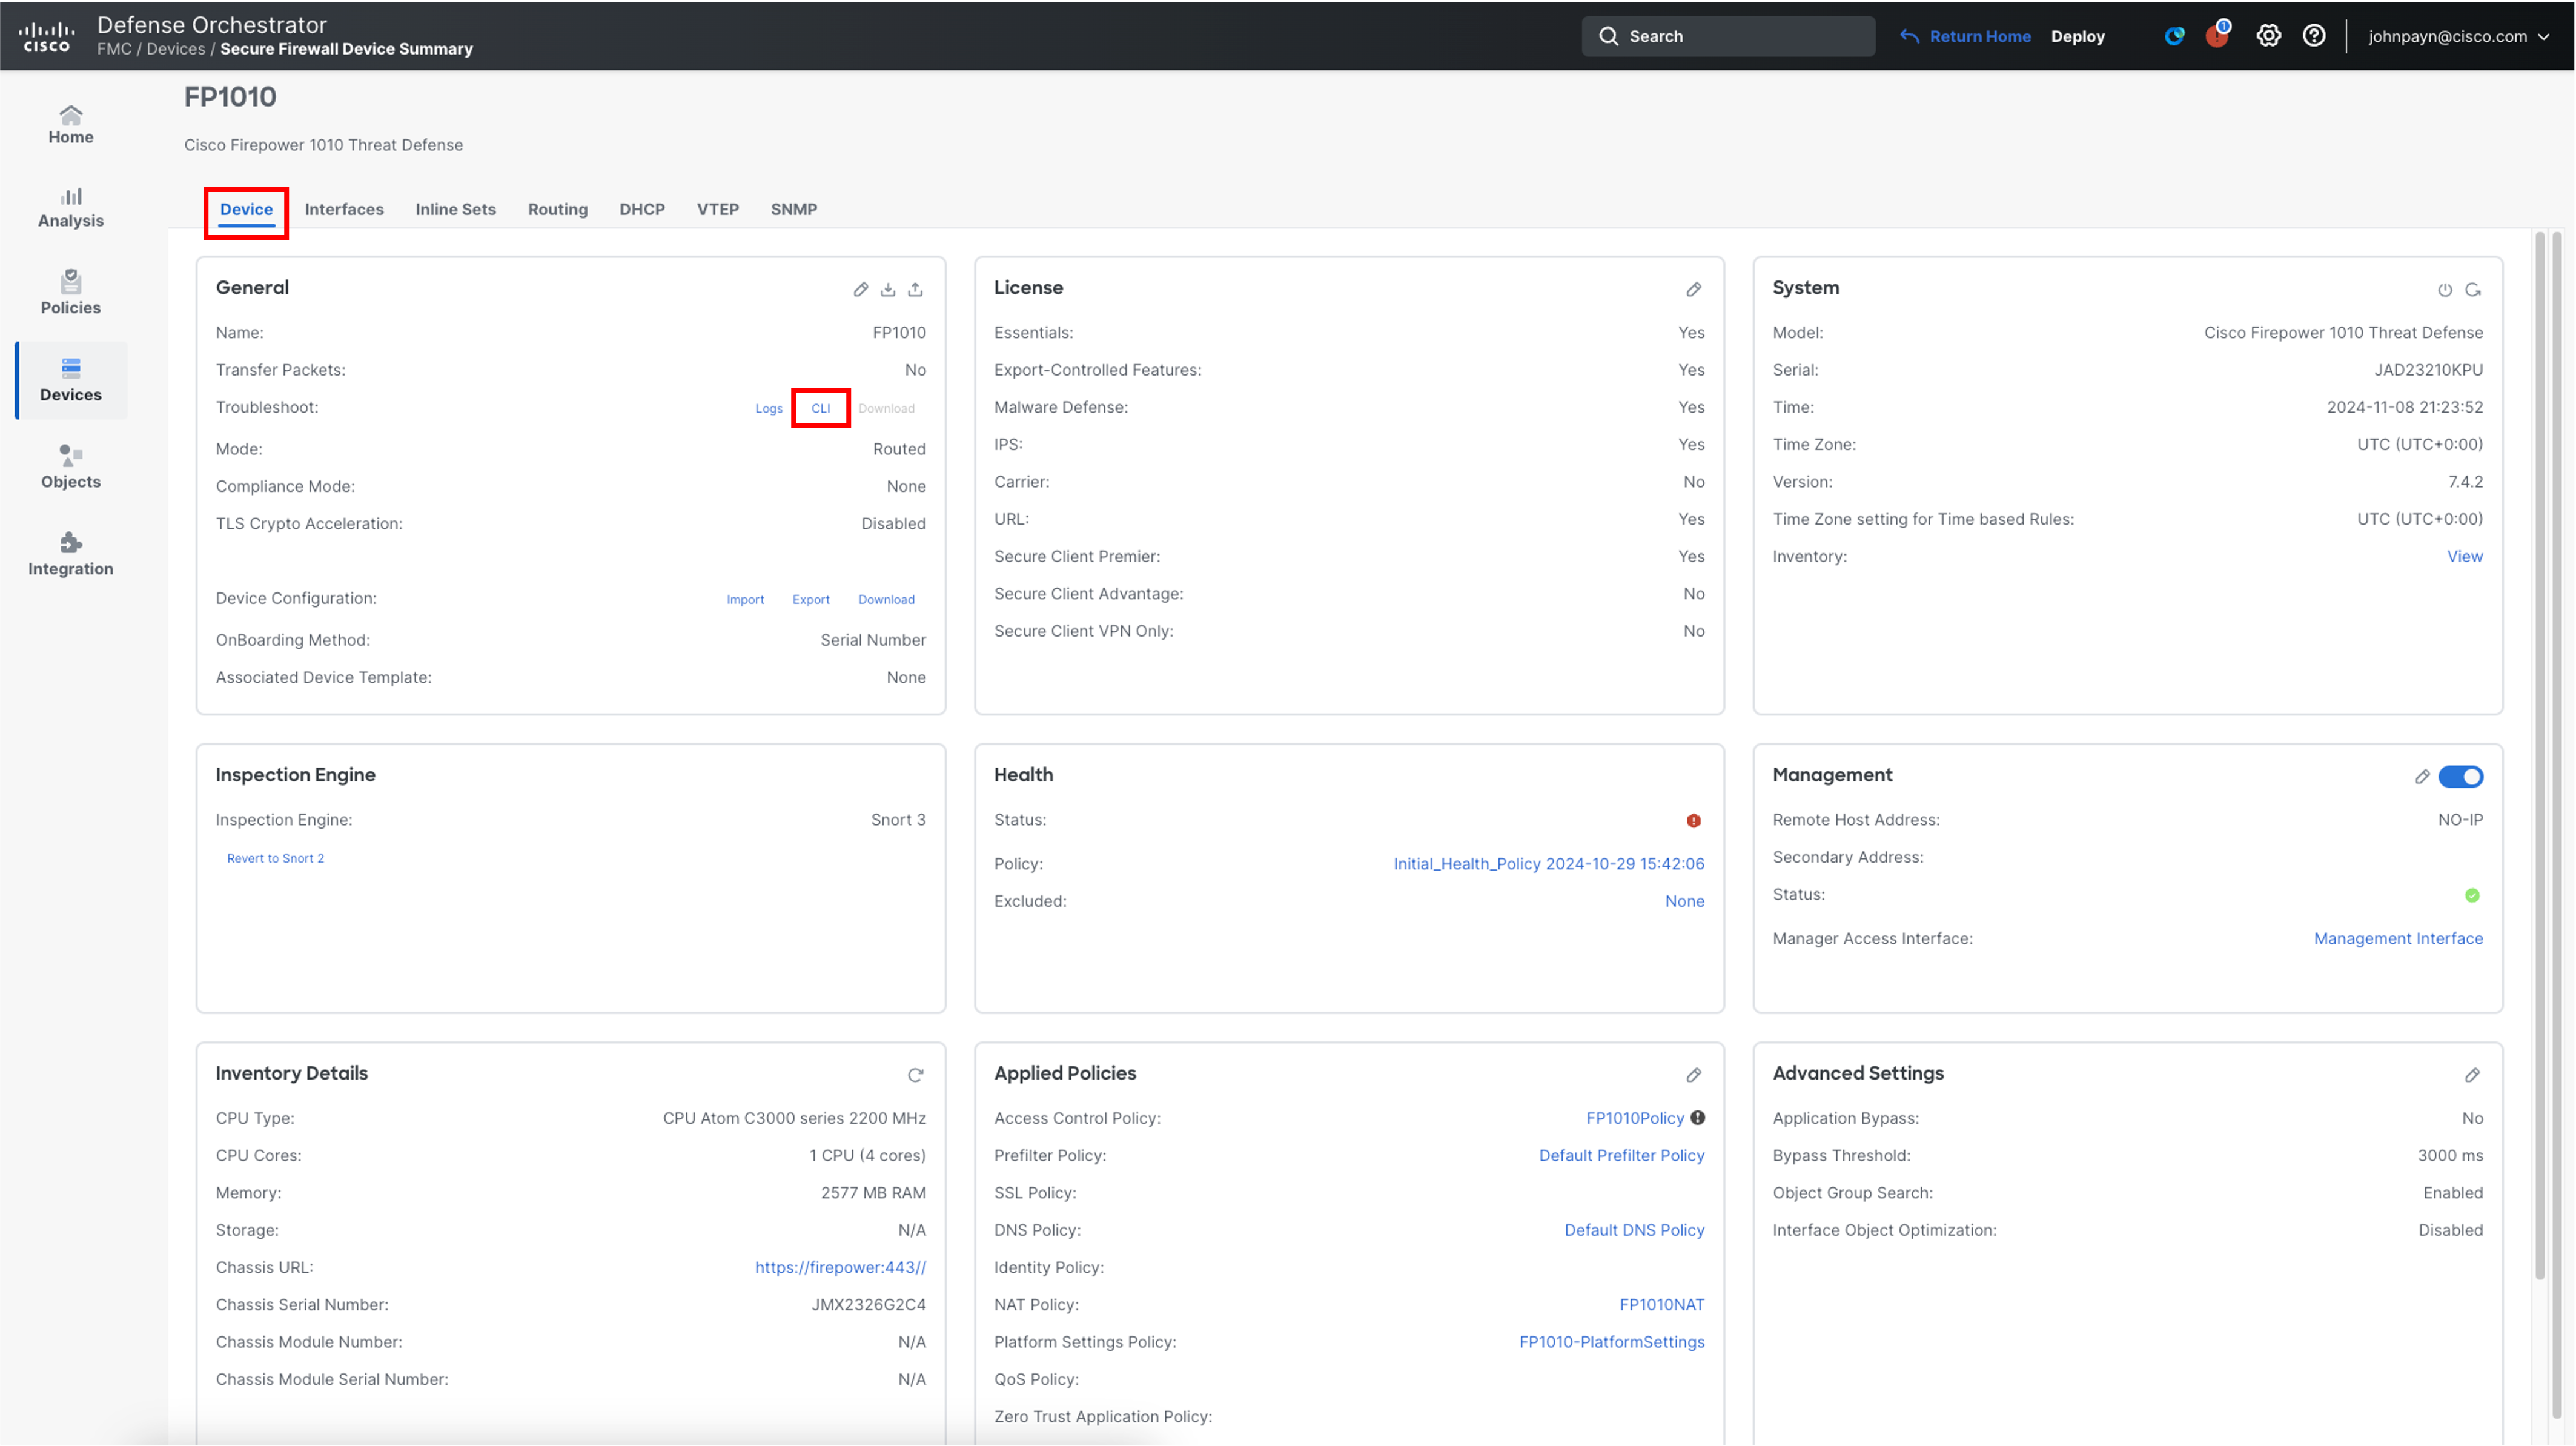
Before connecting to the VPN, you have to note down the IP Address of the outside interface of your Firepower 1010. To do that navigate to the Device > Device Managment > FP1010 and click on the pencil icon on the far right.
-
Click the Device Tab and then click the CLI button under General Widget.
-
Type the command show interface ip brief and click on Execute.
Then note down the IP Address of Ethernet1/1 which is the outside interface.
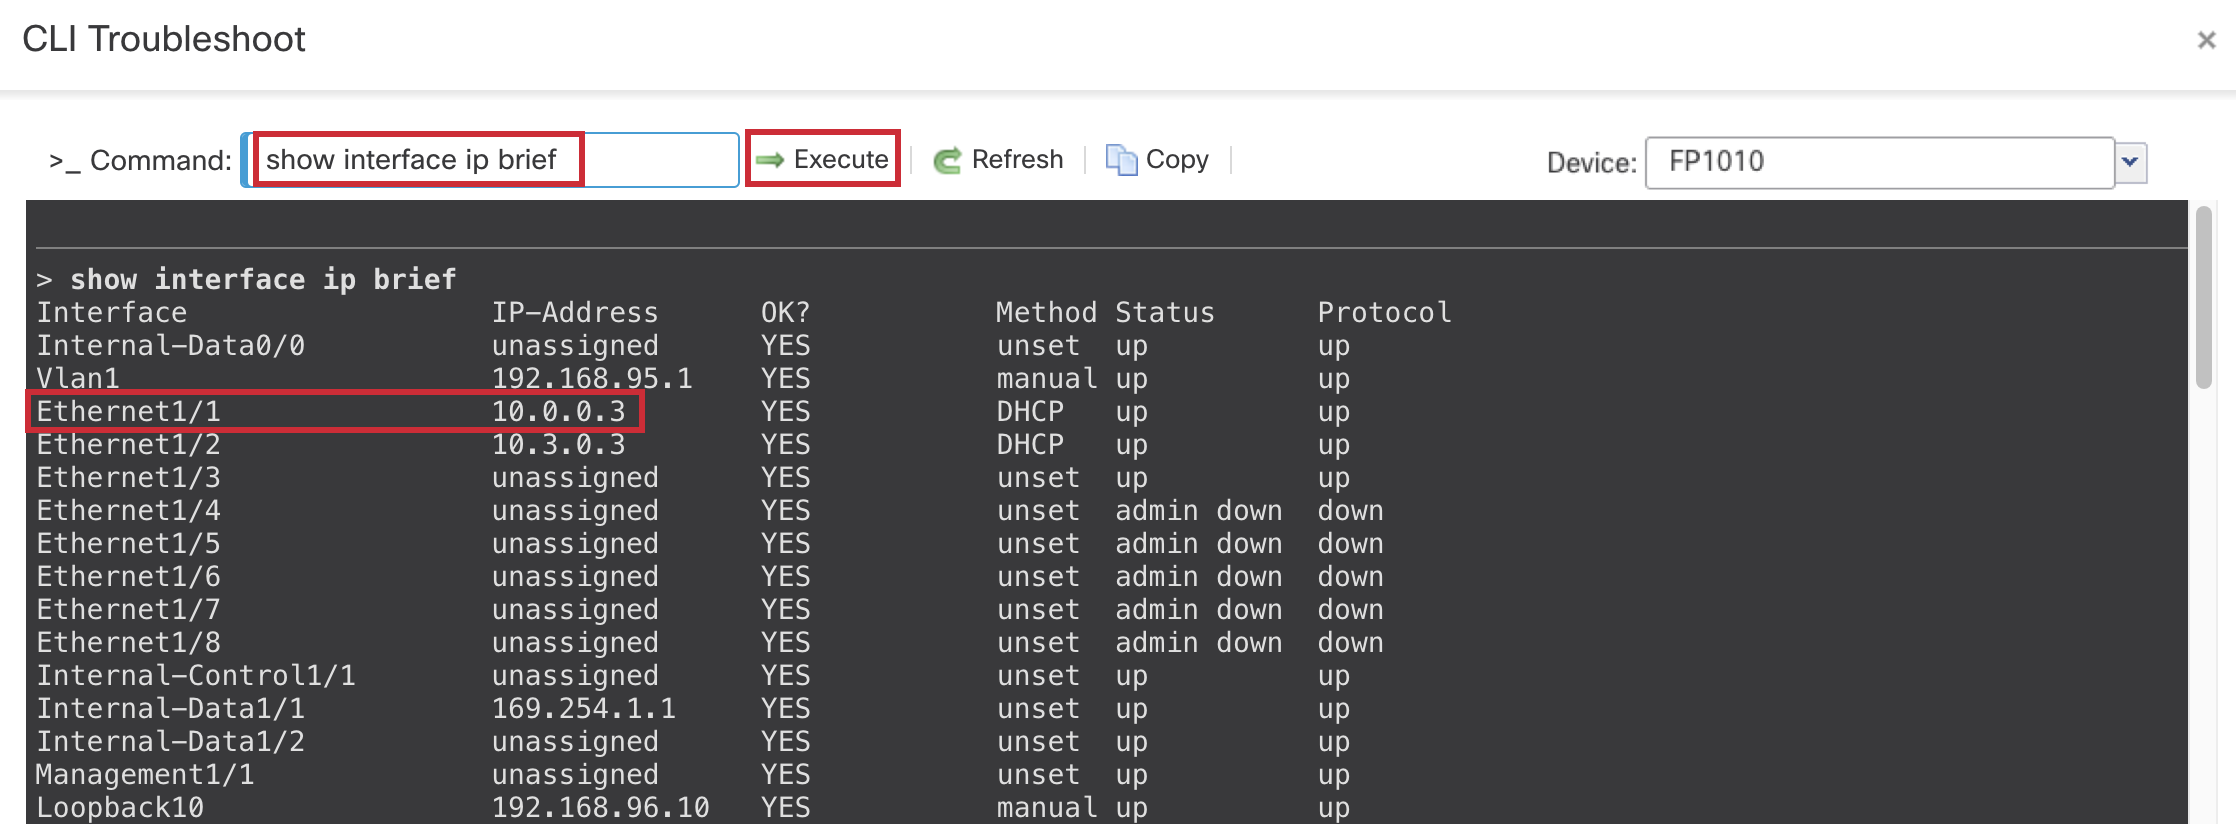
IP Address of your outside interface may differ. Carefully note it down.
- Once the IP address is confirmed, on your local workstation (not the dcloud workstation/jumpbox), open the Start menu, then search for Cisco Secure Client and open it. This step is showing the sample output from the Windows based workstation. Steps will vary for MAC based workstations.
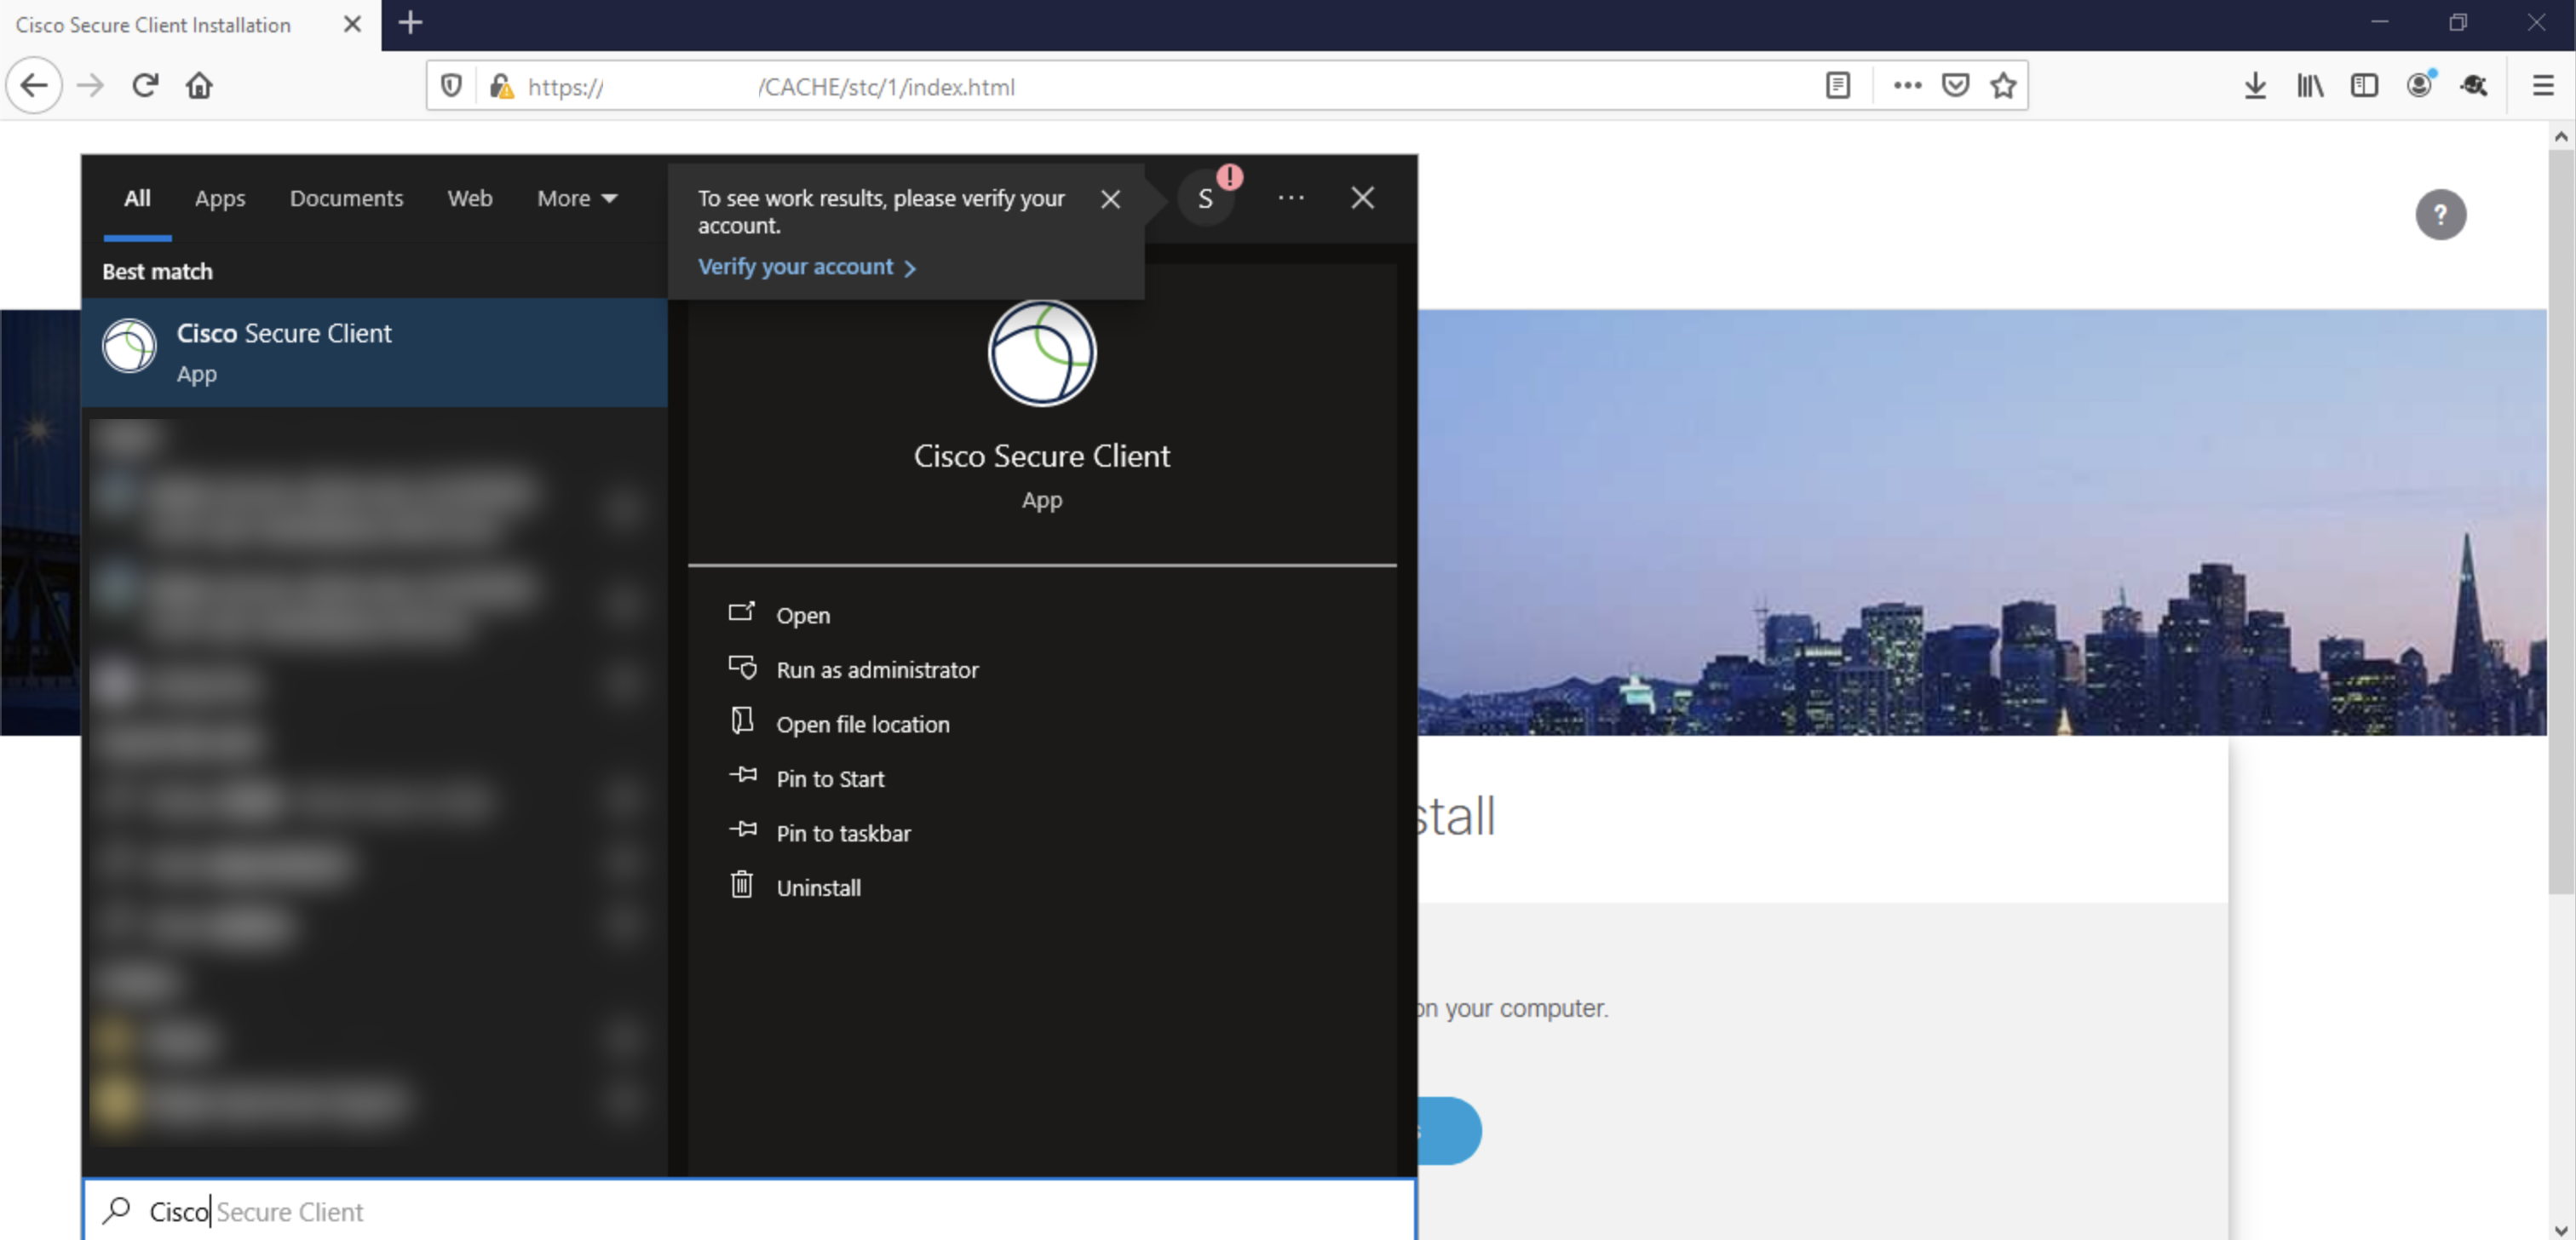
If Cisco Secure Client is not installed, follow the installation steps below:
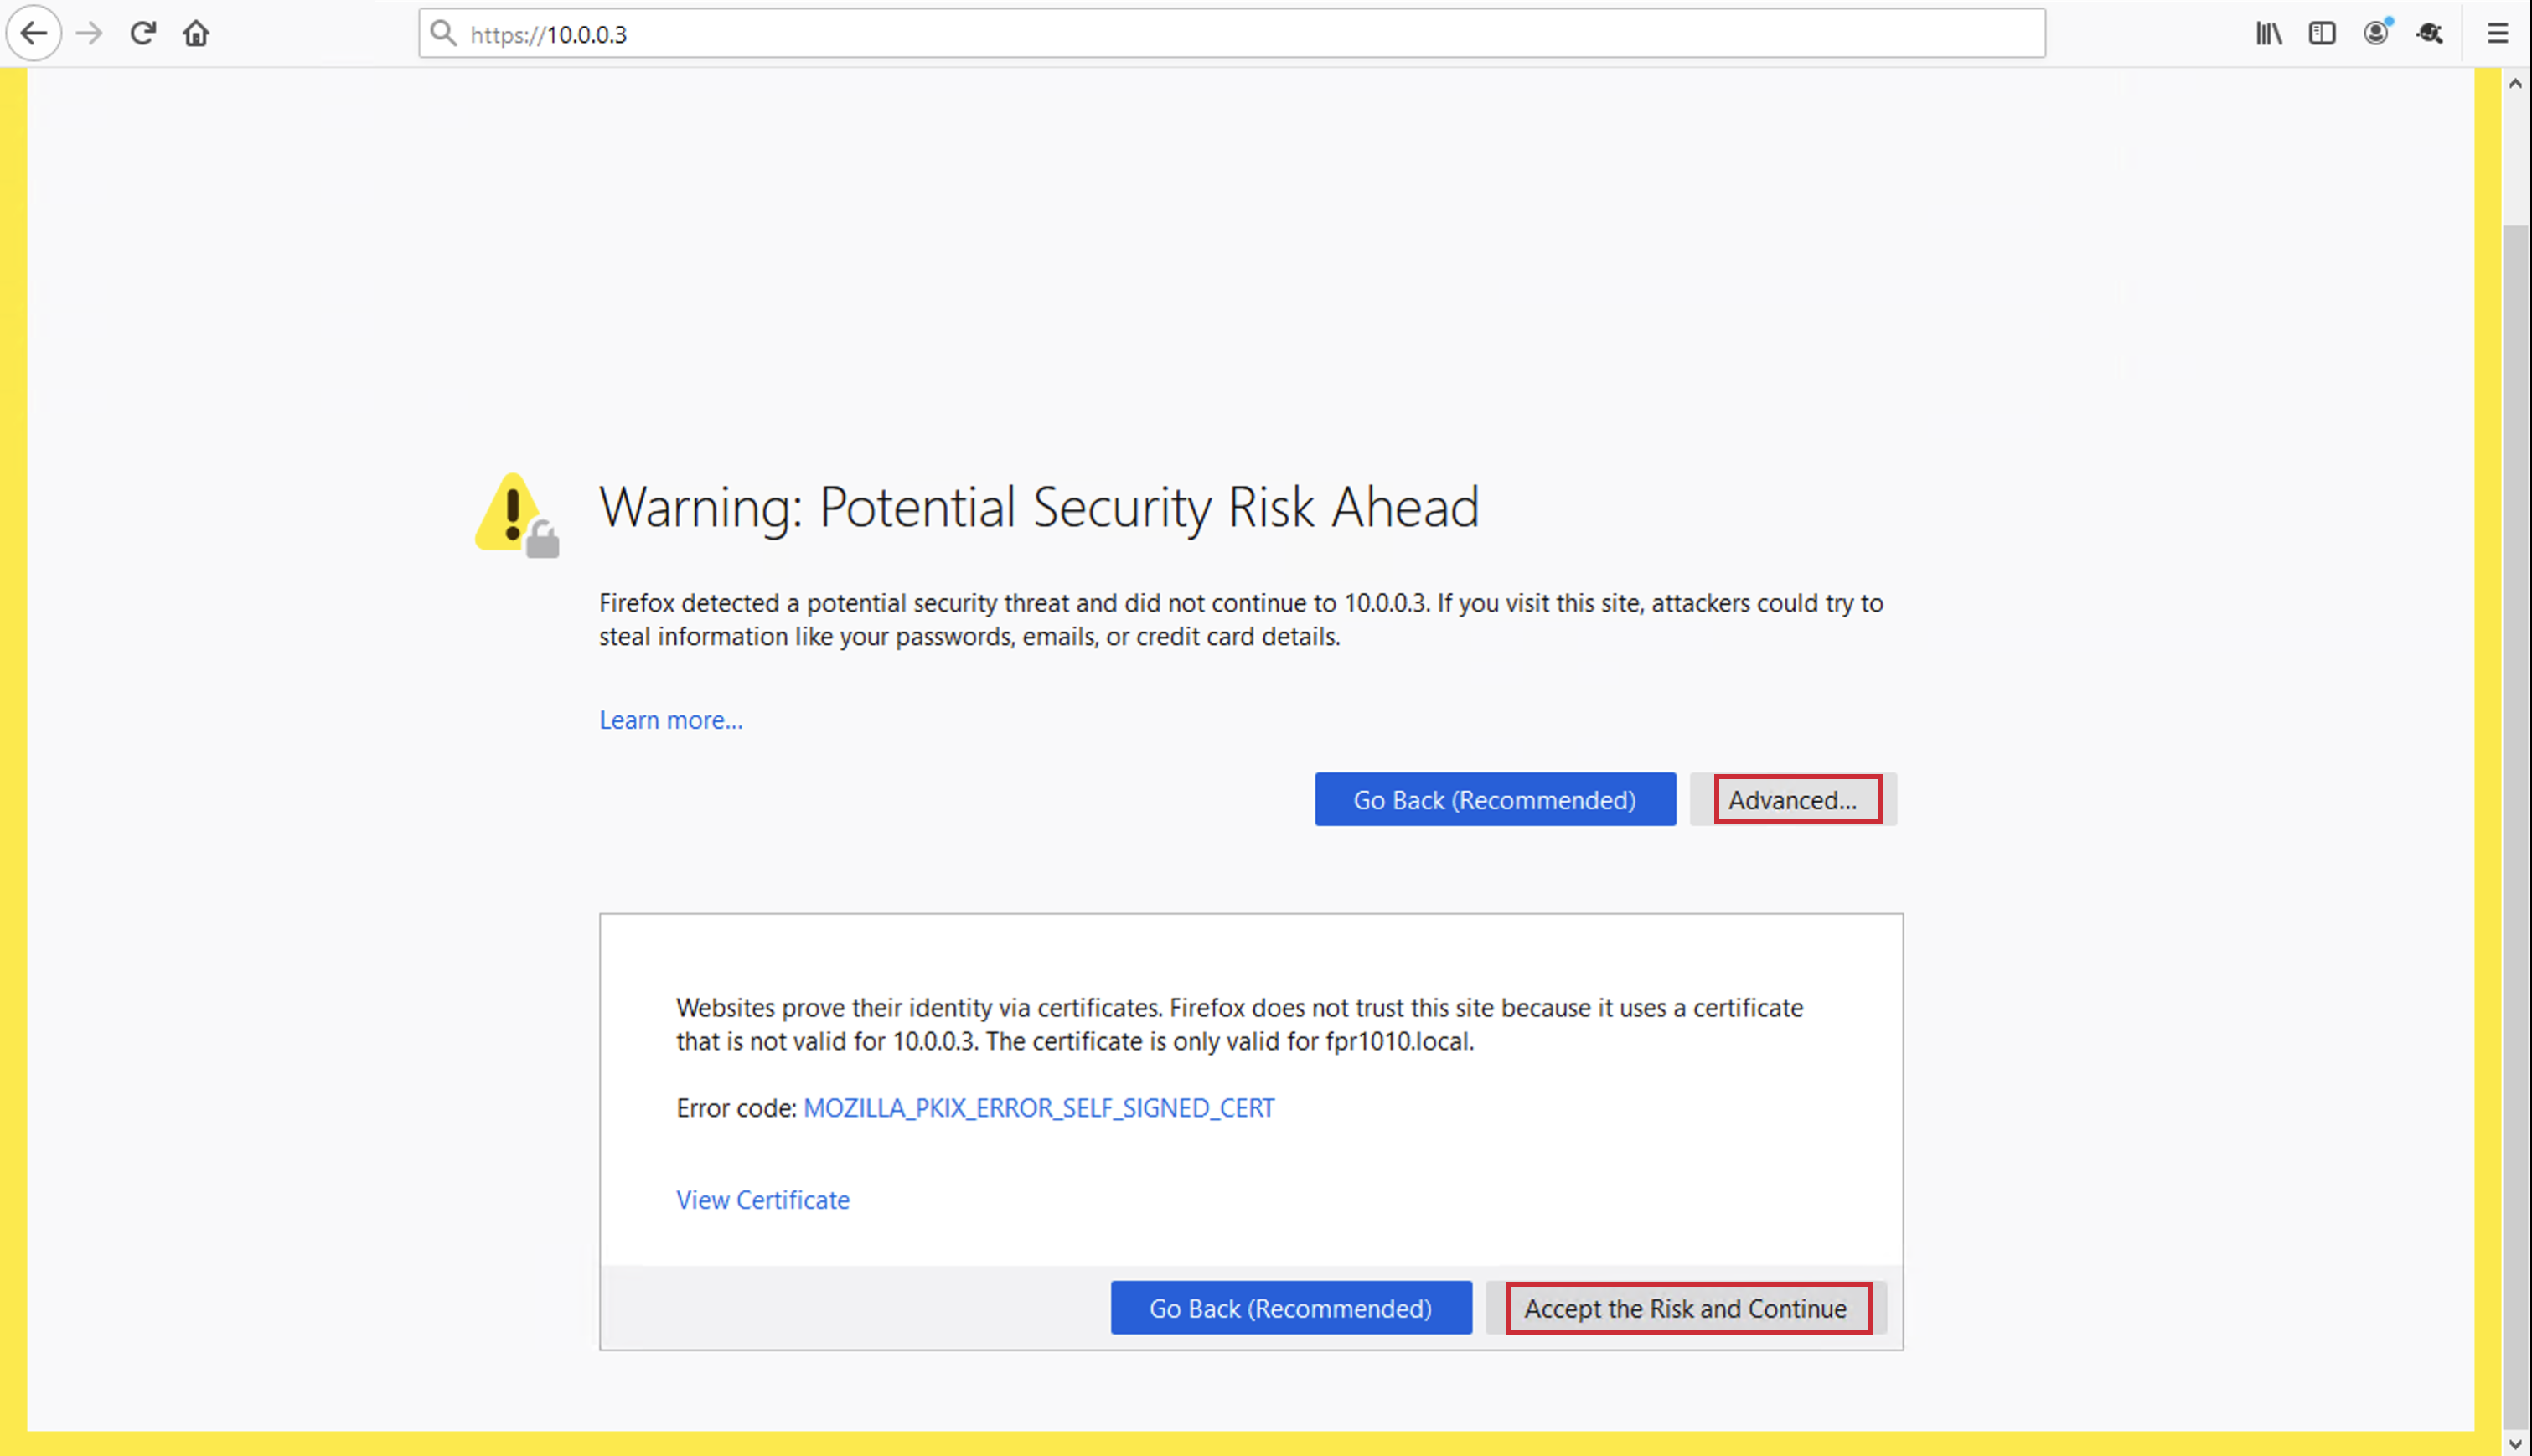
Open your preferred browser and enter https://10.0.0.3(replace with your outside interface IP address).
Since this is a lab environment and a self-signed certificate was enrolled during RAVPN configuration, click on Advanced option of the warning page and click Accept the Risk and Continue to proceed.
Enter the user credentials created in the Local Realm before:
- Username: user1
- Password: C1sco12345!
- Then click Logon

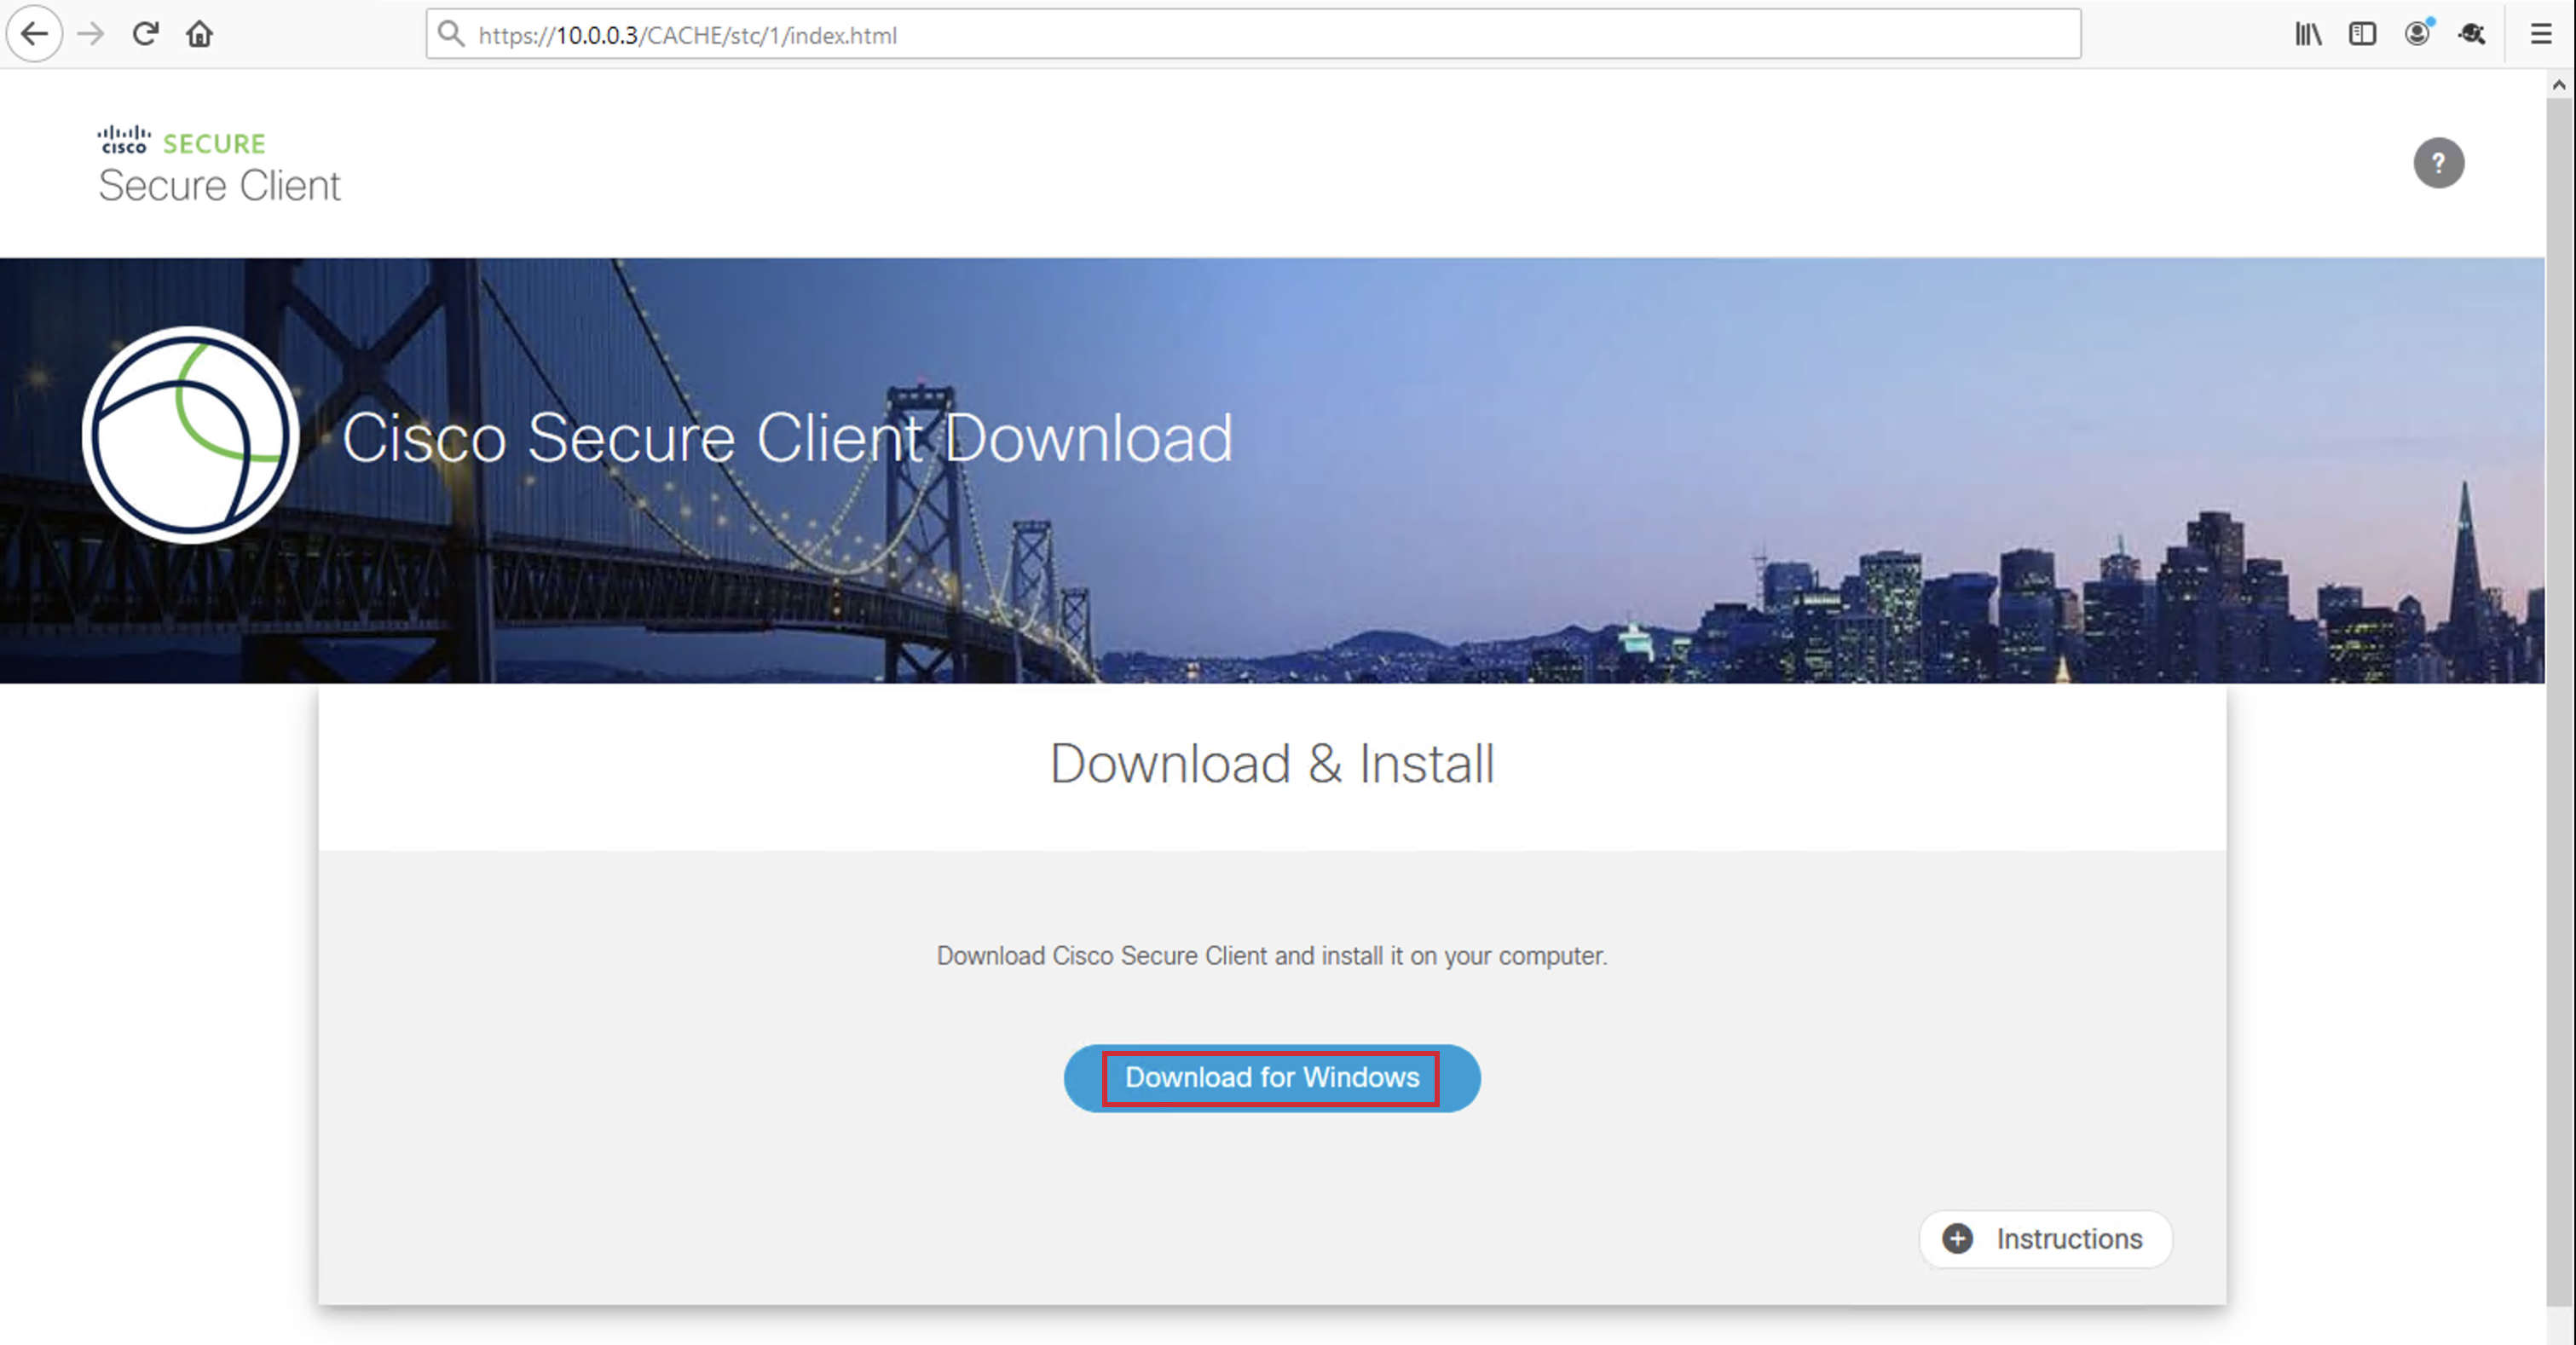
Press the Download for Windows button which will download the installation file. Open the installation file and Accept & Agree for every privilege request and follow the wizard.
-
Before connecting to the VPN:
-
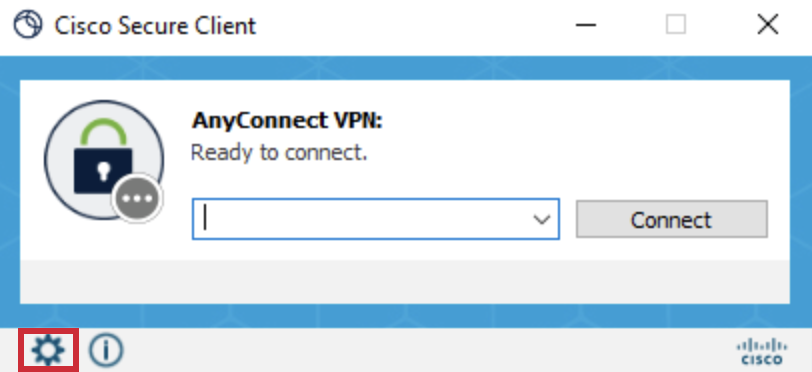
Click on the Preferences icon:
-
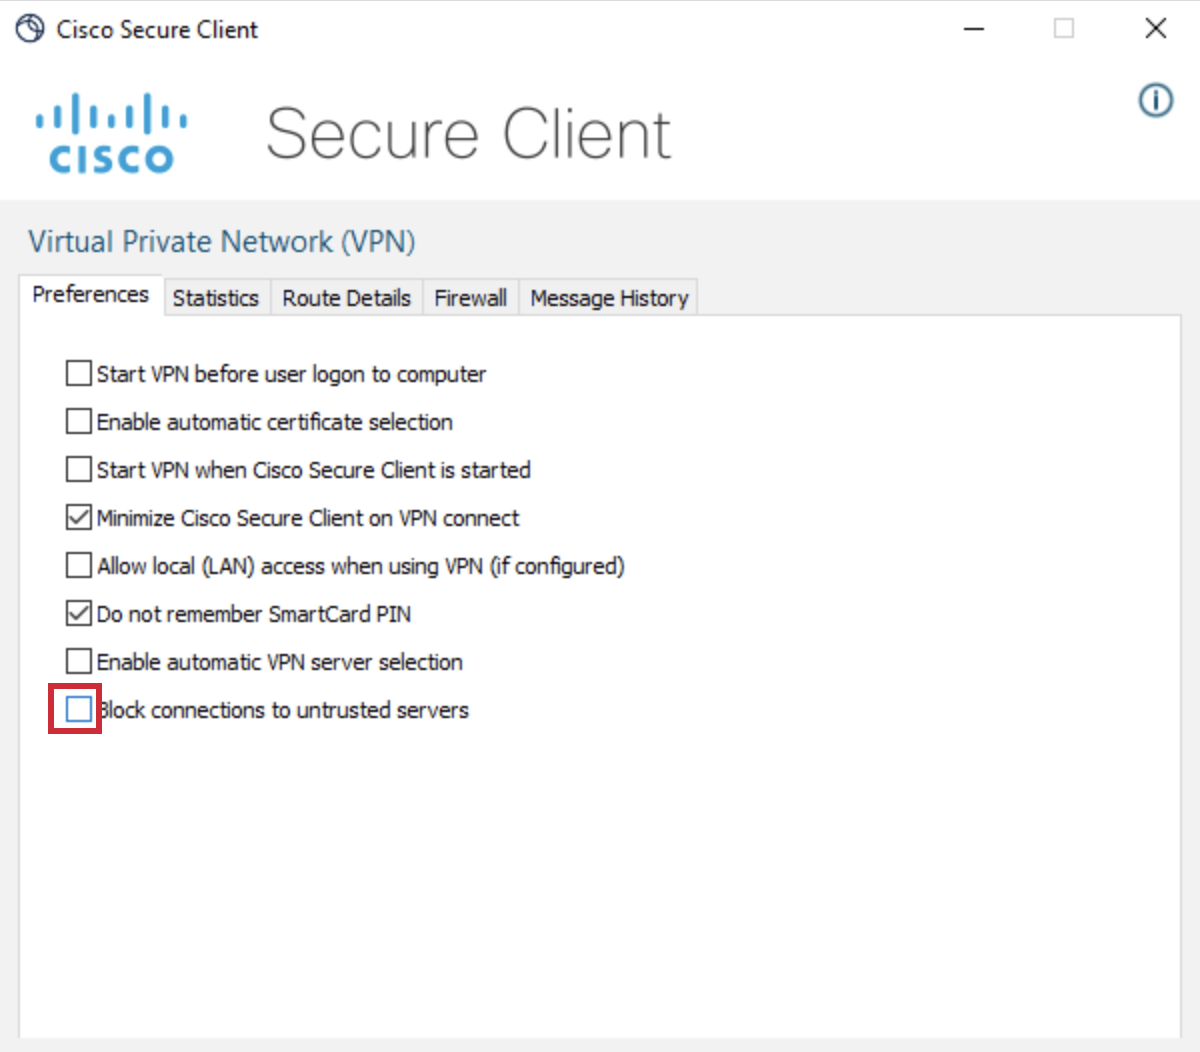
Uncheck the Block connections to untrusted servers option then proceed by closing the window.
-
-
Connect to the IP Address of outside interface that was noted down before. Alternatively, connect to fpr1010.local as long as your workstation resolves it to the IP address of your outside interface.
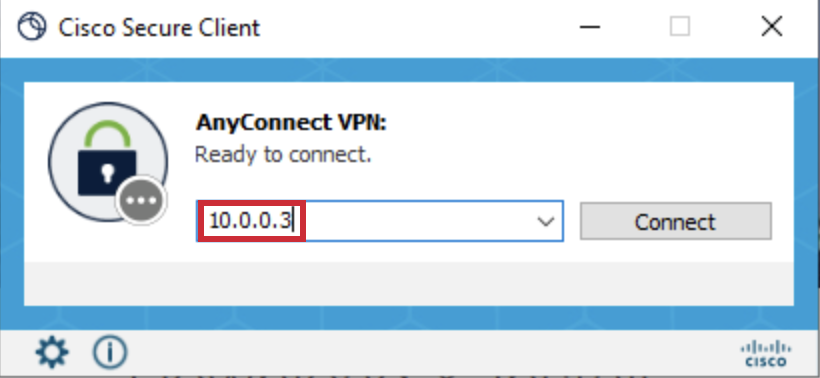
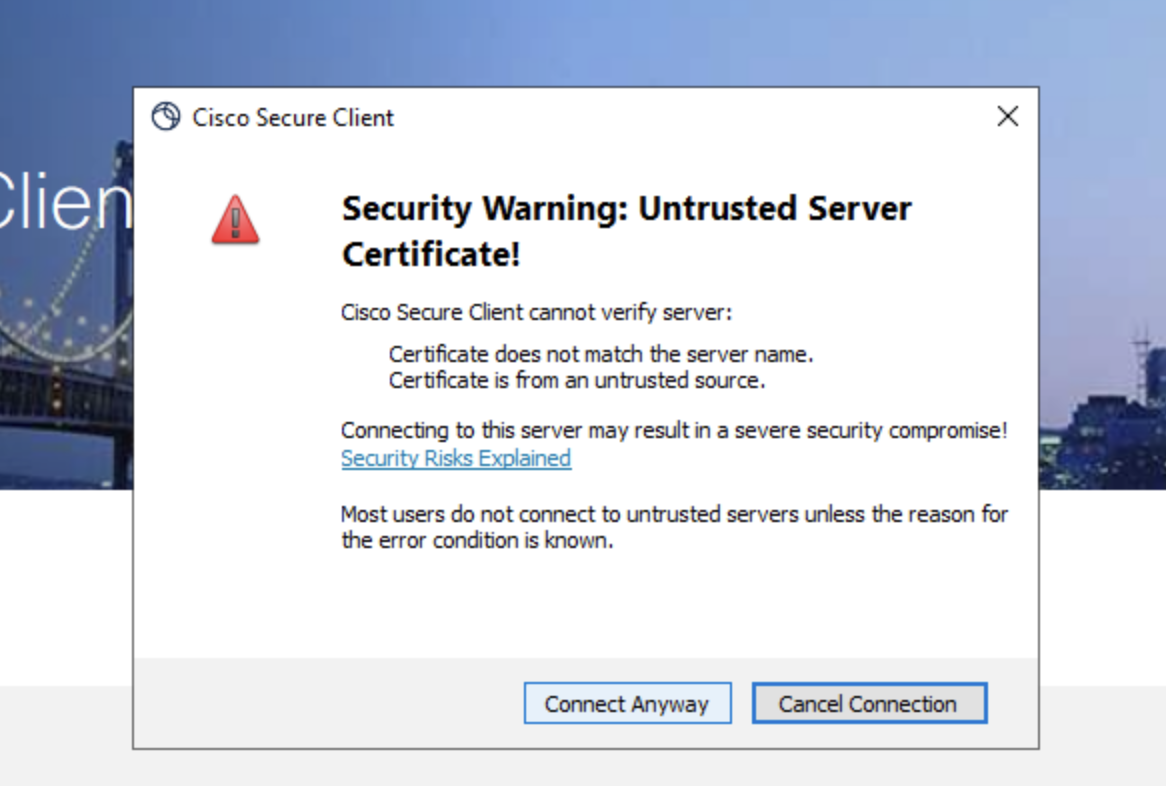
- Since this is a lab environment, the Self-Signed Certificate is Enrolled for the RAVPN will show a warning message before making the connection. Click on Connect Anyway to proceed.
In production network, it is recommended to use a certificate issued by known CA.
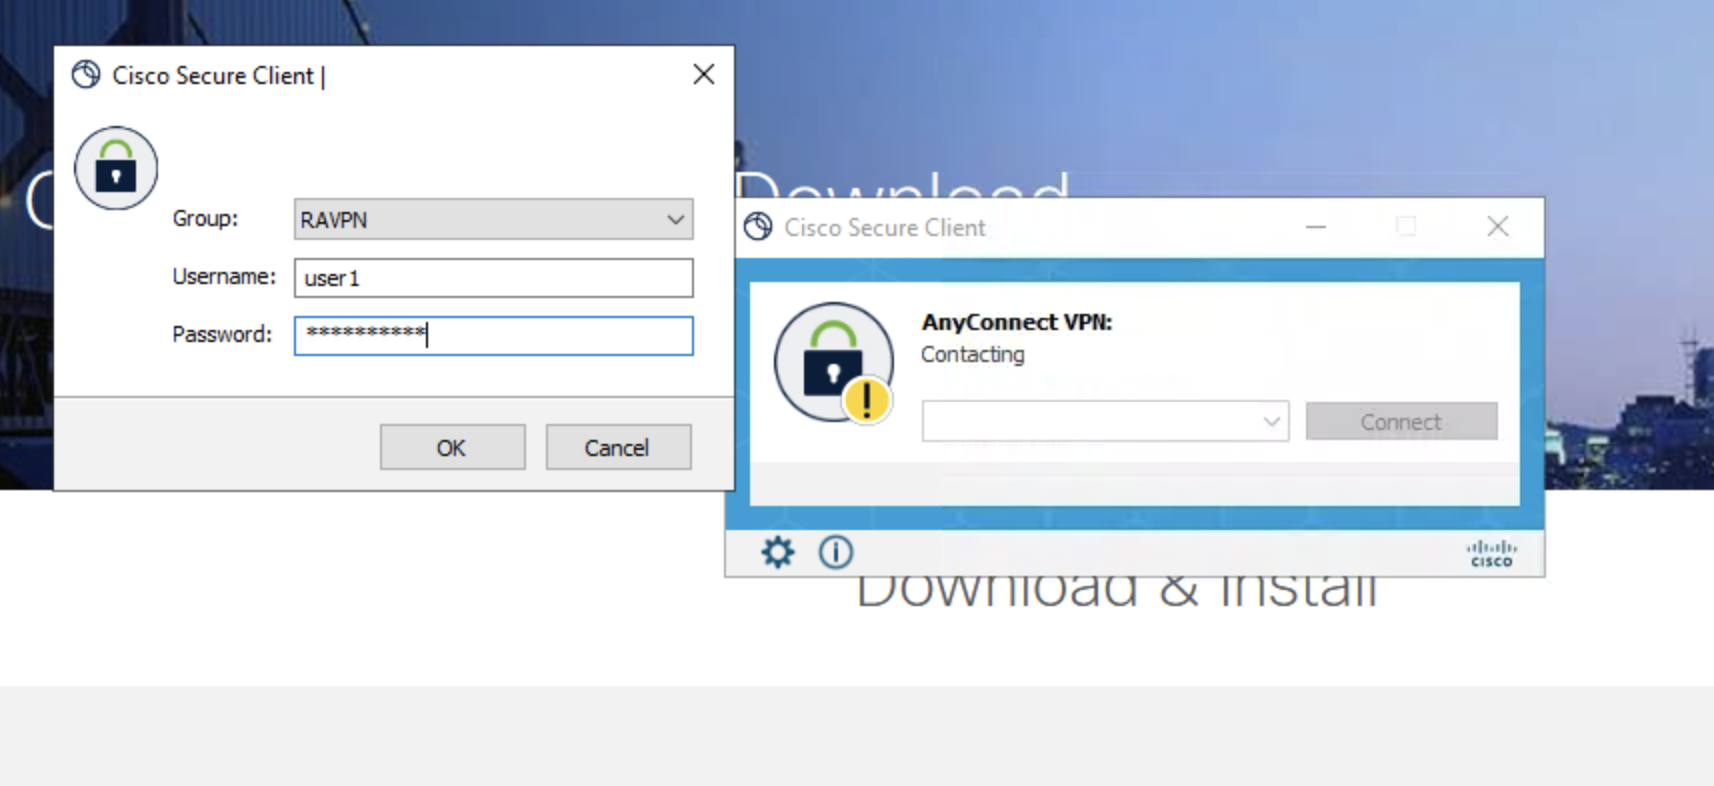
- Enter the user credentials created in the Local Realm before:
- Username: user1
- Password: C1sco12345!
- Then click OK.
-
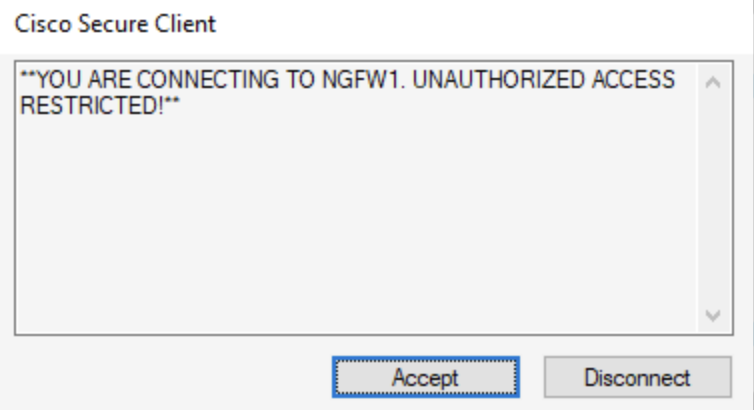
Notice that the Banner Text configured in the Group Policy is displayed here. Click on Accept to proceed.
Note
Click on Connect Anyway again if you face any warning
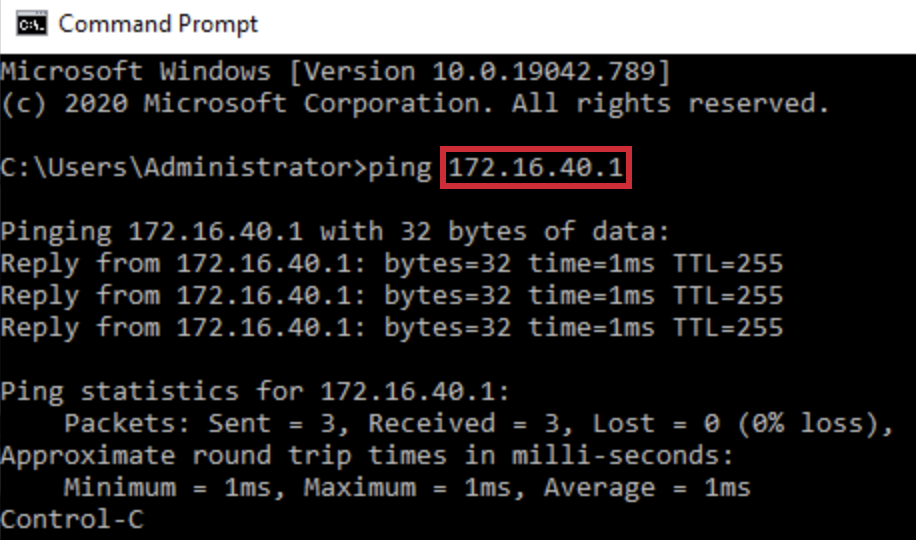
- Open Command Prompt and ping the IP Address of RAVPN-Loopback Interface which is 172.16.40.1 to verify that configured RAVPN is working.
Task 5 - Take a tour of the RAVPN Dashboard
-
Click on Return Home to go back to the Security Cloud Control homepage.
-
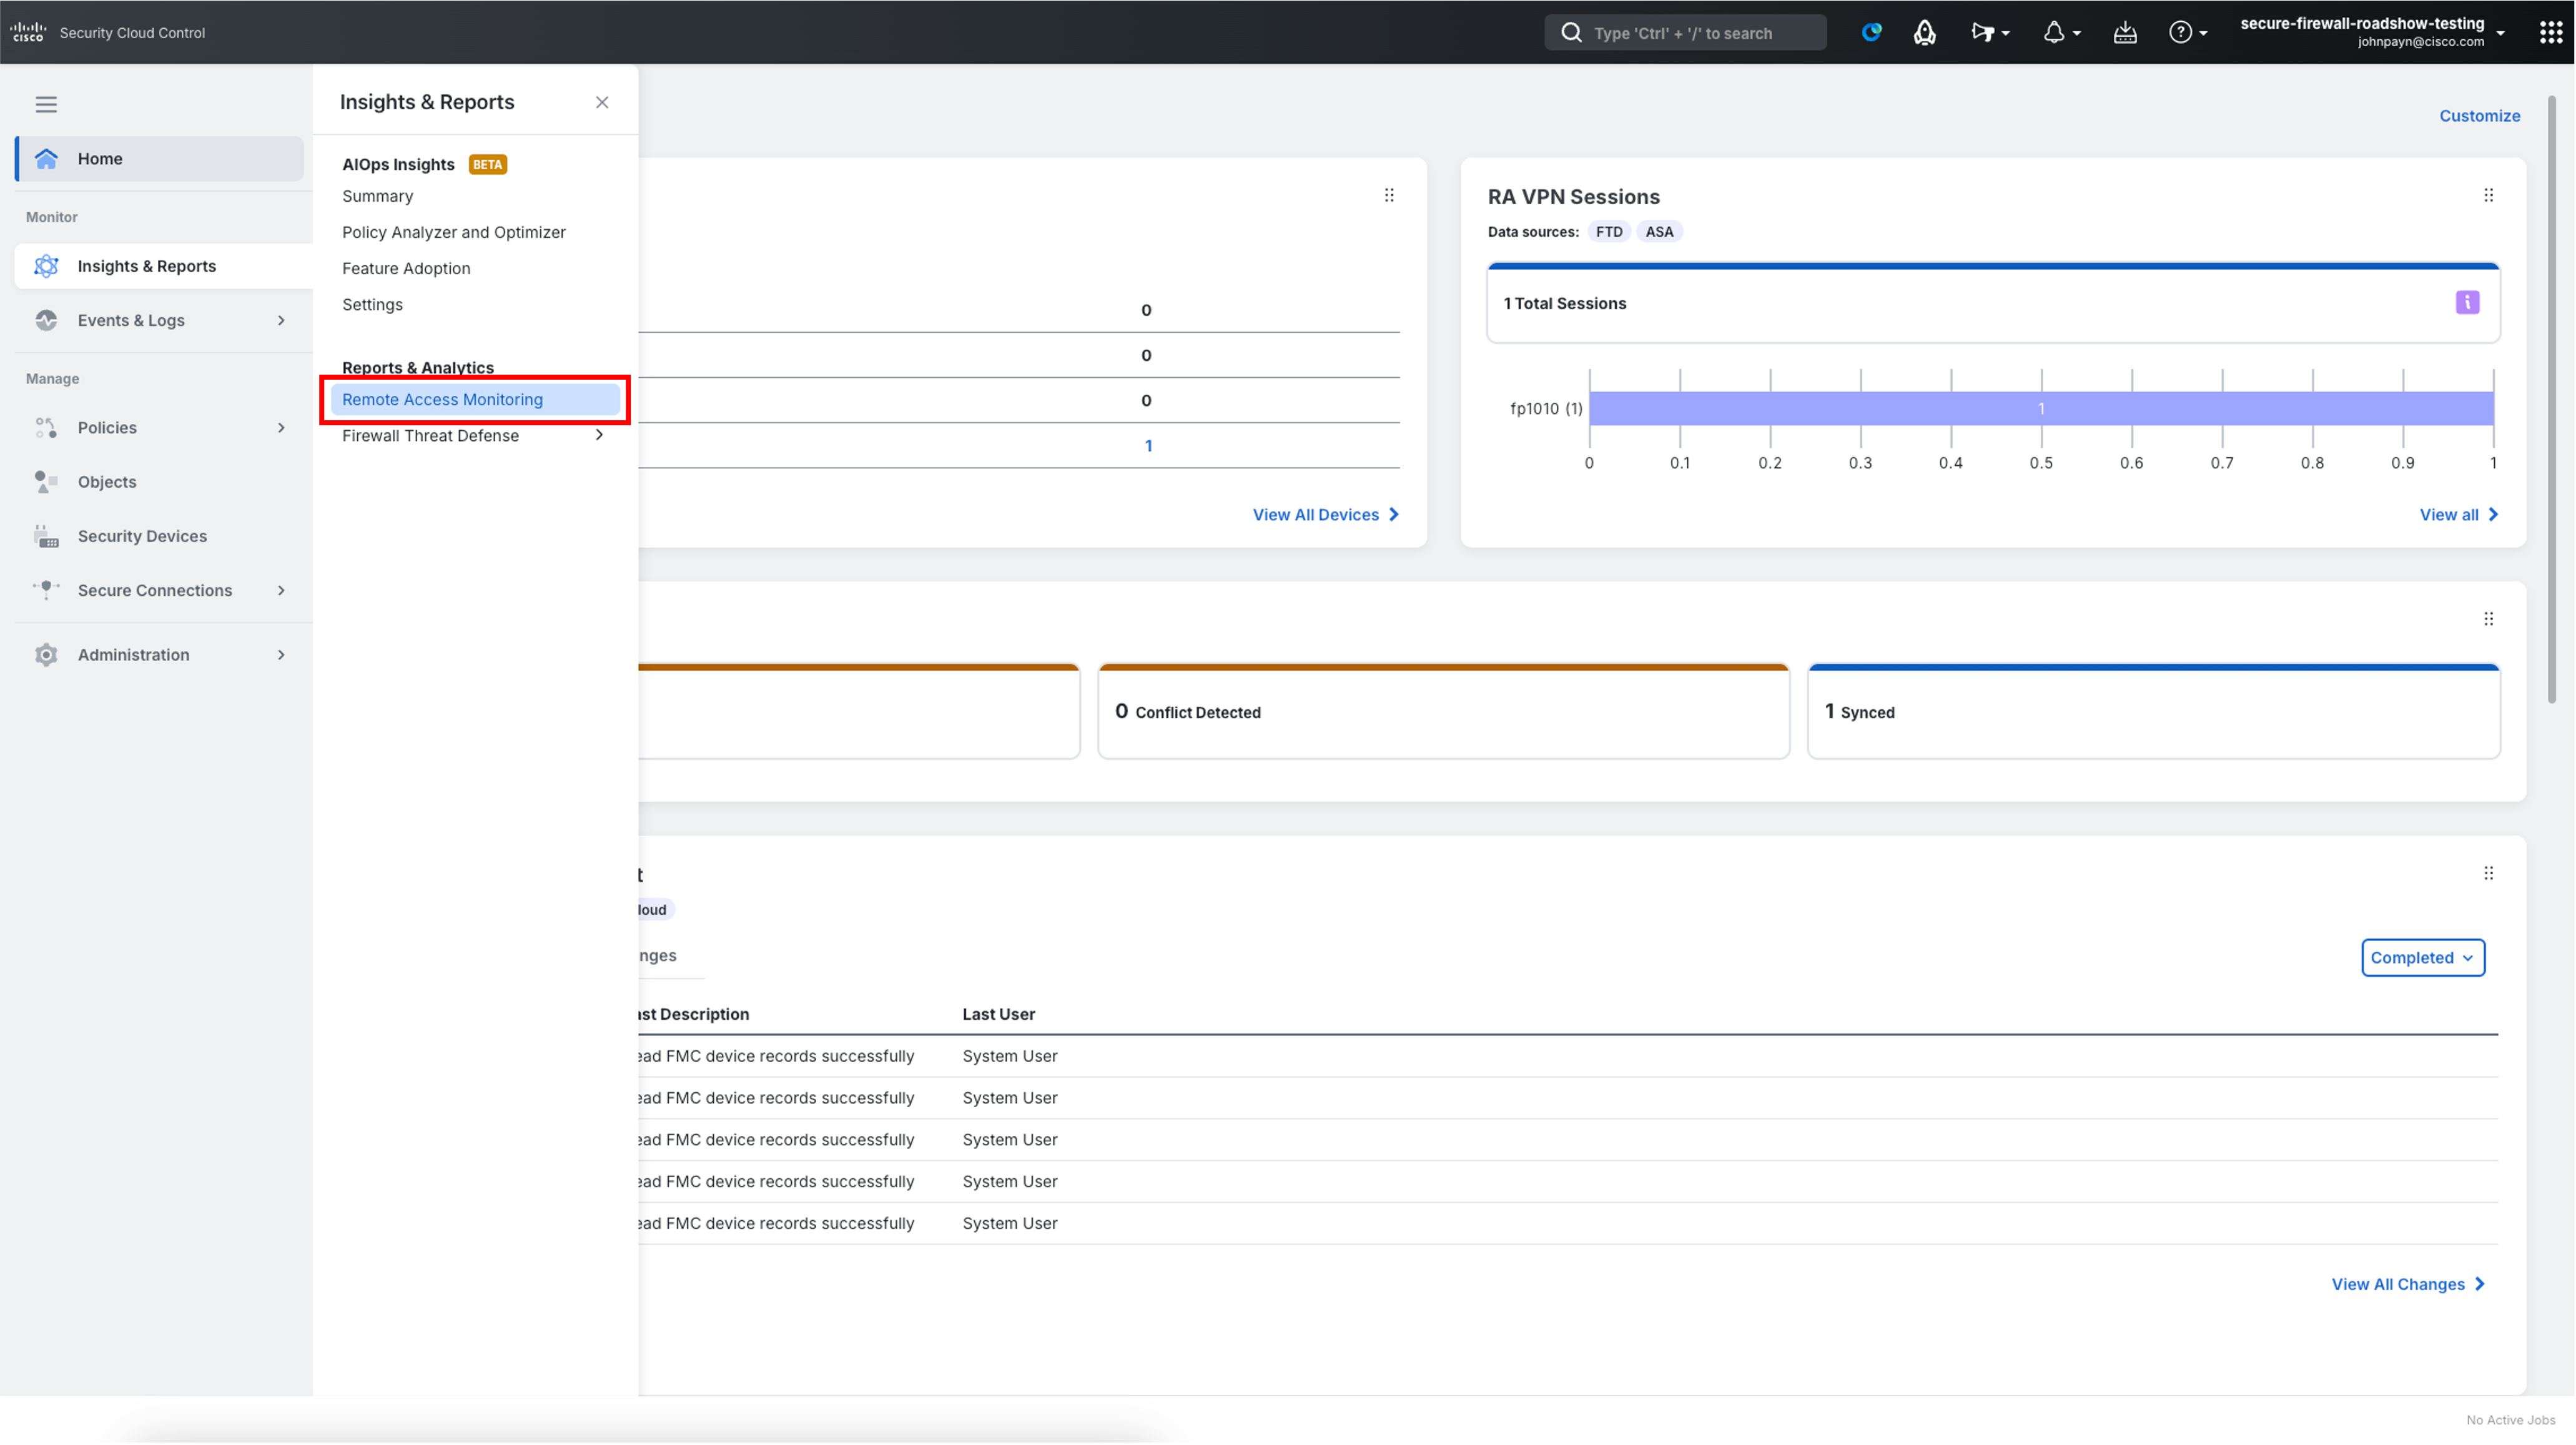
Using theleft bar navigate to Insights & Reports > Remote Access Monitoring.
-
Notice that user1 active connection is listed with details like Status, Device Name, Assigned IP(v4), Login Time, Duration, Data TX, Data RX, Location.
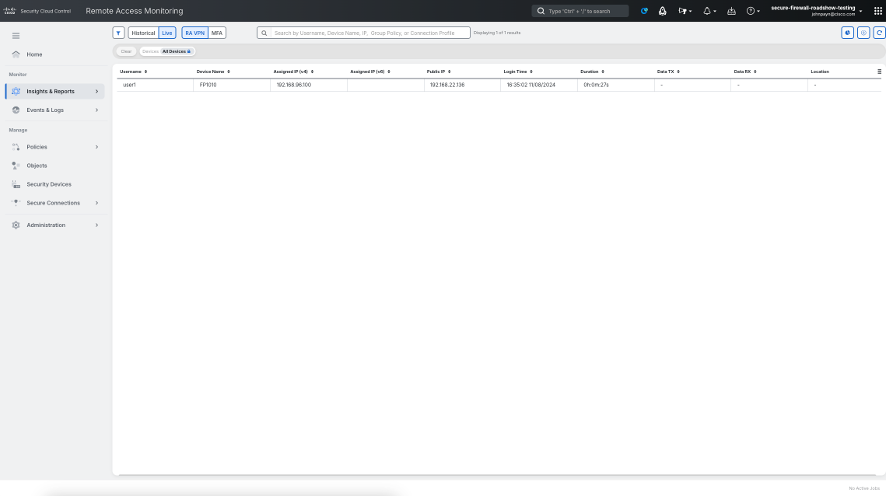
If the connection is not visible immediately, make sure to refresh the page after few minutes.
-
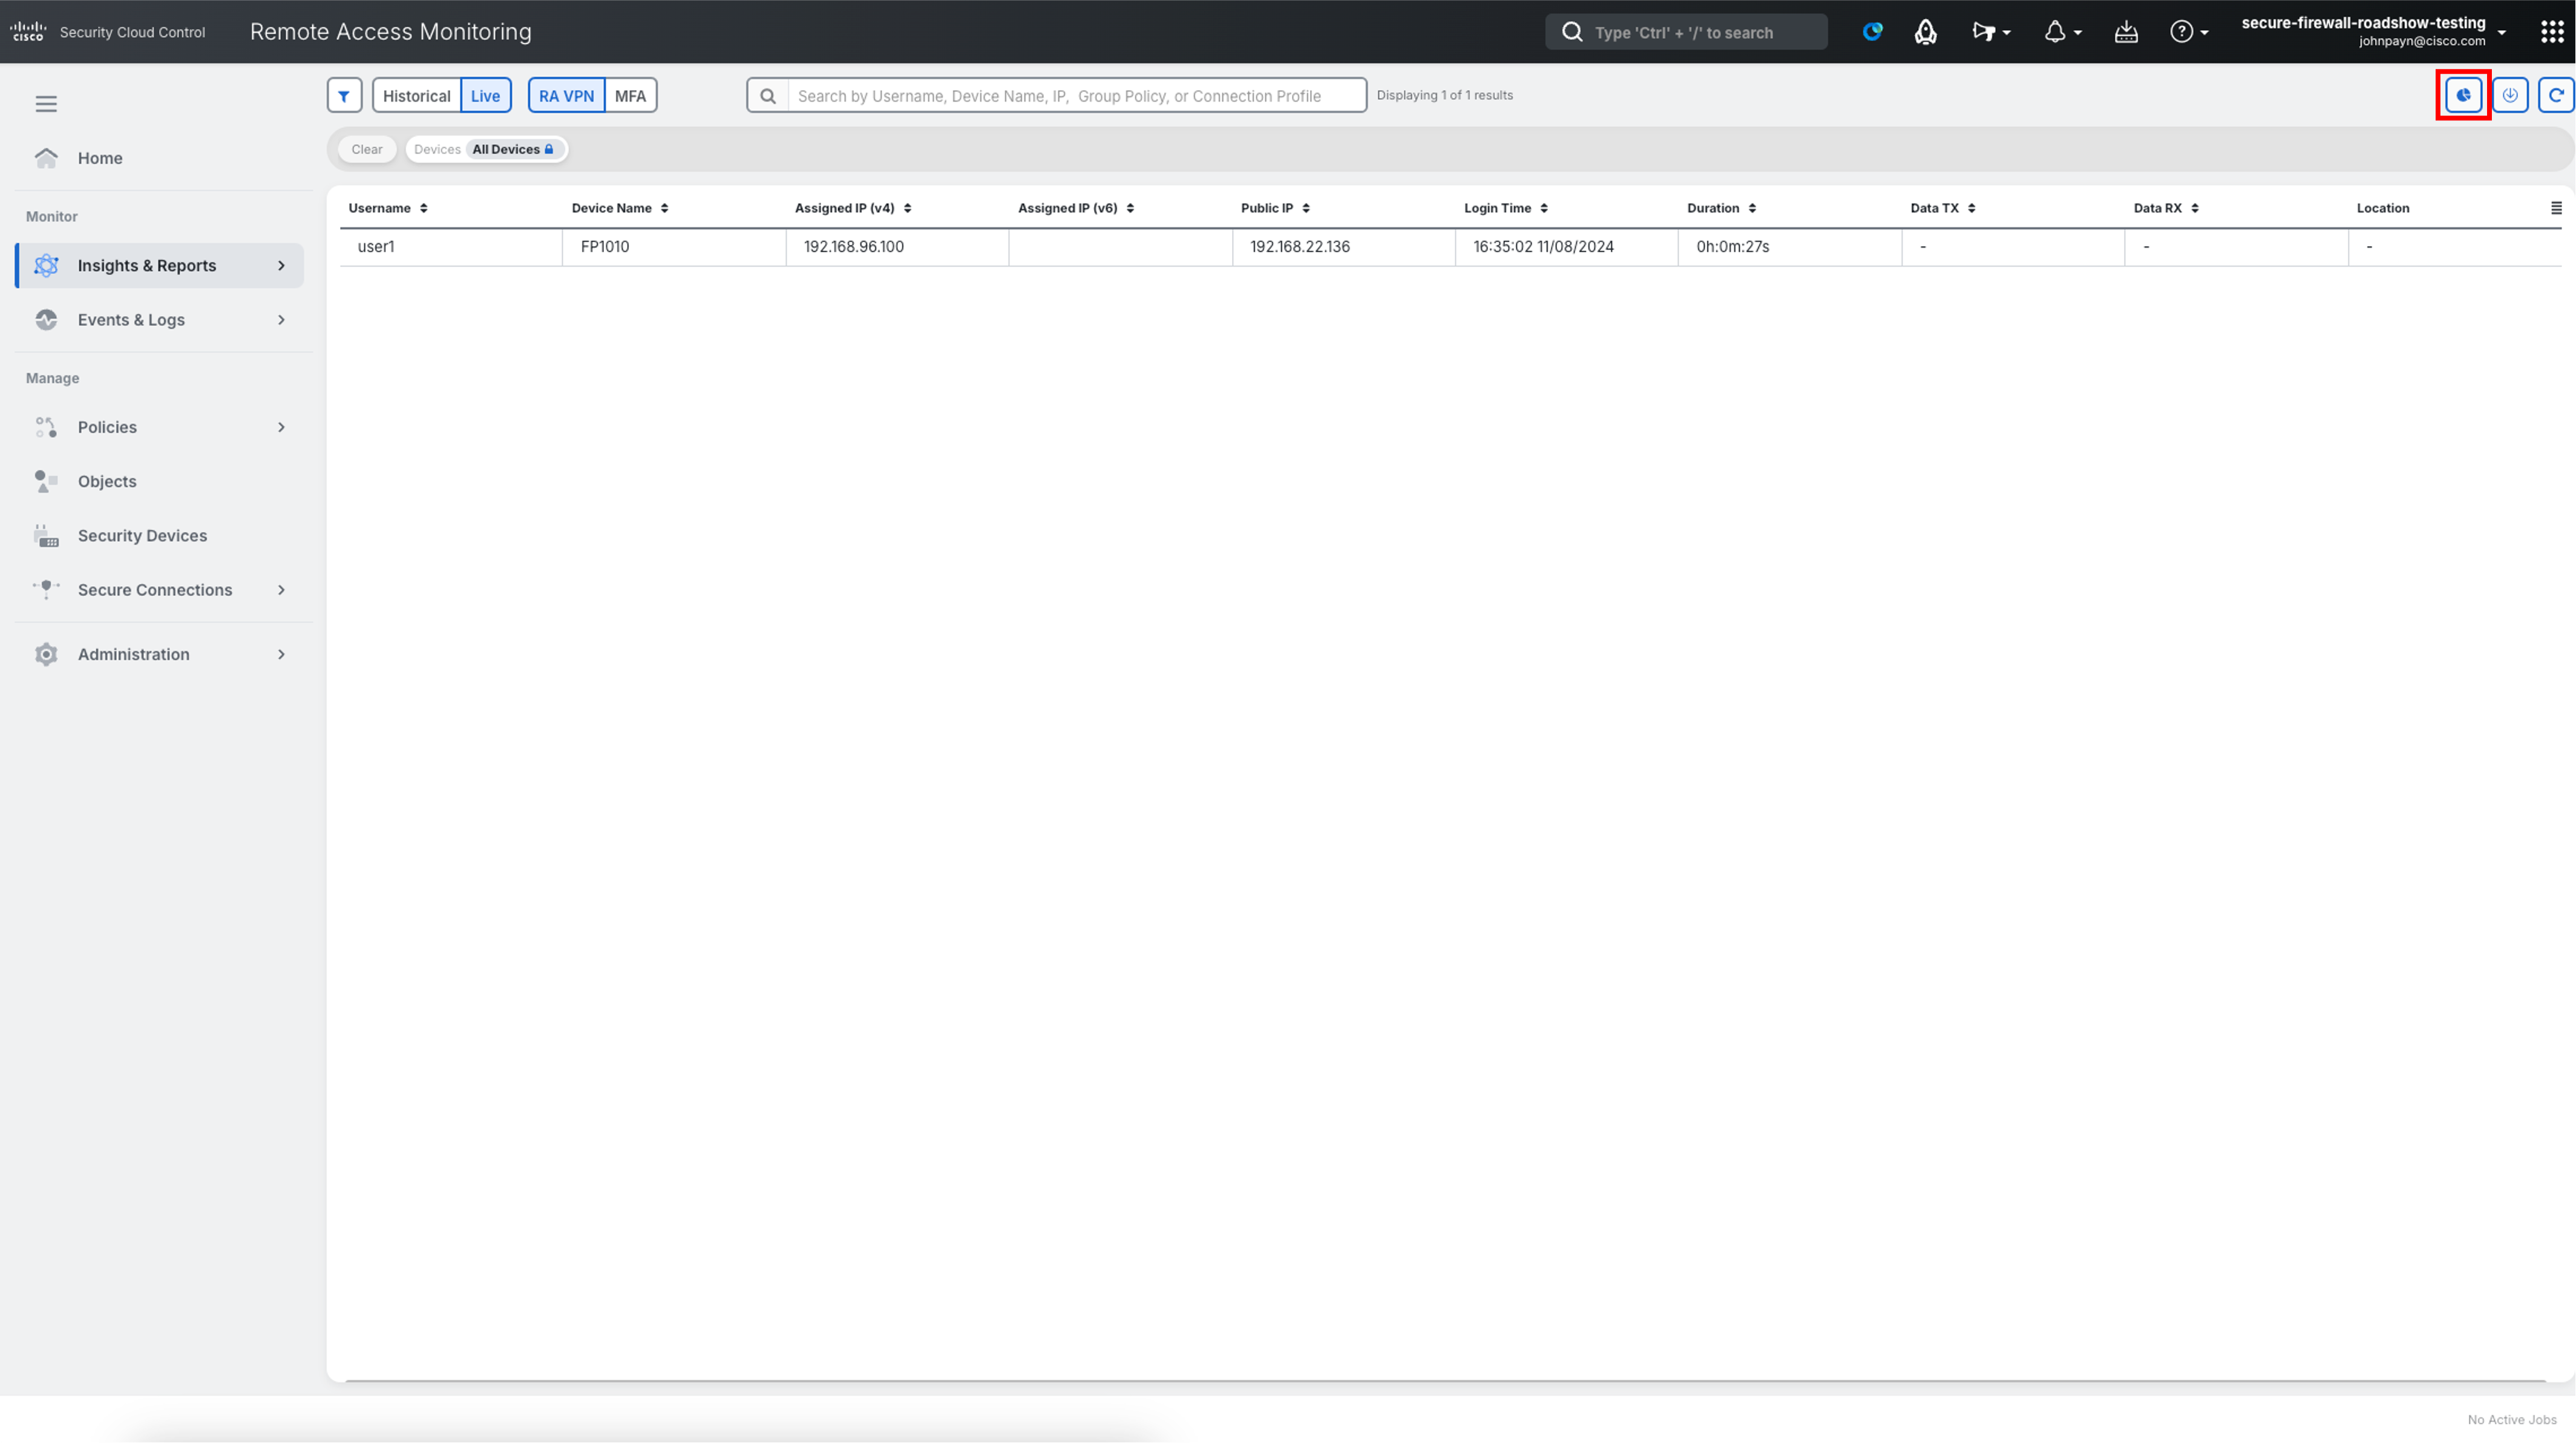
Click on the Charts View icon to switch from table view.
-
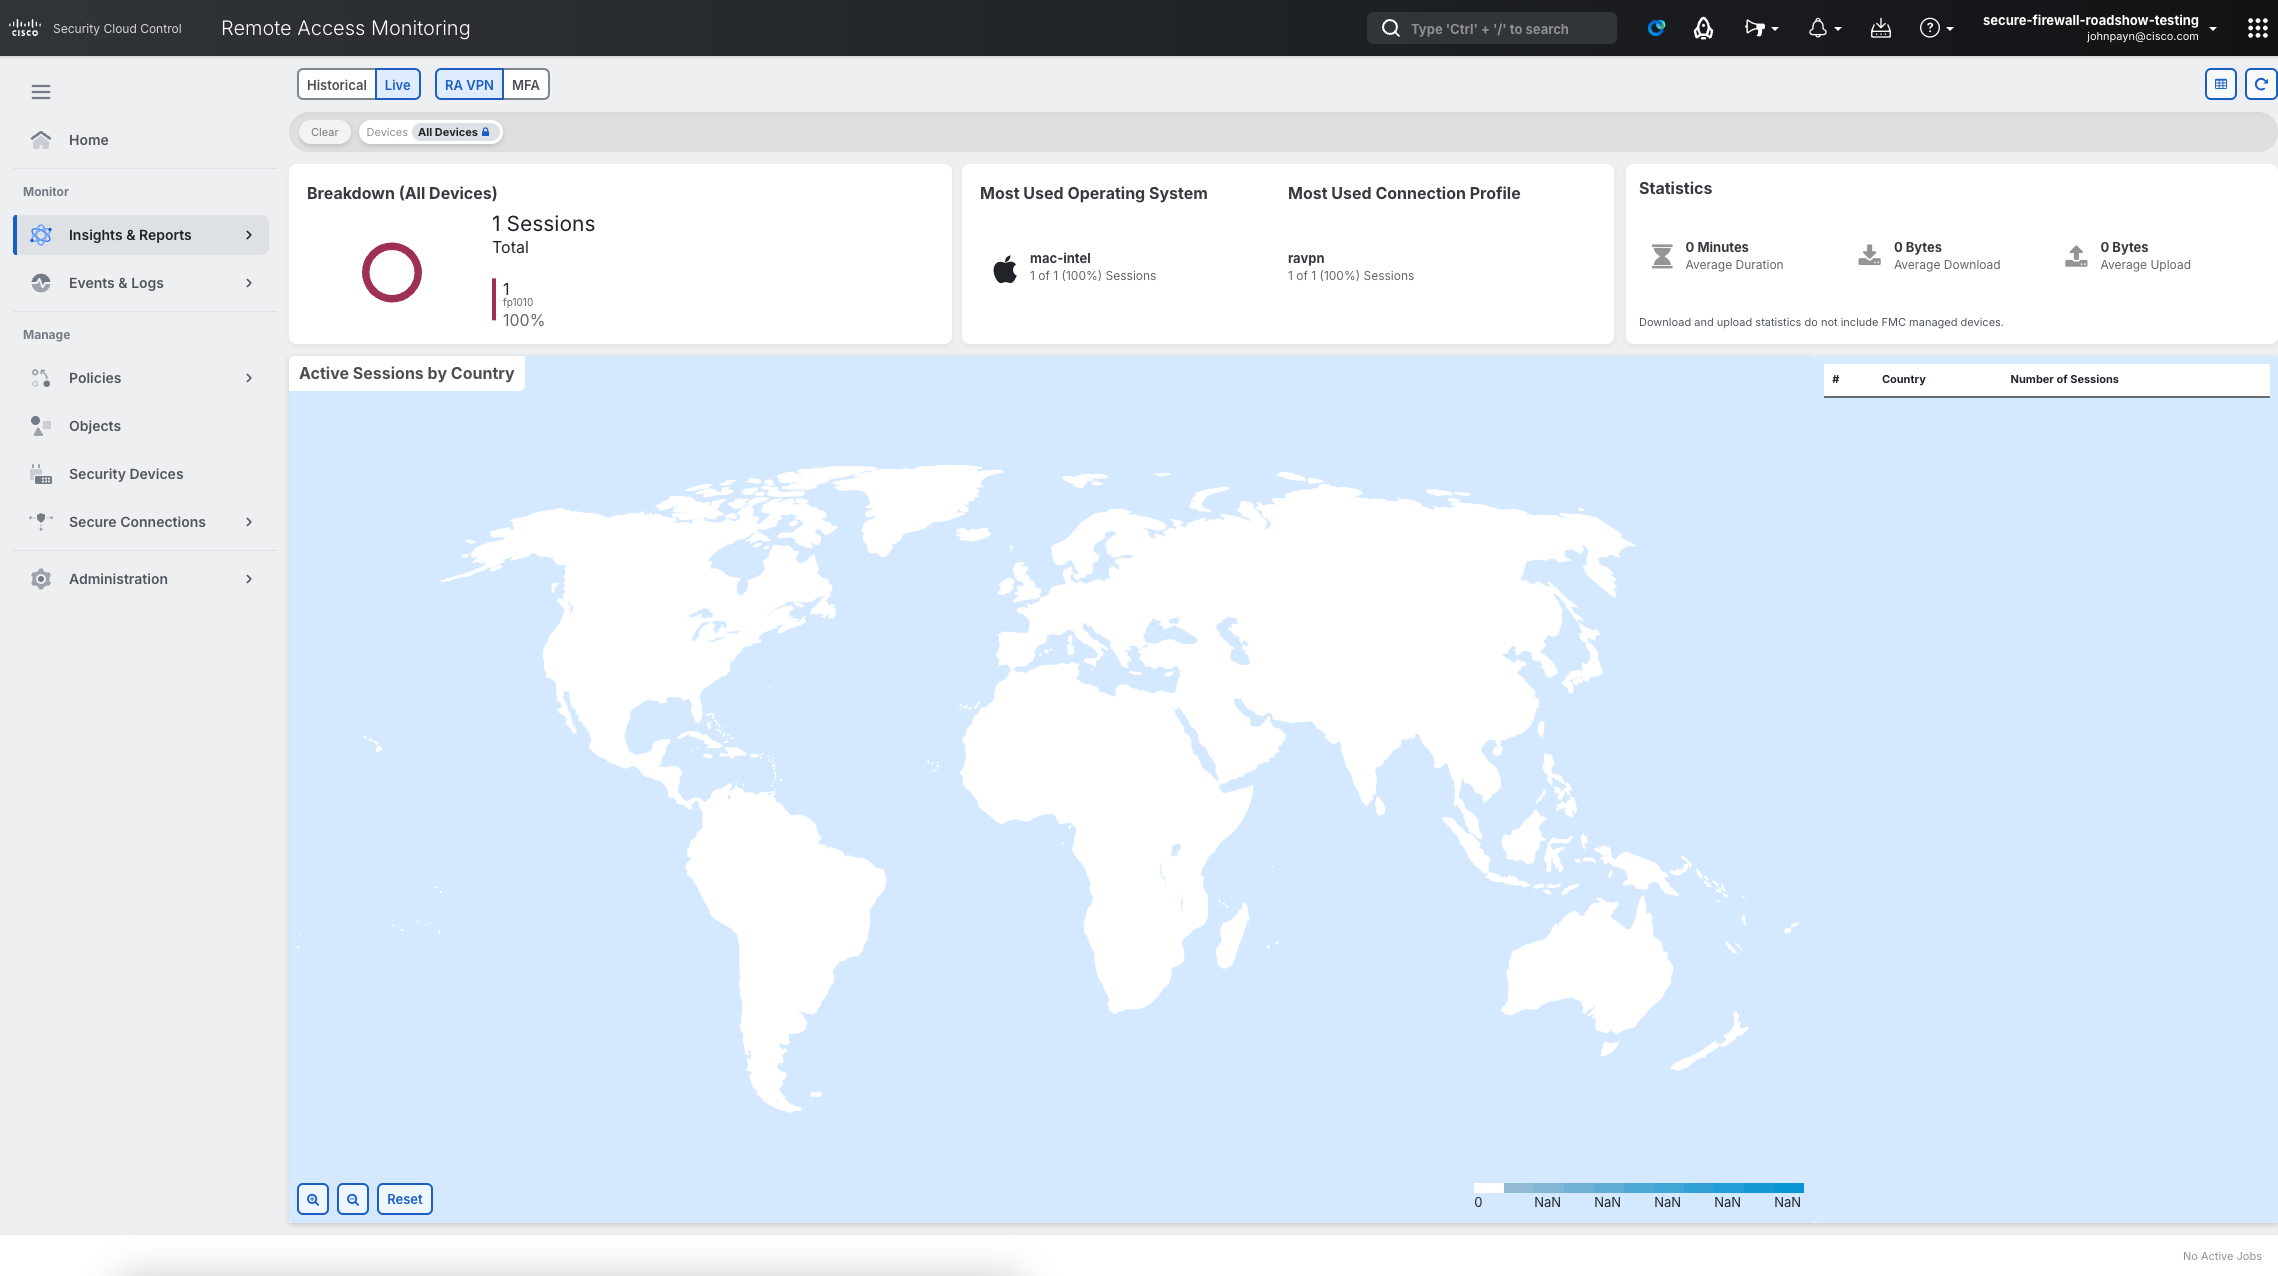
Here you can monitor all active connections with graphical visualization of statistics.
-
Click Tabular View to move switch from Charts view.
-
Click on the user1 row to access Actions on the right sidebar.
Available actions are:
- Terminate session
- Terminate all of this user's sessions
- Terminate all sessions on this device
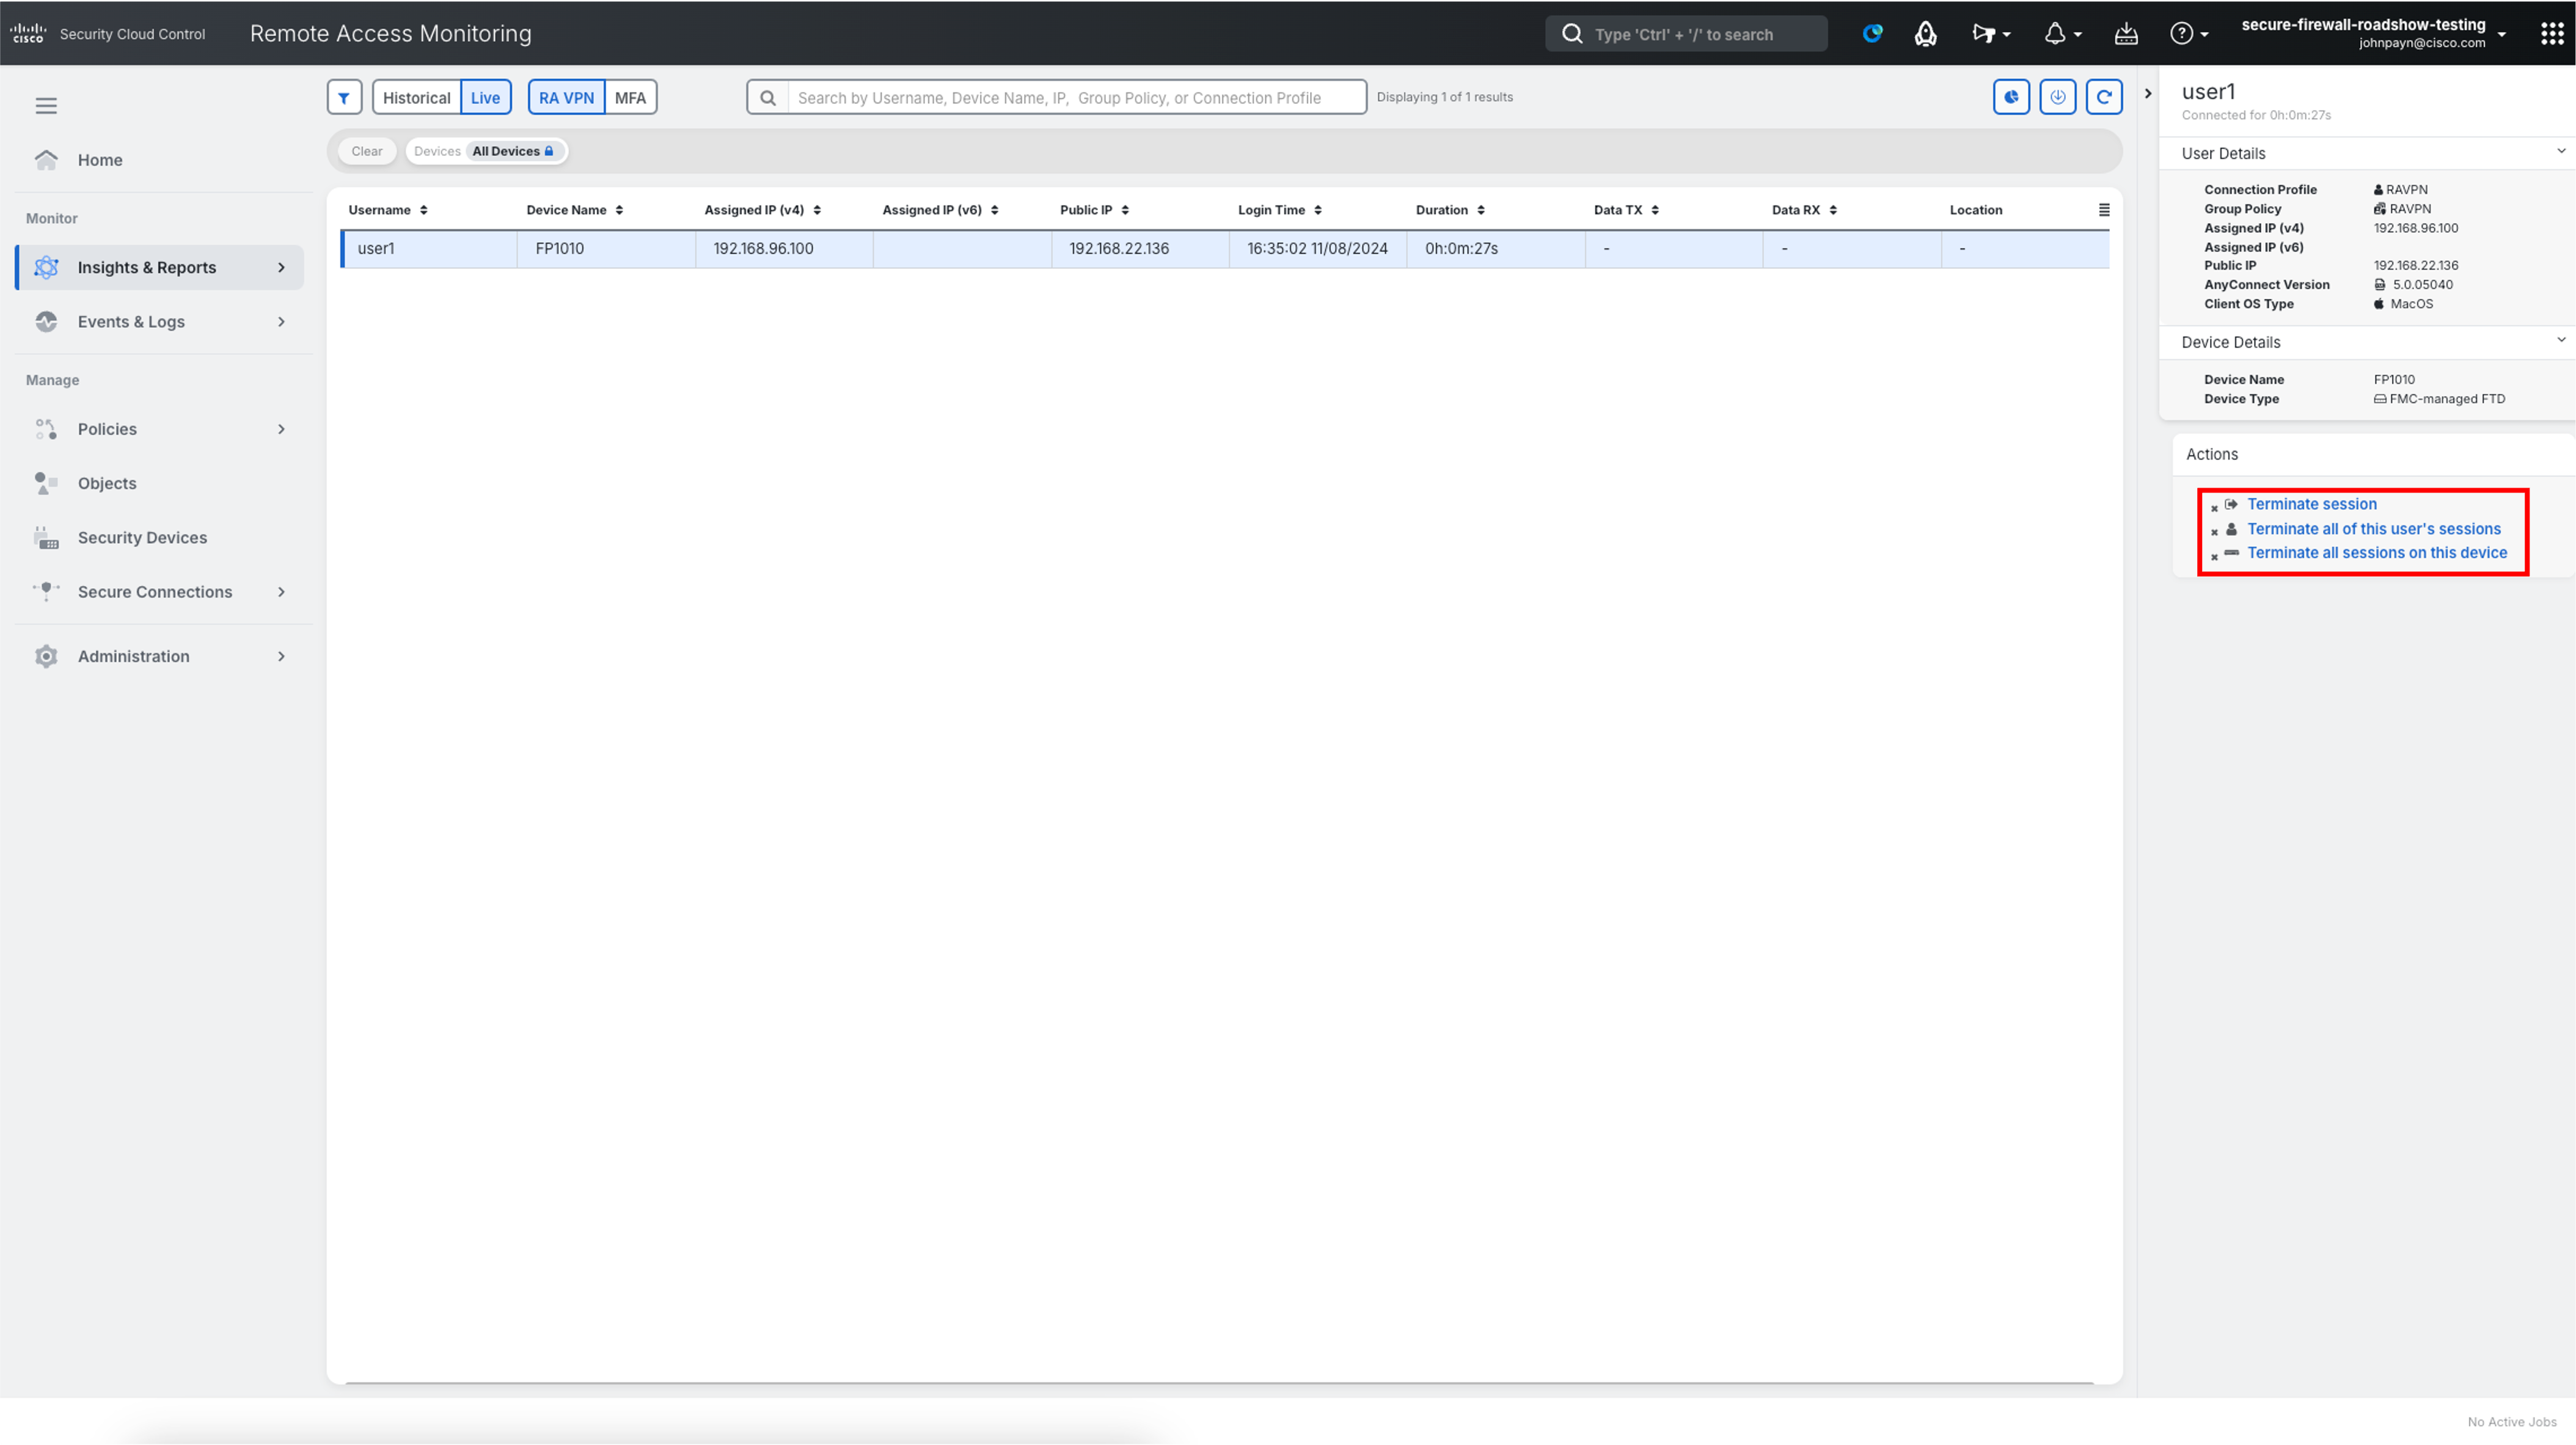
- Clicking on any of the actions will pop-up a confirm dialog box before termination.
This concludes the lab for RAVPN.
Updated 11 months ago

