Threat (AttackIQ)
Cisco Internal Use Only for Secure Firewall Roadshow Ignite Event
Introduction
AttackIQ is a breach and attack simulation platform that provides visibility into our security performance with clear data-driven analysis and mitigation guidance. Its sensors receive and execute selected scenarios and allow for live testing.
This guide showcases the threat efficacy of the Secure Firewall based on the analysis of the packages built by AttackIQ. The firewall is subjected to a series of common, high-severity attack scenarios, post which, a report is generated detailing the effectiveness of the firewall in stopping these attacks along with recommendations for bridging the gaps seen.
Lab Tasks
These are the tasks in the scenario below. If you are familiar with the Secure Firewall and AttackIQ you may do these on your own, or for step-by-step instructions see below.
- Task 1 - Login to AttackIQ portal and download the baseline package
- Task 2 - Configure policies for NGFW1
- Prefilter policy
- DNS policy
- Malware & File policy
- Intrusion policy
- Network Analysis policy
- Decryption policy
- Access Control policy
- Task 3 - Re-run the AttackIQ package
- Task 4 - View the Events on FMC
Lab Connectivity Diagram
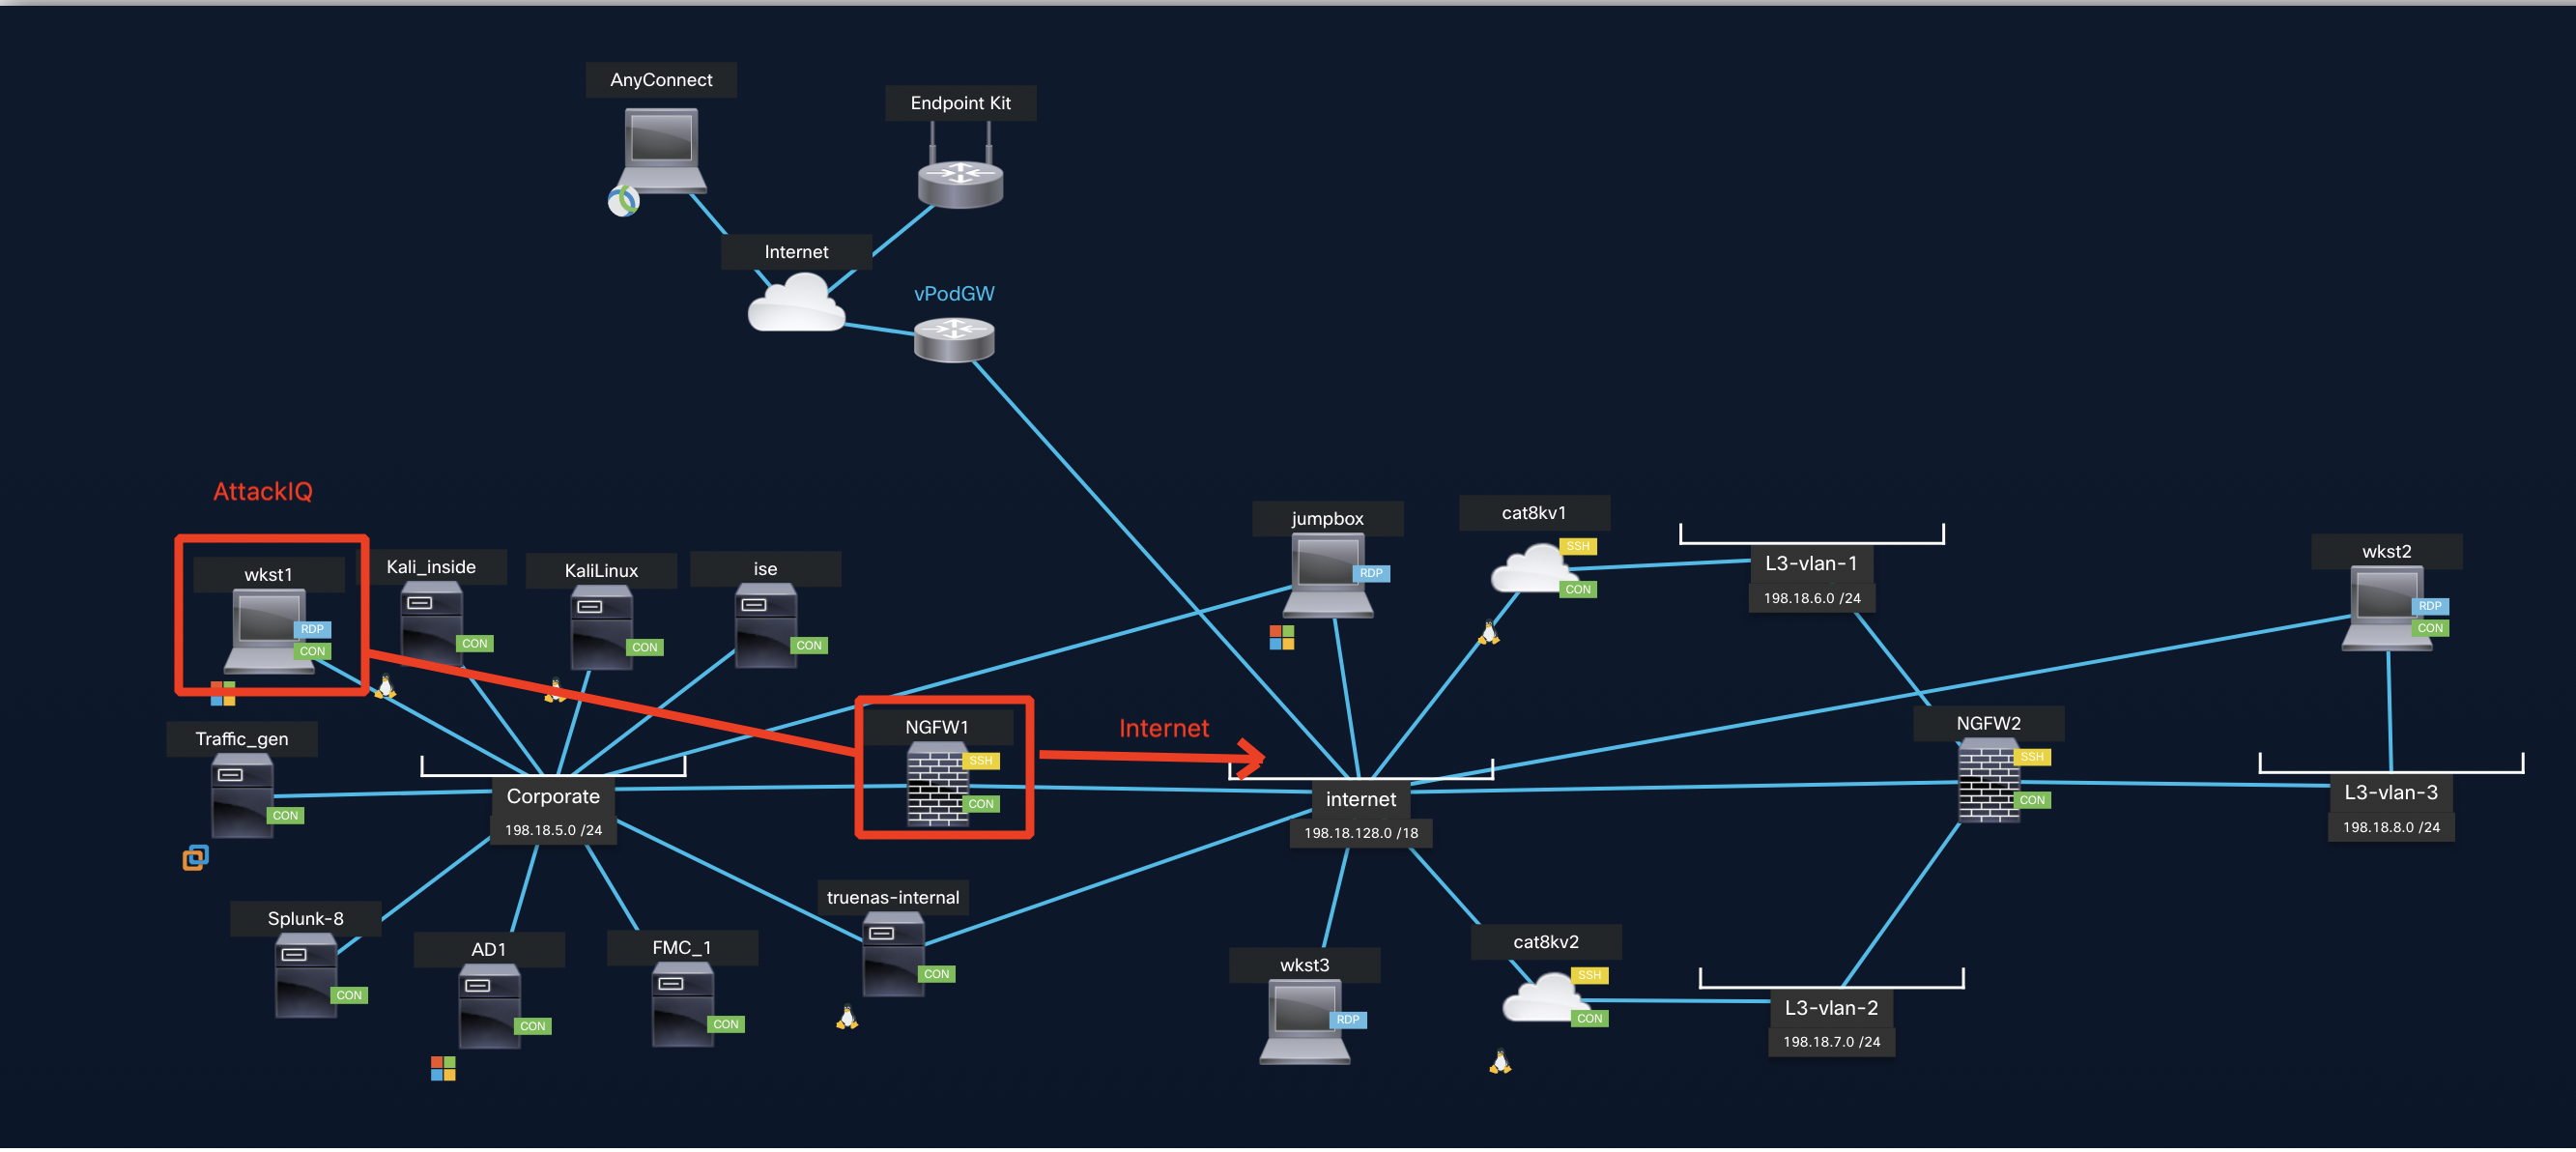
The AttackIQ package is run from Wkst1 which is connected to the Inside interface of NGFW1. The execution of this package requires Internet connectivity wherein it communicates with the AttackIQ servers hosting the simulated attacks. The flow of traffic is as shown below. The traffic hitting the inside interface is routed out via the outside interface of NGFW1.
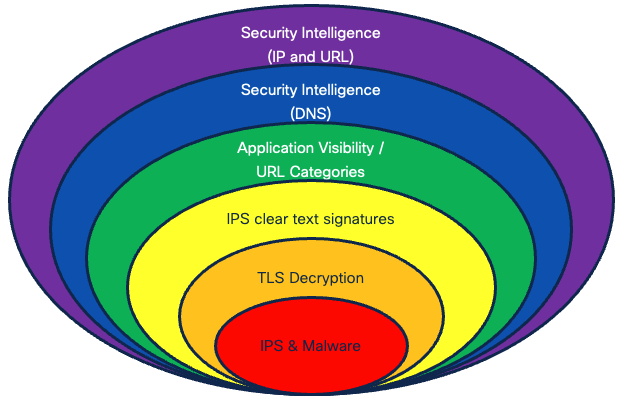
As the famous quote by H.E. Luccock goes, "No one can whistle a symphony. It takes an orchestra to play it", to get the most out of the protection rendered by the firewall, we need to utilize all of its security features. No single security feature of a firewall or IPS can protect your network against constantly emerging security threats. Cisco Secure Firewall provides a security barrier consisting of mutually complementary layers of protection. Cisco Secure Firewall is not just a box you install in your network – it is a security enabler for Cisco Talos – one of the largest commercial threat intelligence teams in the world.
Lab Tasks Overview
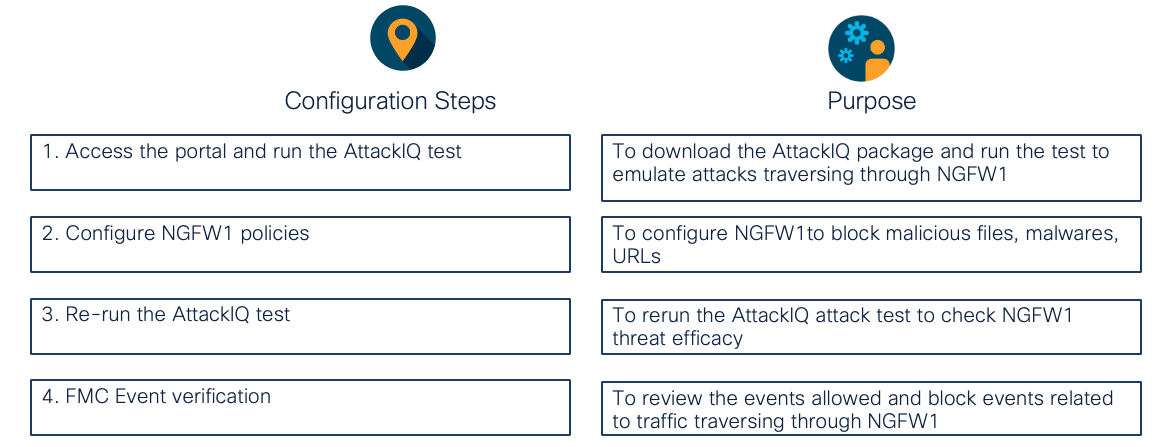
Task 1 - Login to AttackIQ portal and download the baseline package
- On the Jumpbox, open Quick Launch and click on WKST 1 to open an RDP session to the workstation.
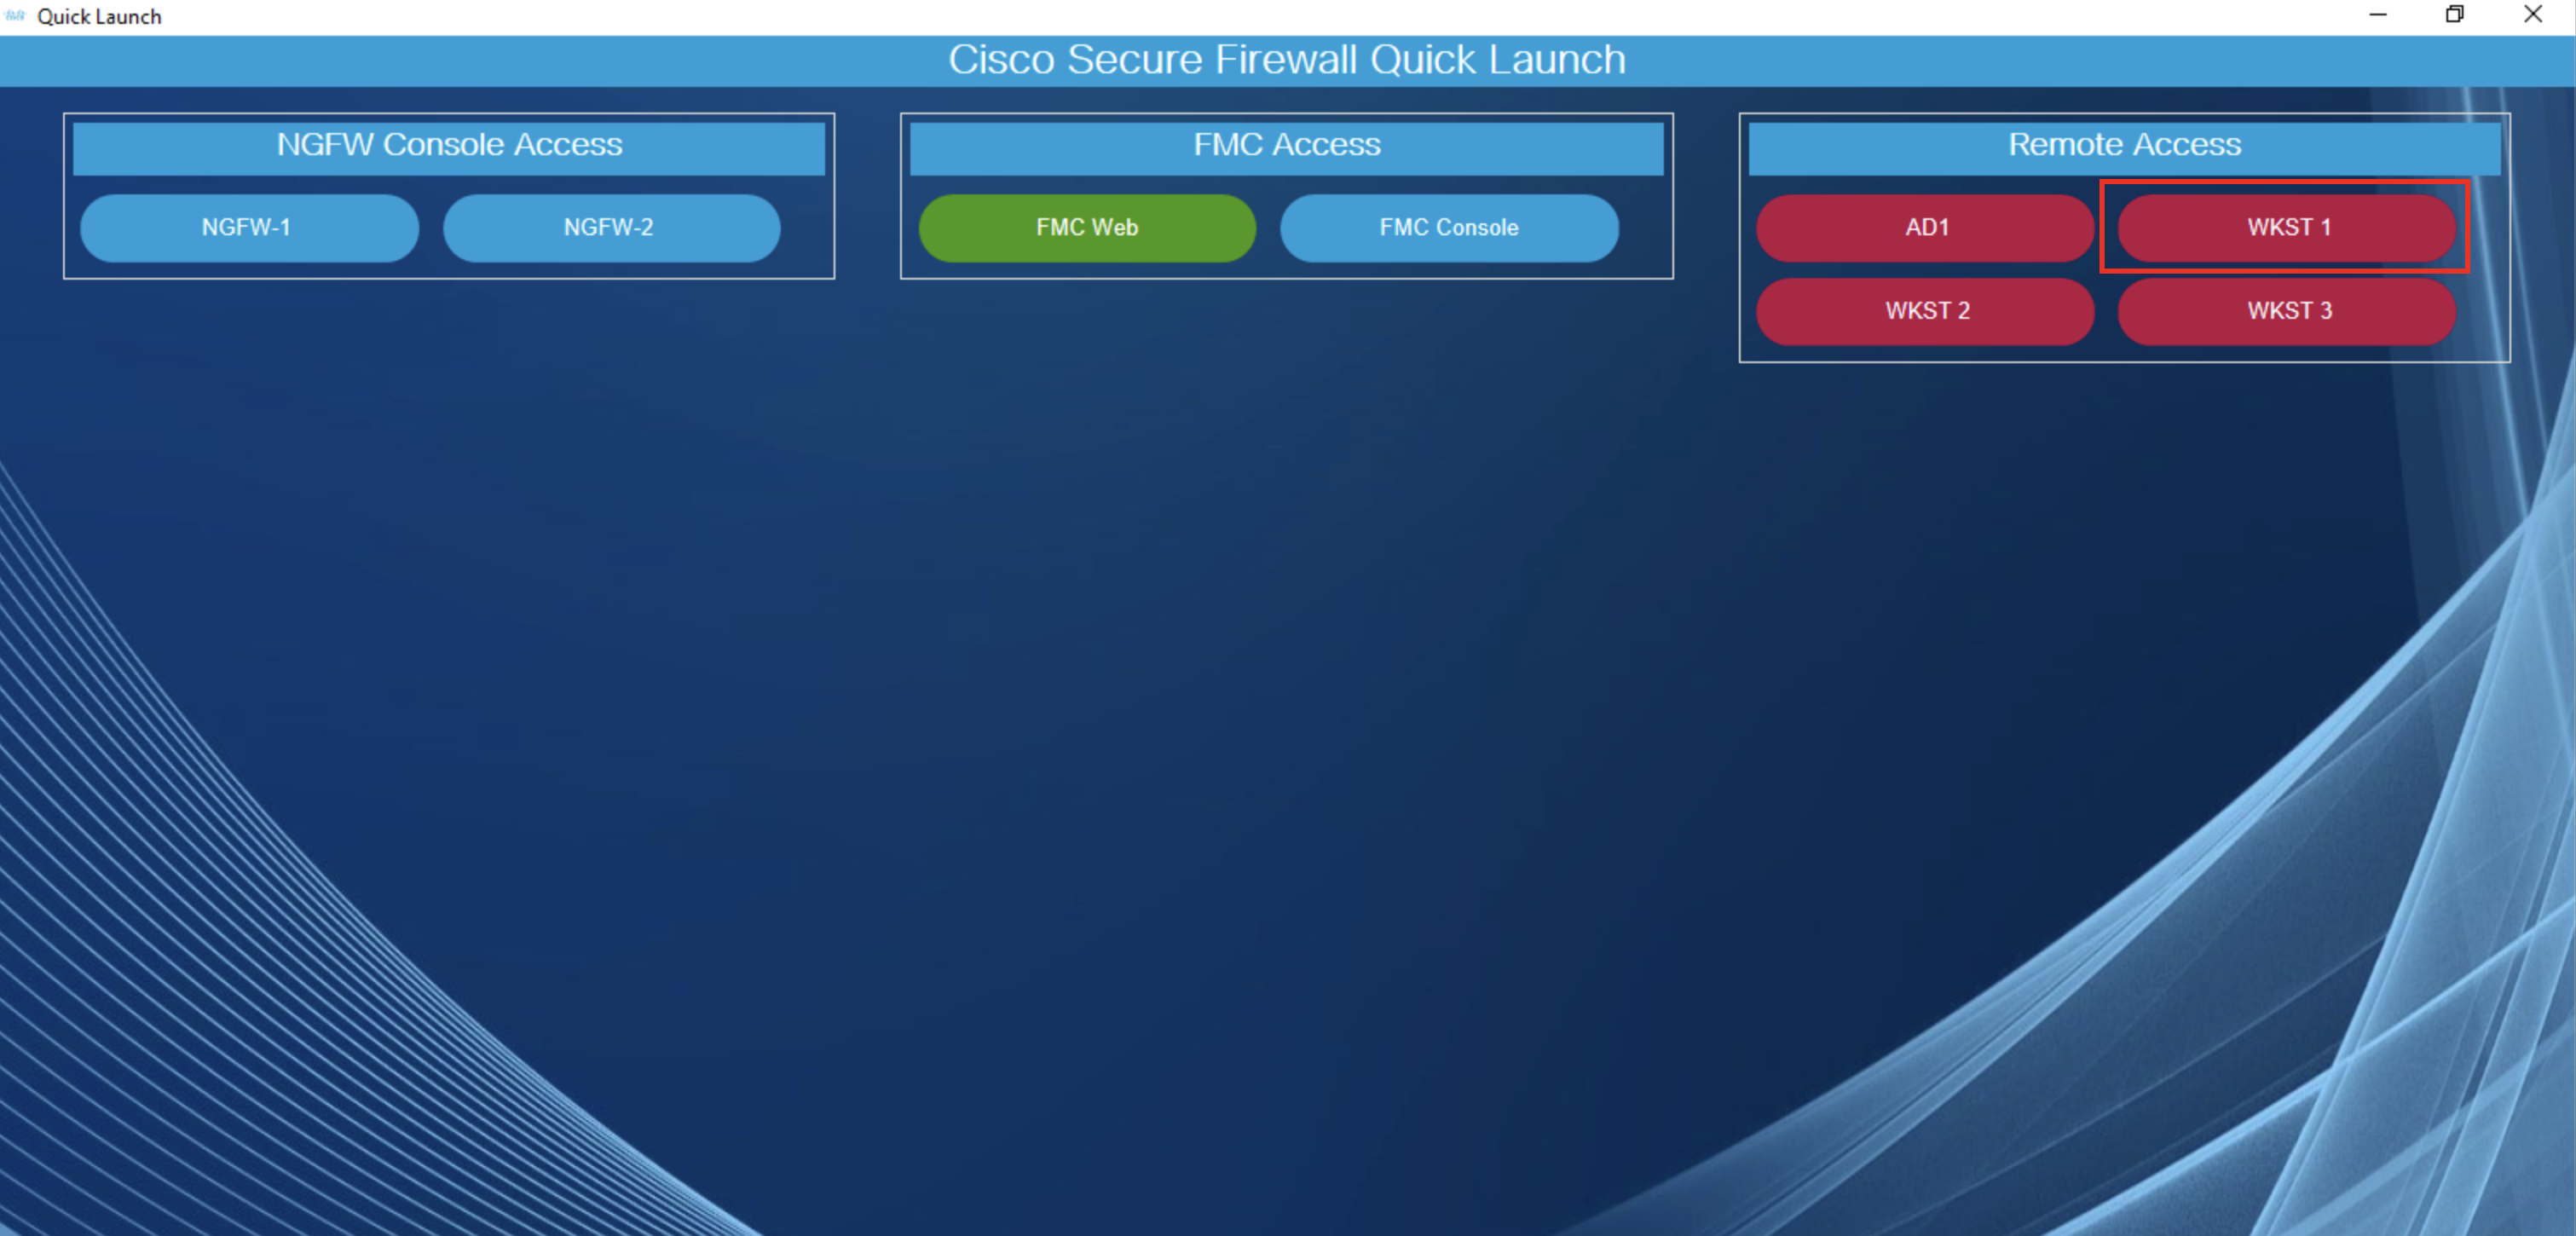
- Type in the password "C1sco12345". Press the Enter key.
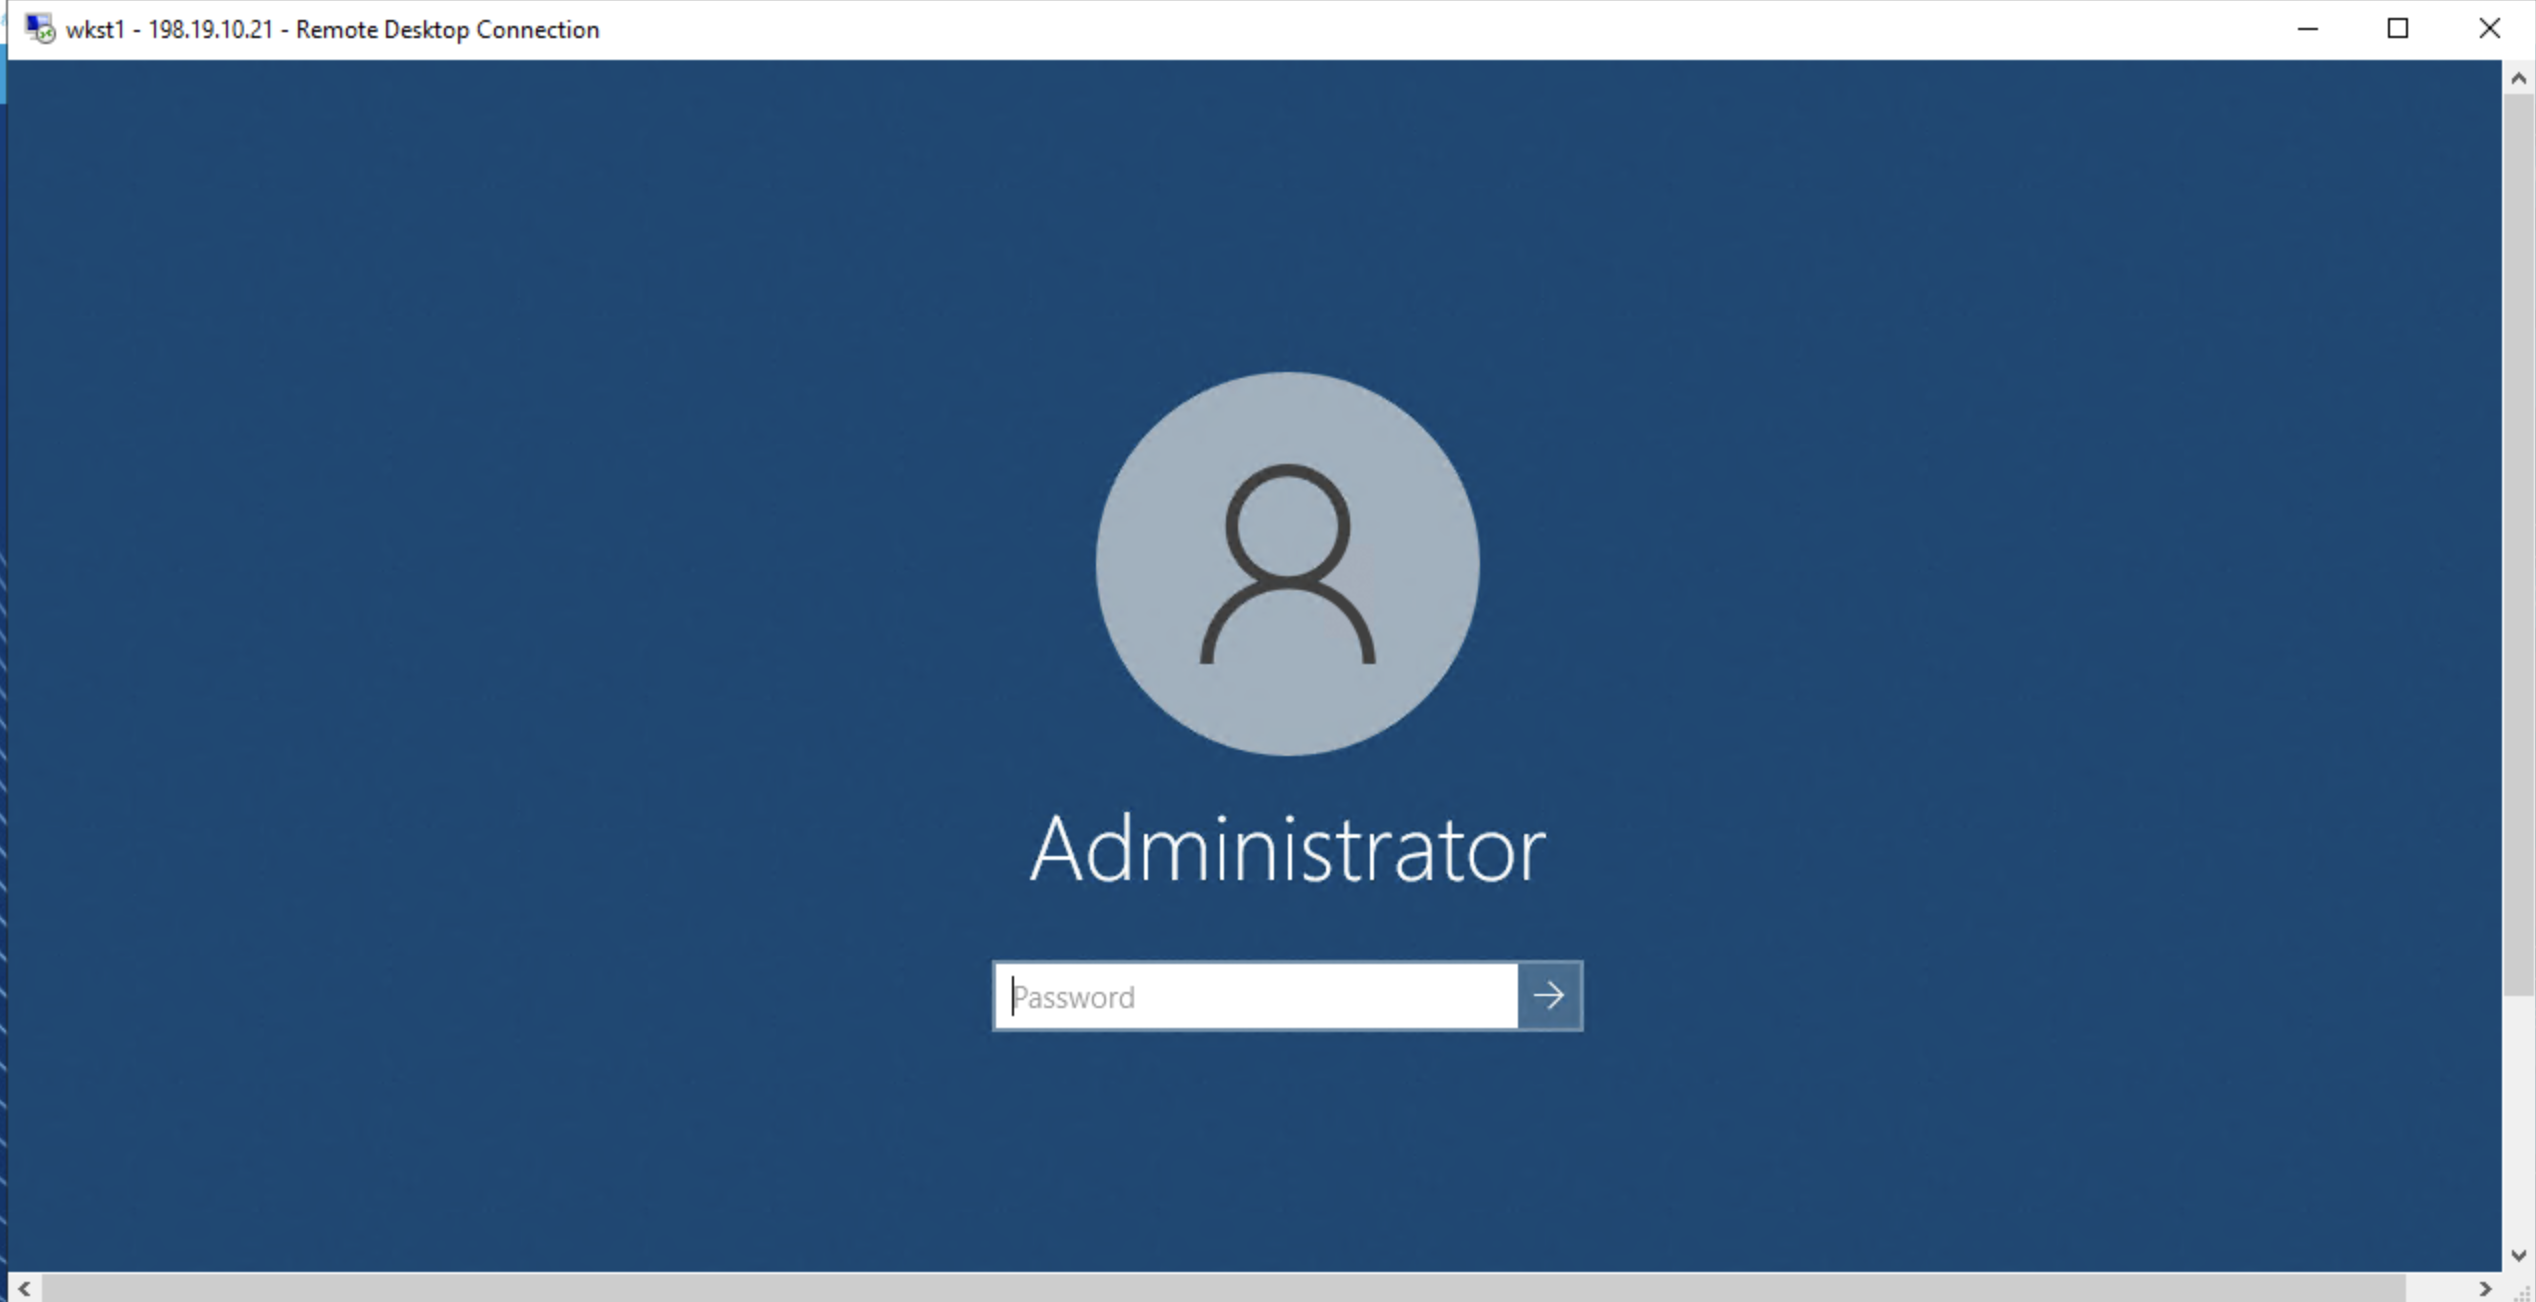
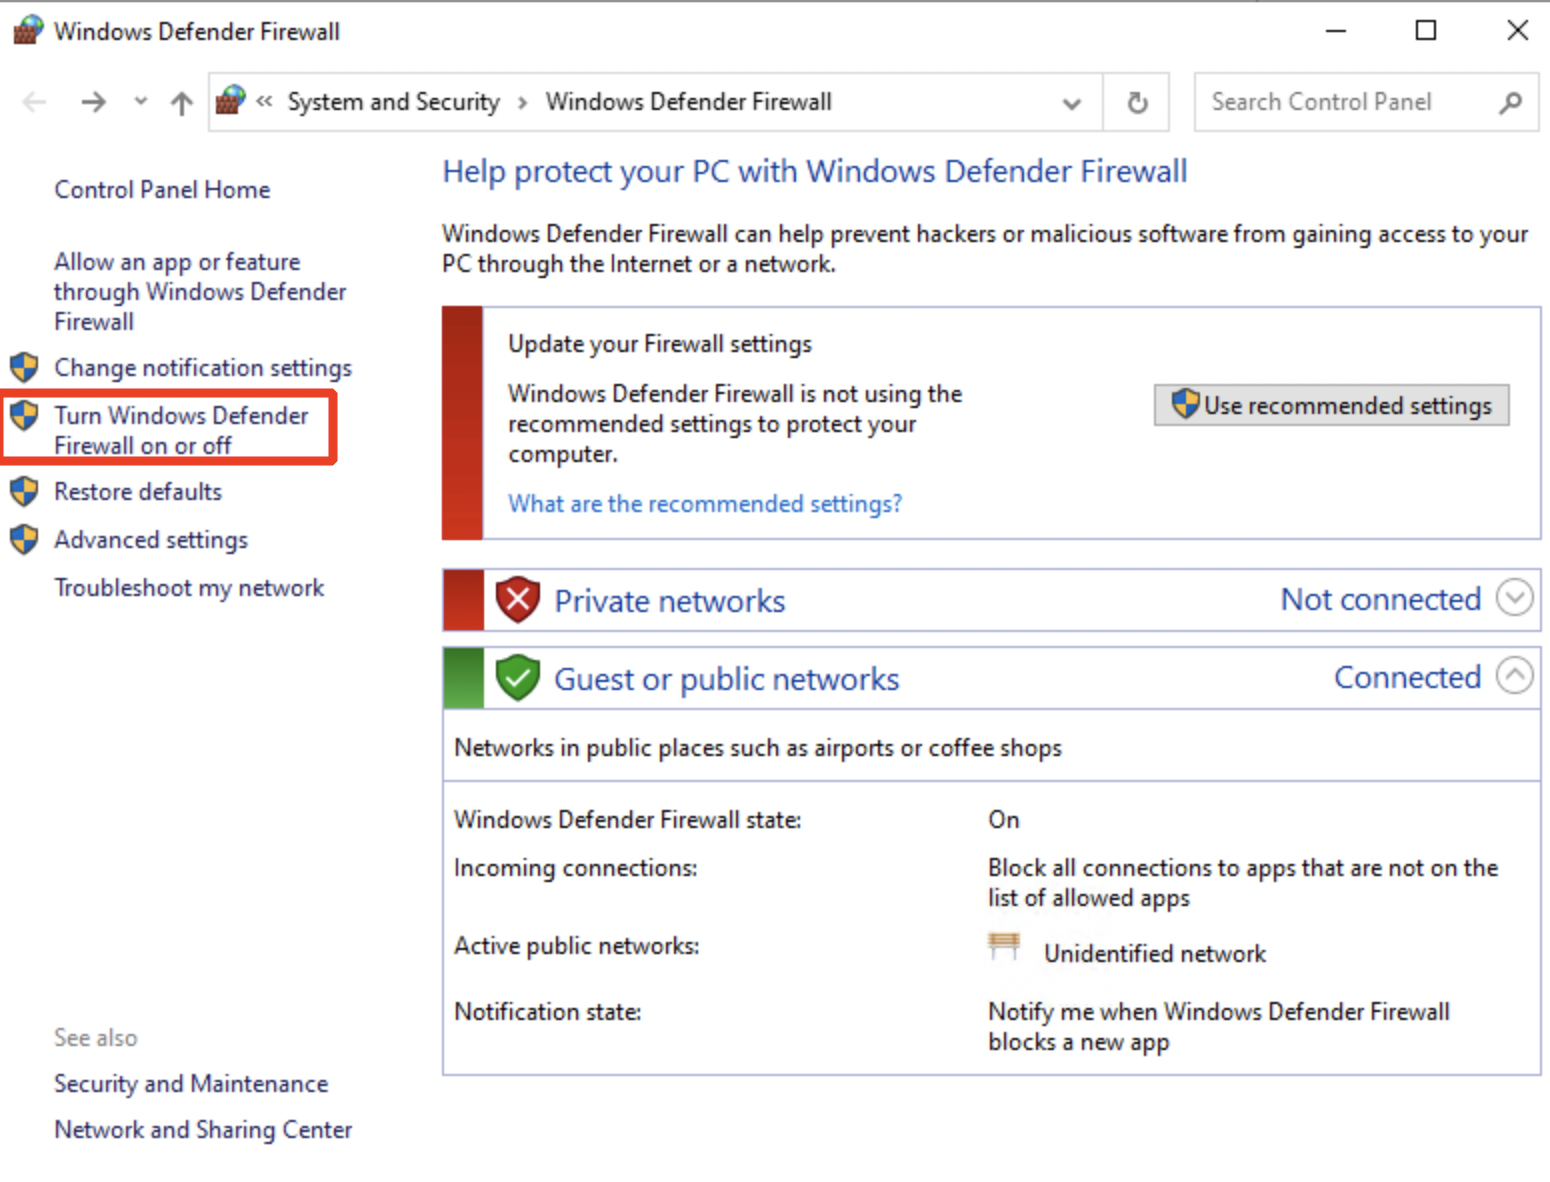
- Ensure that the Windows Defender Firewall is turned off on Wkst1 for the AttackIQ tests to run without any disruption. Search for the application 'Windows Defender Firewall'. Click on Turn Windows Defender Firewall on or off.
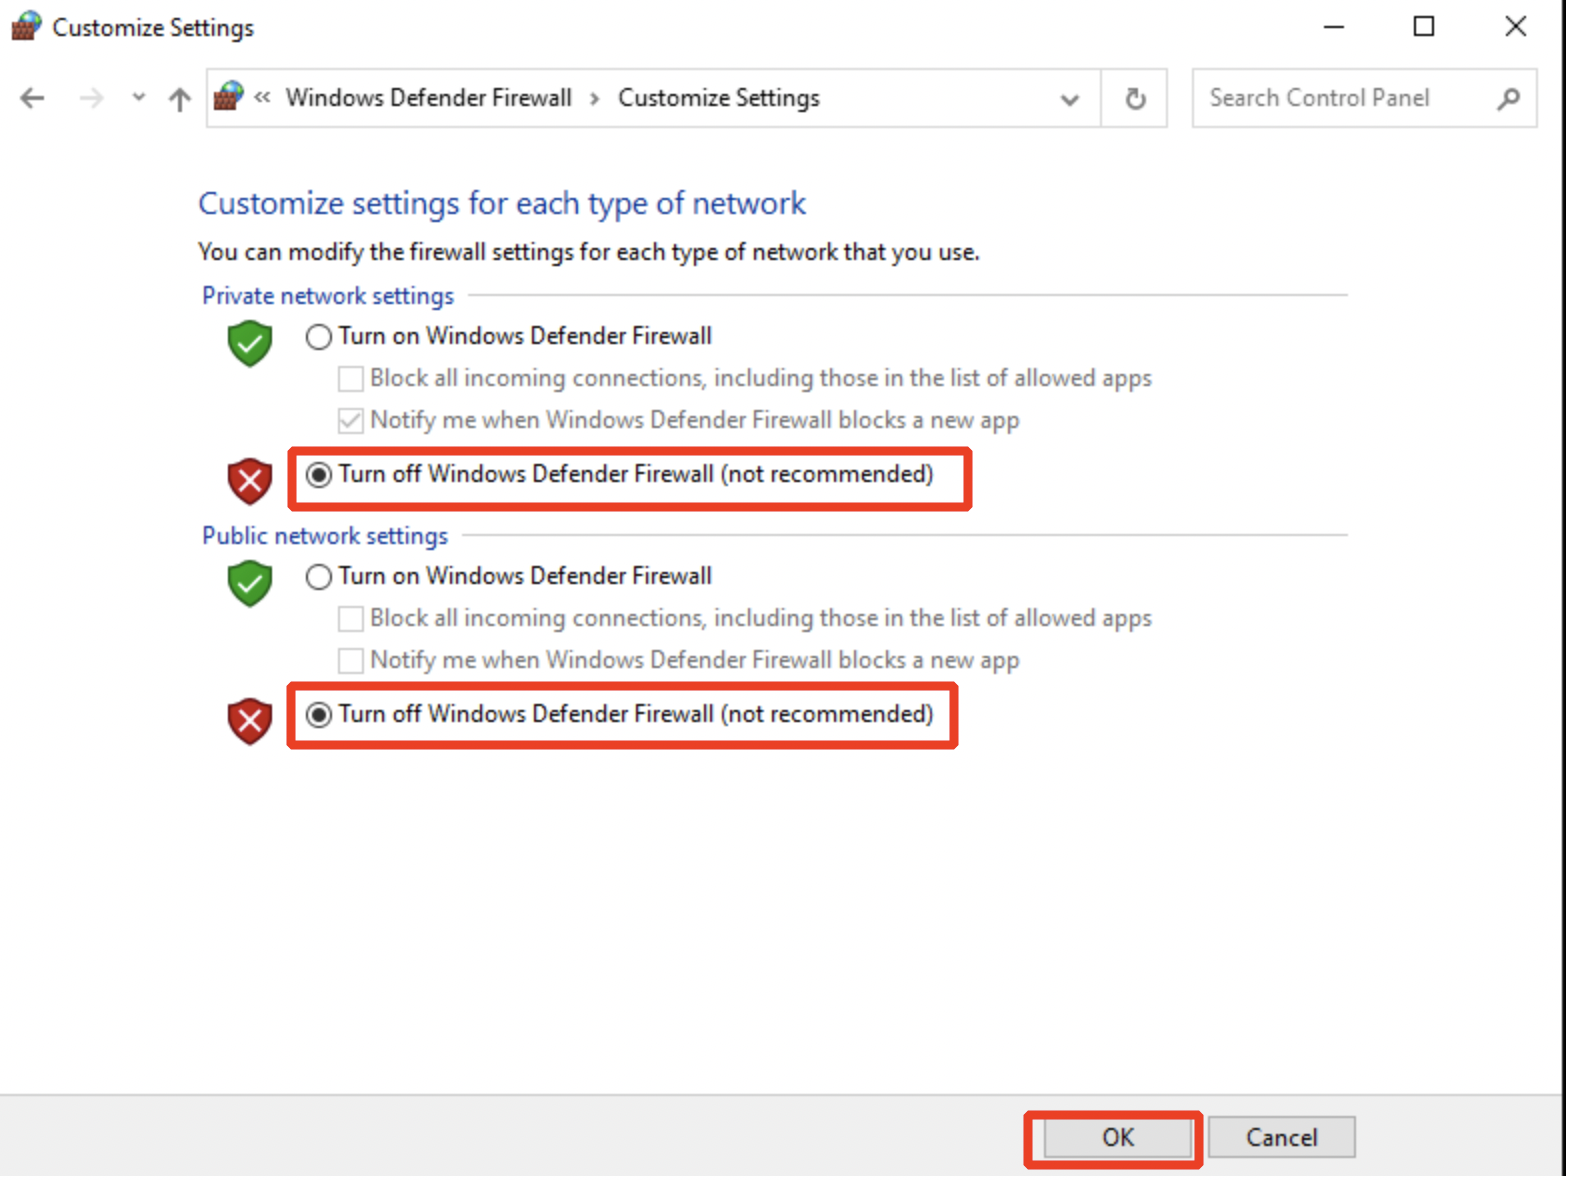
- Select the radio button Turn off Windows Defender Firewall as shown below. Click on OK.
- Open a browser on Wkst1. It is recommended to use Google Chrome. Log in to your AttackIQ tenant.
Note
Please check your email for the tenant URL and login credentials. Reach out to the proctor if you have not received any email.
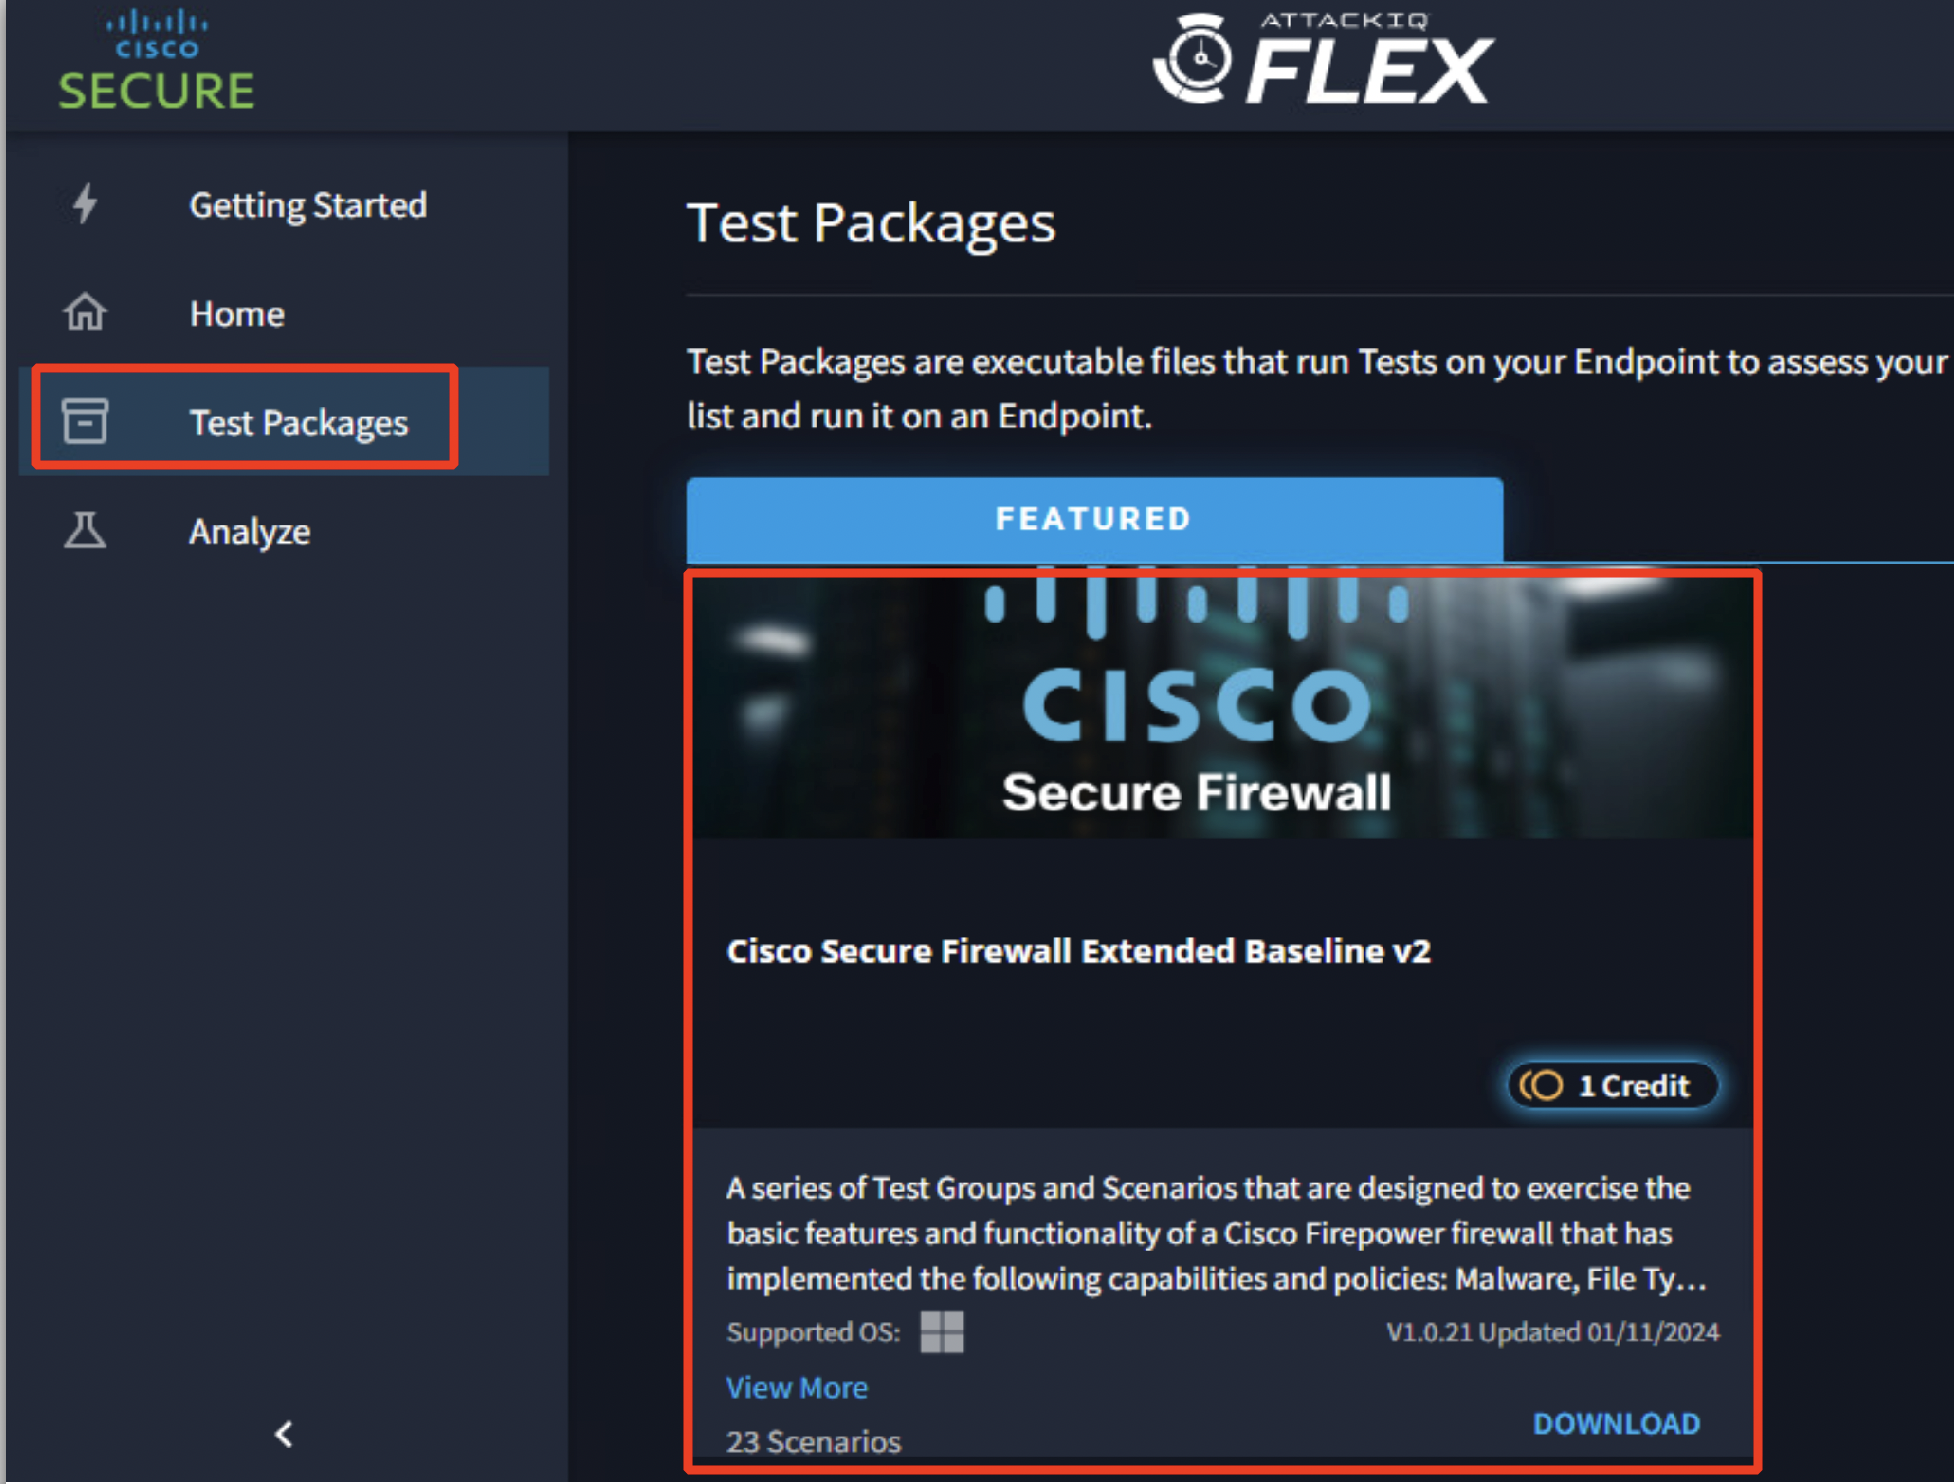
- Navigate to Test Packages on the left side of your browser page. Click on Grid View at the top right to get the below view.

- Download the test package Cisco Secure Firewall Extended Baseline v2 which is designed to examine the effectiveness of Cisco Secure firewalls by clicking on Download.
Note
Ensure that pop-ups are allowed for the AttackIQ site.
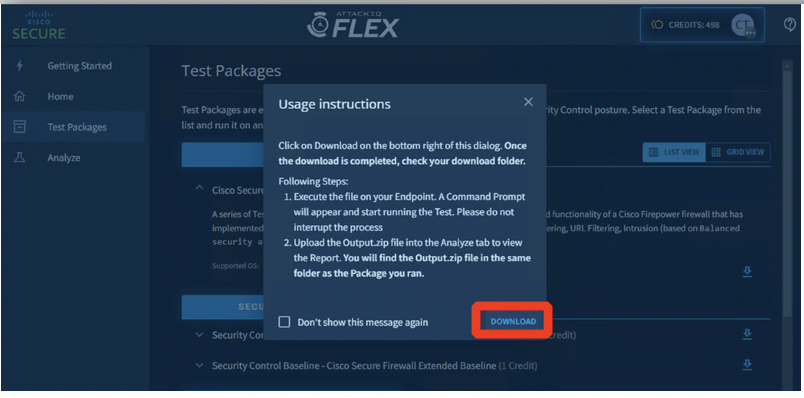
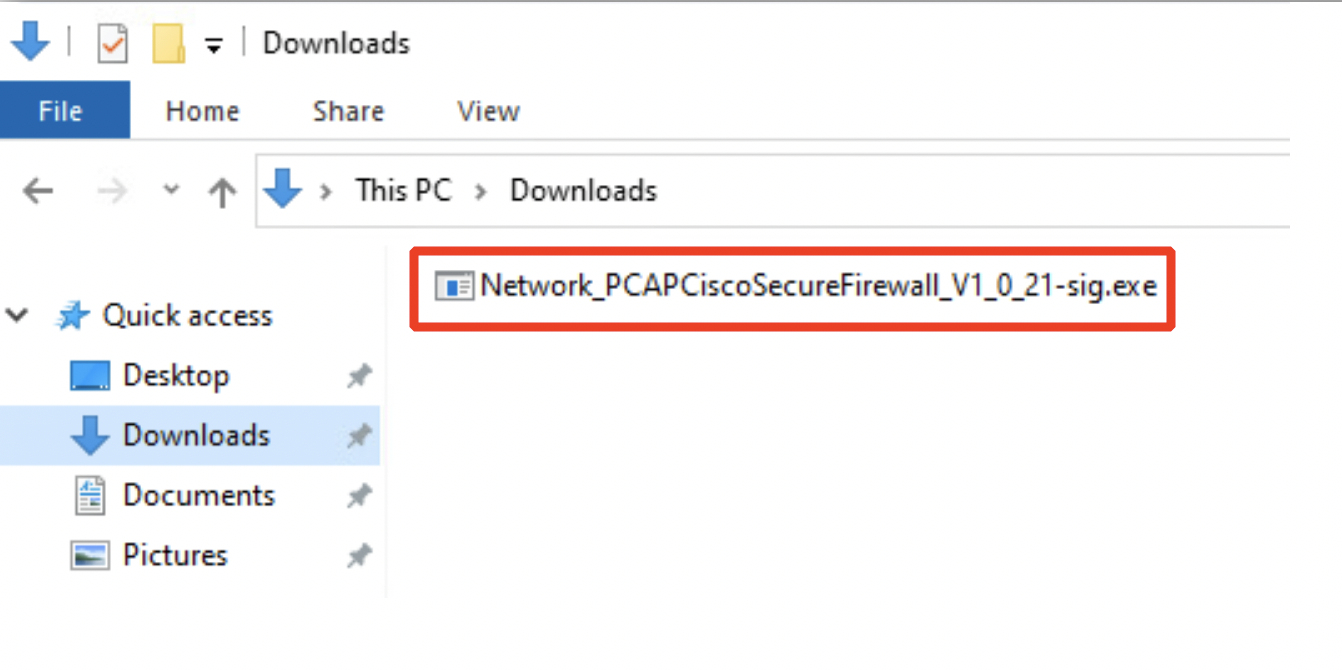
- Go to the Downloads folder. Execute the file on Wkst1 by double-clicking on the .exe file.
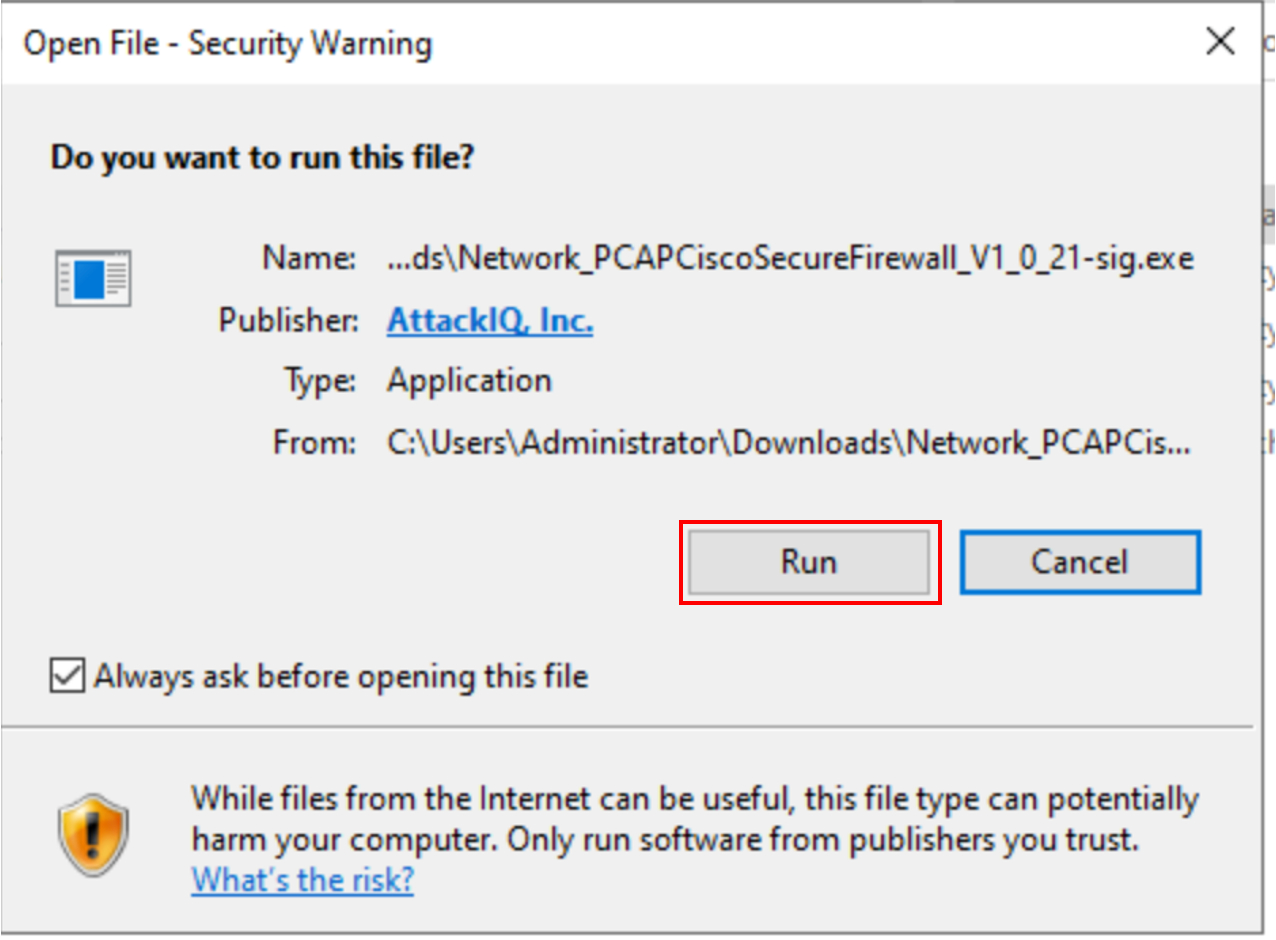
- Click Run.
The bundle extracts a set of files containing attack replay packets exchanged between the endpoint and the AttackIQ server through the firewall.

Note
The test takes approximately 10-20 minutes to complete. In the meantime, continue with the configuration while the AttackIQ executable is running on Wkst1.
Task 2 - Configure policies for NGFW1
In this task, you will preemptively configure the firewall to block certain files, block malware, URLs, etc. which you will see similar recommendations in the initial report generated by AttackIQ. You will view the report in the next task while the executable is running on Wkst1.
I. PREFILTER POLICY
The Prefilter policy is the first phase of the packet inspection. Before resource-intensive evaluation takes place, traffic can be either blocked, fast-pathed, or analyzed using this policy, improving the firewall's overall performance. The Prefilter policy also allows you to configure firewall actions on GRE, IPinIP, IPv6inIP and Teredo encapsulated traffic.
- Go back to the FMC web interface on the Jumpbox. From the Access Control page, navigate to Policies > Prefilter. Click on New Policy. Configure a new Prefilter Policy as shown below.

Name: Prefilter Policy
Click on Save.
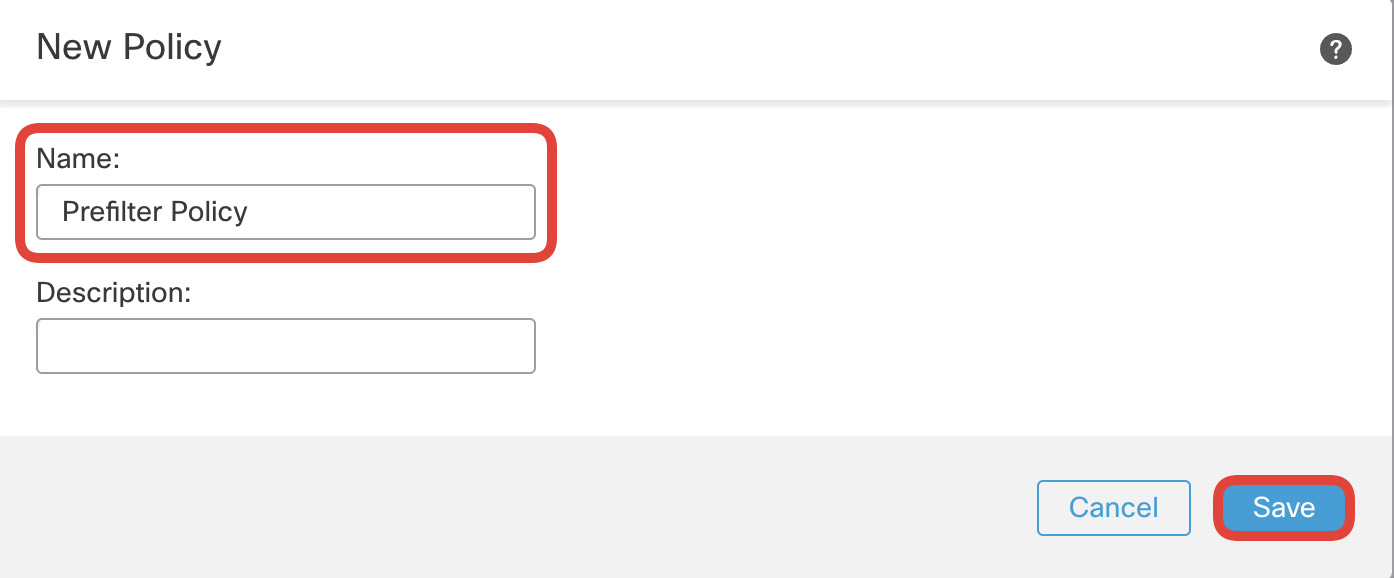
Ensure that the Default Action: Tunnel Traffic is Analyze all tunnel traffic.

Note
The default prefilter policy which pre-exists on the FMC has the same configuration as above and can be used instead as well. A new prefilter policy creation step is added here to get you acquainted with its configuration.
II. DNS POLICY
DNS-based Security Intelligence allows you to block traffic based on the domain name requested by a client, using a Security Intelligence Block list. Cisco provides domain name intelligence you can use to filter your traffic; you can also configure custom lists and feeds of domain names tailored to your deployment.
Warning
For the DNS-based Security Intelligence policies to be effective, ensure your clients use clear-text DNS resolution through the firewall. DNS packets between the clients and the DNS server must pass the firewall to be inspected.
-
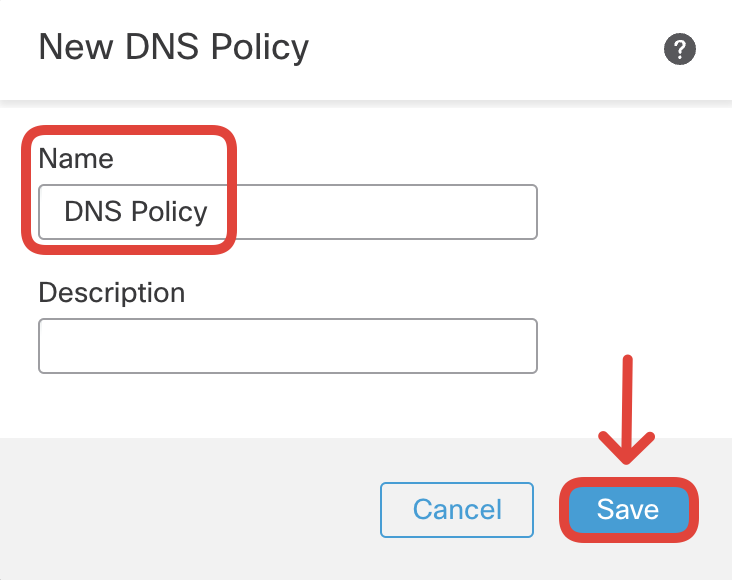
Navigate to Policies > DNS and click Add DNS Policy > DNS Policy.

Specify the name DNS Policy and click Save.
- Add a new rule by clicking Add DNS Rule.

Configure the rule as per screenshot below:
- Name: Block Malicious DNS
- Action: Domain not Found
- DNS: Select ALL elements available in the DNS Lists and Feeds lists (from DNS Attackers to DNS Tor_exit_node). Click on Add to Rule.
Note
Please do not add 'Global-Block-List-for-DNS' and 'Global-Do-Not-Block-List-for-DNS' to Selected Items.
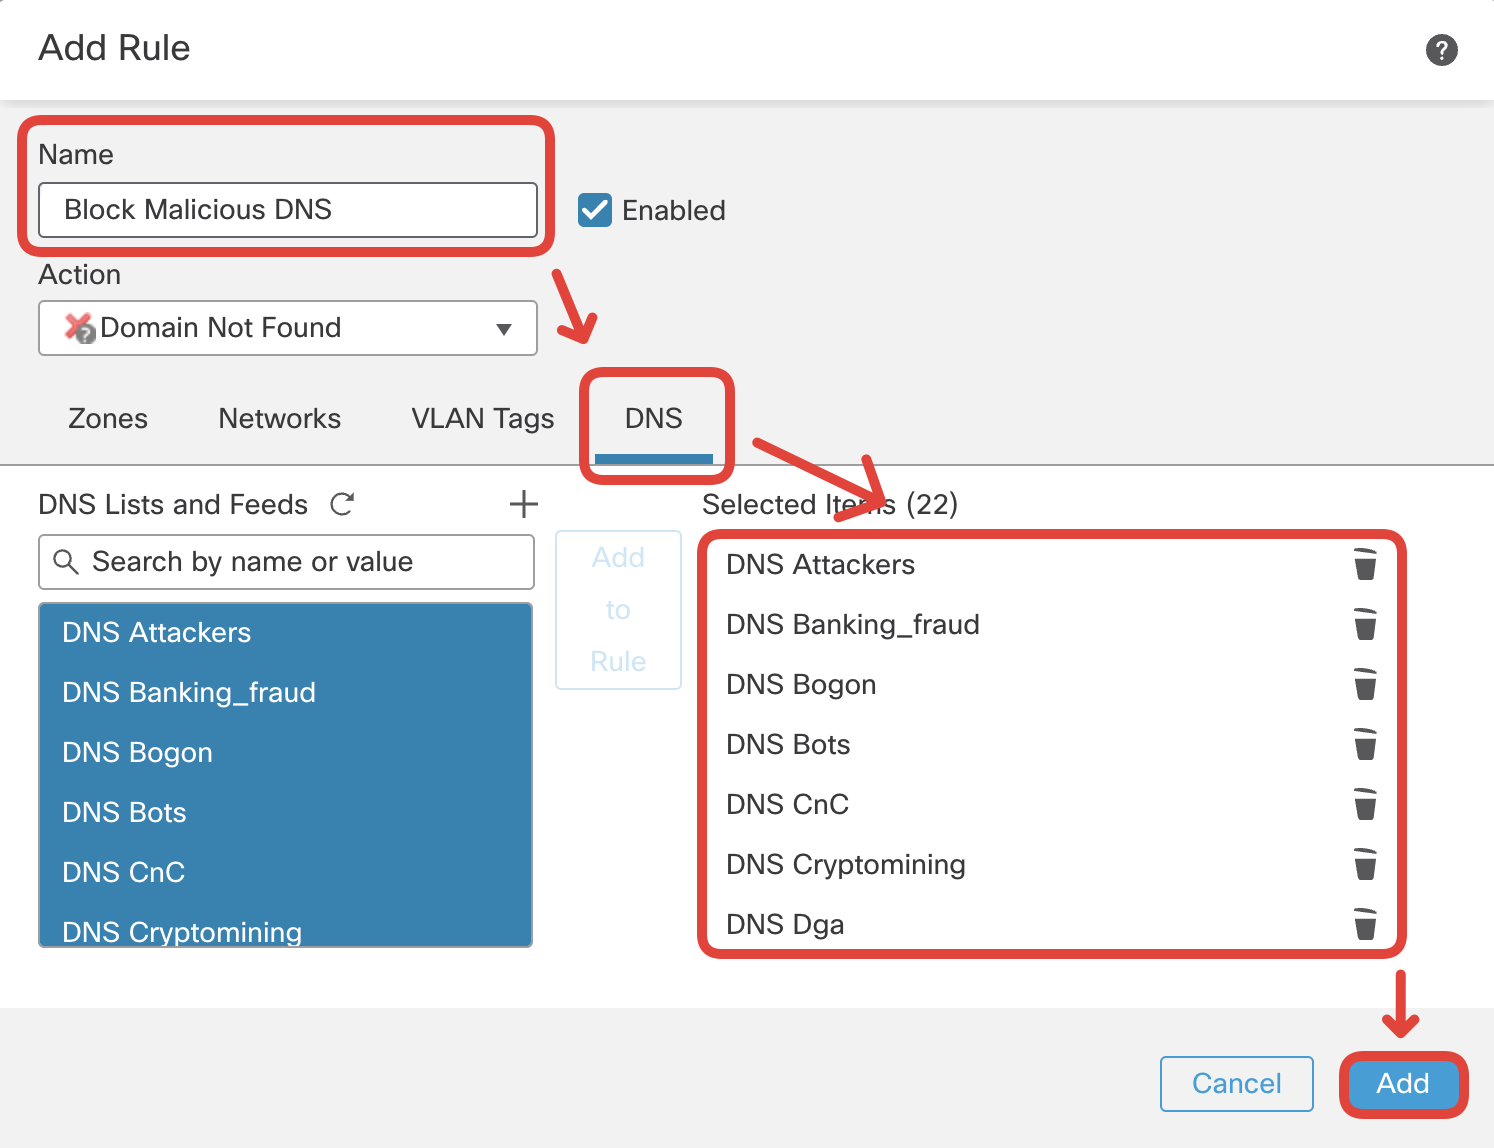
Click Add.
-
Ensure the new rule is properly configured and click Save.

Note
The other available actions for a DNS rule are - 'Do Not Block', 'Monitor', 'Drop', and 'Sinkhole'.
III. FILE POLICY
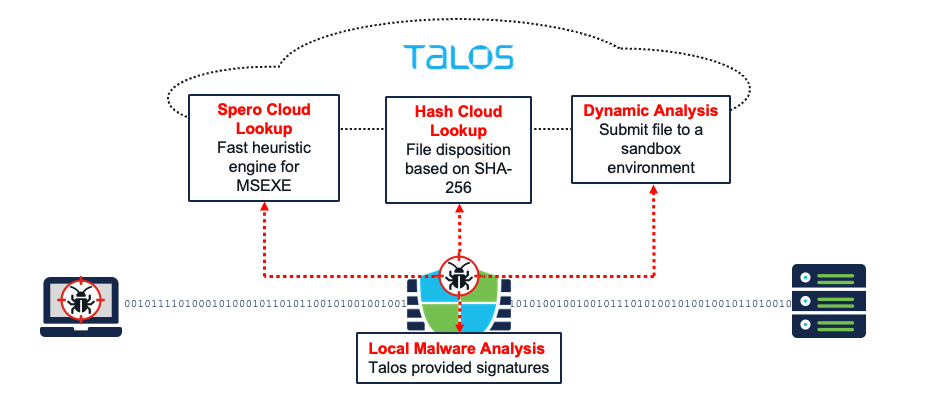
A file policy is a set of configurations that the system uses to perform malware protection and file control, as part of your overall access control configuration. This association ensures that before the system passes a file in traffic that matches an access control rule’s conditions, it first inspects the file. Cisco Secure Firewall supports a few types of file analysis to provide the best protection:
- Spero Analysis - Spero analysis examines structural characteristics such as metadata and header information in executable files. After generating a Spero signature based on this information, if the file is an eligible executable file, the device submits it to the Spero heuristic engine in the AMP cloud
- Local Malware Analysis - Local malware analysis allows a managed device to locally inspect executables, PDFs, office documents, and other types of files for the most common types of malware, using a detection rule set provided by the Talos Intelligence Group.
- Hash Cloud Lookup - Querying the TALOS cloud for the file's disposition based on its SHA-256 hash value.
- Dynamic Analysis - submit files for dynamic analysis using Secure Malware Analytics (formerly Threat Grid), Cisco’s file analysis and threat intelligence platform. Secure Malware Analytics runs the file in a sandbox environment, analyzes the file's behavior to determine whether the file is malicious, and returns a threat score that indicates the likelihood that a file contains malware.
-
Create a new file policy. Navigate to Policies > Malware & File and click New File Policy.

-
Set the name to File Policy and click Save.
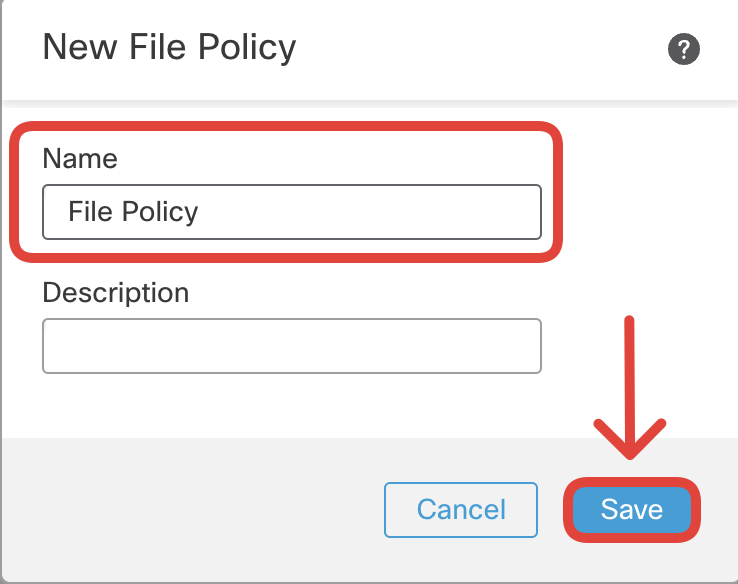
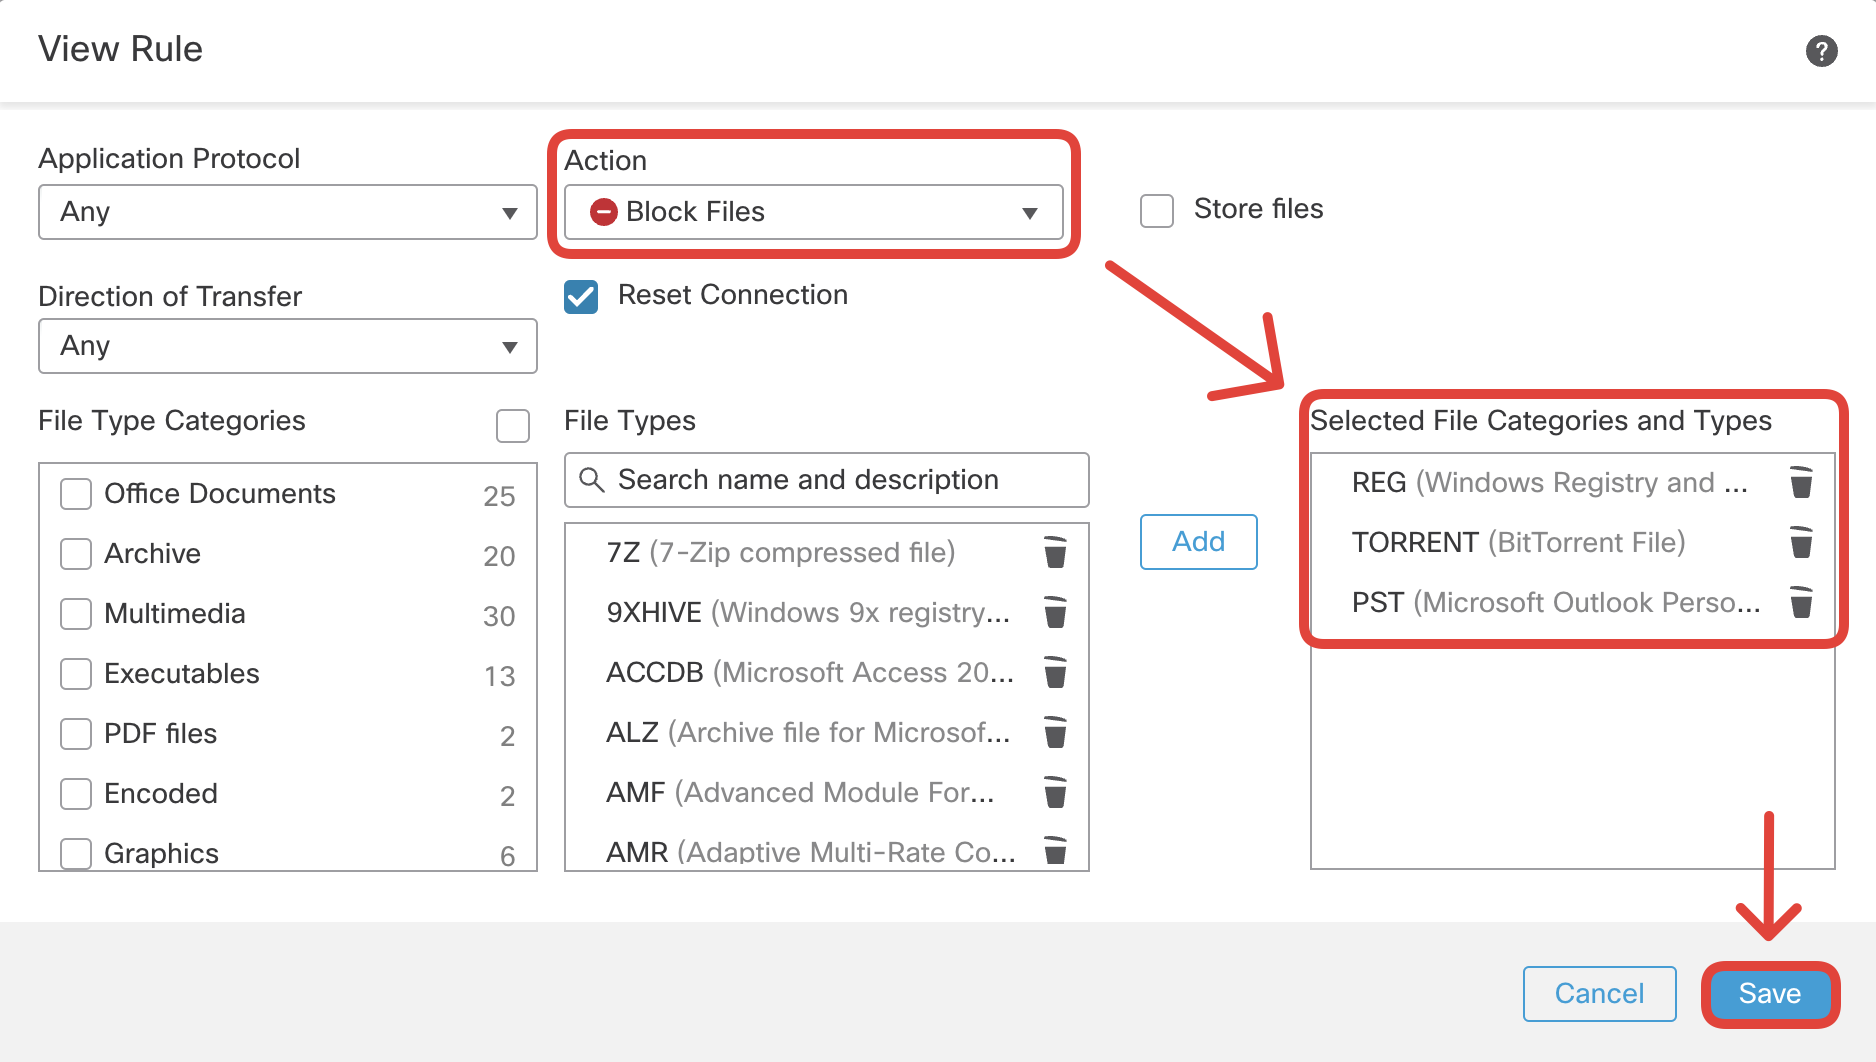
- First, you add a rule that disallows sending certain file types through the firewall.
Note
The firewall uses the concept of File Magic to detect a file type. File Magic is a Hex word in the beginning of every file that is unique for their type and respective version. Below are a few examples of magic numbers for common file types:
Portable Network Graphics (PNG): 89 50 4E 47 0D 0A 1A 0A
MS Outlook Personal Storage Table (PST): 21 42 44 4E
PDF Document (version 1.0): 25 50 44 46 2D 31 2E 30
PDF Document (version 1.7): 25 50 44 46 2D 31 2E 37
Click Add rule.

Set the action to Block Files and select three file types:
- REG (Windows Registry)
- TORRENT (BitTorrent File)
- PST (Microsoft Outlook Personal Storage)
Click Save.
- Add another rule to block malware found in any of all the available file categories and types as shown below:
- Click on + Add Rule.
- Action: Block Malware
- Options Selected:
- Spero Analysis for MSEXE
- Dynamic Analysis
- Local Malware Analysis
- Reset Connection.
- File Categories and Types: All files categories
Click on the checkbox against File Type Categories. Select 'All types in selected Categories' under File Types and click on Add.
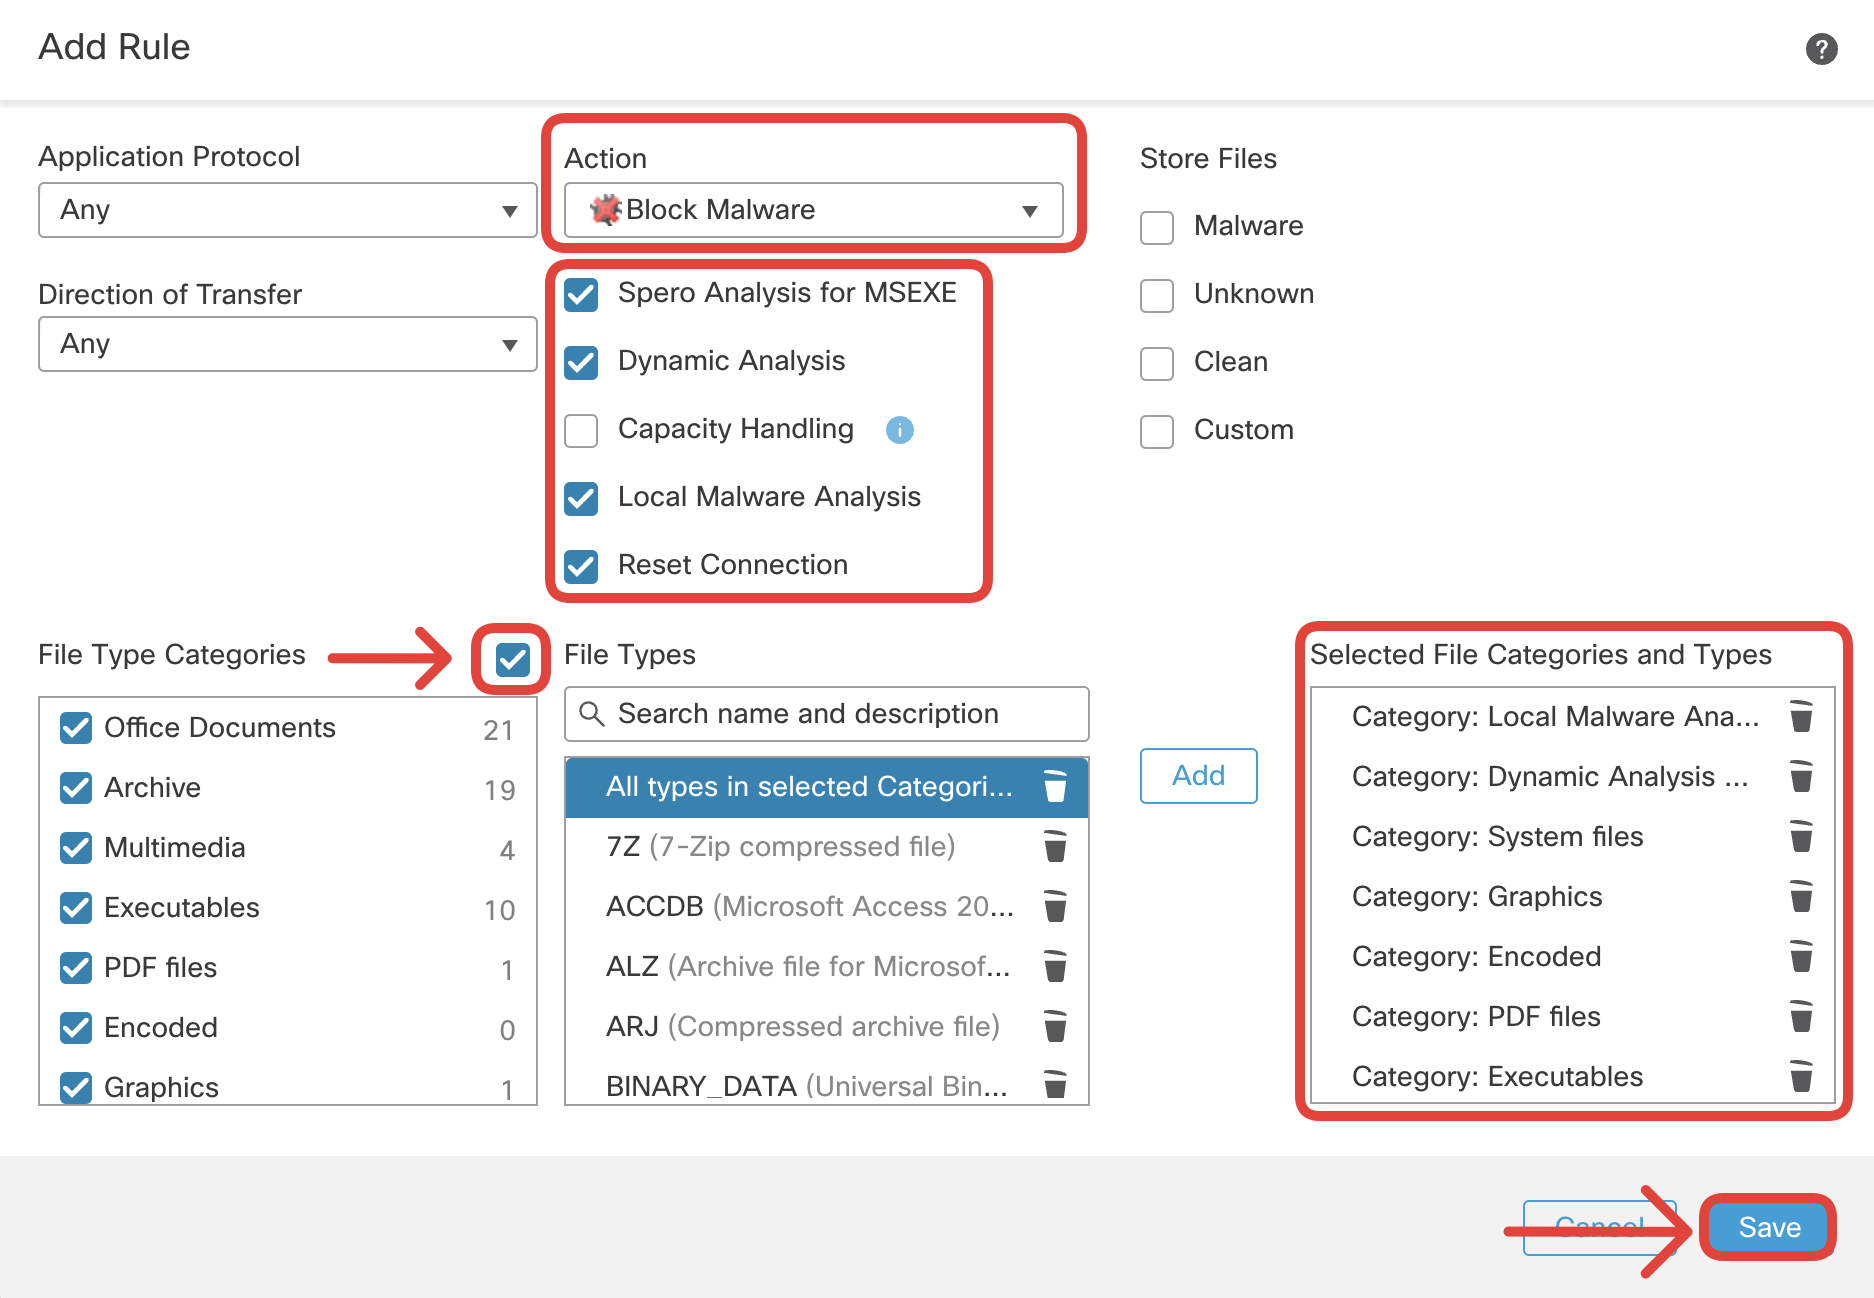
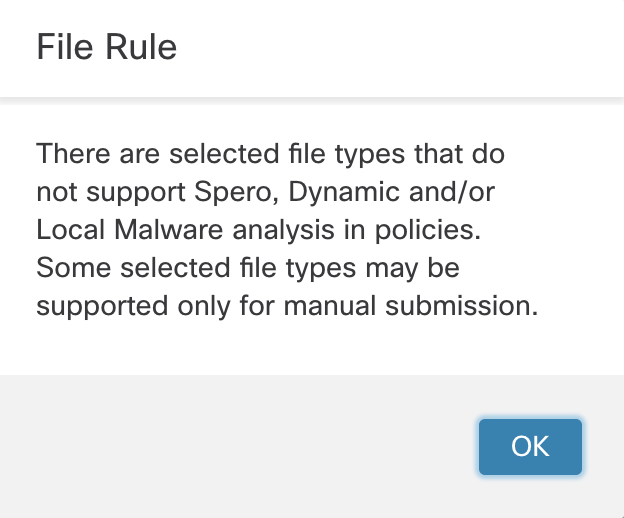
Click Save. You can ignore the warning that pops up afterward. Click OK.
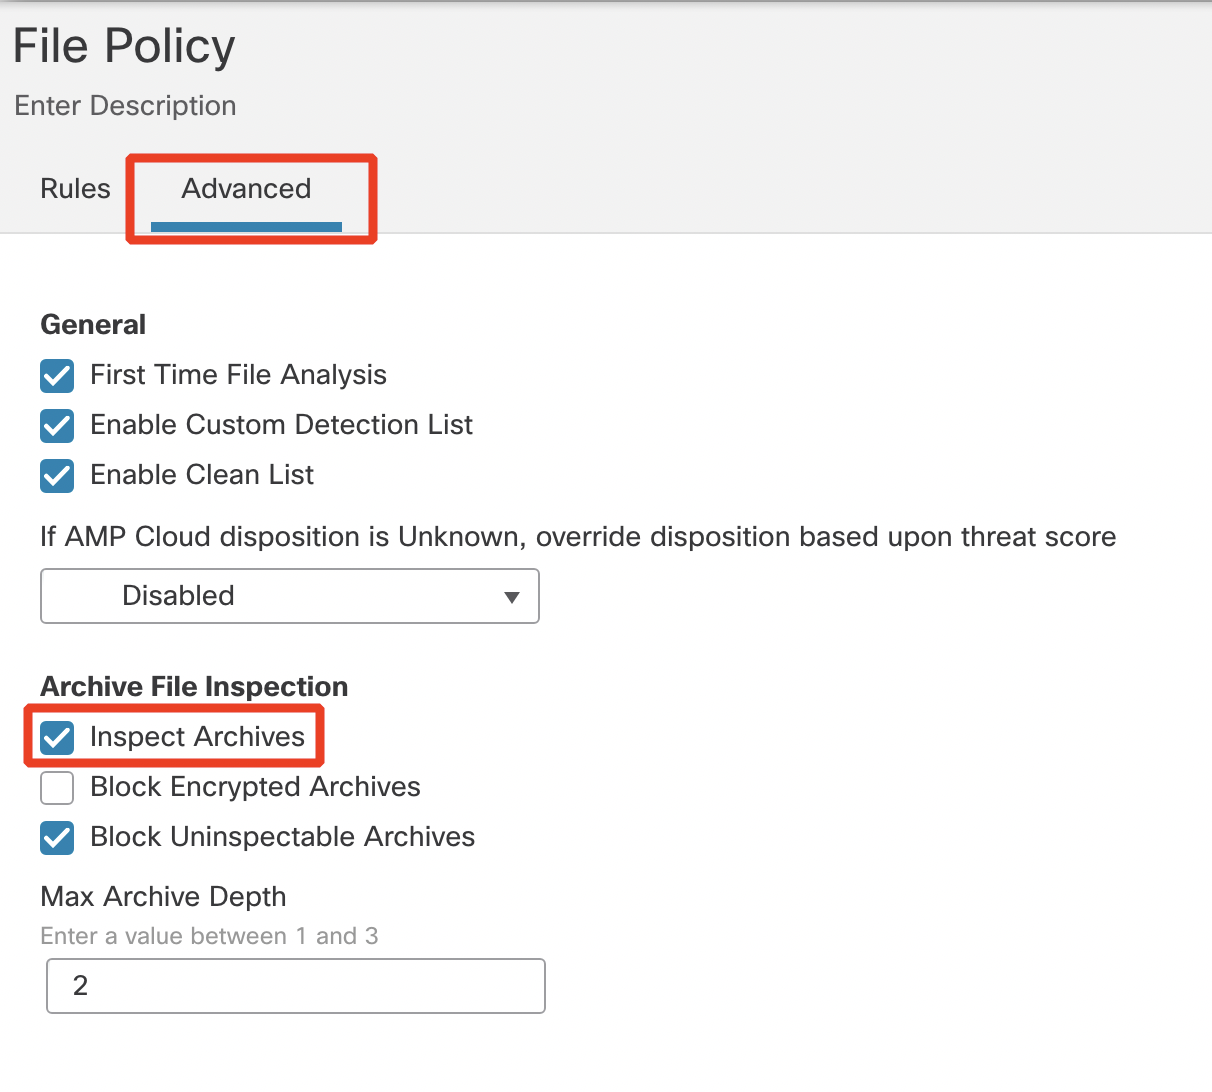
- Click on the Advanced tab. Select Inspect Archives under Archive File Inspection. Ensure that the rest of the check boxes are enabled as shown in the below screenshot.
- Go back to the Rules tab. The final File Policy should have two rules as per the screenshot below.
Note
Notice, the file policies are unordered. If more than one rule applies to a file under inspection, the following rule apply: simple blocking takes precedence over malware inspection and blocking, which takes precedence over simple detection and logging.

Click Save.
IV. INTRUSION POLICY
Intrusion policy blocks or alters malicious traffic through the firewall by examining the decoded packets for attacks based on patterns. Intrusion policies are paired with variable sets, which comprises of variables like HOME_NET, EXTERNAL_NET, DNS_SERVERS etc. These named values can be defined to accurately reflect your network environment.
The system-delivered policies have pre-set rule states and other configurations, based on the experience of Cisco Talos. The network analysis and intrusion policies have similarly named system-defined policies that complement and work with each other.
The system-defined policies in the order of least security to maximum security is as follows:
- No Rules Active
- Connectivity Over Security
- Balanced Security and Connectivity
- Security Over Connectivity
- Maximum Detection
You can also create custom network analysis and intrusion policies to change the settings best suited to your network environment.
- Navigate to Policies > Access Control > Intrusion. Click on Create Policy to create a new Intrusion Policy.

- Configure the below details:
- Name : IPS Policy
- Inspection Mode : Prevention
- Base Policy : Balanced Security and Connectivity
'Balanced Security and Connectivity' is built for both speed and detection and is recommended for most organizations. Click on the Base Policy drop-down and see the other System-Provided Policies available.
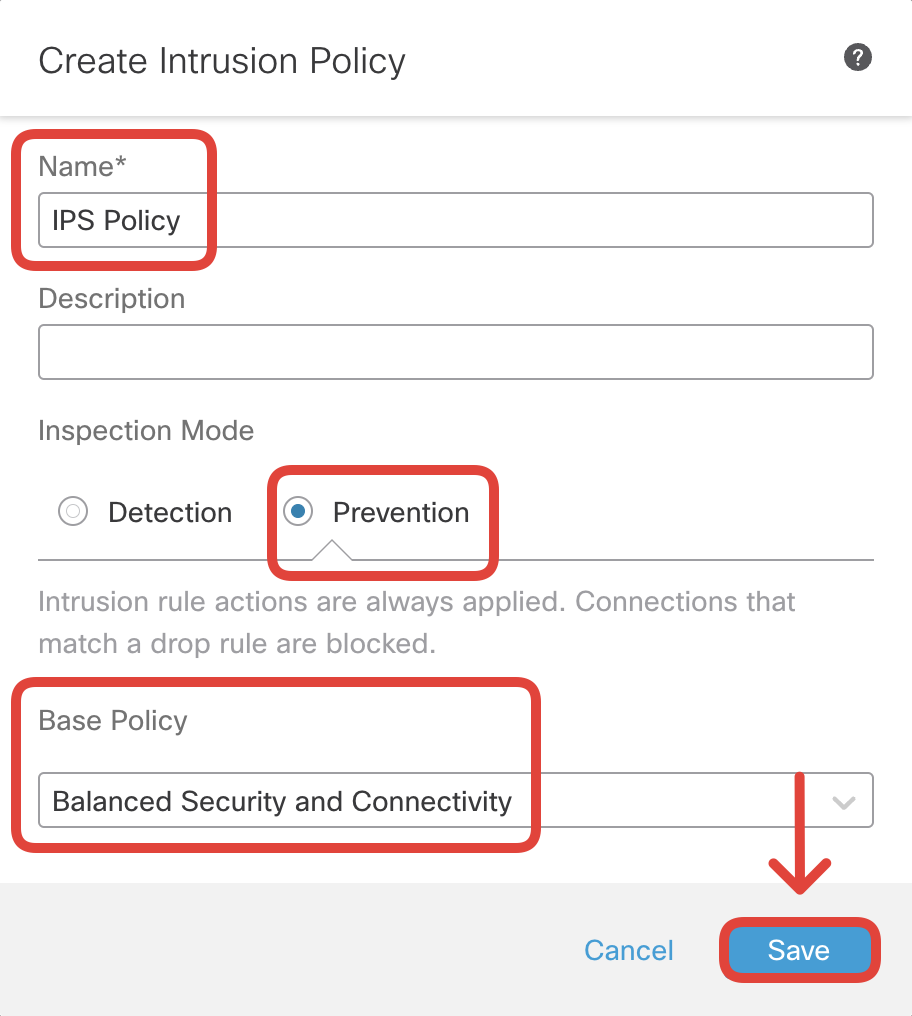
Click on Save.
V. NETWORK ANALYSIS POLICY
Network Analysis Policy decodes and preprocesses traffic before it is inspected by file or intrusion policies. It normalizes packet data into formats that the intrusion rules engine can analyze.
Various network and transport layers preprocessors detect attacks that exploit IP fragmentation, perform checksum validation, and perform TCP and UDP session preprocessing.
Note
Network Analysis Policy also has a sensitive data preprocessor, which detects sensitive data such as credit card numbers and Social Security numbers in ASCII text, in intrusion policies.
-
Click on the tab Network Analysis Policies as shown below. Click on Create Policy.

-
Configure the below details:
- Name : Network Analysis Policy
- Base Policy : Balanced Security and Connectivity
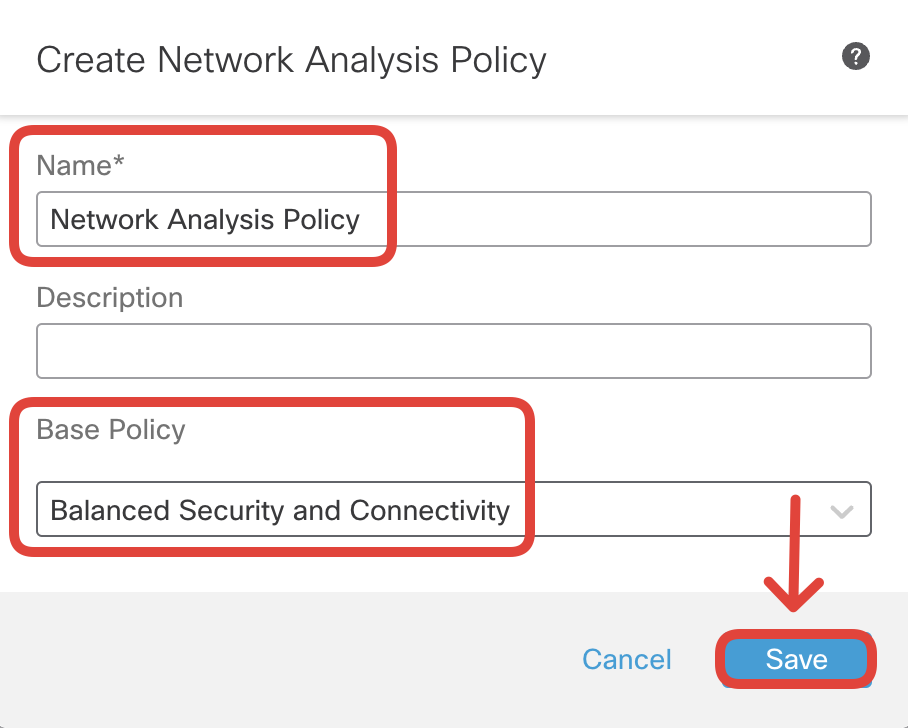
Click on Save.
VI. DECRYPTION POLICY (OPTIONAL)
The TLS decryption governs how the Secure Firewall Threat Defense handles encrypted traffic. Visibility into TLS encrypted traffic provides better information for IPS inspection, File and Malware detection, and micro application visibility.
TLS decryption policy configuration is an optional step in this laboratory. The set of tests in the AttackIQ bundle was chosen to test firewall capabilities without decrypting TLS traffic.
This task should take you between 10-20 minutes to complete.
If you are short on time, you can skip this part and continue to VII. Access Control Policy.
The TLS decryption setup requires the firewall to become a Man-in-the-middle device, performing full decryption of traffic between the client and the server. The TLS handshake is specifically designed to protect against eavesdropping and tampering with the encrypted content. To prevent the TLS handshake from breaking, the firewall spoofs external servers' certificates on the fly, making the client believe it is talking to the legitimate server. For this to work we need to equip the firewall with the right set of certificates.
-
Let's start with adding the Root CA certificate, trusted by the client device. Navigate to Objects > Object Management.
Click on PKI > Trusted CAs. Click on Add Trusted CA.


- Download the dCloud Root CA certificate from this link: http://tmedemos.cisco.com/Lab_Downloads/Certificates/dCloud_RootCA.cer and import it to your management center as per the screenshot below. This Root CA certificate is already installed and trusted on the Windows endpoint in your lab setup. Root certificates are added to trust CAs to verify server certificates used to encrypt traffic.
Type in the Name as 'dCloud_RootCA' and click on Browse to import the certificate.
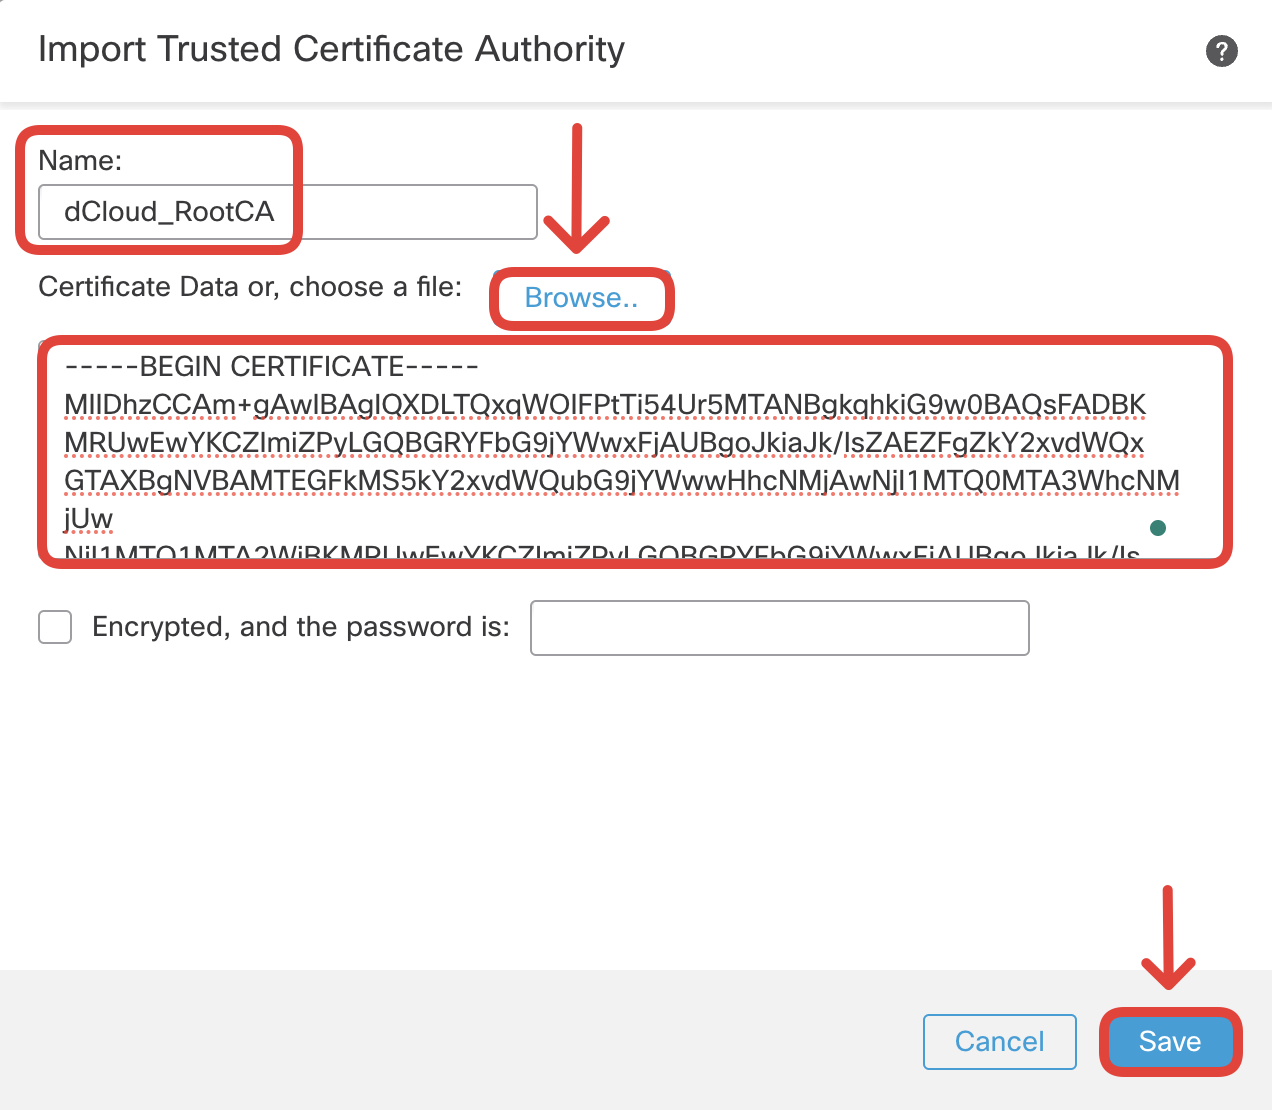
- In this step, you import a Subordinate CA certificate that will be used by the firewall to spoof external servers' certificates on the fly. This certificate is imported along with the associated private key. Navigate to Objects > Object Management > PKI > Internal CAs and click Import CA.

- Download the certificate and the private key using following links: http://tmedemos.cisco.com/Lab_Downloads/Certificates/dCloud_TLS_Decrypt_SubCA.cer and http://tmedemos.cisco.com/Lab_Downloads/Certificates/dCloud_TLS_Decrypt_SubCA.key. This Subordinate CA certificate was issued by the Root CA trusted by the endpoint. The client will trust any certificate issued by the firewall using this Subordinate CA. Import the certificate and the private key to your management center as per the screenshot below.
Type in the Name as 'dCloud_Decrypt_SubCA'. Click on Browse against Certificate Data to import the certificate. Click on Browse against Key to import the key file.
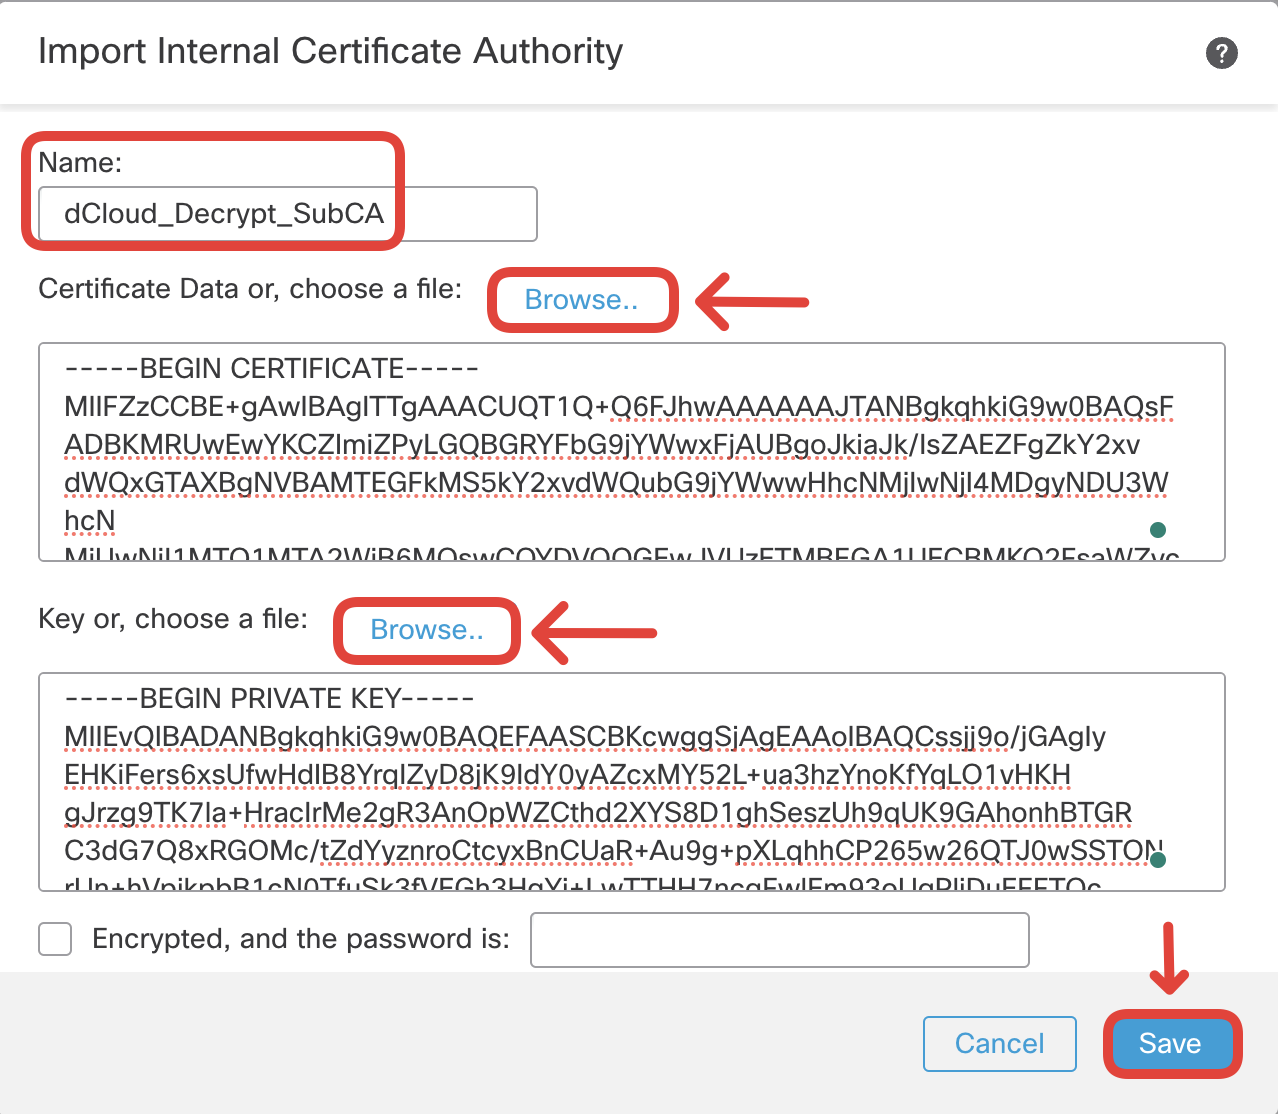
- Ensure the Subordinate certificate is now listed on the Internal CAs page.

- With the certificate setup complete, configure a new TLS decryption policy. Navigate to Policies > Access Control > Decryption. Click on Create Decryption Policy.

- Set the name to TLS Decryption Policy. The initial configured window offers a simplified configuration of User Protection (key-resign) and Server Protection (known-key) decryption. Have a look at both tabs presenting outbound and inbound connections and the block diagrams of each option. In this task, you will configure the TLS Decryption rules manually. Click Save.
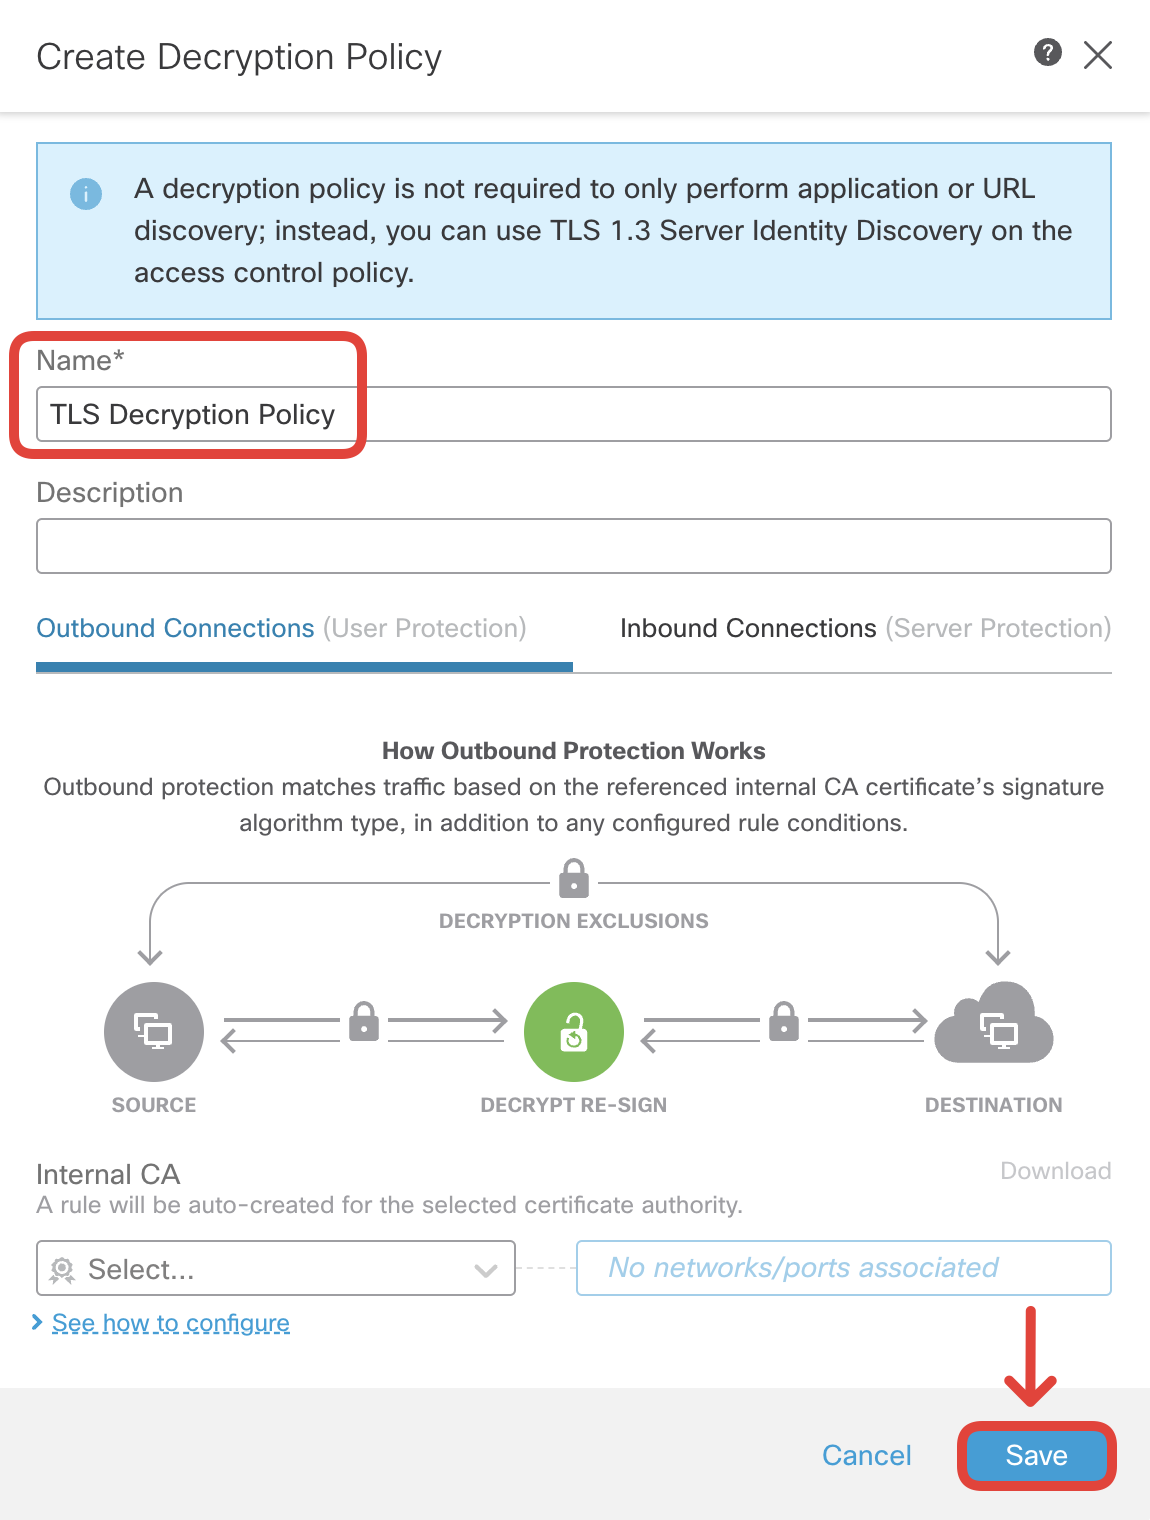
- Edit the new TLS policy by clicking on the pencil icon on the right.

- Click on the Advanced Settings and confirm the decryption policy uses adaptive TLS Server identity probe and is set to decrypt TLS 1.3.
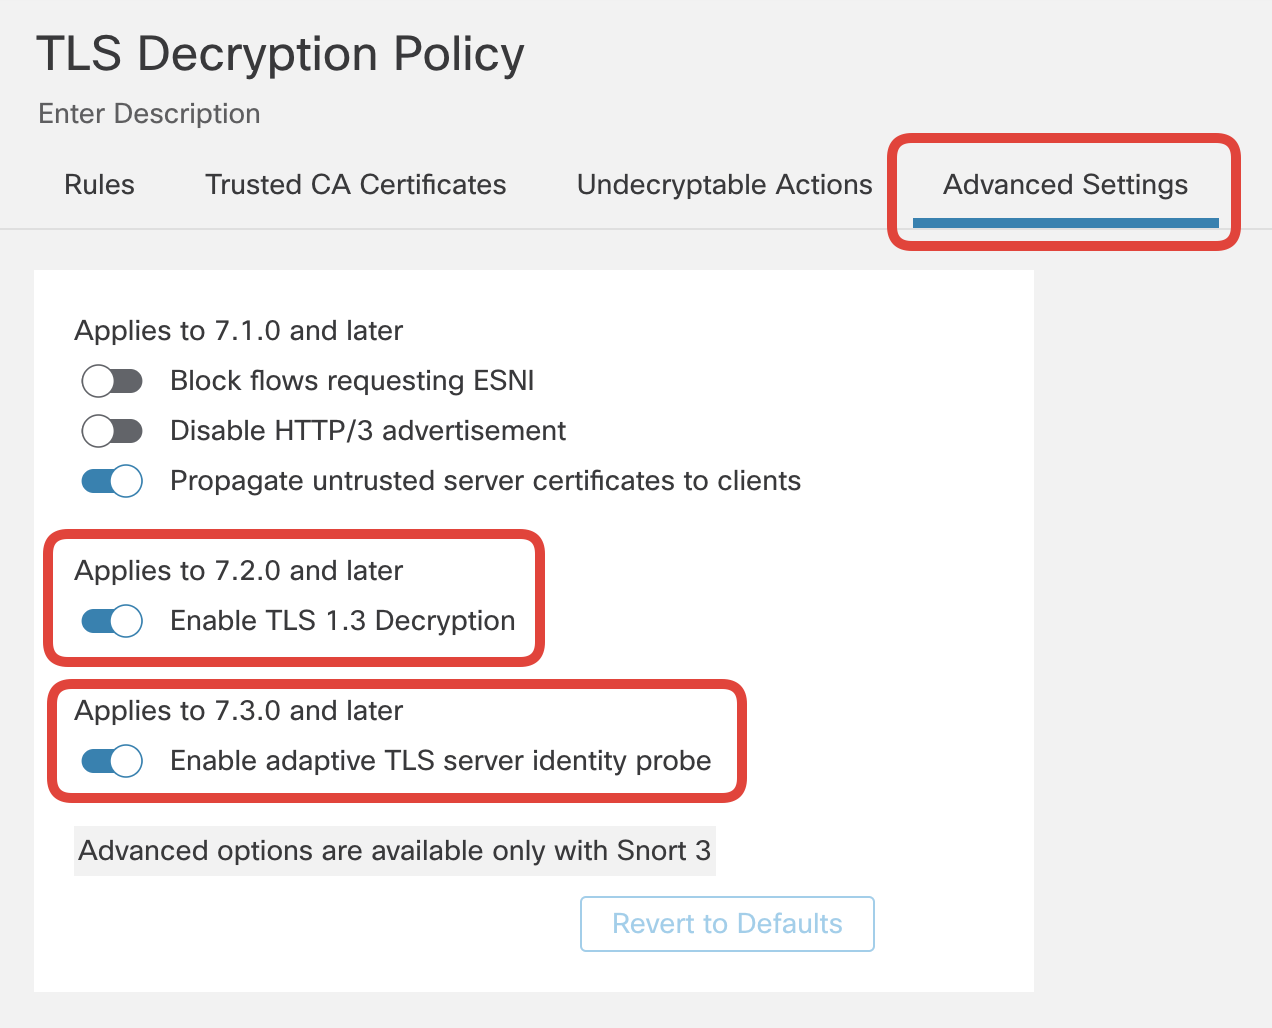
- Switch to the Rules tab and click on Add Rule.

- It is not possible to decrypt every TLS connection passing through the firewall, due to certificate pinning, and application intolerance for tampering with the TLS flow or performance of the hardware. In most deployments, the decryption policy at the top has a set of rules excluding undecryptable flows from decryption.
Note
TLS decryption is a complex process of installing a firewall as a man-in-the-middle between client and server. The TLS protocol is specifically designed to protect client's privacy, and the only reason we can hack the handshake is due to the control over certificate trust on the client machine (trusted Root CA installed). Some sites and applications put extra effort into protecting TLS handshake with certificate pinning. In such cases, the application on the client side, has the original server or root CA hardcoded and does not trust the resigned certificate spoofed by the firewall.
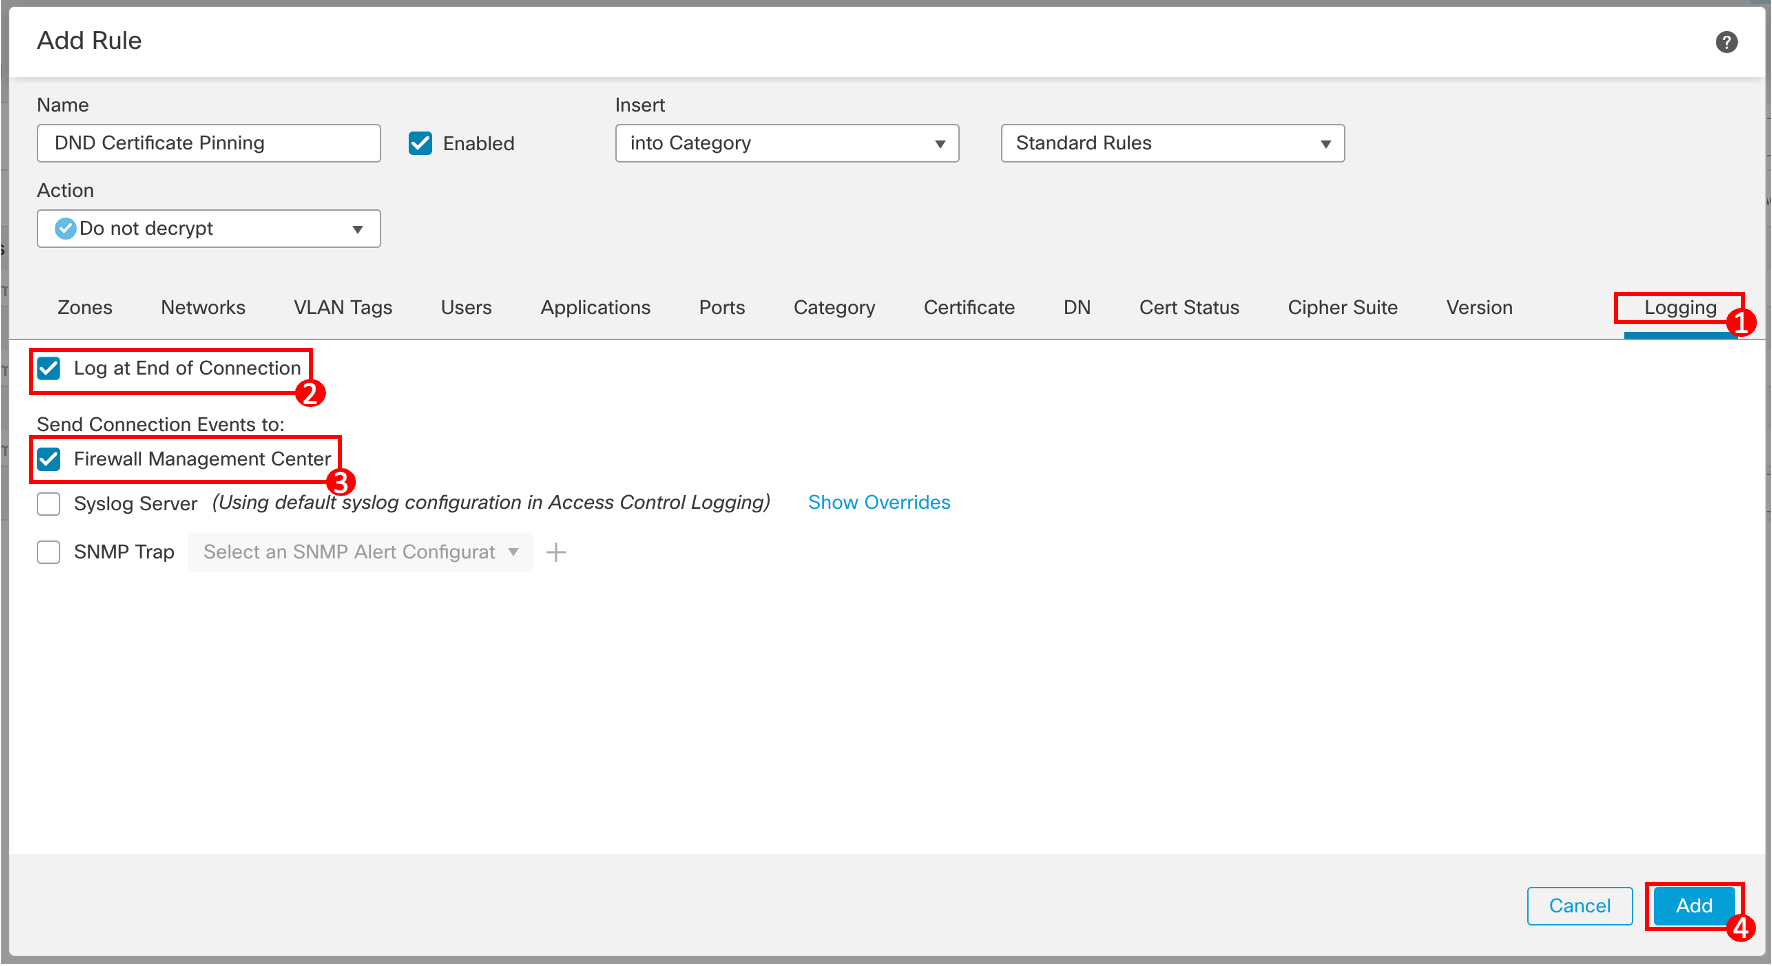
The first rule you configure tells the firewall to not decrypt certificate-pinned applications. Configure the rule as per the screenshot below:
Click on + Add Rule.
Name: DND Certificate Pinning
Action: Do not decrypt
Applications: Select Tags: undecryptable
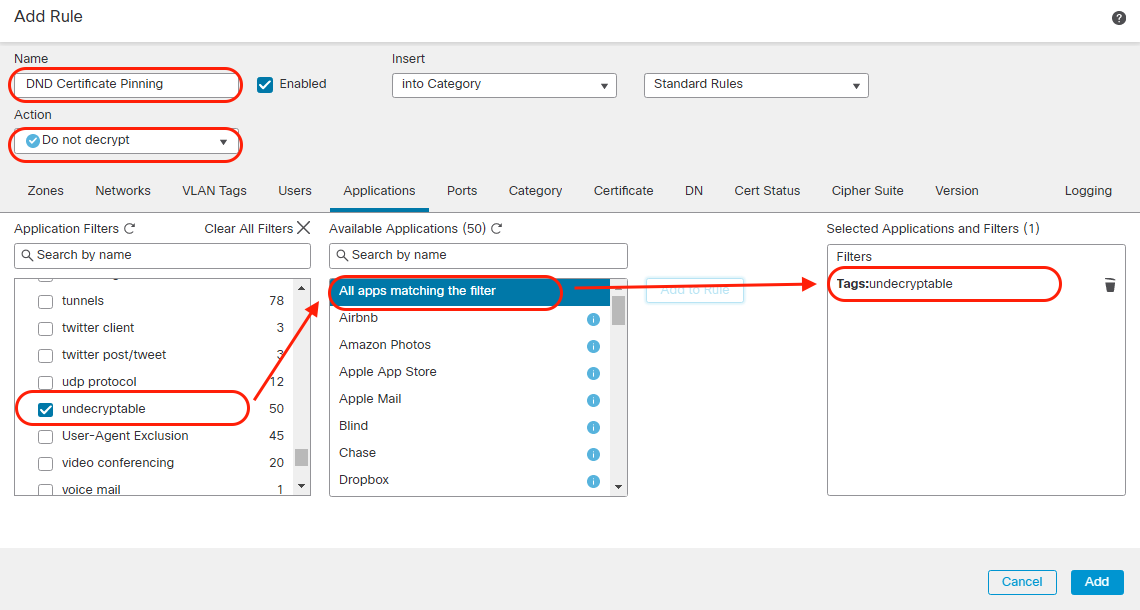
Switch over to Logging tab and configure Log at End of Connection and send events to Firewall Management Center. Then click Add.
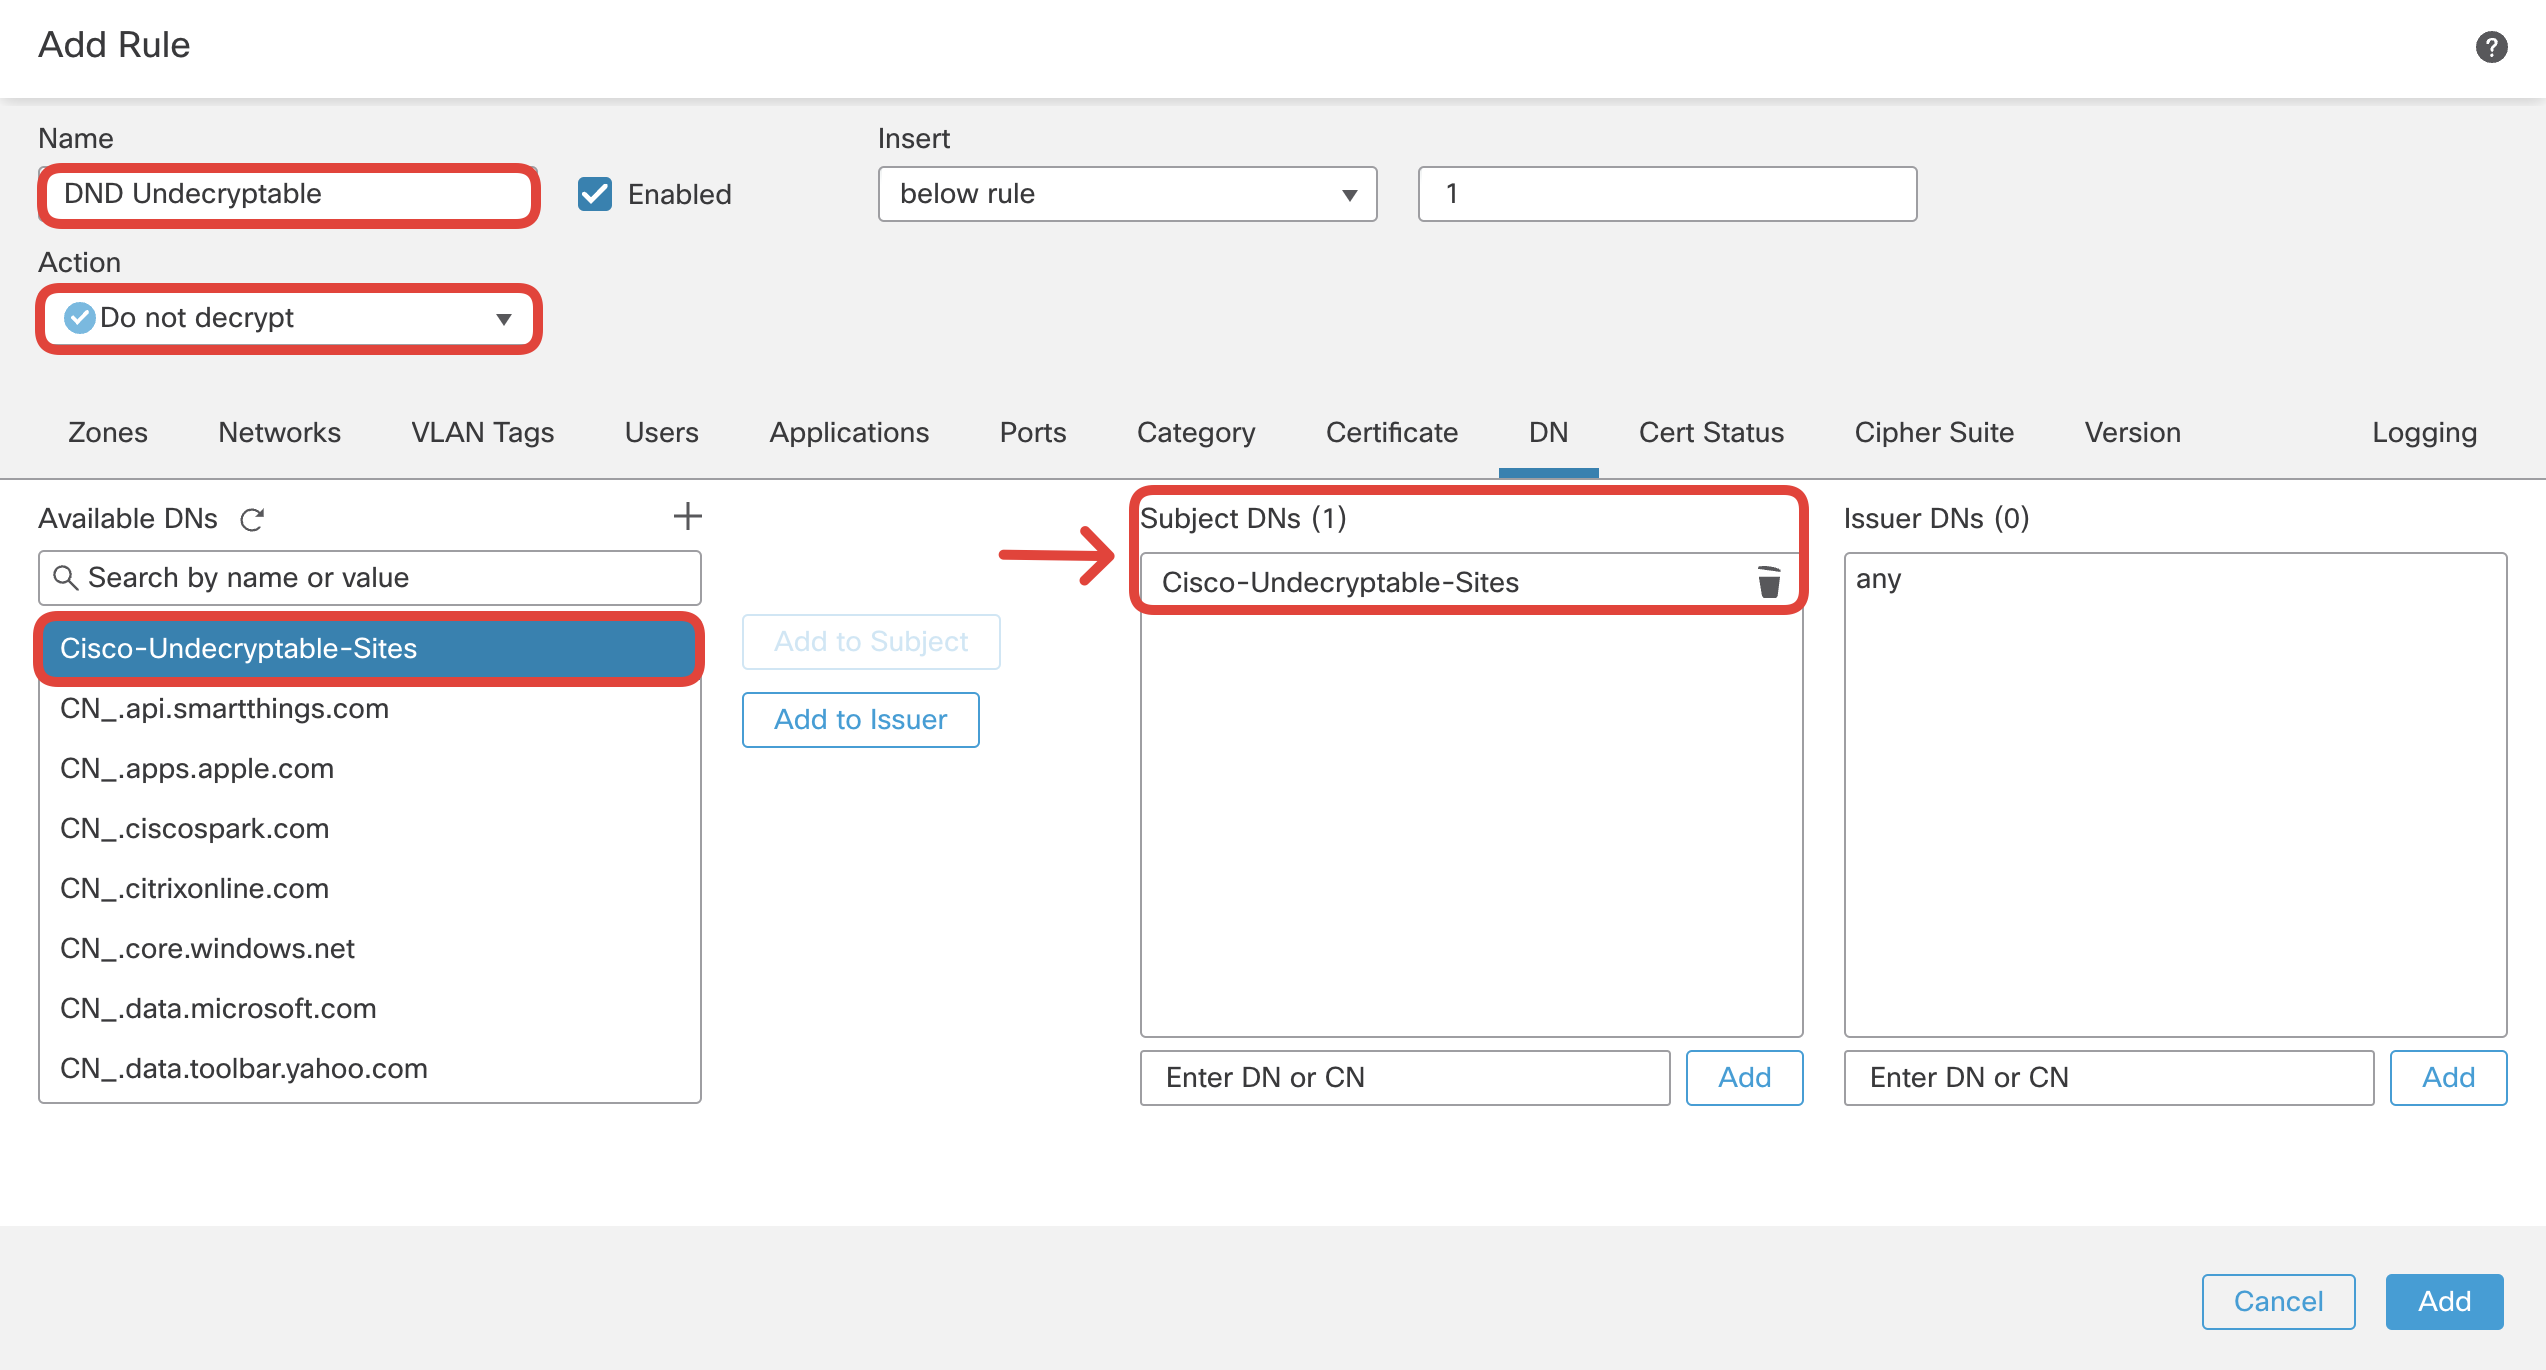
- Add the second "Do not Decrypt" rule excluding sites that Cisco identified as undecryptable.
Click on + Add Rule.
Name: DND Undecryptable
Action: Do not decrypt
Navigate to DN tab. Select 'Cisco-Undecryptable-Sites' and click on Add to Subject.
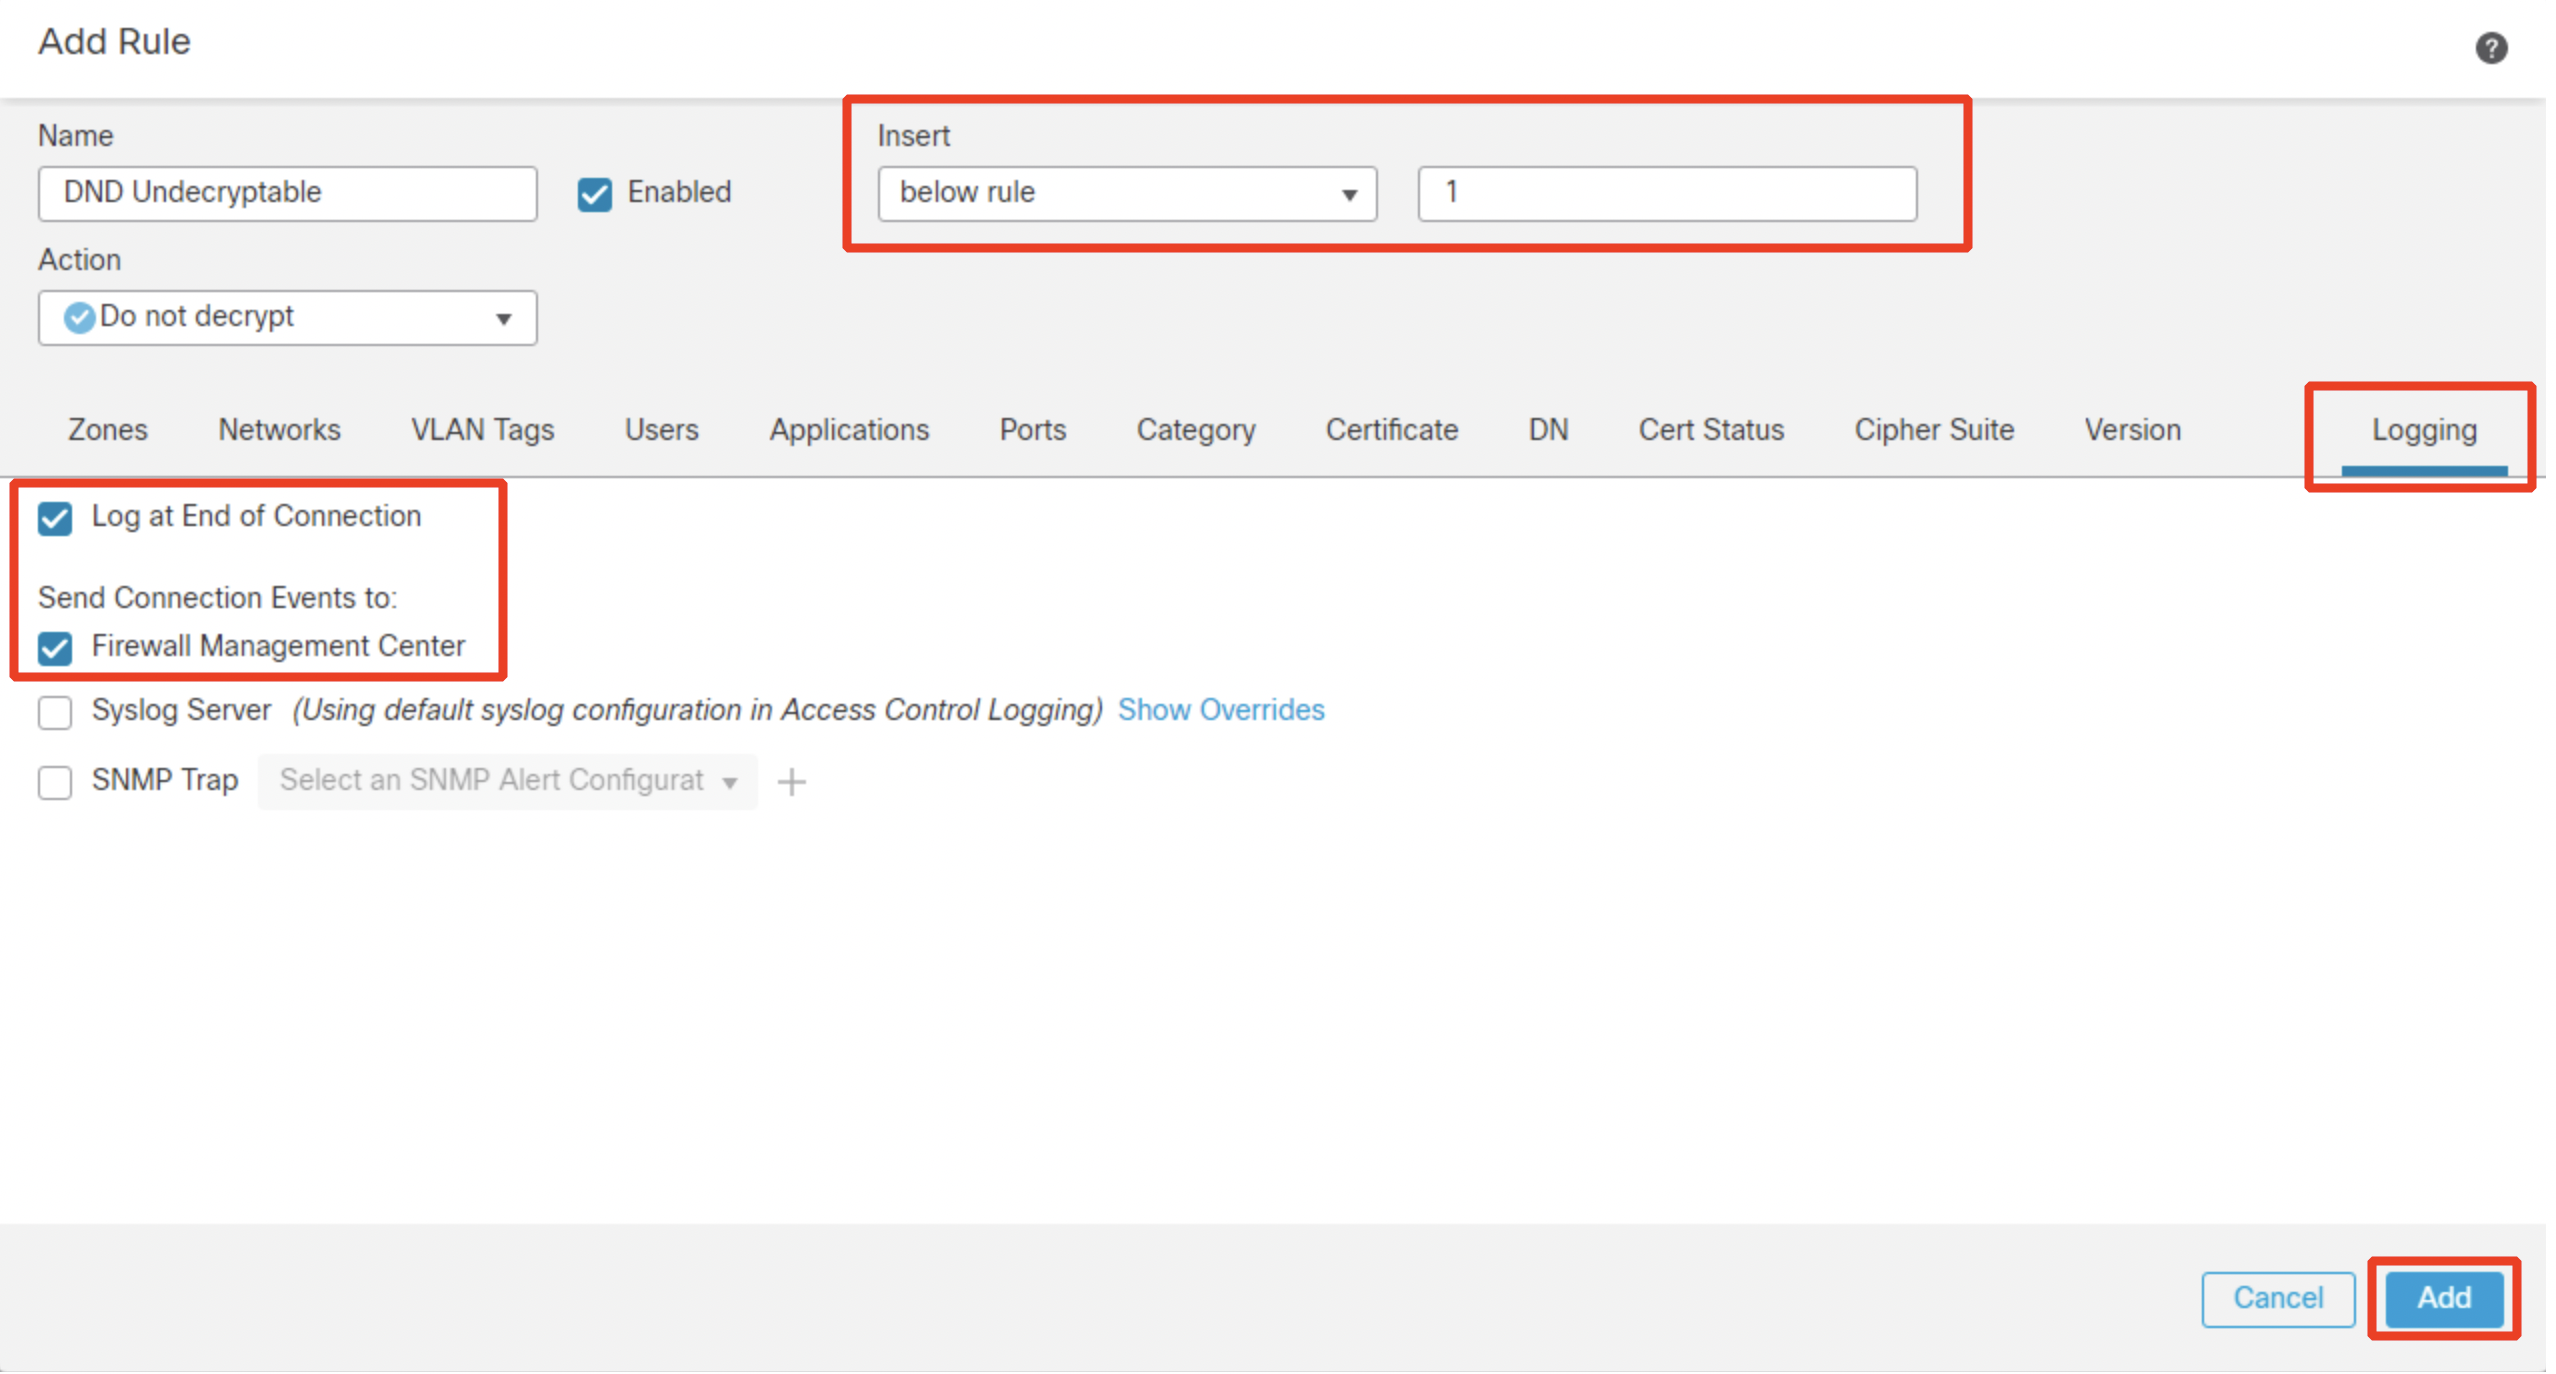
Switch over to Logging tab and configure Log at End of Connection and send events to Firewall Management Center. Then click Add.
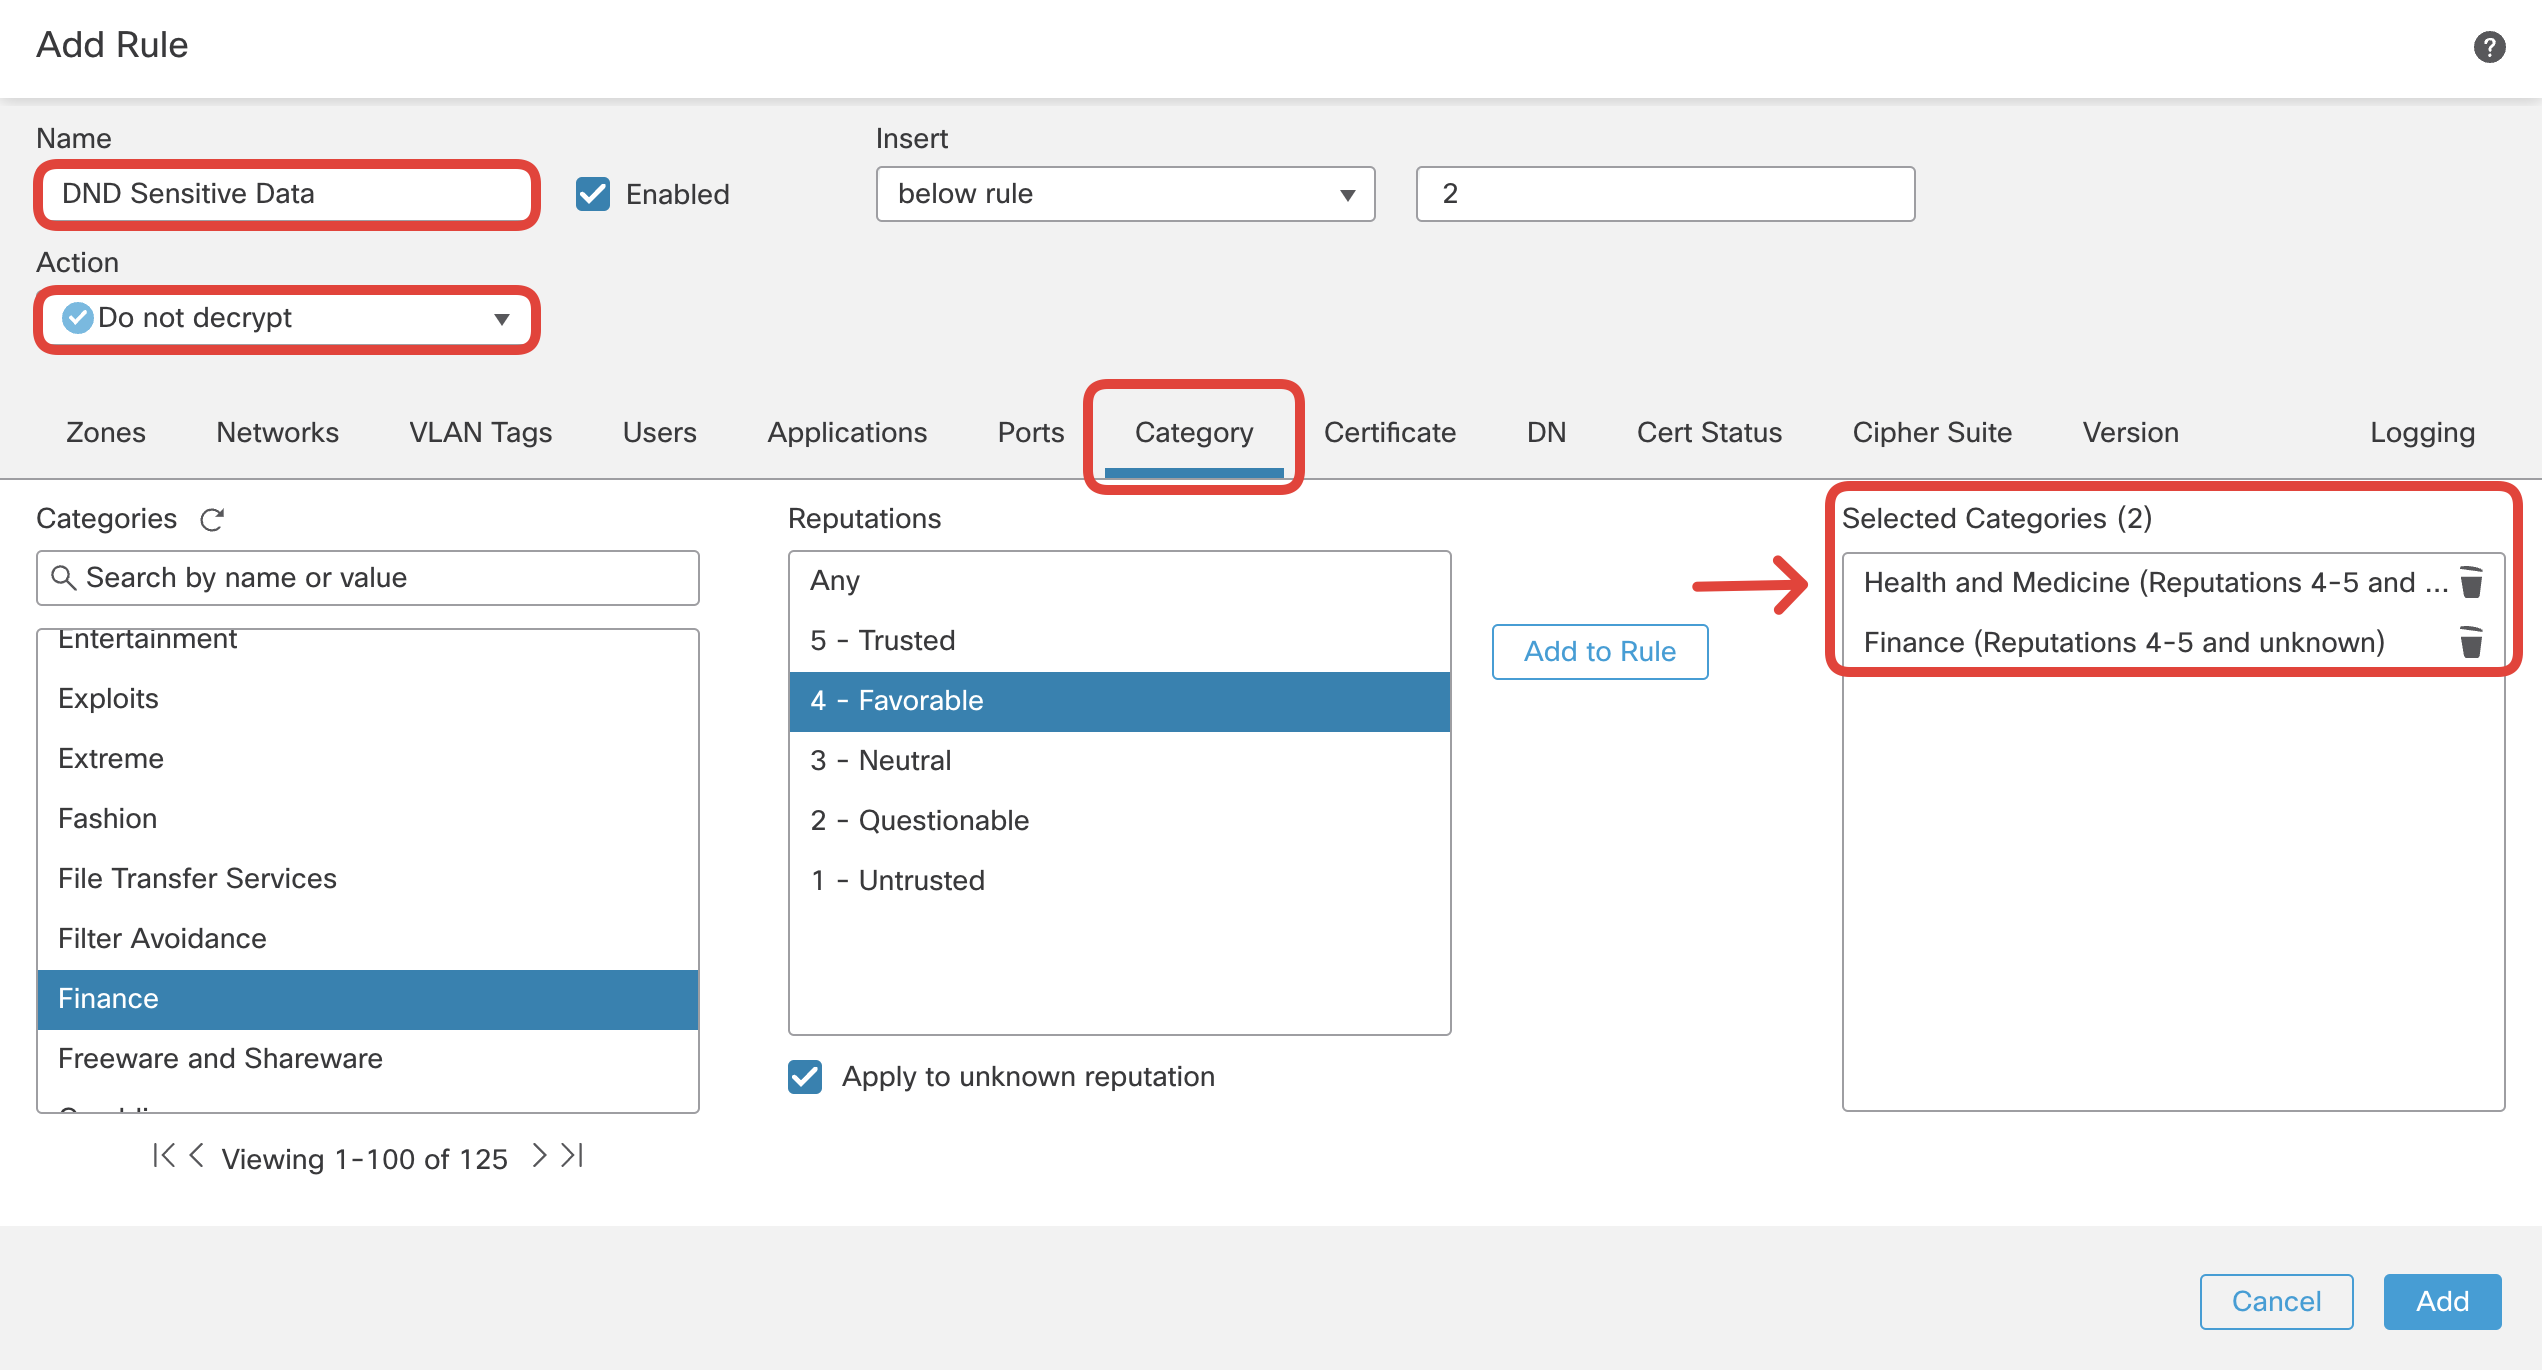
- Add the third "Do not Decrypt" rule. This time you exclude sensitive data services that should remain encrypted due to legal requirements and/or user comfort.
Click on + Add Rule.
Name: DND Sensitive Data
Action: Do not decrypt
Navigate to Category:
i. Categories: Health and Medicine
ii. Reputations: 4 - Favorable. Click on Add to Rule.
Again select:
i. Categories: Finance
ii. Reputations: 4 - Favorable. Click on Add to Rule.
Note
Reputation is how likely the URL is to be used for purposes that might be against your organization’s security policy. It ranges from Untrusted (level 1) to Trusted (level 5).
Switch over to Logging tab and configure Log at End of Connection and send events to Firewall Management Center. Then click Add.
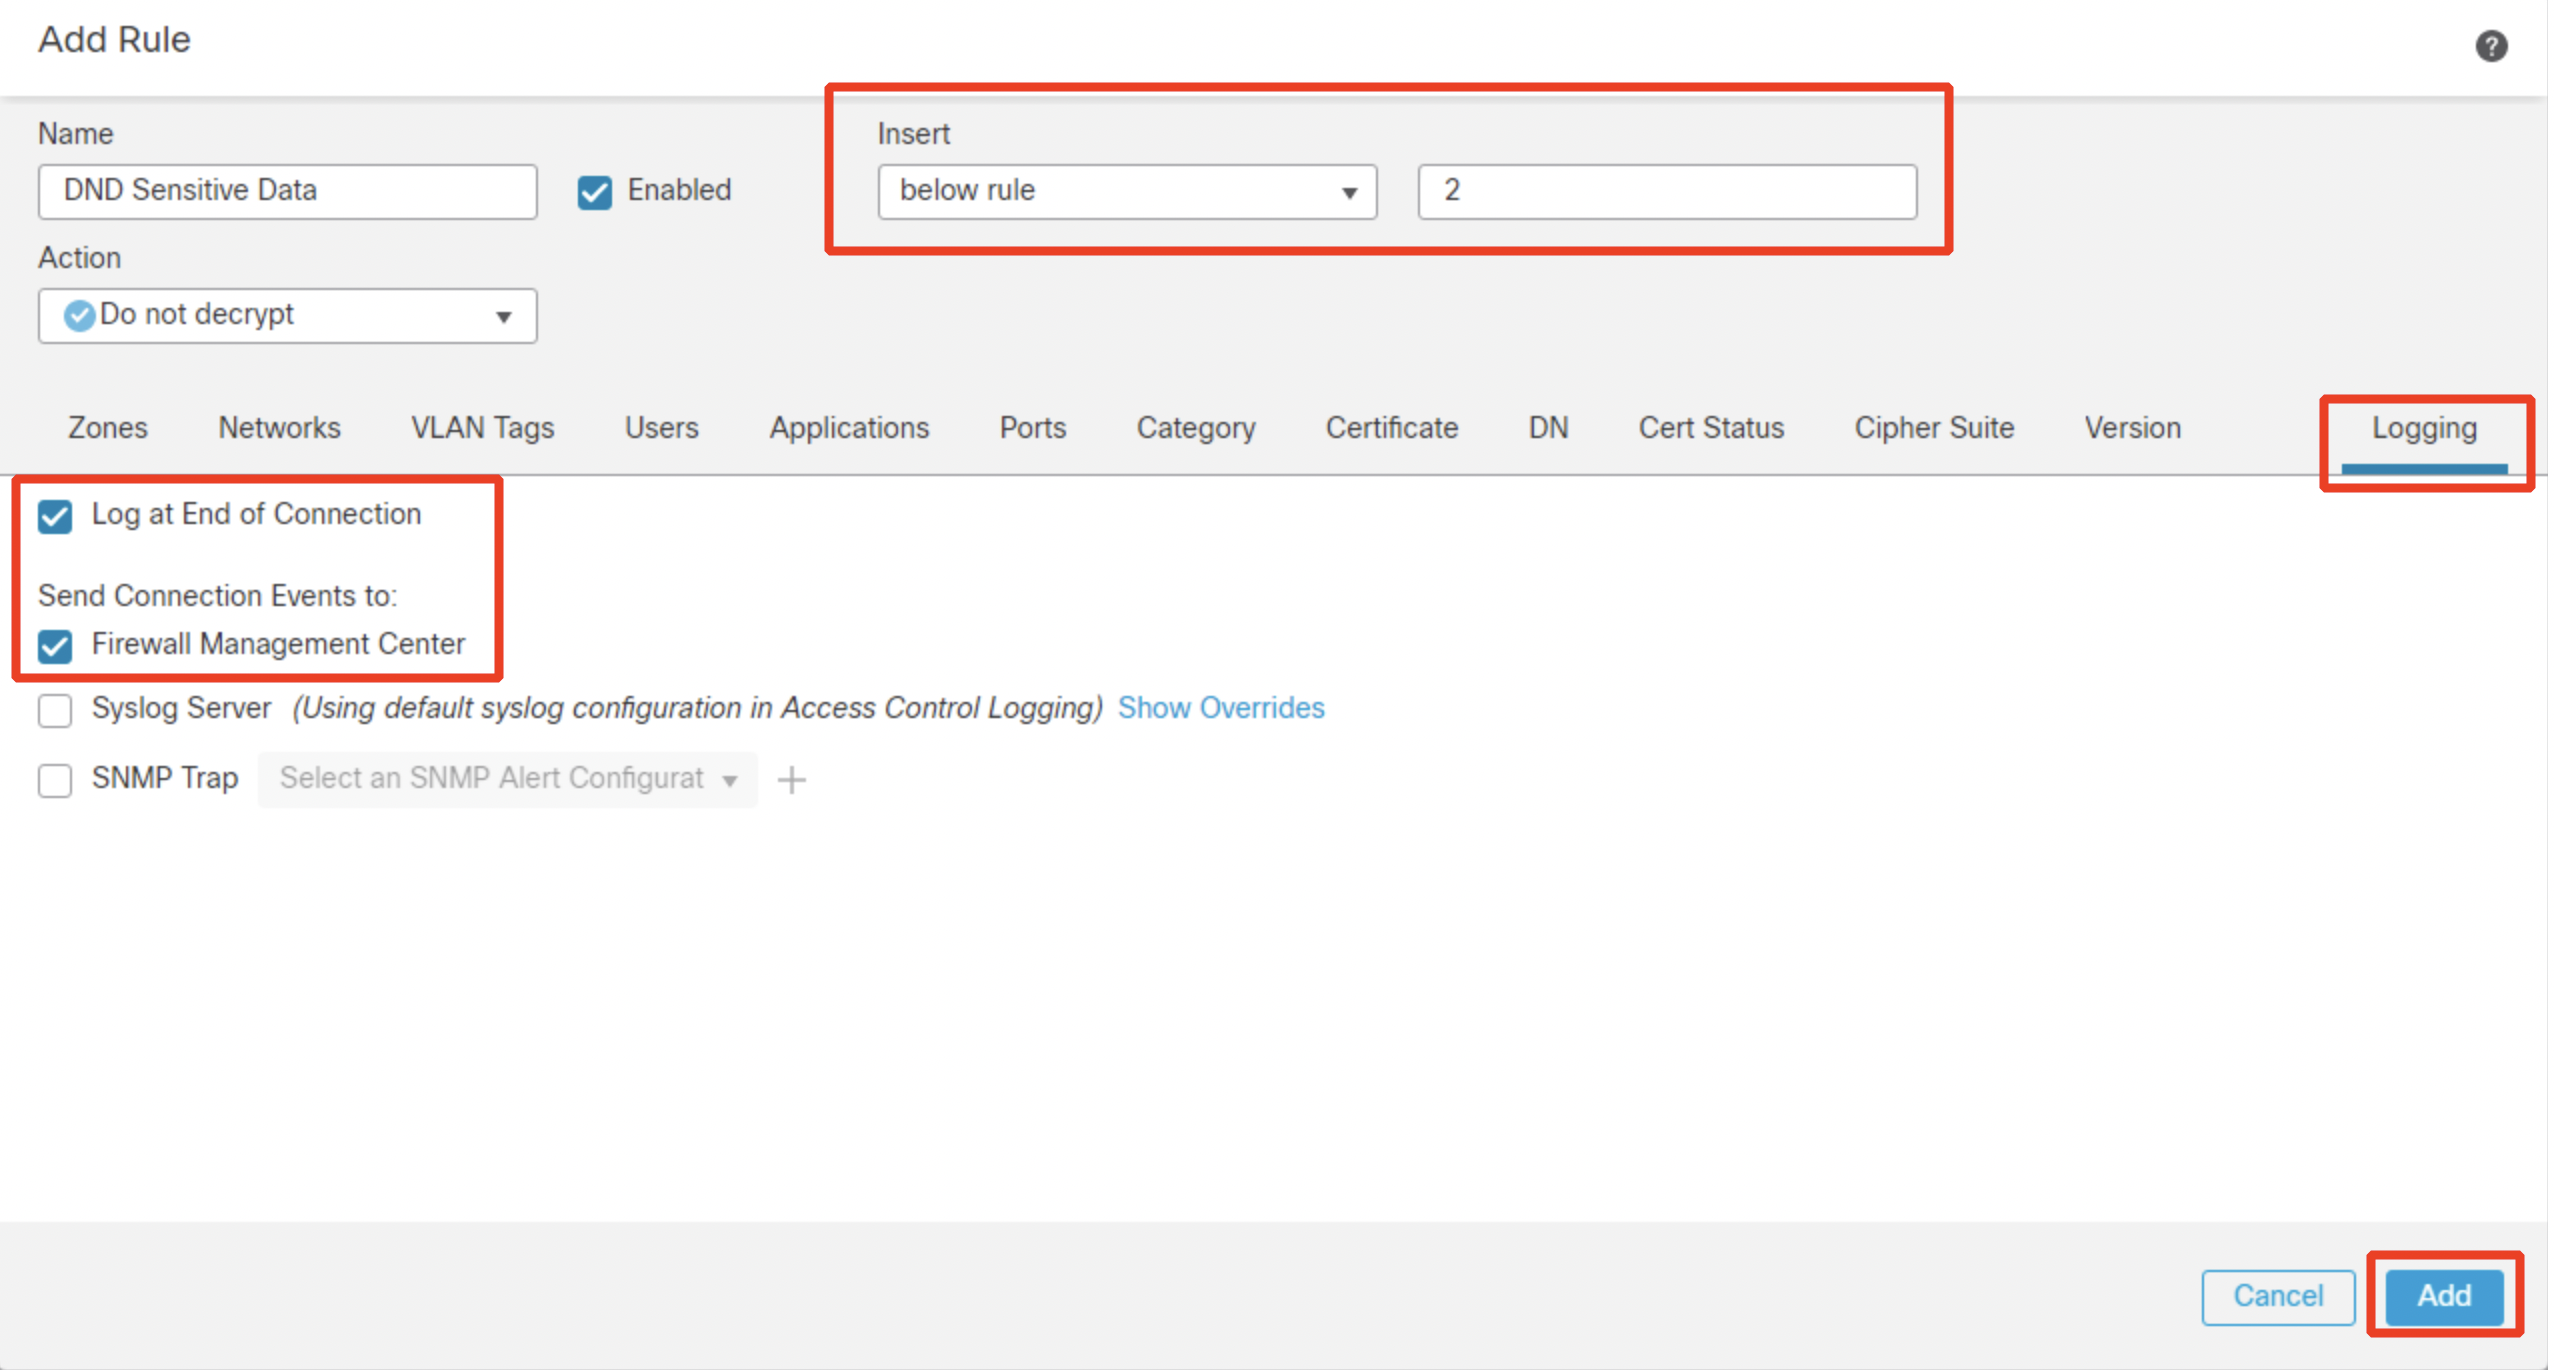
- Now you configure two decryption rules focusing on the most risky applications and URL categories. Add another rule.
Click on + Add Rule.
Name: Decrypt High Risk Apps
Action: Decrypt -Resign with dCloud_Decrypt_SubCA

Switch to the Applications tab and select Application Filters to match:
Risks: High and Very High AND Business Relevance: Low and Very Low
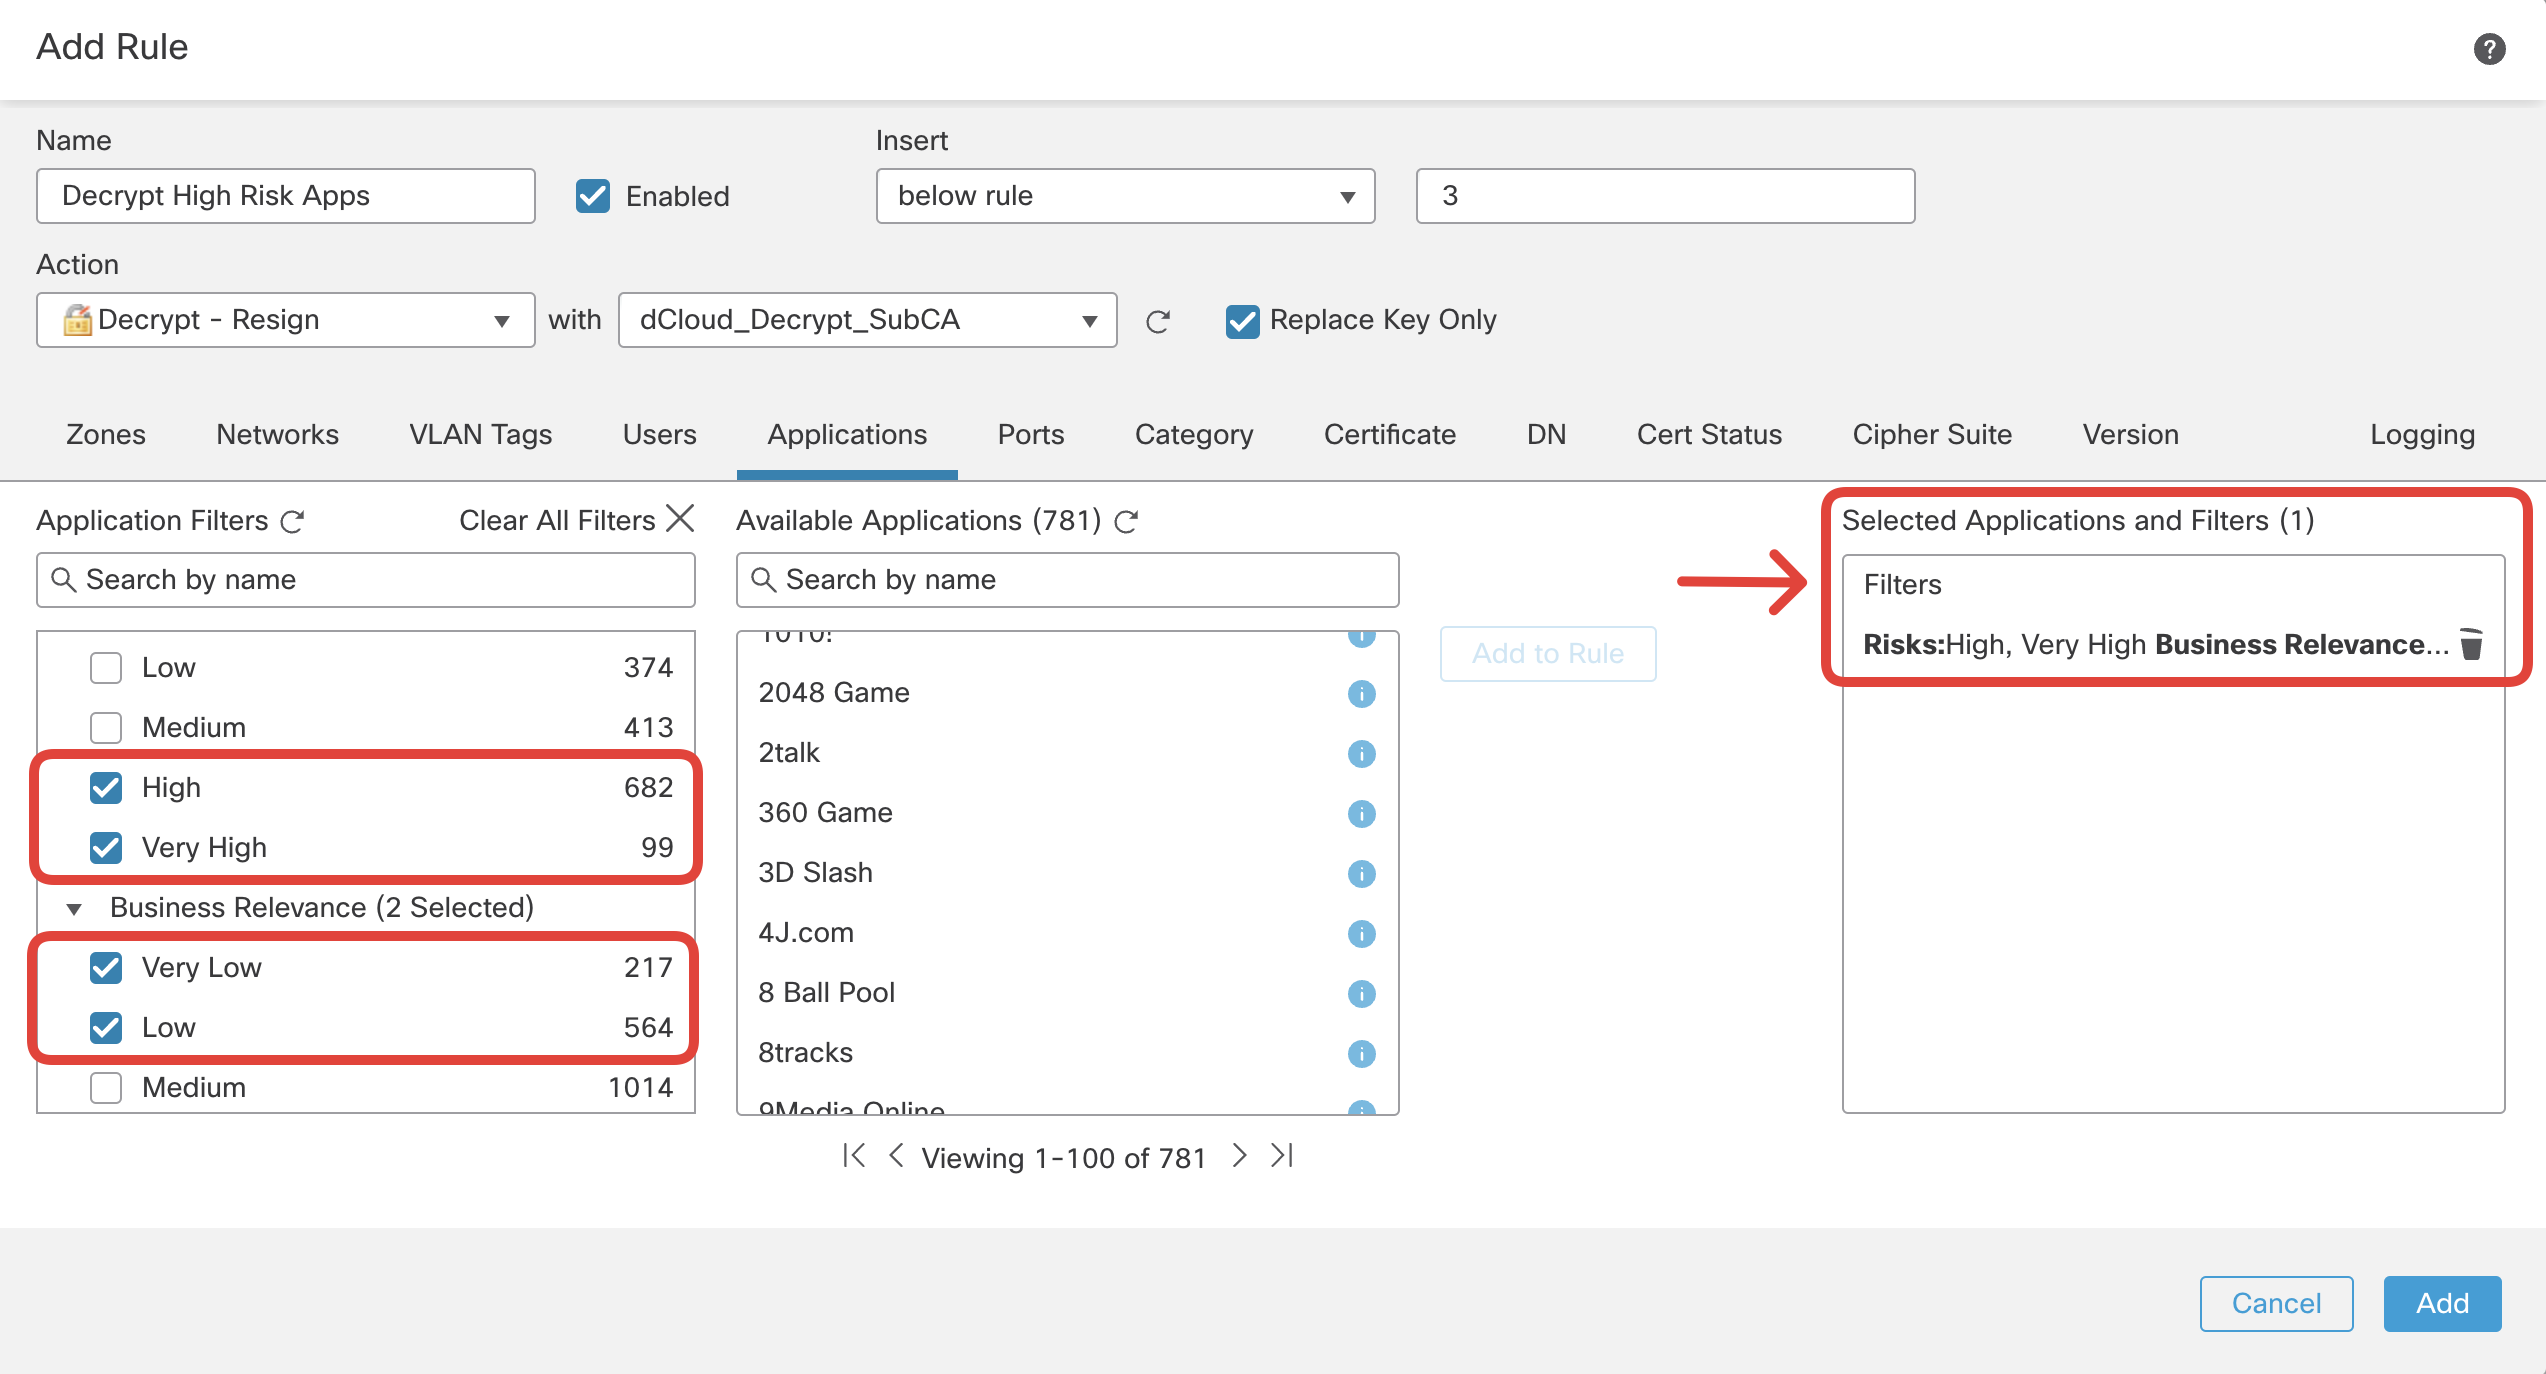
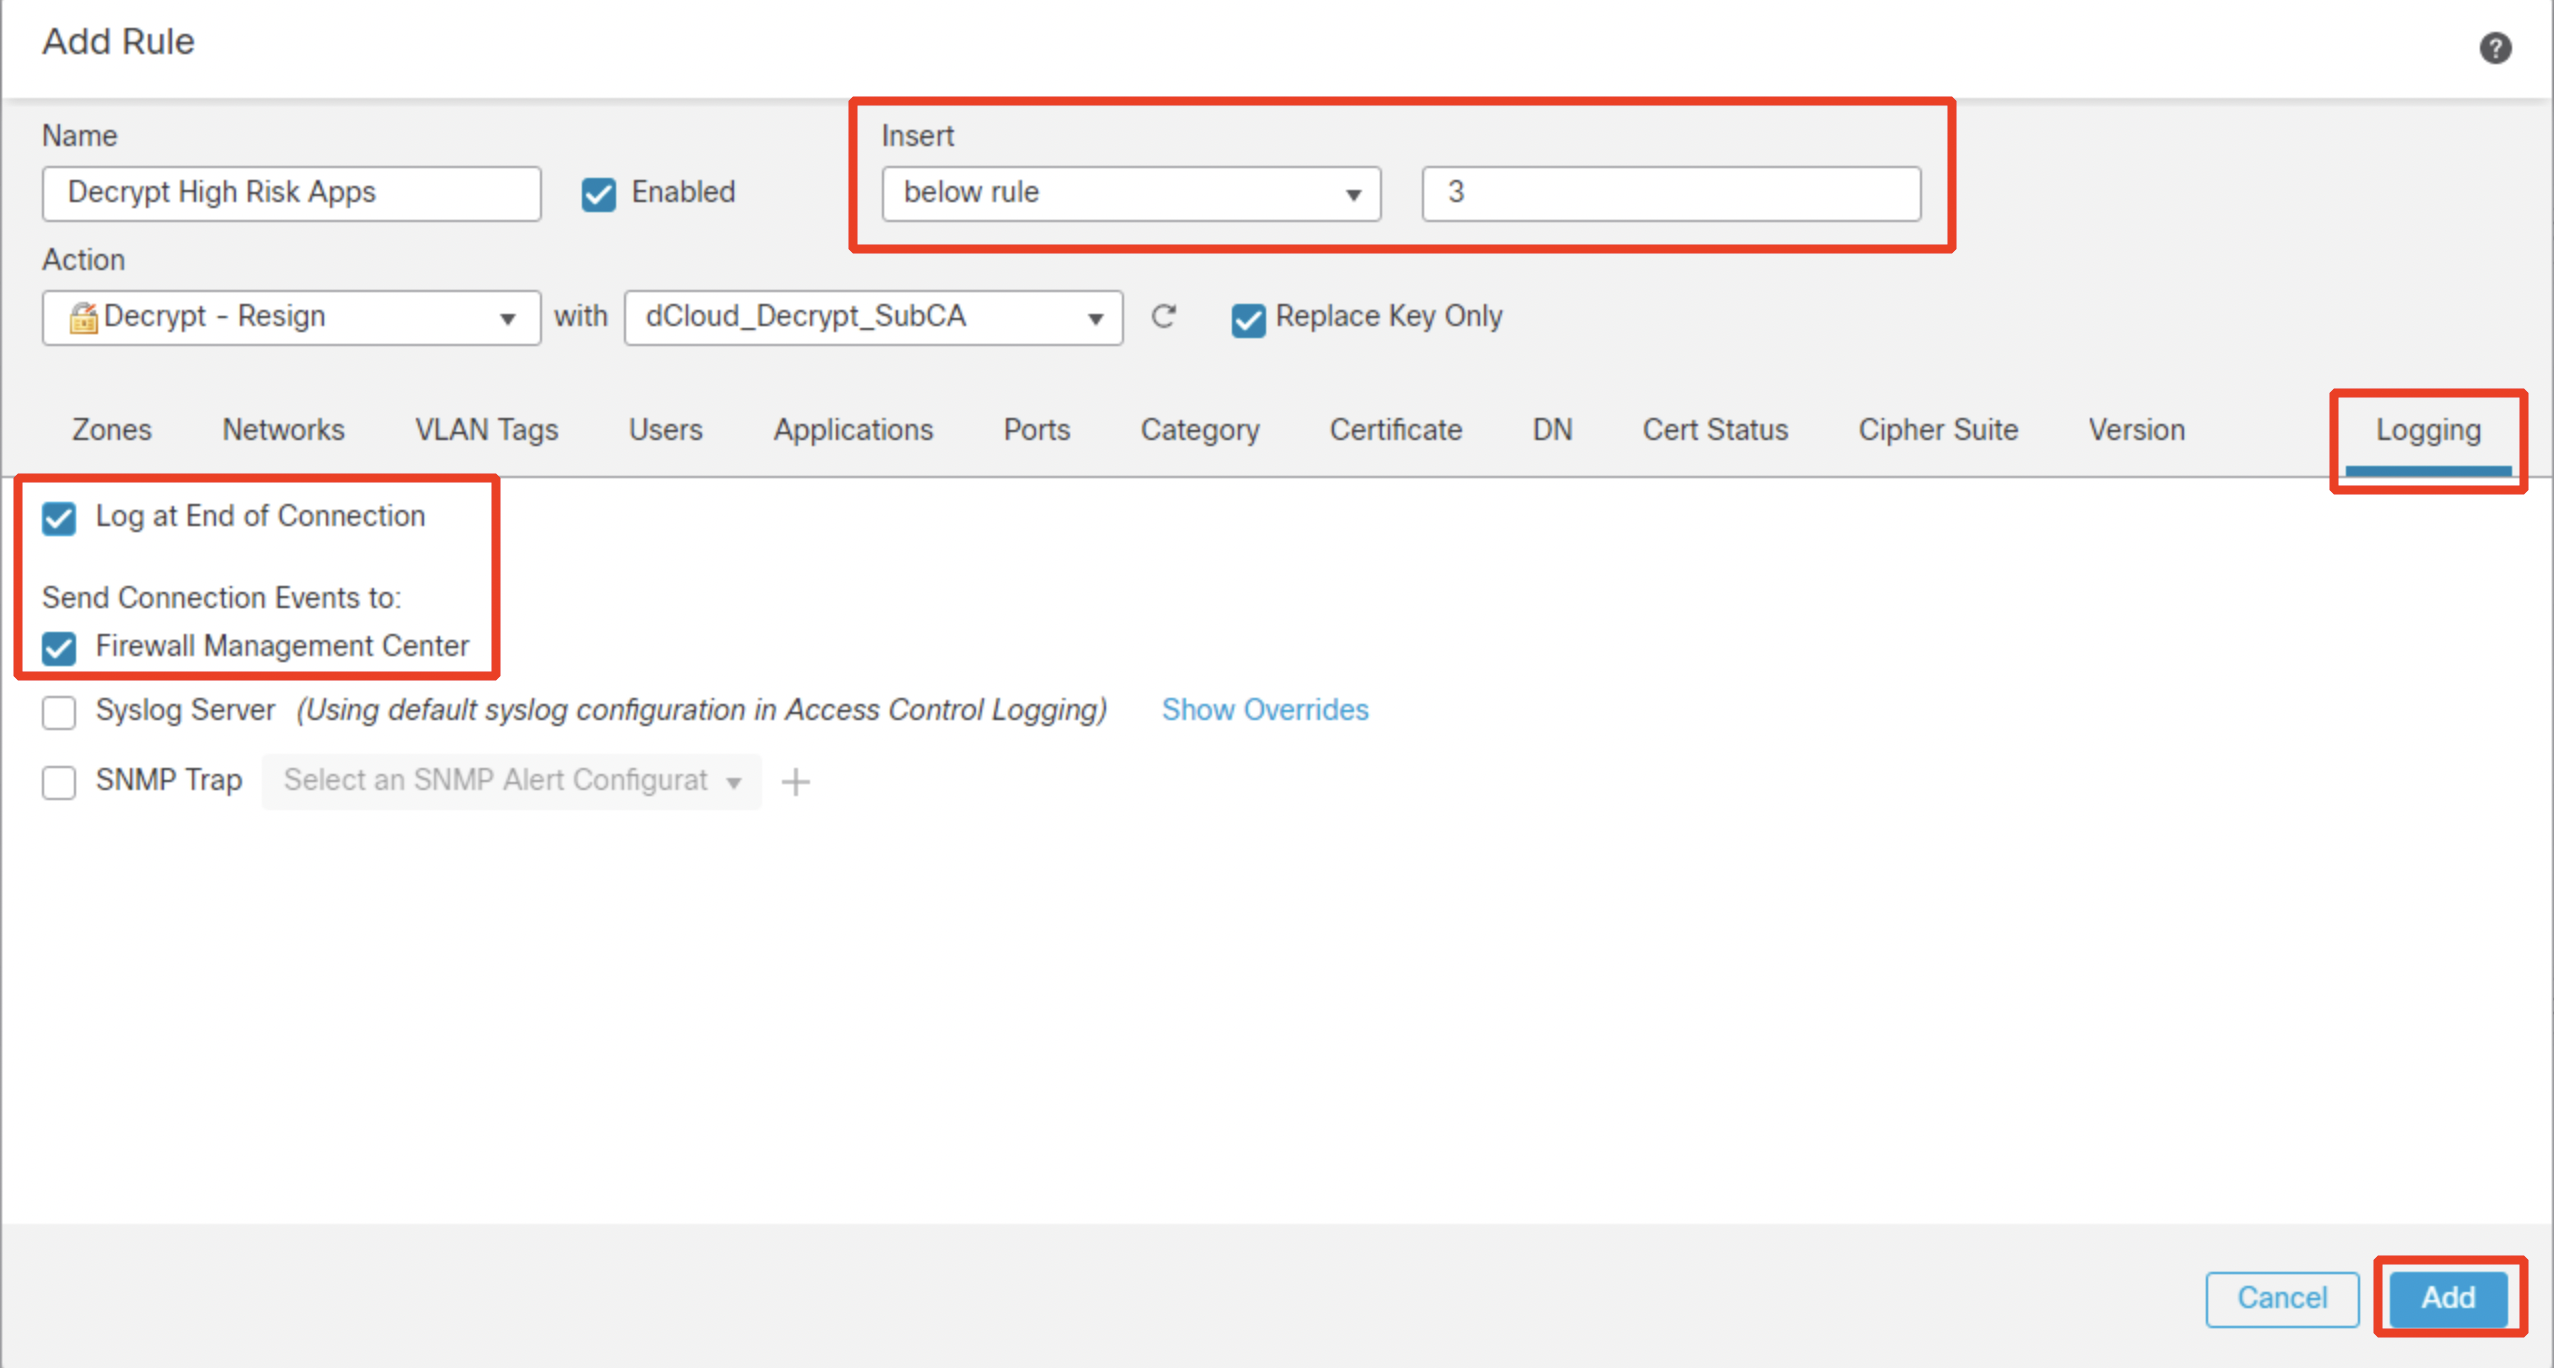
Ensure this rule is placed below the DND rules you configured earlier. Switch over to Logging tab and configure Log at End of Connection and send events to Firewall Management Center. Then click Add.
- Configure the second decryption rule matching risky URLs.
Click on + Add Rule.
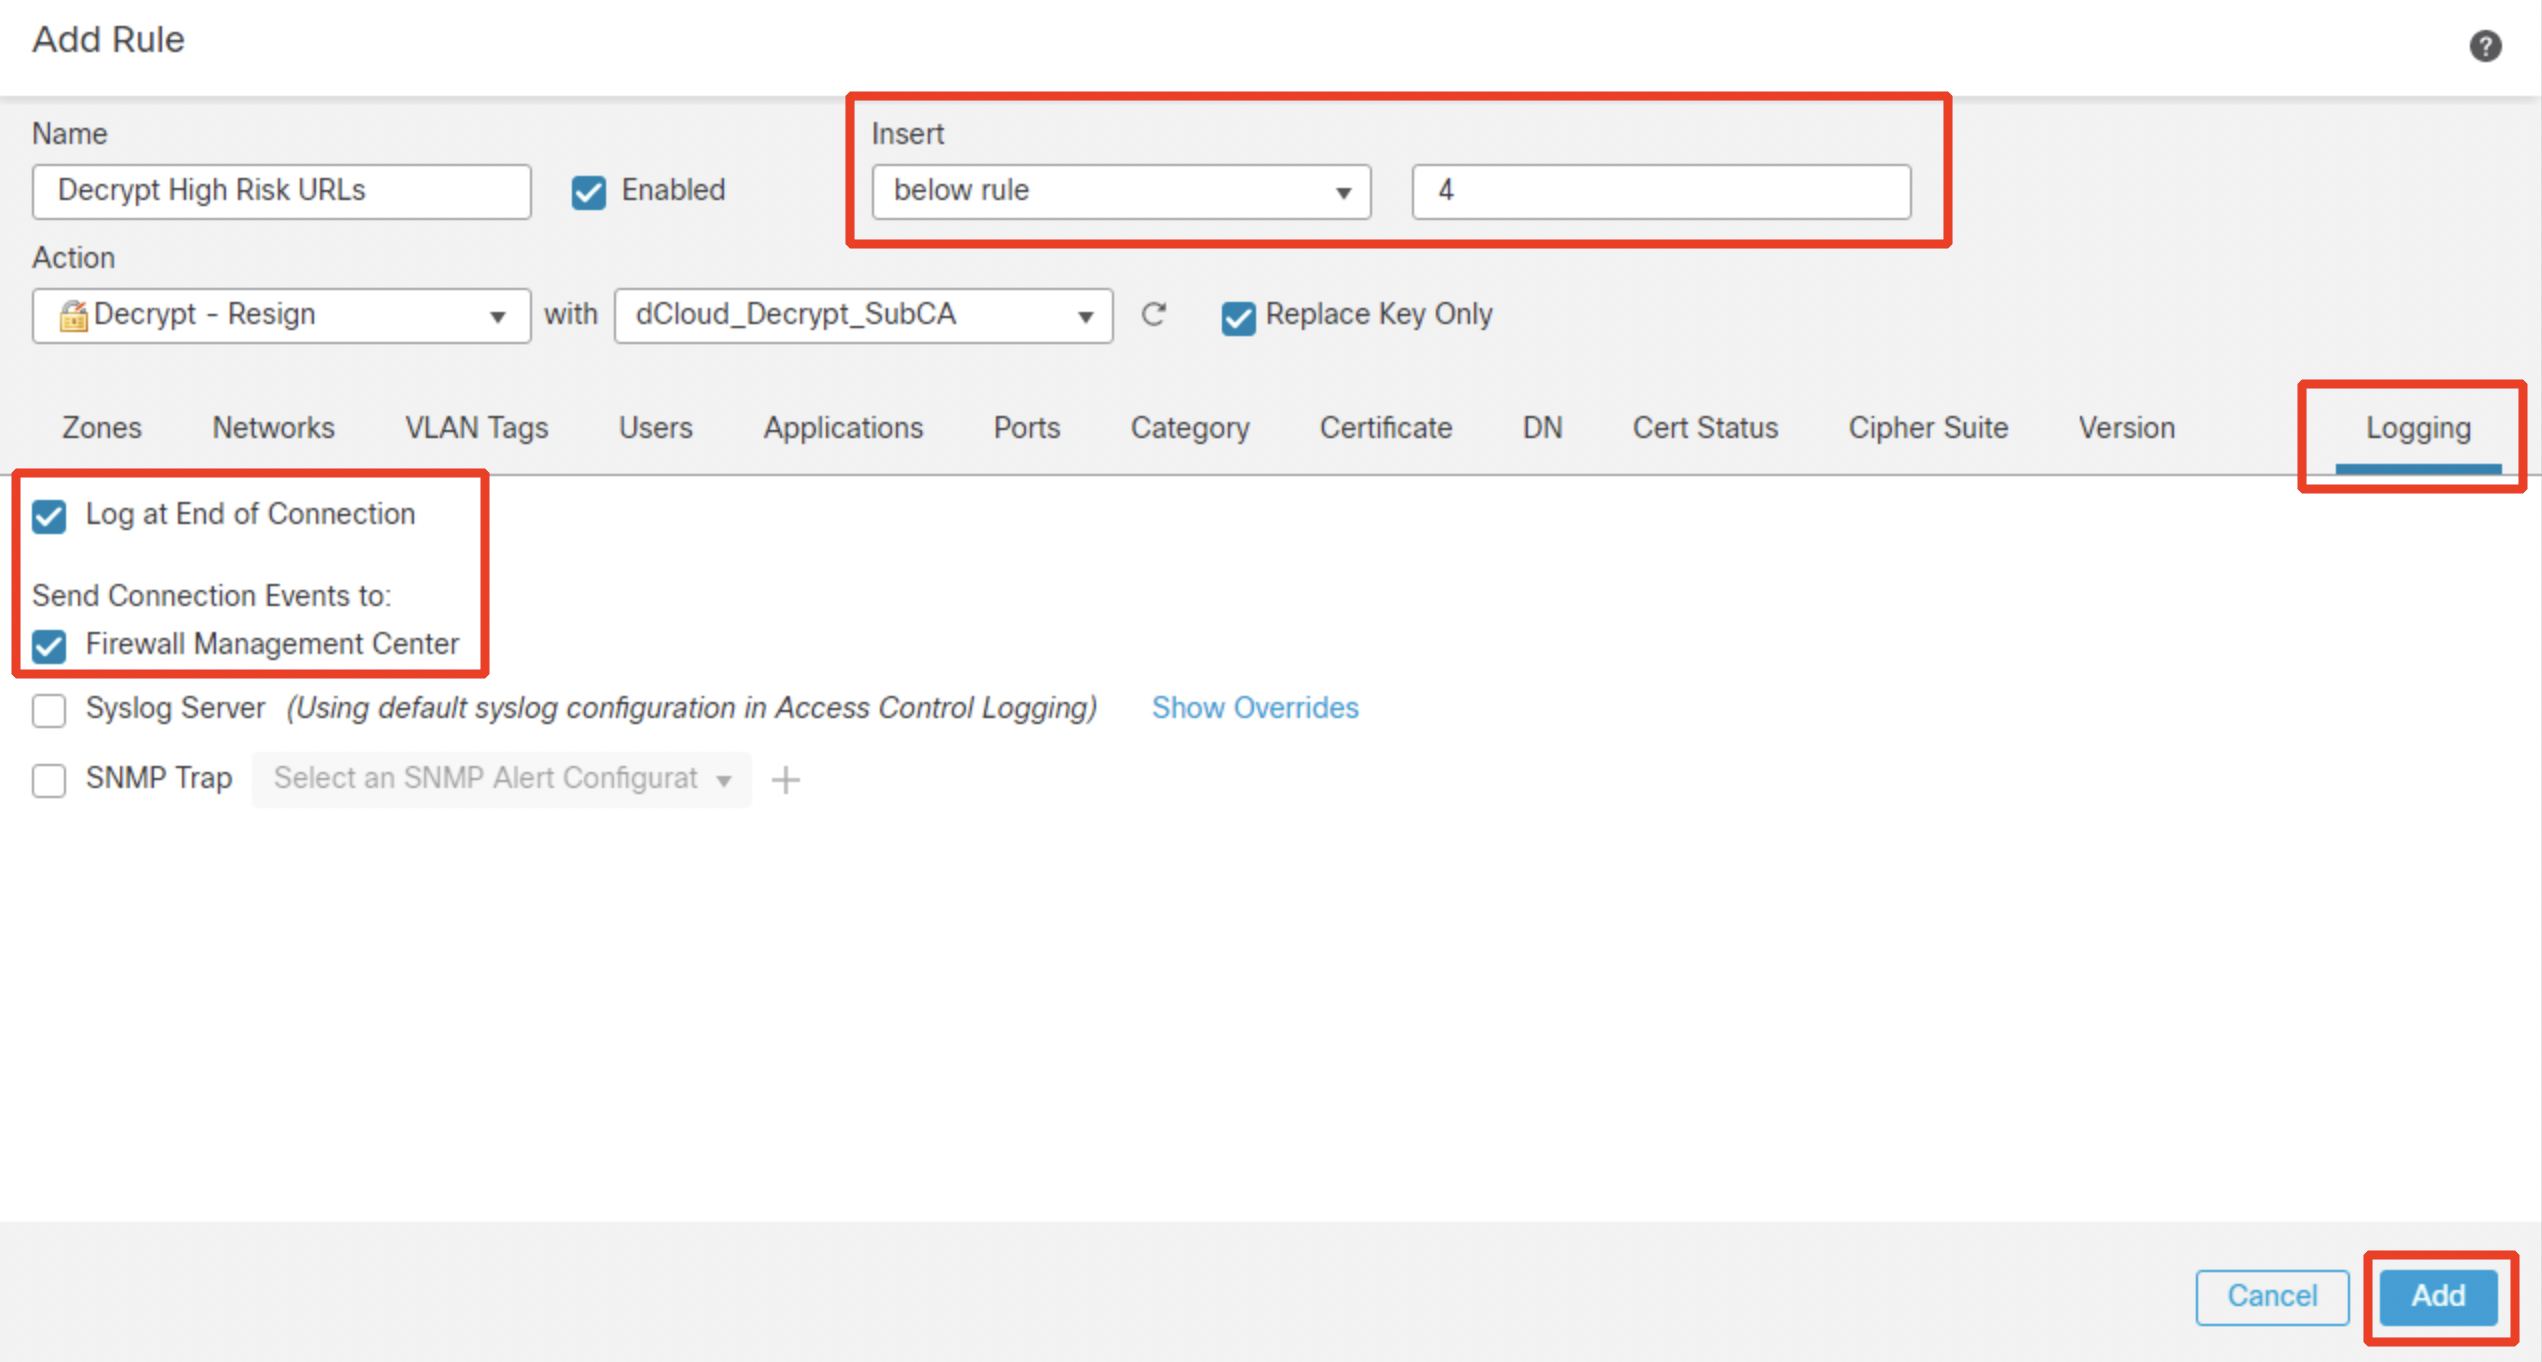
Name: Decrypt High Risk URLs
Action: Decrypt -Resign with dCloud_Decrypt_SubCA

Click the Category tab and select Any (Except Uncategorized) with 2 - Questionable (and below) reputations.
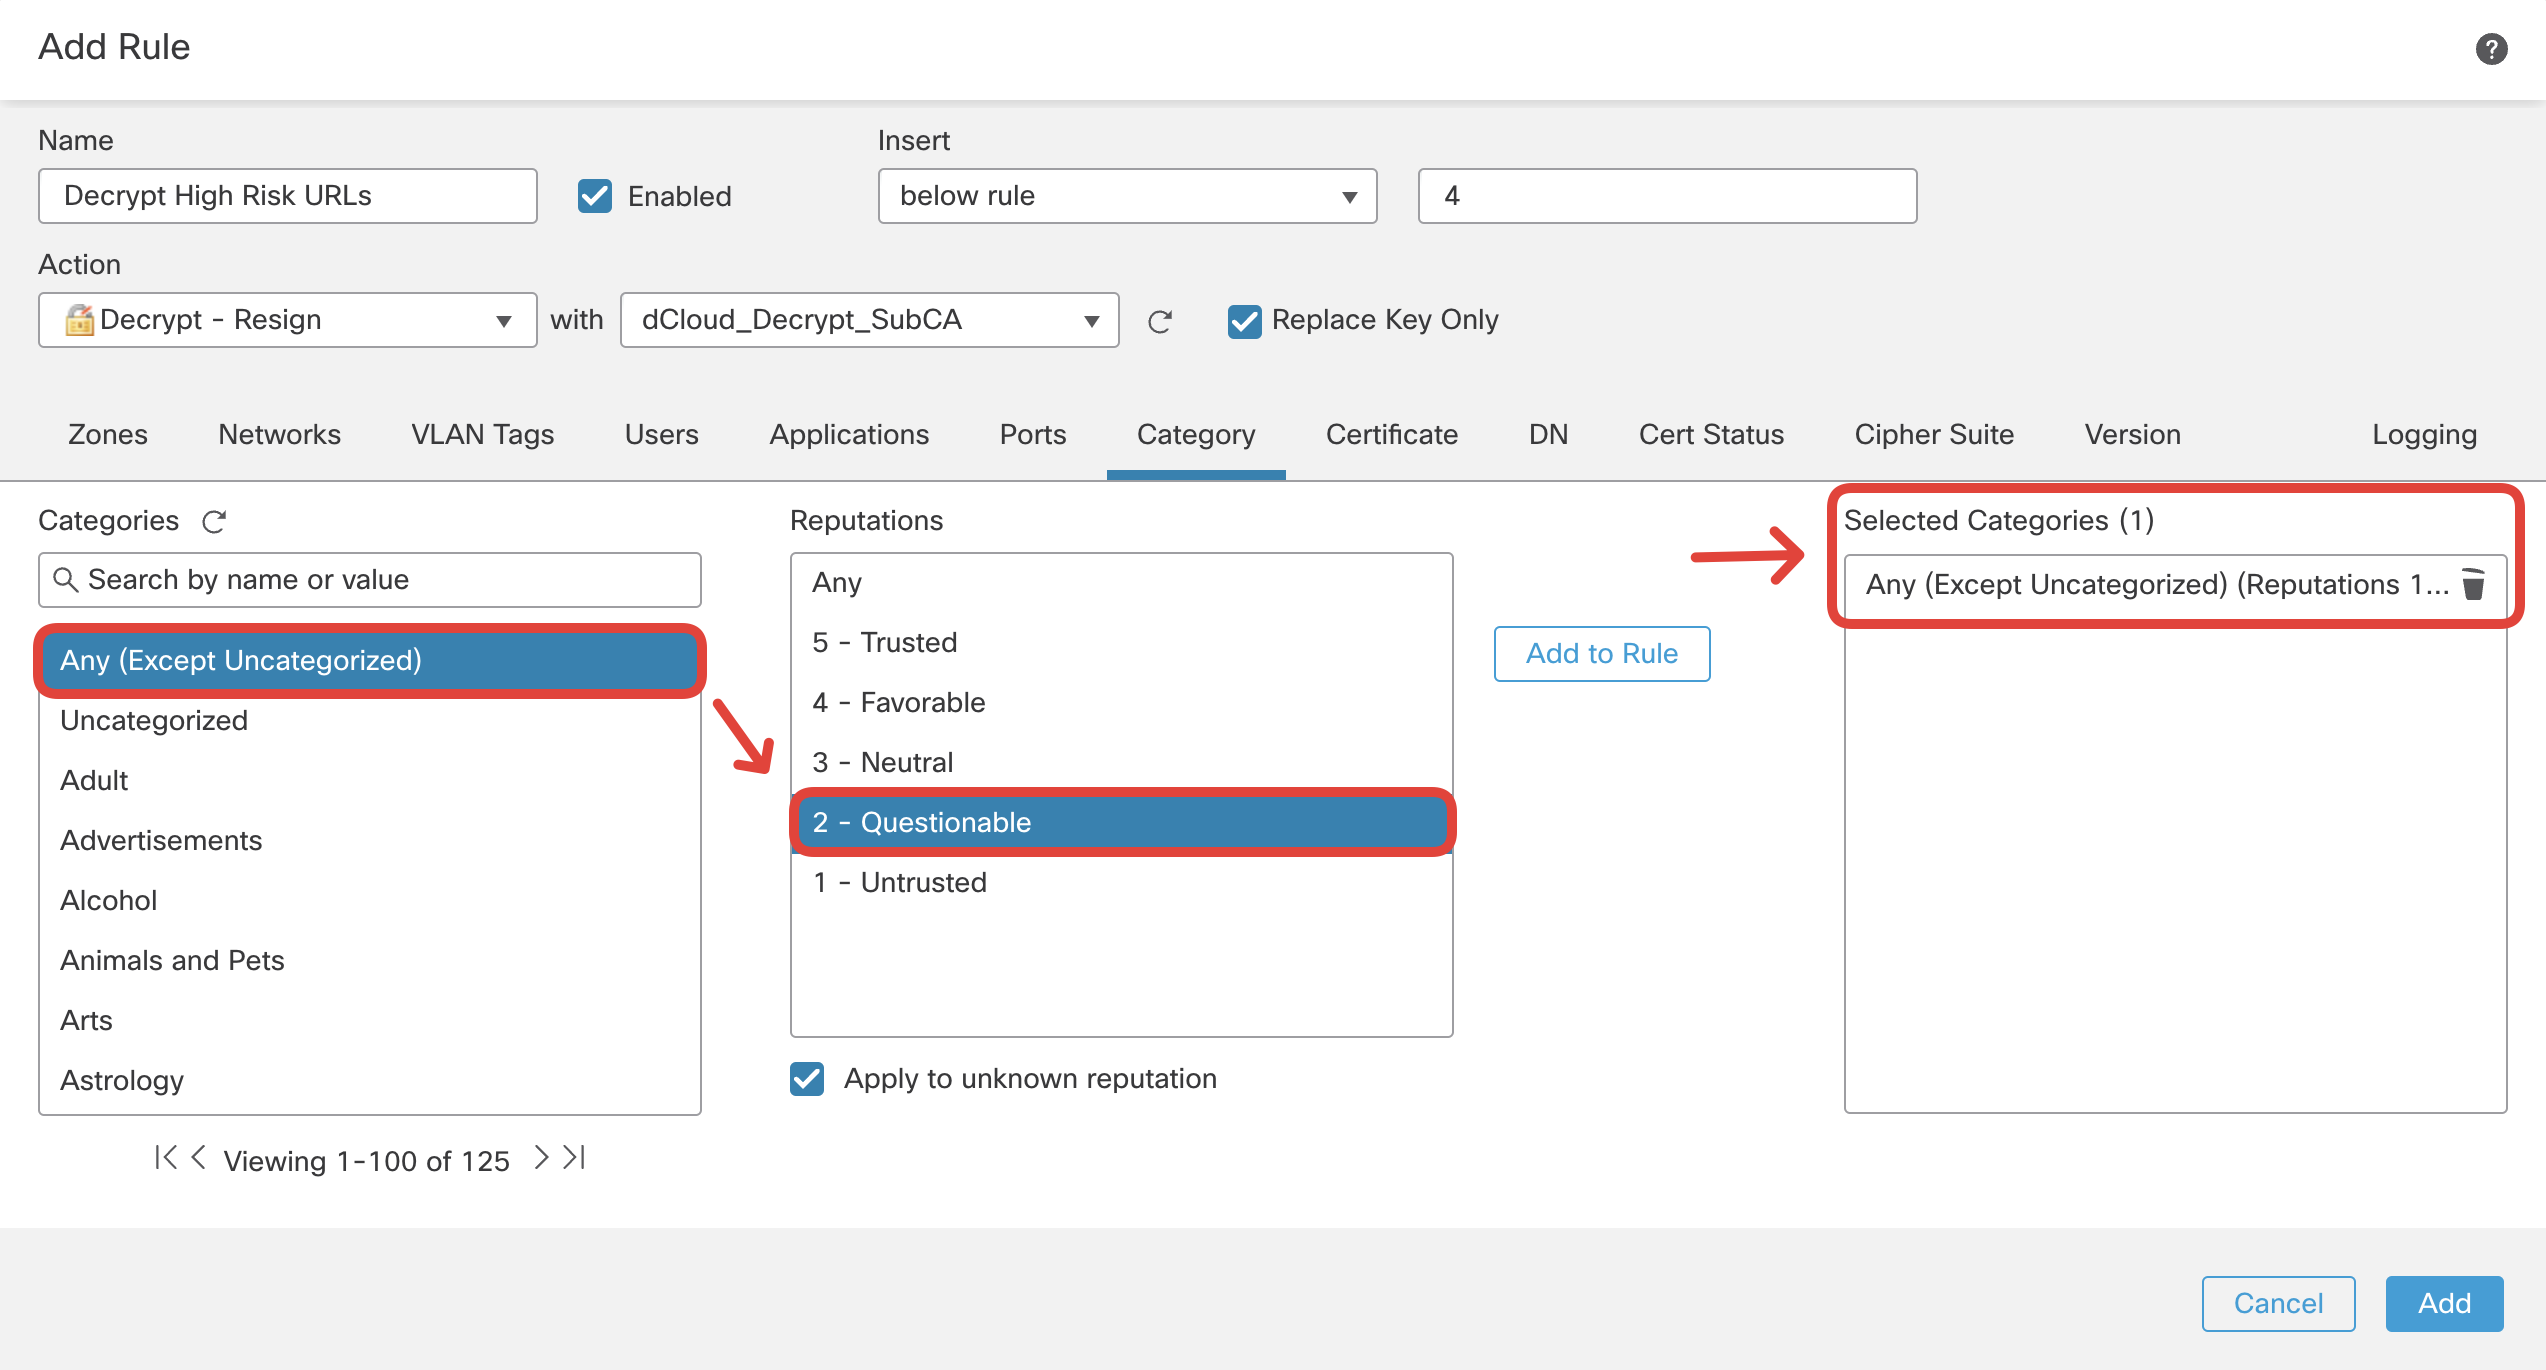
Ensure this rule is placed below the DND rules you configured earlier. Switch over to Logging tab and configure Log at End of Connection and send events to Firewall Management Center. Then click Add.
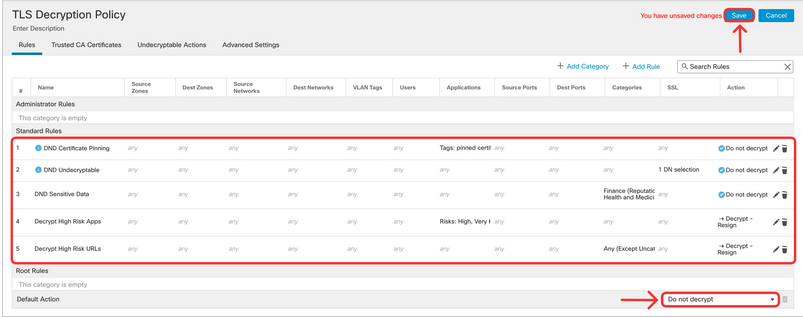
- Review the TLS Decrypion Policy, you've just configured:
- You should have 3 "Do not decrypt" rules at the top.
- Followed by the two matching high-risk apps and URLs.
- The default action of the policy should be "Do not decrypt".
Click Save.
VII. ACCESS CONTROL POLICY
The Access Control Policy comprises of firewall rules that allow, block, monitor or trust traffic based on various parameters like IP addresses, ports, applications, URL categories, Users, dynamic attributes etc. The traffic is matched to the rules in top-down order by ascending rule number.
Each managed device can have only one access control policy assigned to it.
- Go to Policies > Access Control > Access Control. Click on the edit icon of 'NGFW1 Firewall Policy'.

-
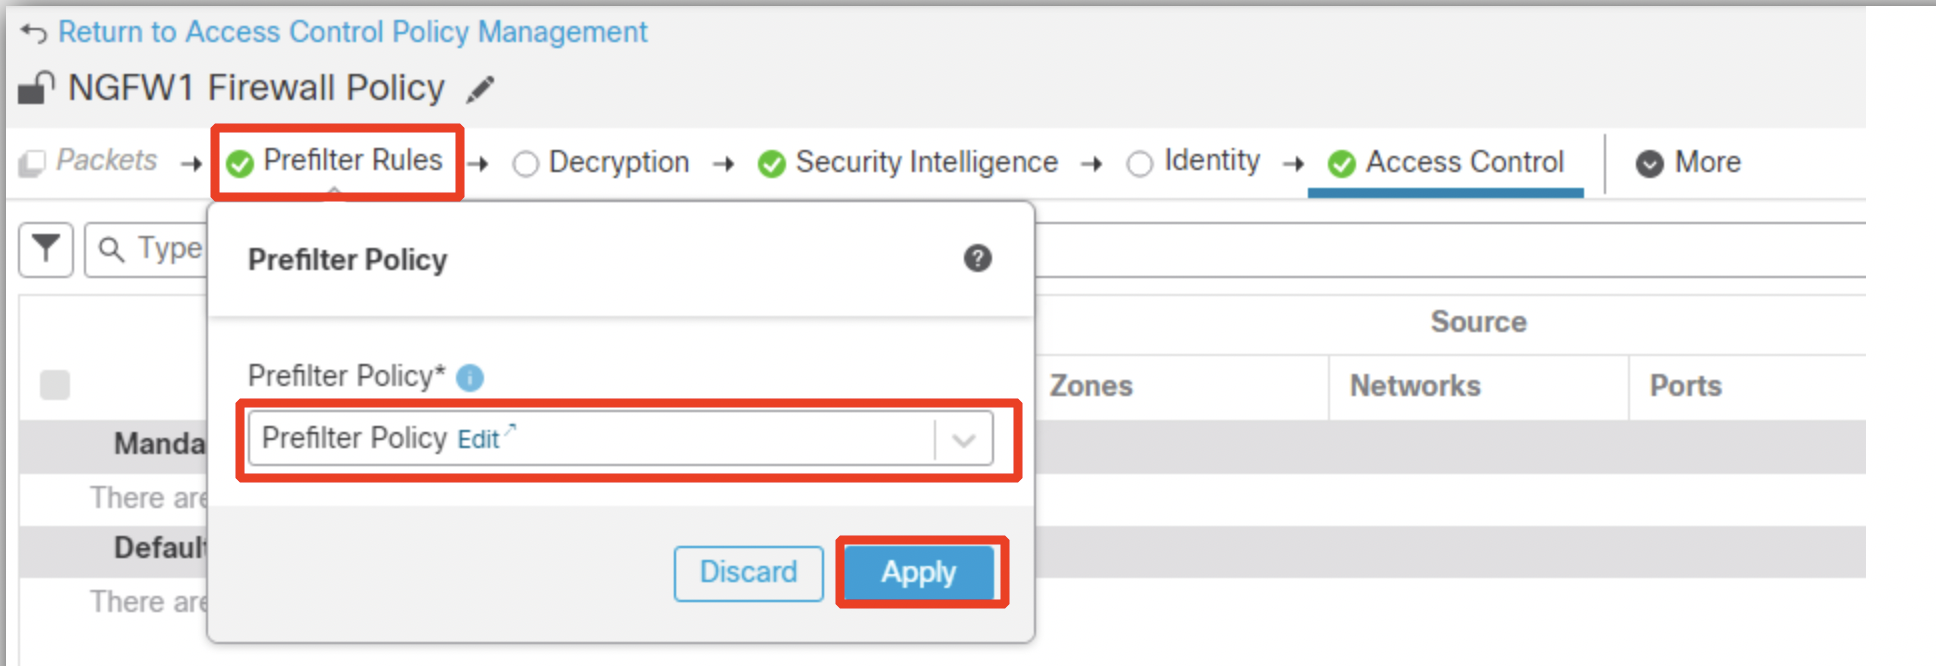
Select the newly created Prefilter Policy - at the top of the Access Control Policy ruleset, click on Prefilter Rules, select the policy and click Apply.
-
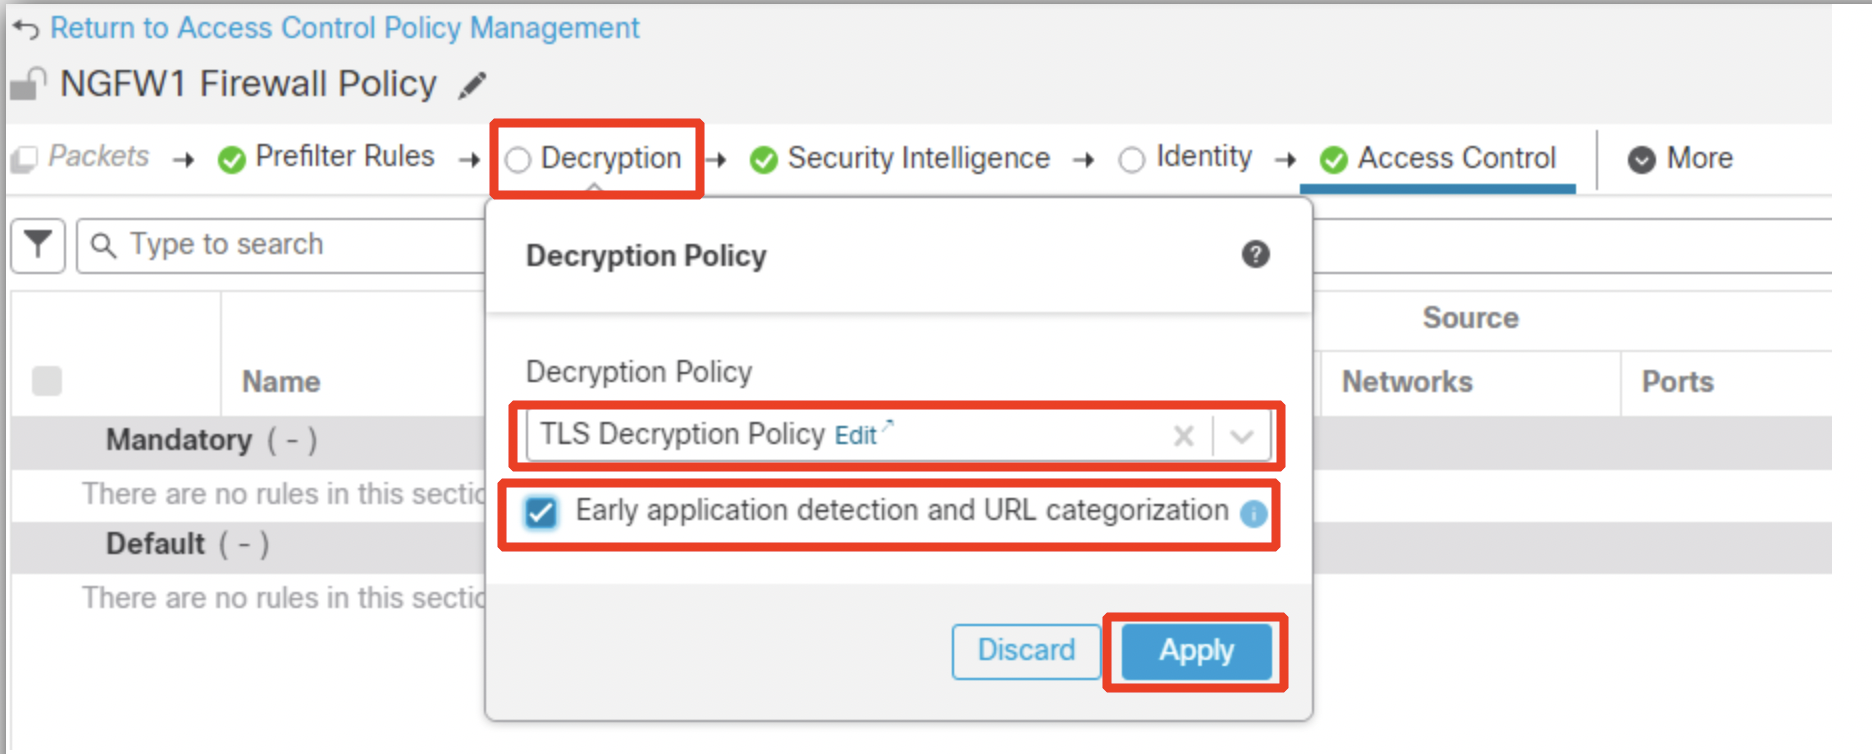
(OPTIONAL) Select the TLS Decryption Policy created as shown below. Ensure you select Early application and URL categorization. This option tells the firewall to use a side-car connection to discover TLS 1.3 certificates required to detect applications/URLs as well as making more accurate decryption decisions.
Skip this step if TLS decryption was not done.
- As an early line of defense against malicious internet content, Security Intelligence uses reputation intelligence to quickly block connections to or from less reputed IP addresses, URLs, and domain names. This is called the Security Intelligence block listing. Security Intelligence is an early phase of access control before the system performs more resource-intensive evaluation. Using a Block list improves performance by quickly excluding traffic that does not require inspection.
Click on the Security Intelligence tab and select DNS Policy from the drop-down menu as shown below.

- Next, add Talos-provided networks to the Block List. Locate the Network and URL Block List section, and click on Networks tab. Select all objects representing malicious networks (from Attackers to Tor_exit_node) and click on Add to Block List.
Tip
Use the shift key to select the Network objects mentioned above

Repeat the same for URLs. Click on URLs tab. Select all objects representing malicious URLs (from URL Attackers to URL Tor_exit_node) and click on Add to Block List.
Tip
Use the shift key to select the URL objects mentioned above.

- In the upcoming tasks, you will configure 5 firewall rules:
- Whitelist-AttackIQ - allow control traffic between Wkst1 and AttackIQ headquarters to run the test bundle.
- Block Bad DNS - demonstrate reputation enforcement on DNS traffic (pornography example).
- Block Unwanted URLs - block malicious or non-acceptable URL categories in the organization
- Block Unwanted Applications - block malicious or non-acceptable Applications in the organization
- Inspect All - permit and inspect the rest of the traffic
Click on Access Control tab.
-
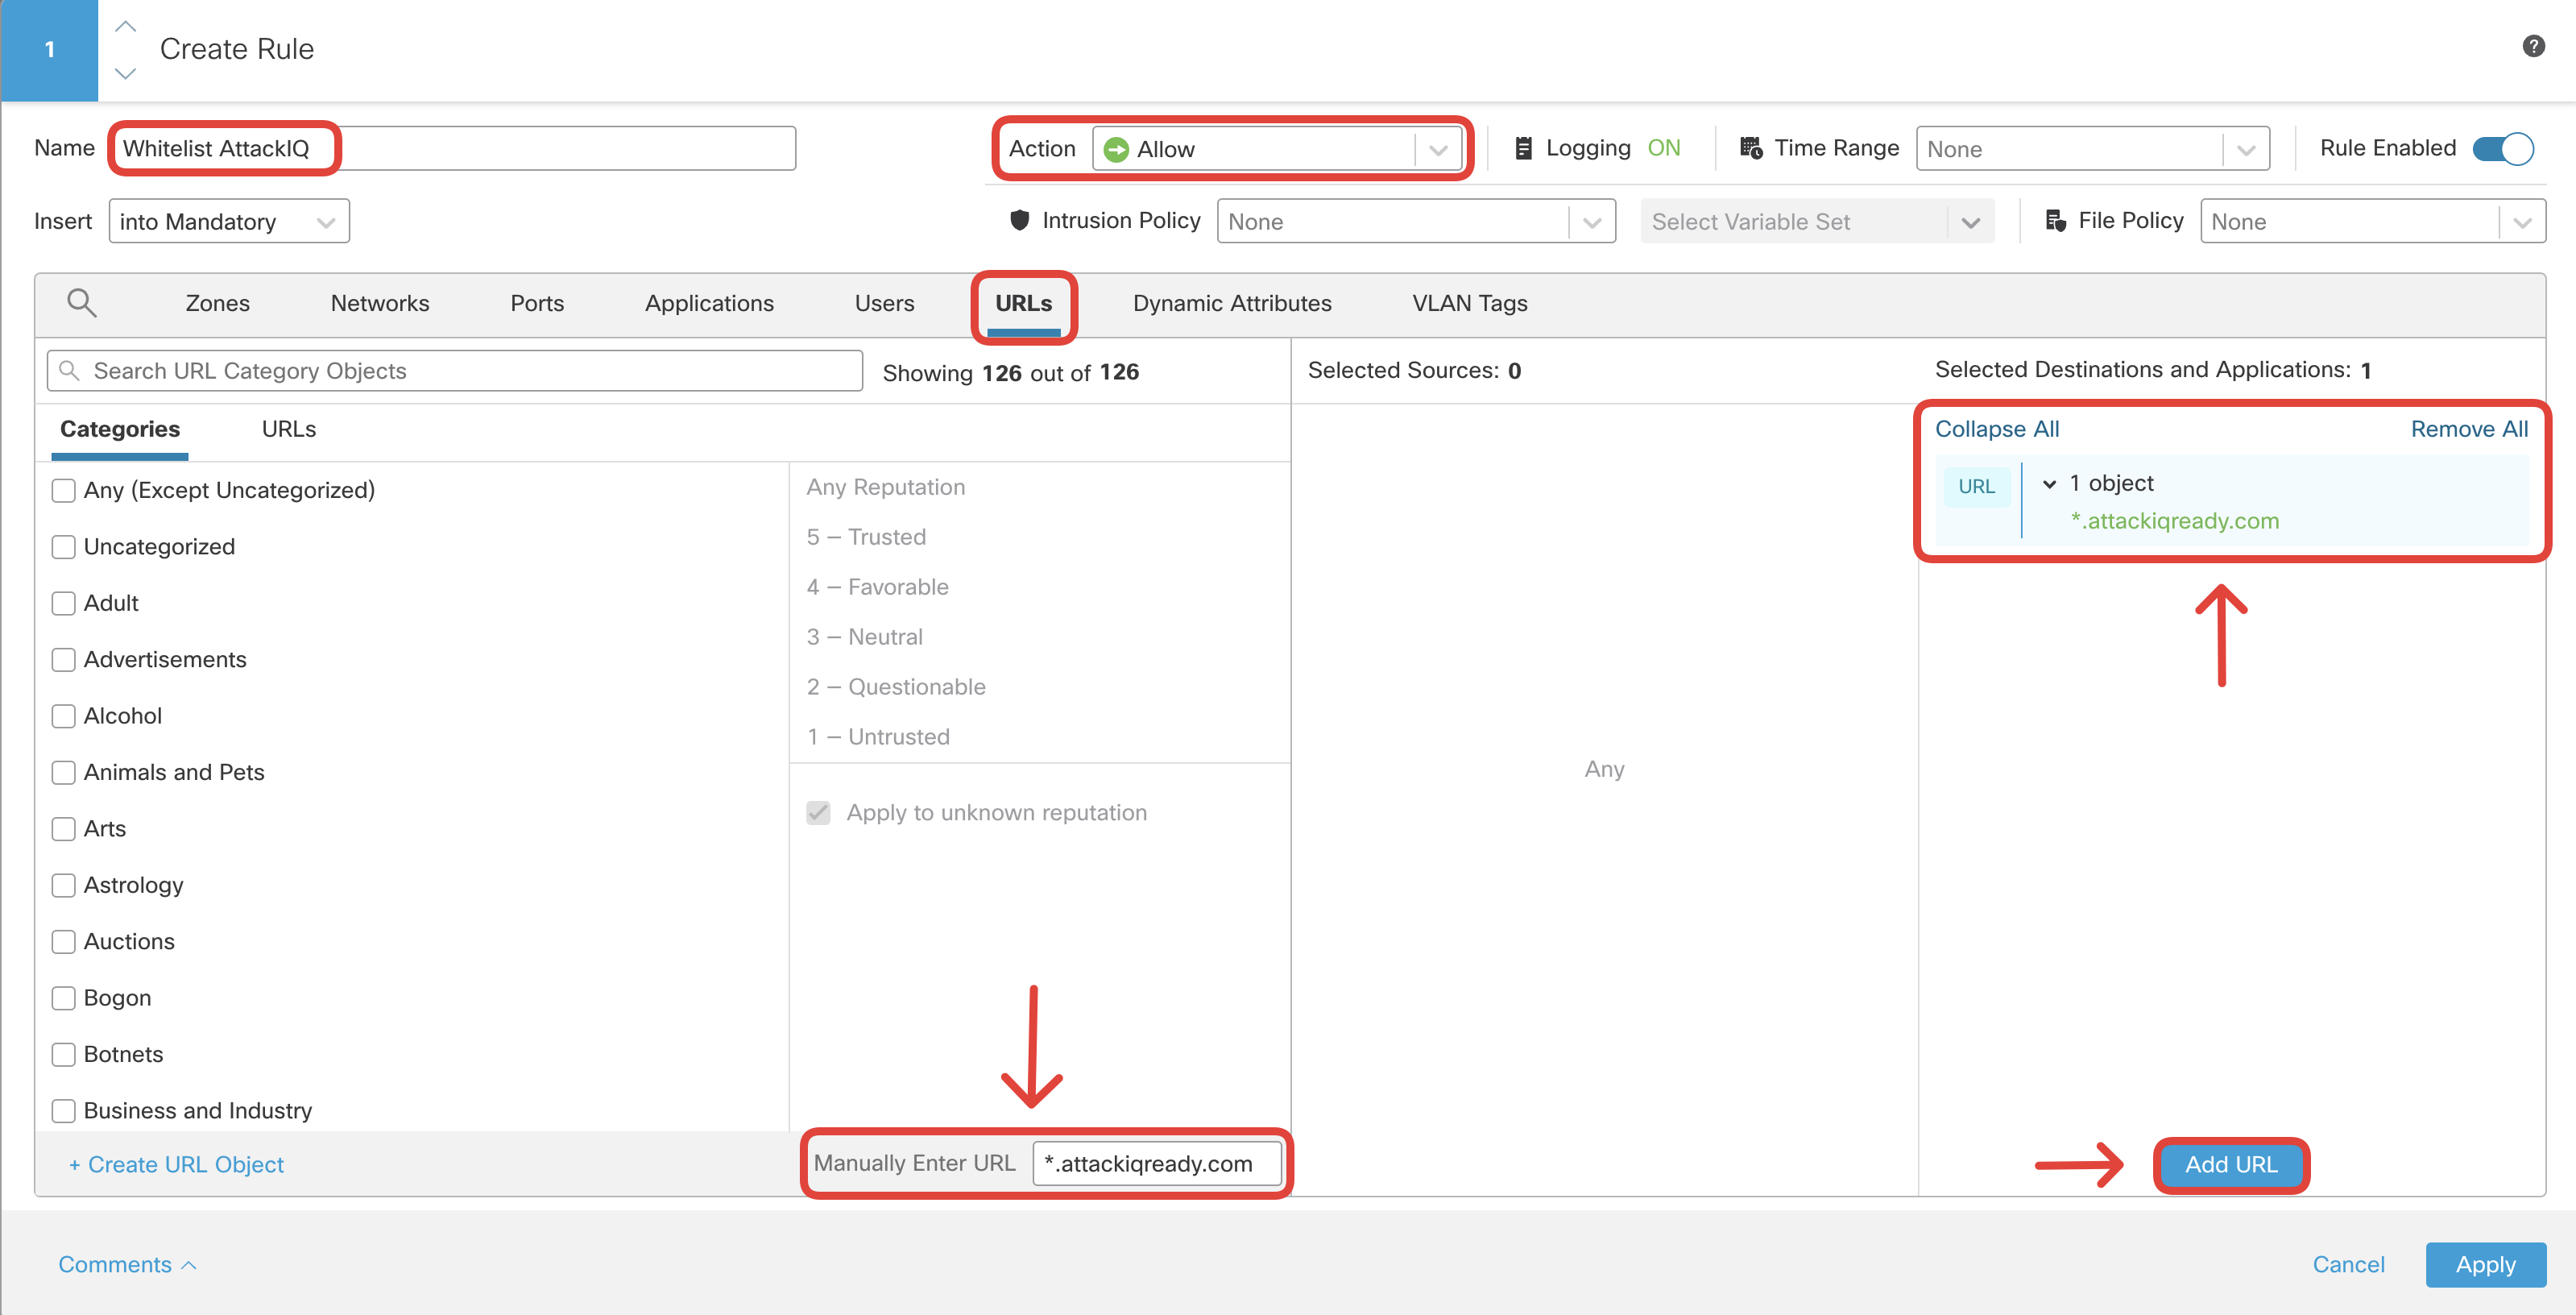
Add a rule to whitelist the AttackIQ URL which is required for the test simulation. Click Add Rule.

Configure the rule as follows:
Name: Whitelist AttackIQ
Action: Allow
Switch to URLs tab and type *.attackiqready.com in Manual Entry URL field at in the middle-bottom of the window. Click Add URL.
Click on Logging and configure Log at End of Connection.
Note
For firewall rules allowing traffic it is recommended to use log at end of connection option, and not enable log at beginning of connection at the same time. Using both may negatively affect the performance of your firewall.
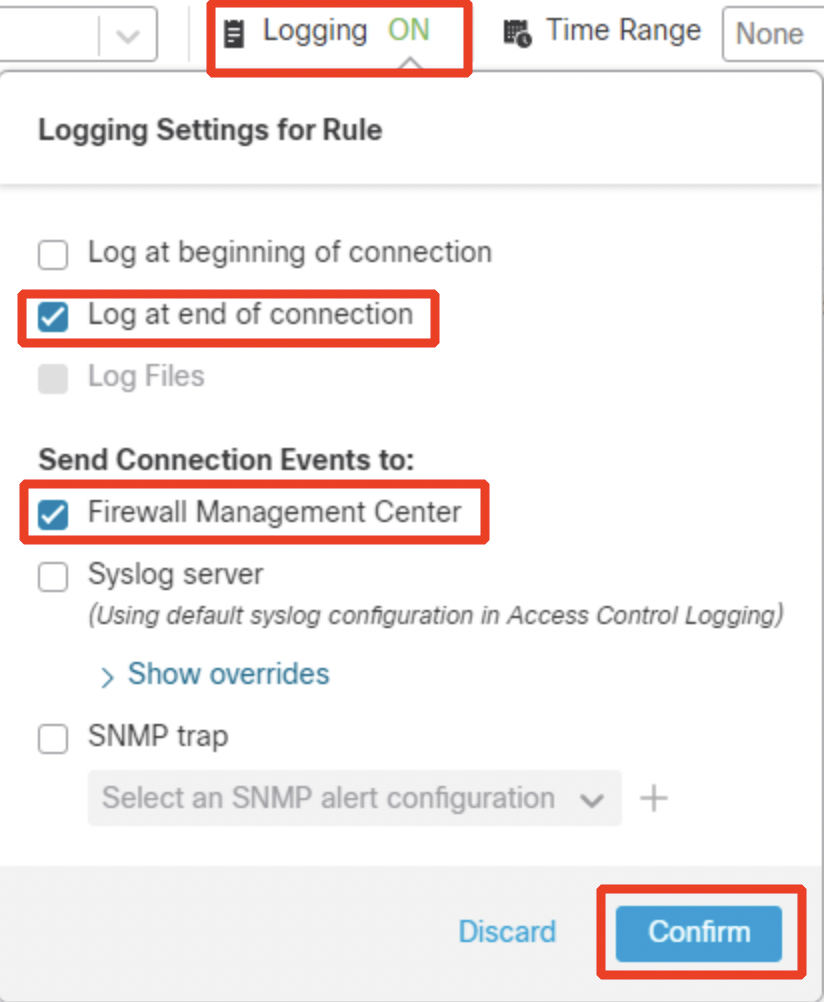
Click Confirm to set logging and then Apply to save the rule.
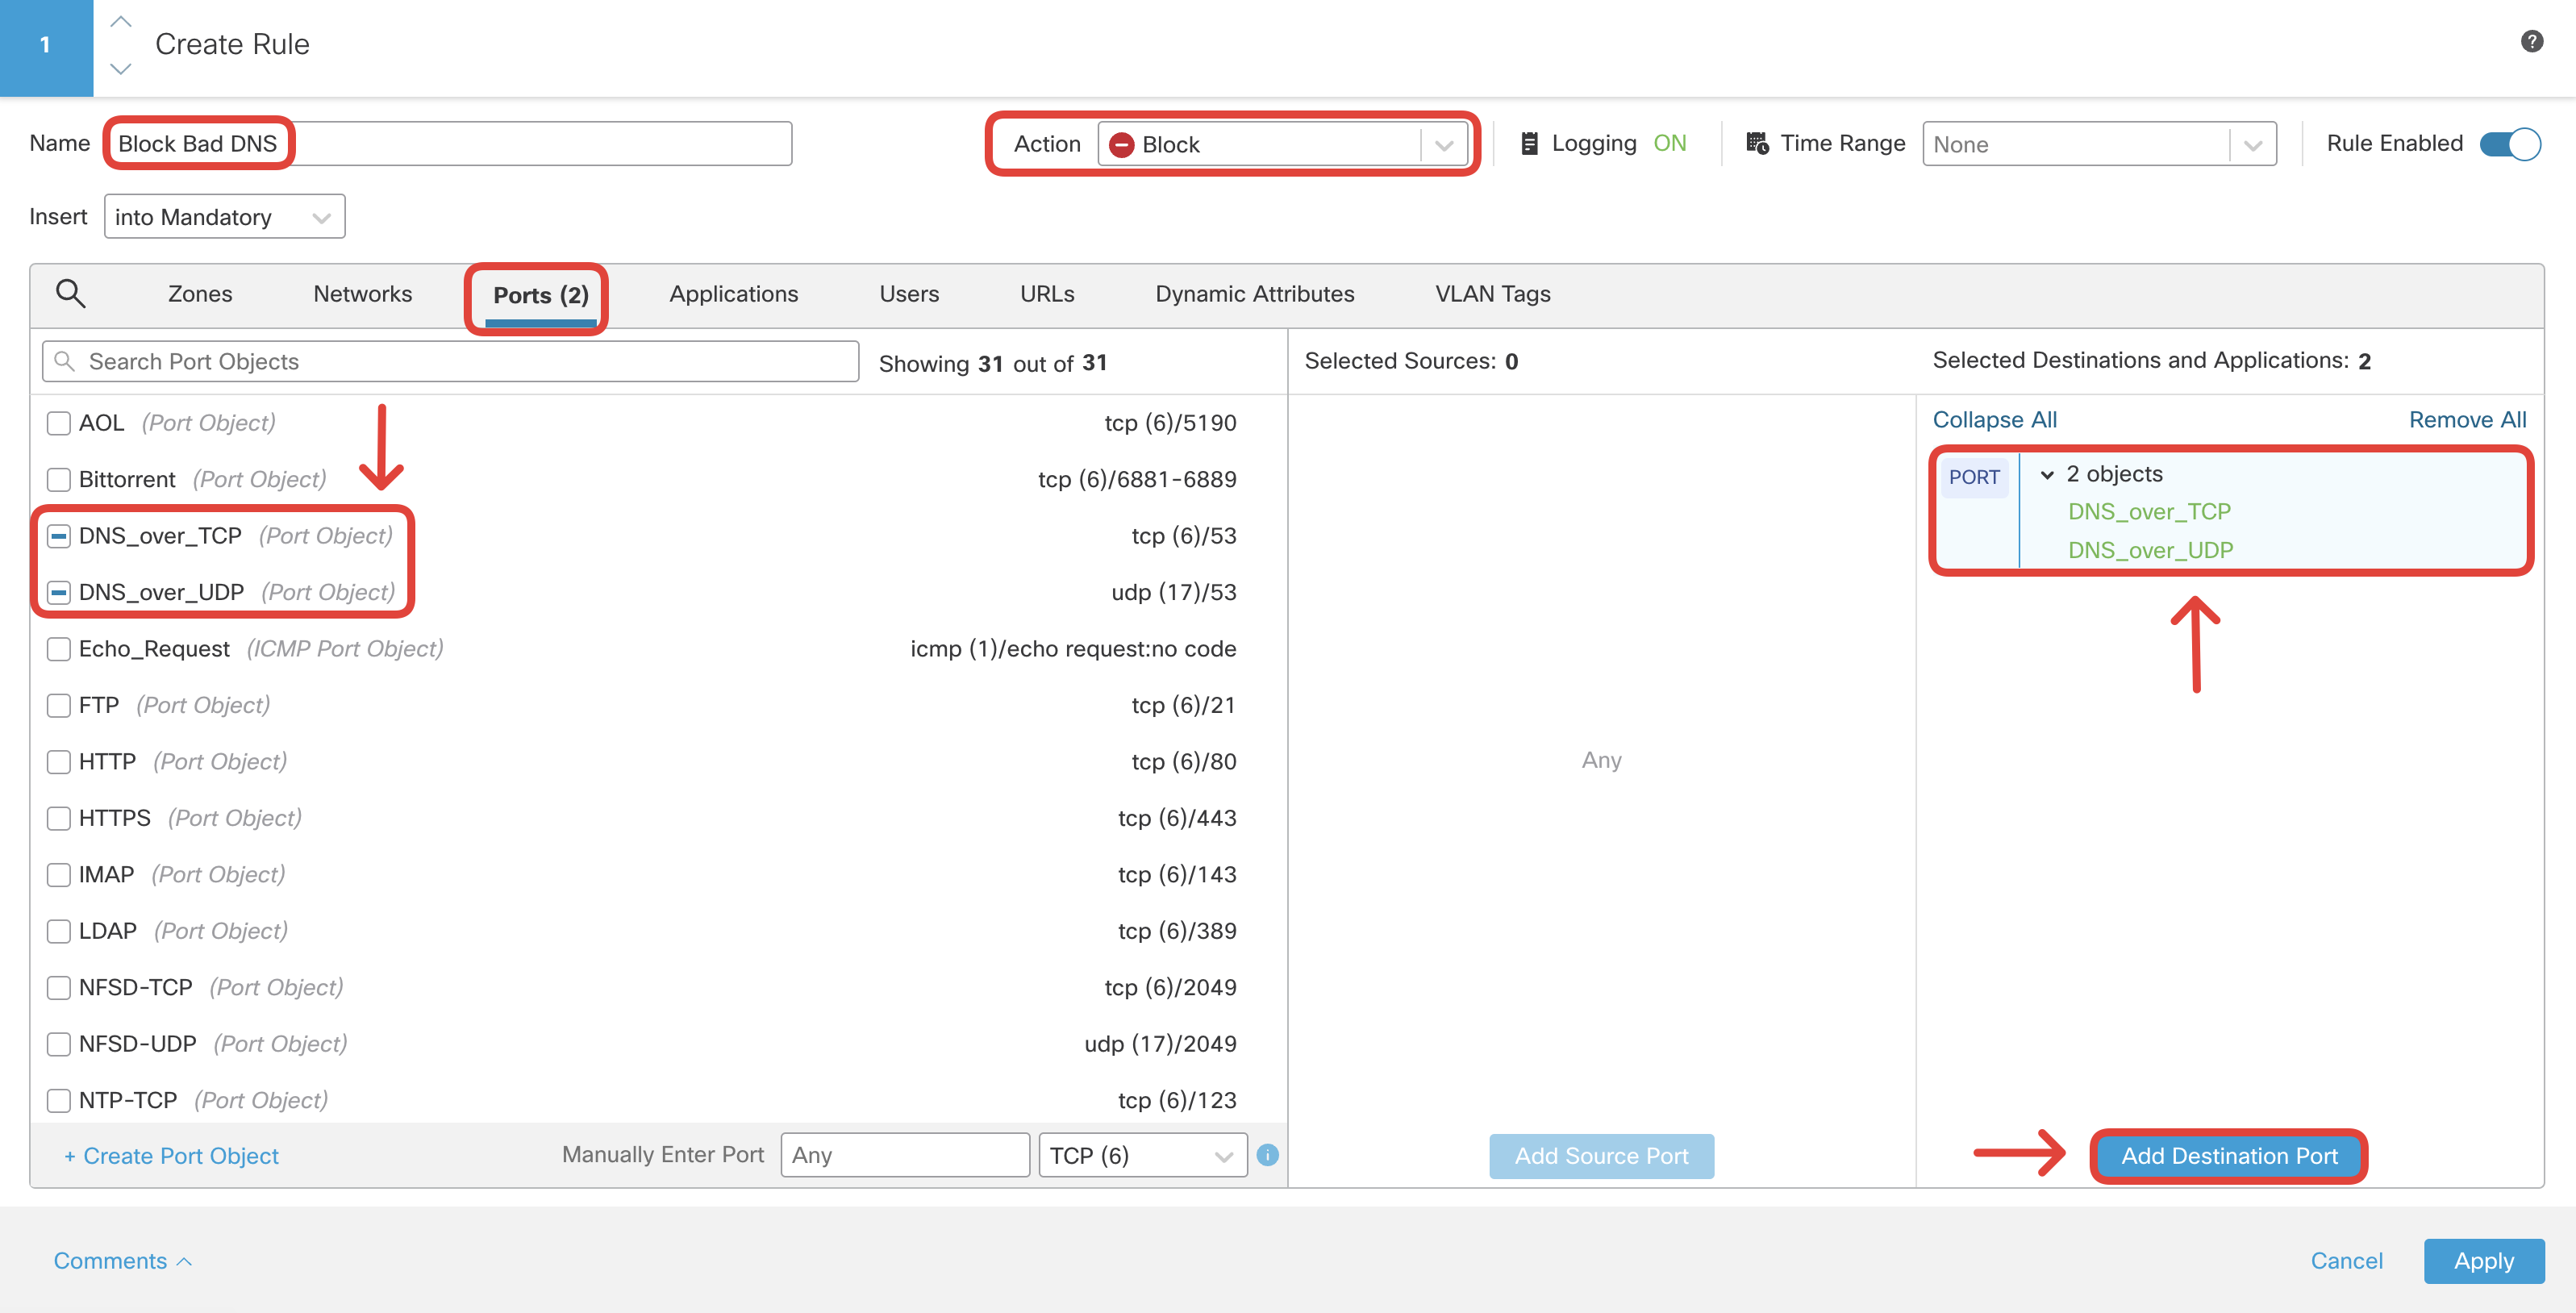
- Create another rule to block DNS requests for the URL category 'Pornography'. This rule is created to demonstrate a firewall's ability to block DNS requests for domains in a particular URL Category. Configure the rule as follows:
Click on + Add Rule.
Name: Block Bad DNS
Action: Block
Switch to Ports tab and select DNS_over_TCP and DNS_over_UDP, then click Add Destination Port.
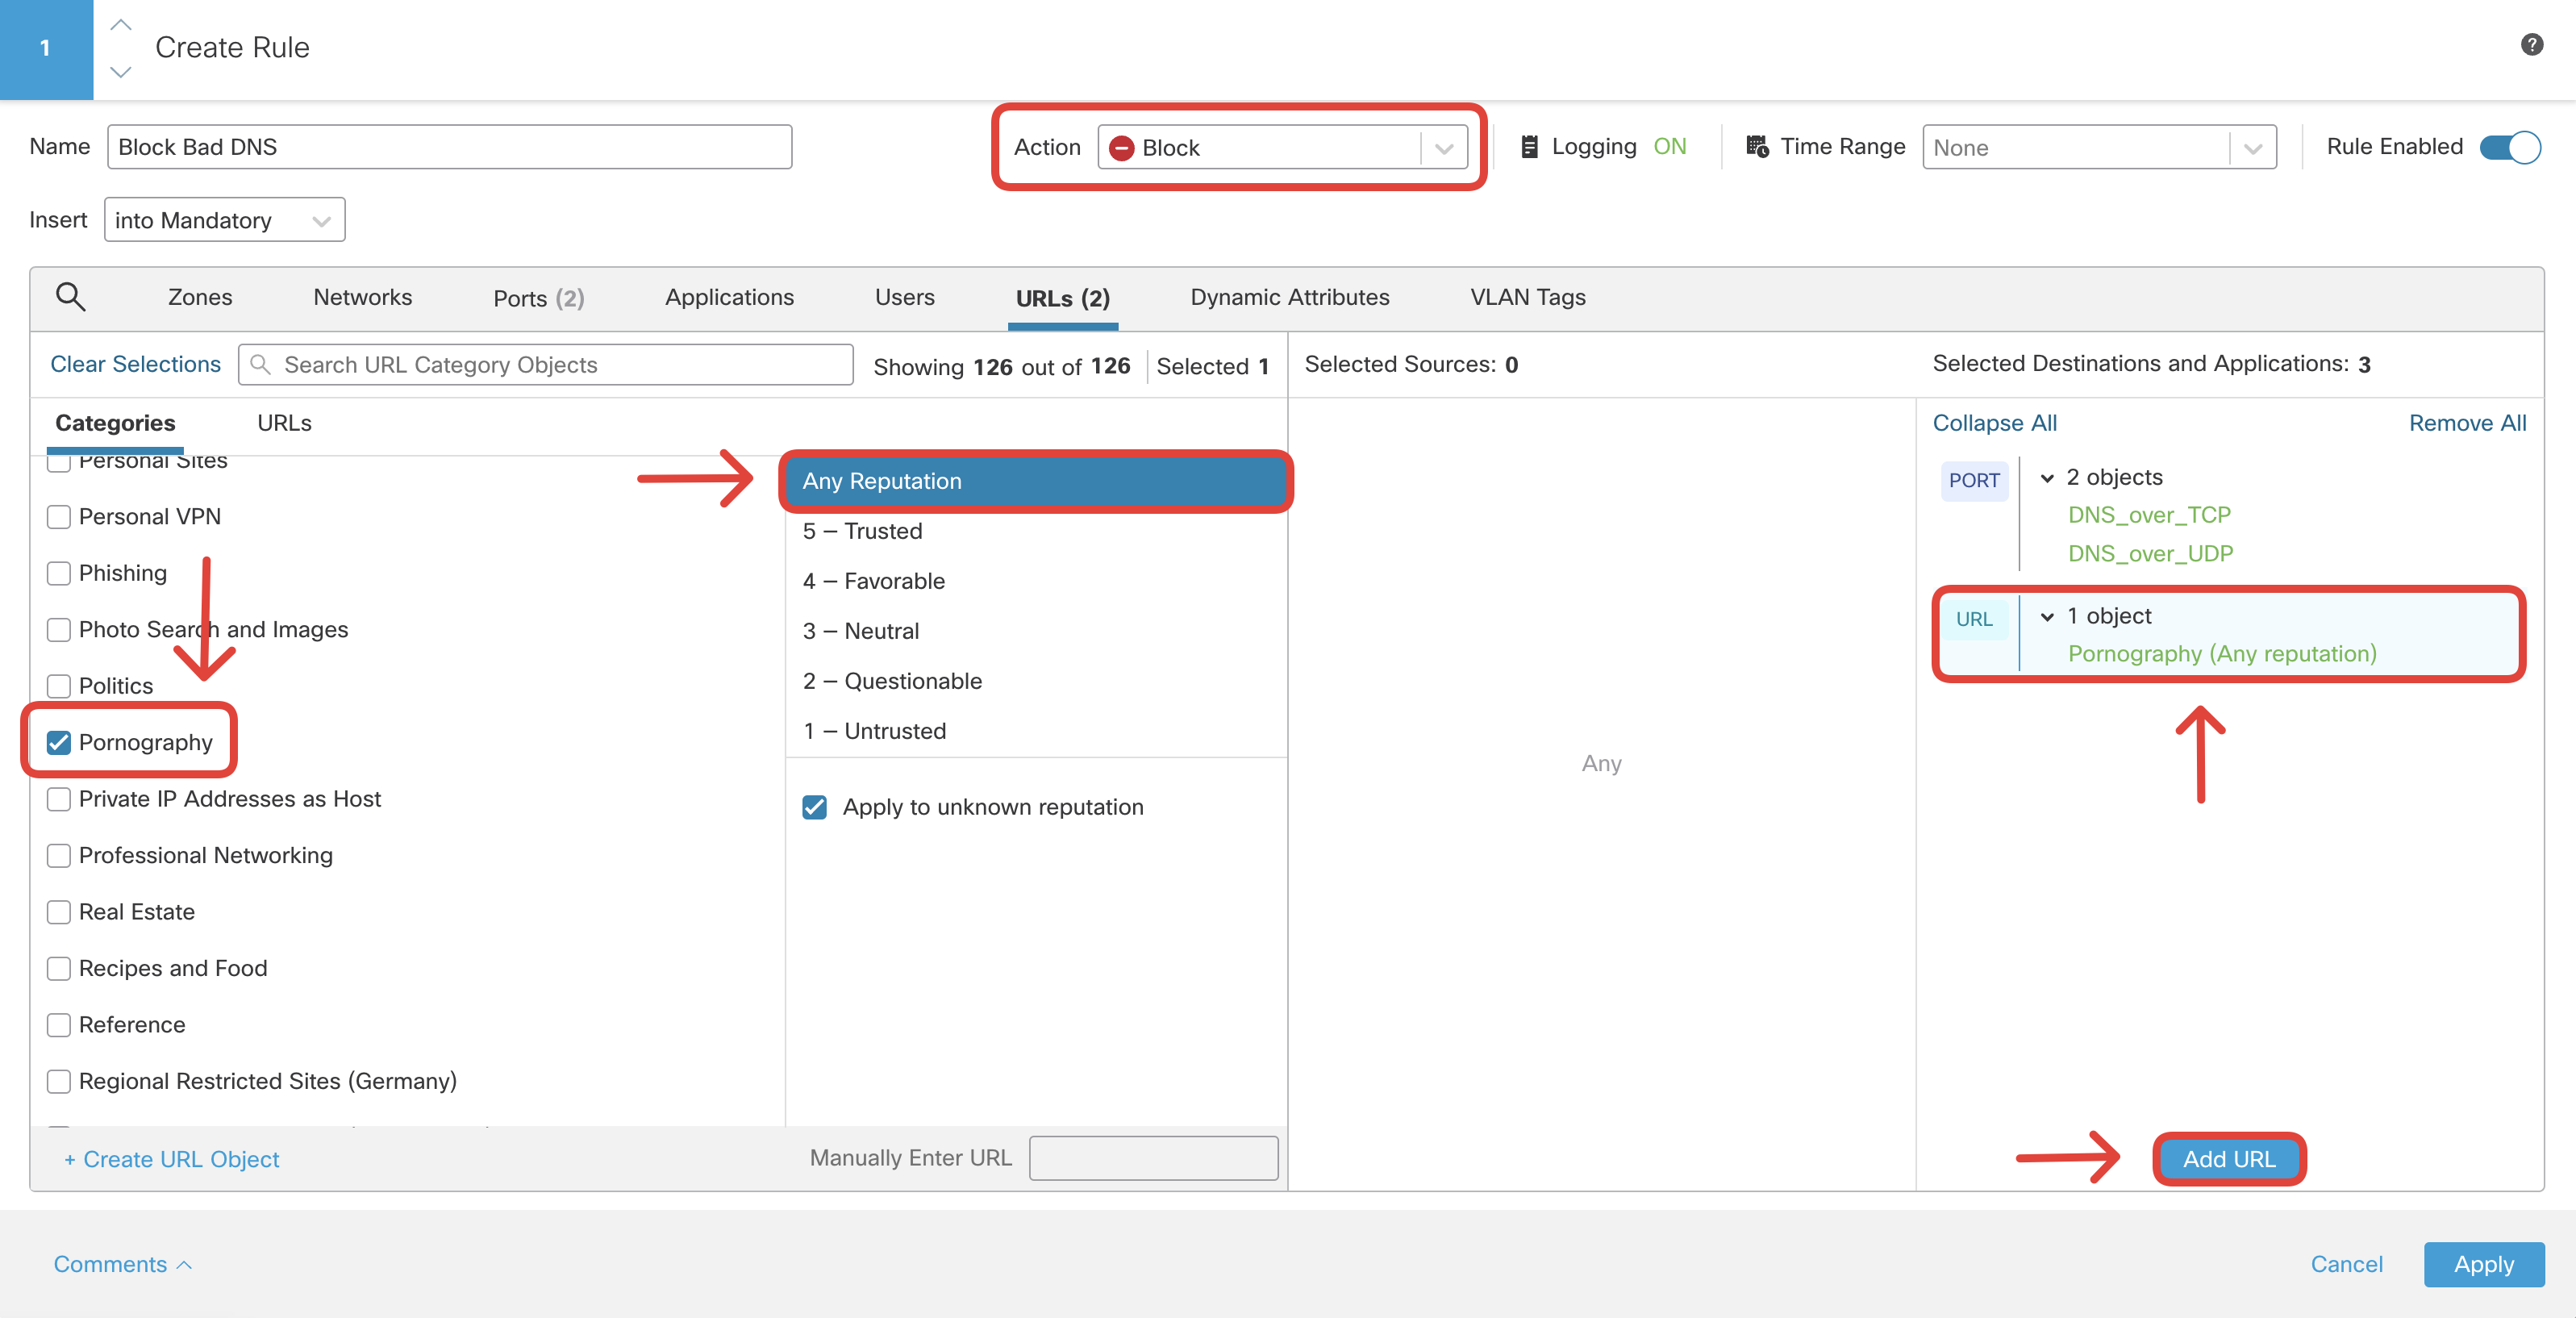
Switch to URLs tab and select Pornography with Any Reputation and click Add URL.
Click on Logging and configure Log at Beginning of Connection.
Observe that 'log at end of connection' is disabled for rules with action 'Block'.
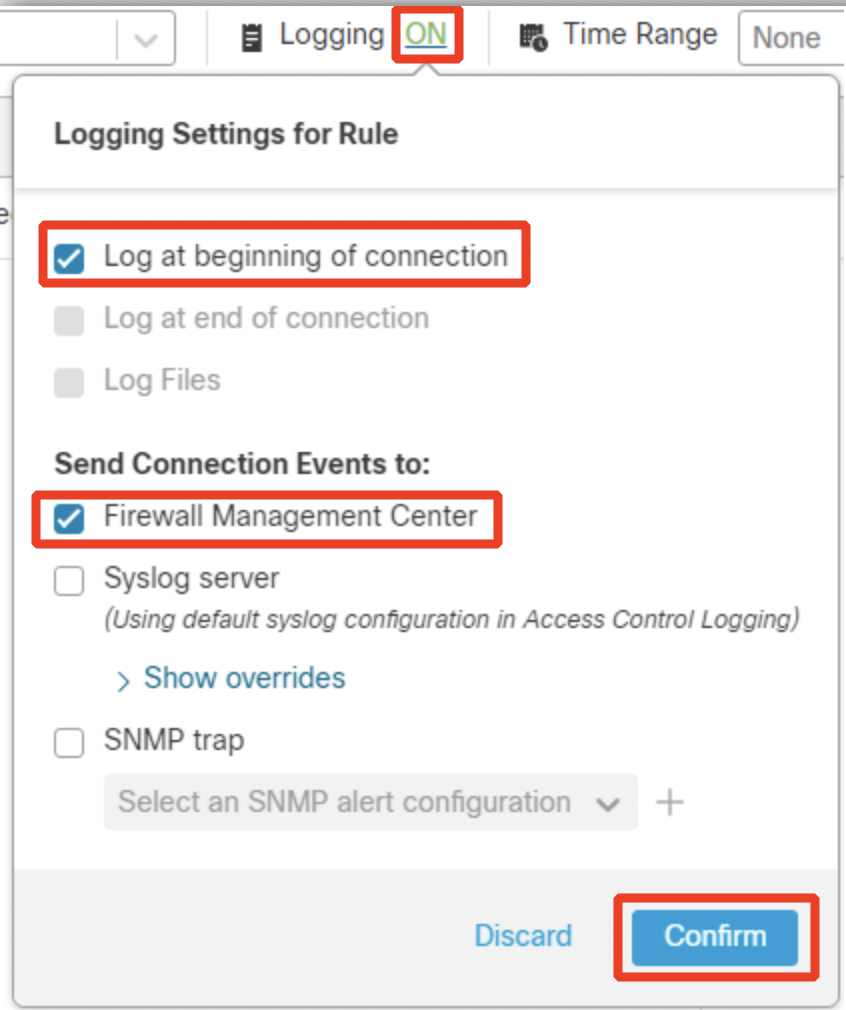
Click Confirm to set logging and then Apply to save the rule.
- Create another block rule for the URL categories as per below.
Click on + Add Rule.
Name: Block Unwanted URLs
Action: Block
Switch to URLs tab and select the following Categorieswith Any Reputation, then click Add URL.
- Adult (Any reputation)
- Botnets (Any reputation)
- Filter Avoidance (Any reputation)
- Gambling (Any reputation)
- Hacking (Any reputation)
- Illegal Activities (Any reputation)
- Illegal Drugs (Any reputation)
- Malicious Sites (Any reputation)
- Malware Sites (Any reputation)
- Pornography (Any reputation)
- Terrorism and Violent Extremism (Any reputation)
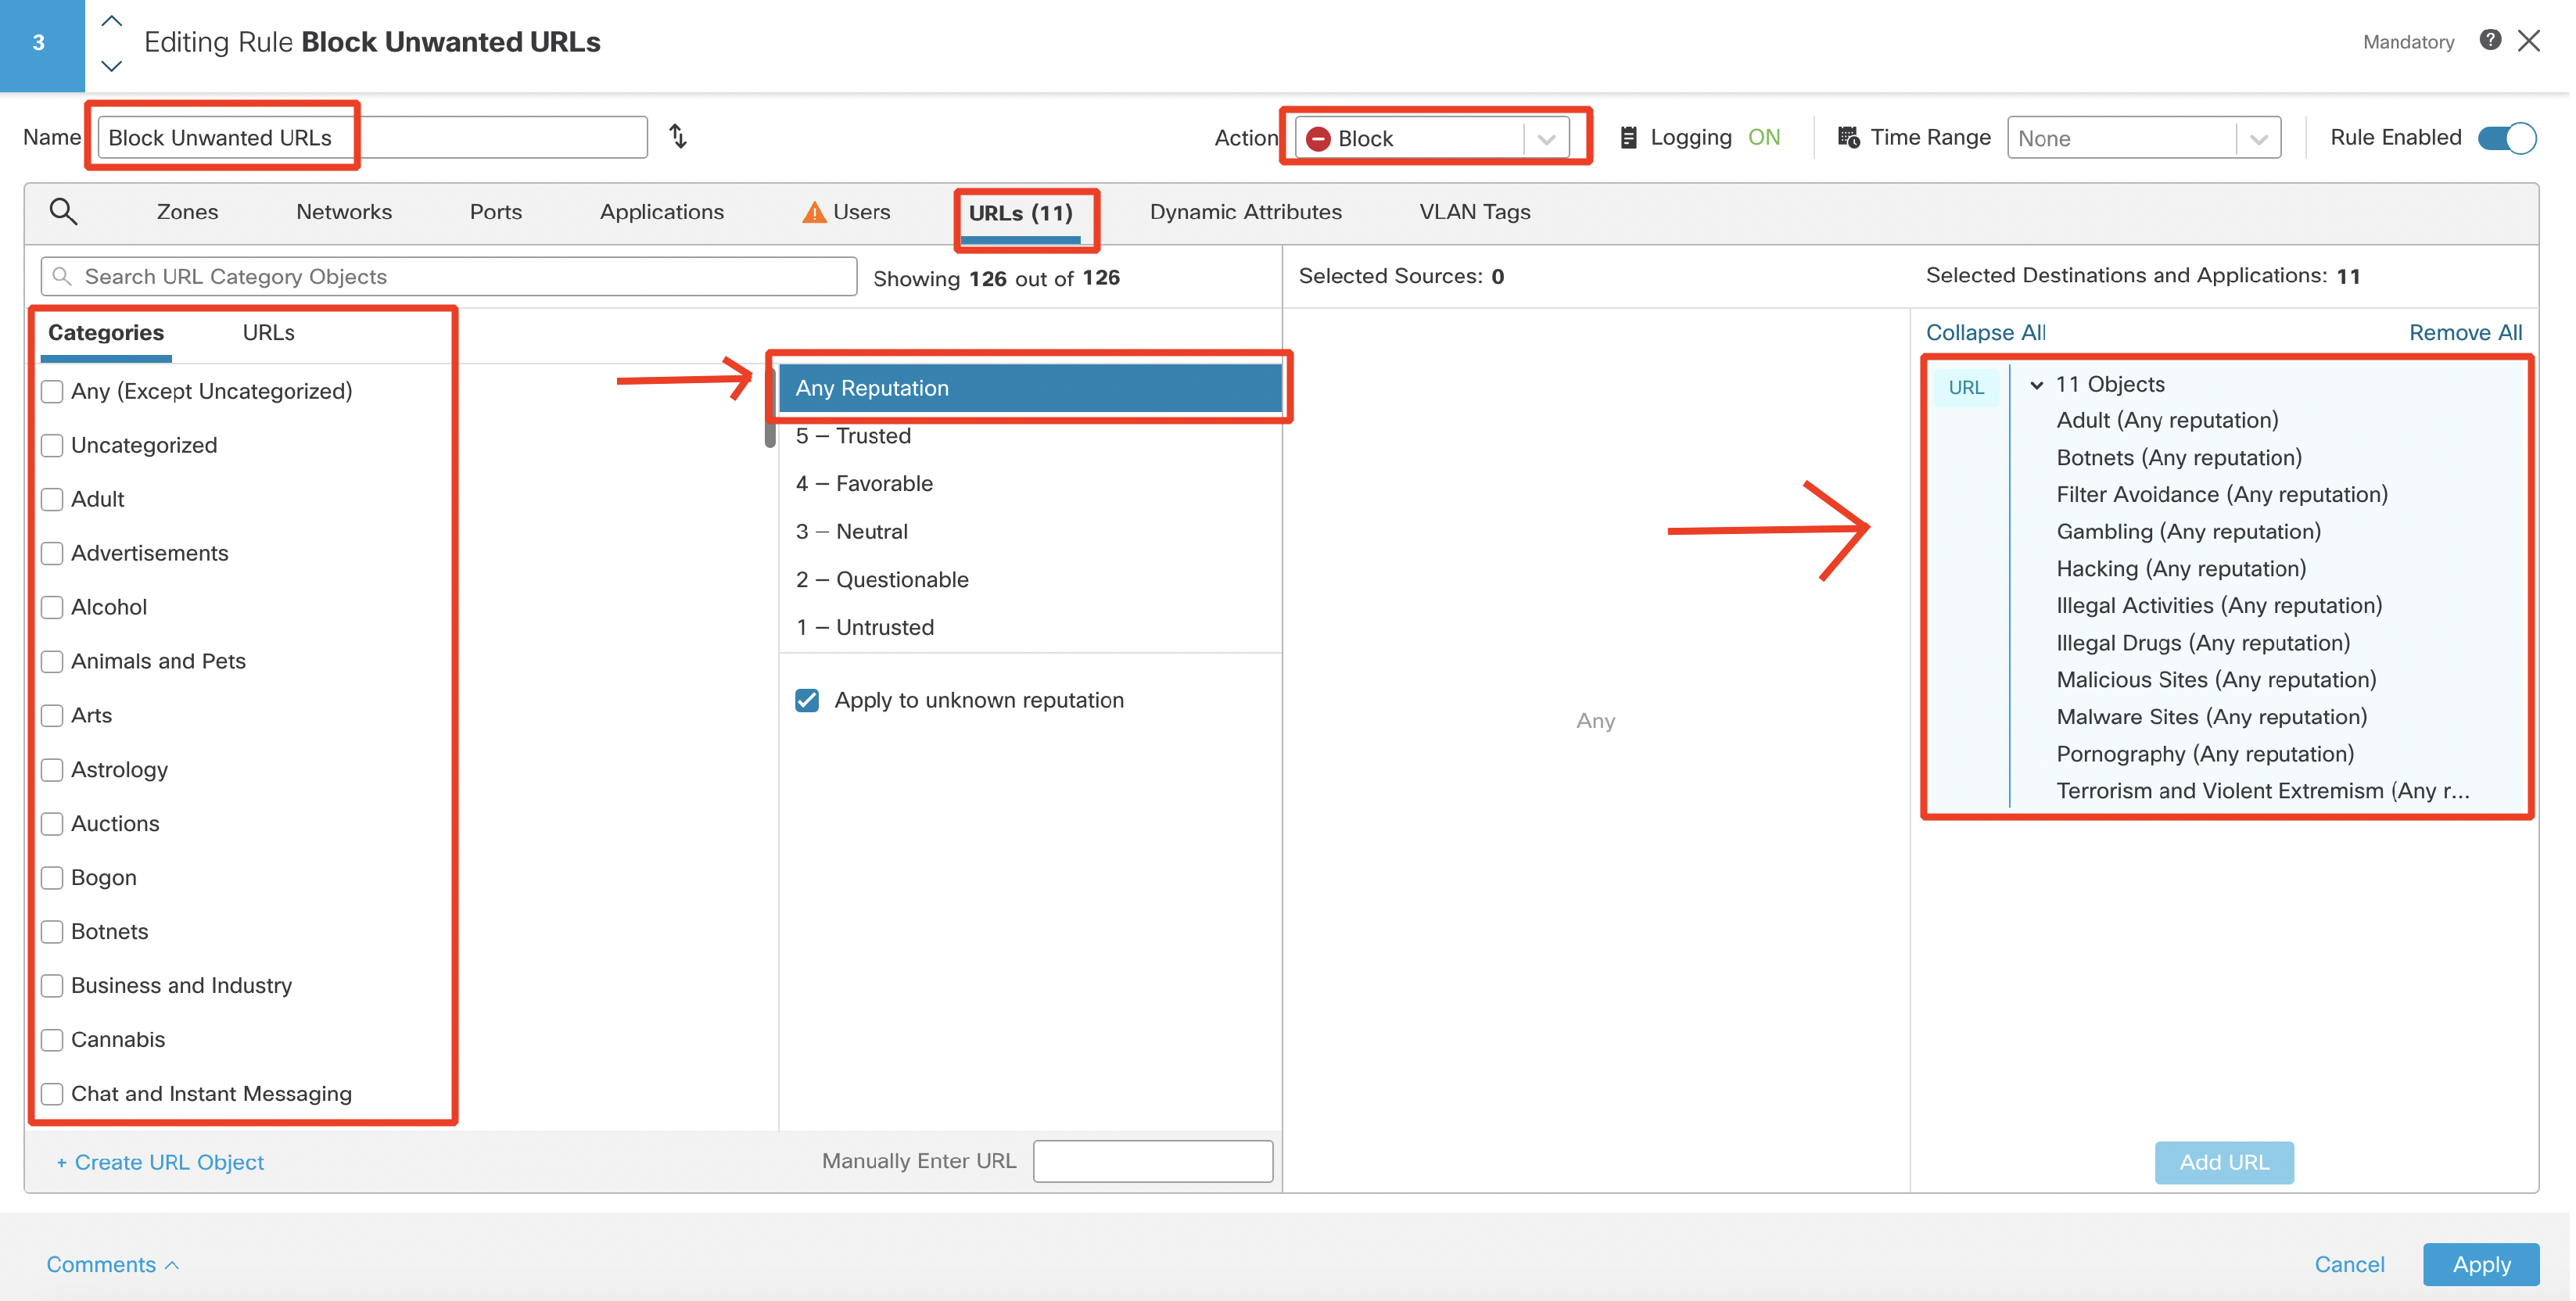
Click on Logging and configure Log at Beginning of Connection.

Click Confirm to set logging and then Apply to save the rule.
- Create another rule to block unwanted applications i.e., AOL, Dropbox, TeamViewer, and WinSCP.
Name: Block Unwanted Applications
Action: Block
Switch to Applications. Use the search field to find applications from the list below. Select each and click Add Application button.
-
AOL, AOL Ads, AOL Games, AOL Mail, AOL Video
-
Dropbox, Dropbox Download, Dropbox Paper, Dropbox Share, Dropbox Transfer, Dropbox Upload
-
TeamViewer
-
WinSCP
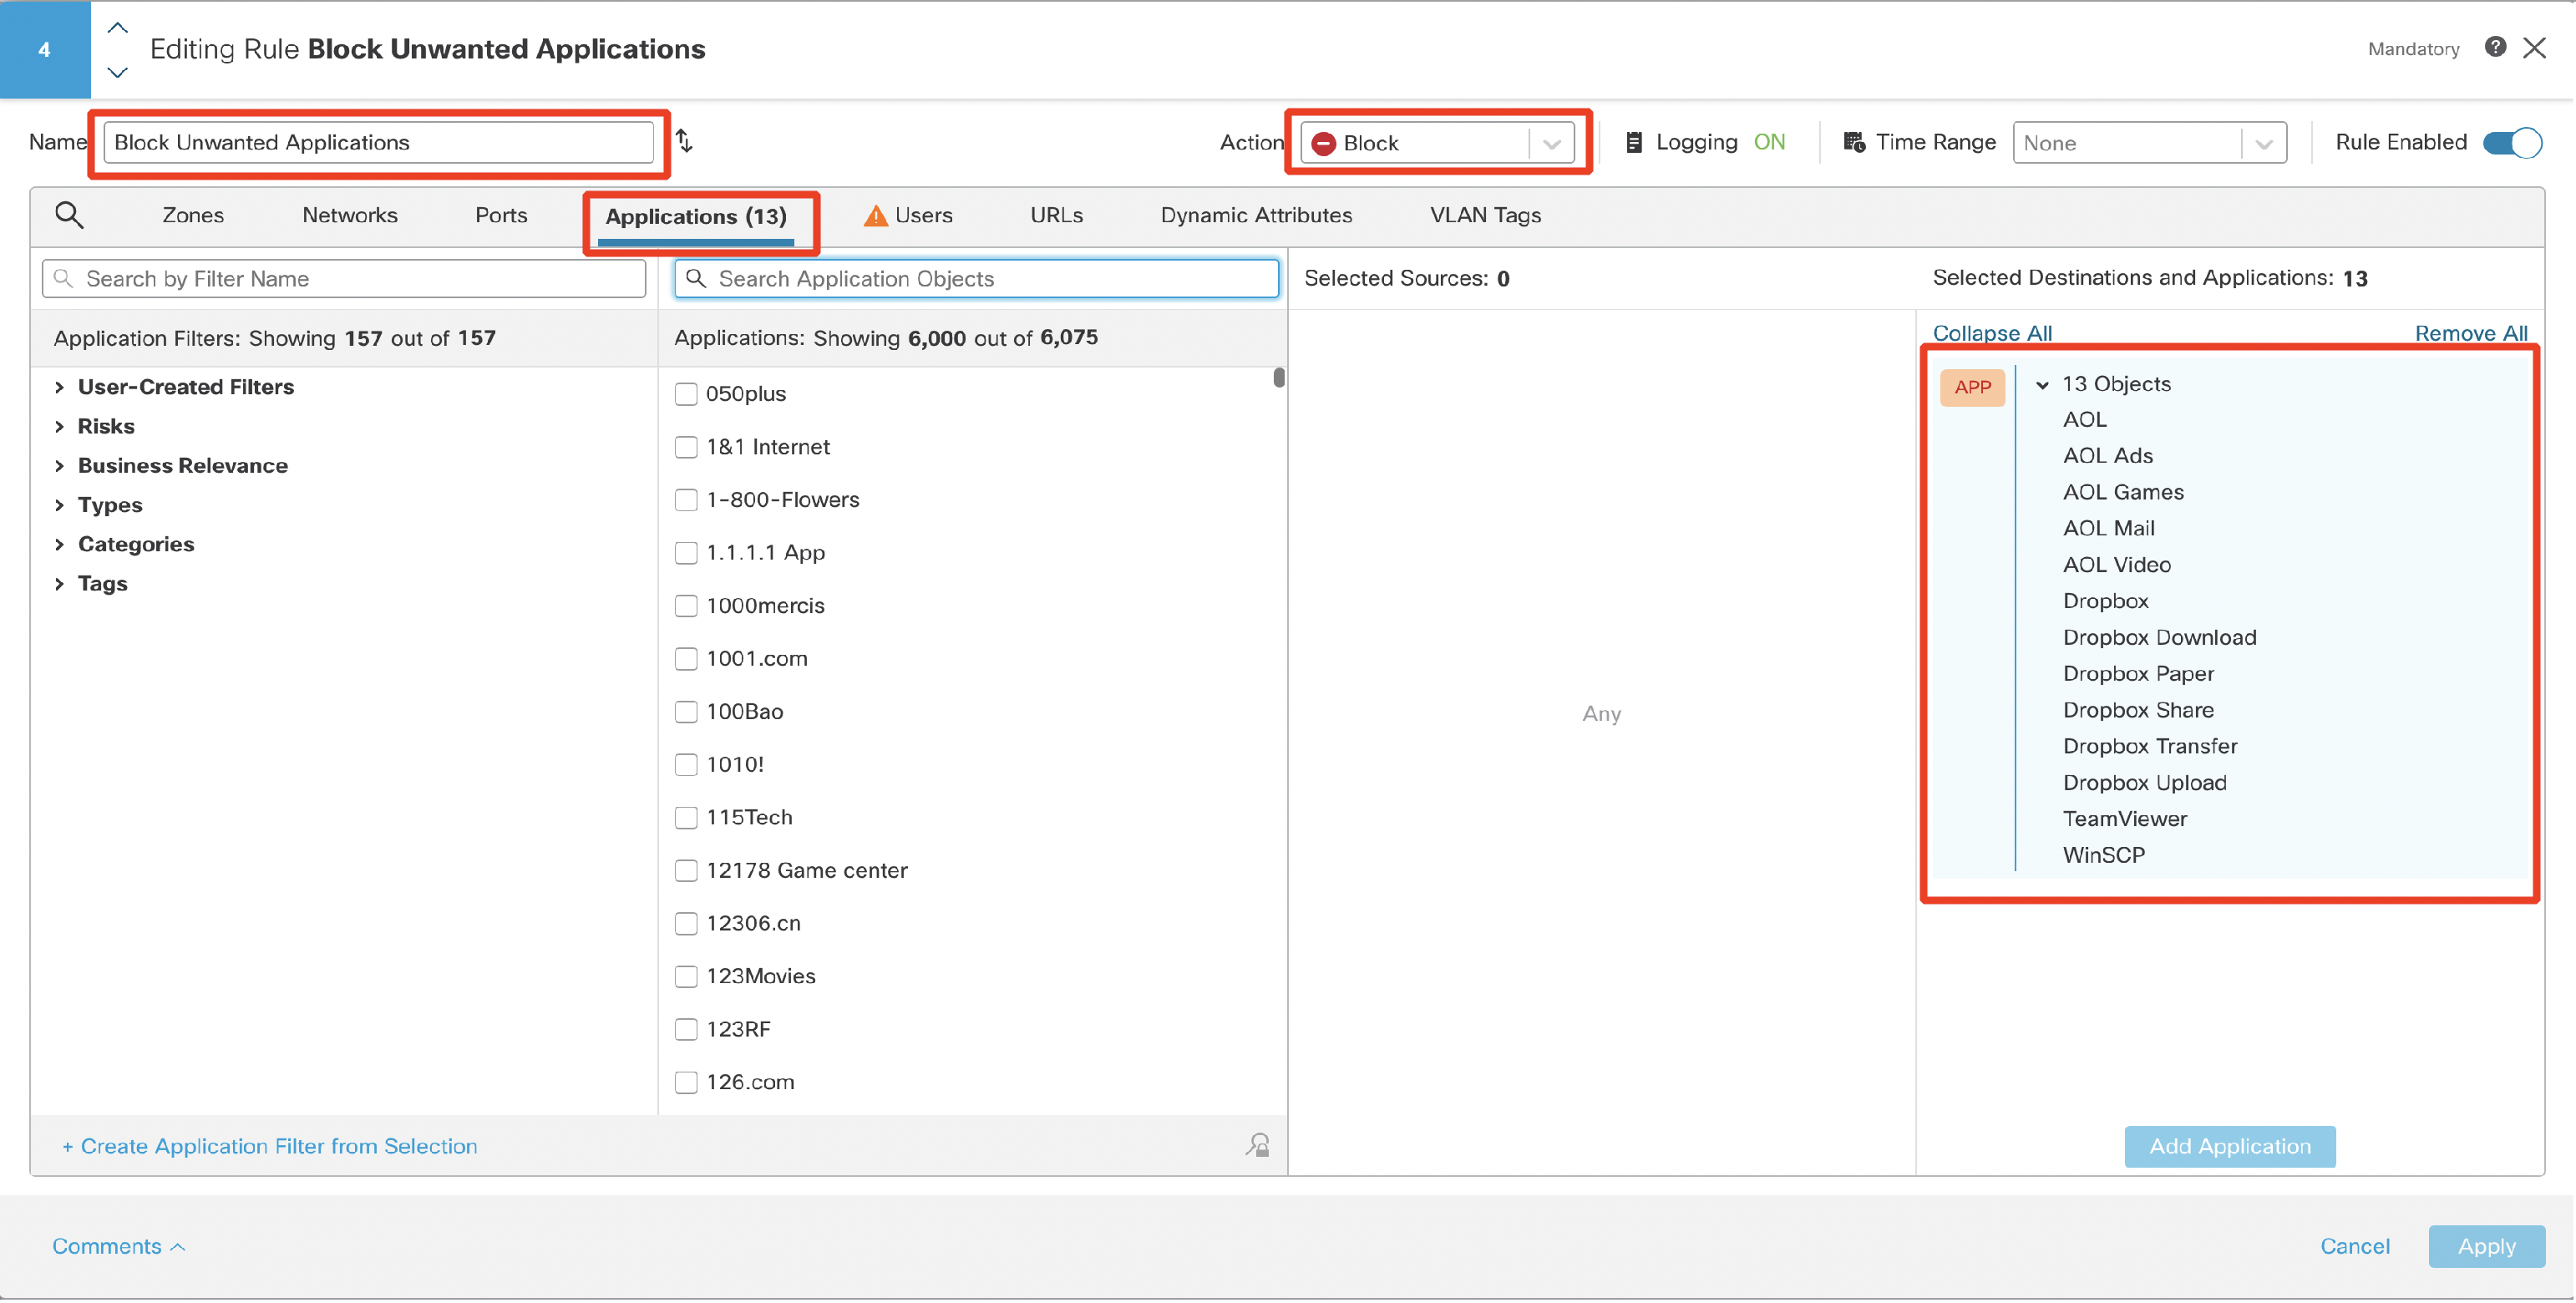
Click on Logging and configure Log at Beginning of Connection.

Click Confirm to set logging and then Apply to save the rule.
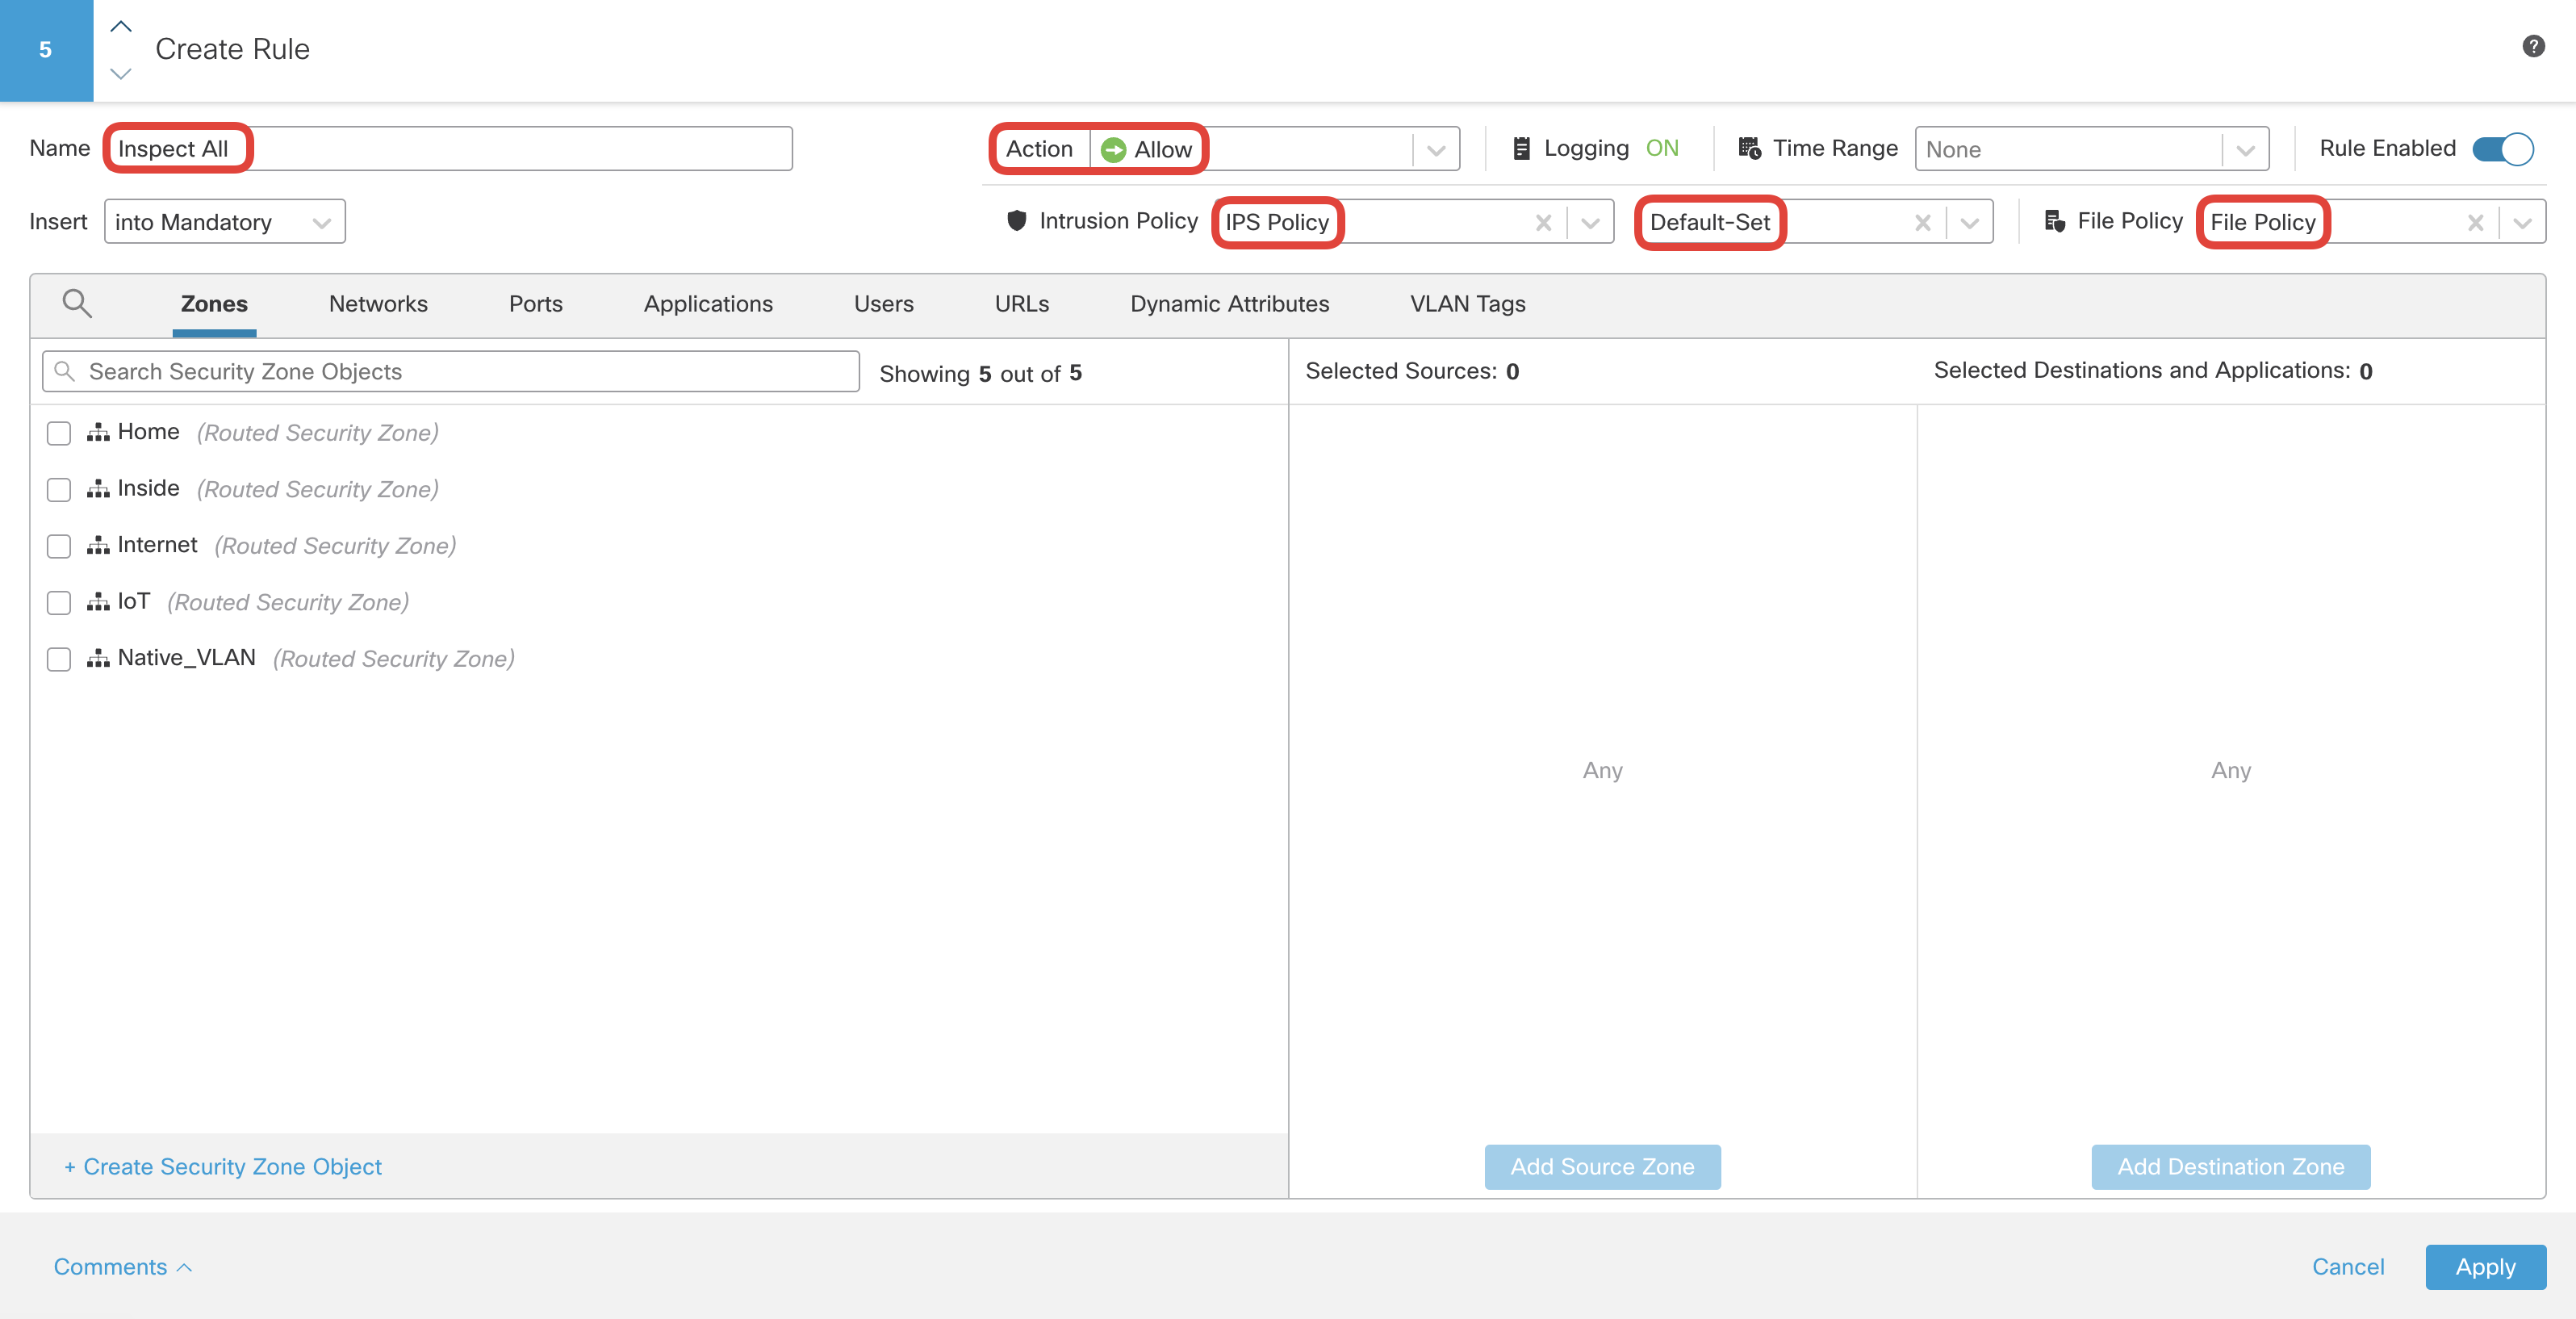
- Finally, you set a final rule which is to allow and inspect the rest of the traffic. You can either edit the existing Allow All, or delete it and create a new one. If you are editing the existing rule, then click on pencil icon for Allow All rule and then click on the reposition icon and position it below the last rule as shown below:
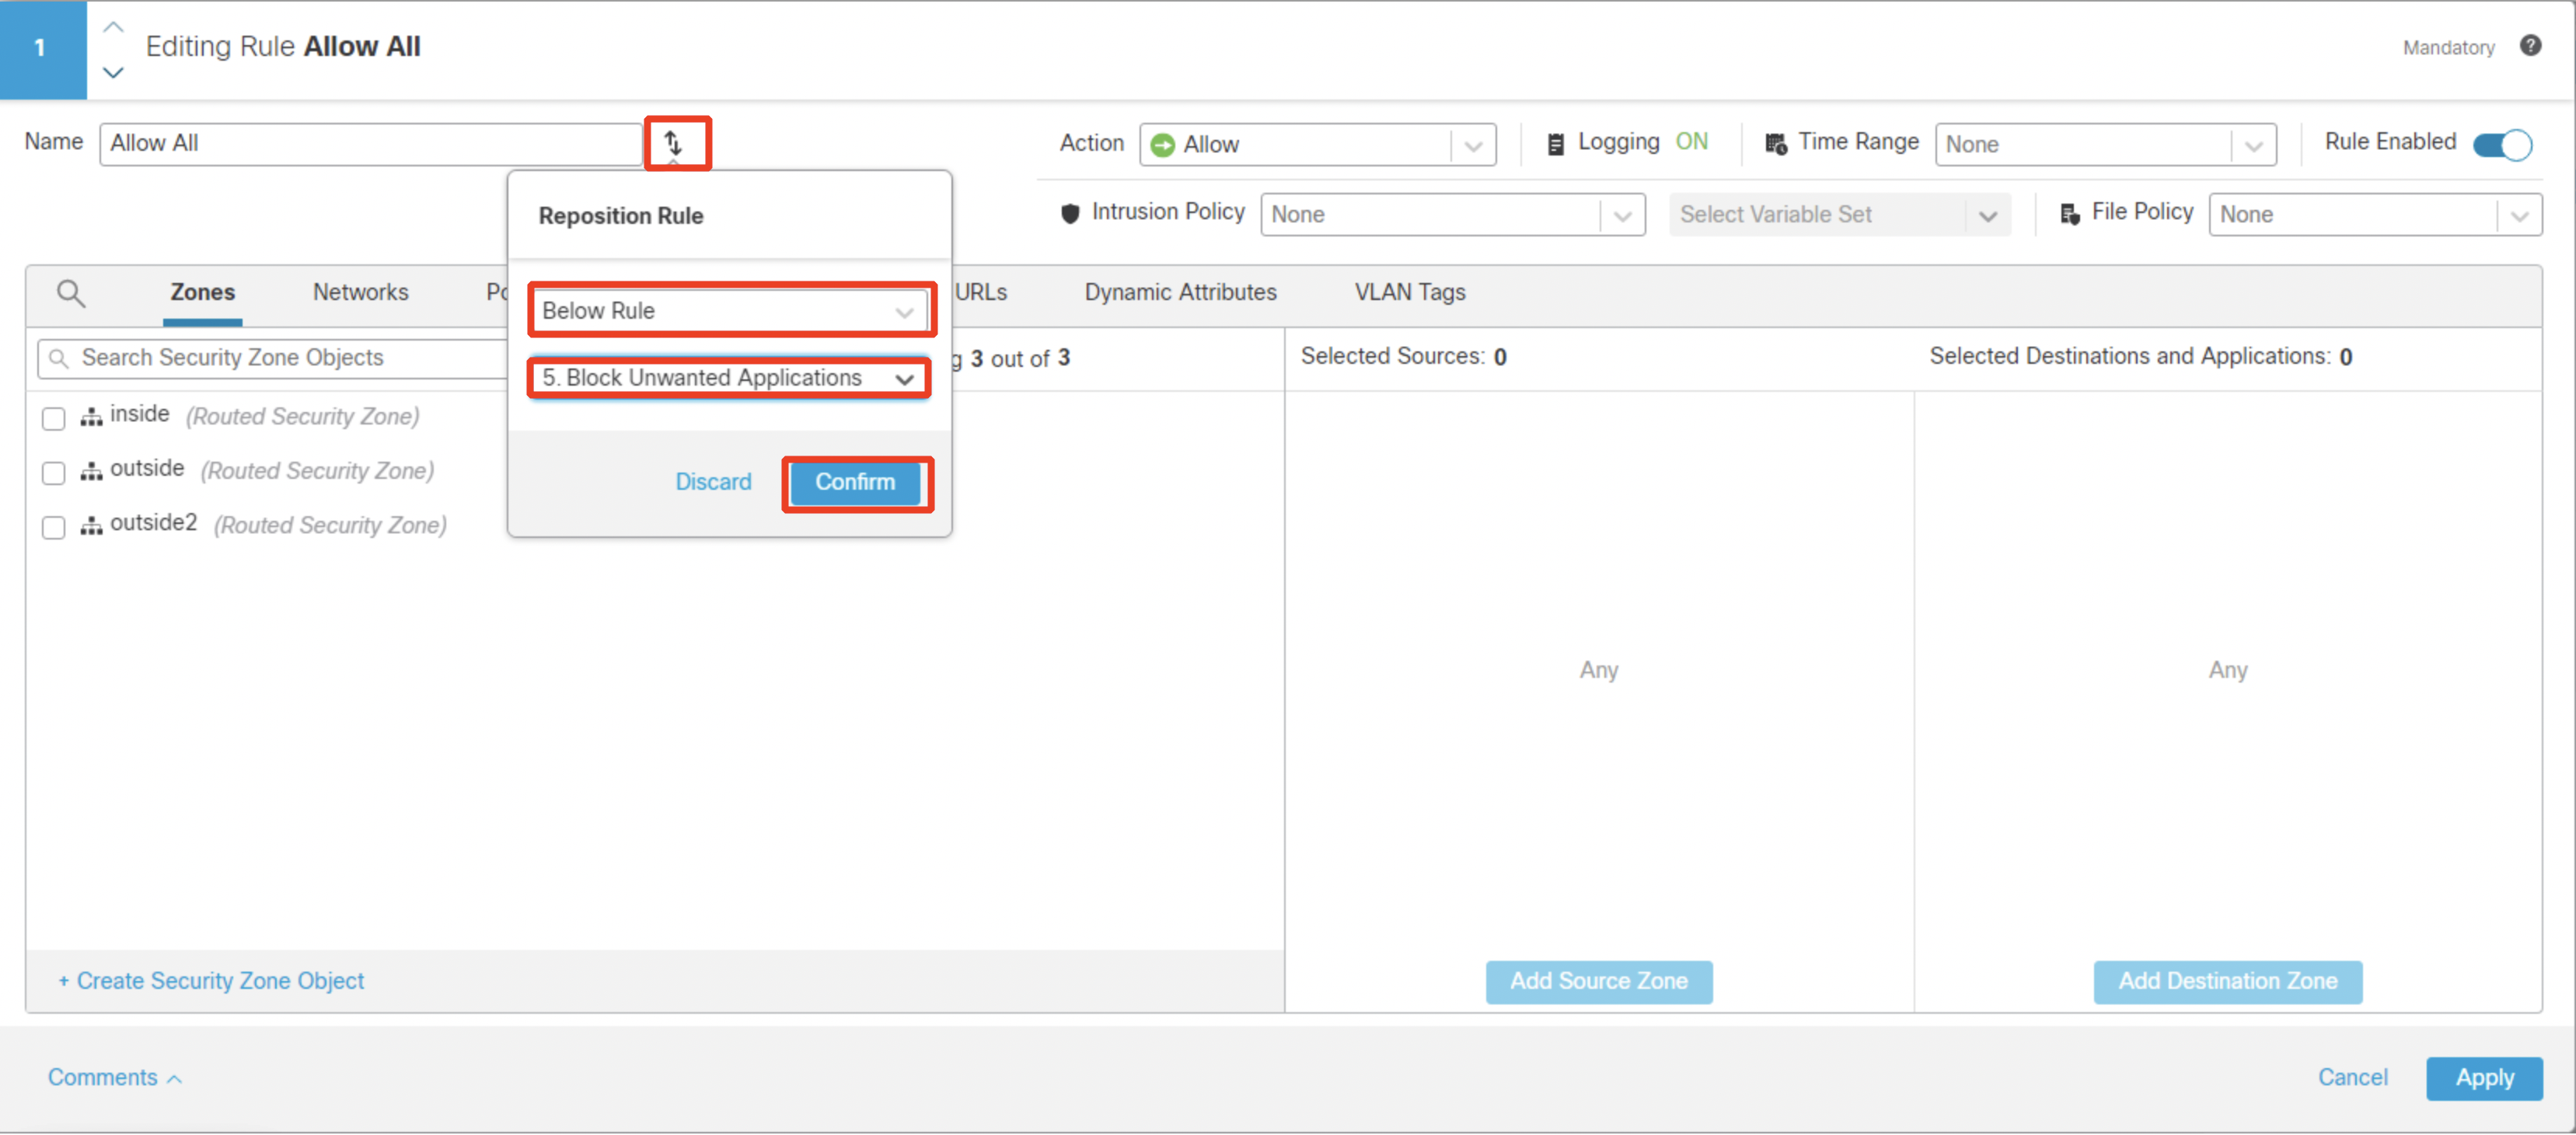
Configure the existing Allow All or new rule (name it Inspect All) as per below:
Action: Allow
Intrusion Policy: IPS Policy with Default-Set
File Policy: File Policy
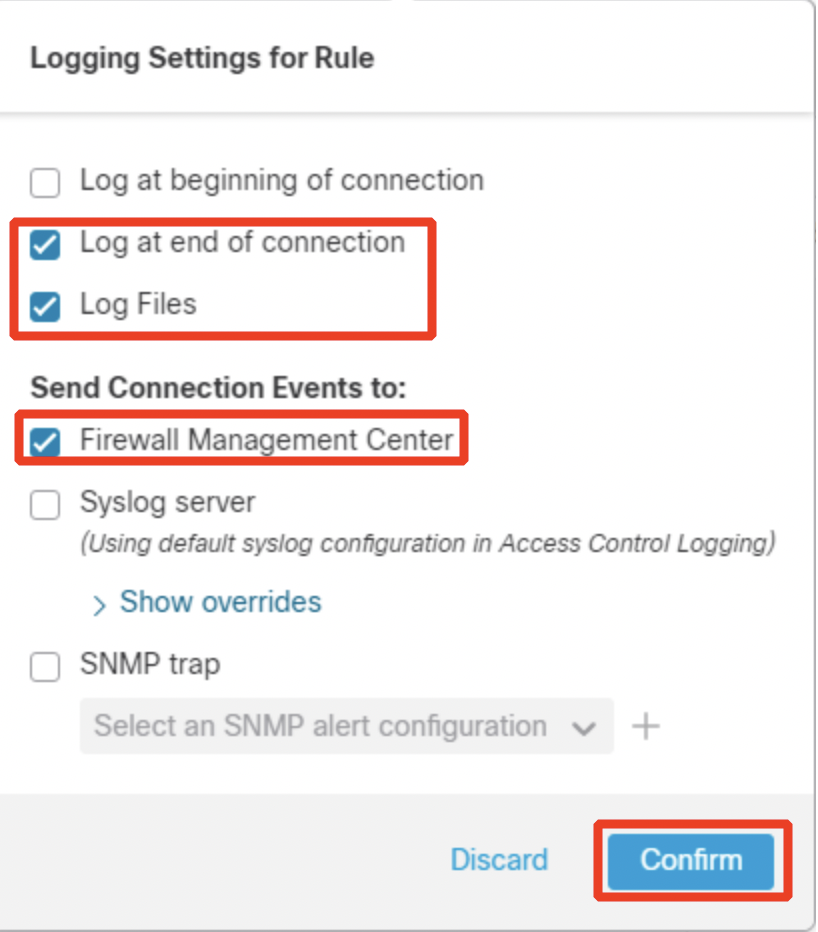
Click on Logging and configure Log at End of Connection along with Log Files.
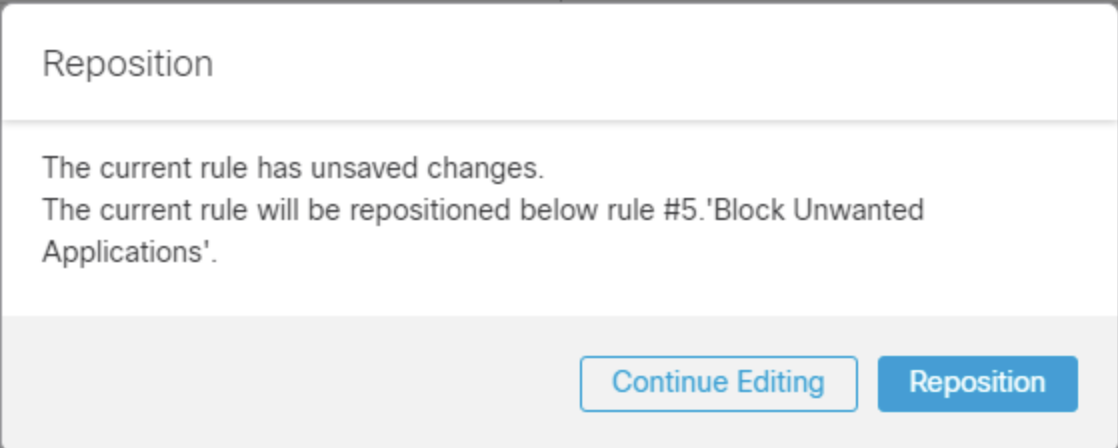
Click Confirm to set logging and then Apply to save the rule. Click on Reposition.
At this moment your Access Control Policy should look like on the screenshot below. Review and confirm:
-
order of the rules
-
there are only five rules in the policy (if there are any leftovers from the previous lab tasks either delete them or move the new rules to the top of the policy)
-
matching conditions for all the rules are set according to the lab guide
-
Prefilter Rules, Decryption (Optional) and Security Intelligence policies are attached.

-
Finally, you will review a few significant knobs in the Advanced Settings of the Access Control Policy that tend to be forgotten. Click More and then Advanced Settings.

First, confirm if Enable reputation enforcement on DNS traffic is enabled. Without this option the rule Block Bad DNS wouldn't work.

- Ensure that Early application detection and URL categorization is enabled. If not, enable it. If you decided to configure the Decryption policy, this option should be already set (refer to step 3 in Task 3 > Section VII)

- By default, the firewall has no IPS rules active for traffic yet to be matched by a specific Access Control Policy rule. You can specify an IPS policy for that traffic in the Network Analysis and Intrusion Policies section. Click on the pencil icon to edit.

Select the IPS Policy with the Default-Set along with Network Analysis Policy created previously as shown below. The packets that pass through the firewall before the access control rule is determined will be subjected to the Intrusion Policy selected i.e., IPS Policy in this lab. Click OK to save.
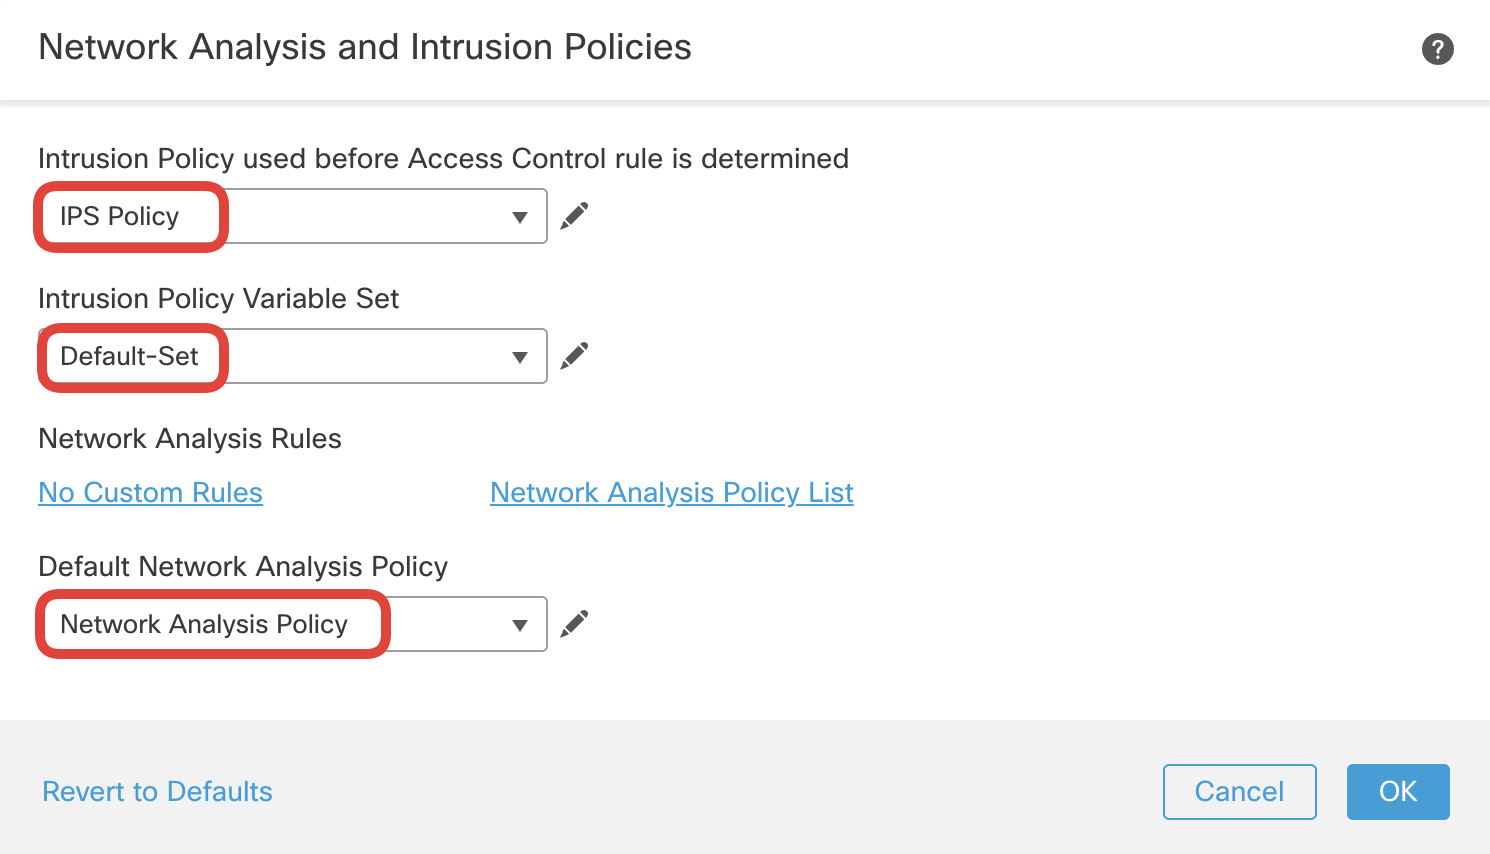
Confirm IPS Policy with the Default-Set along with Network Analysis Policy are set.

- Click Save on the top far right to save the changes and proceed to deploy them to NGFW1 by clicking on Deploy as shown below.
Note
If any warnings seen, click on Ignore warnings and proceed with Deploy.
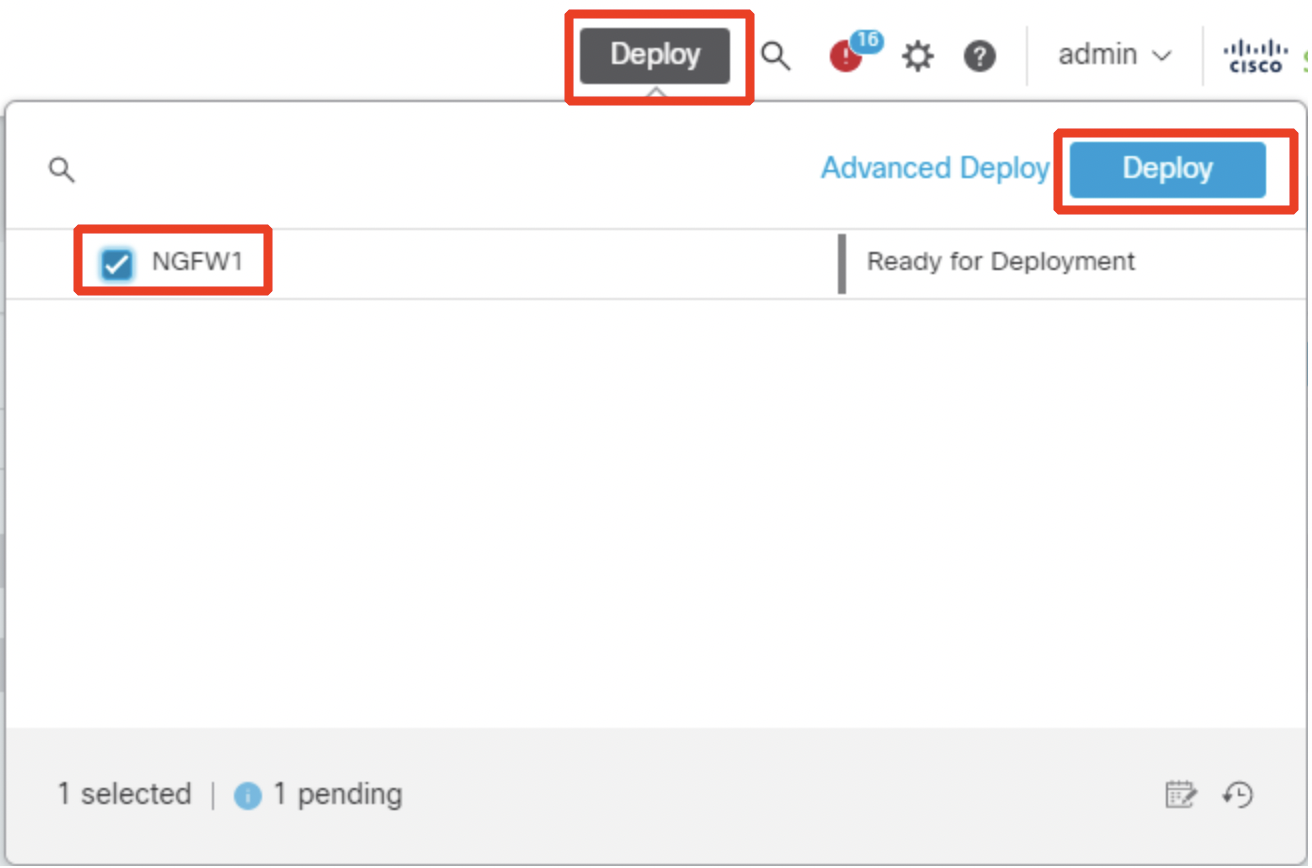
(Optional) Click on Advanced Deploy to view the details of the changes made.
Wait
Wait for the deployment to complete.
Task 3 - Analyze the Initial AttackIQ Test
- Use either the Quick Launch panel, or reopen your remote session to Wkst1.
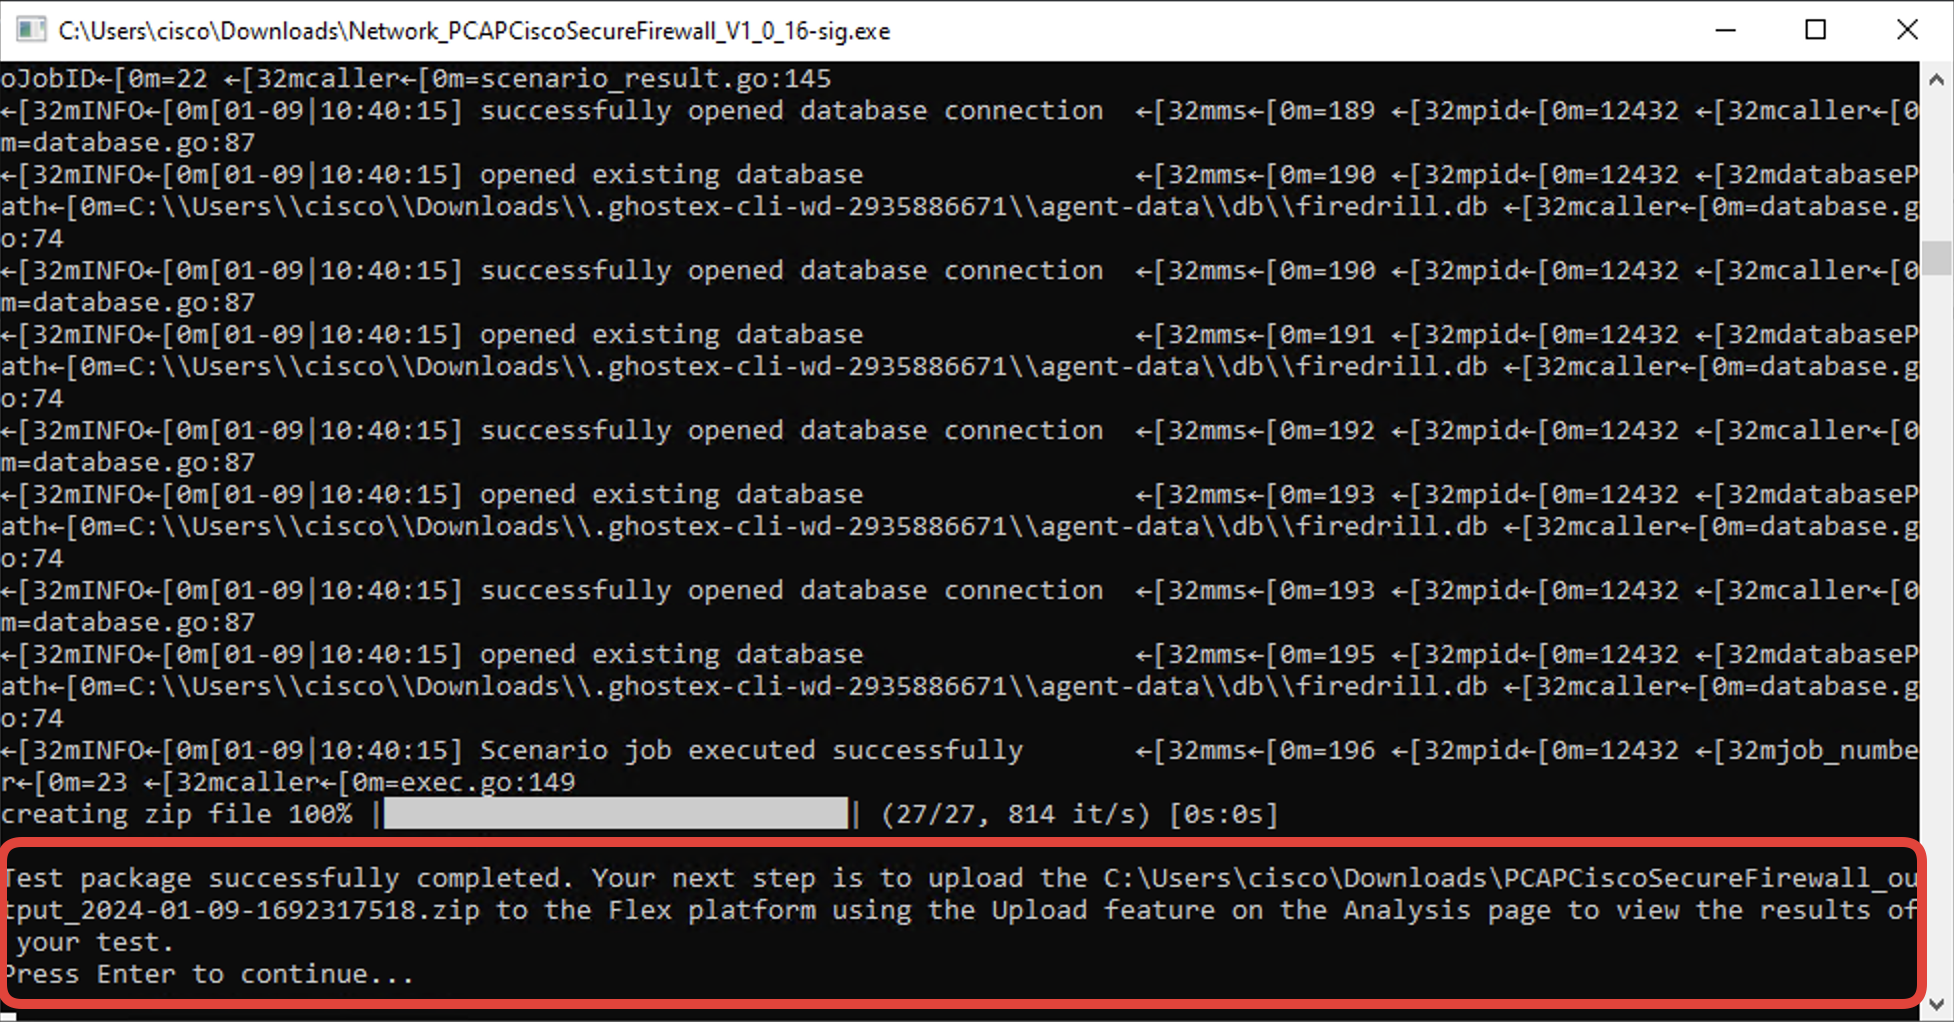
- The first AttackIQ test should have completed by now and you should see the below message. Press Enter to continue.
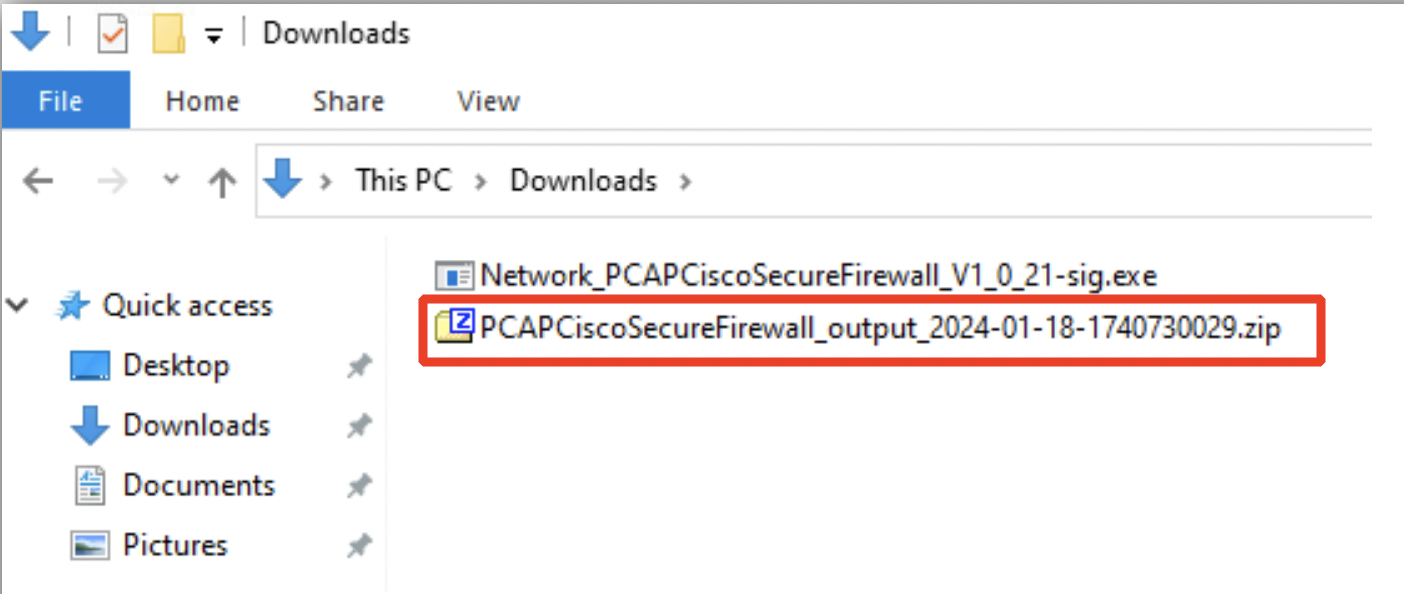
- Once the execution is completed, a .zip file with AttackIQ bundle results will be created in the same folder where the test package is located.
- Head back to the AttackIQ portal and navigate to the Analyze section.
- Enter the Label as "Initial Security Scan".
- Click Click to upload.

- Select the file in the Downloads folder and click on Analyze (1).

Wait
Generating the report via the Analyze function can take up to two minutes to complete. Wait for this to finish before moving forward in the guide.
- The AttackIQ portal consumes the bundle and prepares a report based on the results. Scroll down to see the option to view the report. Click View (1 Credit).

Note
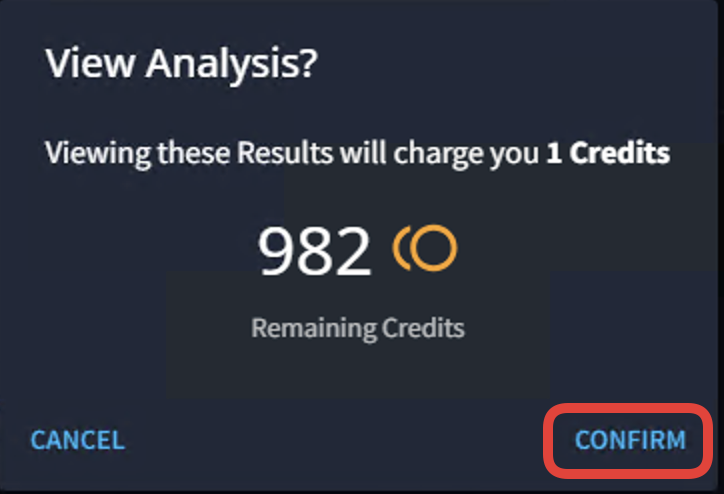
Credits are preloaded into your AttackIQ account. Viewing a new analyzed result costs a credit every time. Repeated viewing of the same result will not cost any credit. You can also download the report for future reference.
- Click View to see the report. You need to confirm the consumption of 1 credit before proceeding.
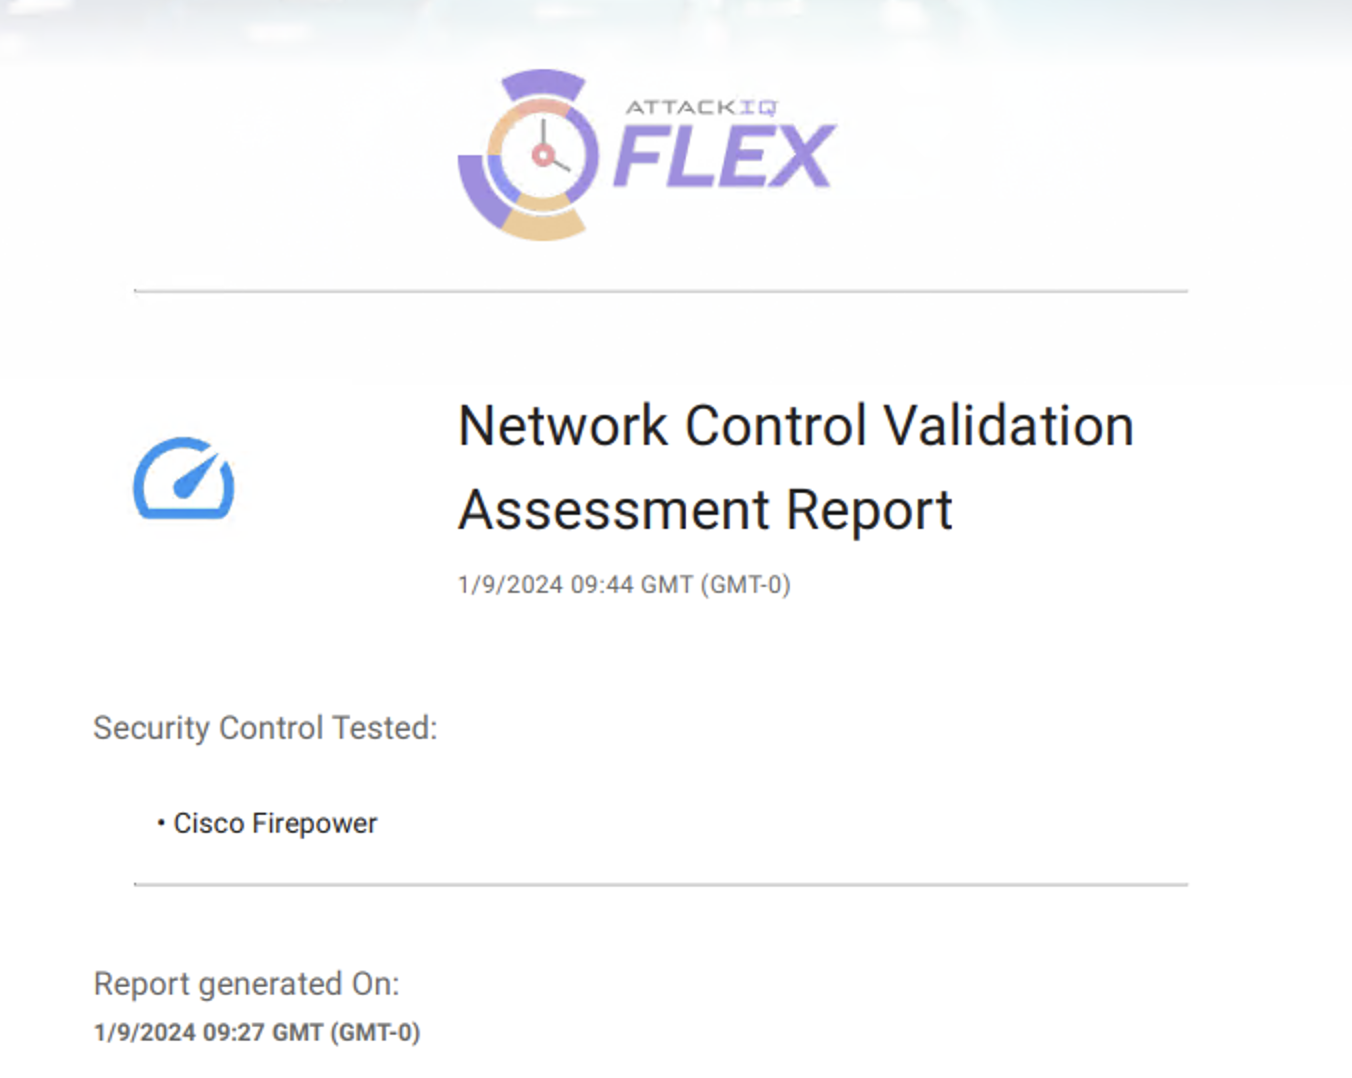
- The report generated would begin with the title as shown below.
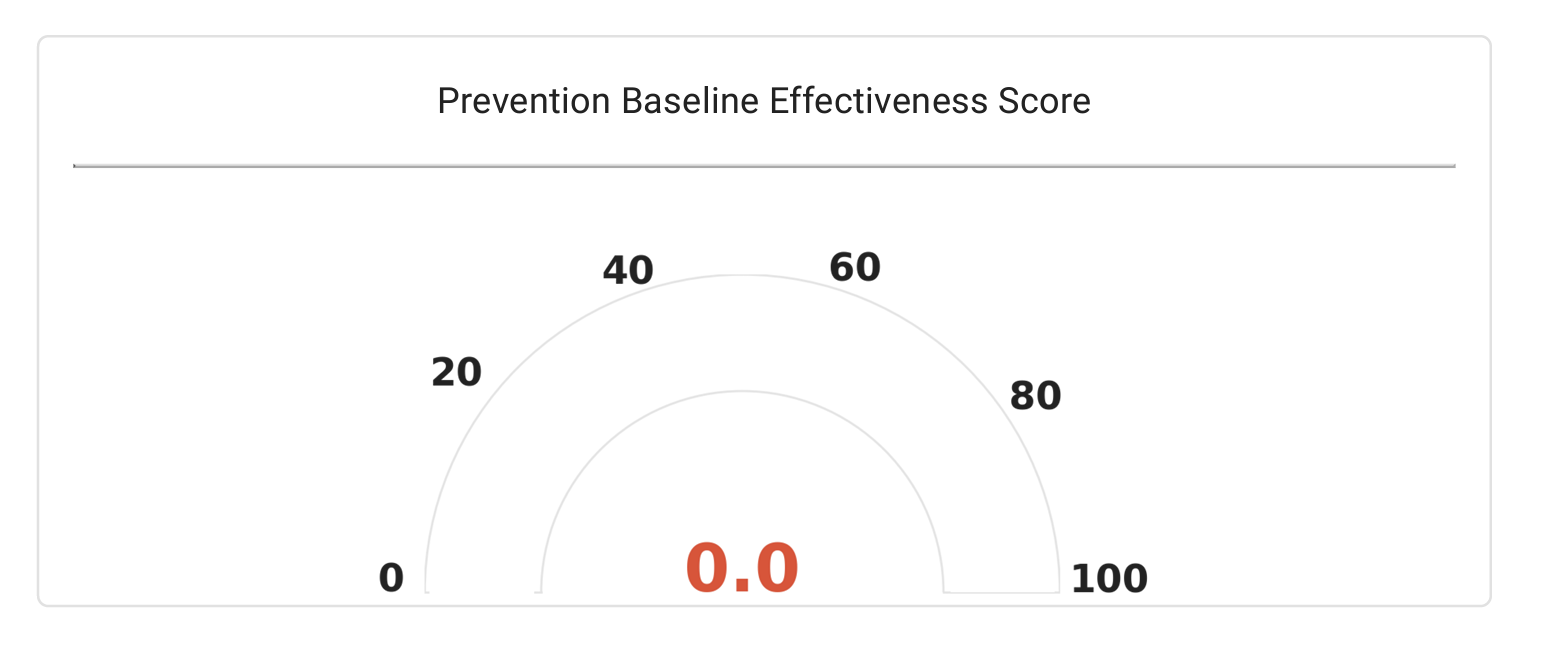
- The effectiveness score will be 0.0 since the firewall allows everything through it without any inspection.
Note
The effectiveness score may vary slightly due to the firewalls in the lab infrastructure. This minor variation in the score can be ignored.
- Scroll down the report for further details. The report will show the testing methodology and the scenarios comprising the test, displaying the result against each test. This will be followed by the recommendations and mitigations to be imbibed, to improve the security posture of the firewall.
Task 4 - Re-run the AttackIQ package
As the deployment is completed and the security rules are applied to the NGFW1, run the AttackIQ test again to validate the threat efficacy of the firewall.
-
Execute the downloaded package again from Wkst1 as performed in Task 1 - Step 9 of this lab guide.
-
Once the execution is completed, a .zip file will be created in the same folder where the test package is located.

-
Upload the new .zip file under the Analyze section as shown below and repeat the steps done in Task 1- Step 5 to generate a new report.
Note
Note the timestamp of the two files and choose the latest file here.
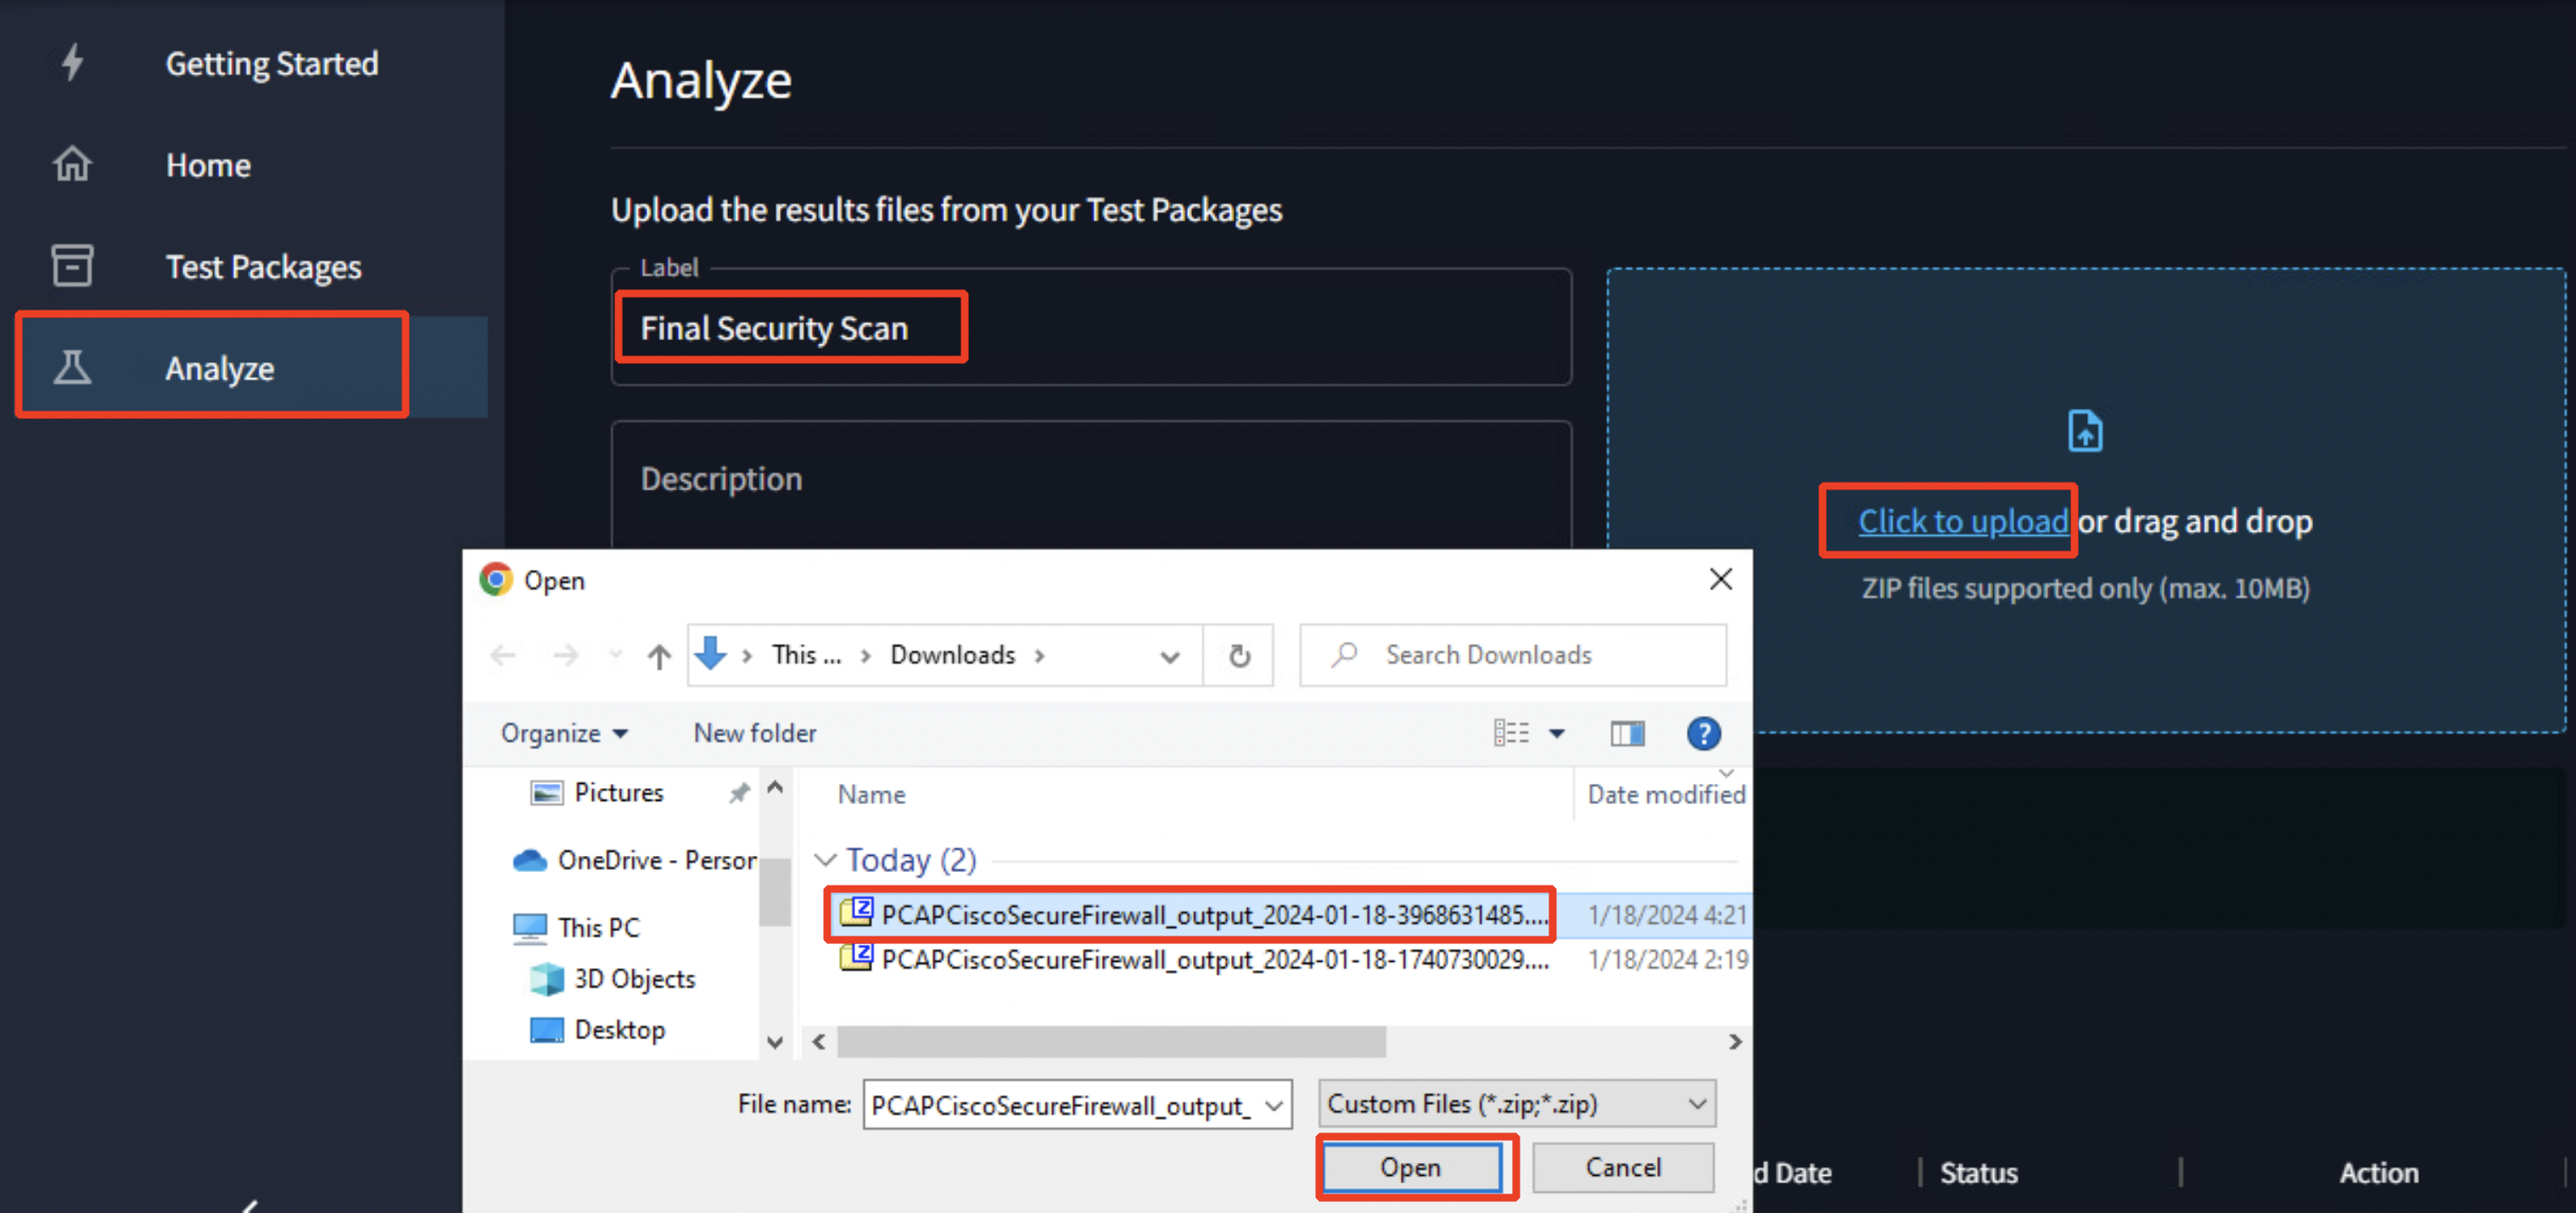
- Review the new report which now shows 100% efficacy as below. Scroll down the report to view further details.

Stop
If the report does not show 100%, review the logs and try to figure out the reason. Verify and correct the configuration and re-run the AttackIQ package.
Task 4 - View the events on FMC
- Go back to the FMC GUI. Navigate to Analysis > Unified Events. In the search bar, type in "Device".

- Click on the Device option. Type in "NGFW1" in the search criteria box. Click Apply.

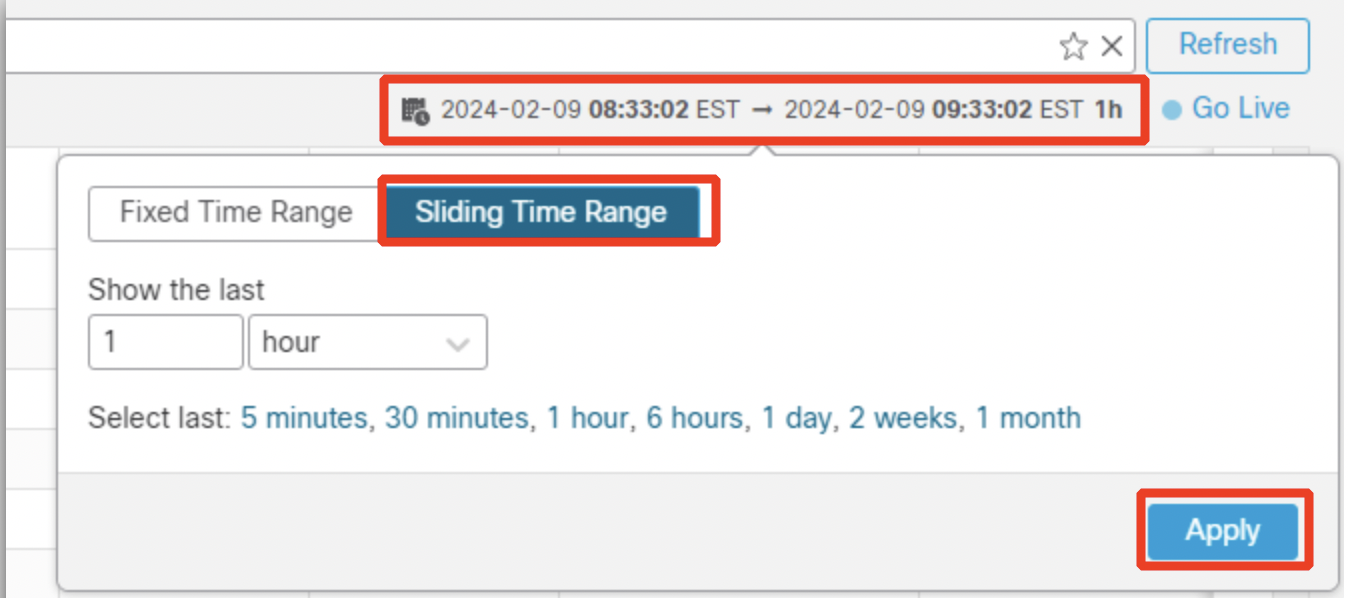
- Observe the events generated as a result of the AttackIQ test. Click on the time window, select Sliding Time Range, and set the time range to show the last 1 hour.
- Click Apply.
- Explore the events by navigating to the other options under Analysis such as:
- Connections > Events
- Intrusions > Events
- Files > Malware Events
- Files > File Events
Summary
This lab task summarizes various threat protection capabilities provided by the firewall, as a result of the AttackIQ test bundles. AttackIQ provides validation of these security controls by running the most common and high-risk attacks through the firewall and generating a detailed report. To achieve maximum security, it is important to utilize most of the aforementioned features.
Success!
Congratulations! You have successfully completed all the lab tasks, should you have time please proceed with the optional Remote Access VPN lab listed below.
📚Additional Resources
For more information on how different types of policies are configured on Firewall Management Center for Secure Firewall devices, please refer to the following documents
Updated over 1 year ago
