Scenario 1 - CSDAC in FMC
Objective
- What - In this scenario, we will look at the Cisco Secure Dynamic Attributes Connector (CSDAC) integrated with the Firewall Management Center. You will have an opportunity to experience the new CSDAC interface and configure the new Zoom, Webex, and Generic Text connectors. During the Azure-related task, you will configure a pair of Dynamic Objects, apply them to the firewall policy, and observe their dynamic nature in real time. In the last task, you will import Azure Service Tags to your Firewall Management Center.
- Why - Instantaneous adaption to changes with attributes obtained from multi and hybrid cloud environments. Accelerated integration, even in complex environment(s) from automatic propagation of host attributes & contexts. Prevent build-up of outdated firewall rules.
- How - Via the FMC Web Interface, Access Control Policy, and the Azure Connector.
Lab Tasks
These are the tasks in the scenario below. If you are familiar with the Secure Firewall you may do these on your own, or for step-by-step instructions see below.
- Task 1 - Login to FMC and review Dynamic Attributes Connector initial setup
- Task 2 - Configure Azure-sourced dynamic objects
- Task 3 - Use dynamic attributes in the Access Control Policy
- Task 4 - Verify the Attribute-Based Policy
- Task 5 - Configure Public Feeds Connectors
- Task 6 - The Generic Text Connector
- Task 7 - The Azure Service Tags Connector
Task 1 - Login to FMC and review Dynamic Attributes Connector initial setup
In this task, you will get acquainted with the CSDAC integrated with the management center as well as the design options diagram presented in the Dynamic Objects view.
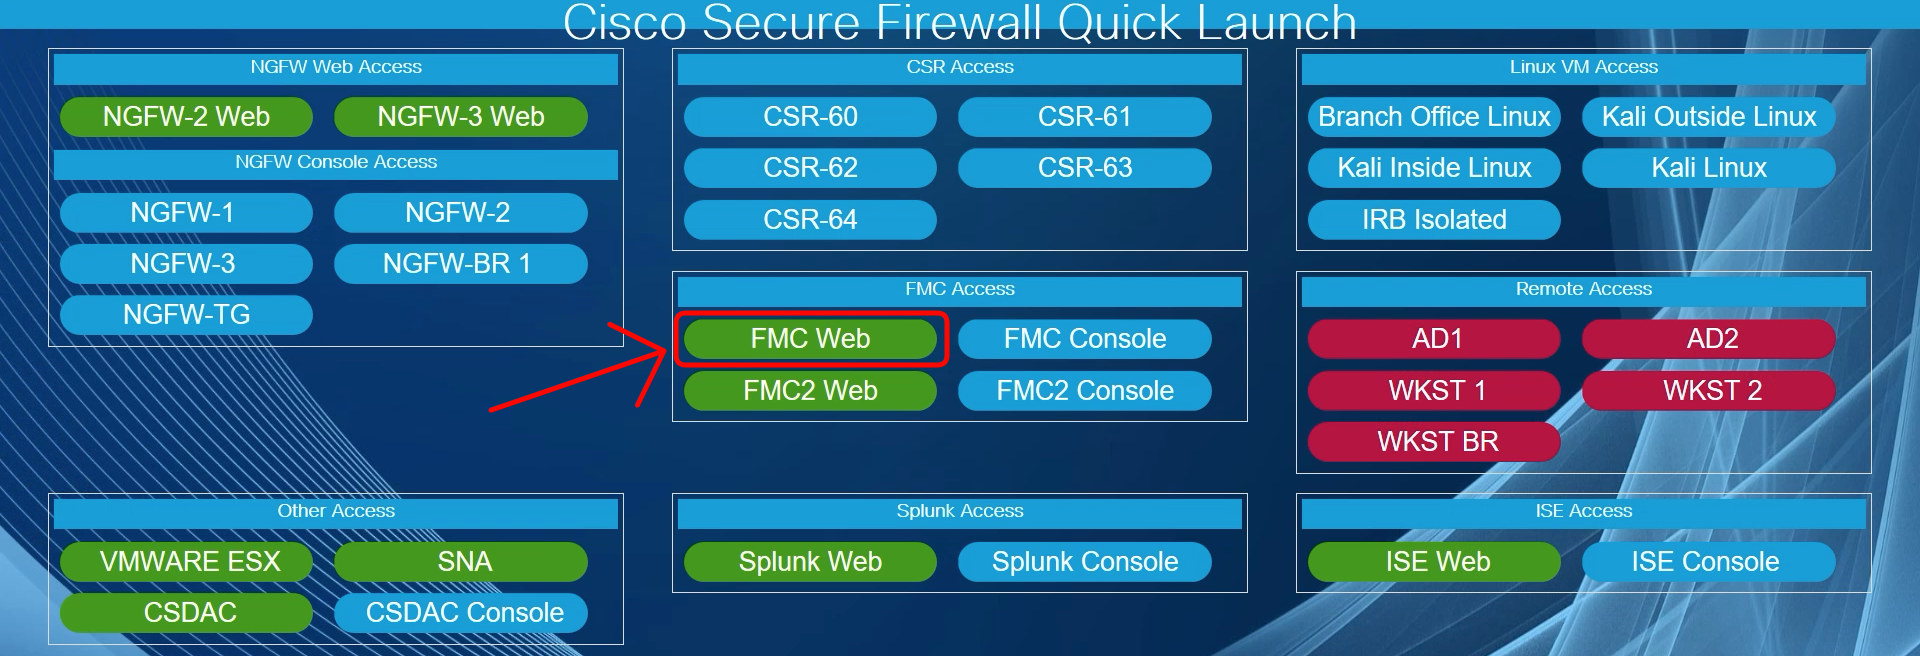
- Using the Quick Launch or the Google Chrome browser connect to the FMC web UI.
Login as admin/C1sco12345. These credentials should be pre-populated in the browser.
- Navigate to Objects -> Object Management -> External Attributes -> Dynamic Objects.
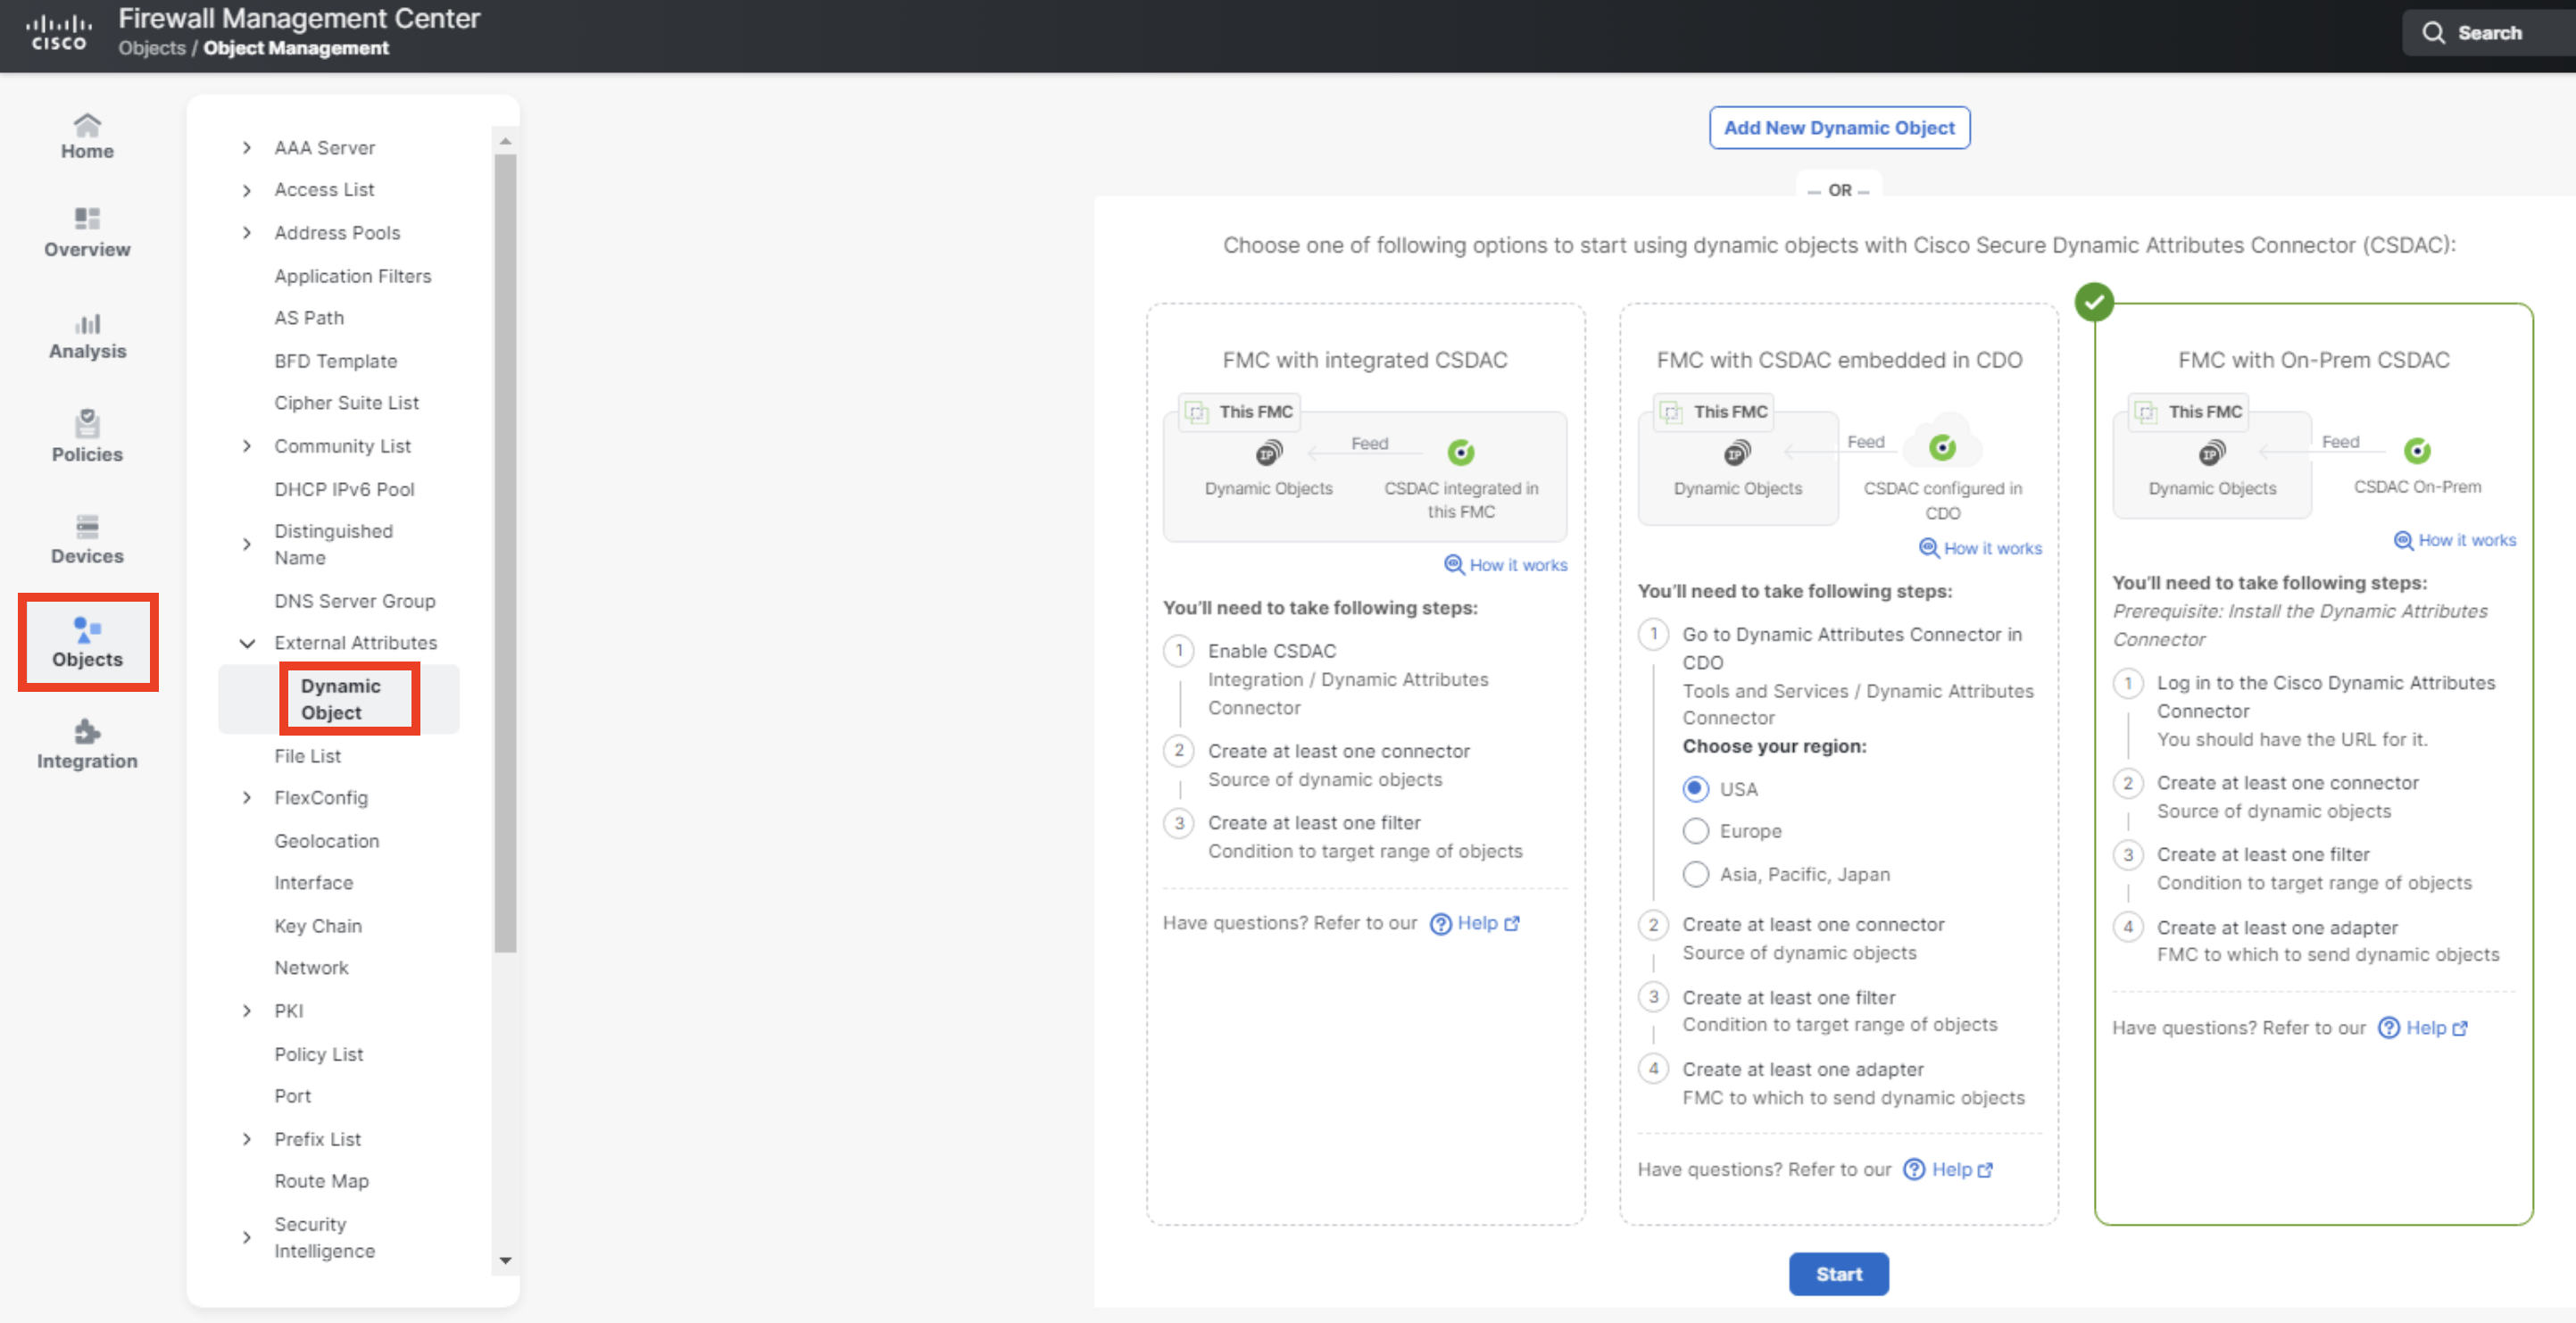
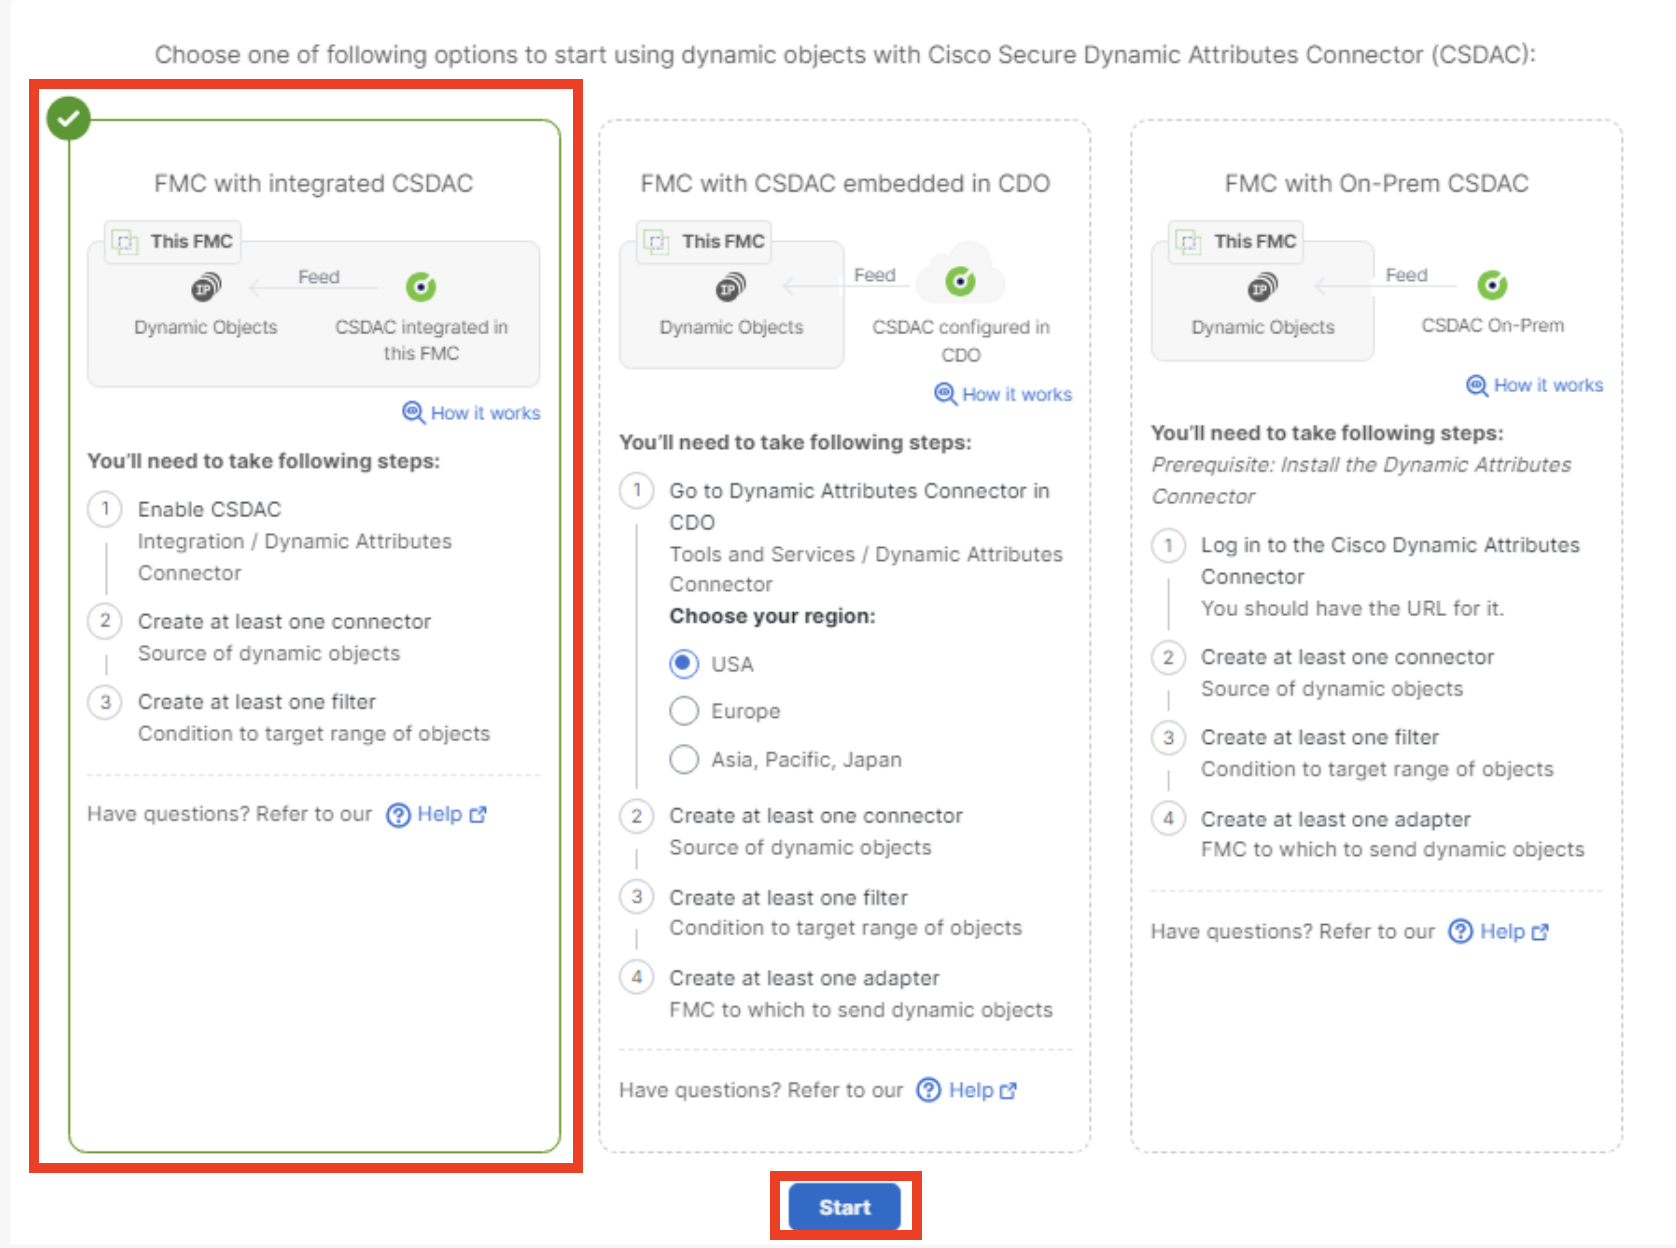
Have a closer look at the available integration options:
- Click on the How it works link for each option and review the diagrams illustrating the integration.
- (Optionally) Select FMC with On-Prem CSDAC integration and click Start below to get redirected to the Ansible Galaxy CSDAC collection.
- (Optionally) Select FMC with CSDAC embedded in CDO integration and click Start below to get redirected to CSDAC in CDO (you'd need an active CDO account for this link to work correctly).
- Select FMC in integrated CSDAC and click Start at the bottom of the page.
This takes you to Integration -> Dynamic Attributes Connector.
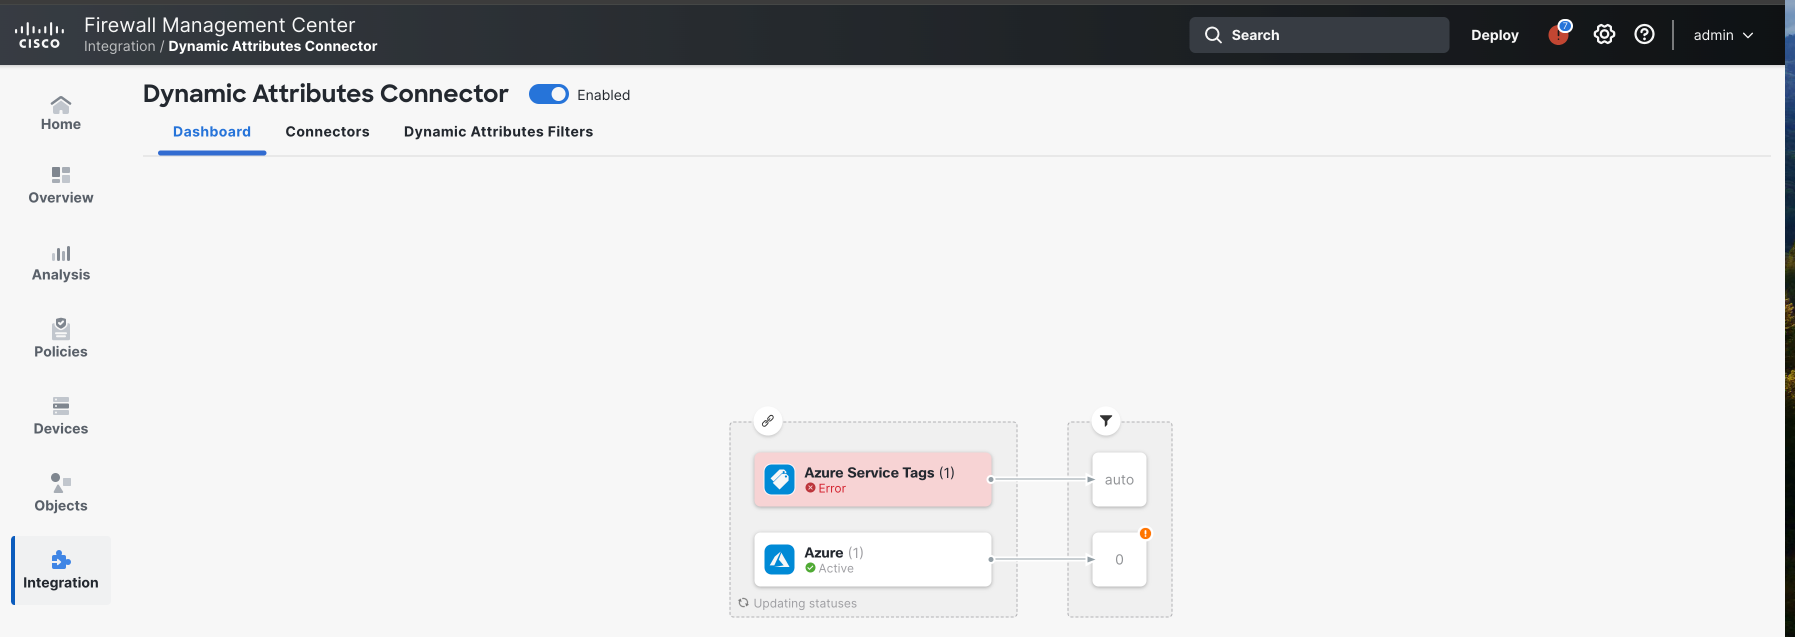
- Review pre-configured Azure connector setup and ensure it is in Active state.

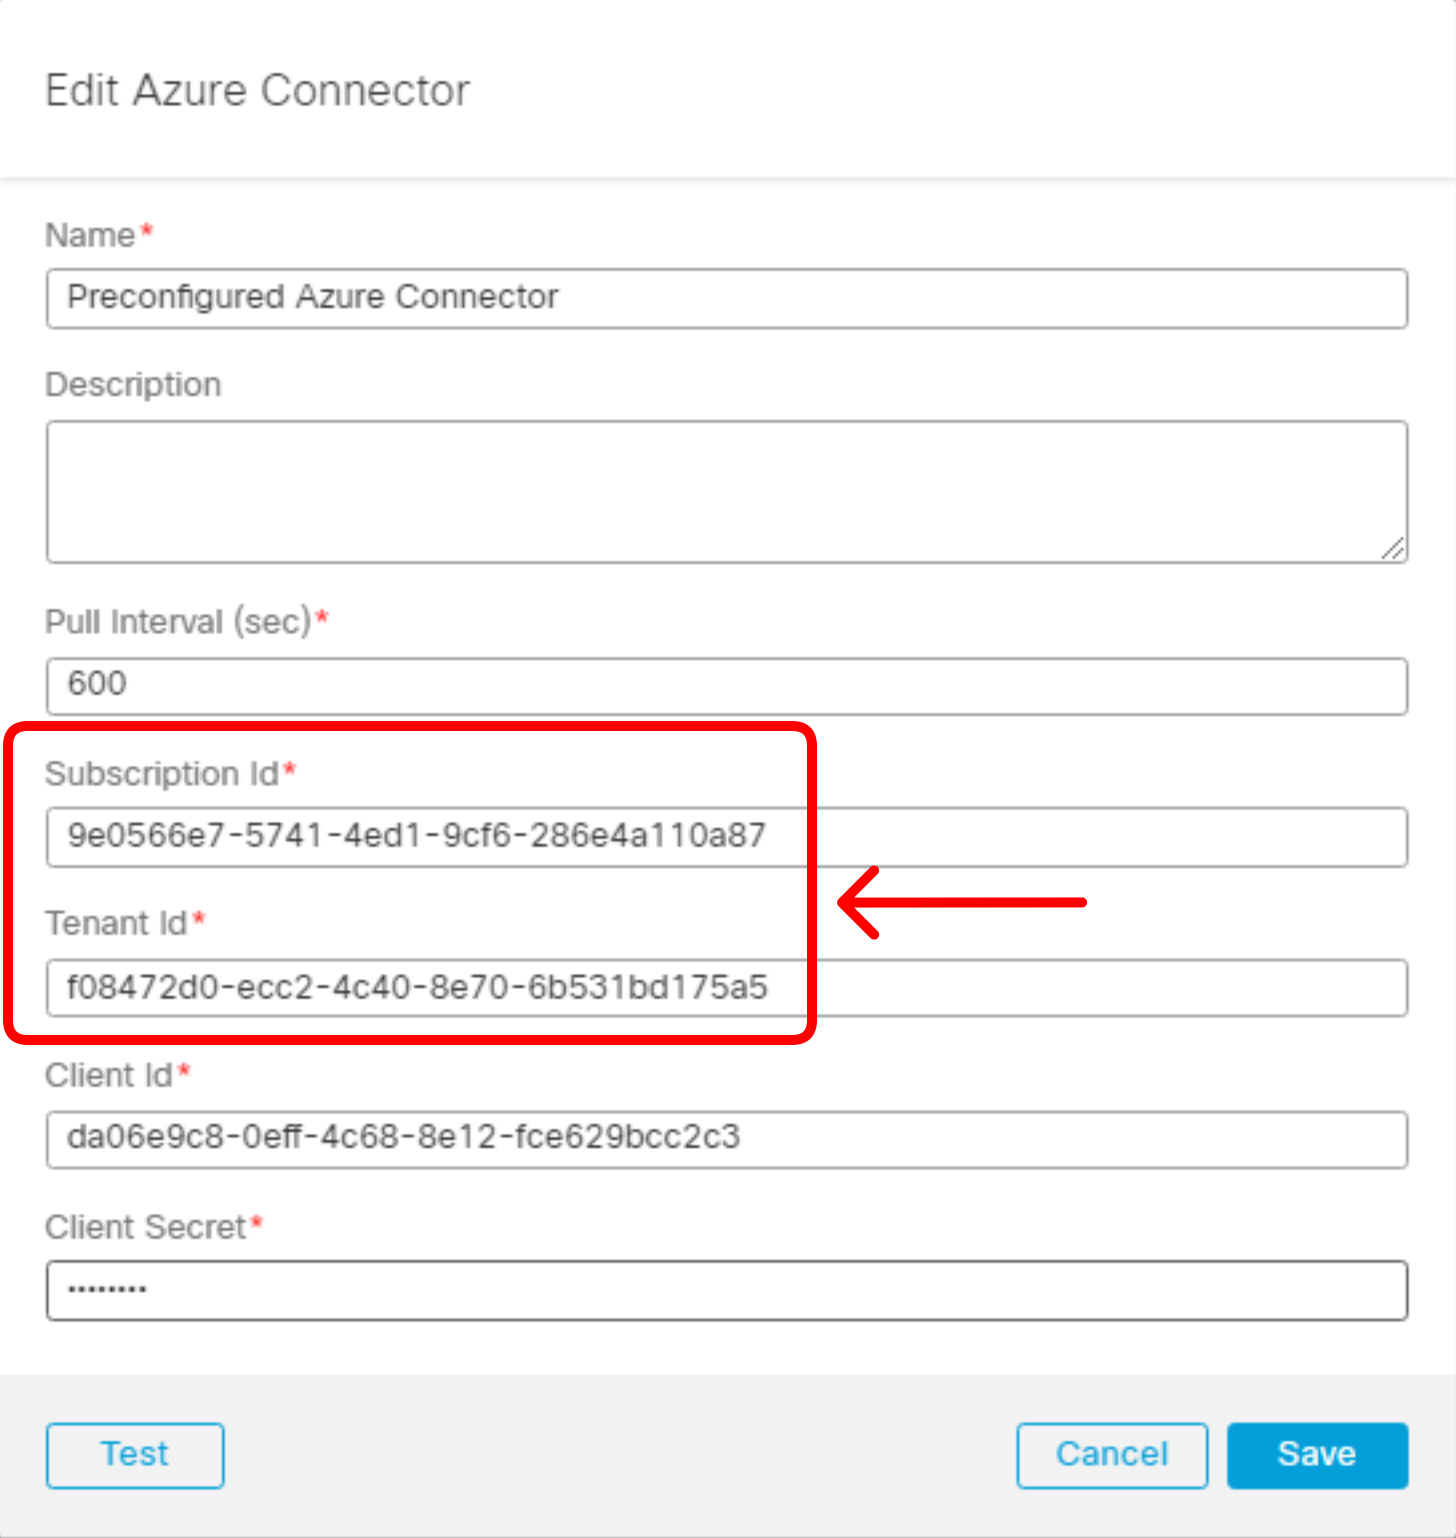
The Azure connector has been preconfigured with Azure subscription API access details:
- Subscription ID
- Tenant ID
- Client ID
- Client Secret
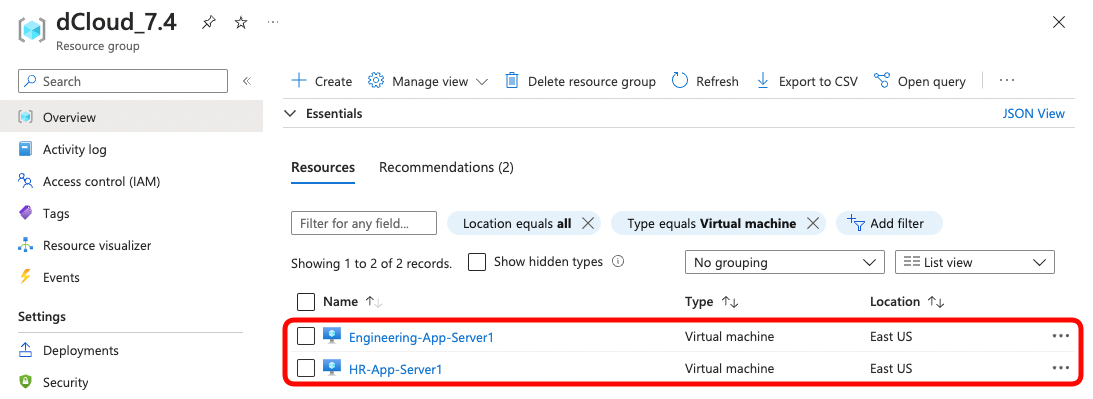
The screenshot below shows the list of virtual machines running in dCloud_7.4 resource group in Azure. The Azure connector is pre-configured with API credentials that allow CSDAC to read the metadata associated with instances running in this resource group. In Task 2, you will configure dynamic objects and filters matching each of the VMs running in Azure.
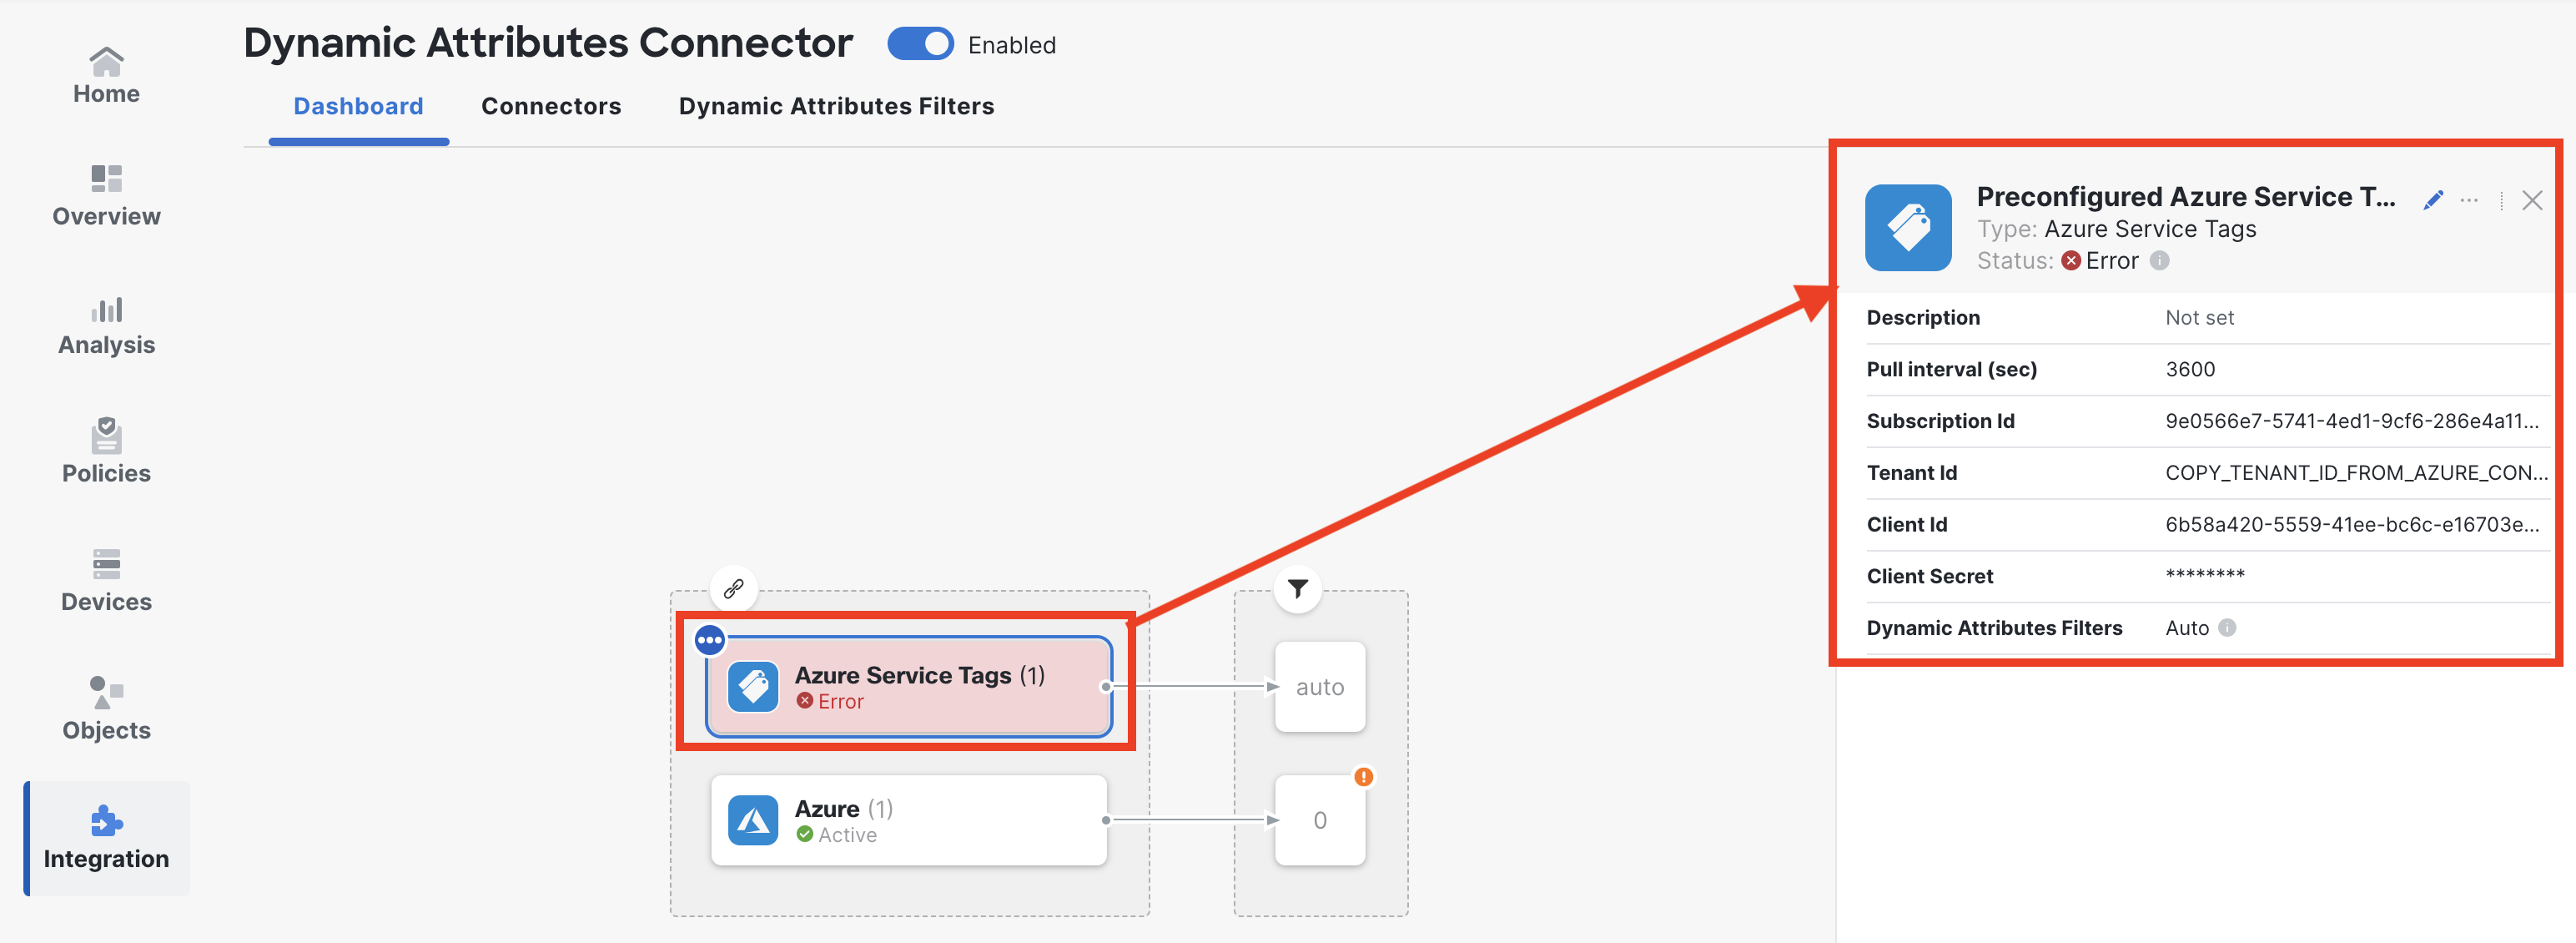
- Review pre-configured Azure Service Tags connector setup and ensure it is in Error state.
Warning:
The Azure Service Tags connector is broken on purpose. You will repair it later tasks in this lab guide.
Task 2 - Configure Azure-sourced dynamic objects
In this task, you will learn how to configure Dynamic Attribute Filters, matching resources living in the Azure public cloud. You will see how the filters build up Dynamic Objects, that later may be used in the firewall policy.
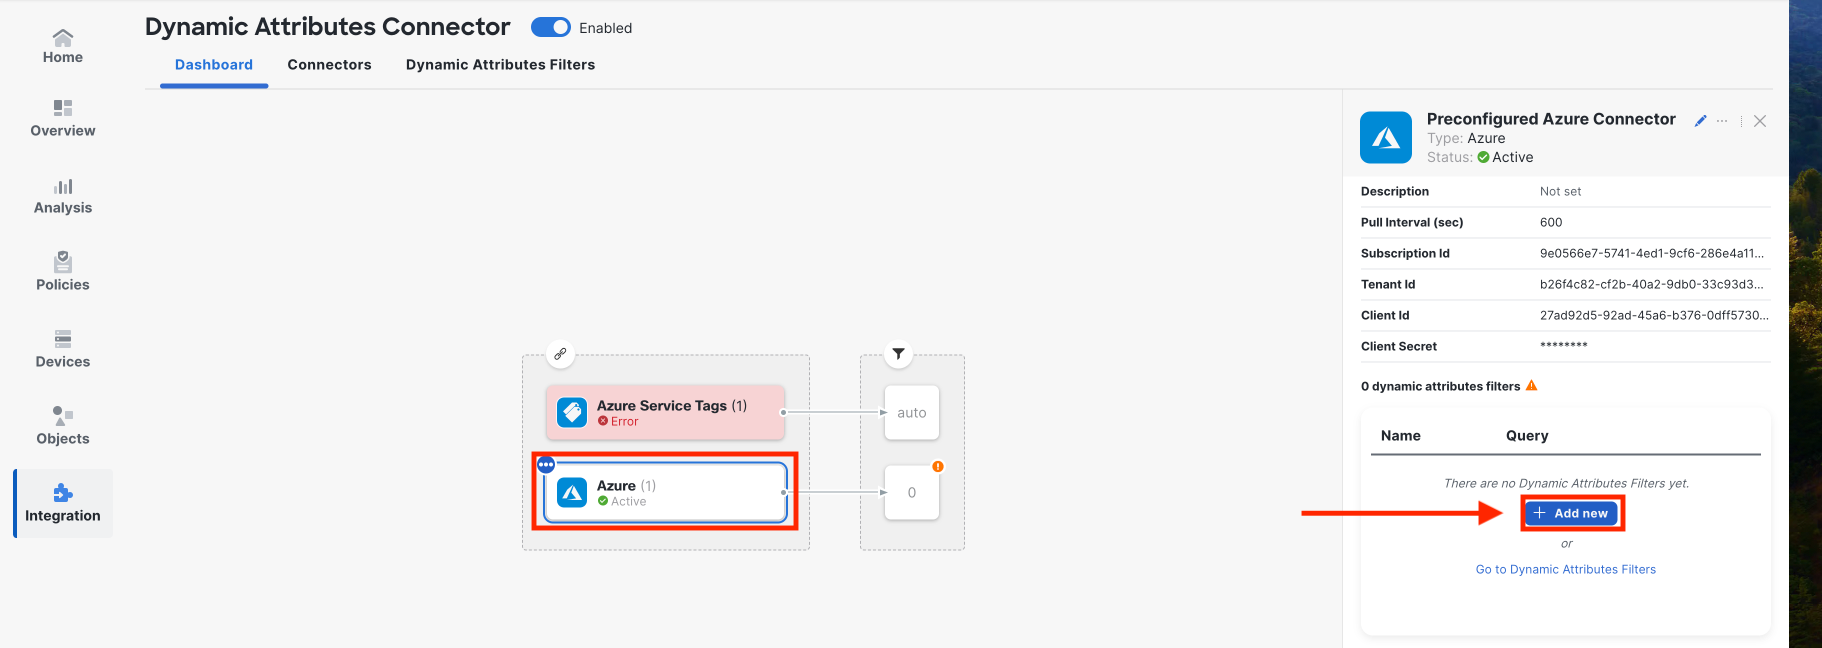
- In the Dynamic Attributes Connector Dashboard tab select Azure connector. In the right-hand side connector details menu, click the + Add New to configure a dynamic attribute filter. (Alternatively, you can click on Dynamic Attributes Filters tab and click + button in the top right).
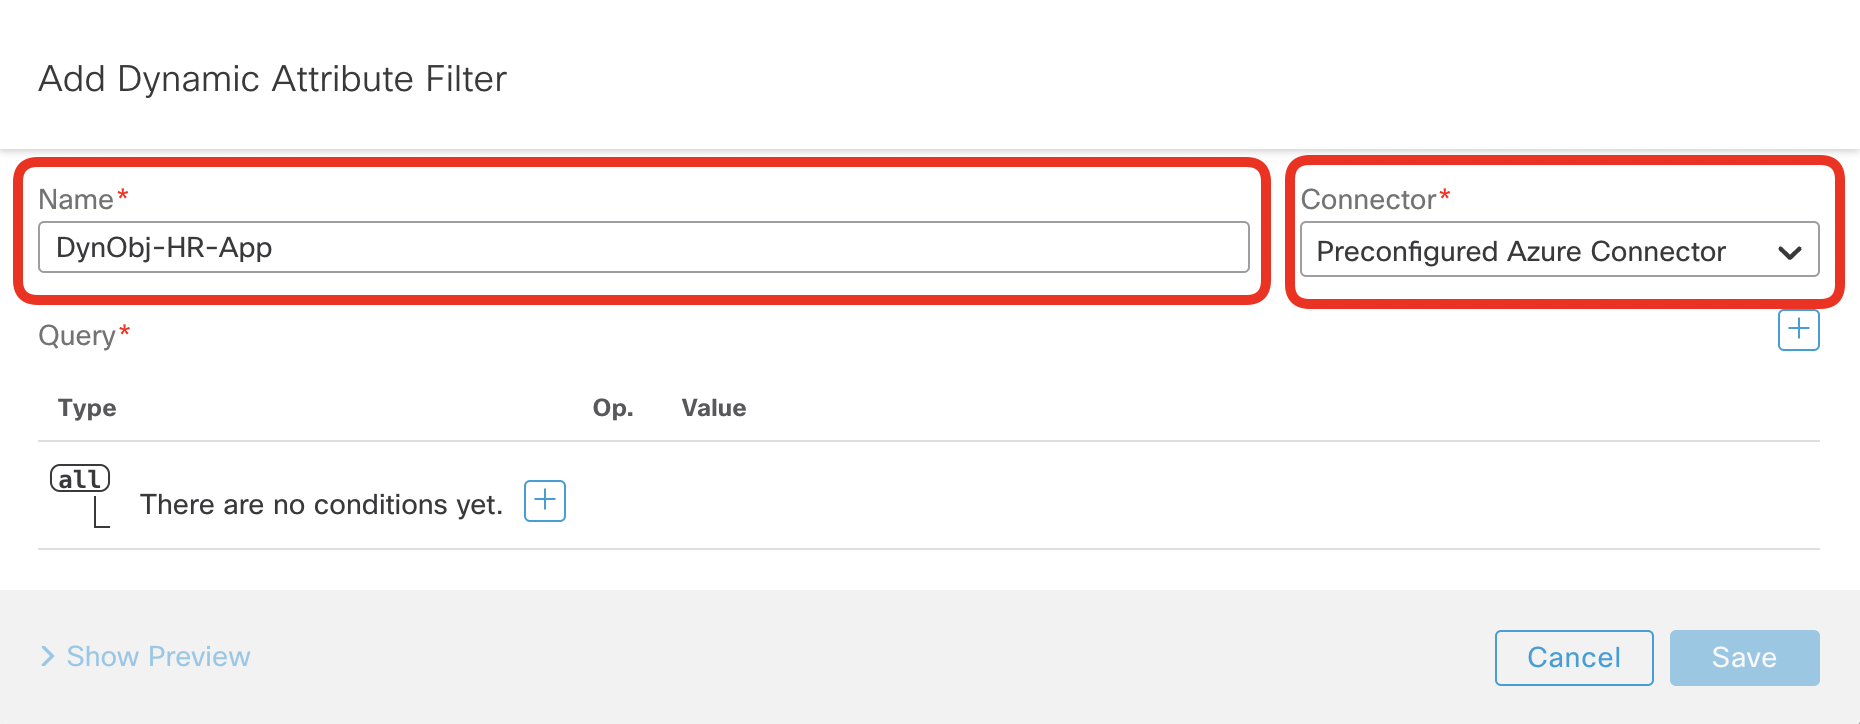
- Set the name to DynObj-HR-App and select Preconfigured Azure Connector.
- Before we configure the matching criteria, have a look at the screenshot of the HR VM configuration in Azure.
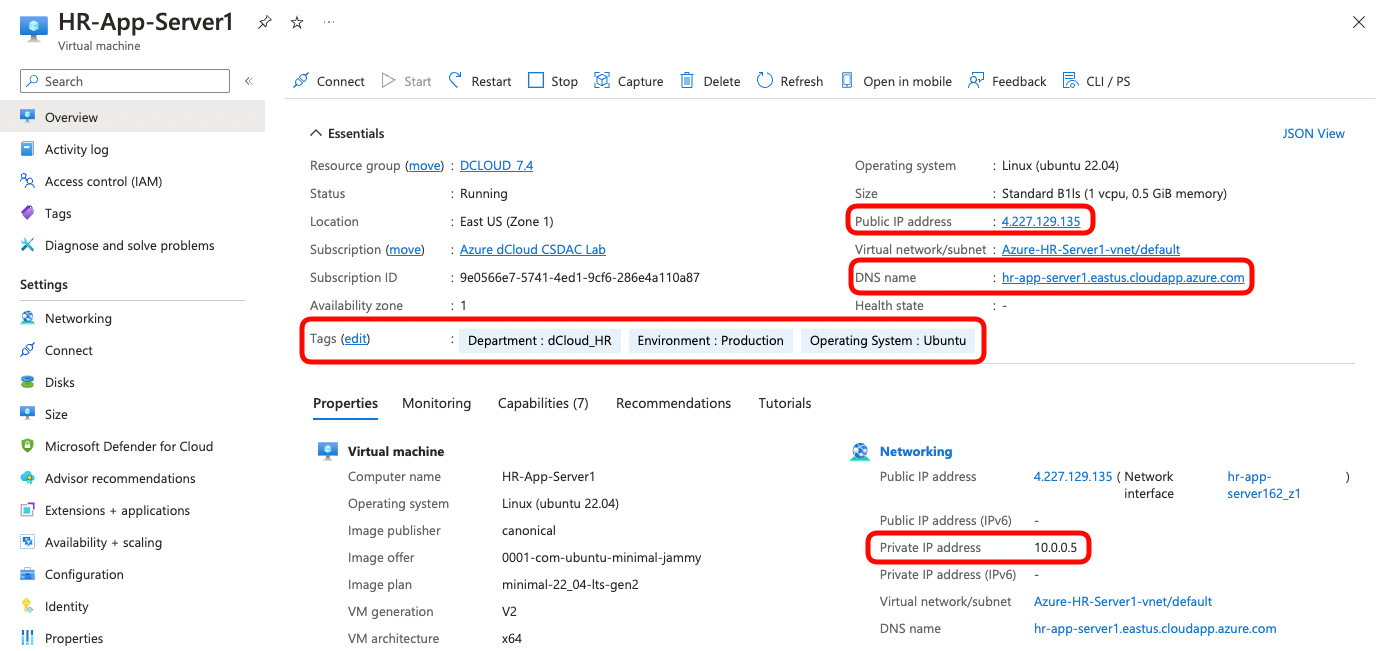
Notice the following:
- There is a public and a private IP address assigned
- DNS name hr-app-server1.eastus.cloudapp.azure.com is configured
- The VM has three Tags assigned:
- Department = dCloud_HR
- Environment = Production
- Operating System = Ubuntu
- Click + button to add a condition.
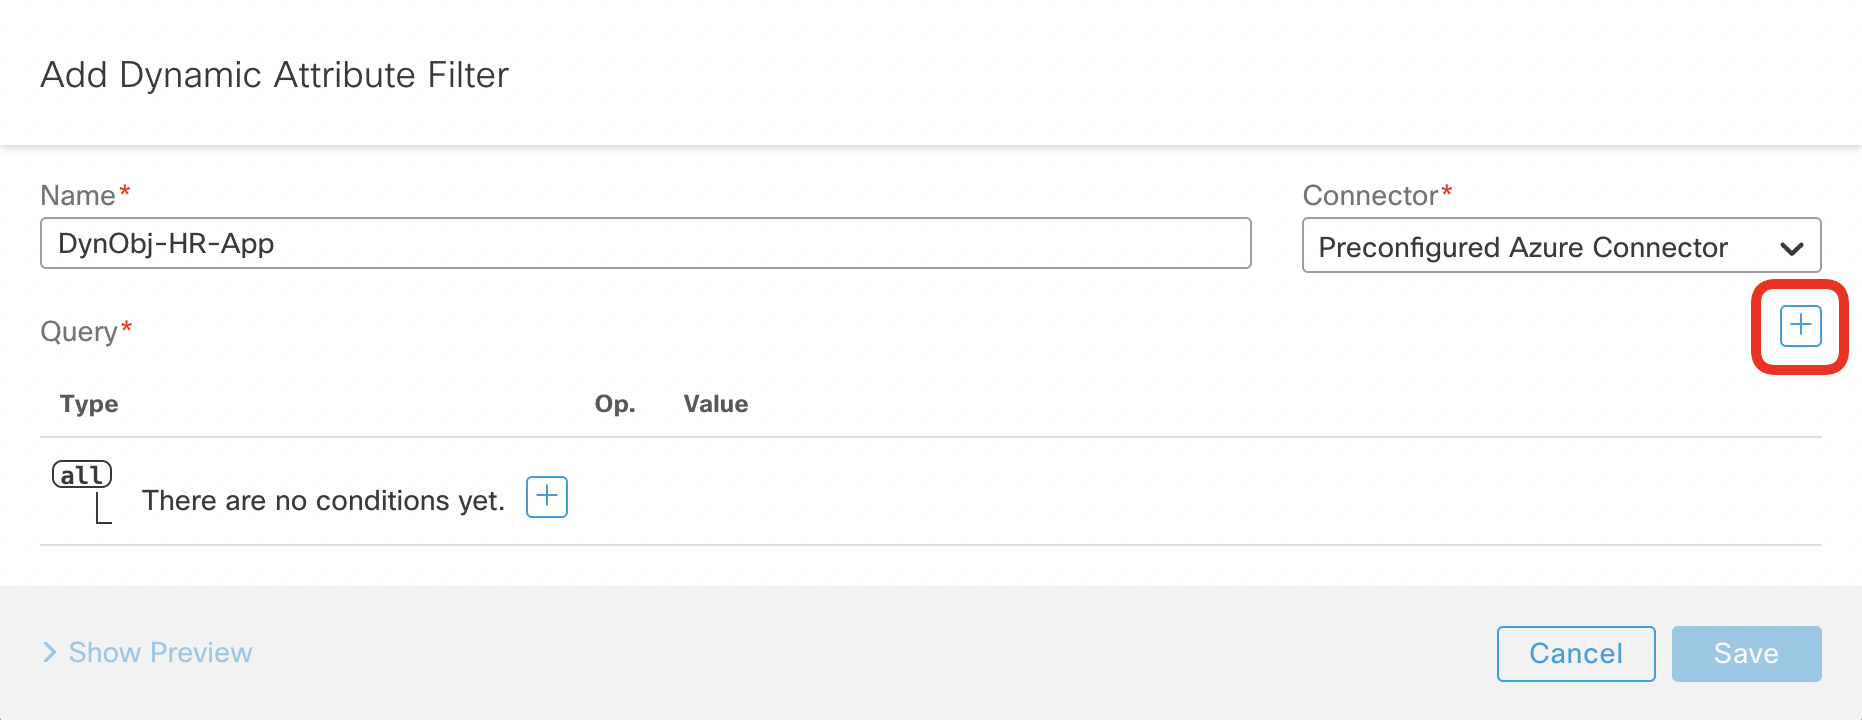
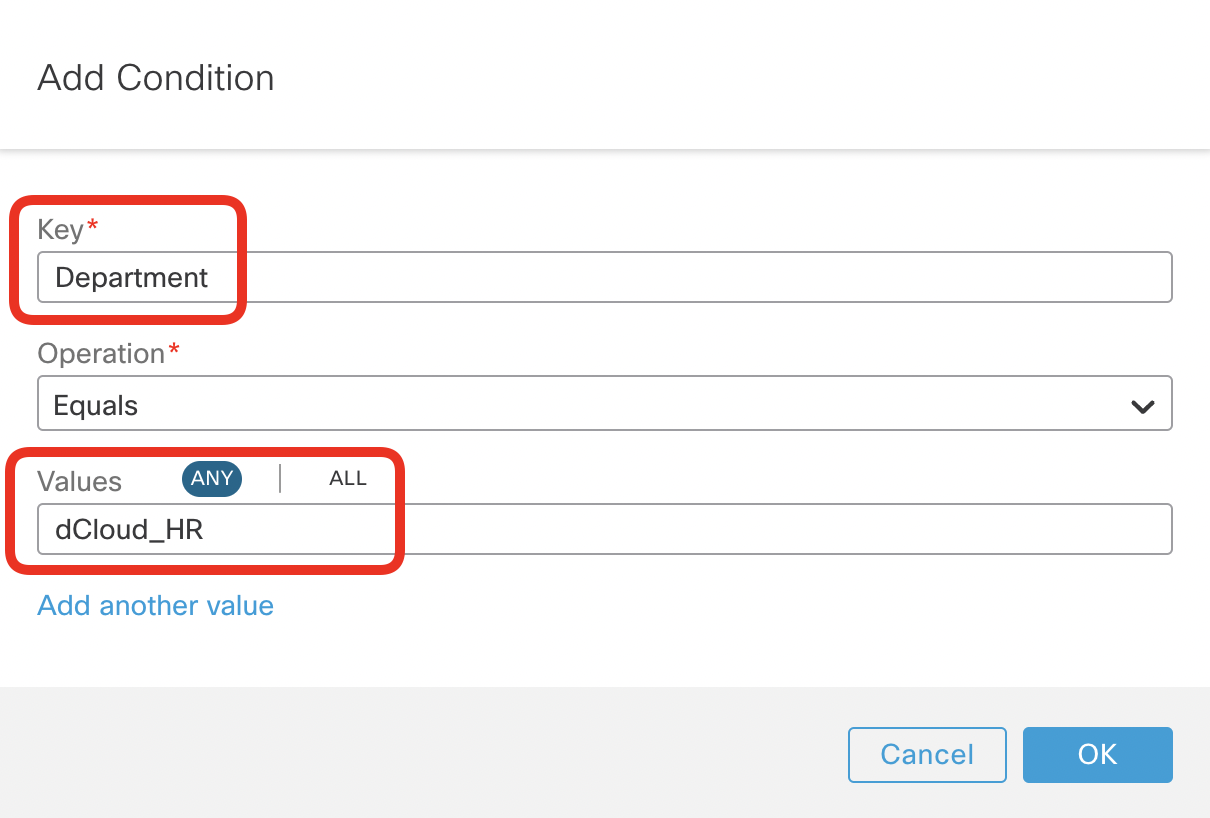
- Select Department as the Key value and dCloud_HR in the Value. Leave the default Equals operator. Click OK.
- Repeat the above step and configure two more conditions:
- second condition matching Environment equals Production
- third condition matching Operating System equals Ubuntu
The resulting configuration should match all Tags assigned to the HR VM in Azure as per the screenshot below. Ensure the type of the top-level operator is set to all, mandating all conditions to match.
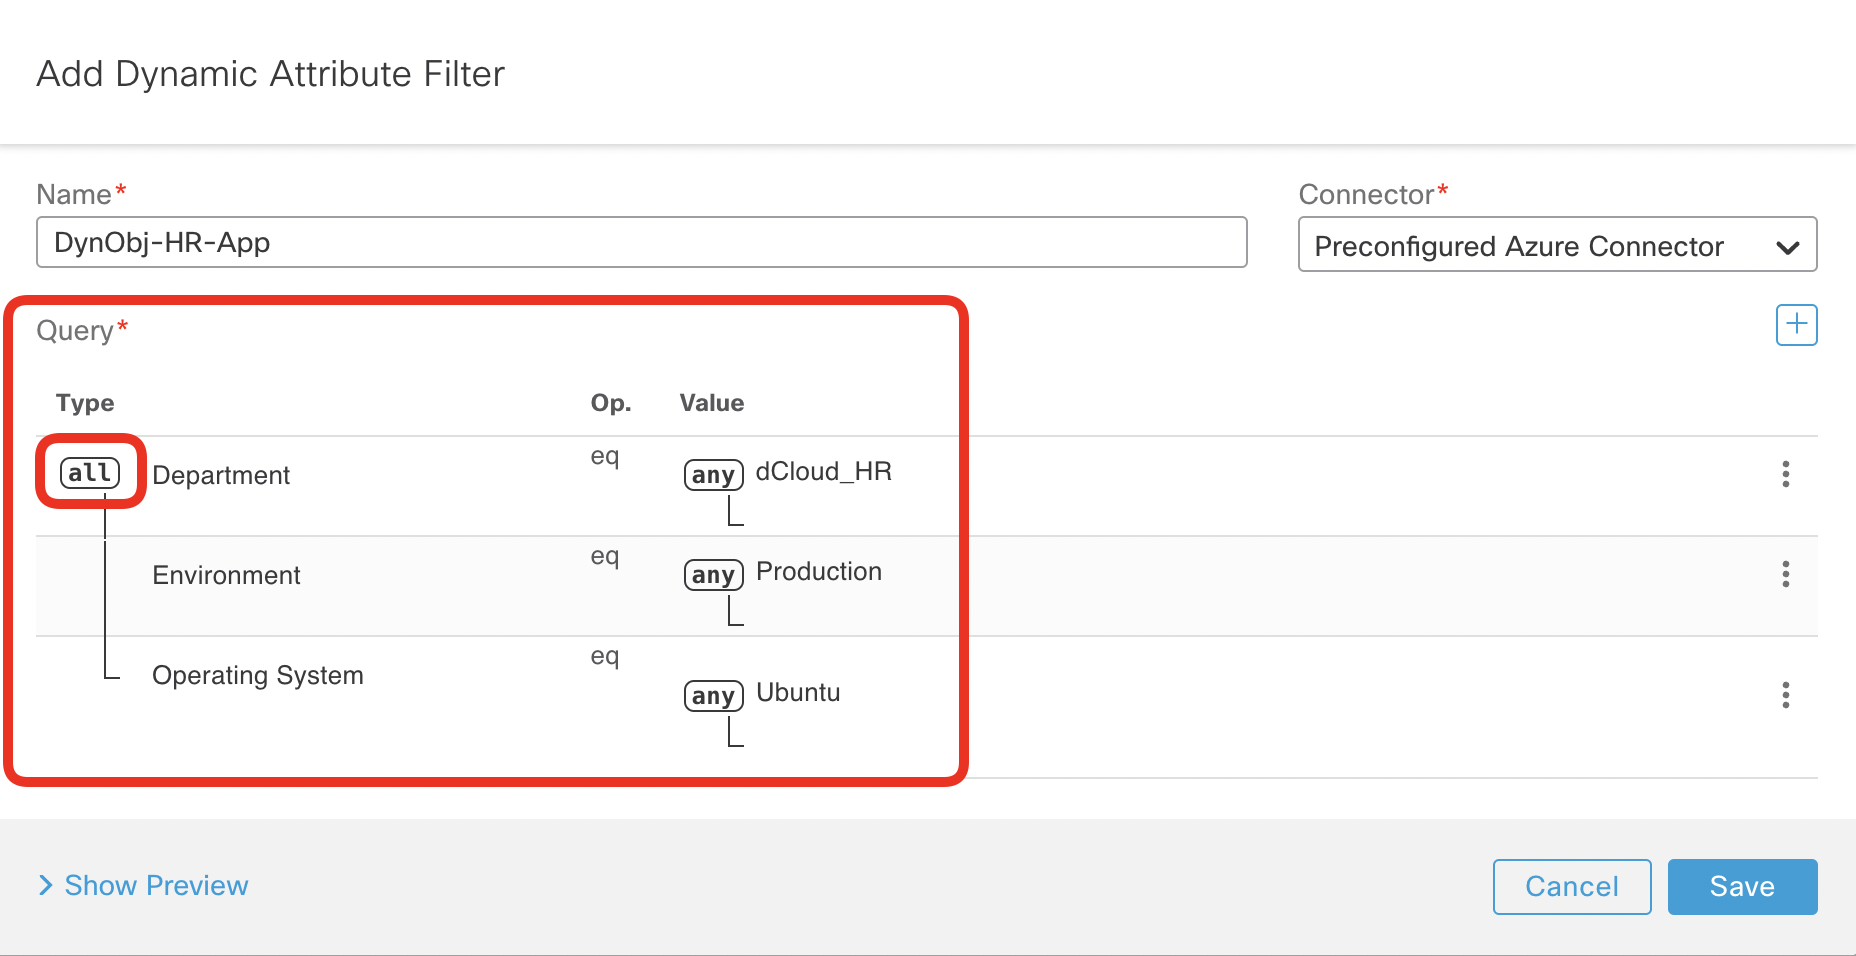
- Click on Show Preview to ensure you match the private and public IP addresses of the HR virtual machine running in Azure. Click Save to finalize the configuration of DynObj-HR-App dynamic object.

- Add the second dynamic filter matching the Engineering VM running in Azure. Set the name to DynObj-Engineering-App and select Preconfigured Azure Connector.
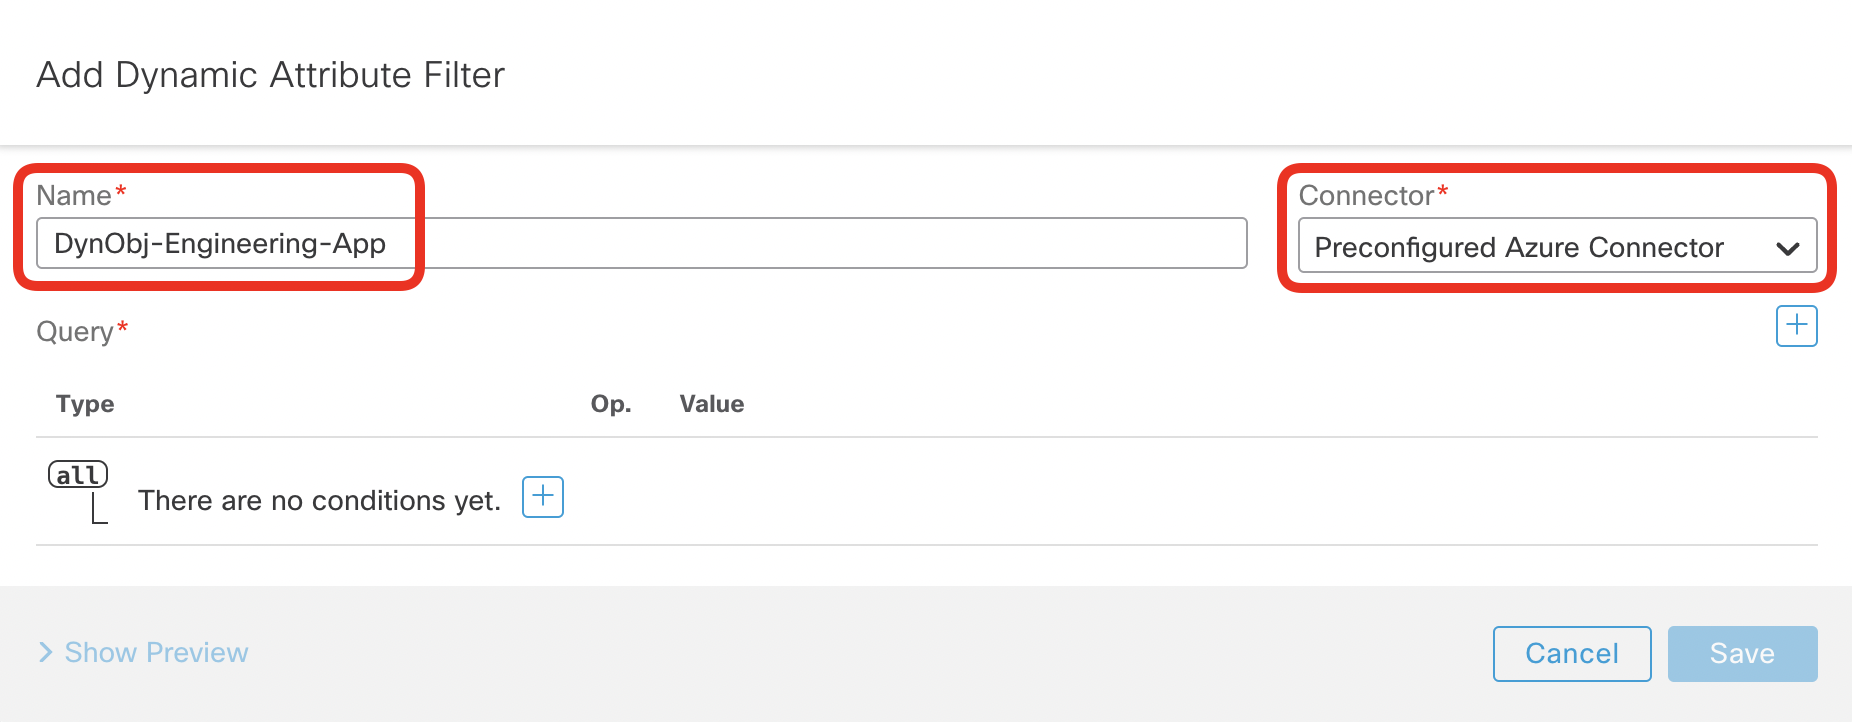
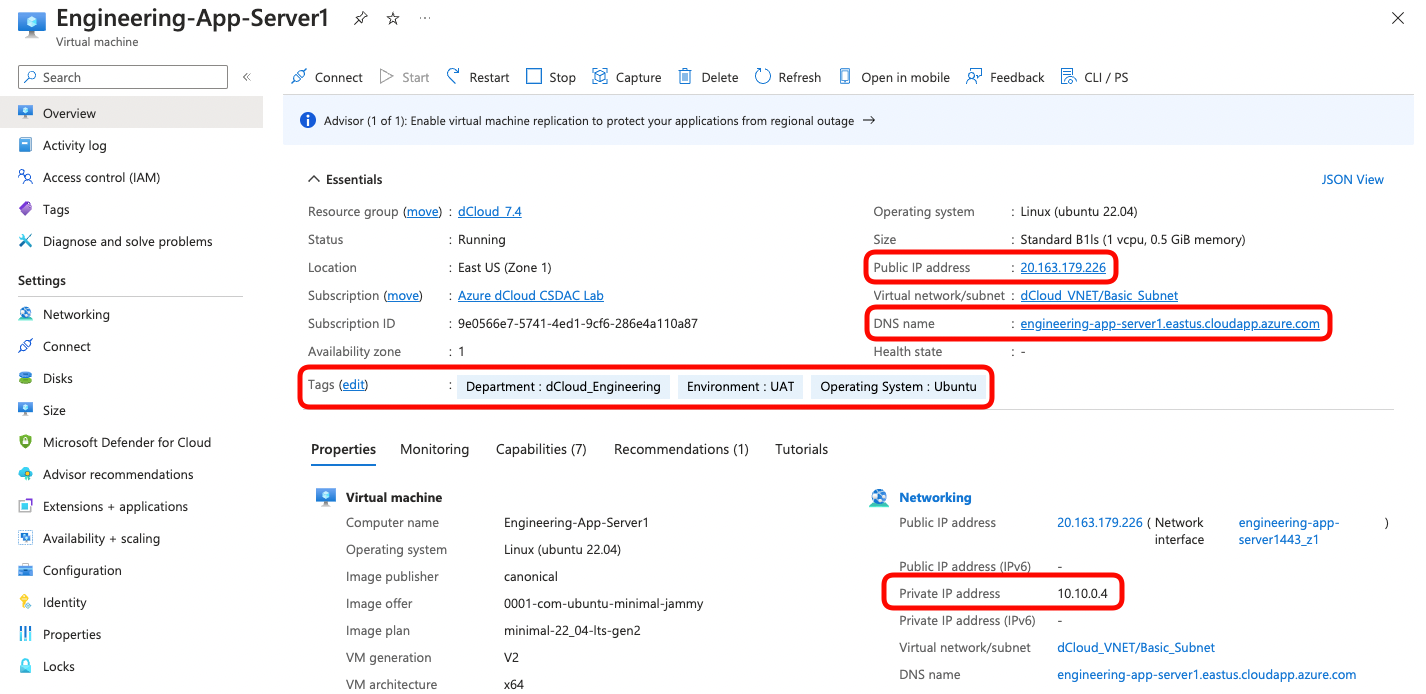
- Have a look at the screenshot of the Engineering VM configuration in Azure and notice the following:
- There is a public and a private IP address assigned
- DNS name engineering-app-server1.eastus.cloudapp.azure.com is configured
- The VM has three Tags assigned:
- Department = dCloud_Engineering
- Environment = UAT
- Operating System = Ubuntu
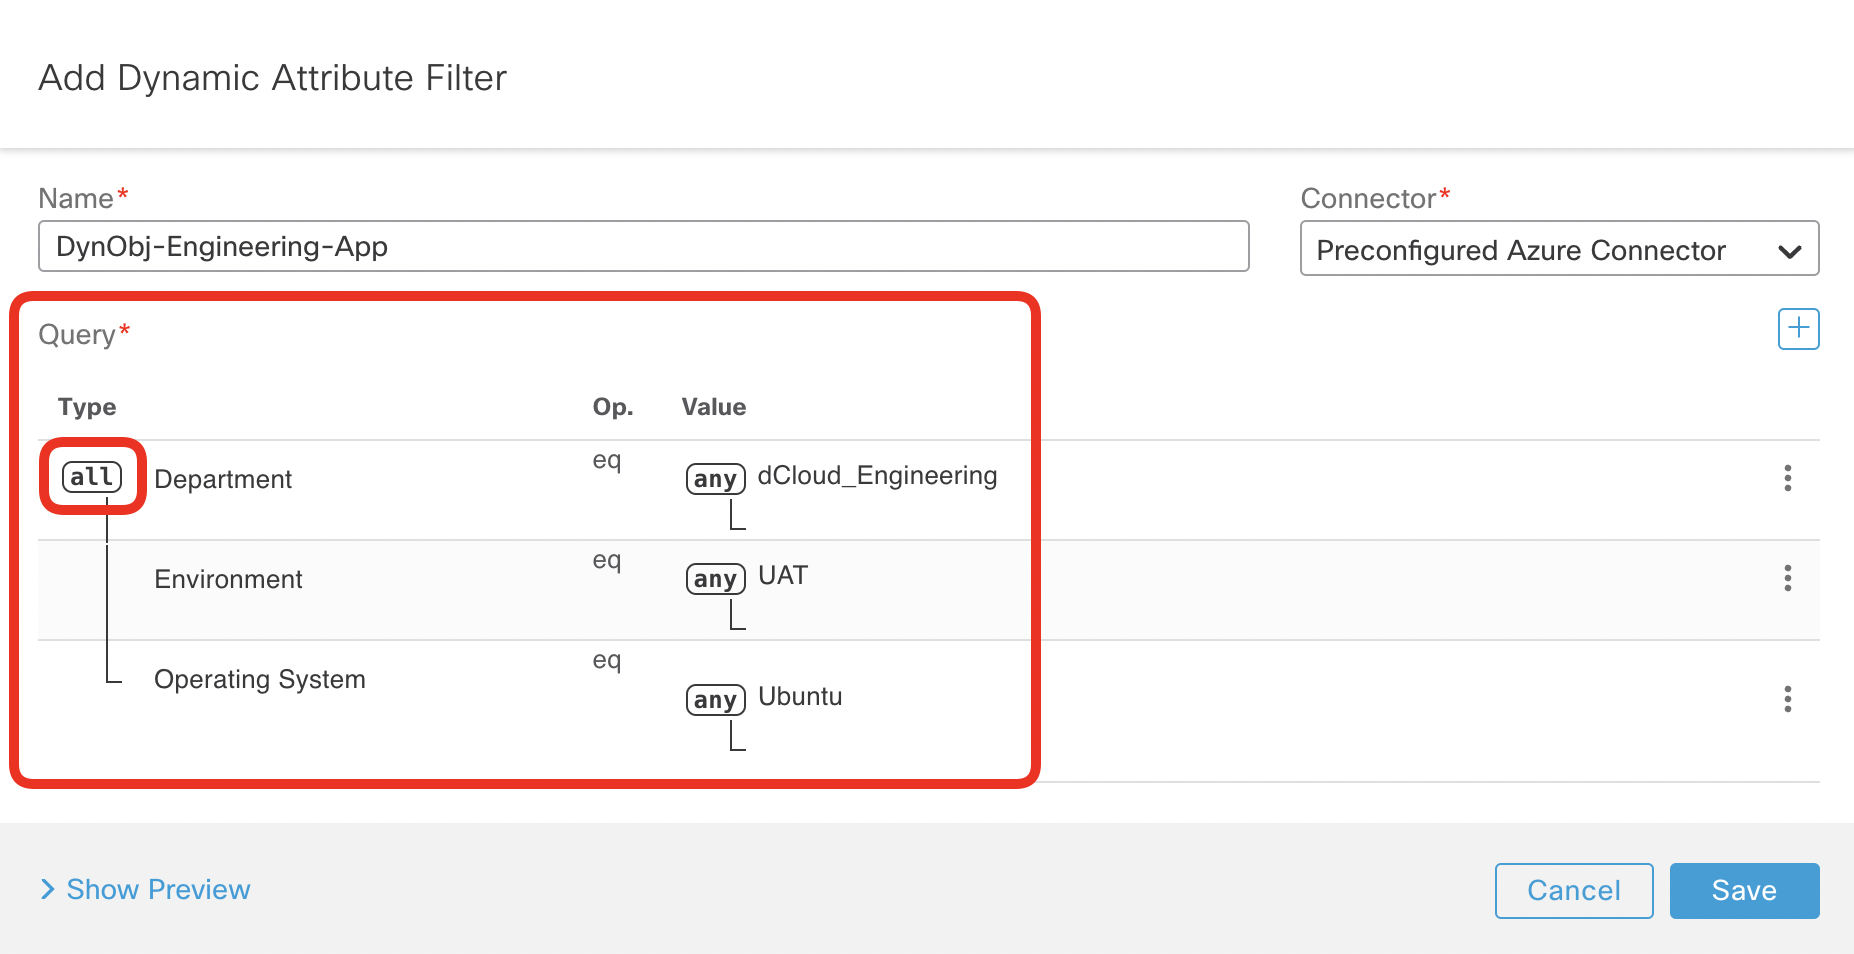
- Configure three conditions matching all tags assigned to the Engineering VM in Azure:
- first condition matching Department equals dCloud_Engineering
- second condition matching Environment equals UAT
- third condition matching Operating System equals Ubuntu
The resulting configuration should match all Tags assigned to the Engineering VM in Azure as per the screenshot below. Ensure the type of the top-level operator is set to all, mandating all conditions to match.
- Click on Show Preview to ensure you match the private and public IP addresses of the Engineering virtual machine running in Azure. Click Save to finalize the configuration of DynObj-Engineering-App dynamic object.

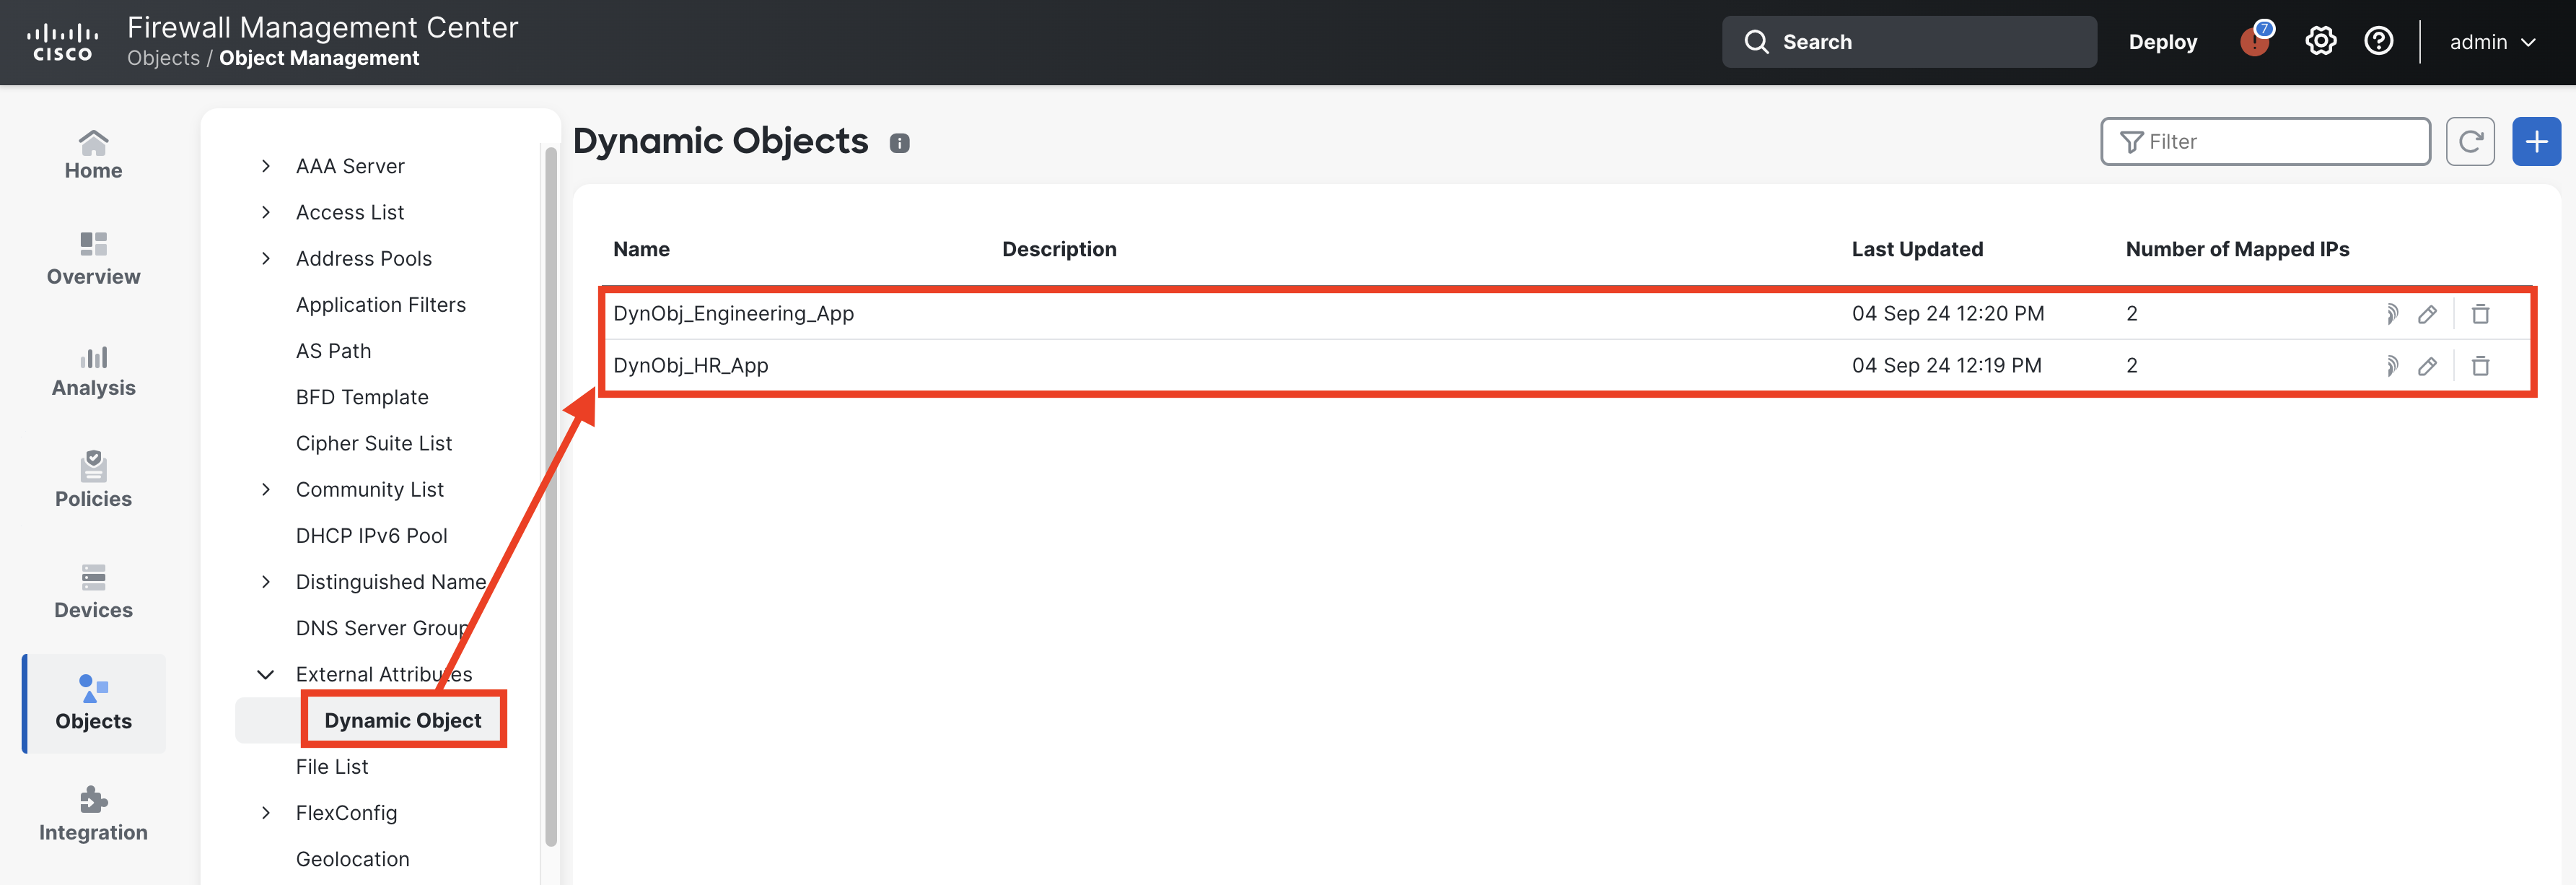
- Navigate to Objects -> Object Management -> External Attributes -> Dynamic Objects.
- Confirm you can see both dynamic objects having two mapped IP addresses each.
- Use the IP icon to check the contents of each object.
- You can click the round arrow icon to refresh the list of the objects.
Task 3 - Use dynamic attributes in the Access Control Policy
With Dynamic Objects configured and updated in real-time by CSDAC, you may now use them in the firewall policy. In this task, you will learn how to use the Dynamic Objects in Access Control Policy rules.
- Navigate to Policies -> Access Control and edit the NGFW1 policy using the pencil icon.

- Add a new rule just below the preconfigured Block Selected Applications. You can hover over the junction between rules and click + Add Rule as per the screenshot below or click Add Rule in the top right (the screenshot was made in ACP Grid View)
Warning
Ensure there are no leftover Access Control Policy rules from previous lab scenarios that overwrite the rules permitting ICMP you are going to create in this task. Specifically, if you already completed the PBR with SGT/User Identity scenario, it's likely you'll have Allow ICMP and SSH rule active in the policy. In such case disable the conflicting rules before proceeding with further steps.
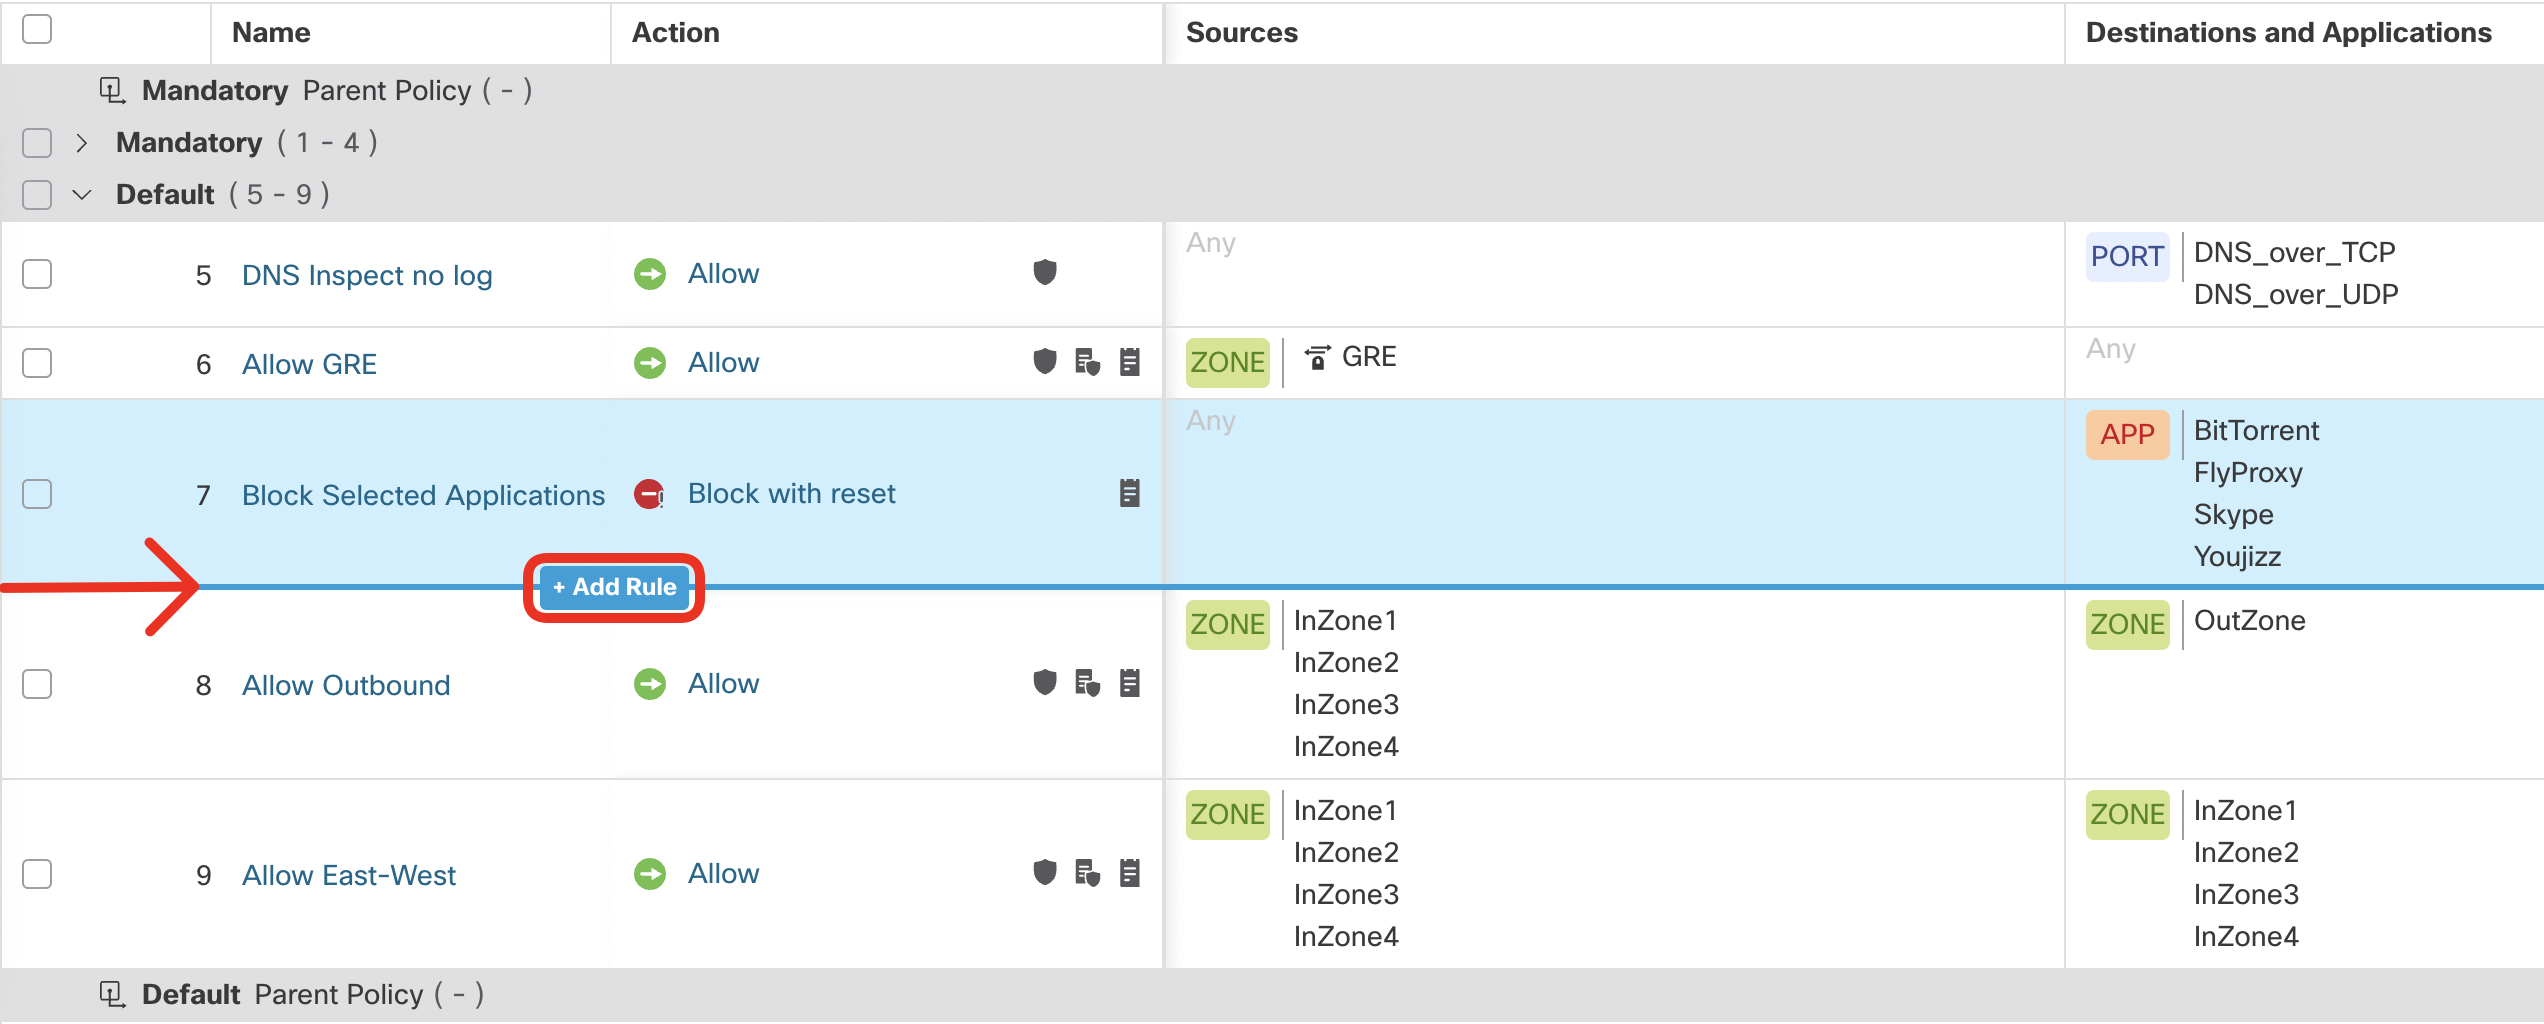
- Configure the rule as follows:
- Name: Allow HR Access
- Insert Below Rule Block Selected Applications
- Action: Allow
- Logging Settings for the Rule:
- Log at end of connection
- Send Connection Events to: Security Analytics and Logging
- Source Zone: InZone1
- Destination Zone: OutZone
- Destination Dynamic Attribute: DynObj_HR_App

Click Apply and Add Another.
- Configure the rule as follows:
- Name: Block Engineering Access
- Insert Below Rule Allow HR Access
- Action: Block
- Logging Settings for the Rule:
- Log at beginning of connection
- Send Connection Events to: Security Analytics and Logging
- Source Zone: InZone1
- Destination Zone: OutZone
- Destination Dynamic Attribute: DynObj_Engineering_App
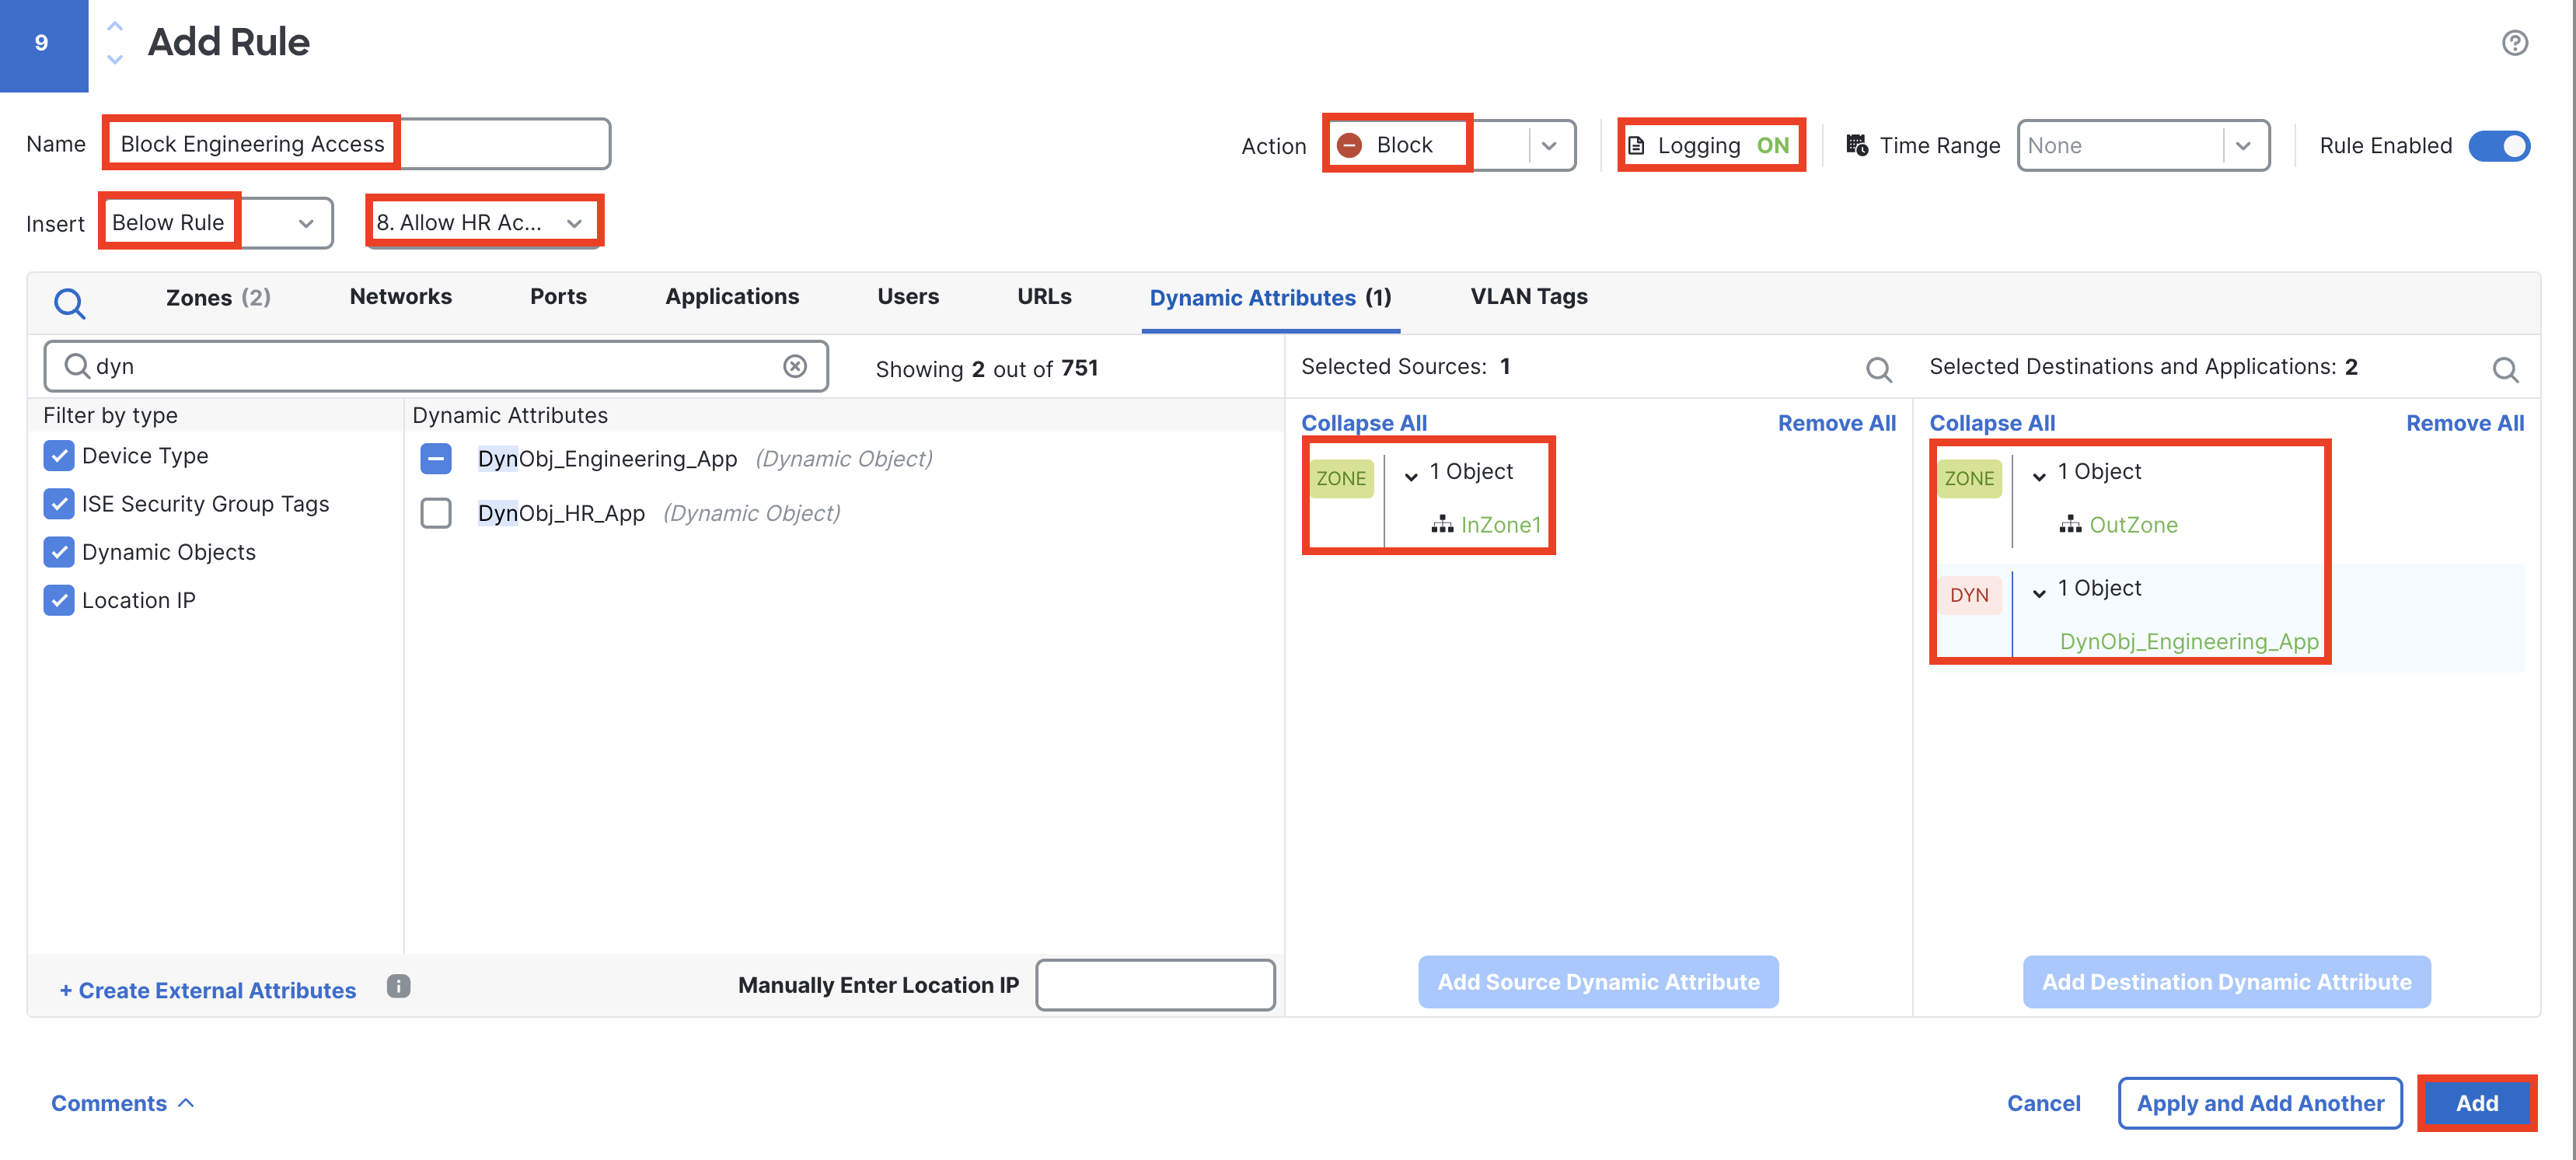
Click Add.
- You should now have two new access control rules configured in the NGFW1 as per the screenshot below. The resulting firewall policy allows internal users sitting behind the firewall to access to HR server in Azure. At the same time, it blocks access to the Engineering server running in Azure.

- Save the changes in the Access Control Policy by clicking Save. Next, push the new policy to the NGFW1 using the Deploy button.
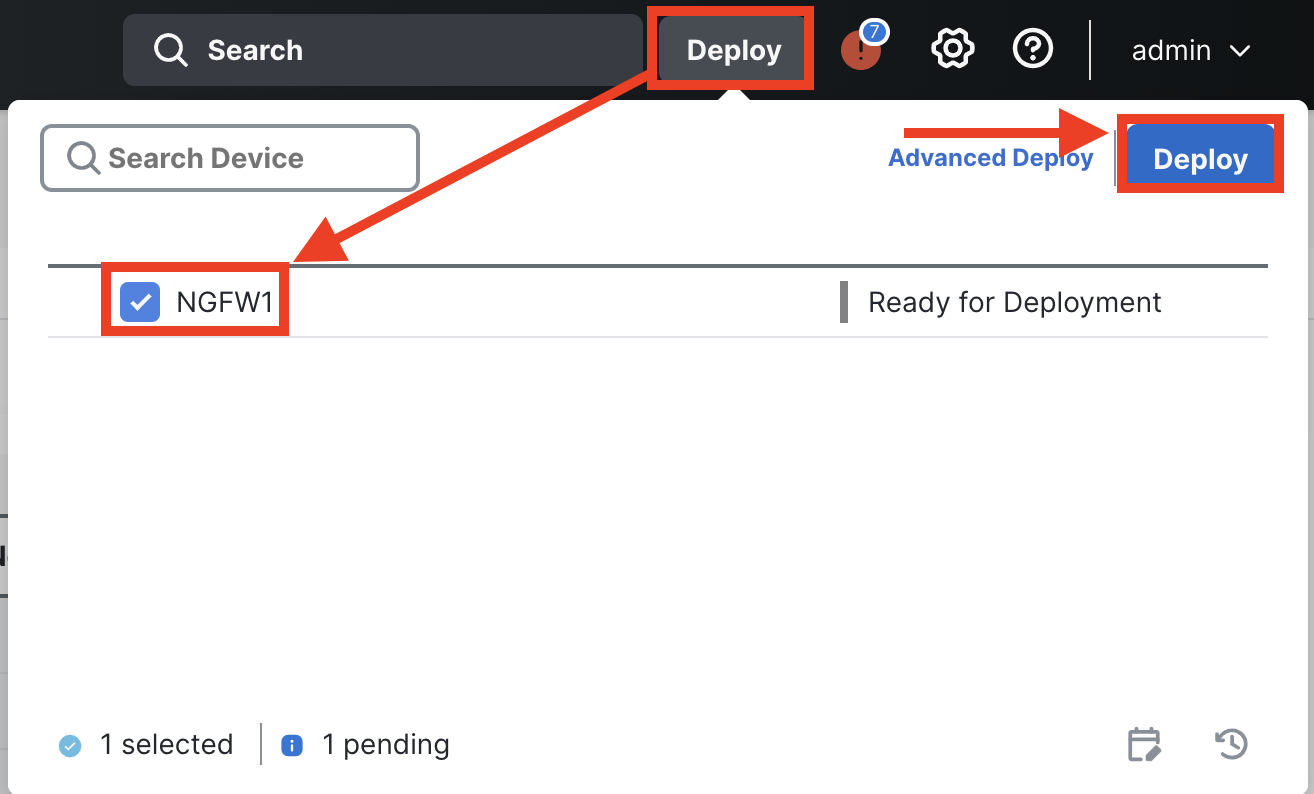
Confirm the policy is successfully deployed.
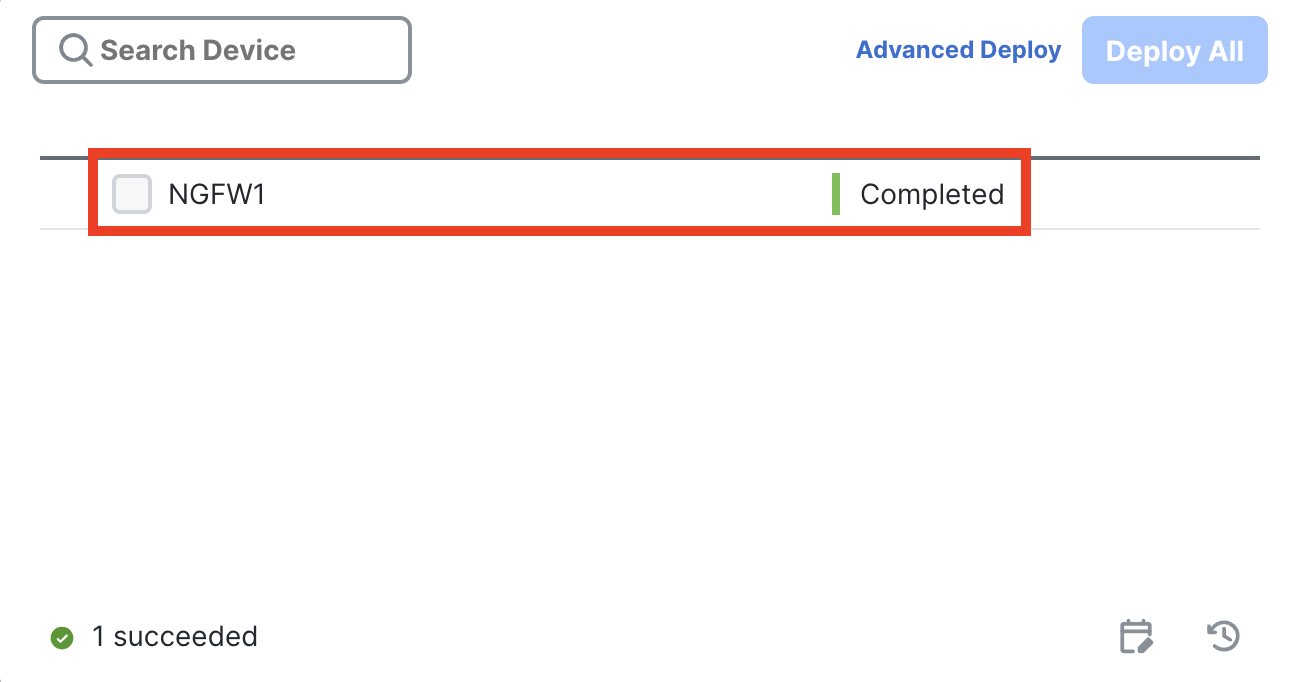
Task 4 - Verify the Attribute-Based Policy
Your Access Control Policy is all set and you will not need to deploy a policy until the end of this scenario. Now it is time to test the firewall policy with Dynamic Objects. In this task, you will test connectivity through the firewall, from a dCloud workstation to virtual machines running in Azure. In the course of this task, you will make a change to one of the dynamic objects in the CSDAC/FMC and observe how quickly the update propagates to the enforcing firewall.
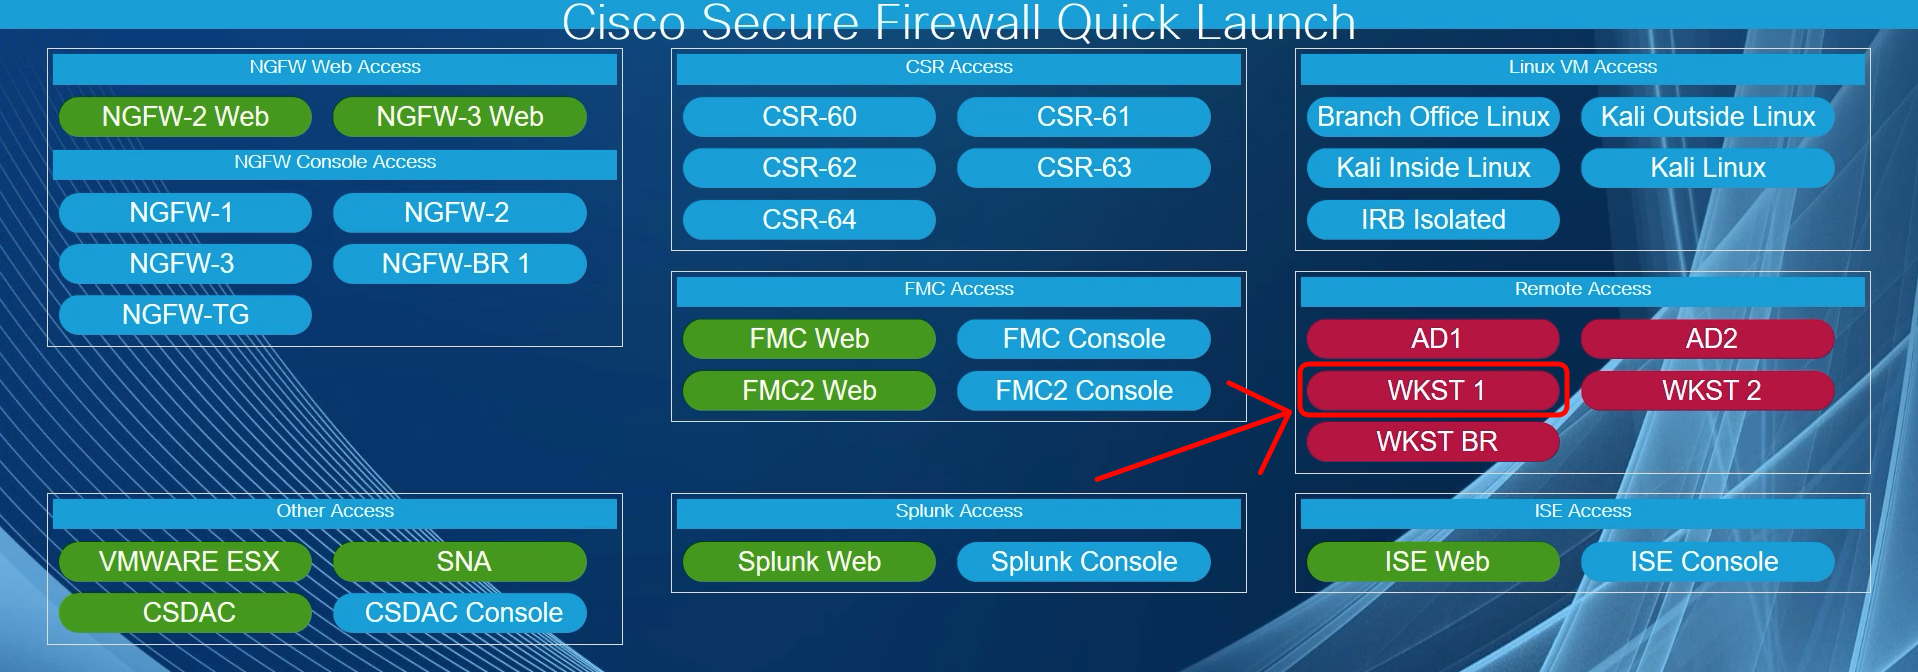
- Using the Quick Launch connect to the WKST1 using Remote Desktop Protocol. Login as Administrator/C1sco12345.
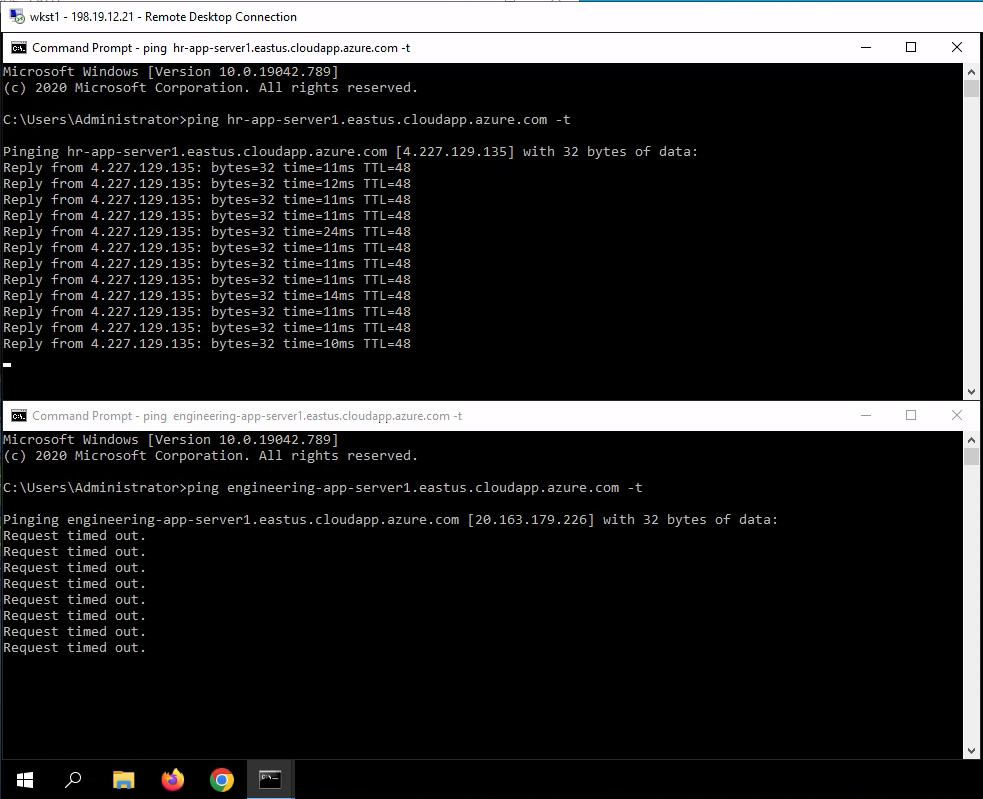
- Open two Command Prompt windows next to each other and in parallel start a continuous ping toward both servers running in Azure. The DNS names should resolve to the current IP addresses currently assigned to each machine.
ping hr-app-server1.eastus.cloudapp.azure.com -t
ping engineering-app-server1.eastus.cloudapp.azure.com -t
As per the firewall configuration, you should see replies from from the HR server and timeouts for the Engineering server.
- Navigate to Analysis -> Unified Events and set the view as follows:
- Click in the search bar and set Source IP filter to 198.19.10.21
- Set the Sliding Time Range showing the last 5 minutes

- You should see ICMP Echo Requests from the WKST1 towards public IP addresses of HR and Engineering servers in Azure. Click on > sign next to each log to see the Event Details.
Notice the Dynamic Object is displayed as one of the matched attributes.
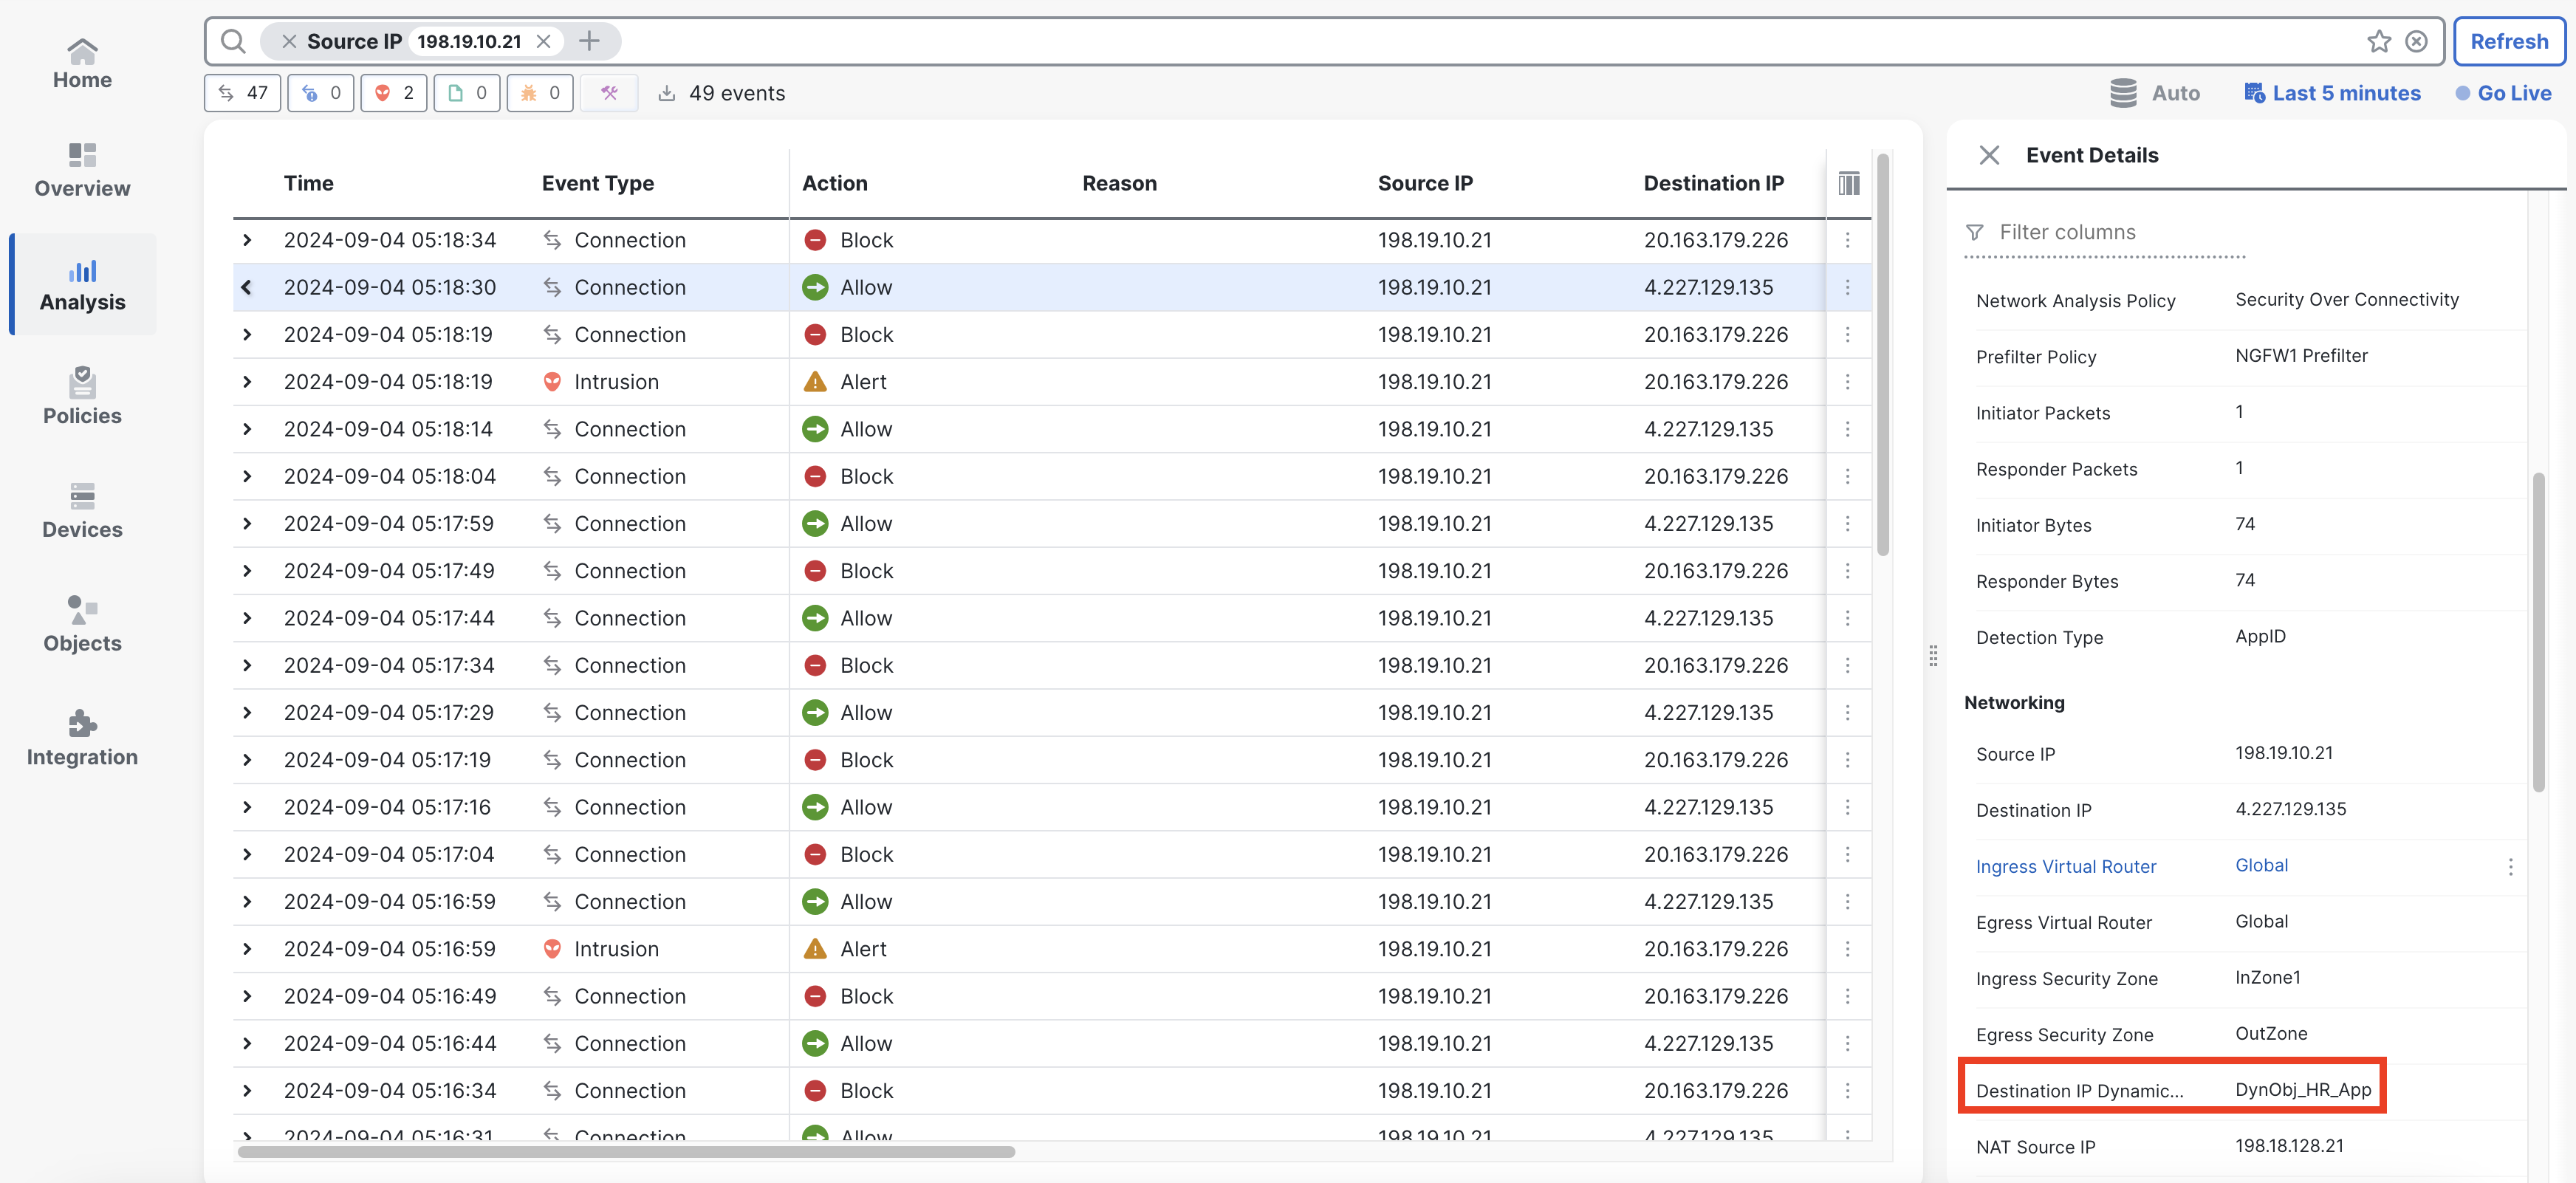
You can also add the Source and Destination Dynamic Attributes to the view with the column selector.

- In the following steps, we want to demonstrate the dynamic nature of the CSDAC and the attribute-based policy. Connect again to the FMC UI and navigate to Integration -> Dynamic Attributes Connector. At the same time keep the WKST1 with running pings visible.
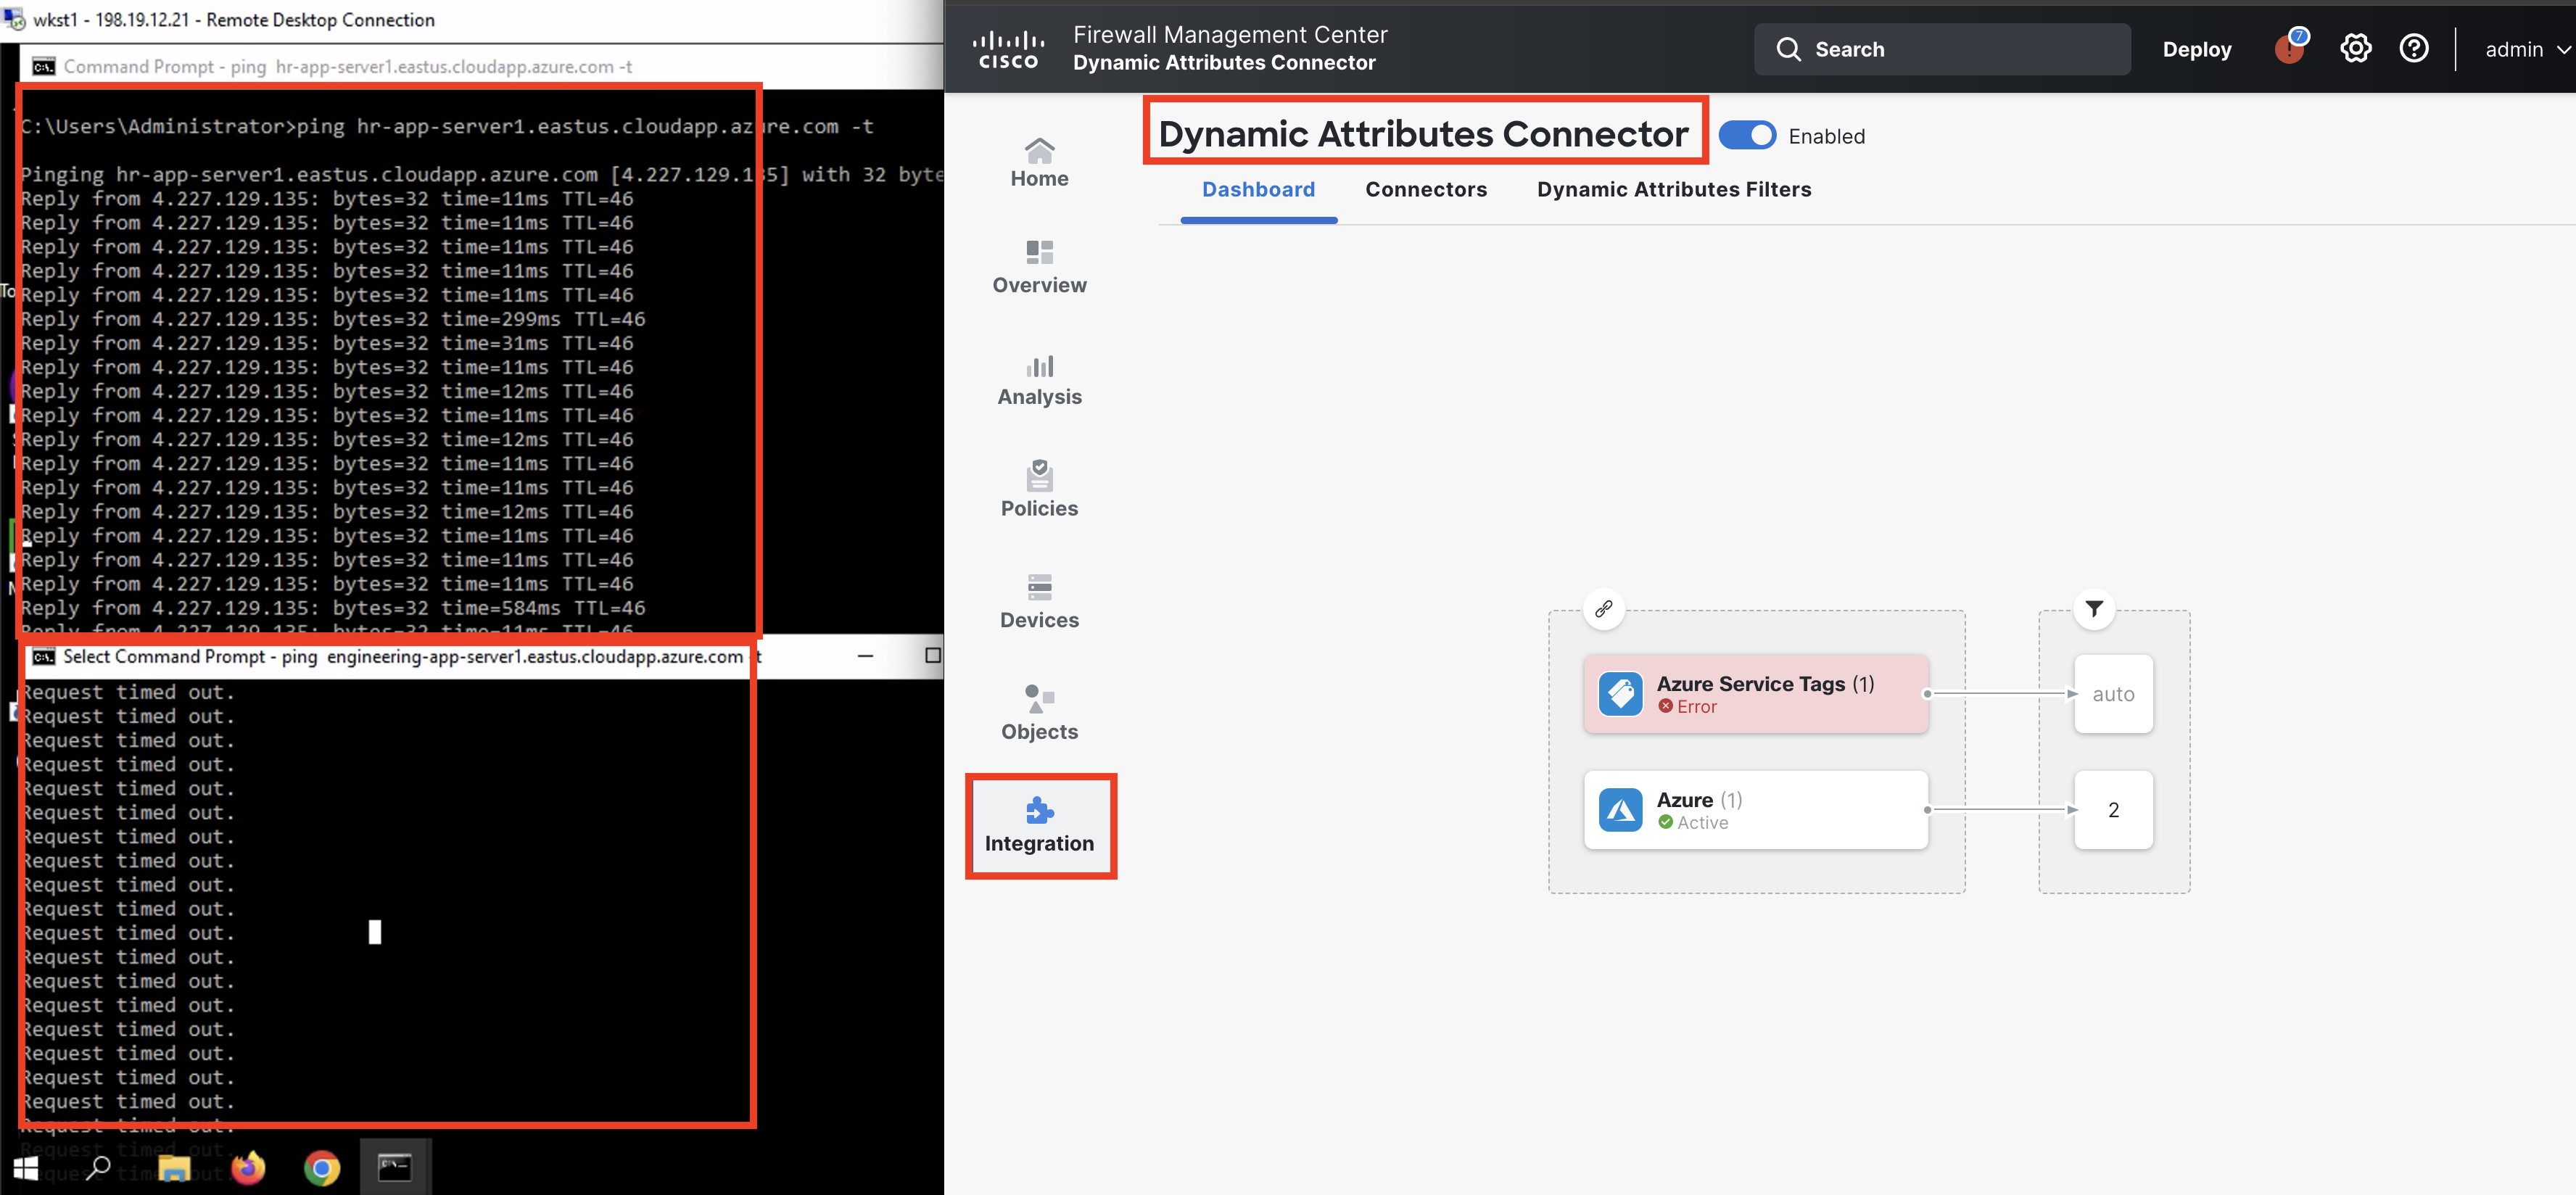
- In the Dashboard tab, select the Azure connector to display the right-hand side menu. Edit the DynObj-HR-App dynamic filter using the pencil icon.
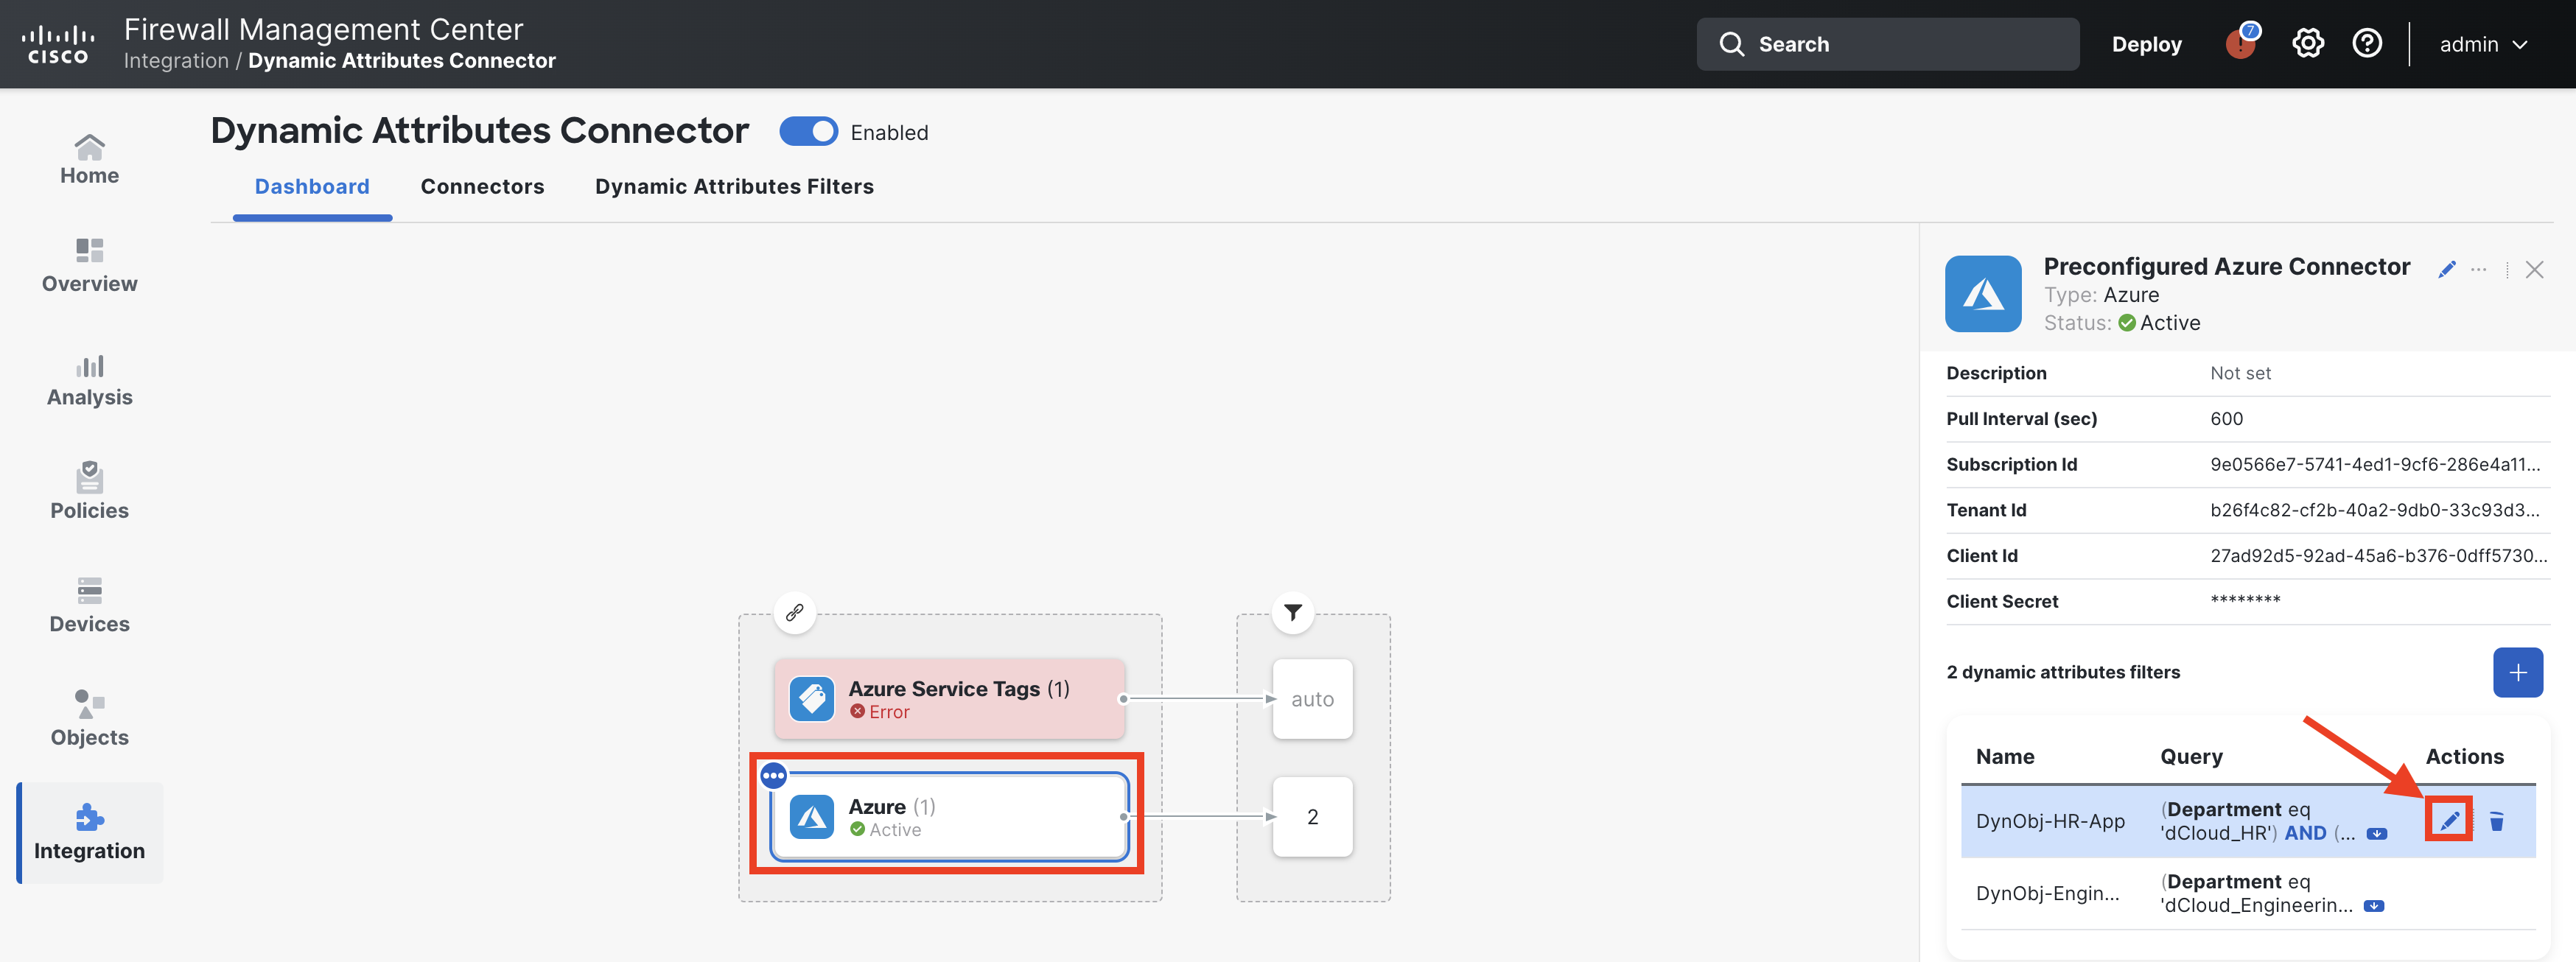
- We want to make the DynObj-HR-App dynamic filter match both HR and Engineering VMs at the same time. HR and Engineering share the same Operating Systems tag equal to Ubuntu.
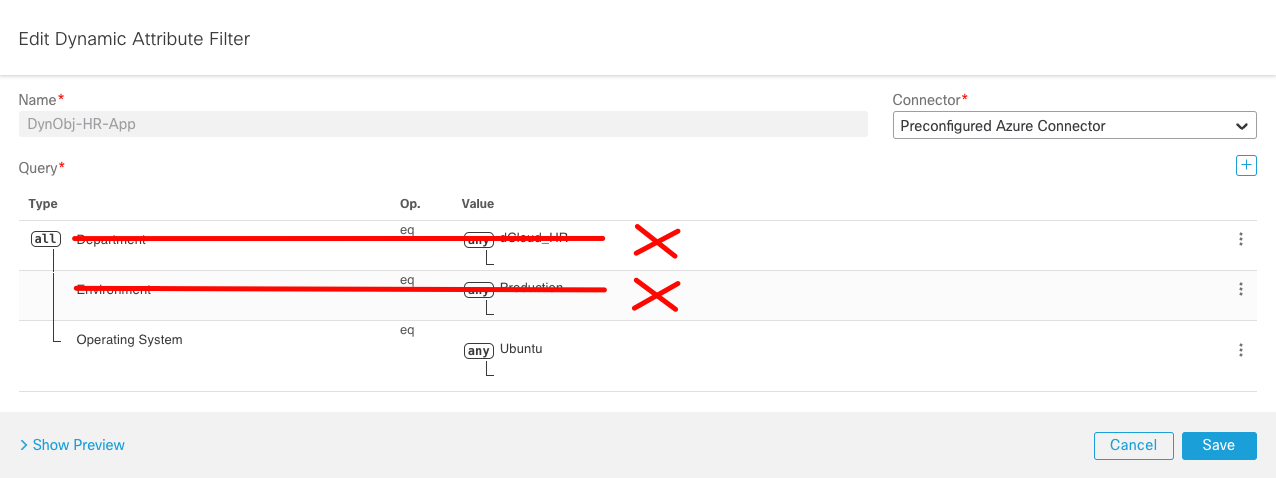
- Delete conditions matching the two other tags Department and Envirionment. Ensure you are only matching the Operating System tag as per the screenshot below.

- Click on Show Preview and confirm you can now see public and private IP addresses of both Engineering and HR VMs.

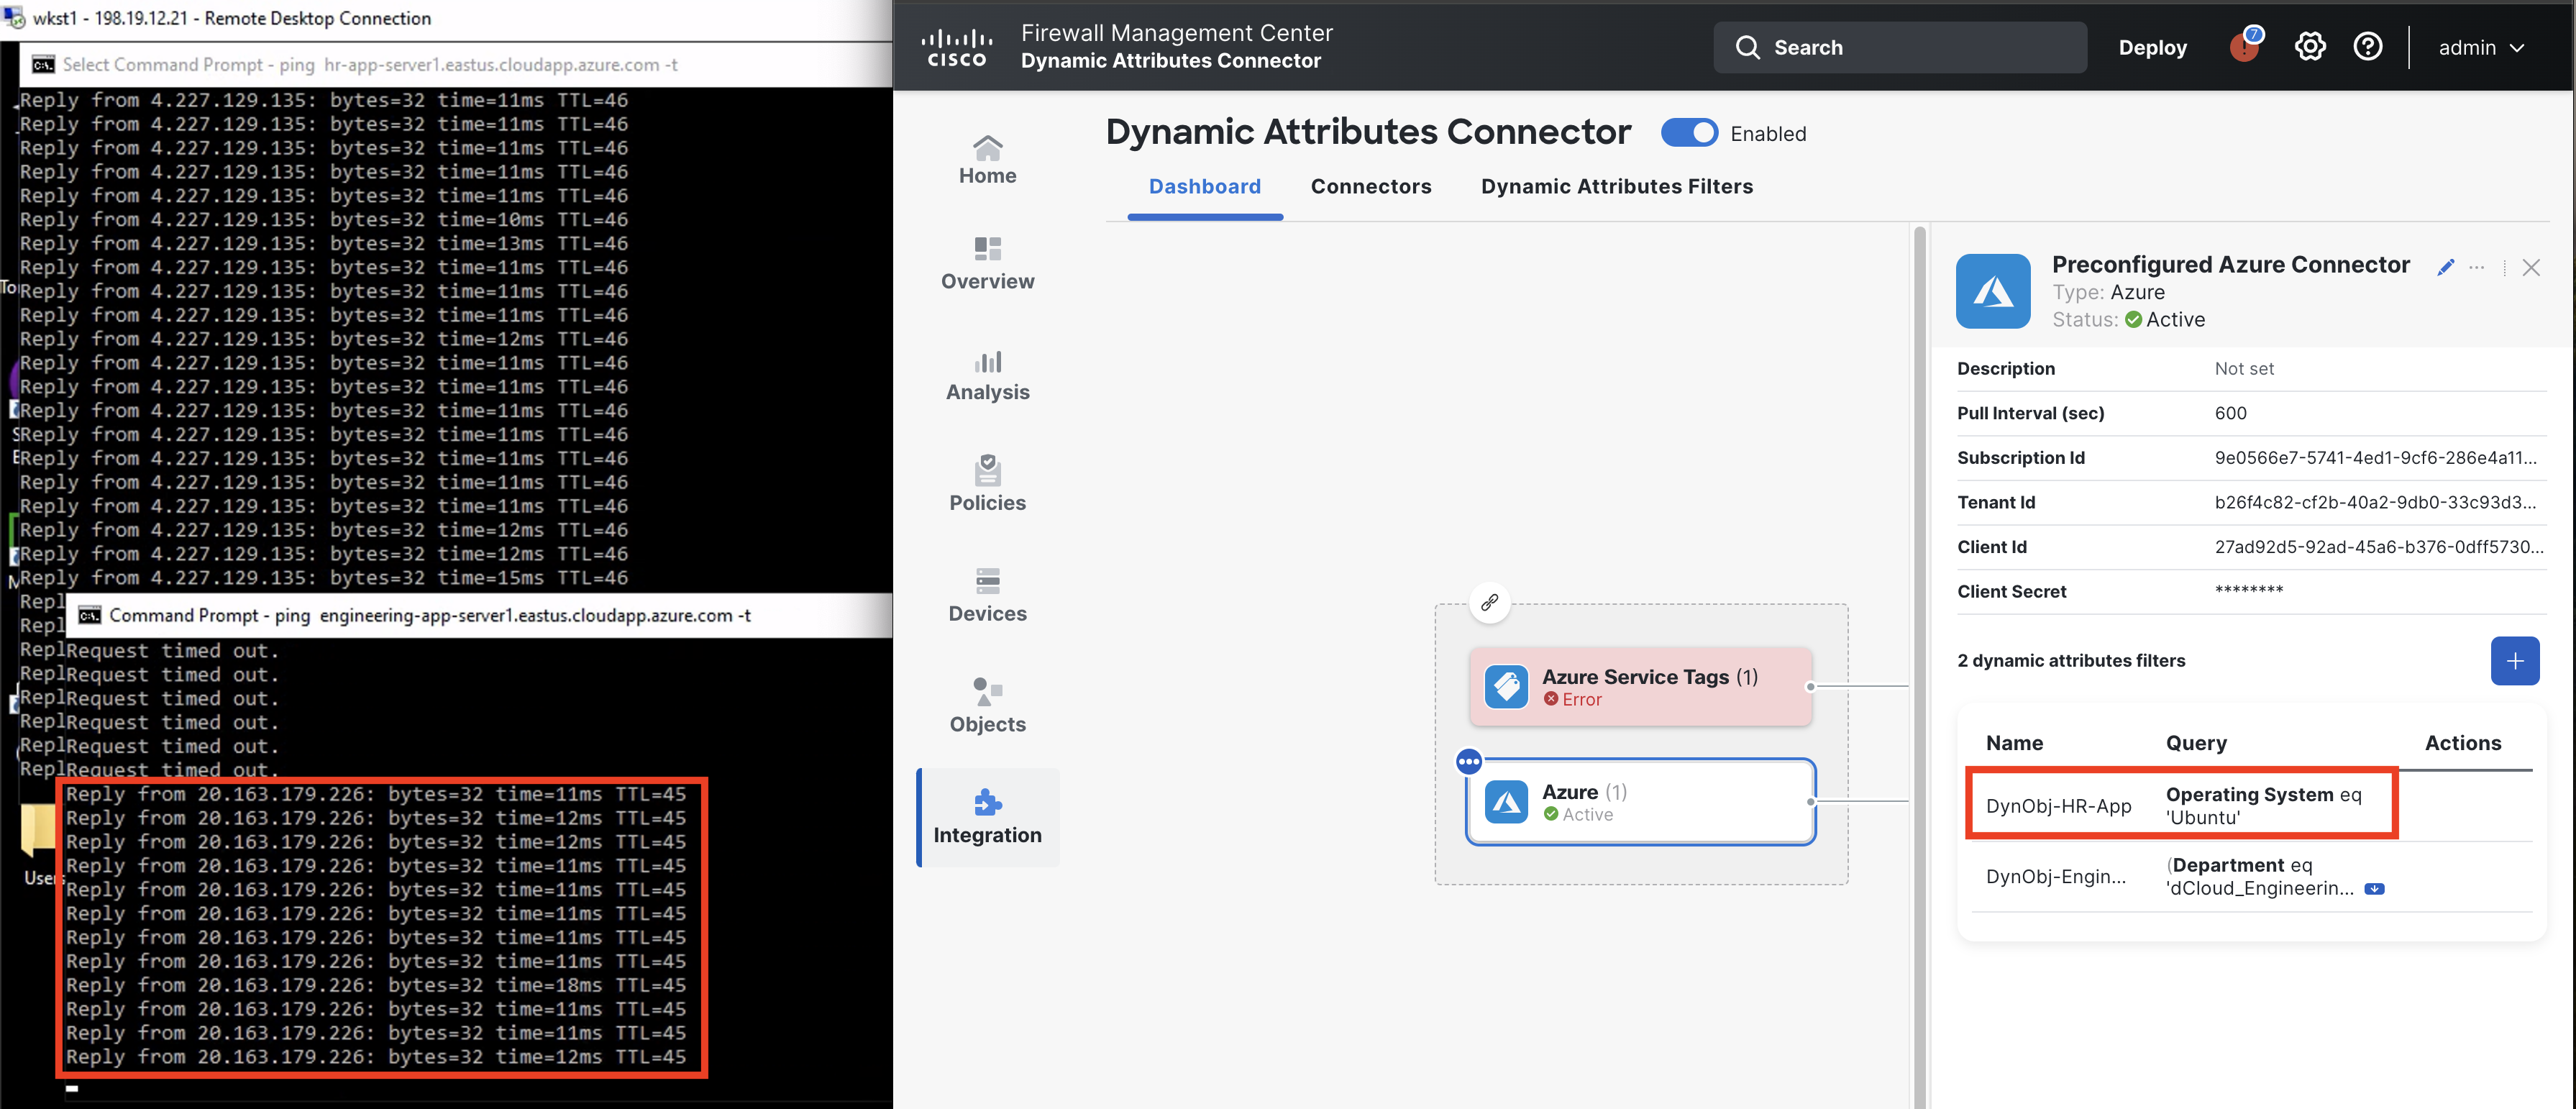
Make the WKST1 desktop visible before you click Save
As soon as you click Save the CSDAC sets the new maching criteria for the dynamic filter. The DynObj-HR-App dynamic object gets updated on the FMC and pushed to the NGFW1.
- Click Save and observe how quickly the firewall picks up the change.
Task 5 - Configure Public Feeds Connectors
In this task, you will see how easy it is to use the public feed connectors. You will configure and observe dynamic objects provided by Zoom, Webex, and Office365 connectors.
- In FMC UI and navigate to Integration -> Dynamic Attributes Connector. In the Dashboard tab click on the connectors icon.
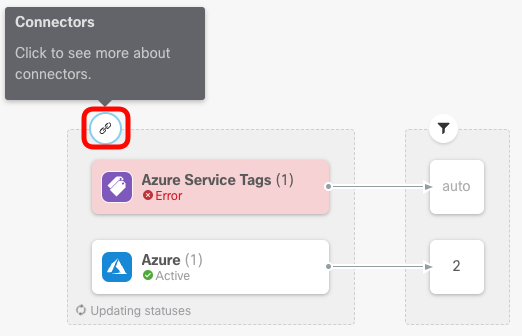
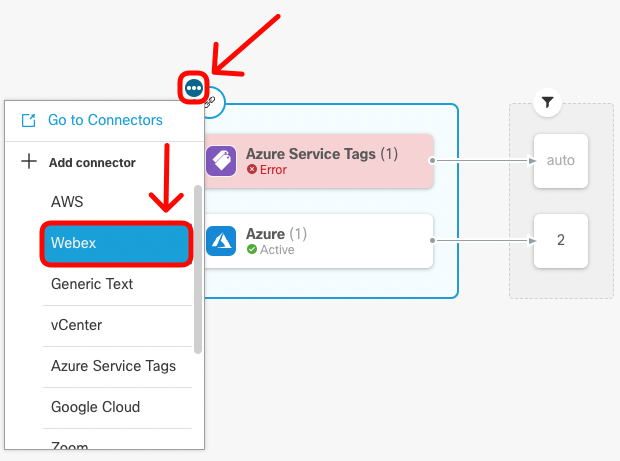
- Next, click on the 3-dots icon to expand a list of connectors. Add Webex connector.
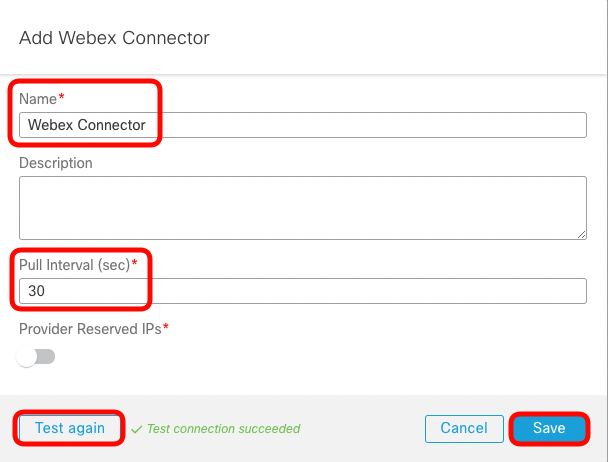
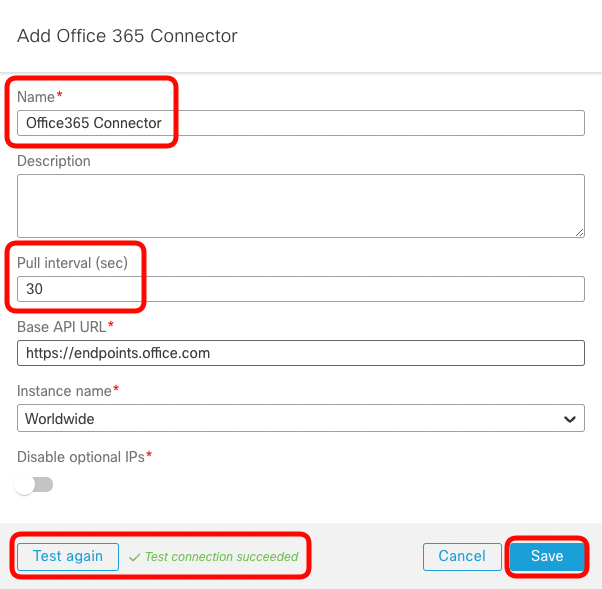
- Set a meaningful Name and desired Pull Interval. Click on the Test button, and once the successful connection is confirmed, Save the configuration.
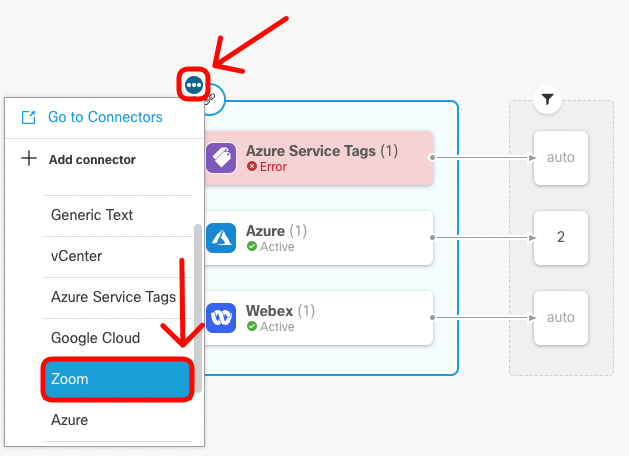
- Repeat the same procedure for Zoom connector.
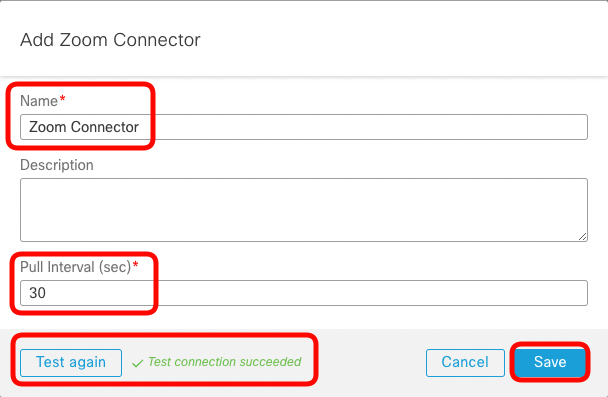
- Set a meaningful Name and desired Pull Interval. Click on the Test button, and once the successful connection is confirmed, Save the configuration.
- Lastly, we'll configure the Office365 connector.
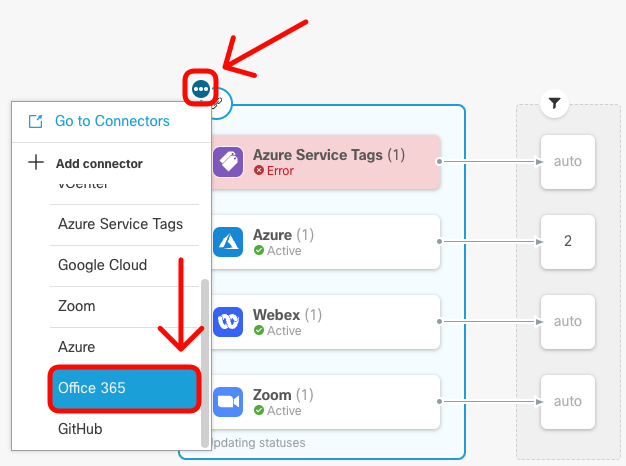
- Set a meaningful Name and desired Pull Interval. Click on the Test button, and once the successful connection is confirmed, Save the configuration.
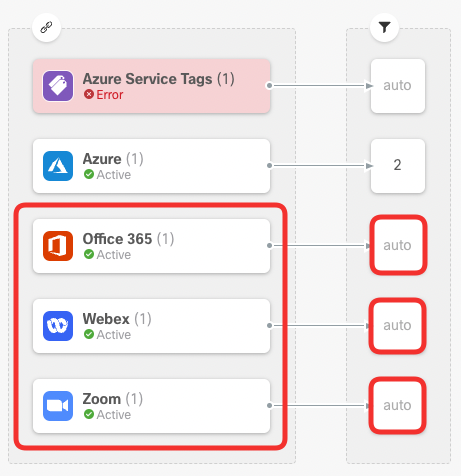
- You should see all three public feed connectors in the Active state. Notice the auto keyword in the dynamic attribute filters section.
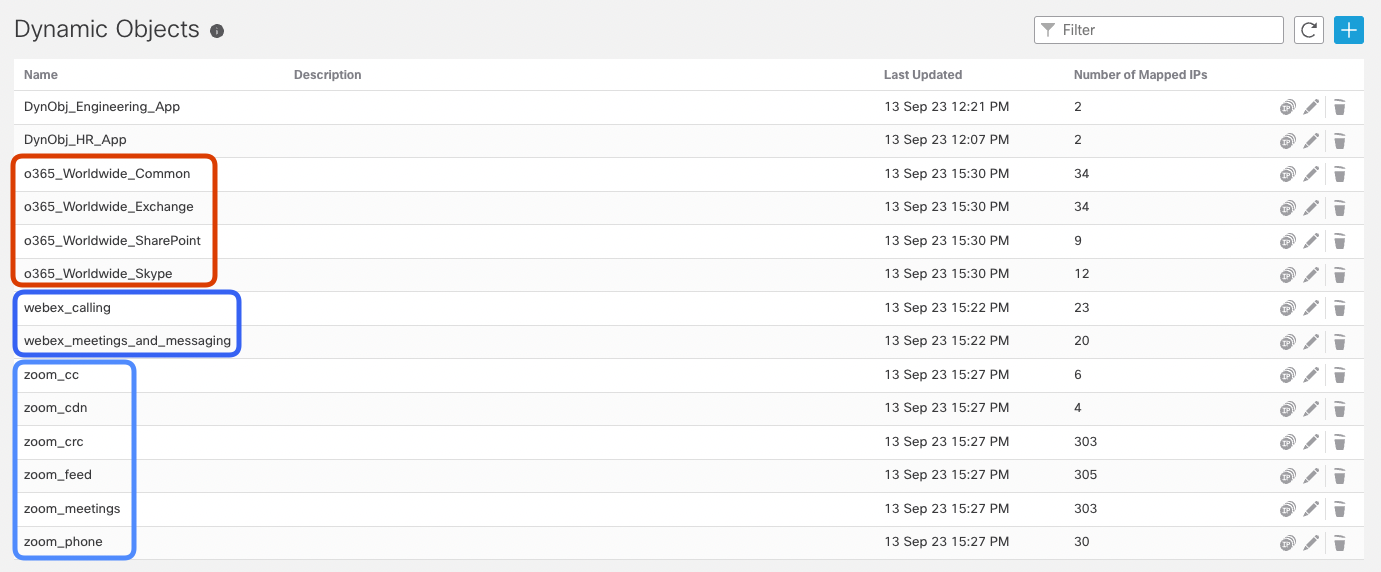
- Navigate to Objects -> Object Management -> External Attributes -> Dynamic Objects. Review the dynamic objects created by public feeds connectors. Notice you didn't have to configure attribute filters as with Azure connector.
Task 6 - The Generic Text Connector
The public feed connectors you configured in the previous task had resource URLs pre-configured in CSDAC. The new Generic Text Connector allows you to import IP addresses from flat text files published on custom URL addresses.
In this task we present the functionality of Generic Text Connector with an block-list URL, which is just an example. If you ask yourself a question how the connector compares to Securtity Intelligence (SI) feed please consider:
- The SI feed is applicable only for blocking or whitelisting the traffic before Access Control Policy (ACP) is processed. The dynamic objects provided by Generic Text Connector may be freely used in ACP in conjunction with User, Application, URL and other conditions.
- The dynamic objects may be updated more frequently than SI feeds. The minium update interval of SI feed is 5 minutes, whereas dynamic object may be updated over REST API call in near-real time or as per CSDAC connector pool interval.
- Security Intelligence feeds support URLs and DNS names on top of IP addresses supported by dynamic objects.
- Security Intelligence feeds are limited by file size of 500 MB, whereas dynamic objects share the Snort's identity memory with IP-SGT and User-IP mappings, and are subjected to the same limits.
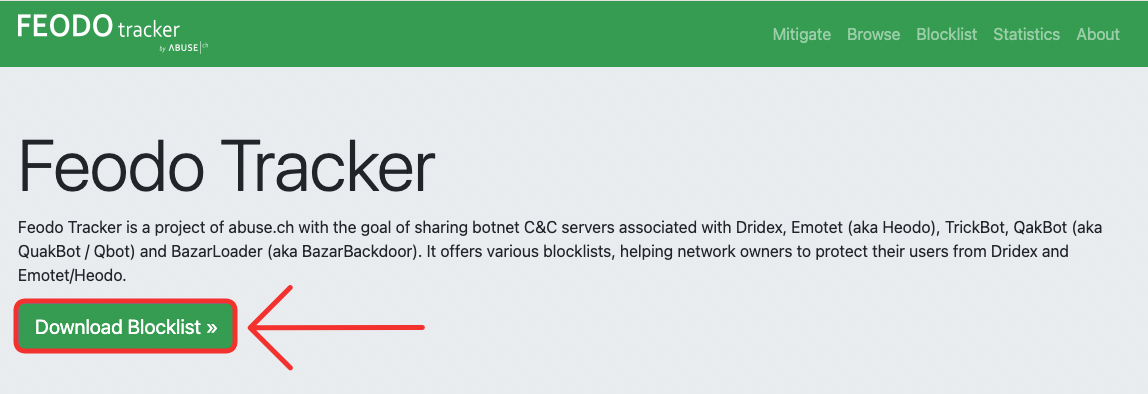
- Open Feodo Tracker home page. Navigate to https://feodotracker.abuse.ch/. Click on Download Blocklist.
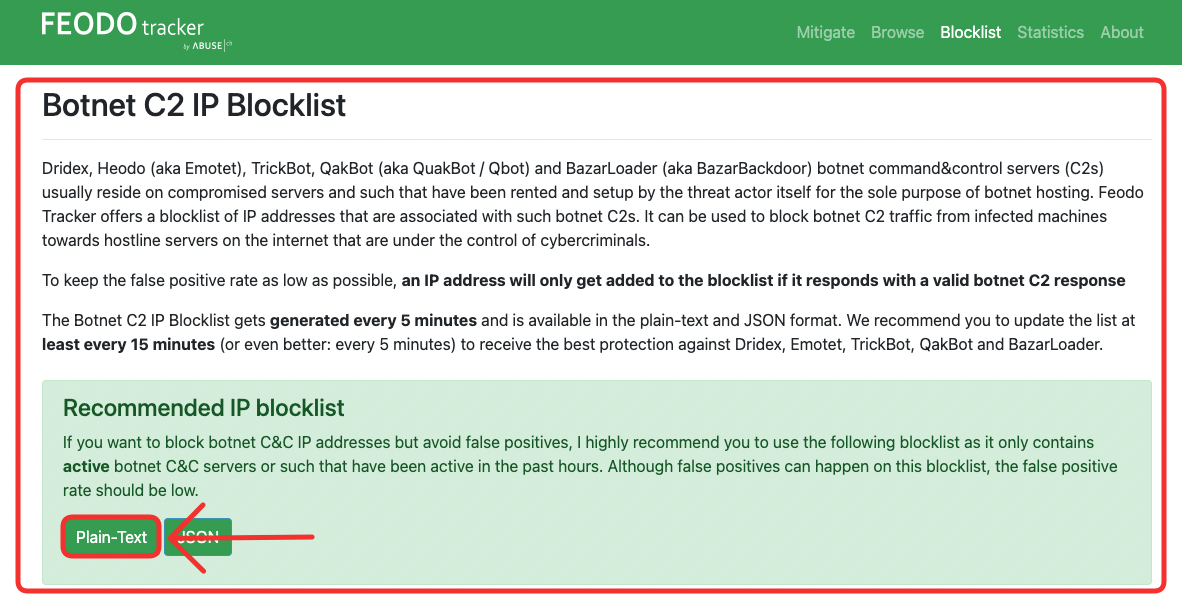
- Scroll down to the Botnet C2 IP Blocklist and find the Recommended IP blocklist section. Click on Plain-Text link.
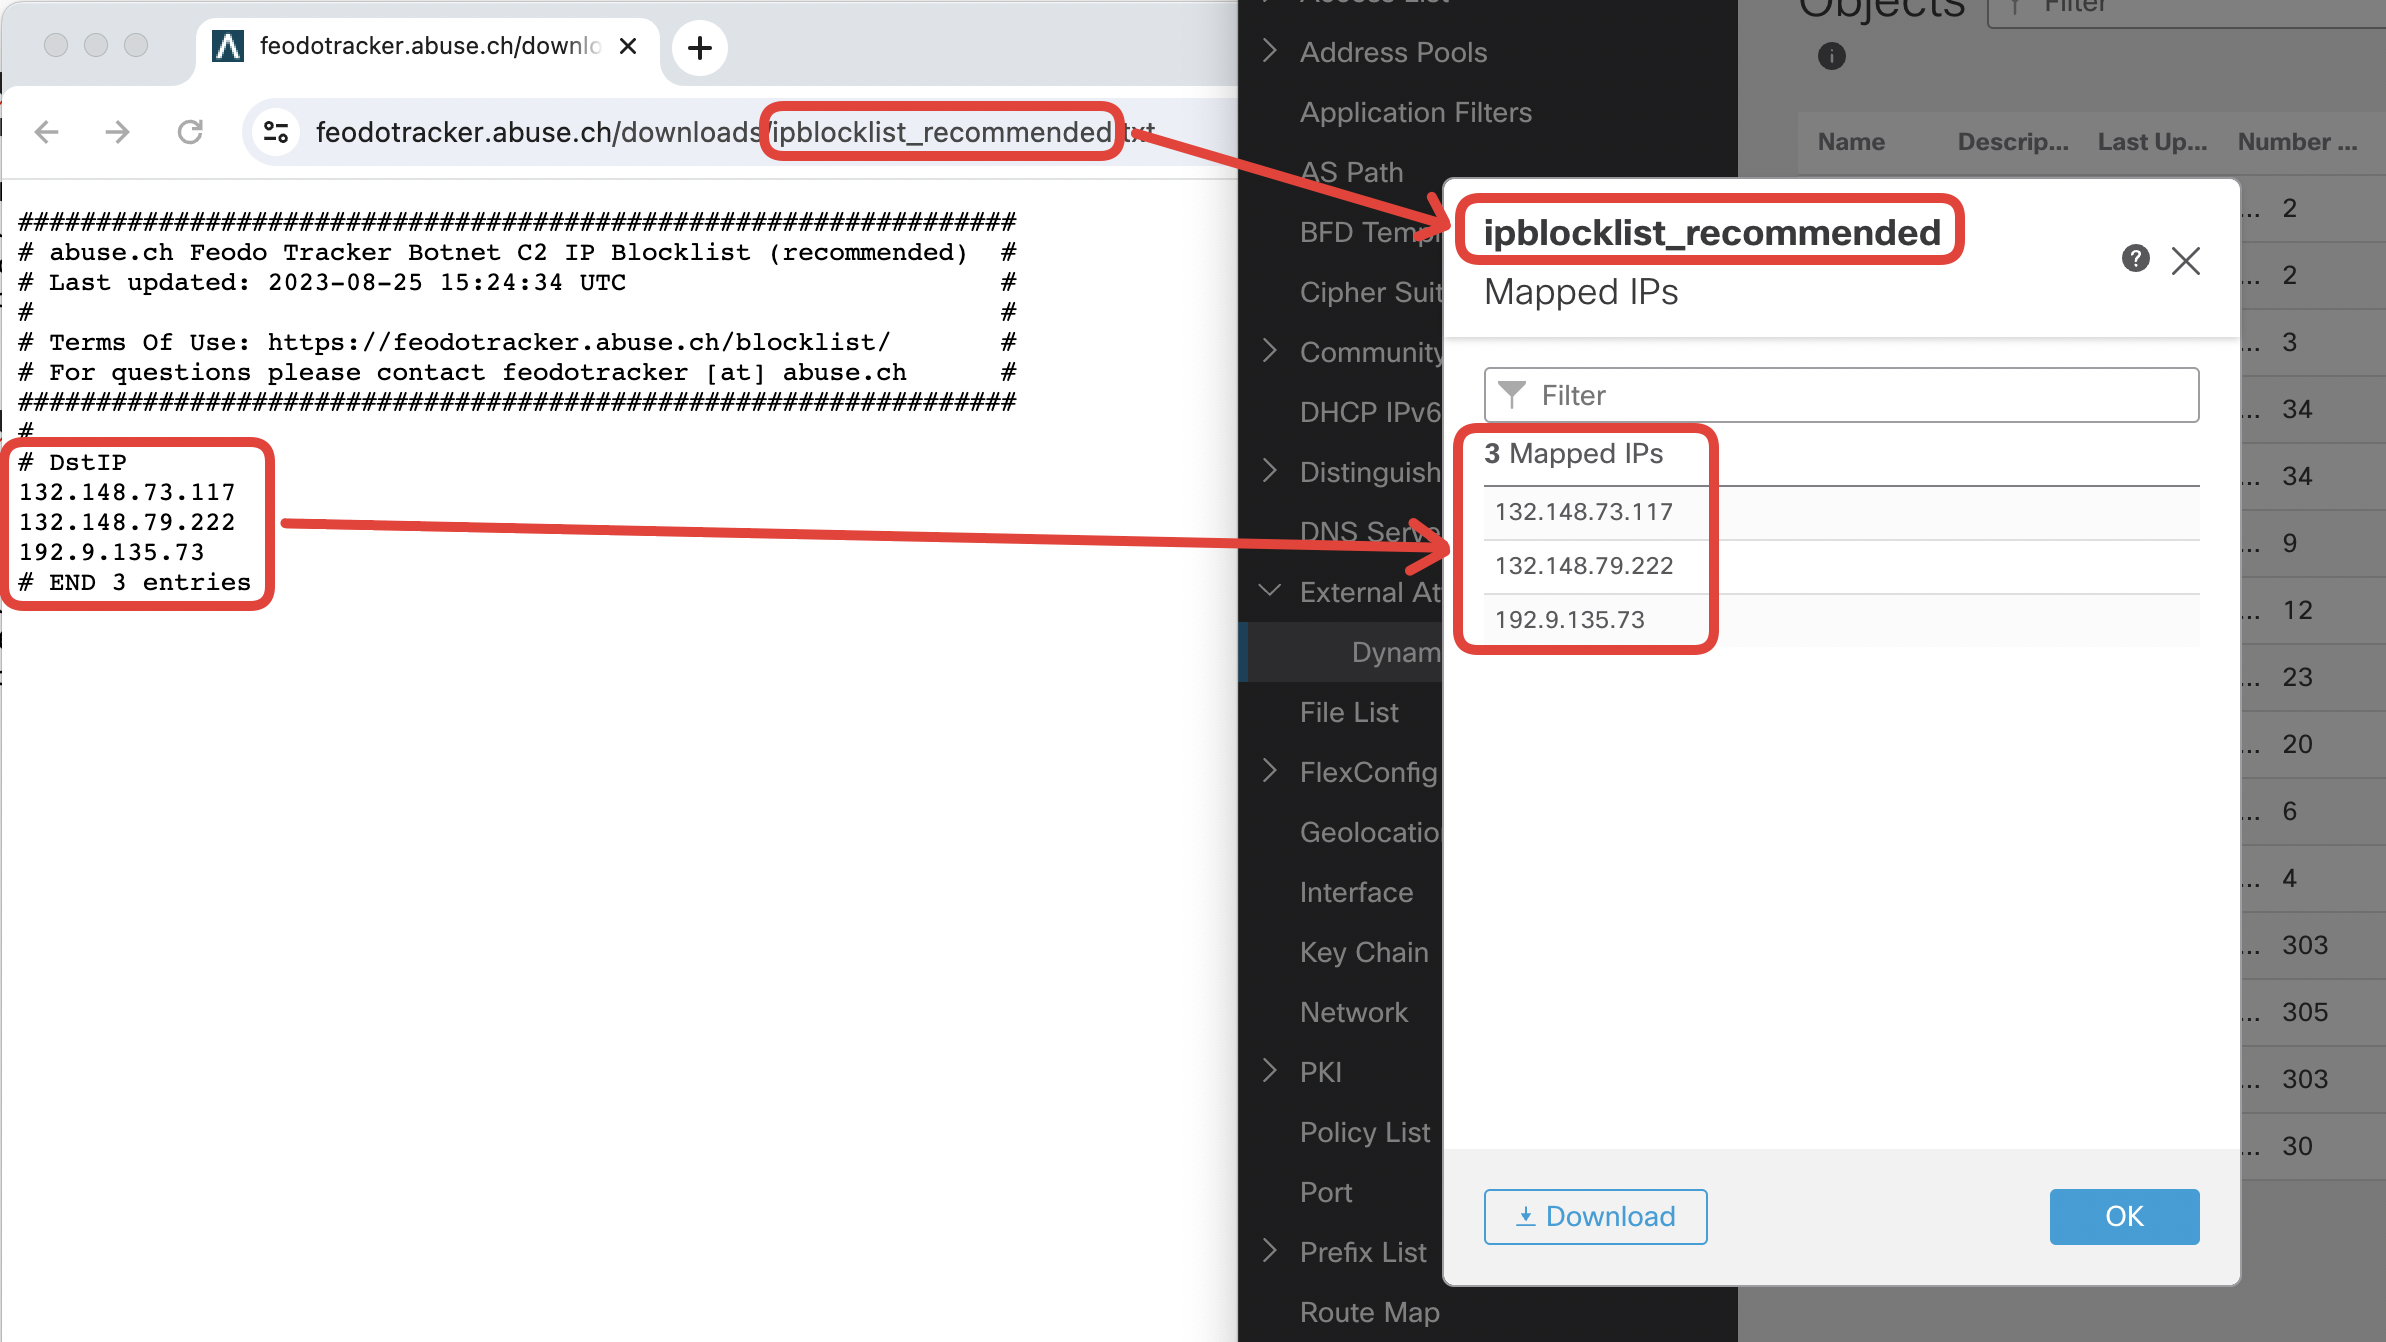
- Observe the list of IP addresses representing currently active CnC botnet servers. Copy the URL of the feed: https://feodotracker.abuse.ch/downloads/ipblocklist_recommended.txt. You will need it the upcoming tasks to set up the Generic Text connector.
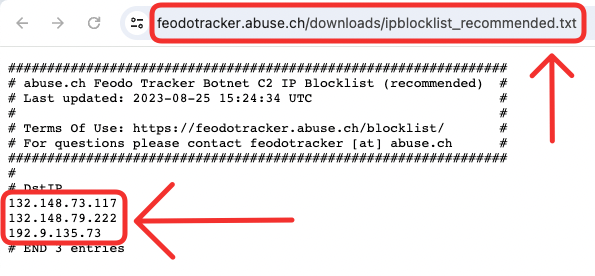
Please note that this feed is dynamically updated every 5 minutes and you will most likely see a different set of IP addresses in the feed.
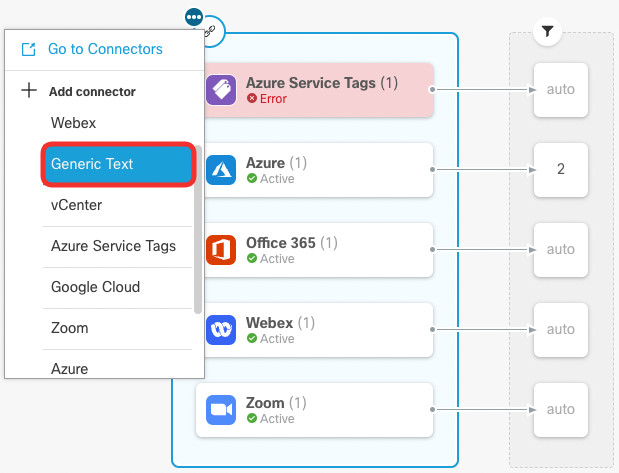
- In FMC UI navigate to Integration -> Dynamic Attributes Connector. In the Dashboard tab click on the connectors icon. Then, click on the 3-dots icon to expand a list of connectors. Add Generic Text connector.
- Set a meaningful Name and desired Pull Interval. Paste the Feodo Tracker C2 blocklist URL, you copied earlier: https://feodotracker.abuse.ch/downloads/ipblocklist_recommended.txt
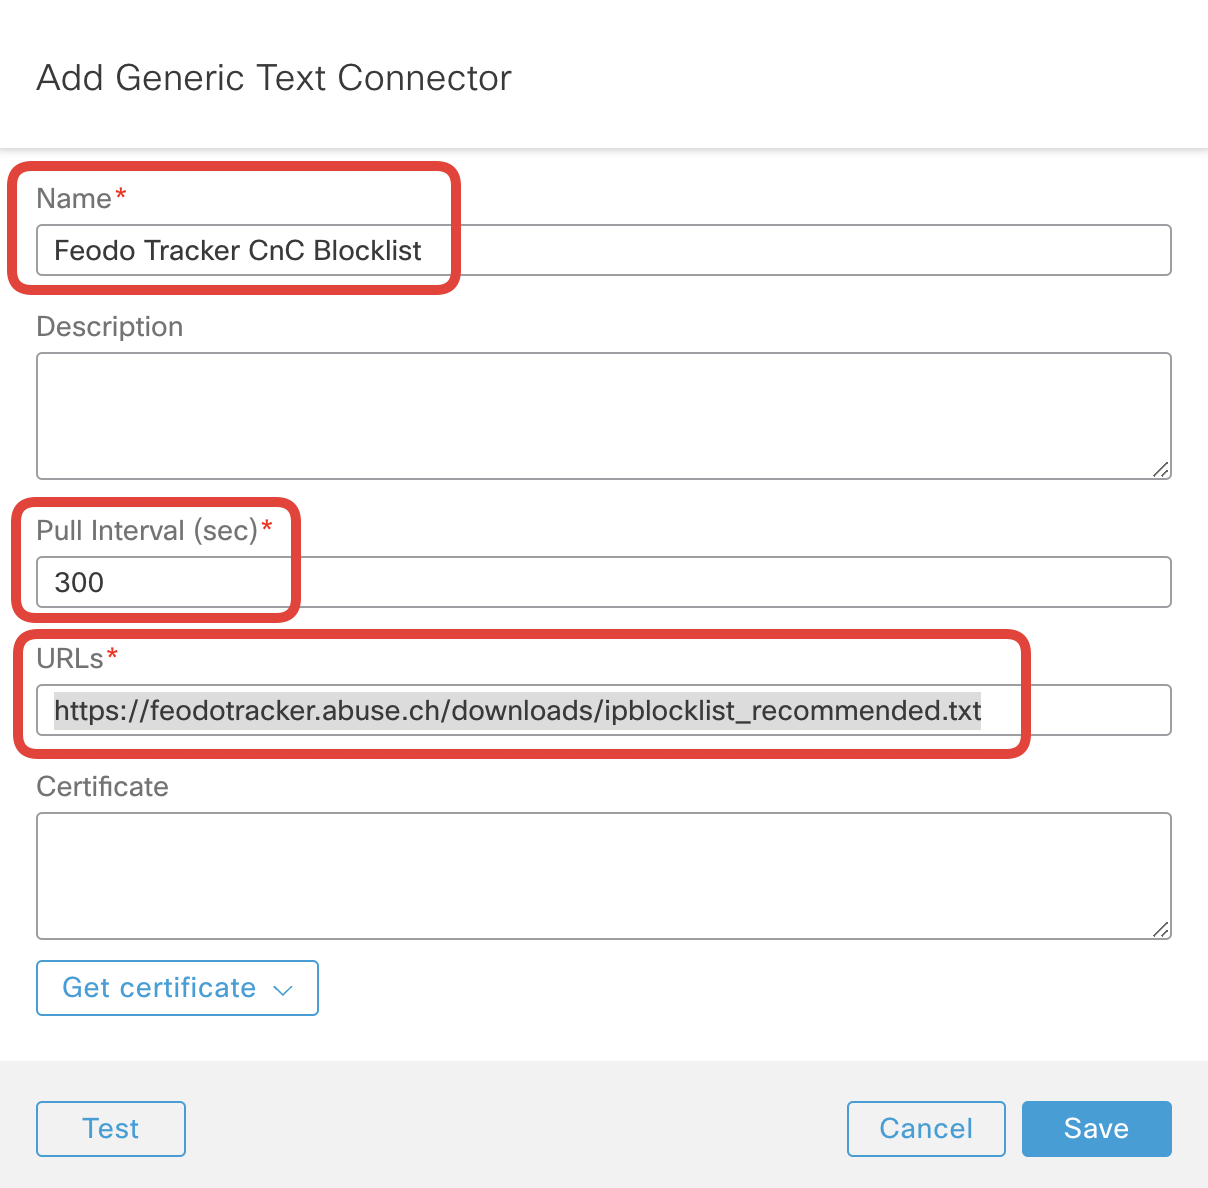
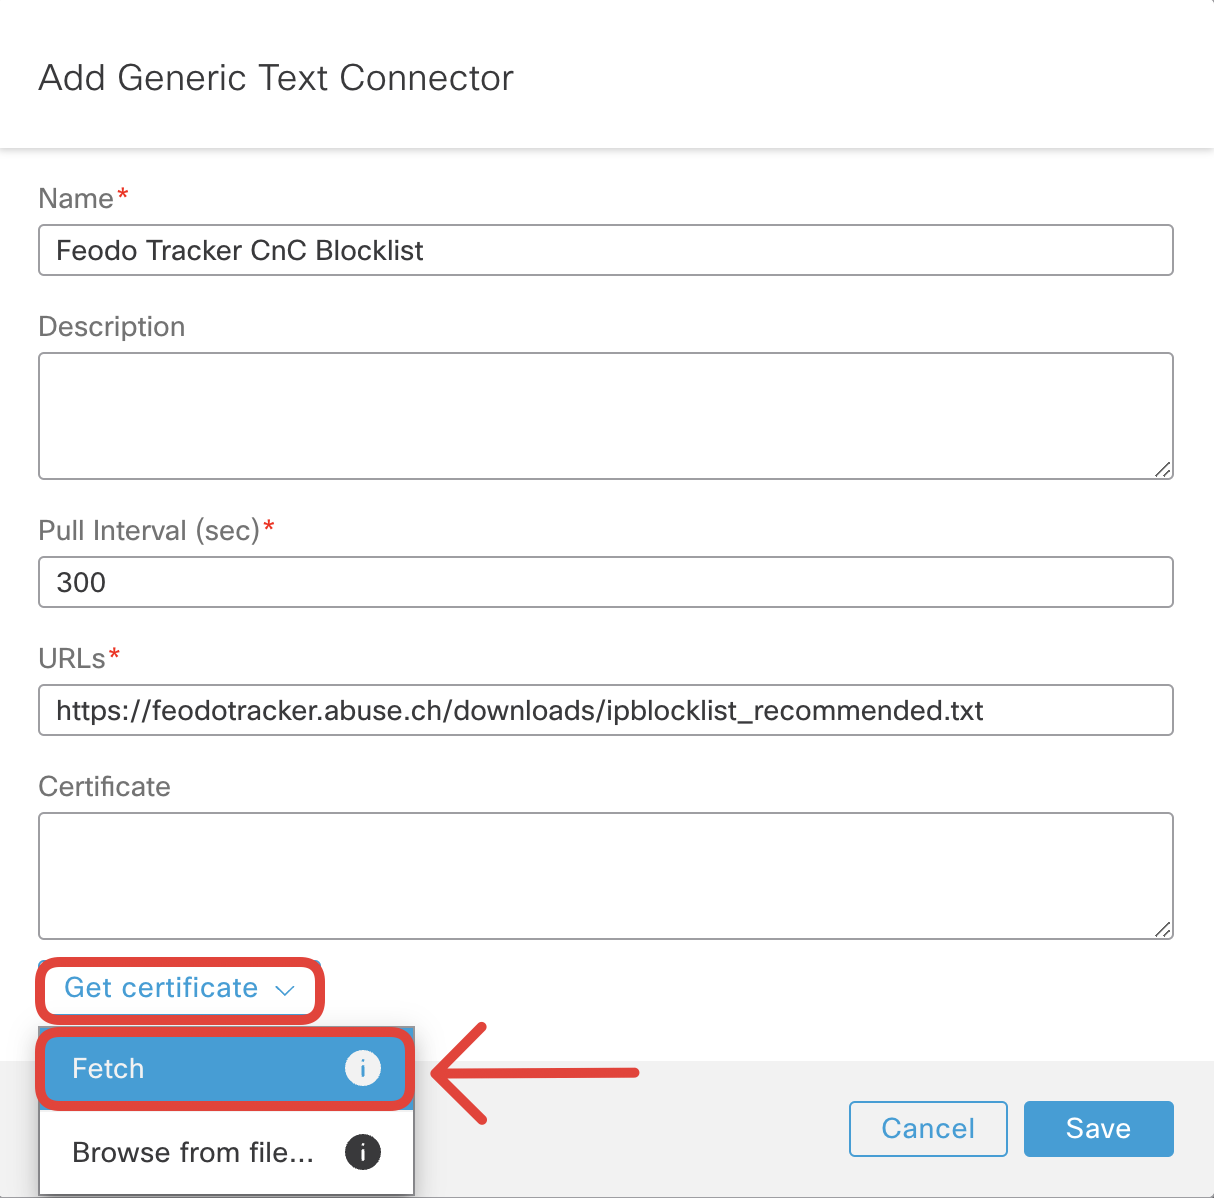
- Optionally, you can cache the certificate of the feed to ensure CSDAC won't connect to a spoofed server. Click on Get cerficate -> Fetch
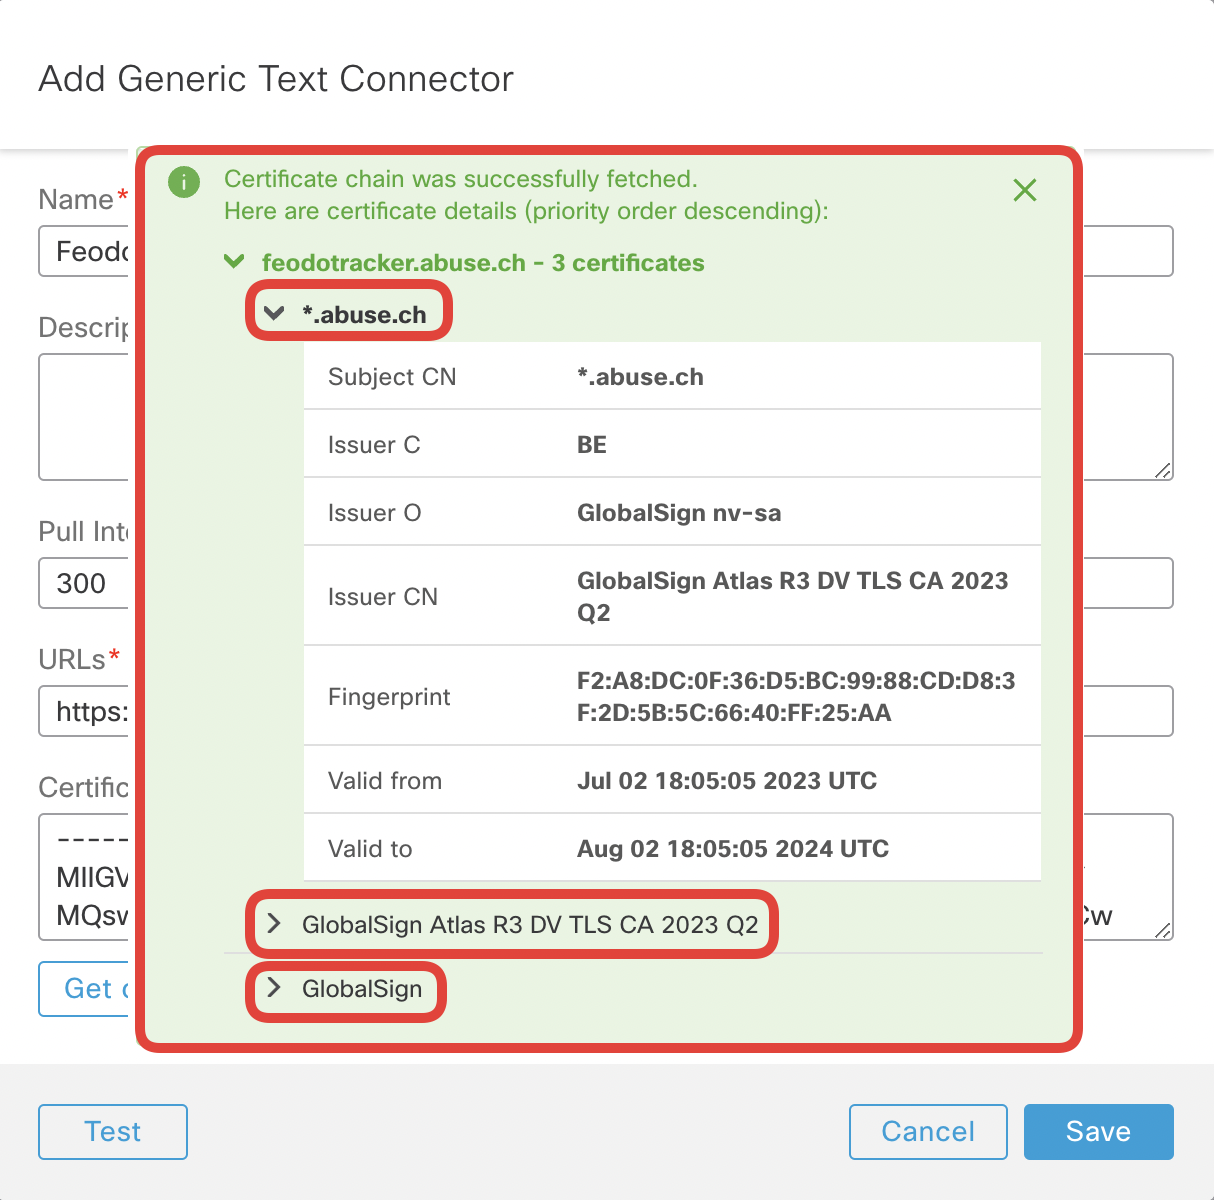
- Review the certificate chain and close the pop-up with x sign.
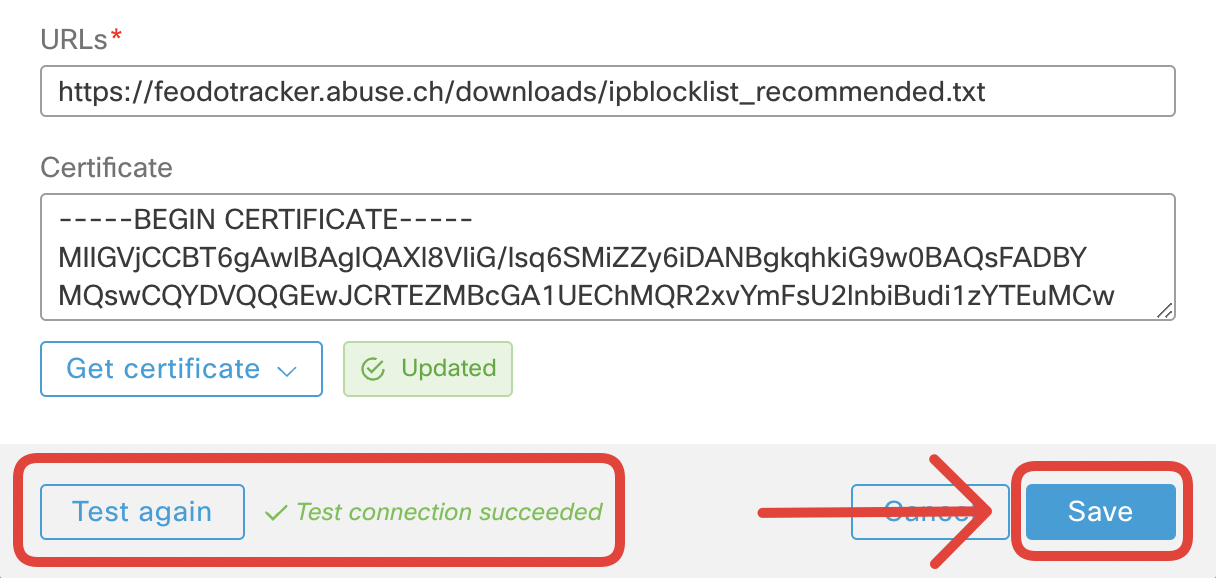
- Run Test if successful, click Save.
- You should now see the connector in the Active state. Notice the auto keyword in the dynamic attribute filters section.
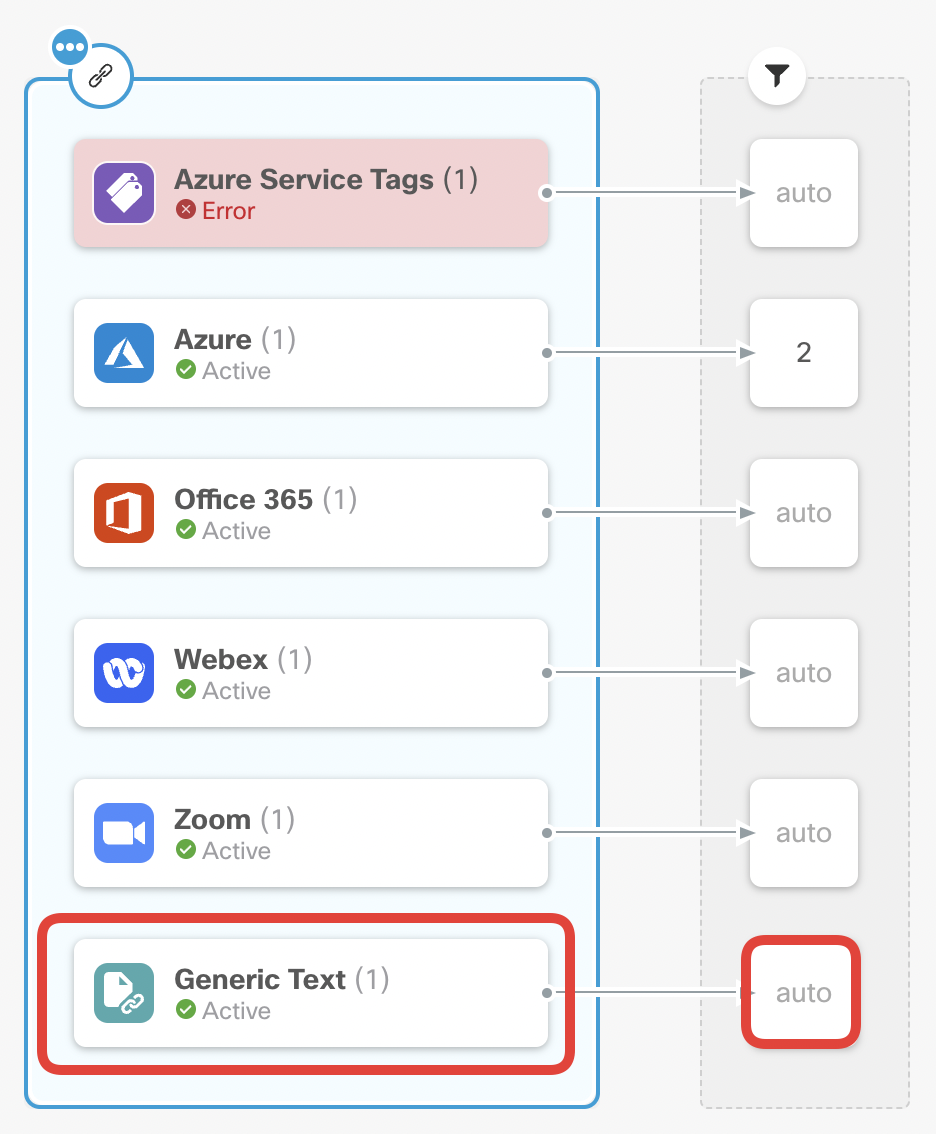
- Navigate to Objects -> Object Management -> External Attributes -> Dynamic Objects. Review the dynamic object created by the Generic Text connector. Notice you didn't have to set an attribute filter, the name of the object is auto-configured from the name of the file published on the feed ipblocklist_recomended.

- Click on the IP icon next to the ipblocklist_recommended dynamic object to display mapped IP addresses. This dynamic object will auto-update as per changes published by Feodo Tracker.
Task 7 - The Azure Service Tags Connector
In the last task, you will enable the Azure Service Tags Connector. You will observe a wide range of dynamic objects, provided by this connector, representing various Azure services.
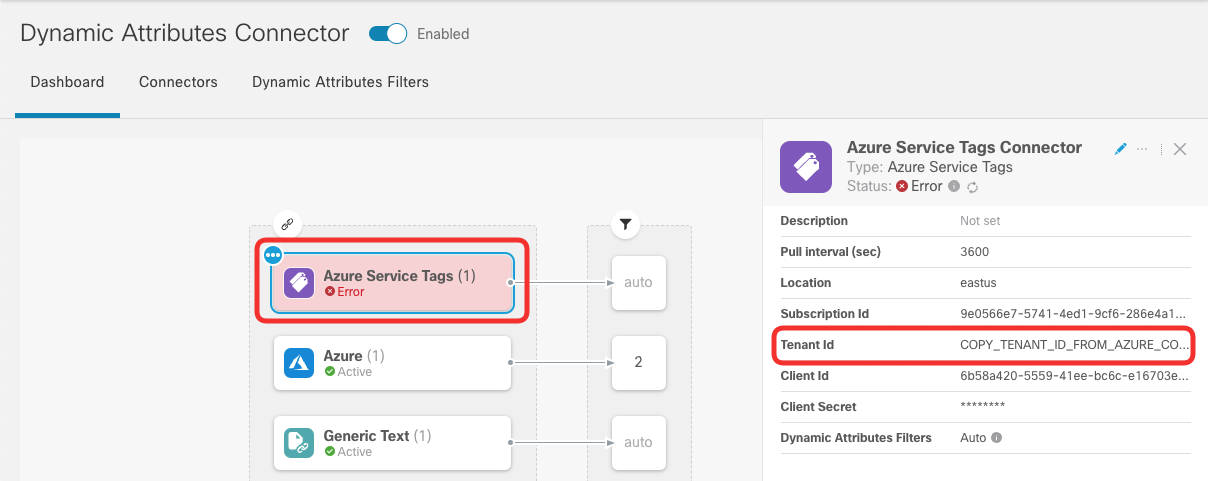
- In FMC UI navigate to Integration -> Dynamic Attributes Connector. In the Dashboard tab click on the Azure Service Tags connector. In the right-hand detail menu, you'll notice the Tenant ID value is set to a dummy value.
Both connectors, Azure Service Tagsand Azure, reach out to the same Azure subscription and tenant. In the following steps, you will copy the Tenant ID value from the active Azure connector.
- In the same view click on the Azure connector and edit its configuration with the pencil icon in the right-hand side menu.
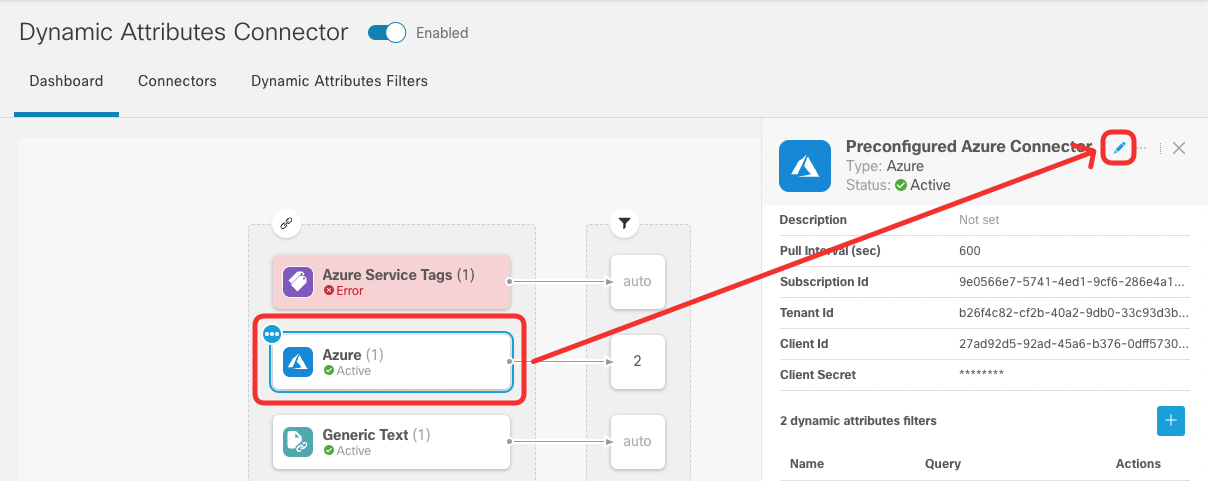
- Copy the Subscription ID and Tenant ID value from the connector setup and click Cancel.
- Now, edit the configuration of the Azure Service Tags connector.

- Replace the dummy Subscription ID and Tenant ID values with the ones copied from Azure connector. Click Test and confirm the connection is successful now. Click Save.
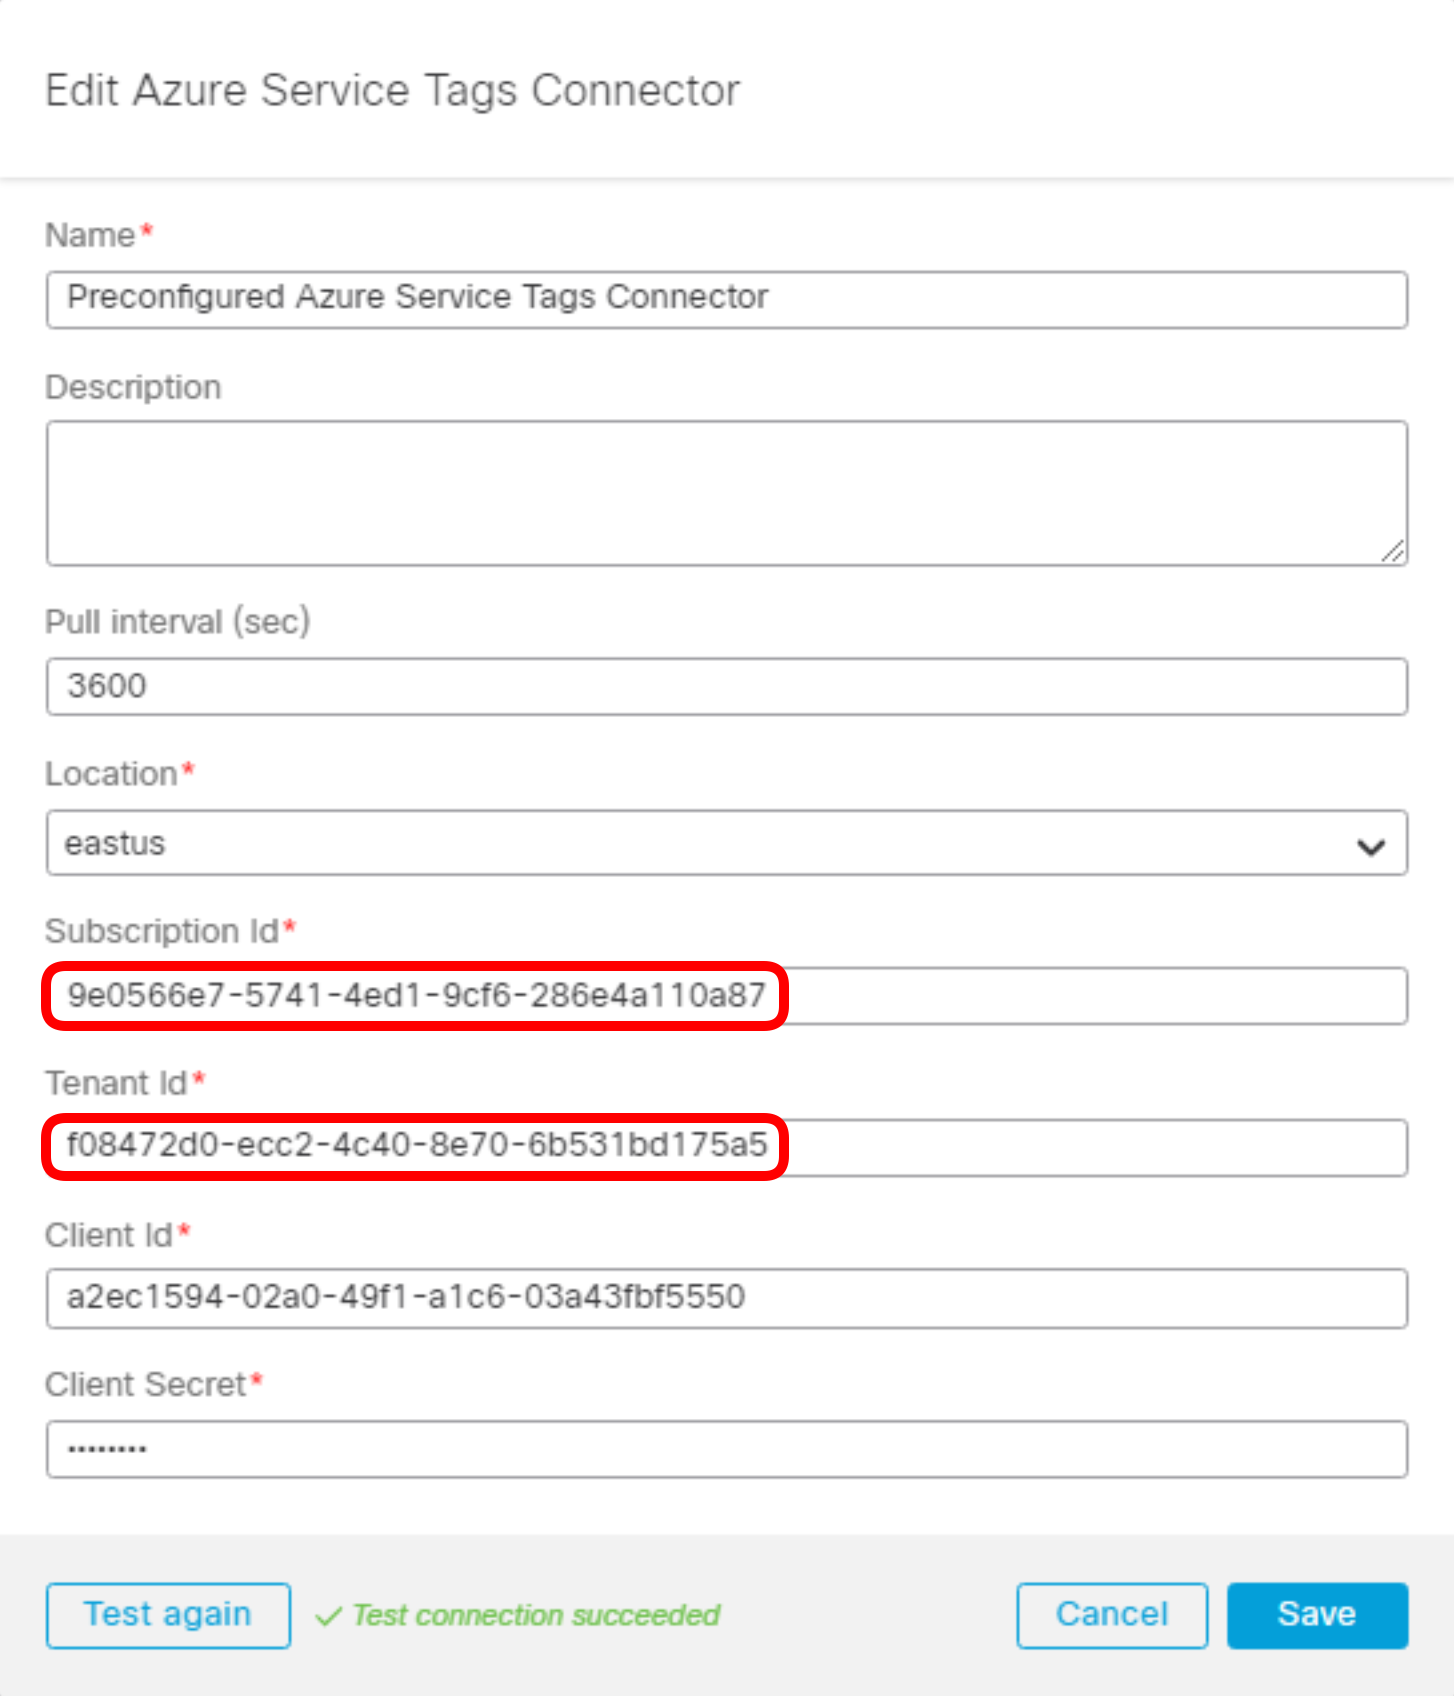
- You should now see the Azure Service Tags connector in the Active state. Notice the auto keyword in the dynamic attribute filters section.

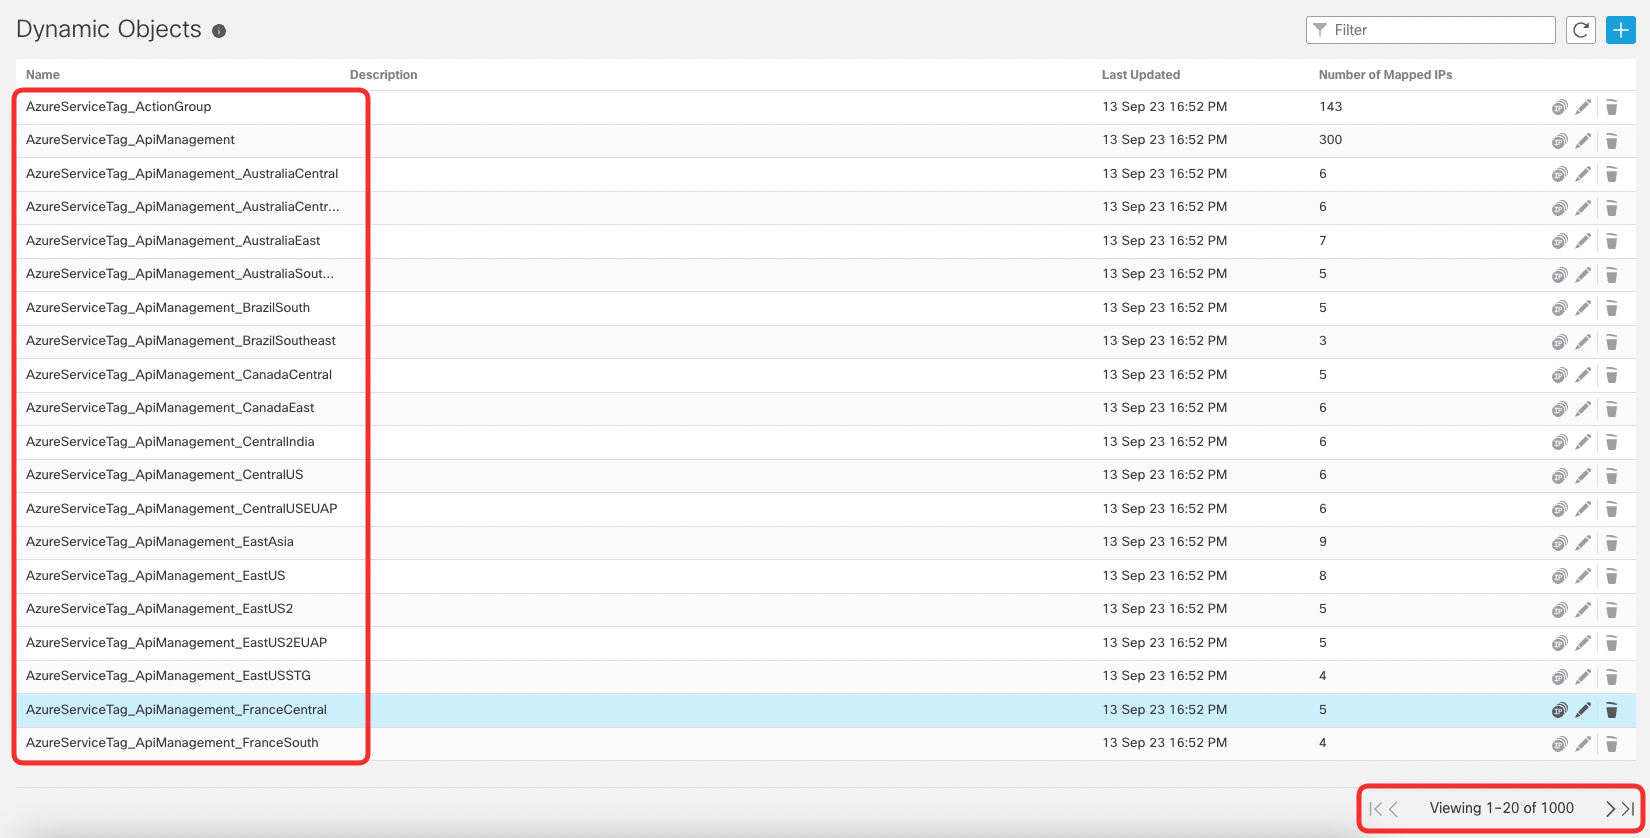
- Navigate to Objects -> Object Management -> External Attributes -> Dynamic Objects. Review the dynamic object created by the Azure Service Tags connector.
Tell us how we are doing
We are doing our best to ensure the scenarios in this lab guides are useful, clear and work as expected.
Please share your thoughts to help us improve or fix any problems you may run into..
Click here to provide your feedback or report an issue with this guide
Updated about 1 year ago

