QUIC Decryption
Introduction
Welcome to the lab guide on QUIC decryption using Cisco Secure Firewall. This guide is designed to help you understand and practice the essential tasks involved in decrypting QUIC traffic, which is increasingly prevalent in today's network environments.
What is QUIC?
QUIC (Quick UDP Internet Connections) is a new secure transport protocol standardised by the Internet Engineering Task Force (IETF) as RFC 9000. Originally developed by Google in 2014, QUIC aims to enhance internet performance and security by taking several innovative approaches:
- Application-Level Flow Control: Unlike traditional protocols that manage flow control at the network layer, QUIC delegates this responsibility to the application layer. This shift allows applications to have more granular control over data transmission, improving overall efficiency.
- 0-RTT Connection Establishment and Seamless Roaming: QUIC reduces latency through zero round-trip time (0-RTT) connection establishment, enabling faster connections. Additionally, it supports seamless roaming, allowing connections to persist even as the underlying network changes (e.g., switching from Wi-Fi to cellular).
- Improved Content Delivery: QUIC mitigates the head-of-line blocking issues commonly associated with TLS over TCP by allowing multiplexed streams within a single connection. This ensures that packet loss in one stream doesn't impede the delivery of others.
- Network Ossification Prevention: By encapsulating its features over UDP, QUIC counters network ossification, which slows down the adoption of new protocols due to rigid network infrastructure.
Why is QUIC a Challenge for Network Security Administrators?
As a new secure transport protocol, QUIC poses significant challenges for network security administrators:
- Encryption Complexity: QUIC's encryption mechanisms are robust, making it extremely difficult to decrypt and inspect traffic using traditional security tools.
- Protocol Versatility: QUIC can serve as an underlay for a wide range of applications and protocols, including HTTP3, SMB, BGP, SSH, and DNS. This versatility increases the scope of potential security threats.
The Synergy of Protocol Elements in QUIC
QUIC is a remarkable fusion of concepts and elements drawn from various existing protocols, combined to create a more efficient and secure transport layer.

Figure 1 - QUIC Protocol Components
By synthesising elements from TLS 1.3, UDP, TCP, and HTTP/2, QUIC achieves a balance of security, speed, reliability, and efficiency. It retains the security benefits of TLS, the low-latency characteristics of UDP, the reliable transmission of TCP, and the efficient data handling of HTTP/2. The result is a high-performance transport protocol that meets the demands of modern internet applications, paving the way for faster, more secure, and more reliable online experiences.
- QUIC leverages the optimized cryptographic handshake from TLS 1.3, significantly reducing the time needed to establish a secure connection. TLS 1.3 improves performance by streamlining the handshake process, enabling faster encryption and decryption. Additionally, QUIC introduces 0-RTT (Zero Round-Trip Time) connection establishment, allowing data to be sent immediately without waiting for the handshake to complete. This reduces latency, making QUIC particularly advantageous for applications that require quick responsiveness.
- By operating over UDP, QUIC avoids many of the issues associated with TCP, such as middle-box interference and the requirement for a 3-way handshake. UDP’s “middle-box neutrality” means that it can traverse most network devices without modification, simplifying deployment and reducing the chances of network ossification. The absence of a 3-way handshake also means that connection establishment is quicker, contributing to the overall reduction in latency.
- Although QUIC runs over UDP, it incorporates TCP’s reliability and flow control mechanisms. This means that QUIC can guarantee the delivery of packets, retransmitting any lost data and managing congestion effectively. By embedding these TCP-like features at the application layer, QUIC ensures reliable data transfer while maintaining the flexibility and simplicity of UDP.
- QUIC borrows the concept of stream multiplexing from HTTP/2, allowing multiple streams of data to be sent concurrently over a single connection. This resolves the head-of-line blocking issue that plagues TCP, where packet loss in one stream can delay the delivery of packets in all other streams. With QUIC, each stream is independent, so issues in one do not affect the others. This improves the overall efficiency of data transfer and enhances user experience by ensuring smoother and faster content delivery.
Cisco Secure Firewall and QUIC Decryption
Despite the challenges, Cisco Secure Firewall now offers the capability to decrypt QUIC traffic, providing enhanced visibility and security for modern network environments. This laboratory guide will walk you through various tasks to configure and test QUIC decryption, enabling you to secure your network effectively.
Learning Objectives
Lab Tasks
These are the tasks in the scenario below. If you are familiar with the Secure Firewall you may do these on your own, or for step-by-step instructions see below.
- Task 1 - Observe encrypted QUIC traffic passing the firewall
- Task 2 - Configure QUIC decryption for outgoing traffic protection (Key-Resign Decryption)
- Task 3 - Test Malware Protection in QUIC decrypted traffic
- Task 4 - Install a custom Snort rule detecting the EICAR string in an UDP flow
- Task 5 - Configure QUIC decryption for incoming traffic (Known-Key Decryption)
- Task 6 - Test Intrusion Prevention in QUIC decrypted traffic
Task 1 - Observe encrypted QUIC traffic passing the firewall
- From the Jumphost use the Quick Launch to connect to the WKST2 with Remote Desktop Protocol. Login as Administrator/C1sco12345.
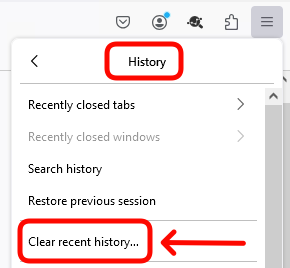
- Open Firefox browser and clear the cache in Application Menu > History > Clear recent history...
Use Firefox throughout the QUIC section
QUIC implementation varies between web browsers and affects firewall's decryption capabilities and user experience. Most notable caveat to be aware of, is the strict server certificate requirement of Chromium based browsers. These browsers switch to QUIC transport only when connecting to servers with certificates issued by a know certificate root (predefined trusted root Certificate Authorities). This behaviour affects the outbound protection use case
- Select Everything in the timespan and tick all options. Then click Clear button.

- Throughout this task you will be observing browser's network activity with Web Developer Tools. This helps you understand when the browser switches from HTTP/2 to HTTP/3 and what requests are sent to the server. After you enable QUIC decryption later in this section, you will be able to associate individual Firefox requests with QUIC streams recognized by the firewall.
Open Application Menu > More Tools > Web Developer Tools.
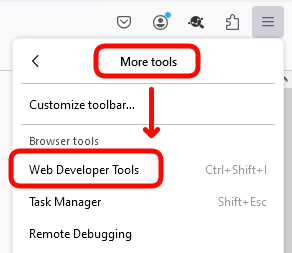
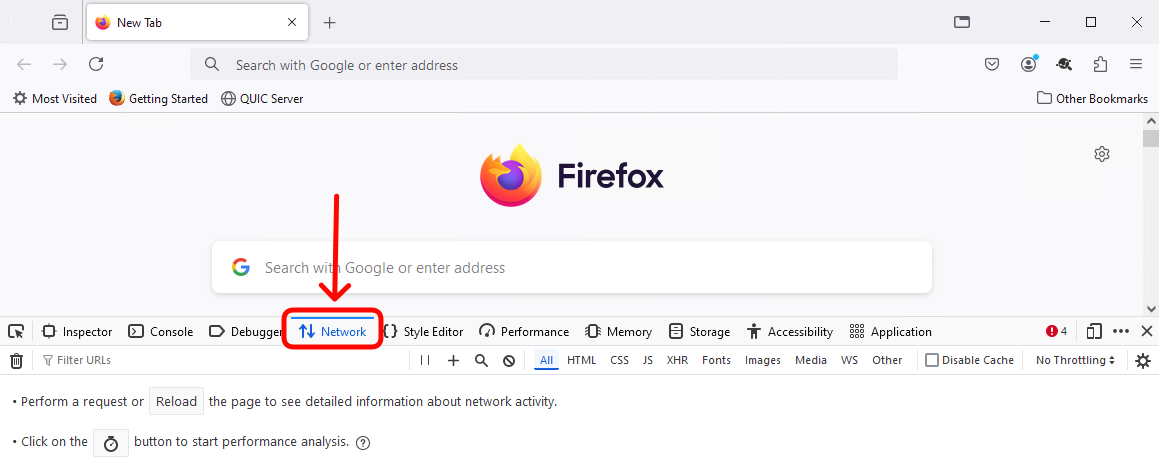
- In the Web Devloper Tools switch to Network tab.
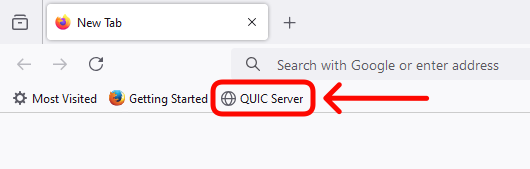
- Now connect to a QUIC server sitting behind the NGFW1 firewall. Click on the QUIC Server icon or type in https://quic-server.dcloud.local in the address bar.
- You should see a simple Web page with some graphics and links you will use later to test firewall security features in QUIC traffic.
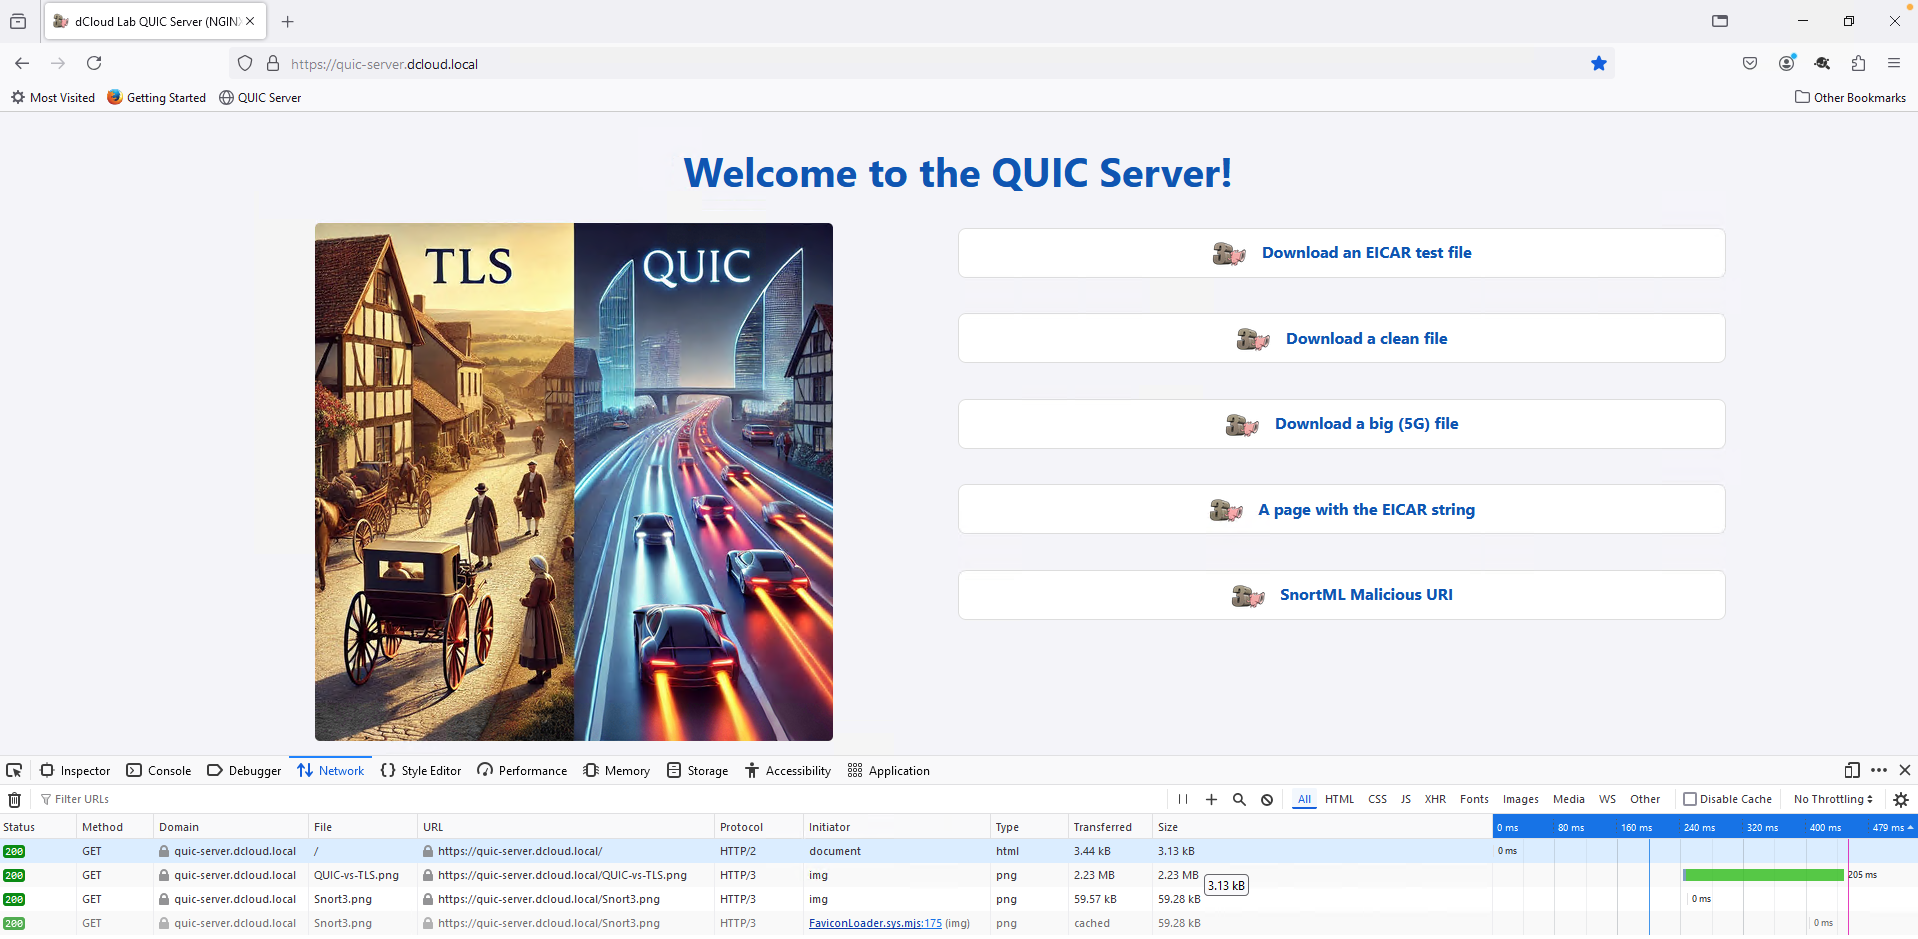
- Let's have a closer look at the network activity in the Web Developer Tools console.
Look at the first request logged in the Network tab. Notice that Firefox requested the html document using HTTP/2 protocol. HTTP/2 indicates this connection was transported over TLS.

If the Protocol column is not visible, right click on any column title and select the option.
- Click on this request and view the Headers tab on the right. Look at the Response Headers and notice the alt-svc header returned by the server. This informs the browser that the server is QUIC capable.

- Firefox switches over to QUIC transport and transmits the subsequent requests using HTTP3.

Notice we have a simple scripted "keep alive" mechanism on our QUIC server page to keep session up.
- Now try to download an EICAR test file and see how it gets under the radar being encrypted inside QUIC. Clear the log in Web Developer Tools.
- Click on Download an EICAR test file.
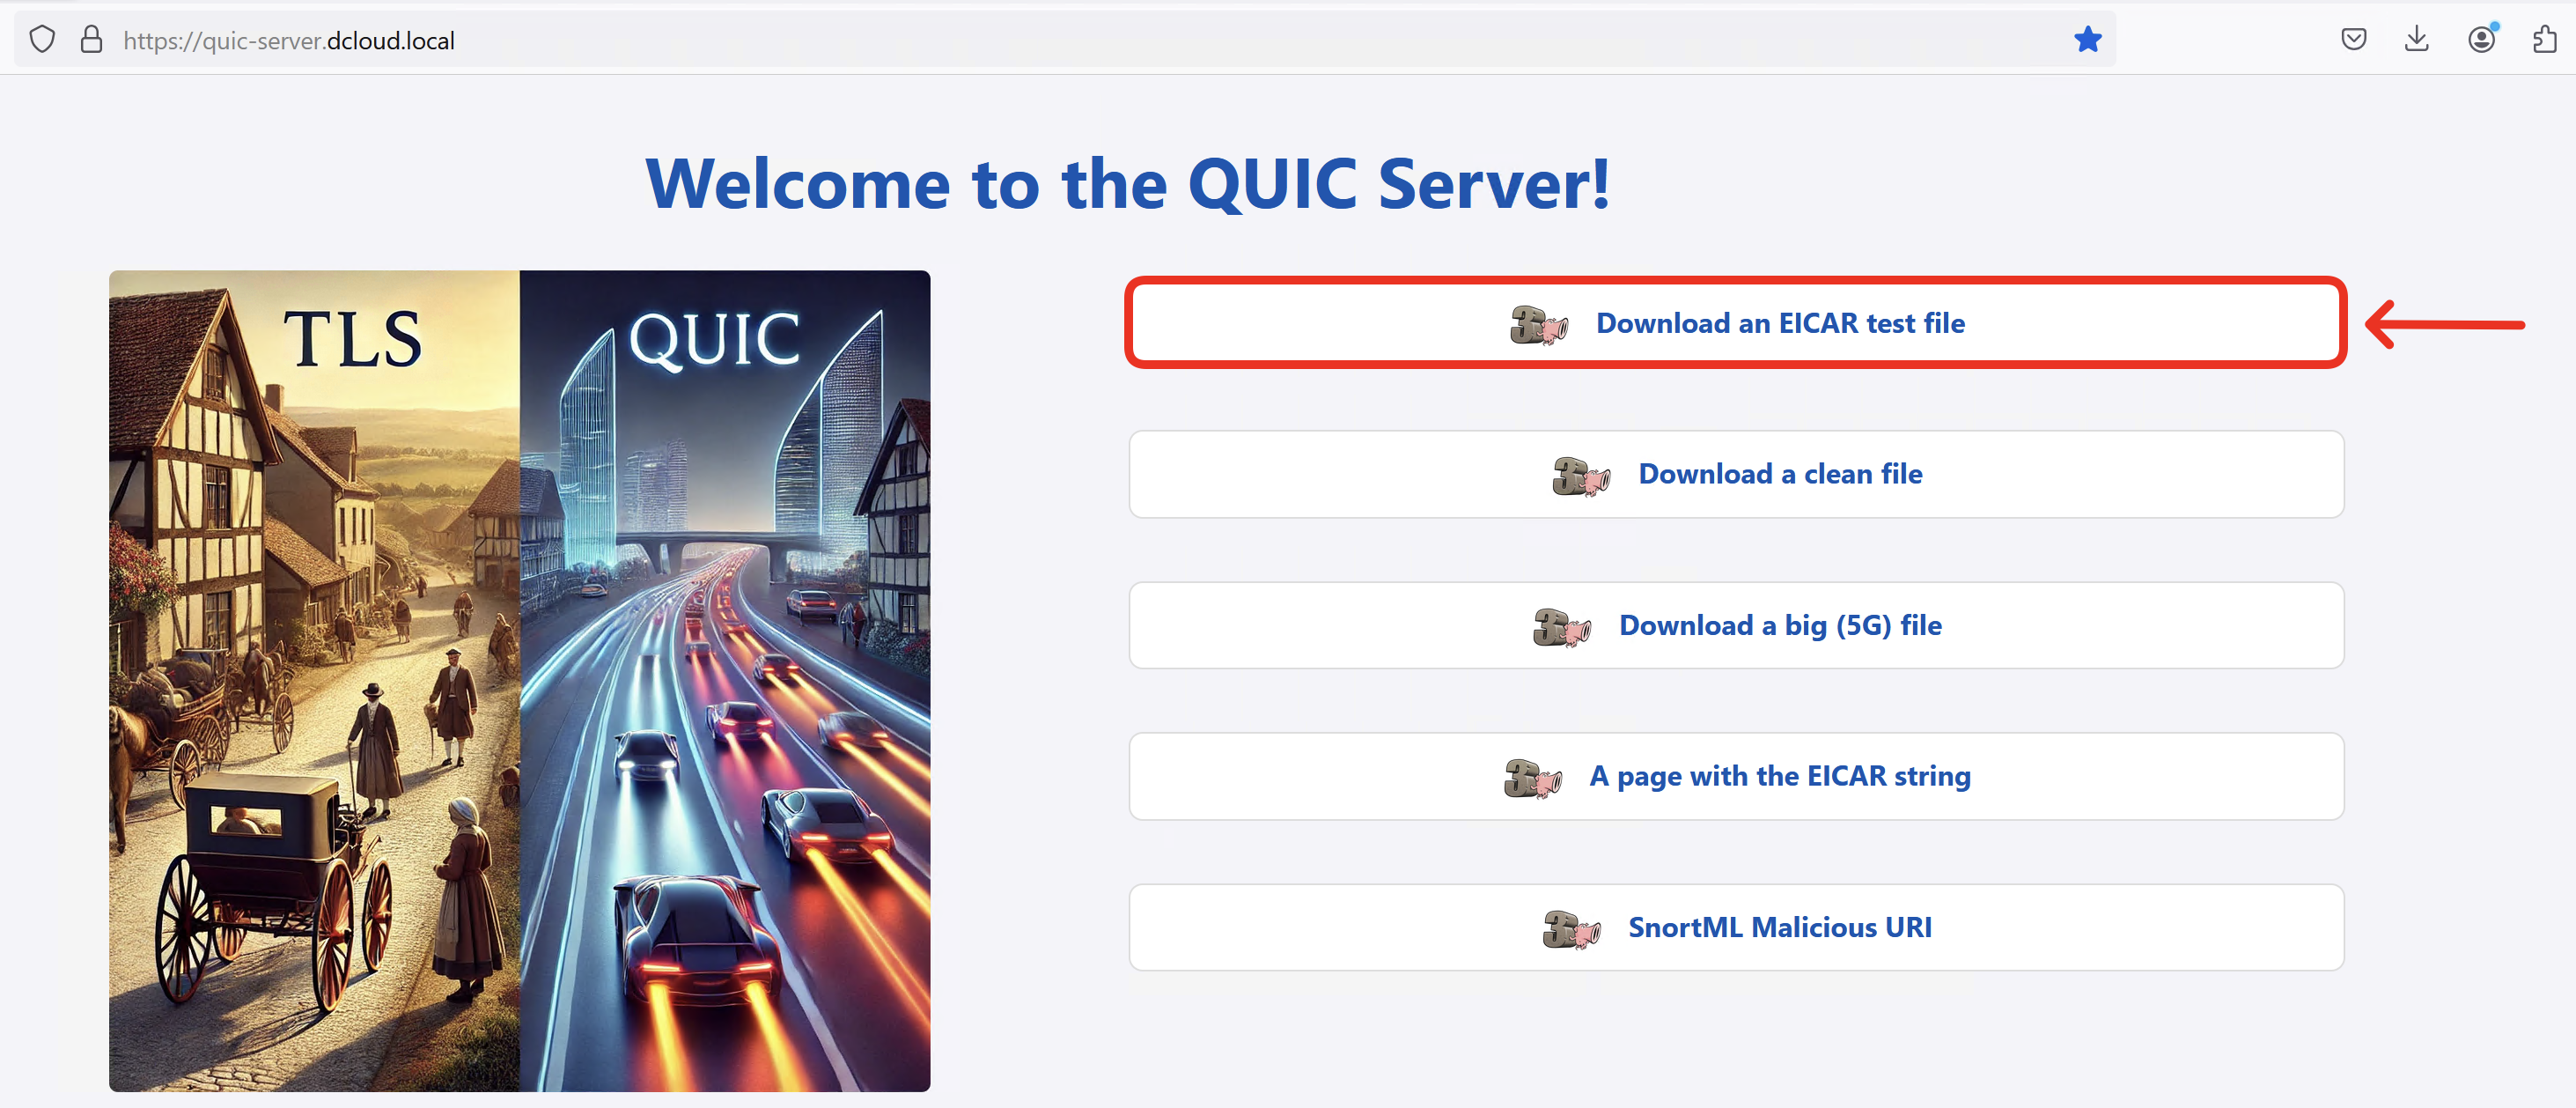
Notice the download succeeds and the malicious file gets through to WKST2.

In the Web Developer Tools confirm the file is transmitted over QUIC (HTTP/3).

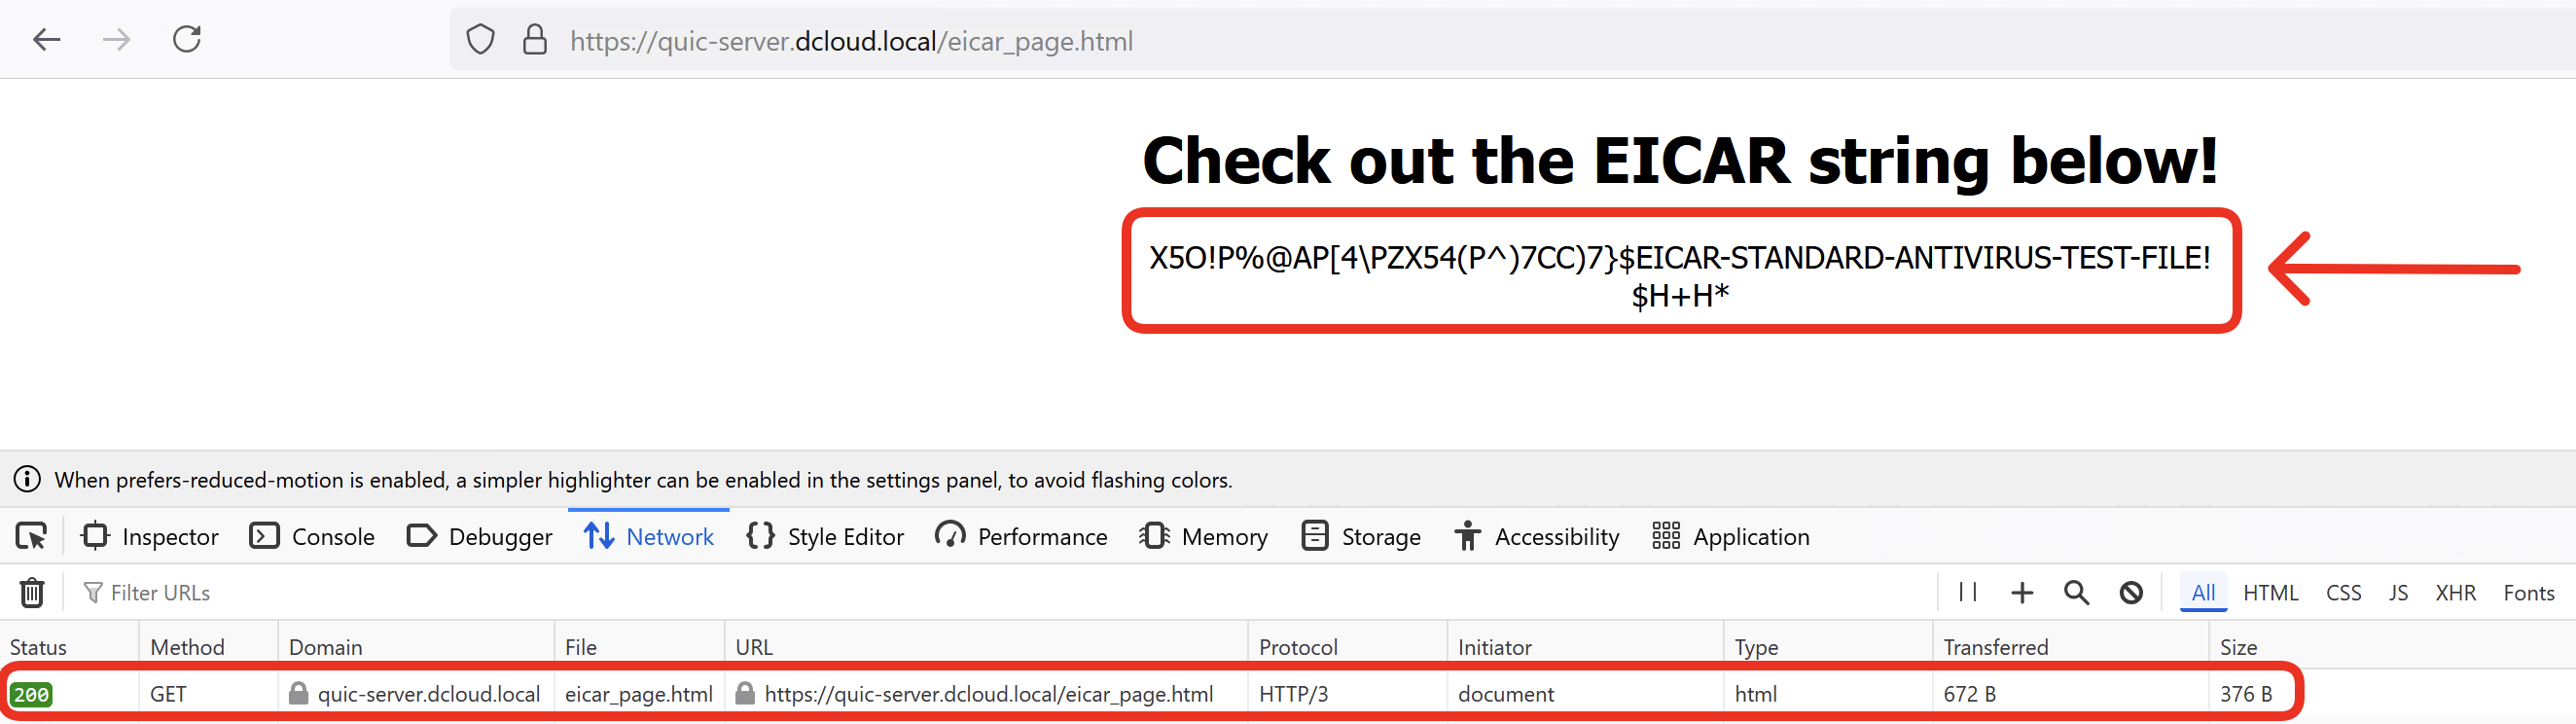
- Clear the Web Devloper Tools log and click on A page with the EICAR string to prove the Intrusion Prevention protection has no visibility inside QUIC.
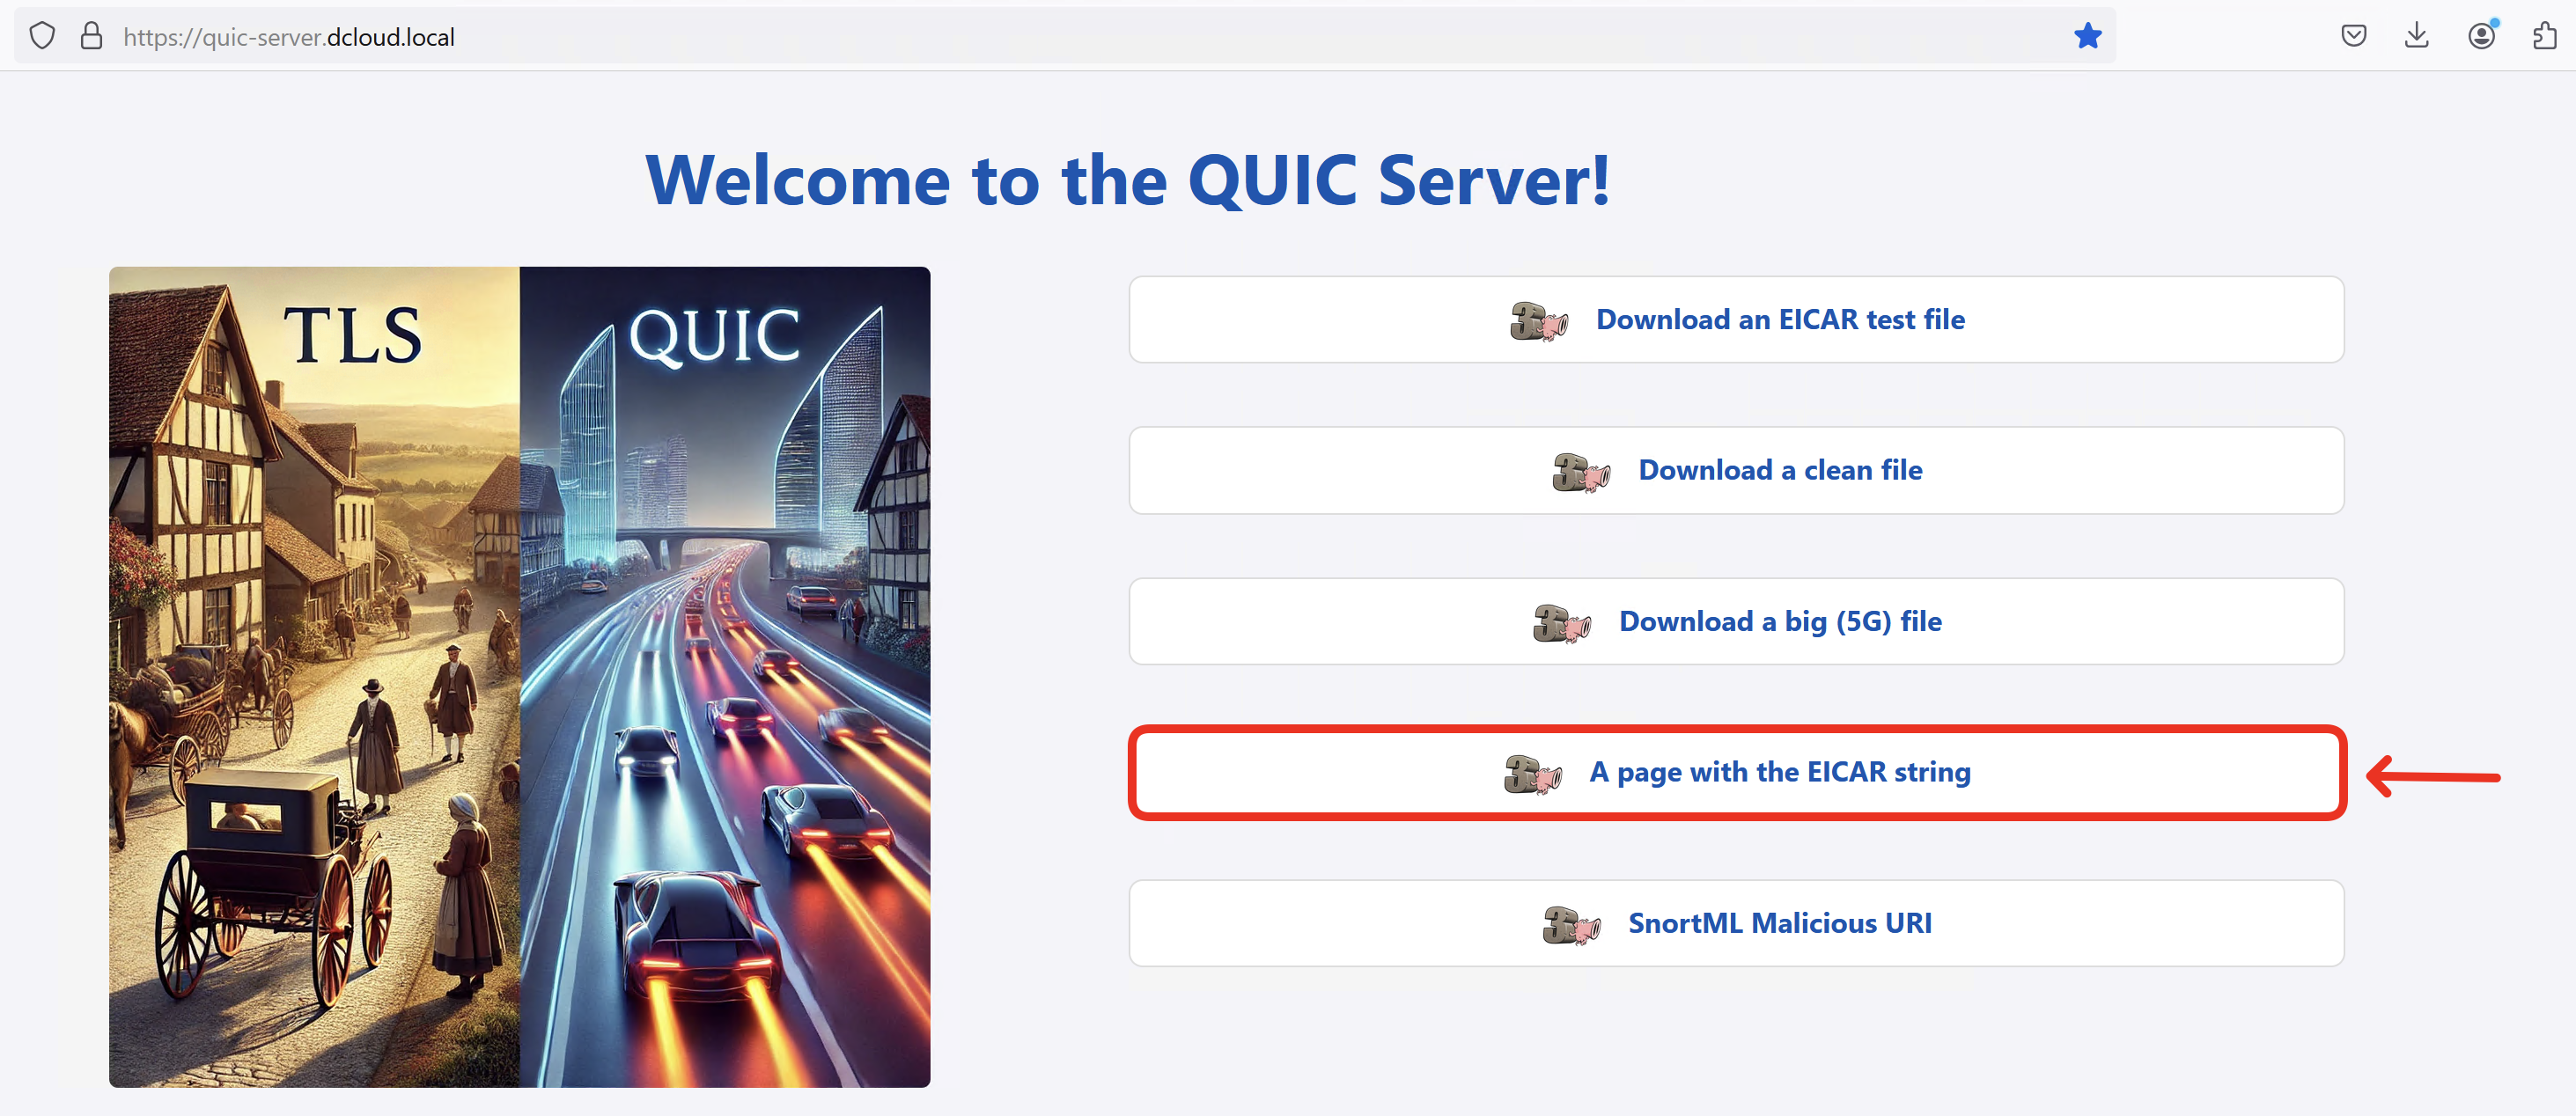
You should see the page with the EICAR string displayed. Confirm the page is loaded with QUIC and HTTP/3.
- Before reviewing the QUIC traffic in the Firewall Management Center close the Firefox browser.
Without QUIC decryption the firewall has no visibility into the state of QUIC session. The connections you observed in Web Developer Tools in previous tasks, are opaque to the intermediate devices. For the firewall, all QUIC messages exchanged between Firefox and the QUIC server, are visible as an UDP connection.
Close the Firefox browser
In order to see the QUIC connection log, you need to wait 120 seconds until the corresponding UDP session times out. The firewall is configured to record a log after the connection is closed. Contrary to TCP/TLS session, the QUIC connection termination is not exposed in clear text, hence the log on the firewall is recorded after default UDP connection timeout of 2 minutes.
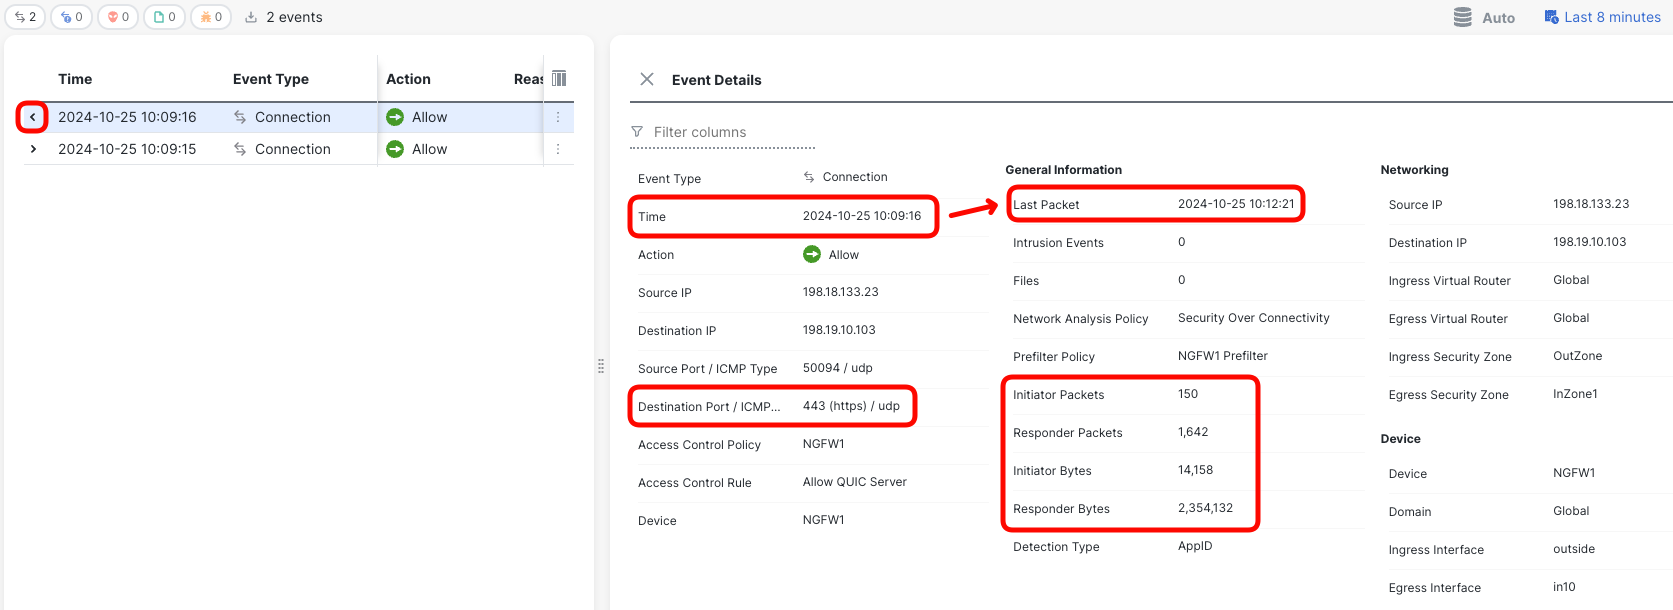
- Once you closed the Firefox browser, open the Firewall Management Center and navigate to Analysis > Unified Events:
- Set a filter to match connections to the QUIC server: Source or Destination IP = 198.19.10.103
- Change the display time to Sliding Time Range and select number of past minutes to display
- In the logs you should see at least one TCP and one UDP connection from WKST2 to the QUIC server.

- The TCP connection corresponds to the initial HTTP/2 request you observed in Step 7. This is when Firefox received the alt-svc header informing the server supports HTTP/3 protocol.

- The subsequent UDP connection is the QUIC session you observed in the Web Developer Tools. Notice that all requests exchanged within this session, the EICAR file and the page were exchanged in this one single UDP connection, completely opaque for the firewall.

- Click on the small arrow icon in the first column of the connection to display the details.
Task 2 - Configure QUIC decryption for outgoing traffic protection (Key-Resign Decryption)
In this task you set the firewall to decryption decrypt and inspect QUIC traffic between WKST2 and the QUIC server:
- You will enable experimental QUIC decryption
- Configure decryption rules to:
- Decrypt TLS and QUIC traffic towards the QUIC server with key-resign method
- Not decrypt QUIC for any other traffic
- Associate decryption policy with Access Control Policy on NGFW1
- Enable IPS and malware protections for decrypted traffic
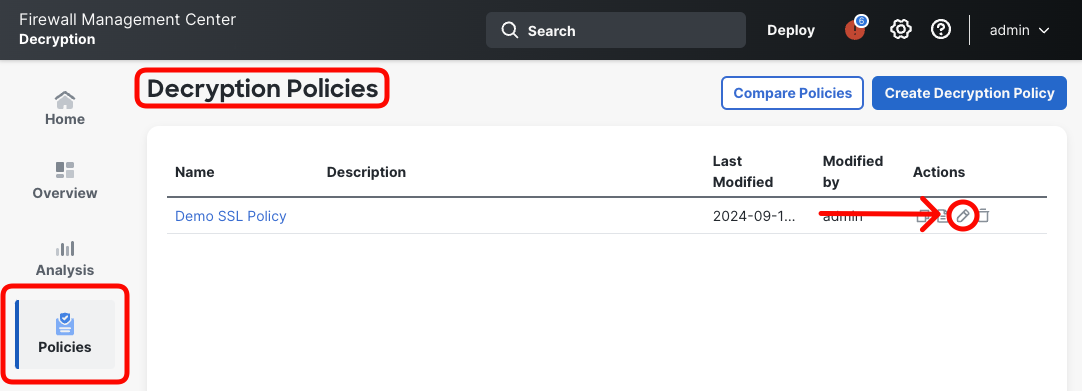
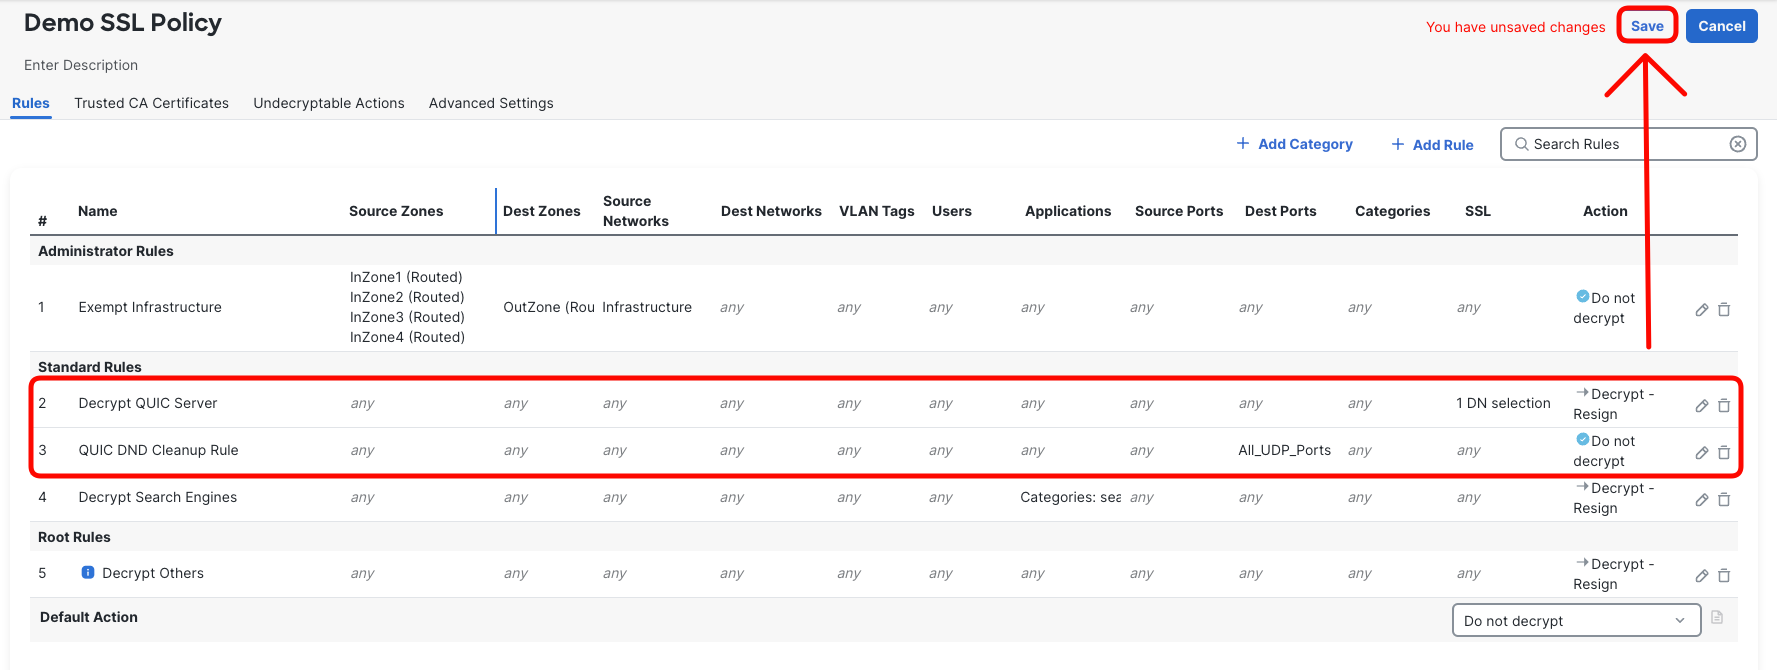
- In FMC navigate to Policies > Decryption and edit Demo SSL Policy.
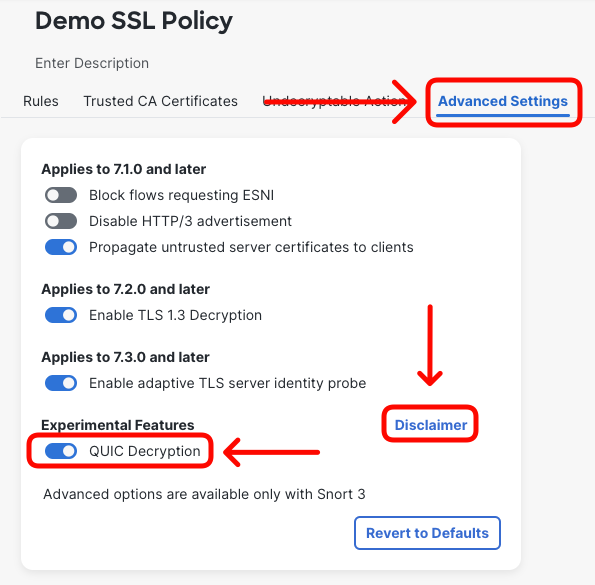
- Switch to Advanced Settingstab and notice QUIC Decryption in the Experimental Features section. Click the slider to enable QUIC decryption.
QUIC decryption in 7.6 release is considered an experimental feature
Please click on the Disclaimer note for more details.
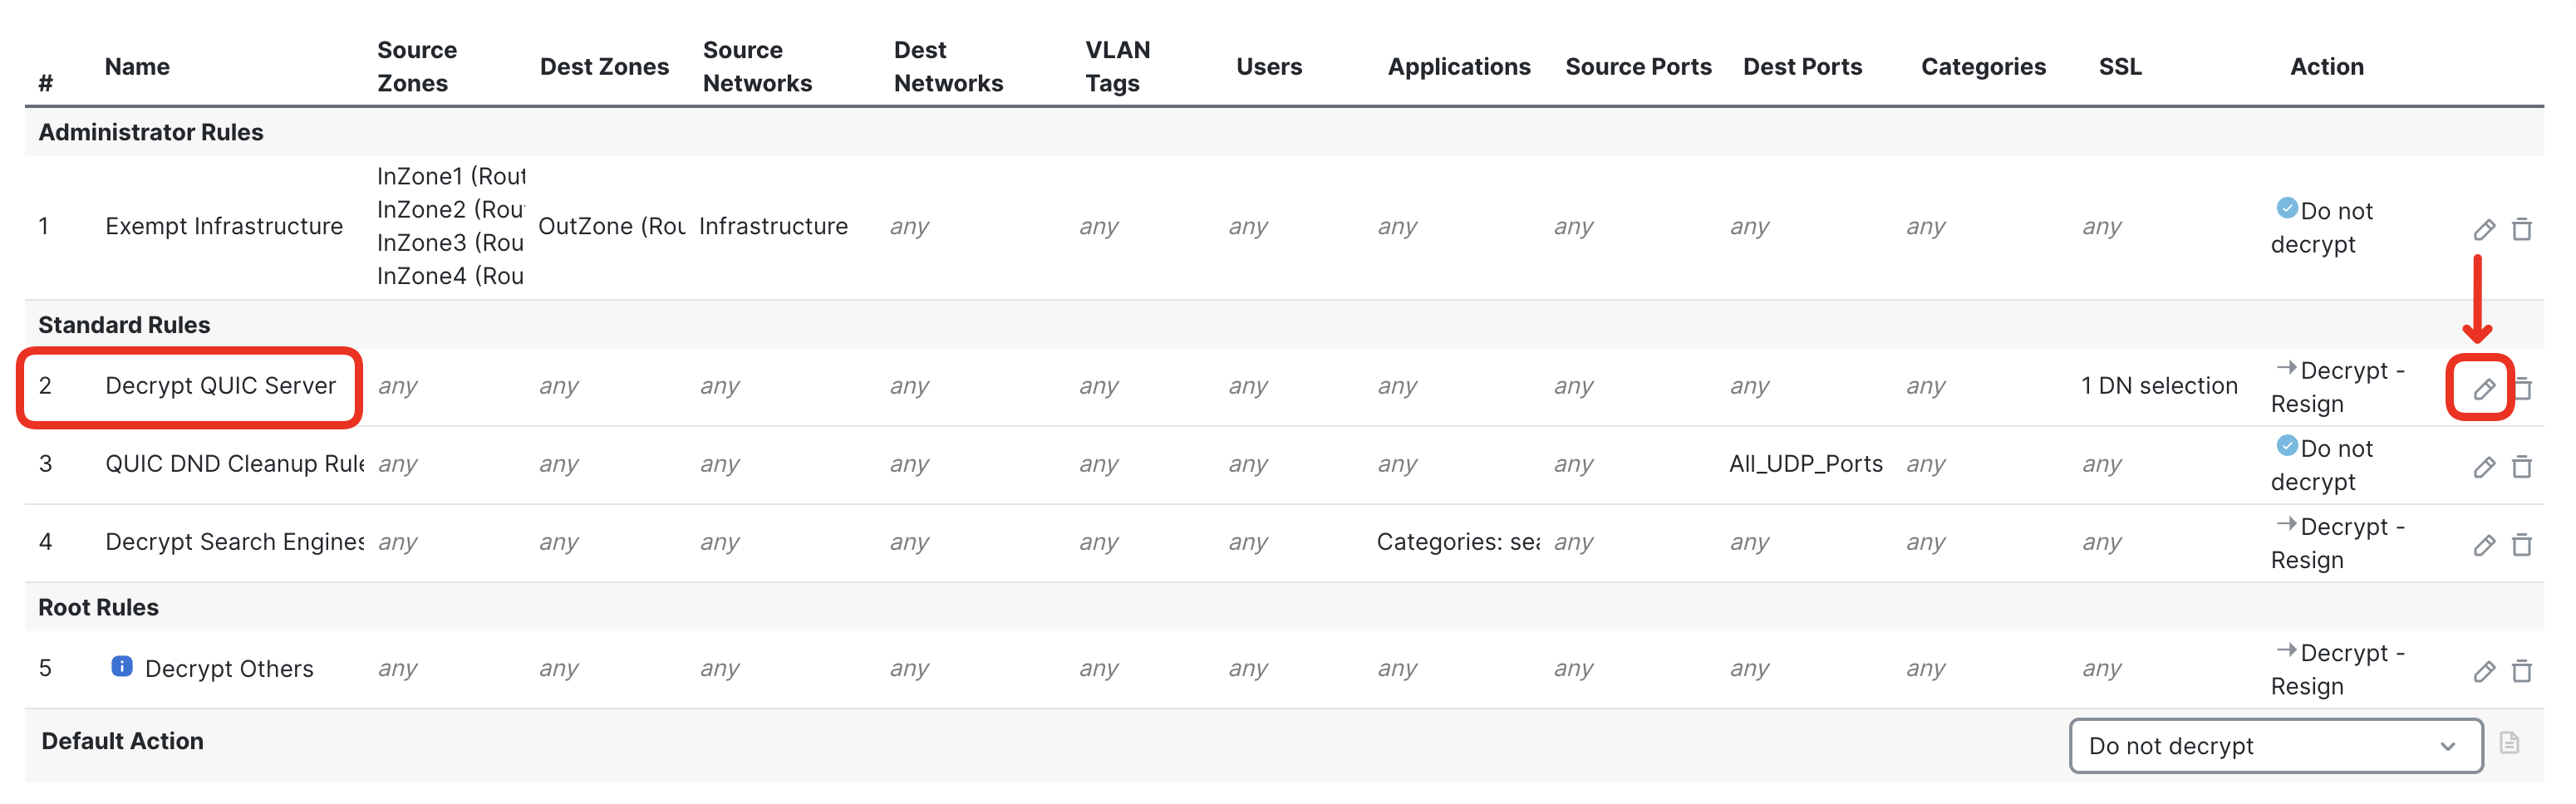
- Switch to Rules tab and click + Add Rule.

- Configure the rule to decrypt traffic destined to the QUIC server. Set following:
- Name: Decrypt QUIC Server
- Insert: Above Rule 2

- In the Action section select Decrypt - Resign with TLS_Decrypt_SubCA.

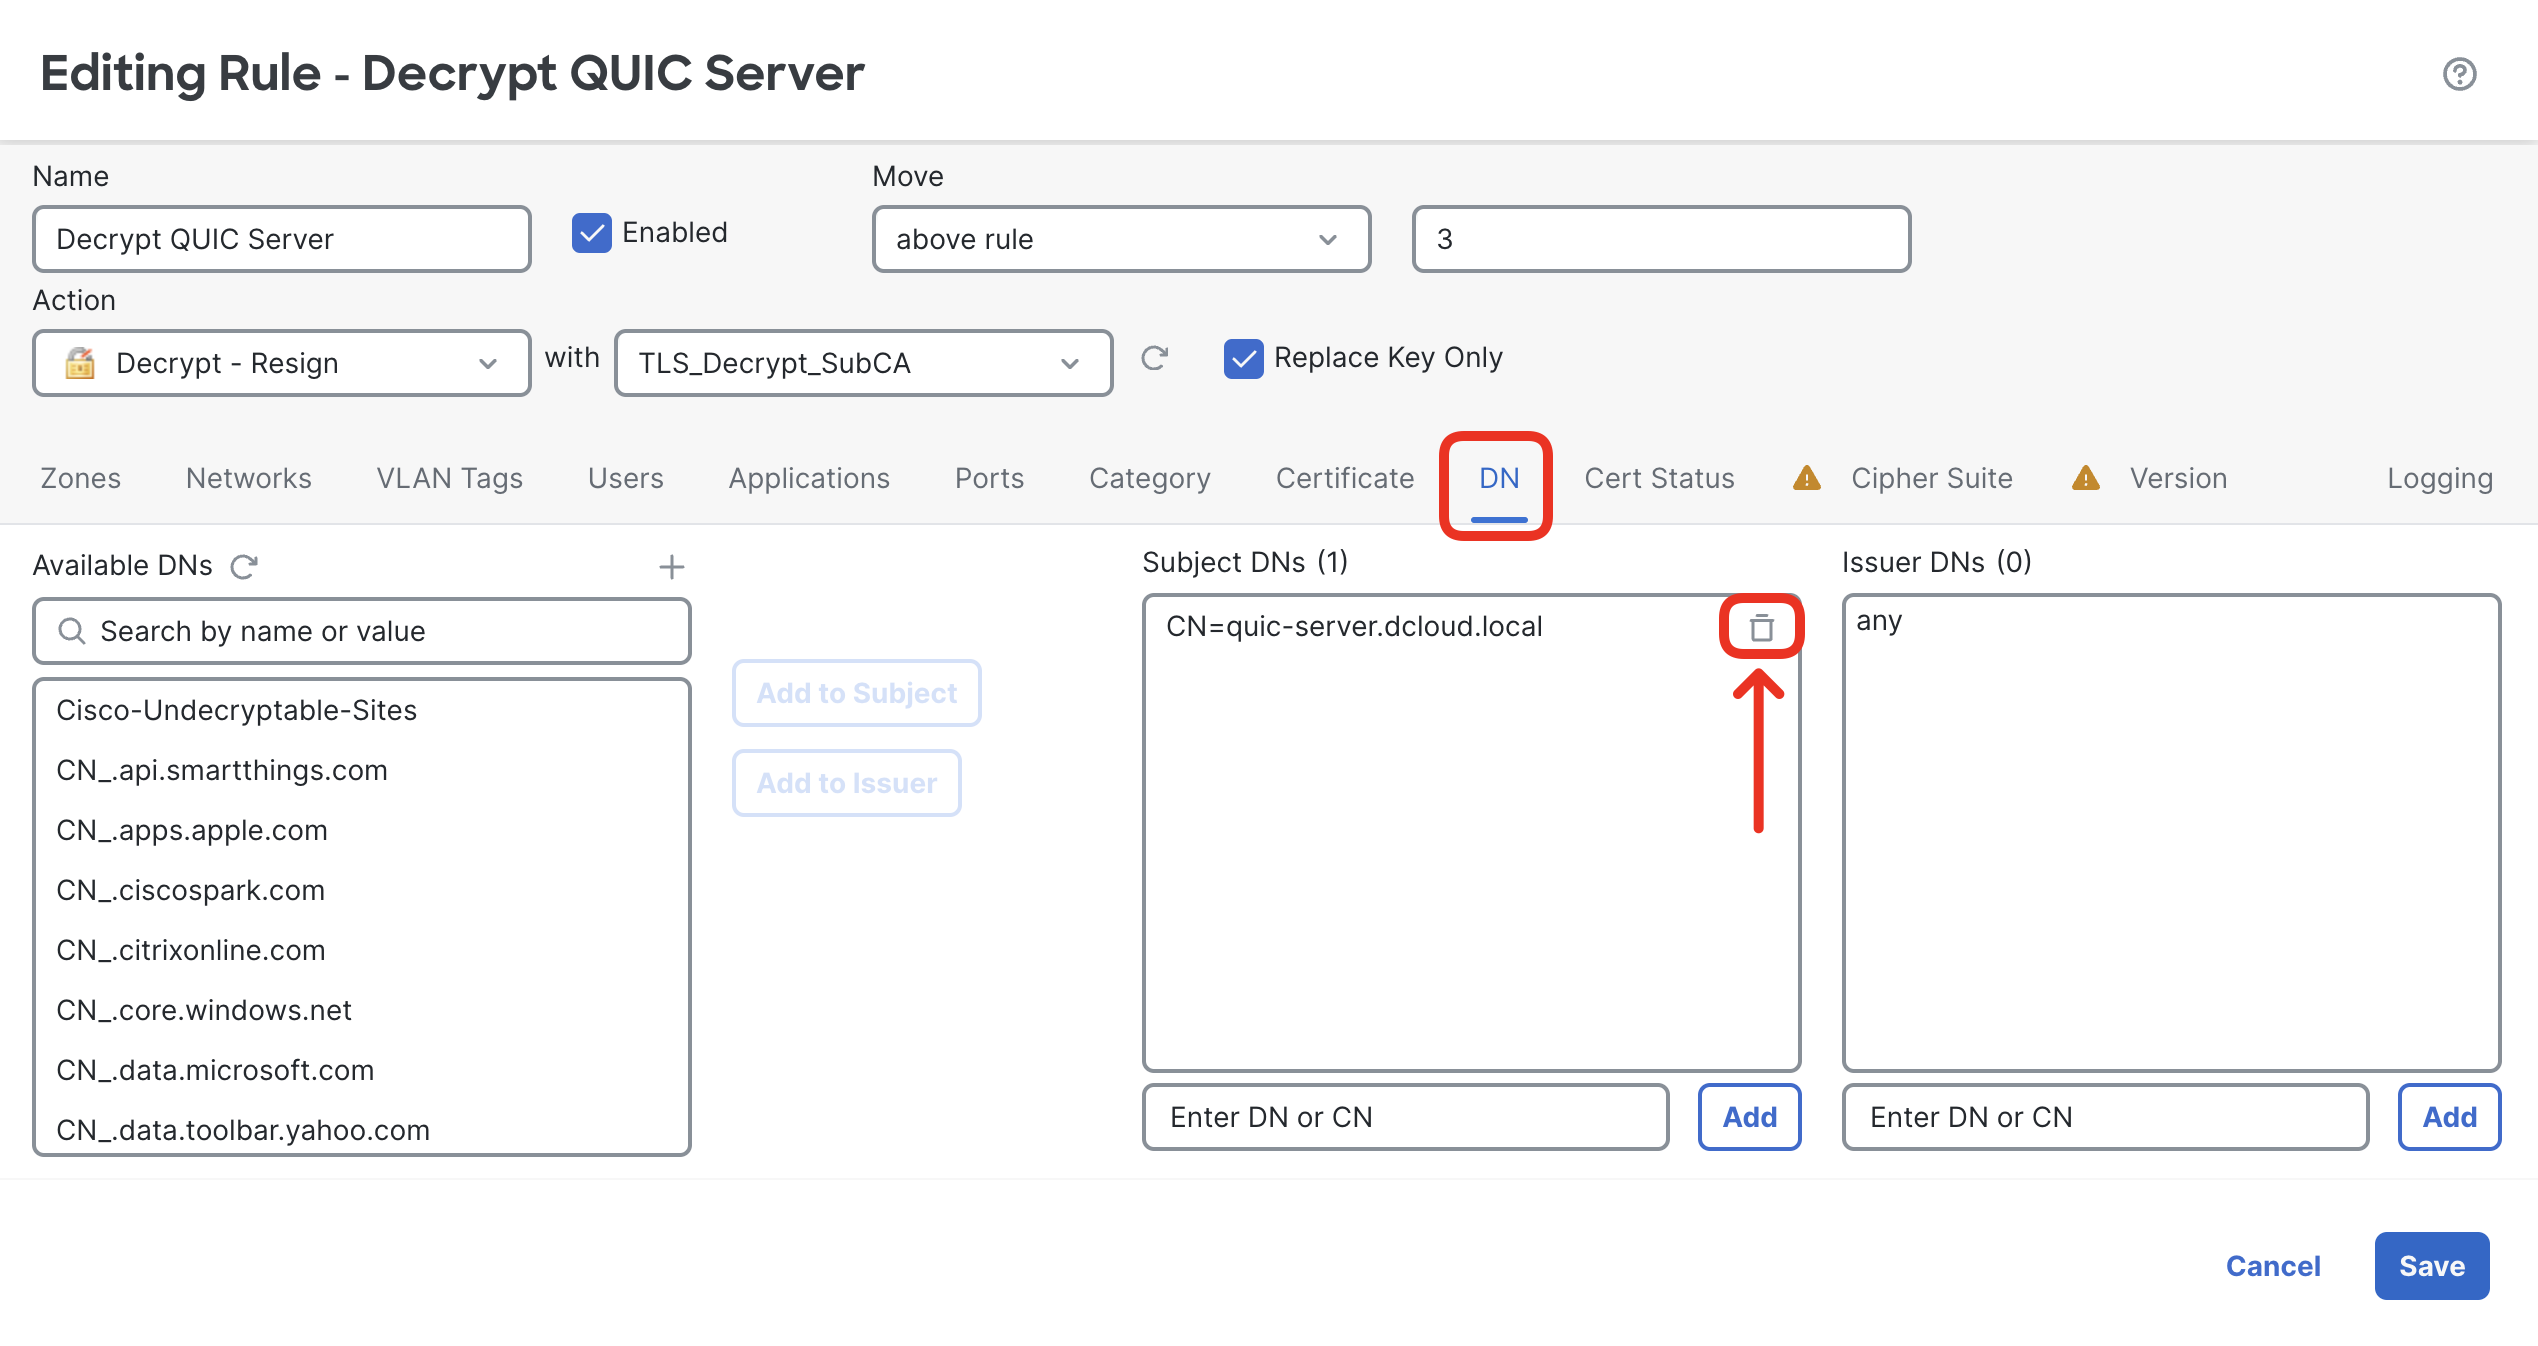
- Switch to DN matching criteria tab, and type in quic-server.dcloud.local in Subjects DNs.
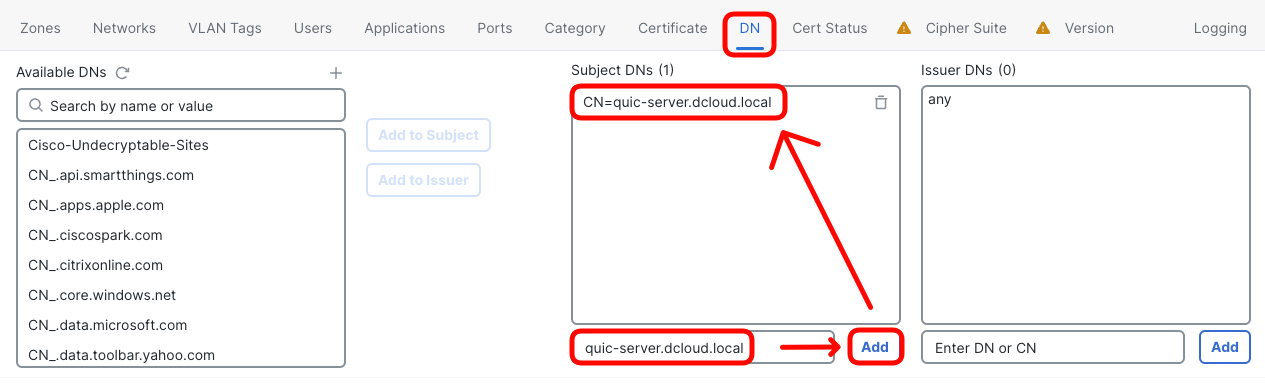
- Click Add and ensure the CN=quic-server.dcloud.local appears correctly.
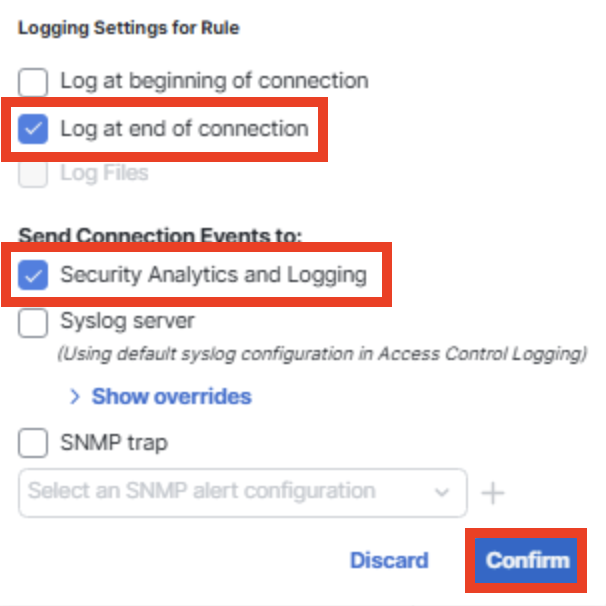
- Switch to Logging tab and select Log at End of Connection.

- The rule is ready. Click Add to finish the dialog.
- Now, configure a "cleanup" rule to not apply QUIC decryption to any other traffic. Remember, QUIC decryption is an experimental feature, therefore ensure to limit your testing to specific targets.
Click + Add Rule and configure as follows:- Name: QUIC DND Cleanup Rule
- Insert: Below Rule 2
- Action: Do not decrypt

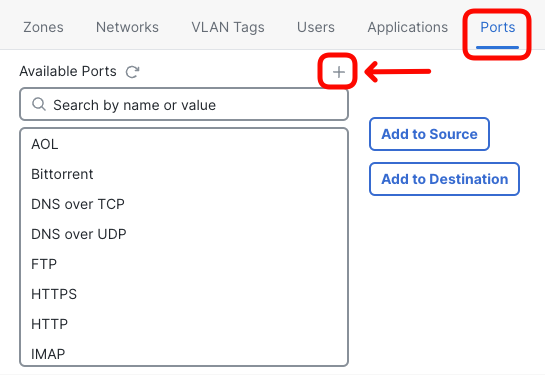
- Switch to Ports matching criteria tab, and click + sign to add a new port range object.
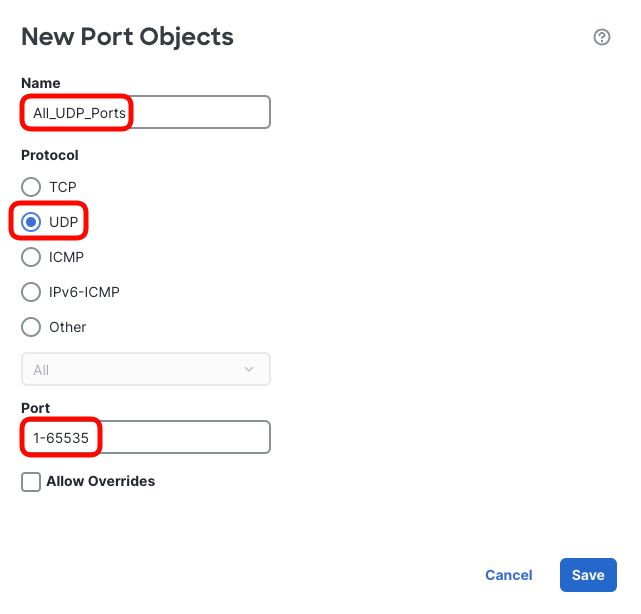
The purpose of this object is to match connections to all UDP ports. QUIC protocol may run on arbitrary port indicated by the QUIC server in the alt-svc header (refer to Step 8 in previous task to check what UDP port was provided by the QUIC server in our setup).
Configure the object as follows and click Save:
- Name: All_UDP_Ports
- Protocol: UDP
- Port: 1-65535
- Back in the rule setup, select the newly configured All_UDP_Ports object and Add to Destination.
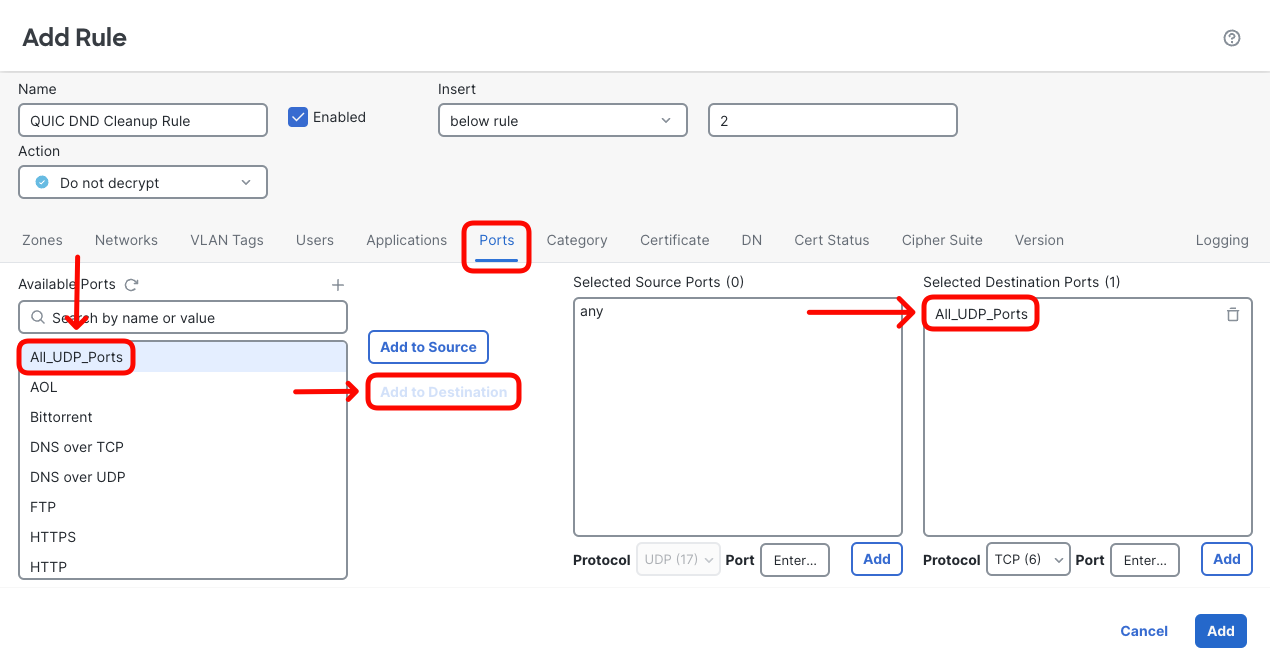
- Confirm the rule is configured as per screenshot above and click Add.
- Review your two new rules in the Demo SSL Policy and save the policy by clicking Save.
-
Now we'll be creating a Malware & File Policy
-
From the FMC UI navigate to Policies -> Malware & File
Click the New File Policy button.
Name your policy Block Malware and click Save -
Click + Add Rule to add a new rule.
Change the action to Block Malware
Enable all the options:- Spero Analysis for MSEXE
- Dynamic Analysis
- Capacity Handling
- Local Malware Analysis
- Reset Connection
Check the box against File Type Categories which will select all the File Type Categories, then click All types in selected Categories in the File Types list and click the Add button.
Note: we could have selected all the File Types and added them that way however, if a file type is added in a later release it would not be selected. By selecting all the File Type Categories any new future file types will also be included.
Your rule should look like the figure below.

-
Click Save to save the rule.
-
Note the File Rule notification window.
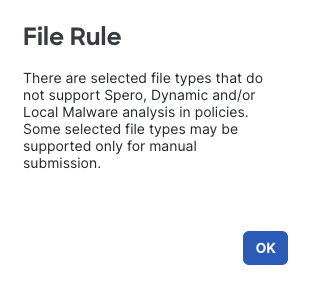
File Rule Notification
This is letting you know that the Dynamic Analysis and Local Malware Analysis options only work on specific file types, because your rule matches all file types those actions may not apply to all files.
- Now we will create a rule to block download of executable files via HTTP.
- Click + Add Rule again to add a new rule.
Under Application Protocol select HTTP
For Direction of Transfer pick Download
For Action pick Block Files
Check Reset Connection
Under File Type Categories check Executables
Under File Types select MSEXE and click the Add button
Your rule should look like the figure below.
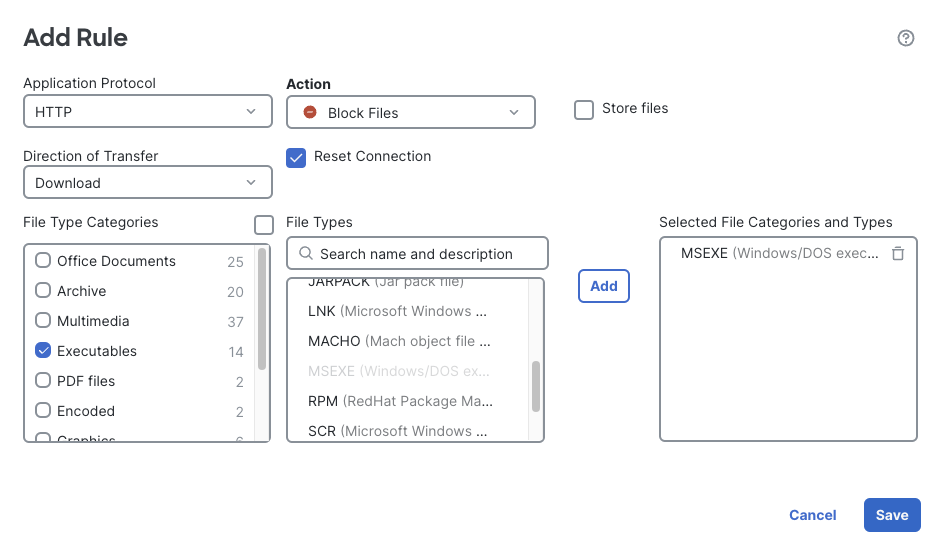
Click Save to save the rule.
-
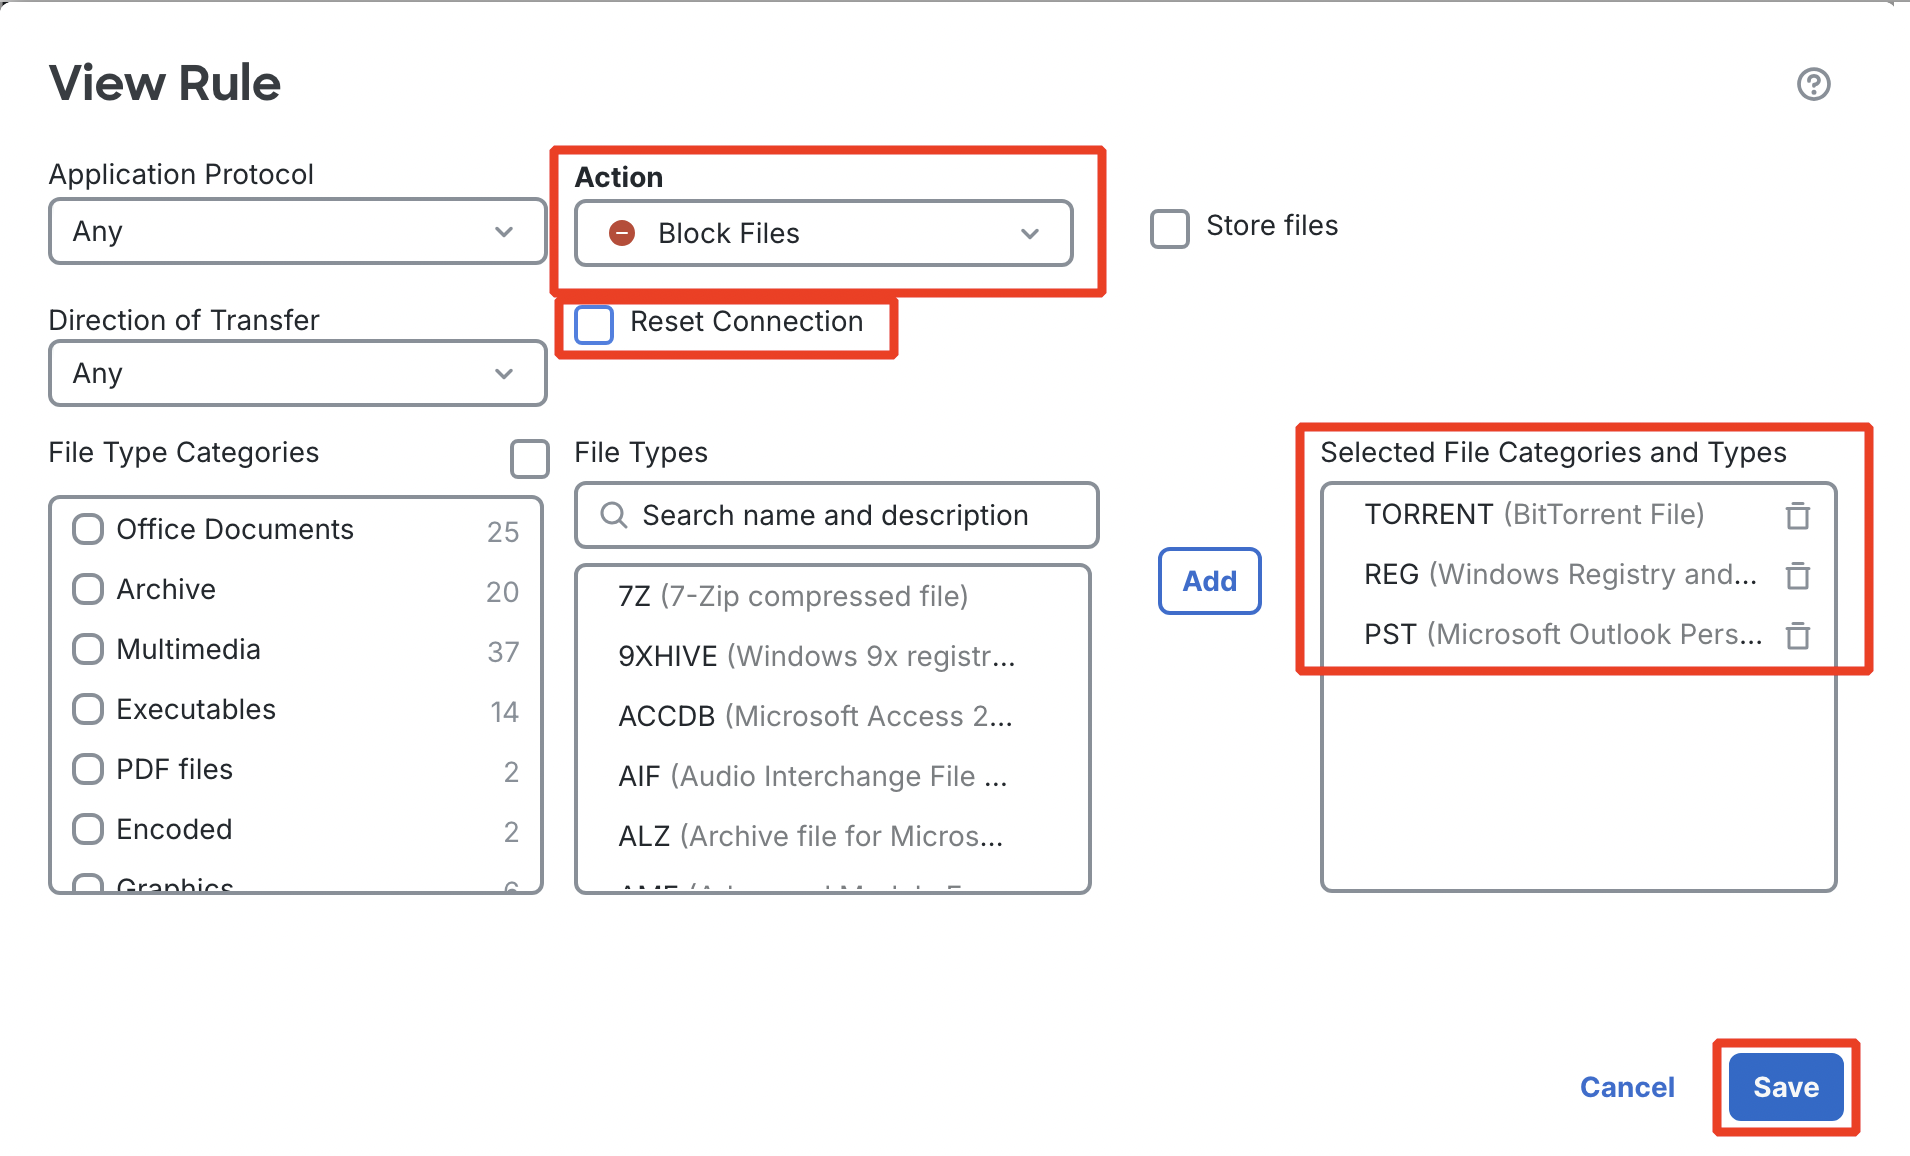
Click + Add rule.
Note
The firewall uses the concept of File Magic to detect a file type. File Magic is a Hex word in the beginning of every file that is unique for their type and respective version. Below are a few examples of magic numbers for common file types:
Portable Network Graphics (PNG): 89 50 4E 47 0D 0A 1A 0A
MS Outlook Personal Storage Table (PST): 21 42 44 4E
PDF Document (version 1.0): 25 50 44 46 2D 31 2E 30
PDF Document (version 1.7): 25 50 44 46 2D 31 2E 37
Set the action to Block Files and select three file types:
- REG (Windows Registry)
- TORRENT (BitTorrent File)
- PST (Microsoft Outlook Personal Storage)
Disable the Reset Connection checkbox. Click Save.
-
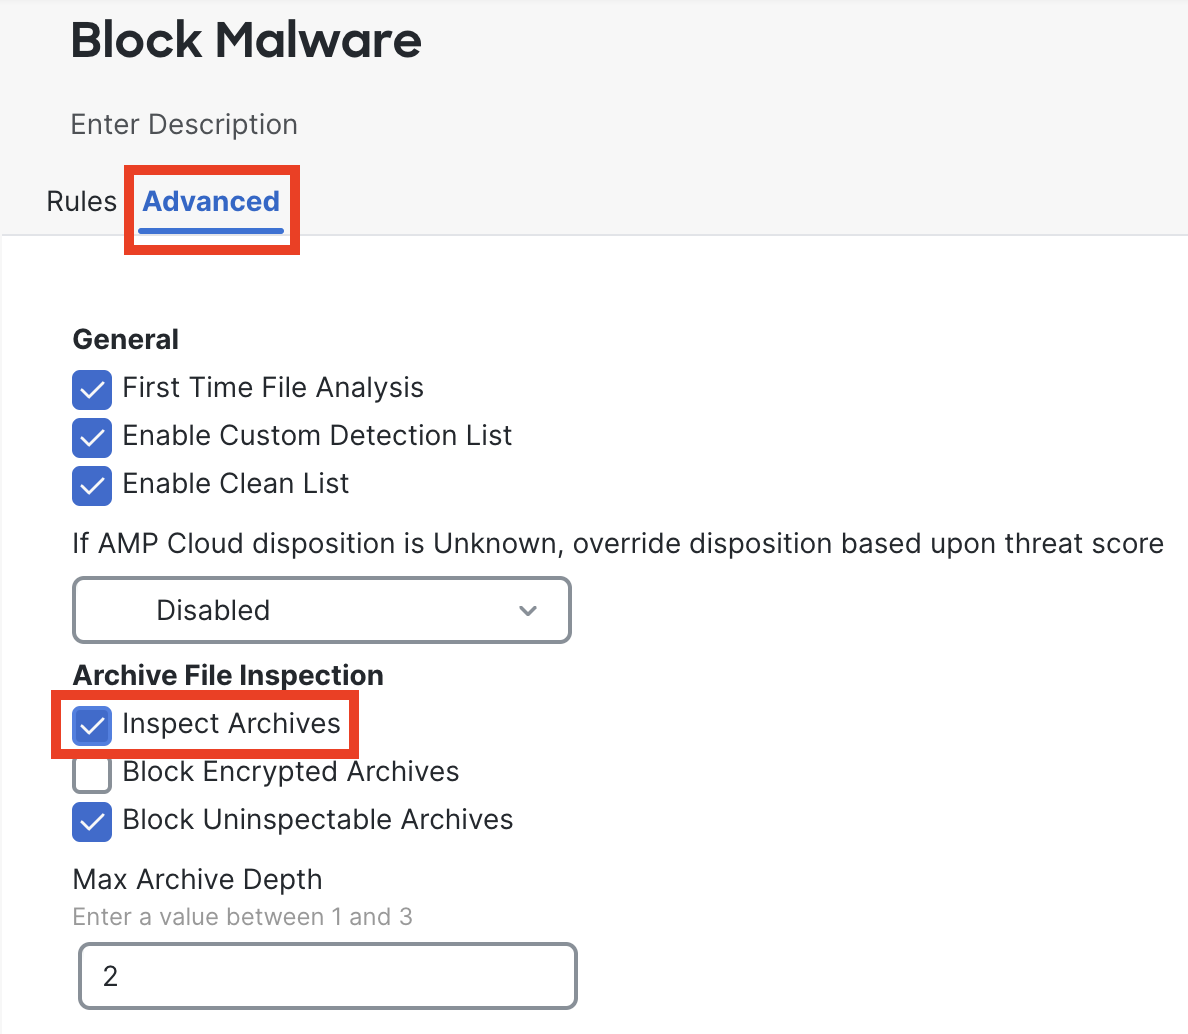
Click on the Advanced tab. Select Inspect Archives under Archive File Inspection. Ensure that the rest of the check-boxes are enabled as shown in the below screenshot.
-
Then click Save to save the policy
-
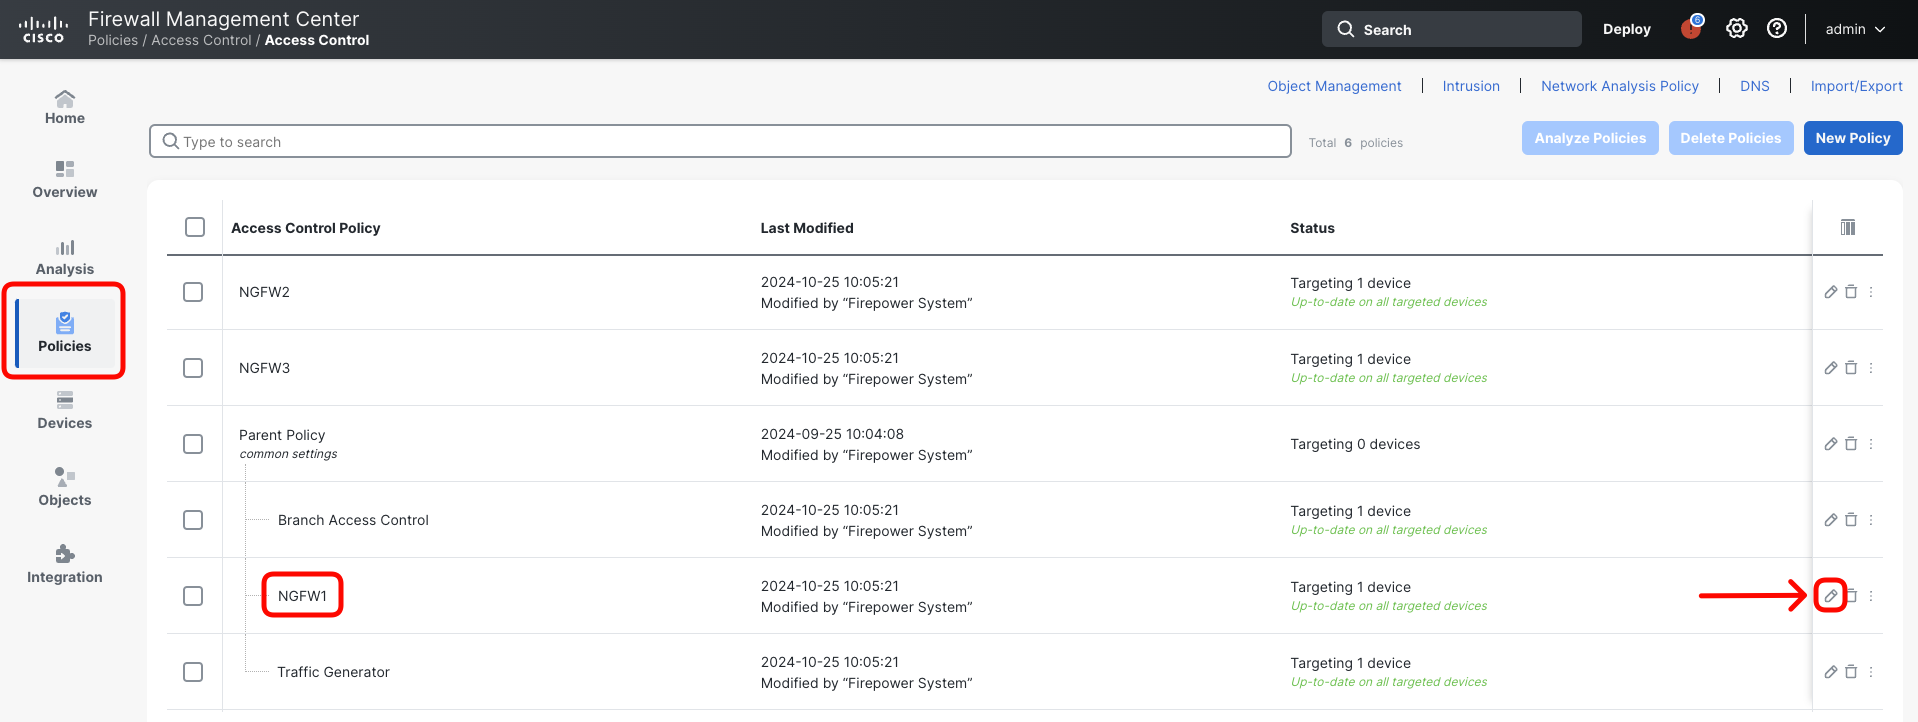
In the following steps you will associate the Decryption Policy, you've just modified with the Access Control Policy applied to NGFW1. Navigate to Policies > Access Control and edit NGFW1 policy.
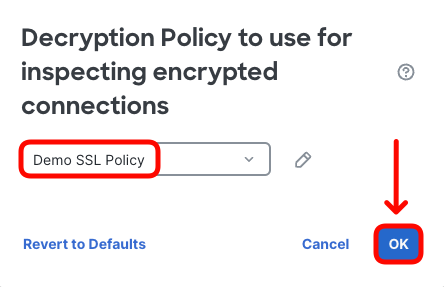
- Open Advanced Settings tab and edit the Decryption Policy Settings.

- Select Demo SSL Policy and click OK.
- Switch to Access Control tab to modify protections applied to QUIC server traffic.

-
Click on Add rule and create a rule with the following details and enable logging.
Name: Allow QUIC Server
Insert: into Default
Source Zone: OutZone
Destination Zone: InZone1
Logging Settings for Rule: Log at end of connection
Send Connection Events to: Security Analytics and Logging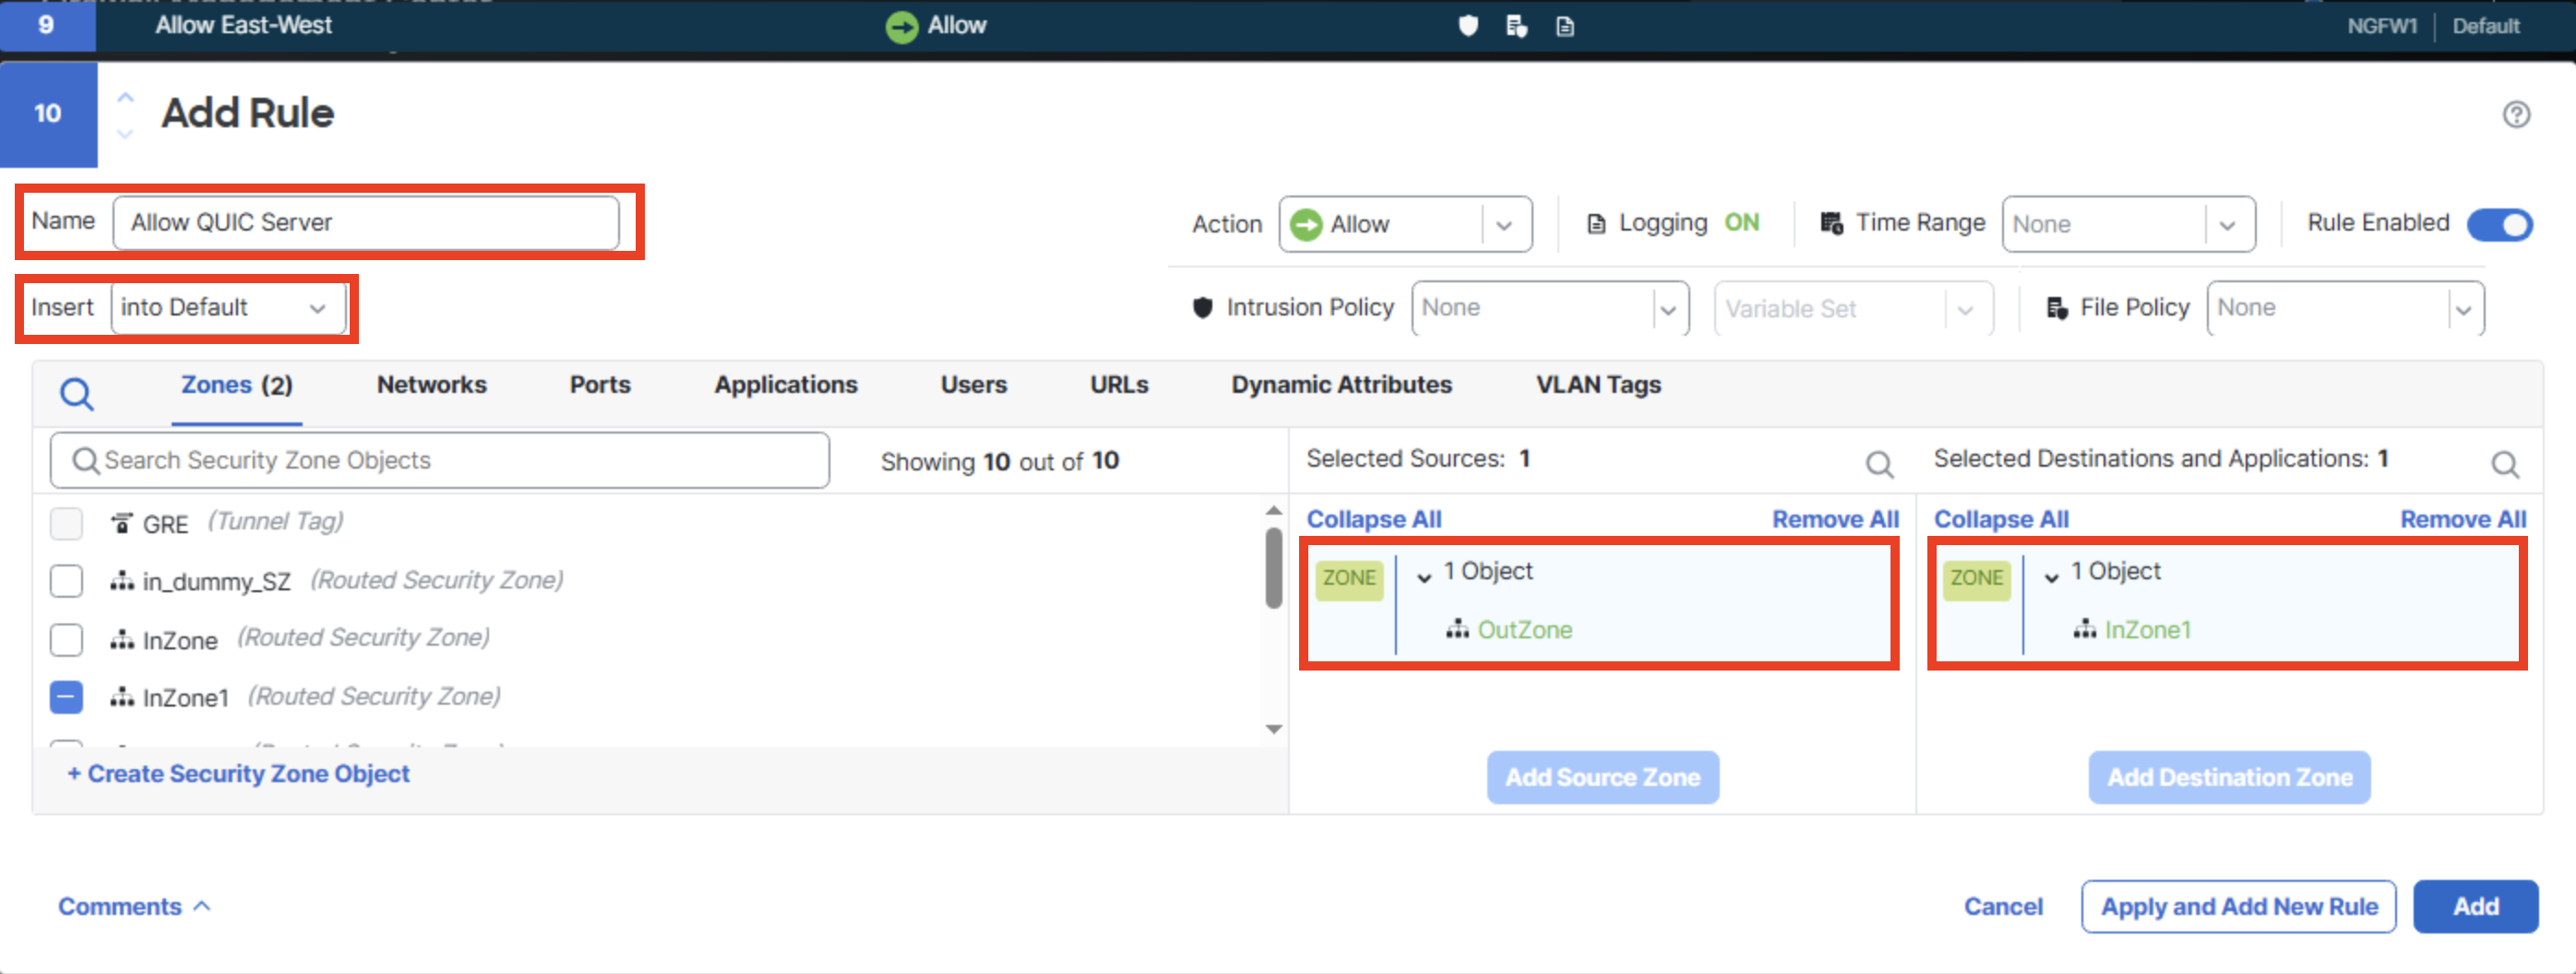
-
Under Networks set the following,
Source Network: OutsideWkst2
Destination Network: QUIC-Server
Then click on Add.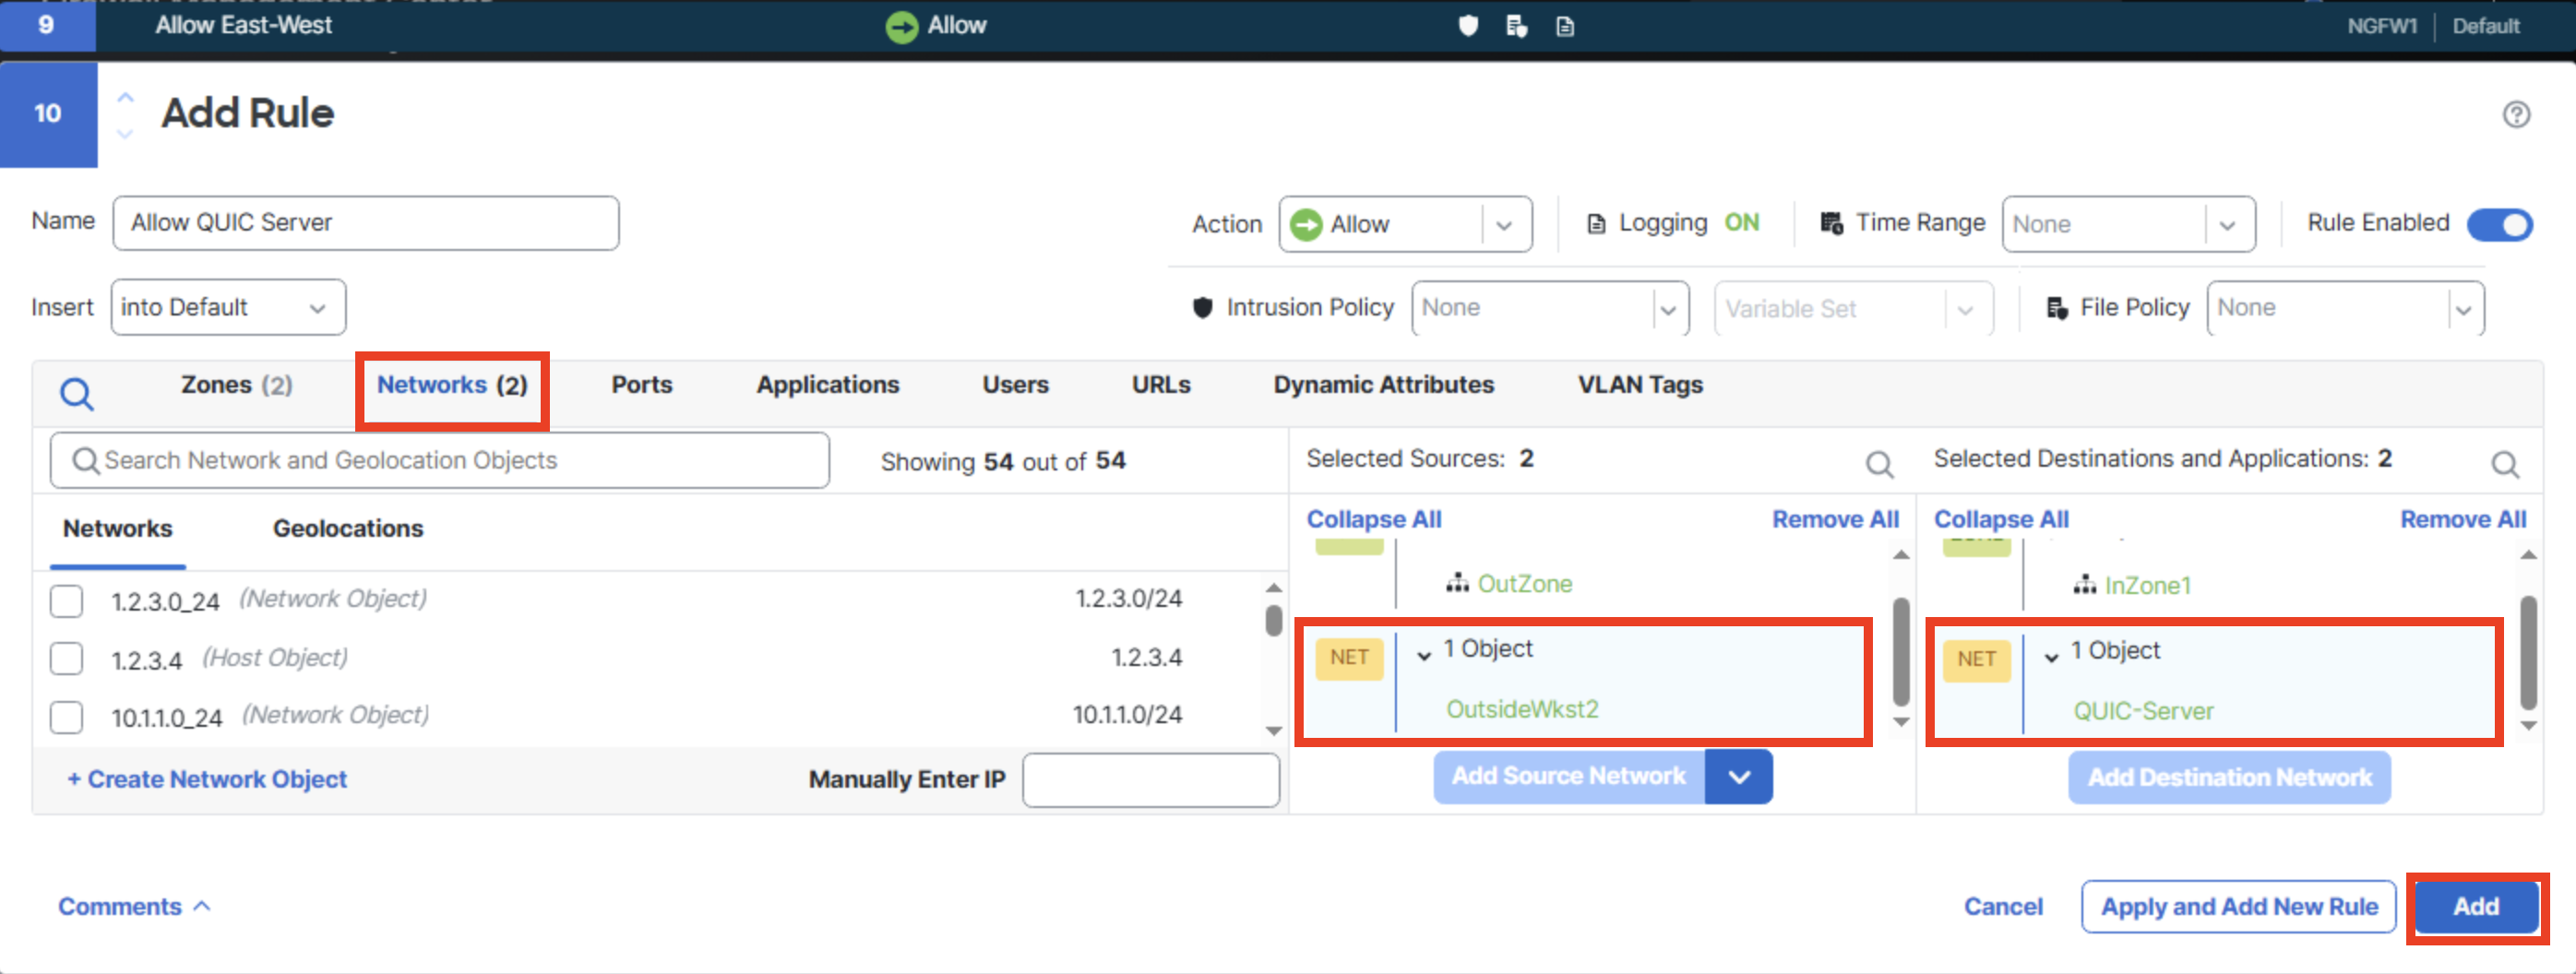
-
Find Allow QUIC Server and click on the shield icon in the Action column.
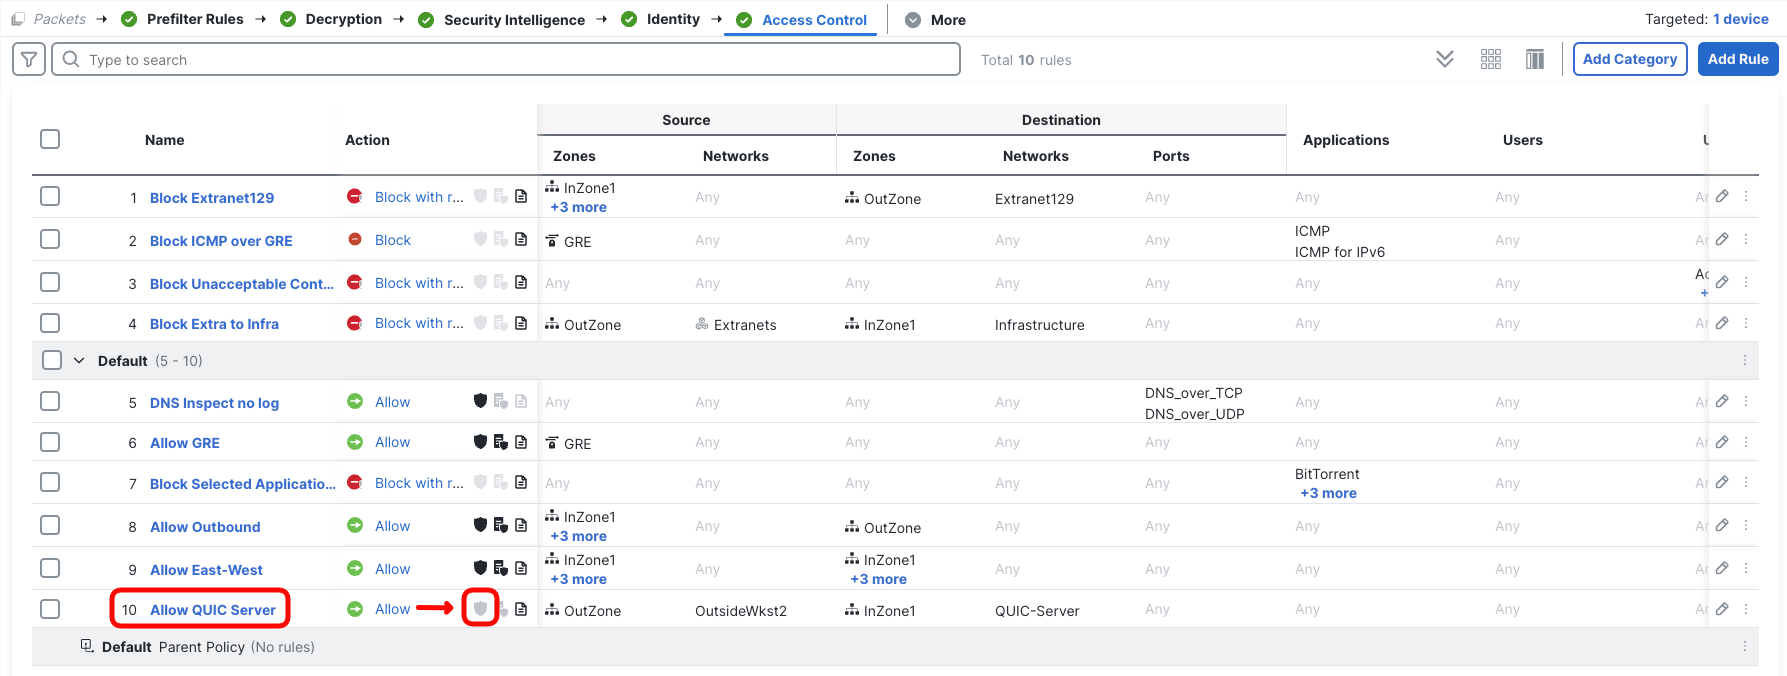
- In the pop-up, set dCloud Balanced Intrusion policy with Default-Set variable set. Click Confirm.

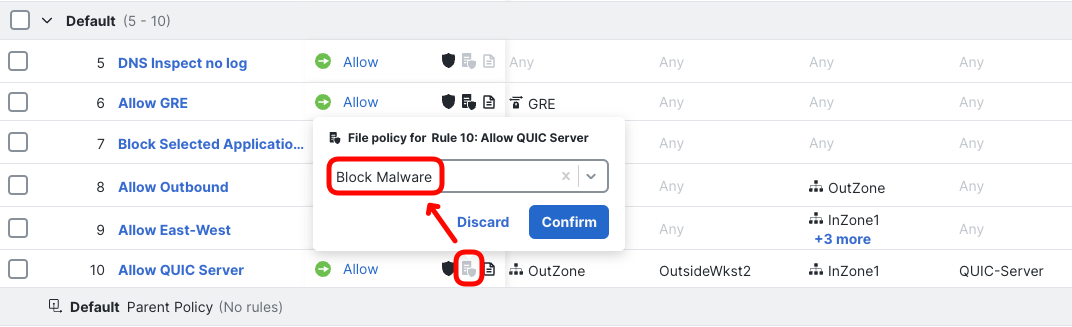
- In the same Allow QUIC Server rule, click on the file with small shield icon in the Action column. Select Block Malware file policy and click Confirm.
- Confirm your policy is configured as expected and click Save.
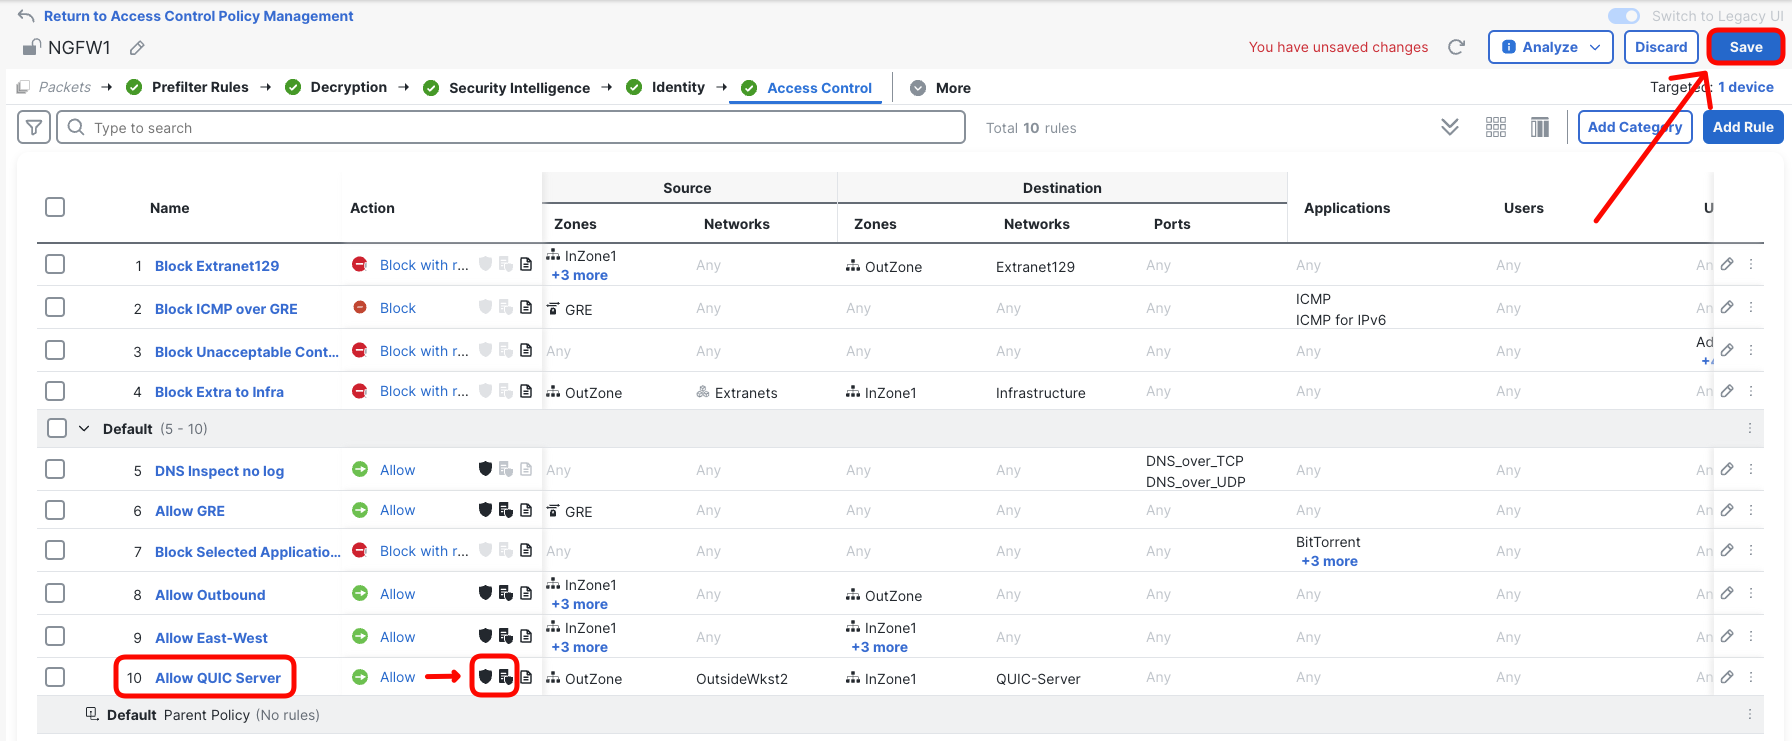
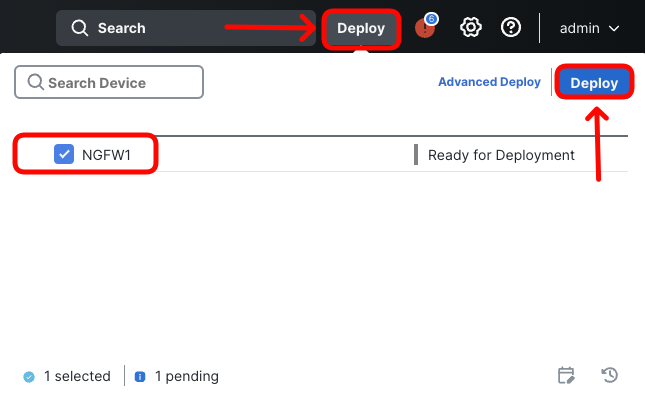
- Deploy the updated policy to the firewall.
Task 3 - Testing Malware Protection in QUIC decrypted traffic
In this task you will send the EICAR test file through the firewall with QUIC decryption enabled.
- Return to WKST2 and open Firefox again. Open Web Developer Tools and switch to Network tab.
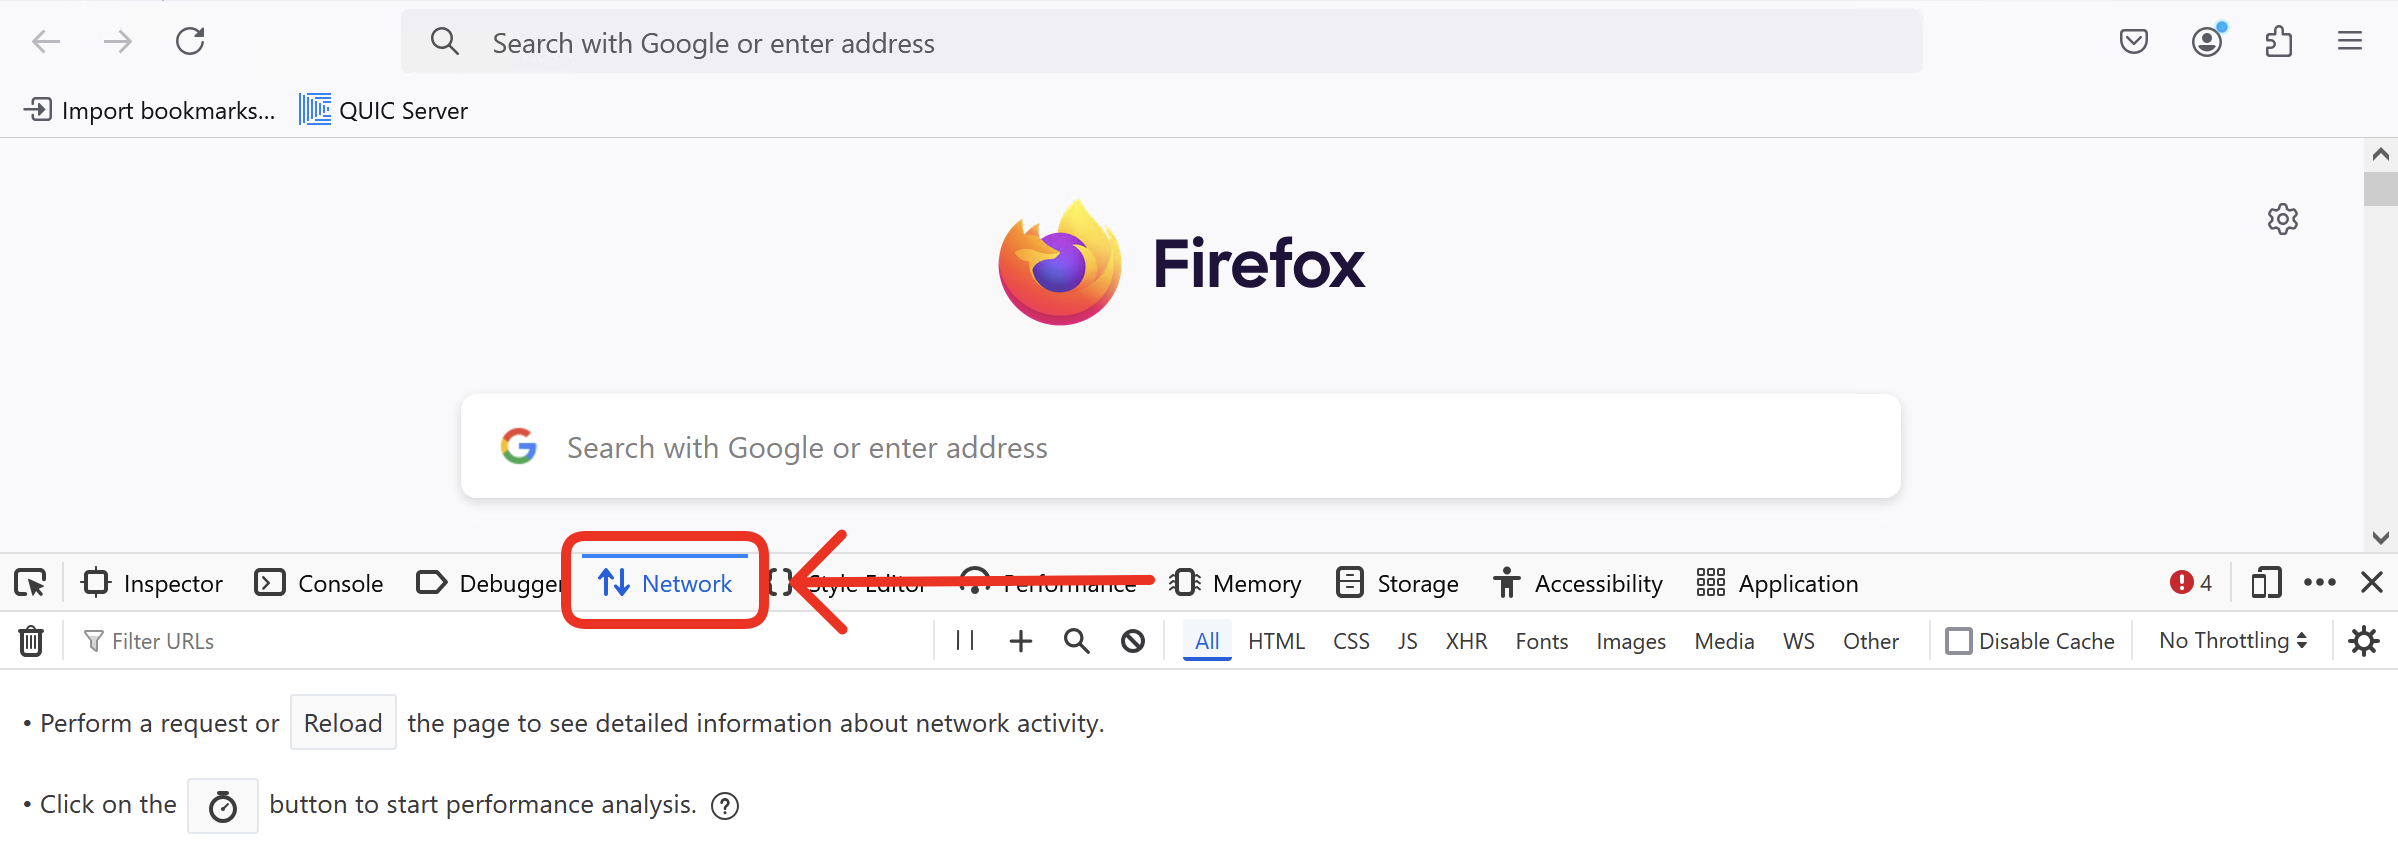
- Click on the QUIC Server icon or type in https://quic-server.dcloud.local in the address bar. Confirm that Firefox switched to HTTP3/QUIC.

- Download the EICAR test file by clicking on Download an EICAR test file.
Depending on the Malware Policy setup, the first-time download of the EICAR file may result in AMP cloud cache-miss. The lookup may timeout resulting in Unknown disposition, therefore passing the file through. The subsequent download is blocked as file disposition is already cached.
The rational behind this default behaviour is to not degrade user experience in case it takes too long to get AMP cloud verdict. The system provides compensating controls with it's retrospective malware containment capabilities and Network File Trajectory.
You can change the default behaviour in the File Policy Advanced settings and switch the following option from Disabled to Very High.

If the file is allowed on the first attempt, click Download an EICAR test file again. This time the file is blocked.
- Have a look at the Network tab in Web Developer Tools and notice the file request does not complete.

- Go back to the Firewall Management Center and navigate to Analysis > Unified Events.
- Use the column icon on the right hand side of the log viewer to toggle on QUIC details columns.
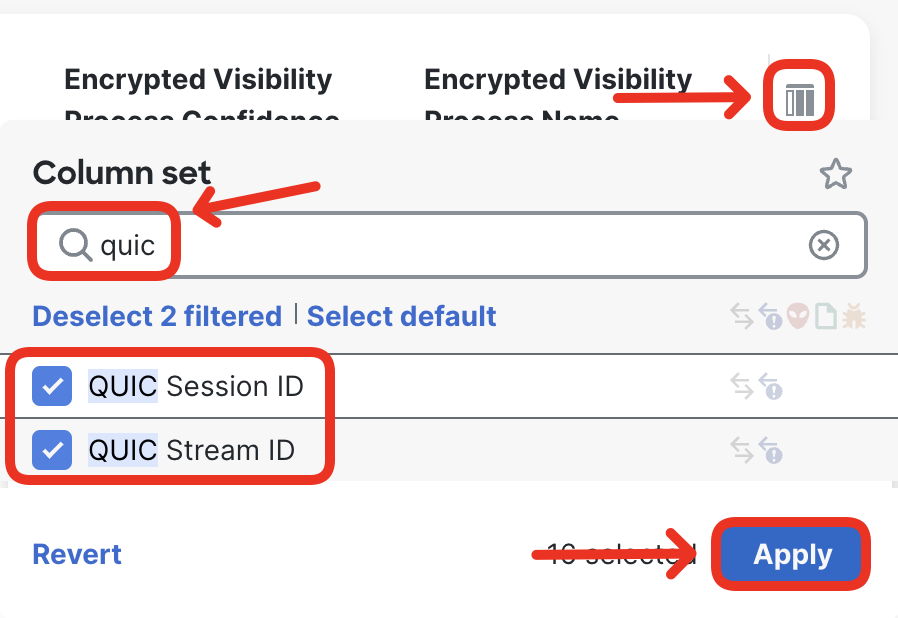
- Repeat the same, to display the URL column in the Events Viewer.
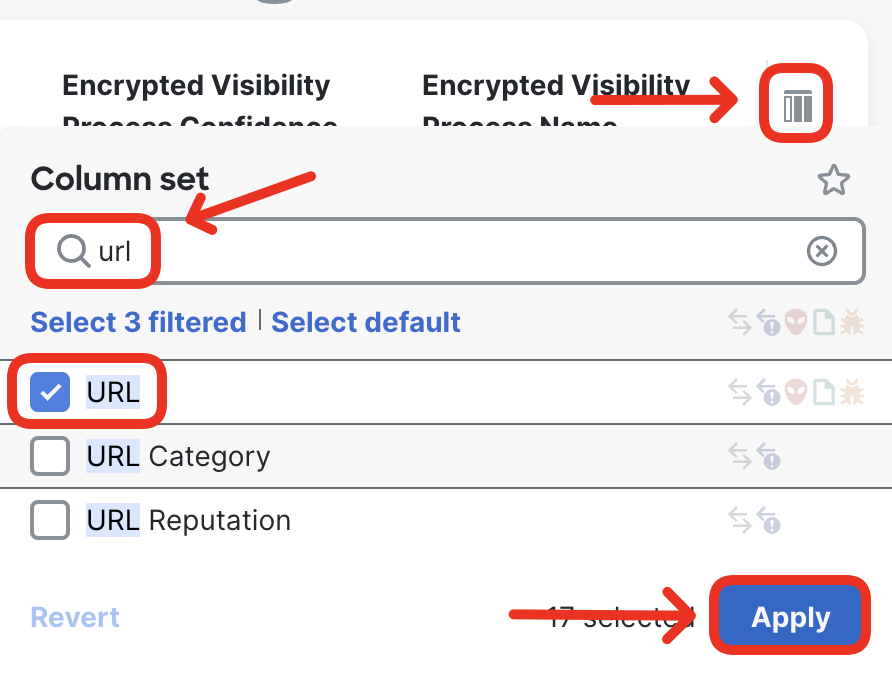
Make yourself at home in Unified Events Viewer
You can drag and drop columns in the Unified Events Viewer to your convenience. In the screenshots below you will see URL, QUIC Session ID and QUIC Stream ID columns dragged into the visible area. This makes it easier to understand the QUIC session and follow the decryption process.
- Set the filters to display the most recent connection logs to and from the QUIC server:
- Set a filter to match connections to the QUIC server: Source or Destination IP = 198.19.10.103
- Change the display time to Sliding Time Range and select number of past minutes to display
- First, locate the initial HTTP2/TLS connection.

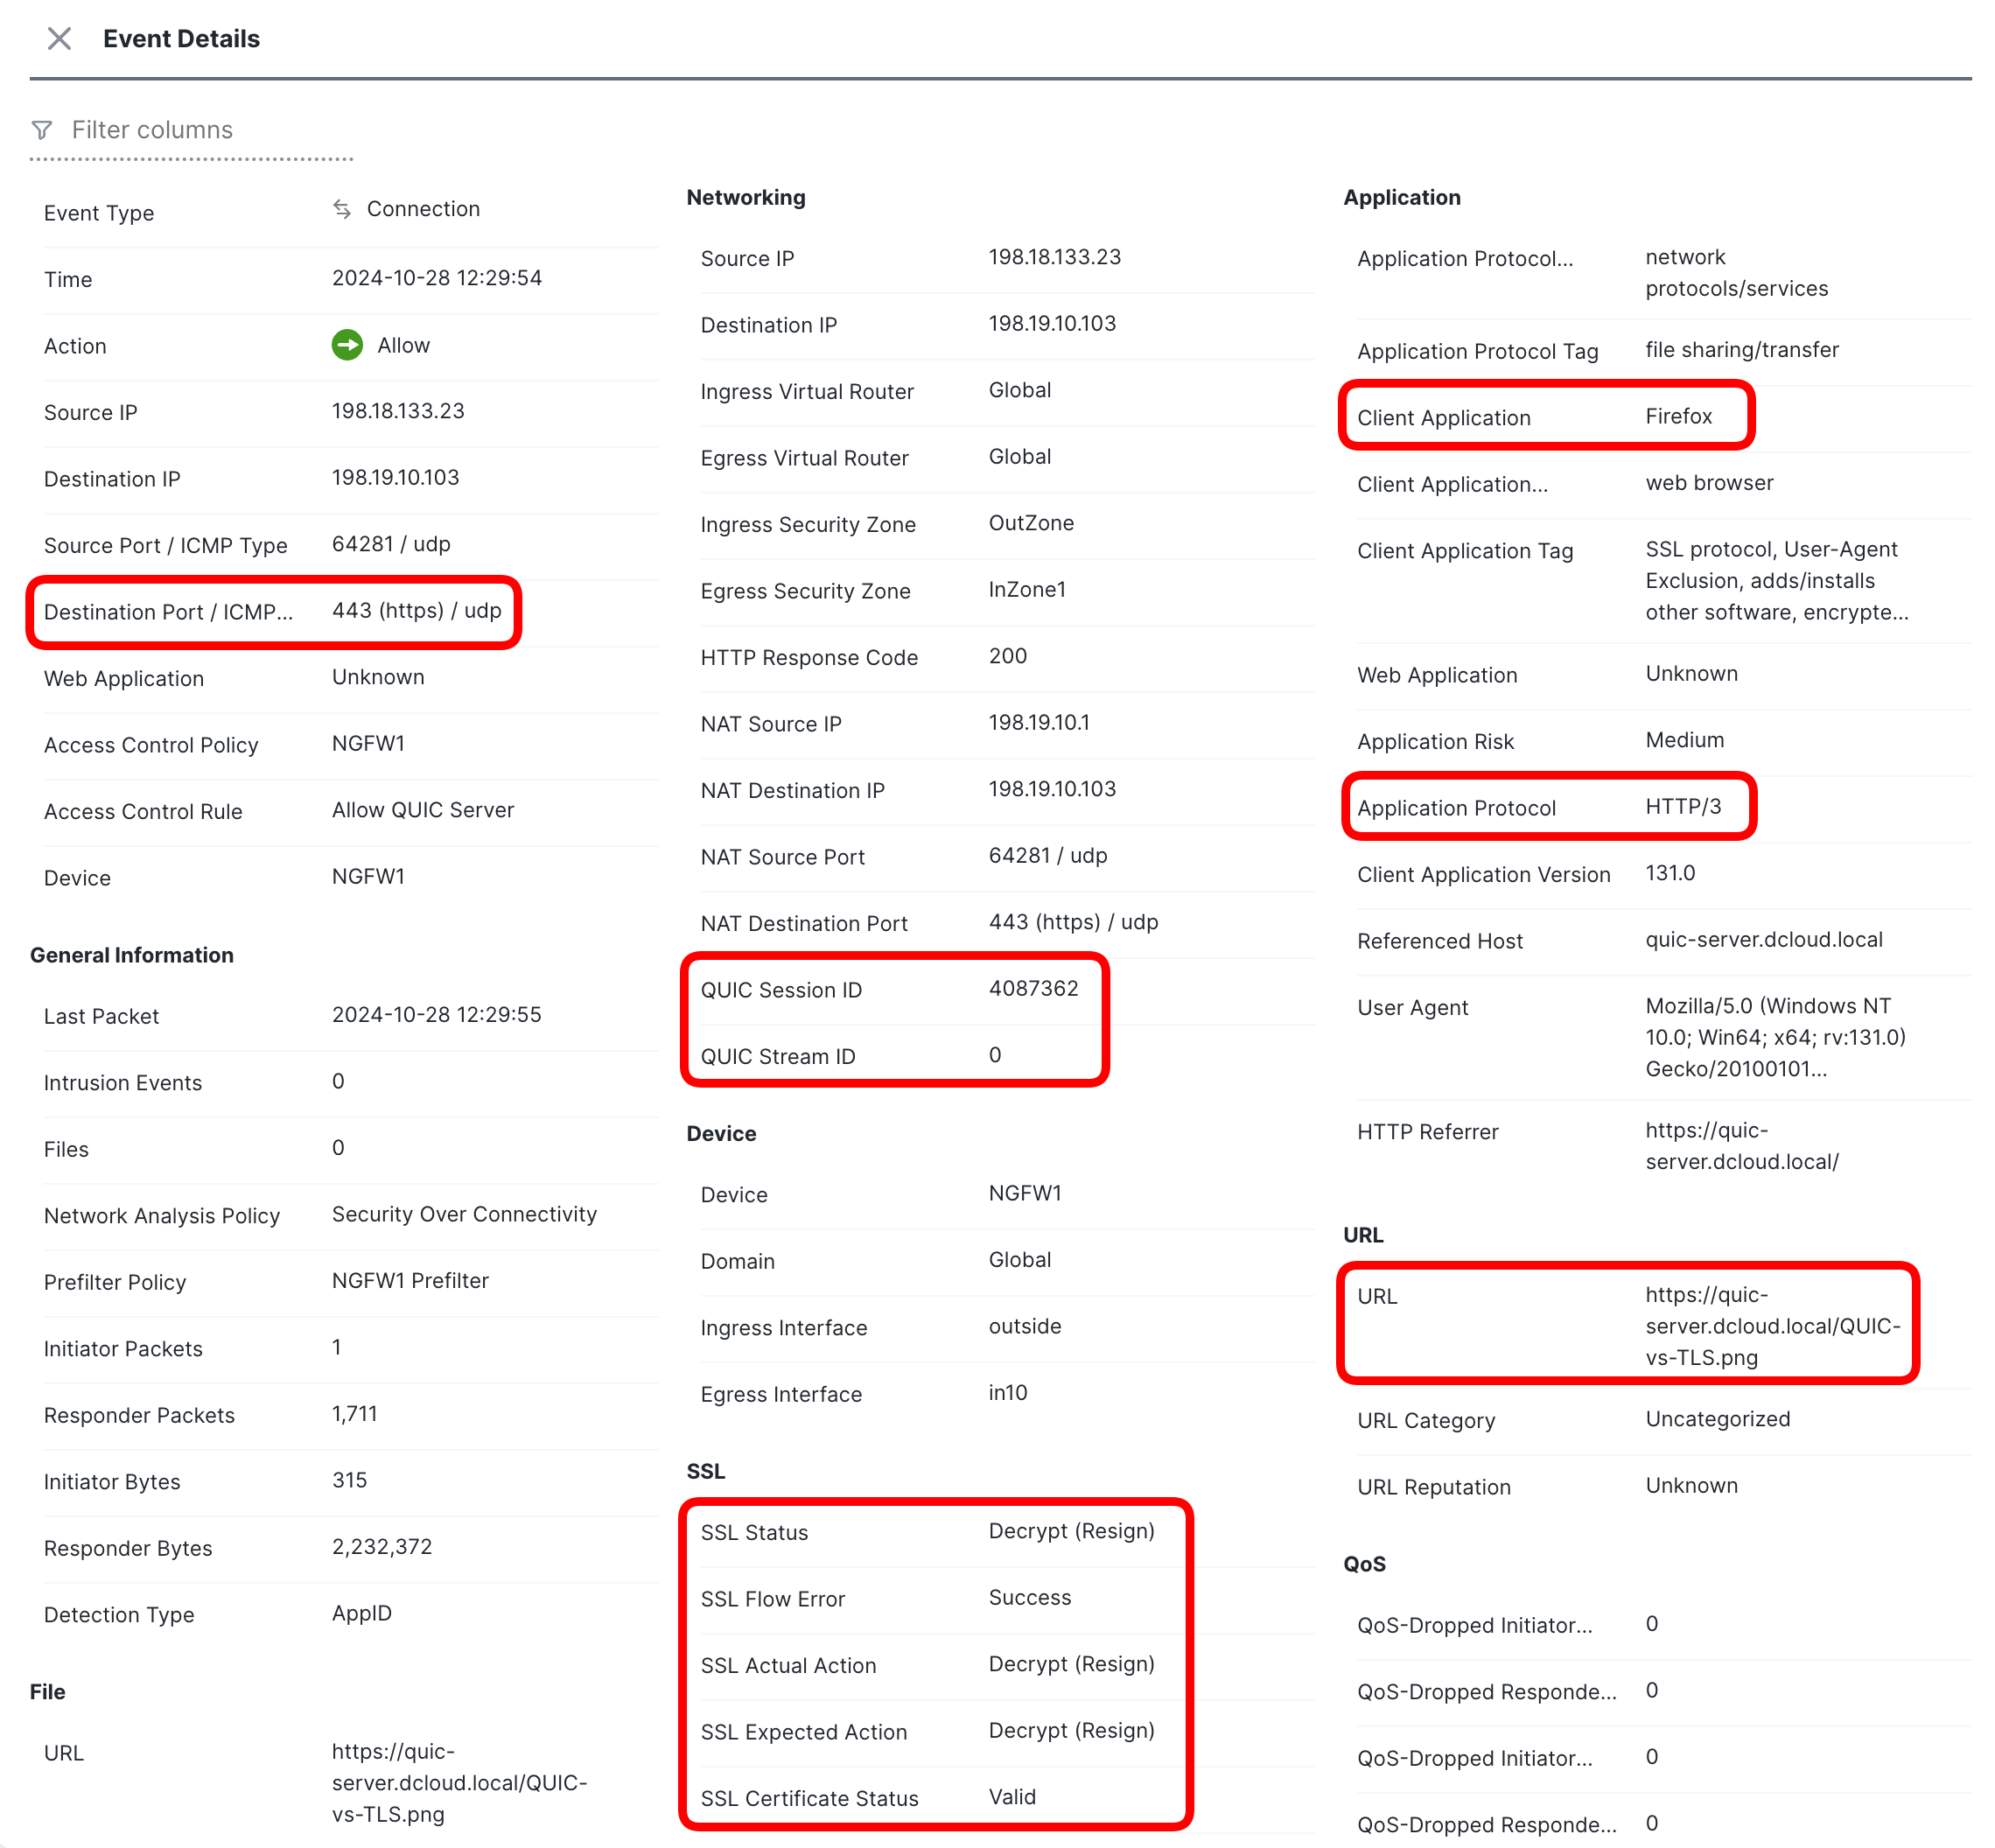
- Next, observe how the QUIC session is now decomposed into individual streams:
- The QUIC Session ID spread across multiple logs, split of the communication into streams identified with QUIC Stream ID
- Individual QUIC streams share the same QUIC Session ID and the UDP source/destination ports
- Notice, how individual elements of the Web page (favicon.ico, Snort3.png, QUIC-vs-TLS.png) are transmitted in their own QUIC streams.
Stream multiplexing technique allows QUIC server to alleviate head-of-line blocking effect caused by large elements of the webpage. Each stream has its own flow-control context, giving application developers powerful tools to detect upstream network congestion and precise stream prioritisation.

- Click on the arrow icon next to one of the QUIC streams to see the details.

Review the recorded details of this stream.
- Now, locate the QUIC stream, used to download the eicar.file. Notice the action Block with reset.

- Review the corresponding File and Malware events.

A lot happened in on inconspicuous UDP connection...
Look again at the long list of the logs associated with this malware download. Notice, all the logs share thesource/destination UDP ports. All that happened in a single UDP connection...
Task 4 - Install a custom Snort rule detecting the EICAR string in an UDP flow
Prior to 7.6 release of software the Intrusion Prevention signatures considered only TCP as a transport protocol for HTTP traffic. With QUIC decryption the HTTP transactions are now exchanged inside UDP datagrams. At the time of writing this guide, Snort rules database undergoes a revamp to become transport protocol agnostic, however EICAR matching signatures are not yet migrated. In this task you will install a custom Snort rule matching the EICAR string in UDP.
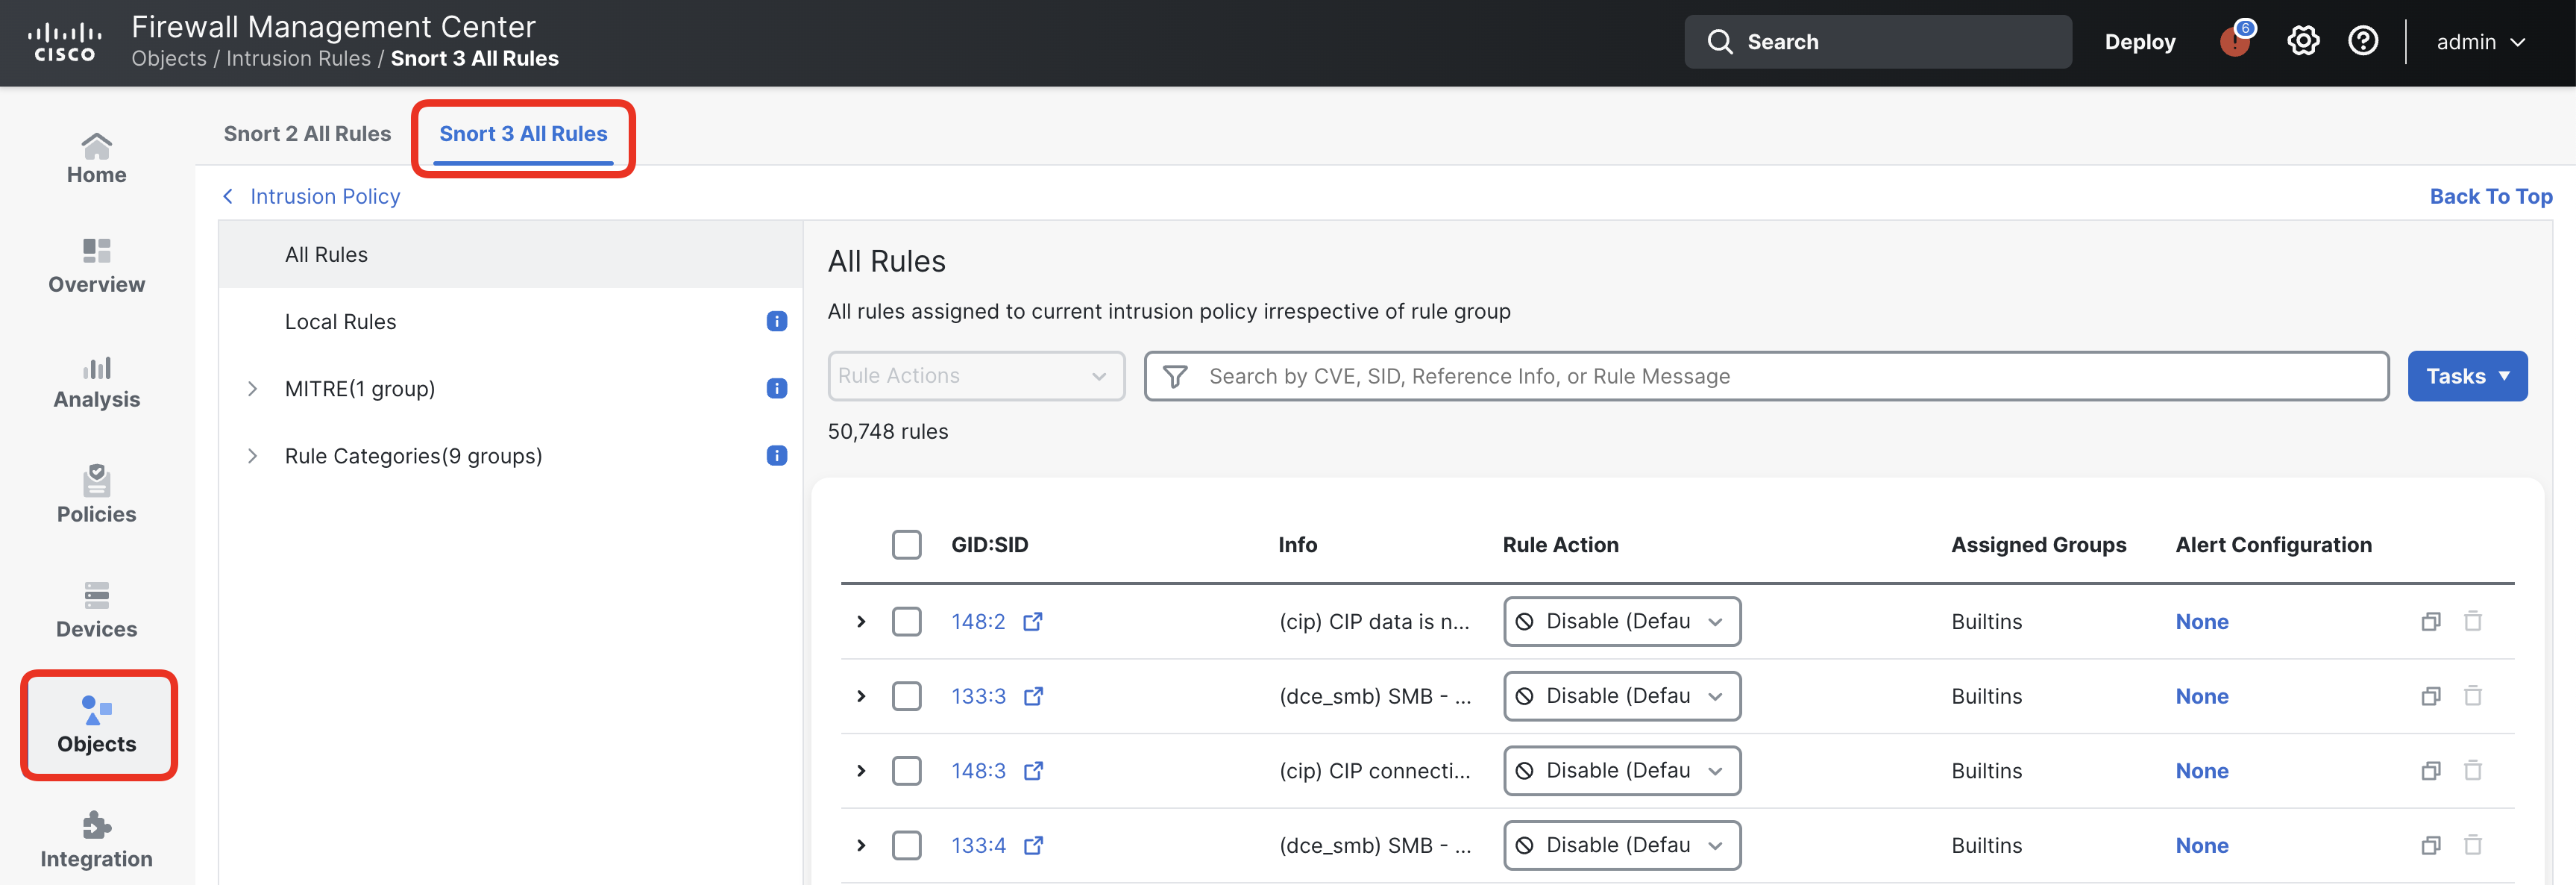
- The signature file is located on the Jumphost. Login to the Jumphost, open the FMC and navigate to Objects > Intrusion Rules > Snort 3 All Rules.
- Click Tasks > Upload Snort 3 Rules.

- Click the drag and drop area to import the rule.
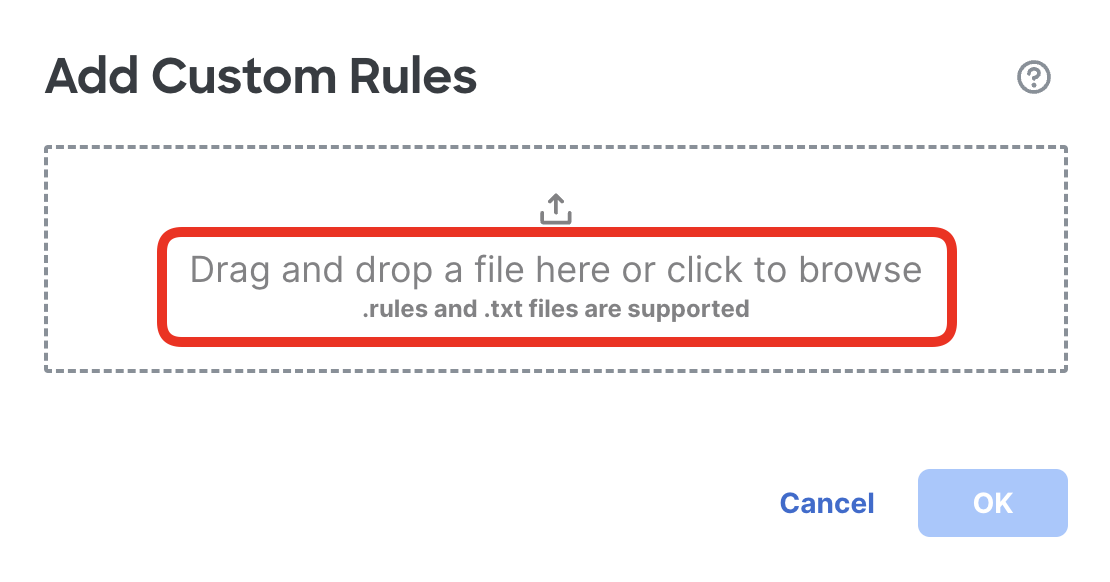
- Navigate to FIles directory on the desktop and select QUIC-EICAR-Signature.txt file.

If you are not accessing the FMC from the Jumphost, you may create the signature file locally on the computer you are connecting from. Just copy/paste the signature string below to a text file on your computer and upload it using the same method as above.
alert udp any any -> any any ( msg:"QUIC EICAR test string download attempt"; content:"7CC|29|7}$EIC|41|R-STANDARD-|41|NTIVIRUS-TEST-FILE!$H+",nocase; sid:1037732; rev:4; classtype:unknown; )
- The user congiured rule must be associated with a custom rule group. Click Create New Custom Rule Group to proceed link.
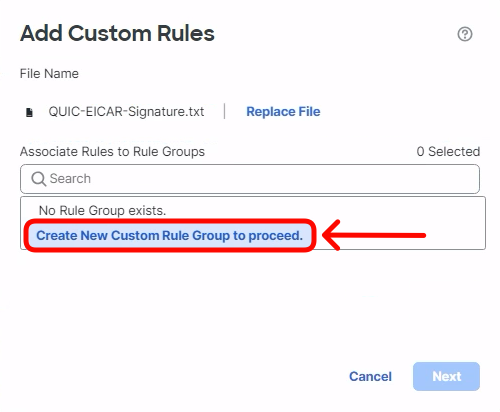
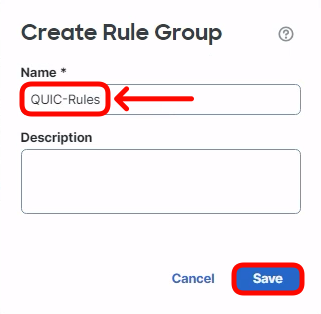
- Set the name to QUIC-Rules and click Save.
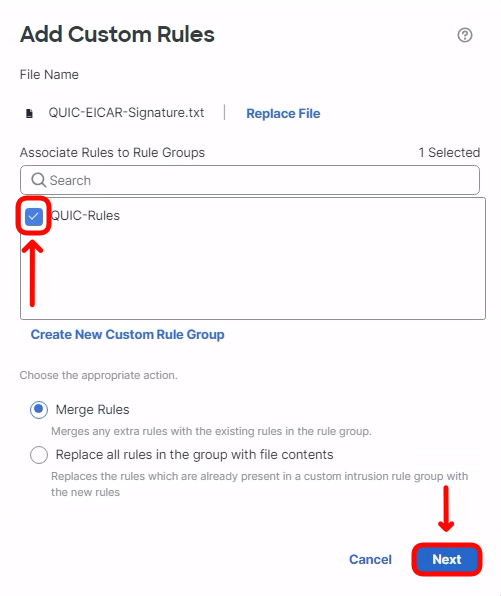
- Select the QUIC-Rules group as the container for the new signature. Click Next.
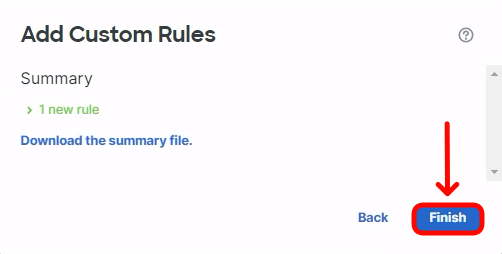
- Click Finish to finalise the import process.
- In the same dialog, click on the newly created QUIC-Rules group to display the EICAR signature. Change the Rule Action to Block.
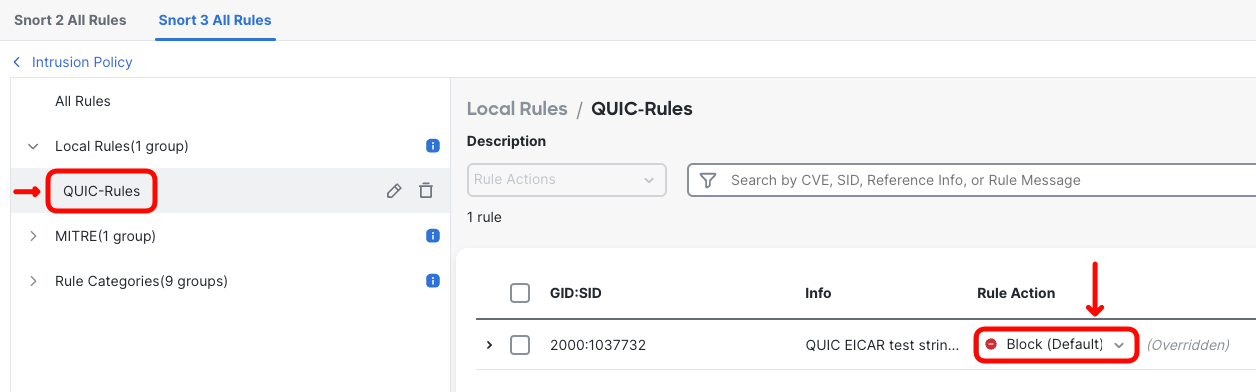
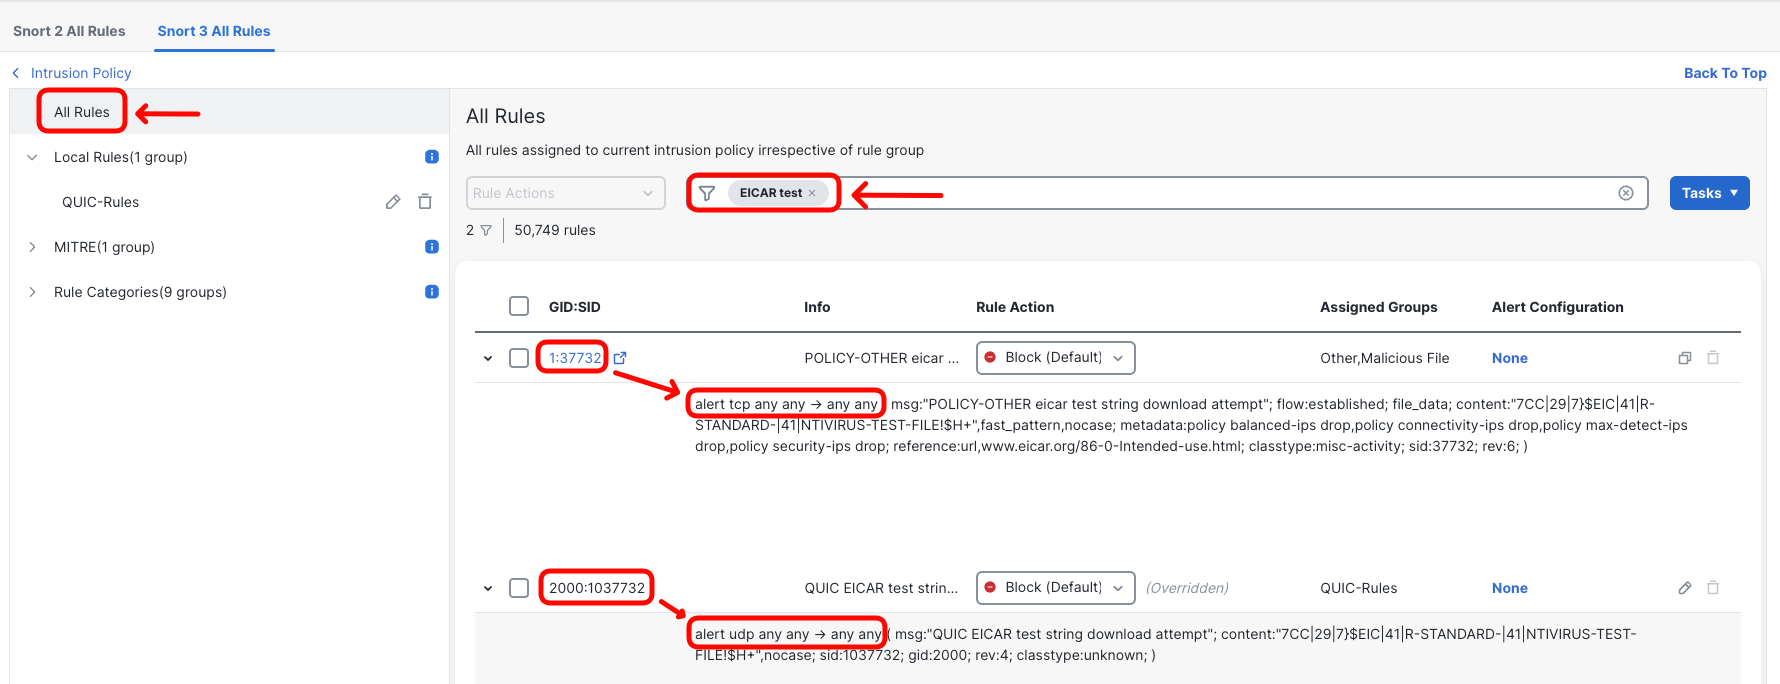
- Switch the view to All Rules and type in EICAR test in the filter field. This should display both:
- Default signature (1:37732) detecting EICAR string in TCP connections
- Custom signature (2000:1037732) detecting EICAR string in UDP connections
Ensure you configured the custom signature to block, otherwise Snort will not detect EICAR string in decrypted QUIC connection.
For now you can skip policy deploy to NGFW1. You will do it anyway after completing Task 5.
Task 5 - Configure QUIC decryption for incoming traffic (Known-Key Decryption)
In this task you reconfigure the decryption policy to ingress protection use case where the firewall decrypts traffic coming to a QUIC server from external. Since the server is under our administration control, we can extract the certificate with associated private key and use it for so-called known-key decryption.
- From the Jumphost, use the Quick Launch to connect to the QUIC server console. Click QUIC Console.

- First, review the NGINX server configuration. Display the NGINX configuration file using the command listed below:
quic@dcloud-virtual-machine:~$ cat /etc/nginx/conf.d/default.conf
- The configuration file holds the setting for the QUIC server we use in our testing. Locate the ssl_certificate and ssl_certificate_key variables which specify the location of QUIC server certificate and the private key. Make a note of both values - you will be copying the certificate and the key over to the FMC in the following steps.
Note
Incidentally, have a look at the configuration file and try to locate lines that:
- enable QUIC protocol
- add alt-svc header to the HTTP responses returned by the server

- Display the certificate file. Copy the whole certificate string to a notepad file, including -----BEGIN CERTIFICATE----- and -----END CERTIFICATE----- markers.
quic@dcloud-virtual-machine:~$ cat /opt/quic.cer

-----BEGIN CERTIFICATE-----
MIIG7DCCBdSgAwIBAgITTgAAADgsEbQRJcktOwABAAAAODANBgkqhkiG9w0BAQsF
...
H6w6umDUazRU5VWL6pWNp40Aw6uUAJepVWDV/jGuTXtZwgwVv/faa0P4gbk4AF7P
-----END CERTIFICATE-----
- Display the private key file. Copy the whole key string to a notepad file, including -----BEGIN PRIVATE KEY----- and -----END PRIVATE KEY----- markers.
quic@dcloud-virtual-machine:~$ cat /opt/quic.pem

-----BEGIN PRIVATE KEY-----
MIIJQgIBADANBgkqhkiG9w0BAQEFAASCCSwwggkoAgEAAoICAQCVLsCzDia7GQKJ
...
h7WnaHRpvEzmUH0xMdBcLuphrujPLA==
-----END PRIVATE KEY-----
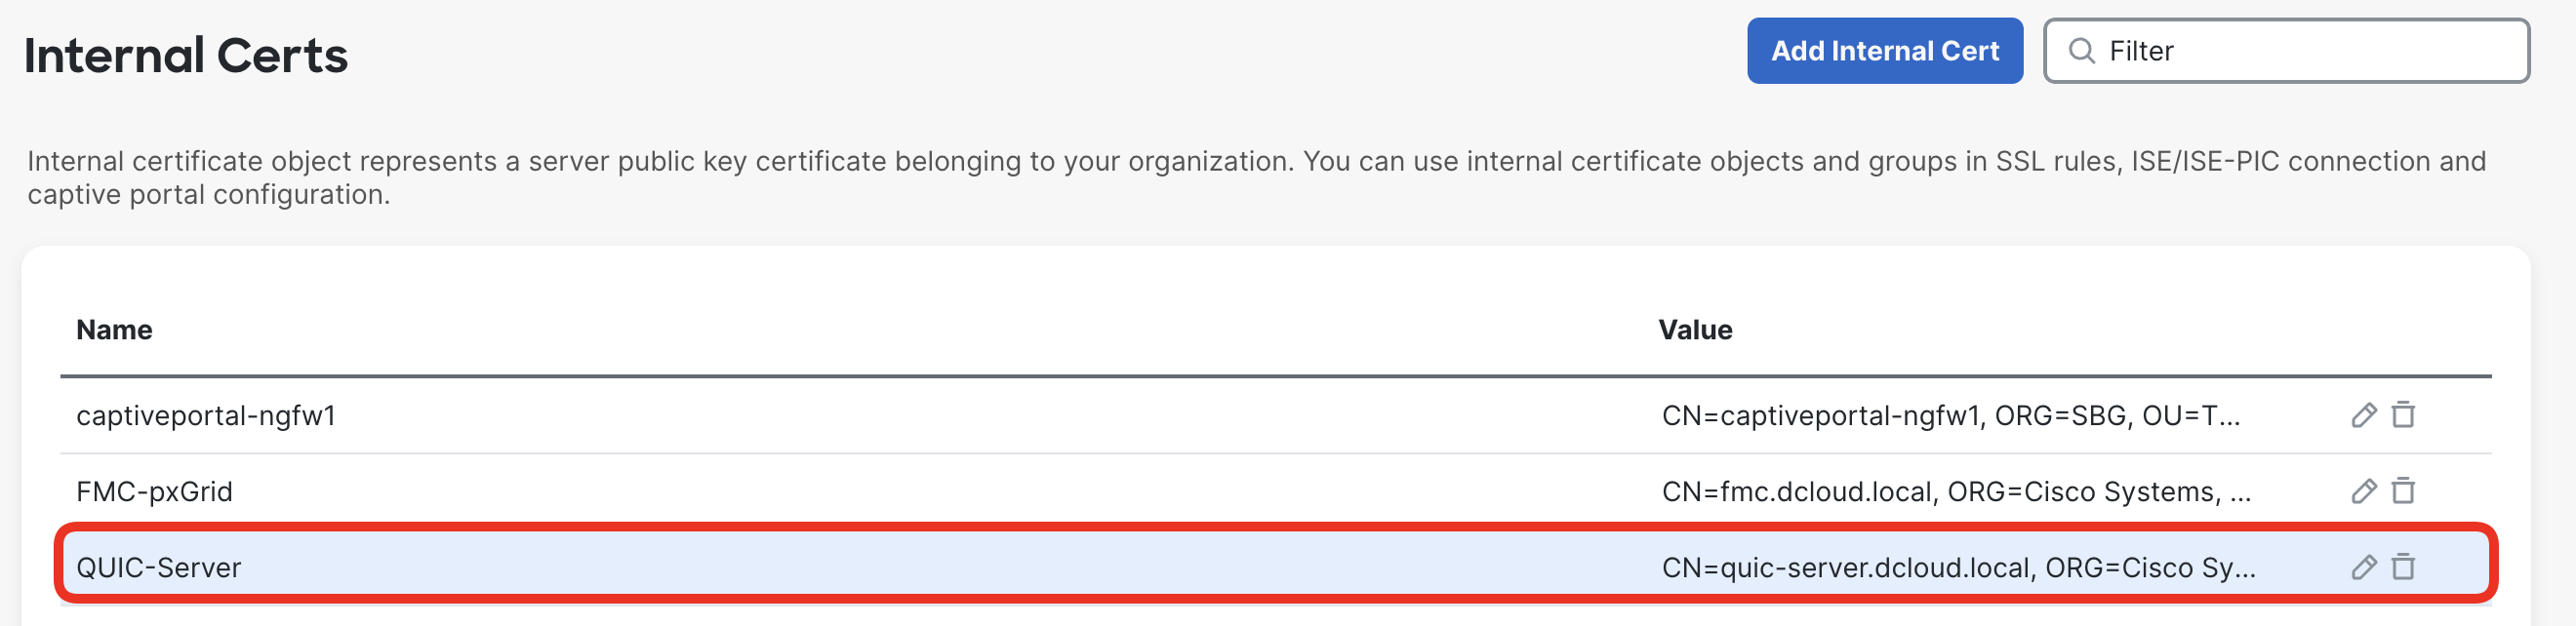
- Return to the FMC and navigate to Objects > Object Management > PKI > Internal Certs. Click Add Internal Cert.
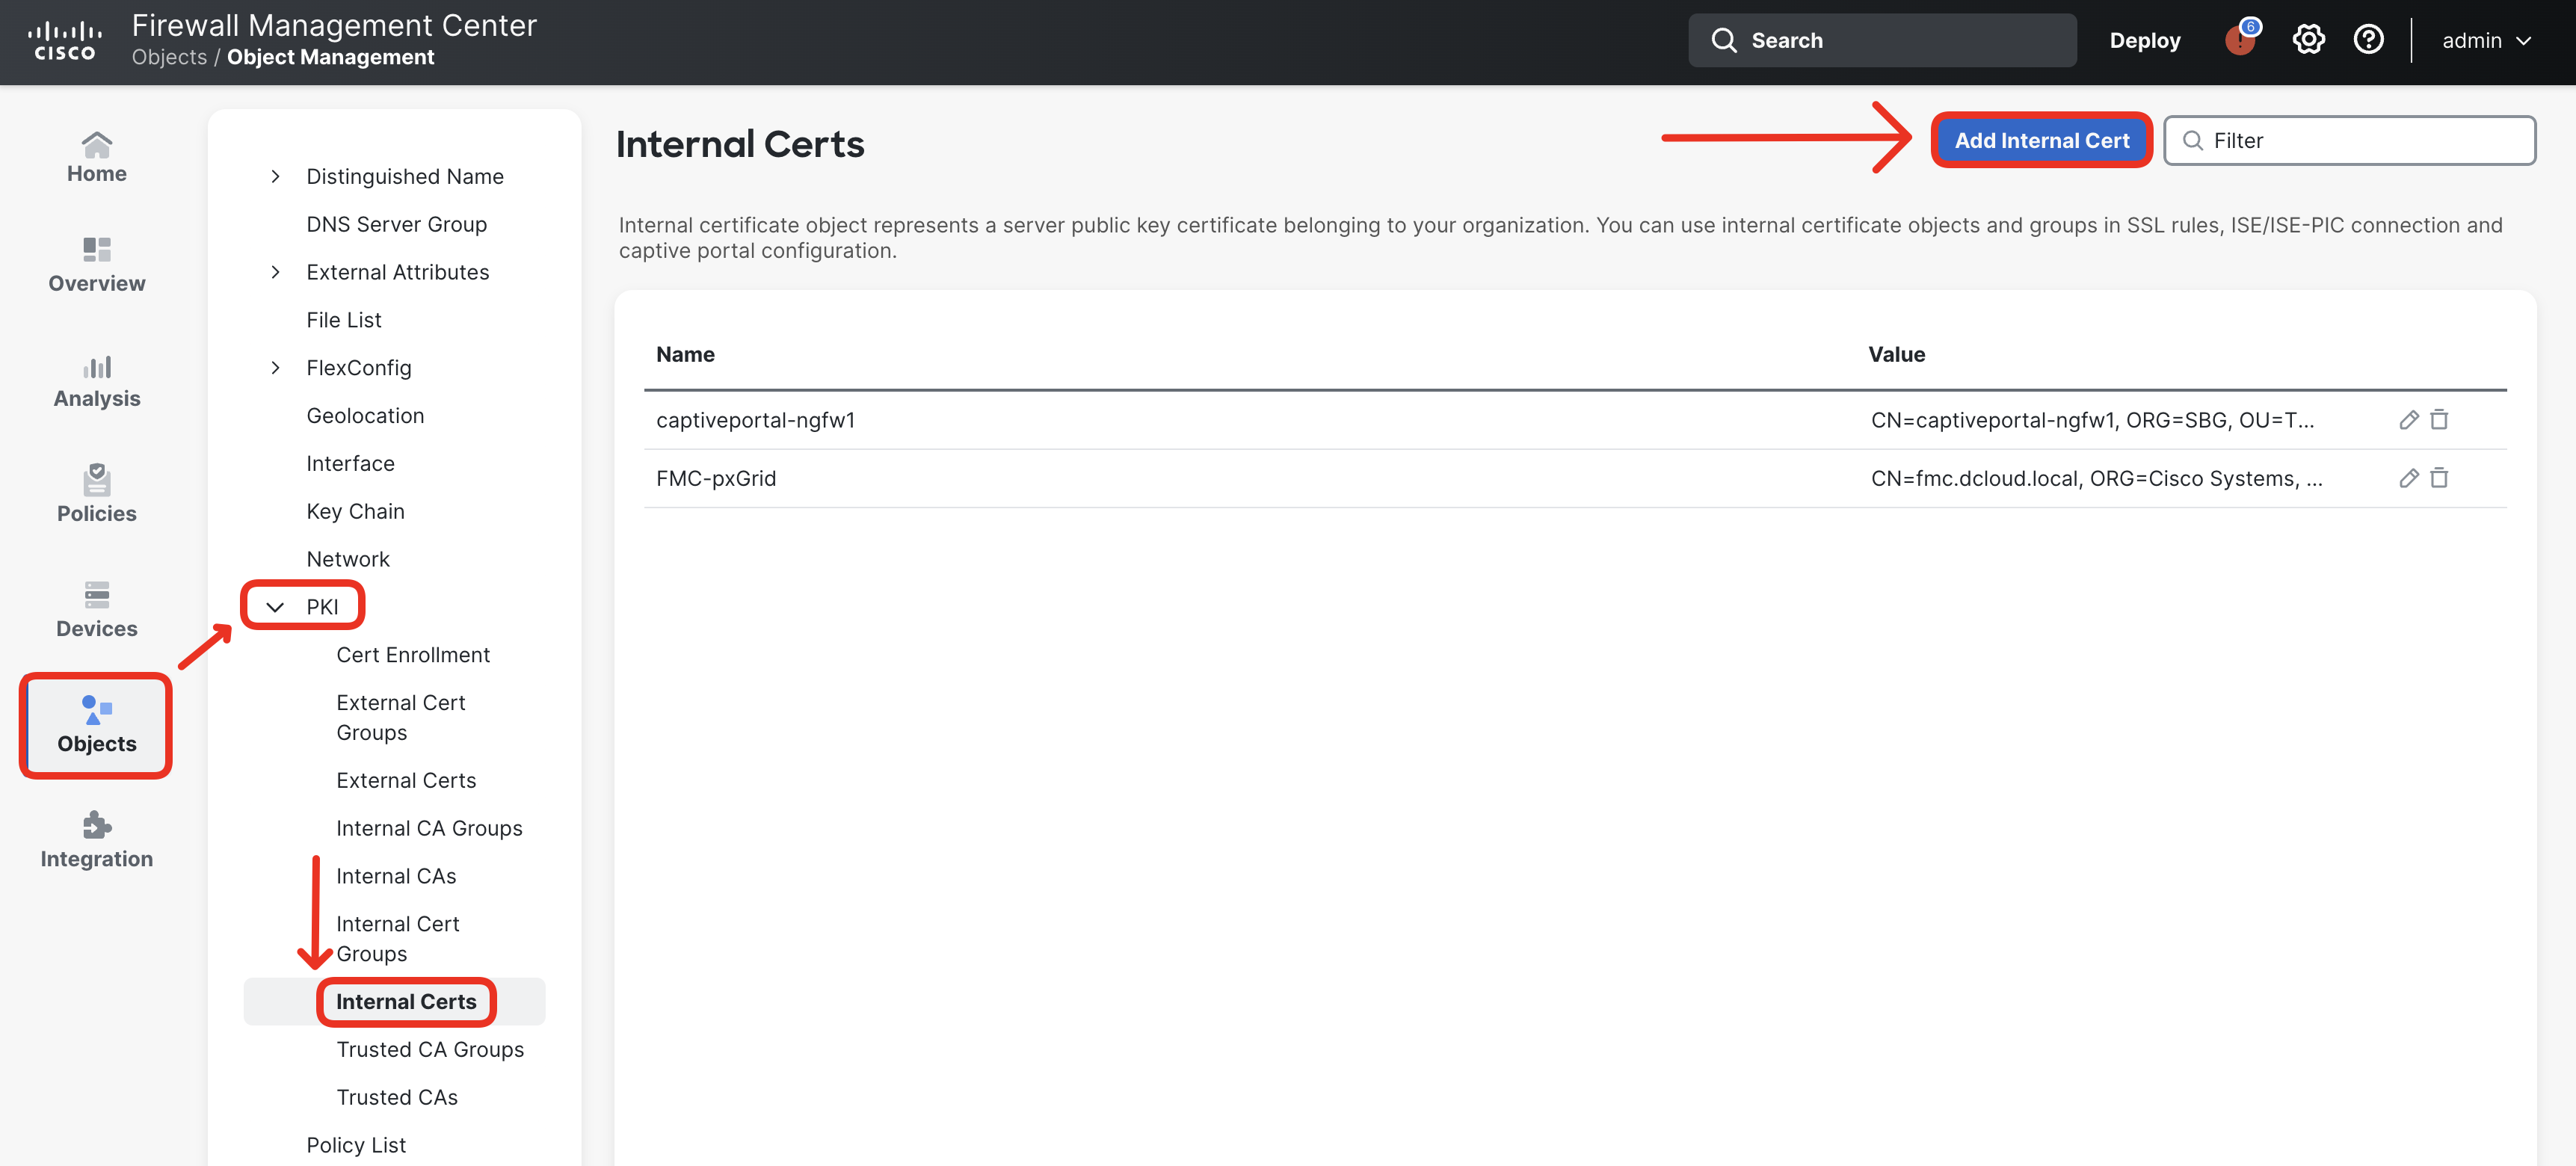
- Type in QUIC-Server in the name field. Then paste the certificate and the private key of the QUIC certificate to the respective boxes. The private key string is not encrypted, therefore keep the Encrypted box unchecked.
Remember to include the -----BEGIN... and -----END... markers in the pasted certificate/key text.
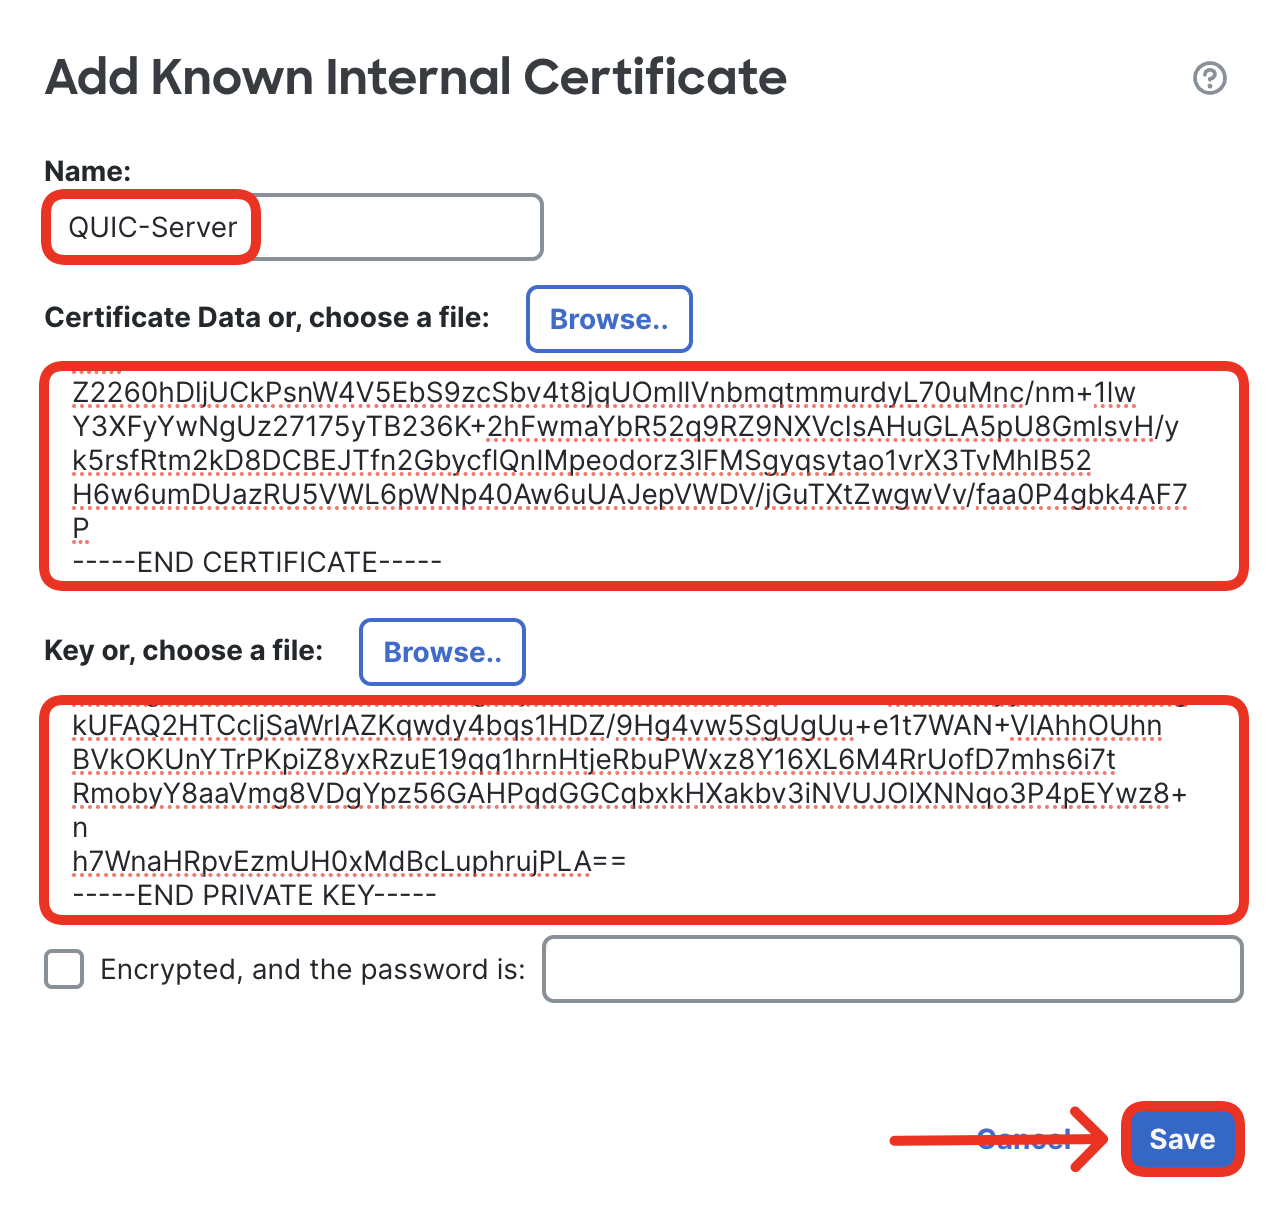
- Confirm the certificate is correctly imported.
- In the following steps, you reconfigure the decryption policy to decrypt traffic to the QUIC sever with the certificate/key pair you've just imported. Navigate to Policies > Decryption Policy and edit Demo SSL Policy.
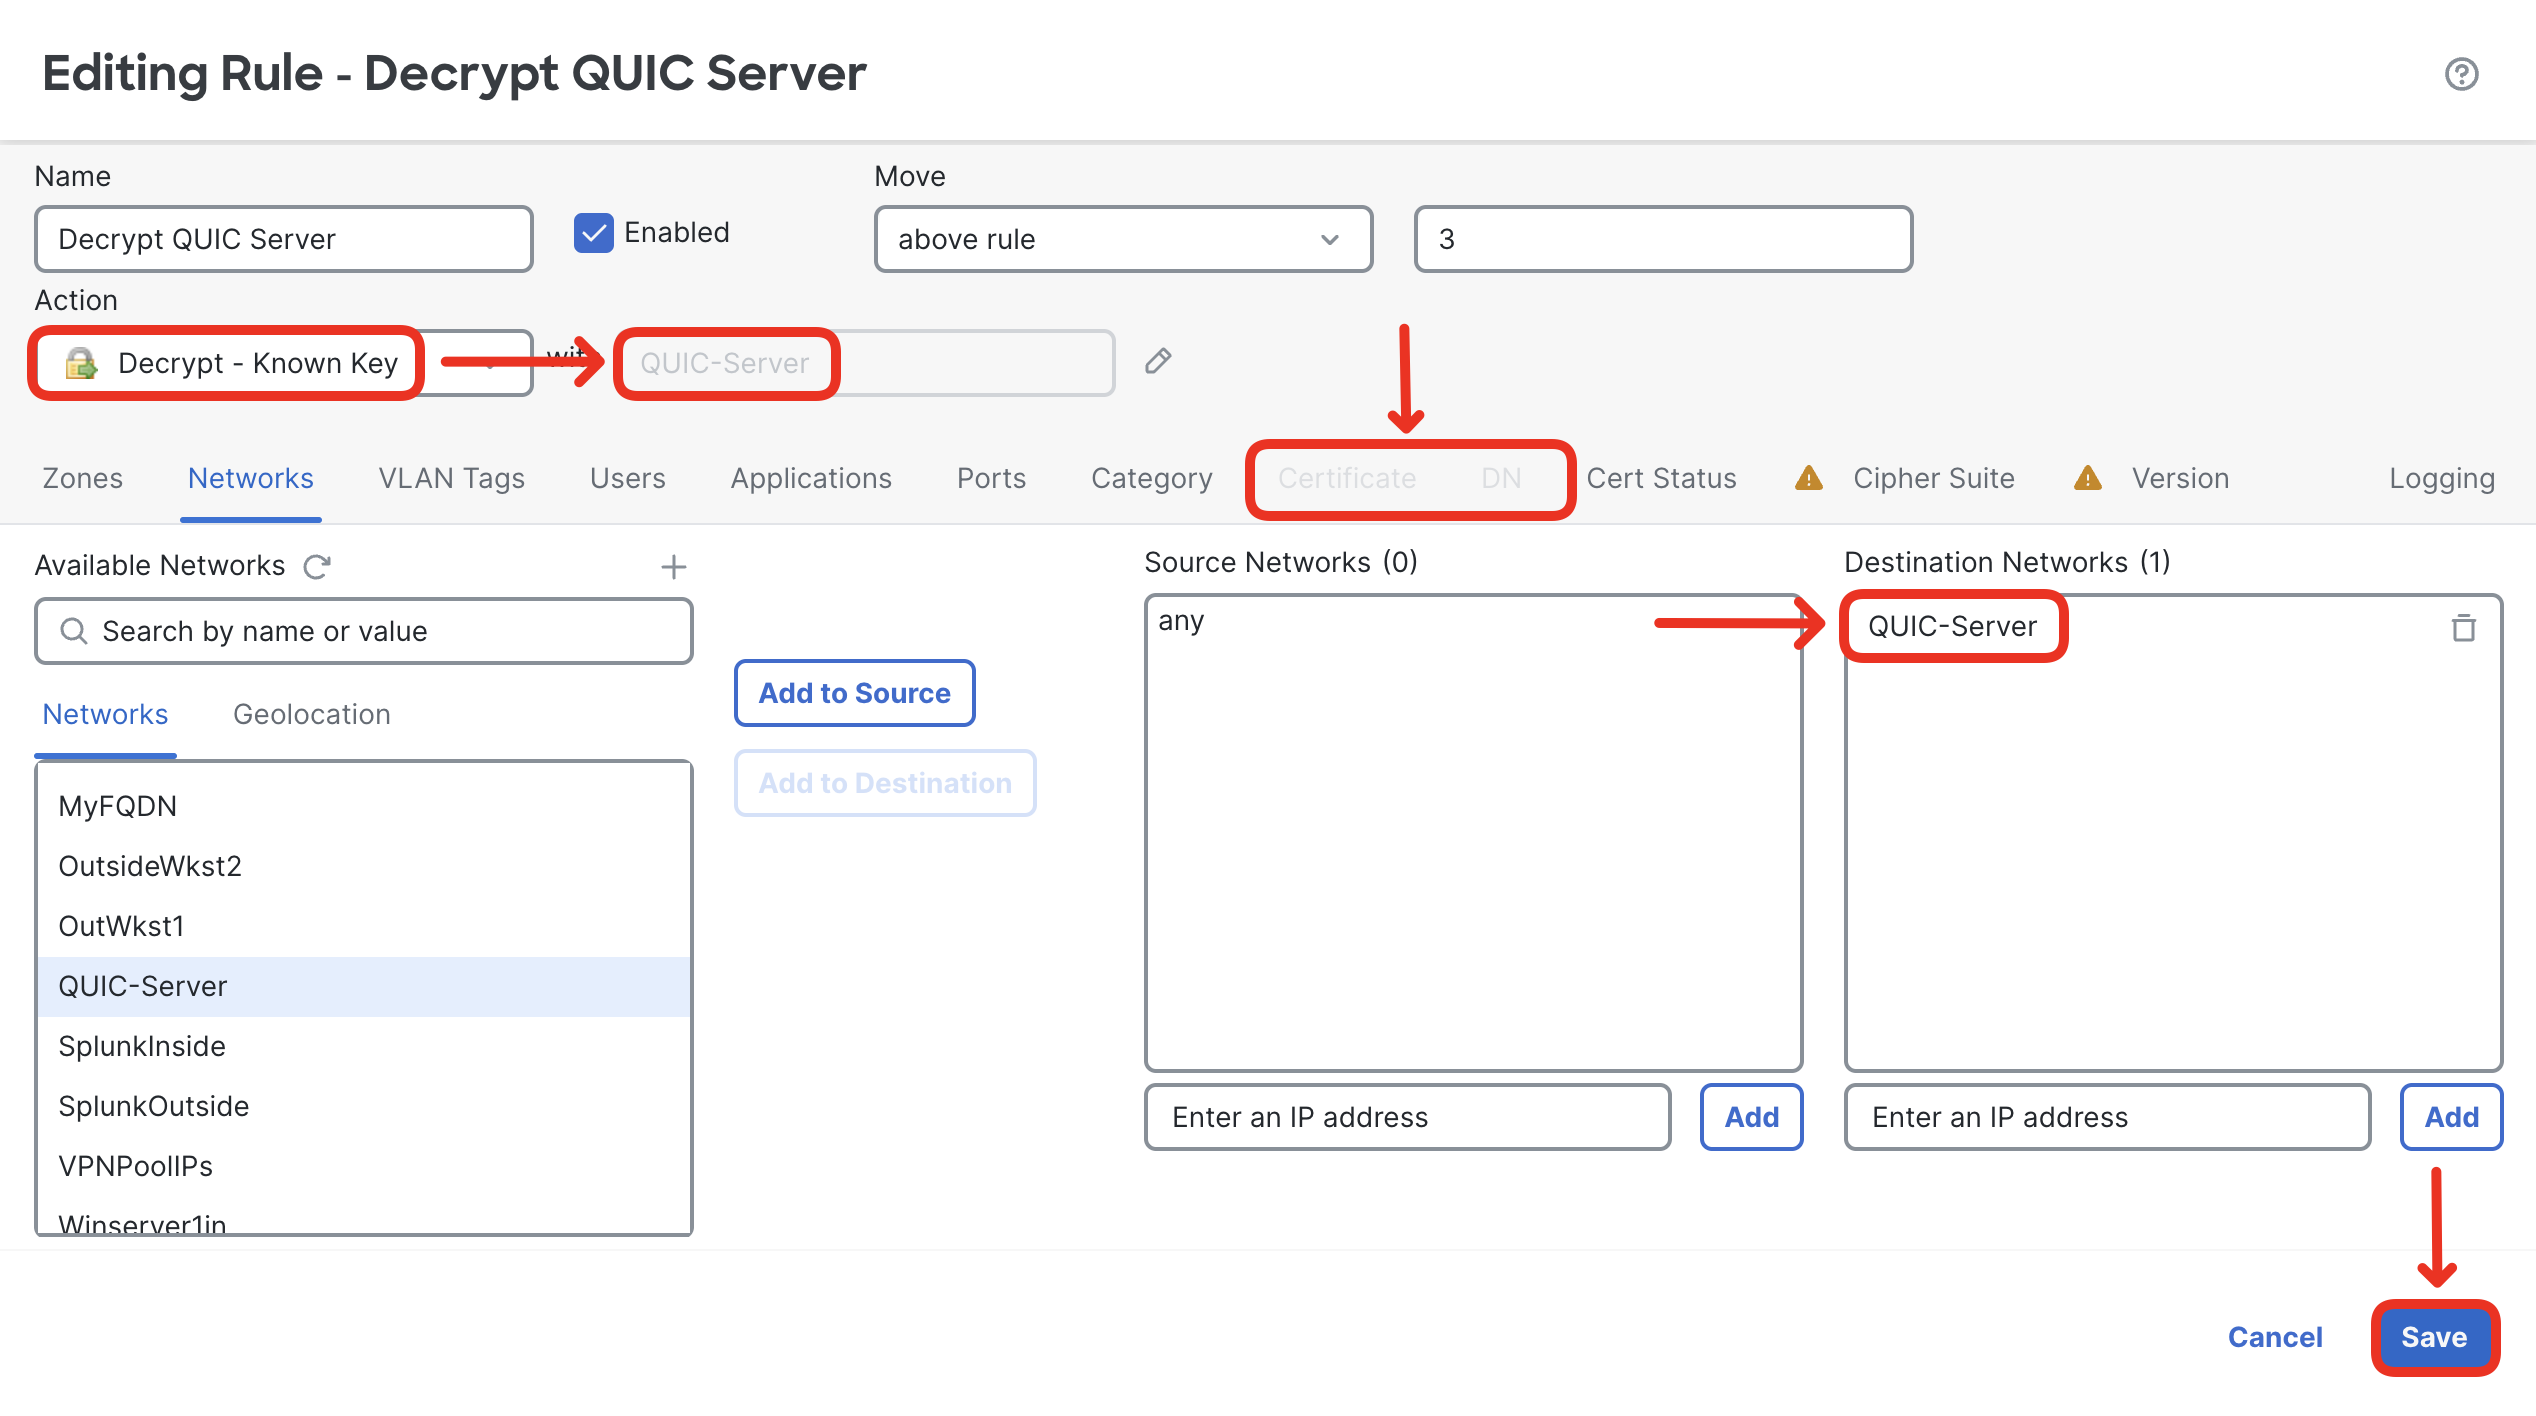
- Reconfigure the previously added Decrypt QUIC Server to Known-Key decryption. Find the rule and click on the pencil icon.
- First, remove the DN condition which is not supported in known-key decryption rules (in the DN matching conditions tab).
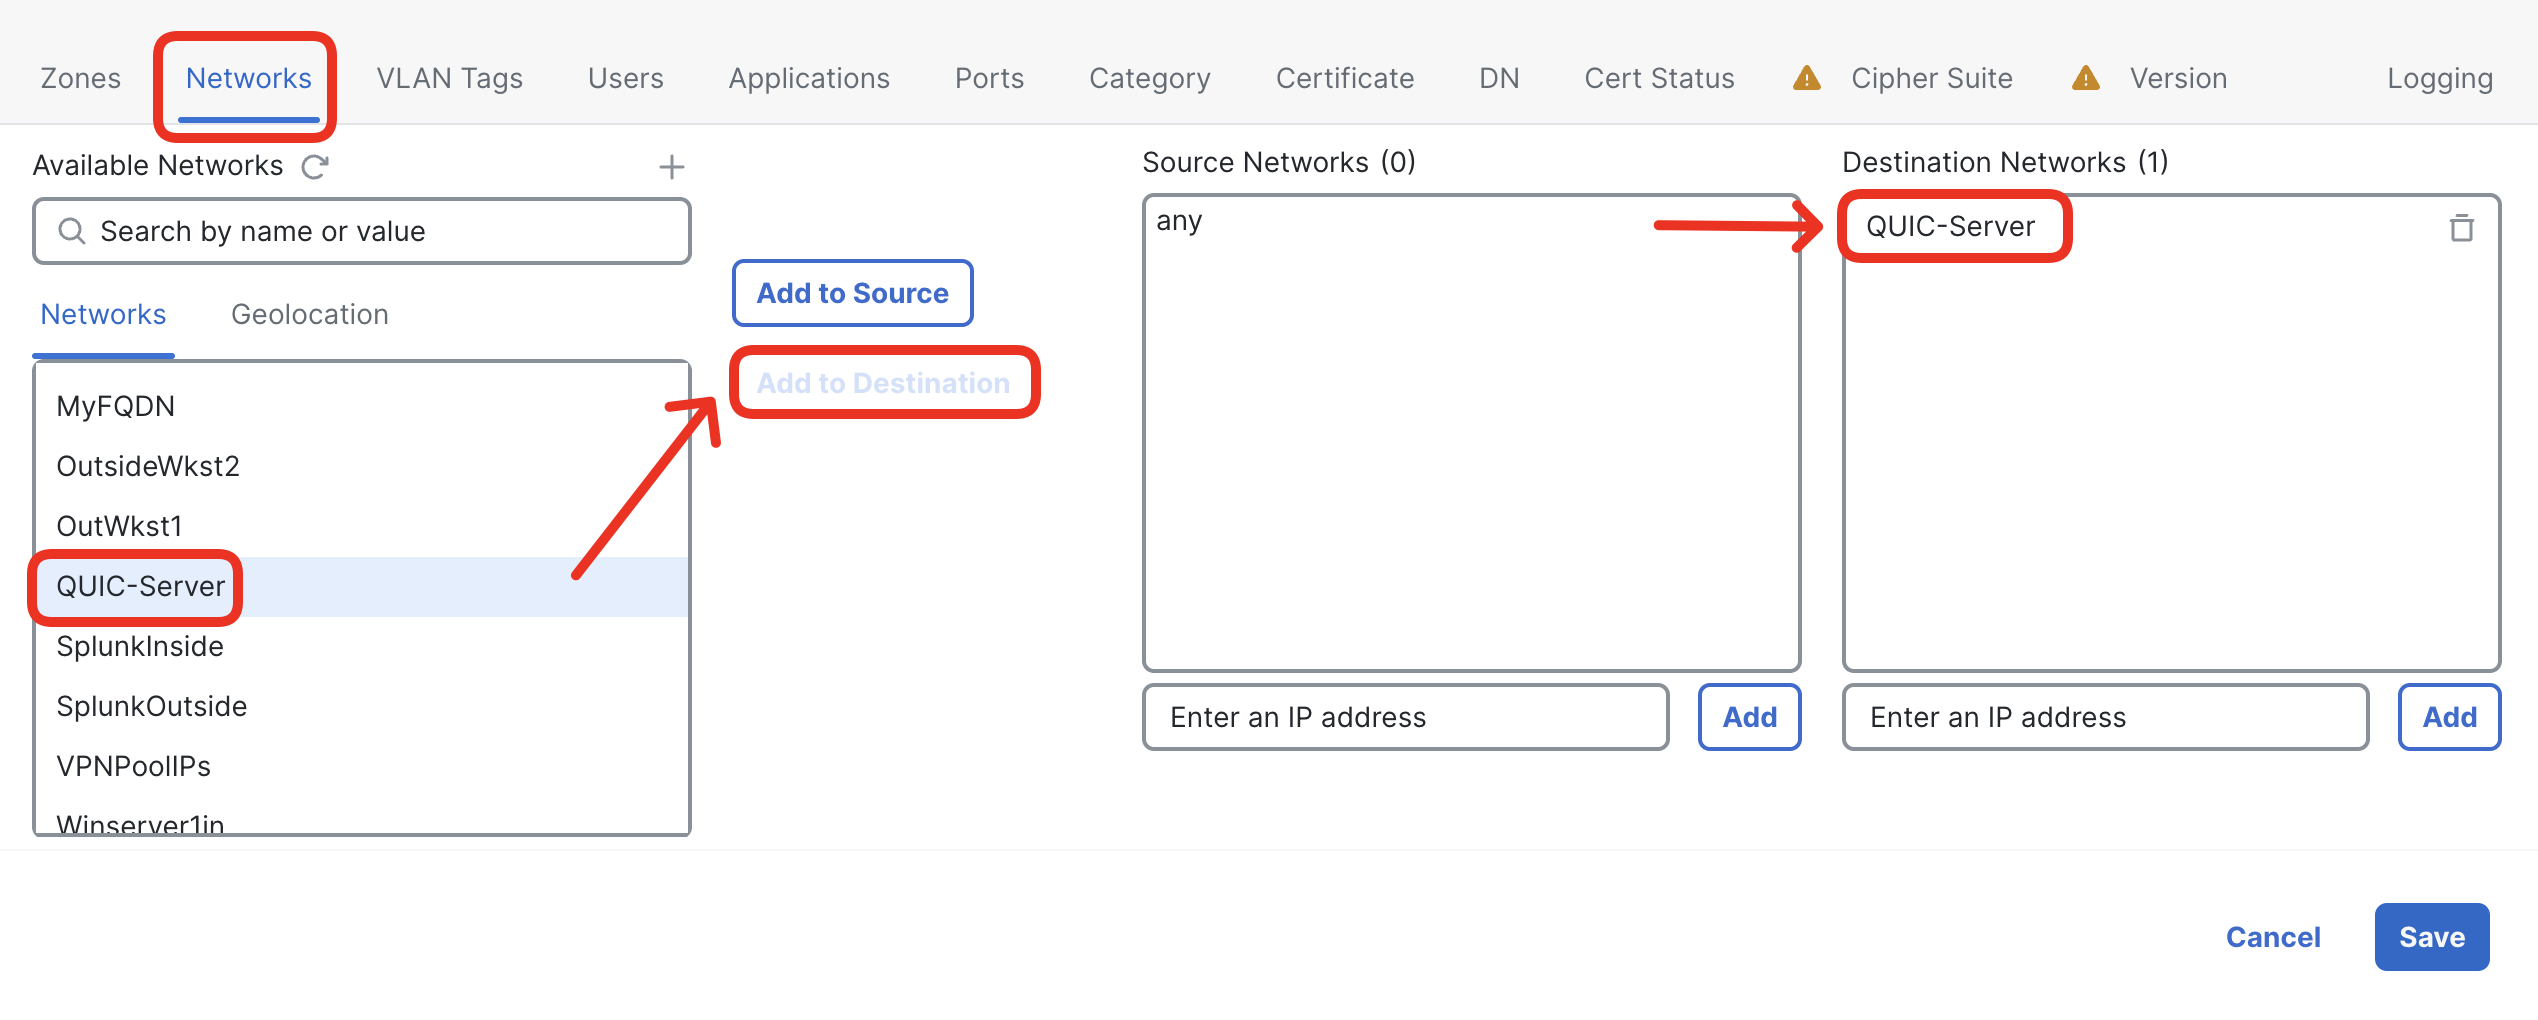
- Next, switch to Networks matching criteria tab and add the preconfigured QUIC-Server object to the Destination Networks.
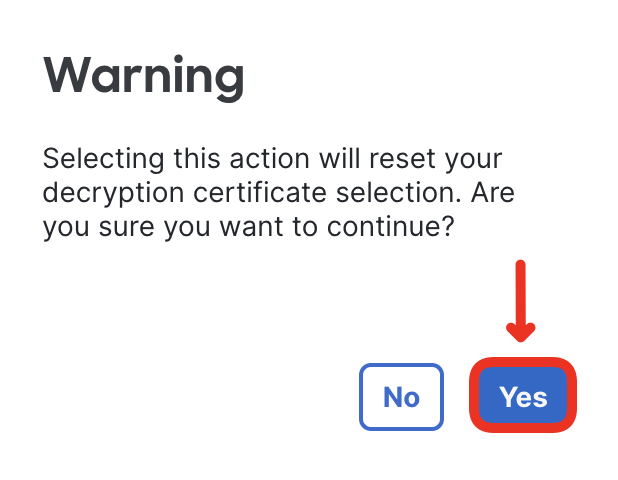
- Now, you can reconfigure the rule action to Decrypt - Known Key.
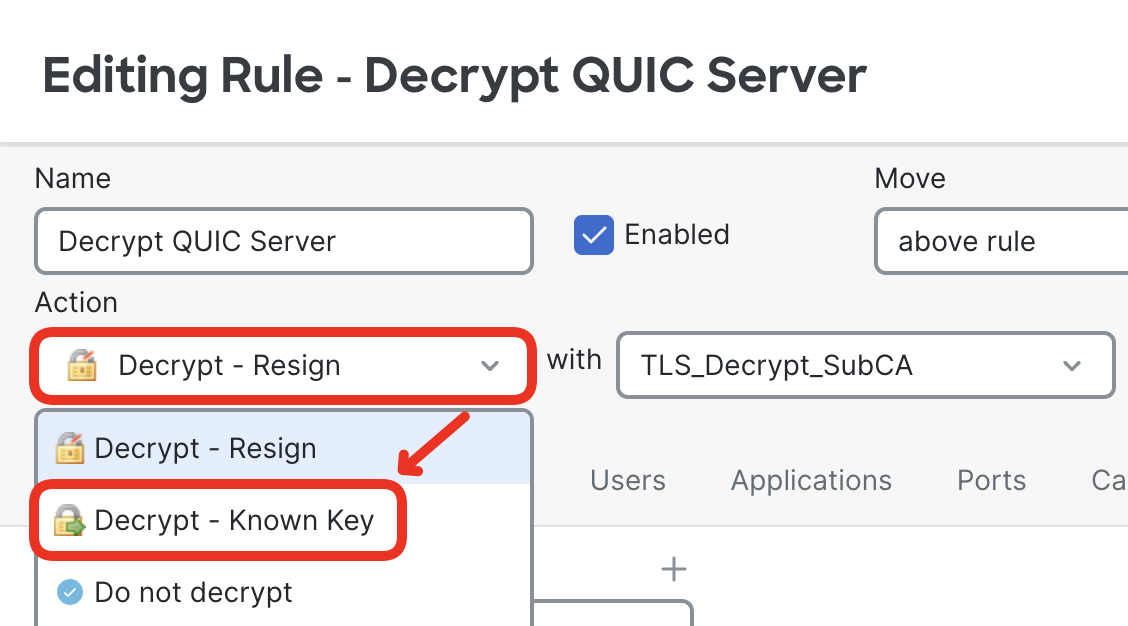
- Accept the warning popup.
- Select the decryption certificate the firewall will use to decrypt the traffic destined to the QUIC server. Use Click to select decryption certs field.
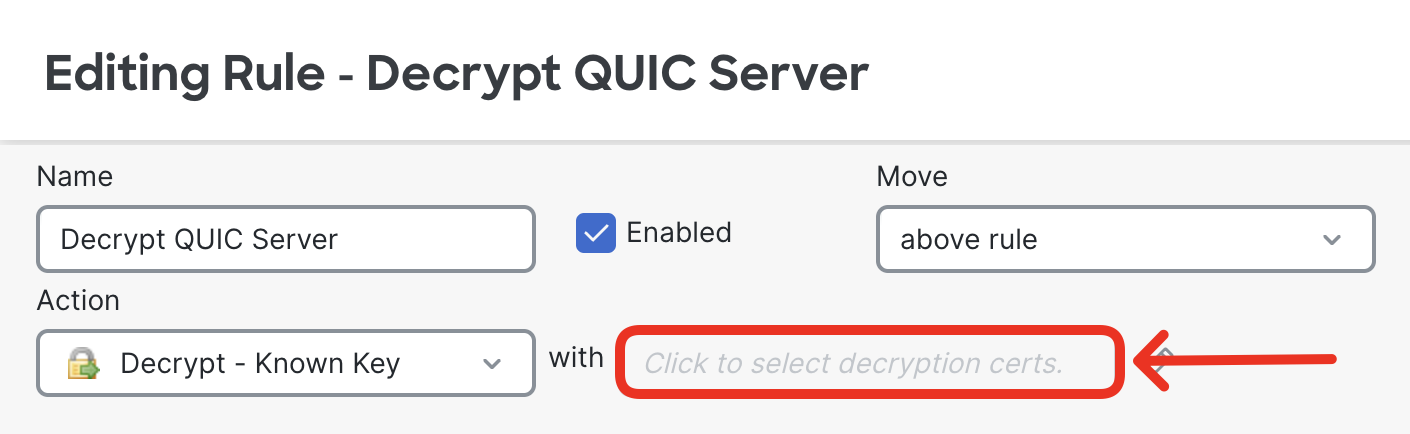
- Select the QUIC-Server certificate you configured a few step back. Click OK.
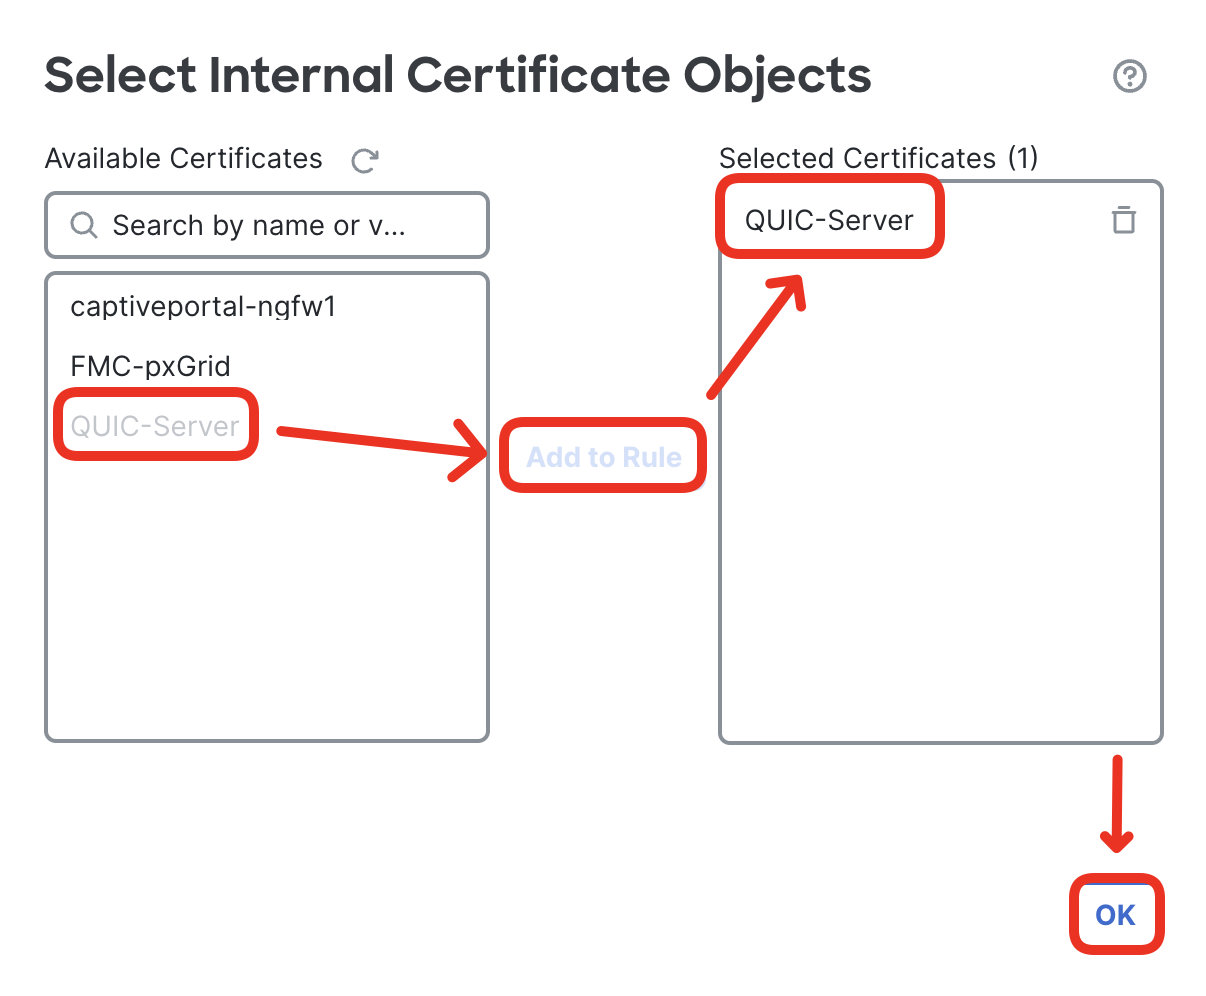
- Confirm the rule is now set to Decrypt - Known Key, with QUIC-Server certificate/key. Notice the Certificate and DN tabs are grayed out. Confirm the rule matches on QUIC-Server network object in the Destination Networks. Finally, click Save.
- Review the rule contents and position in the policy.
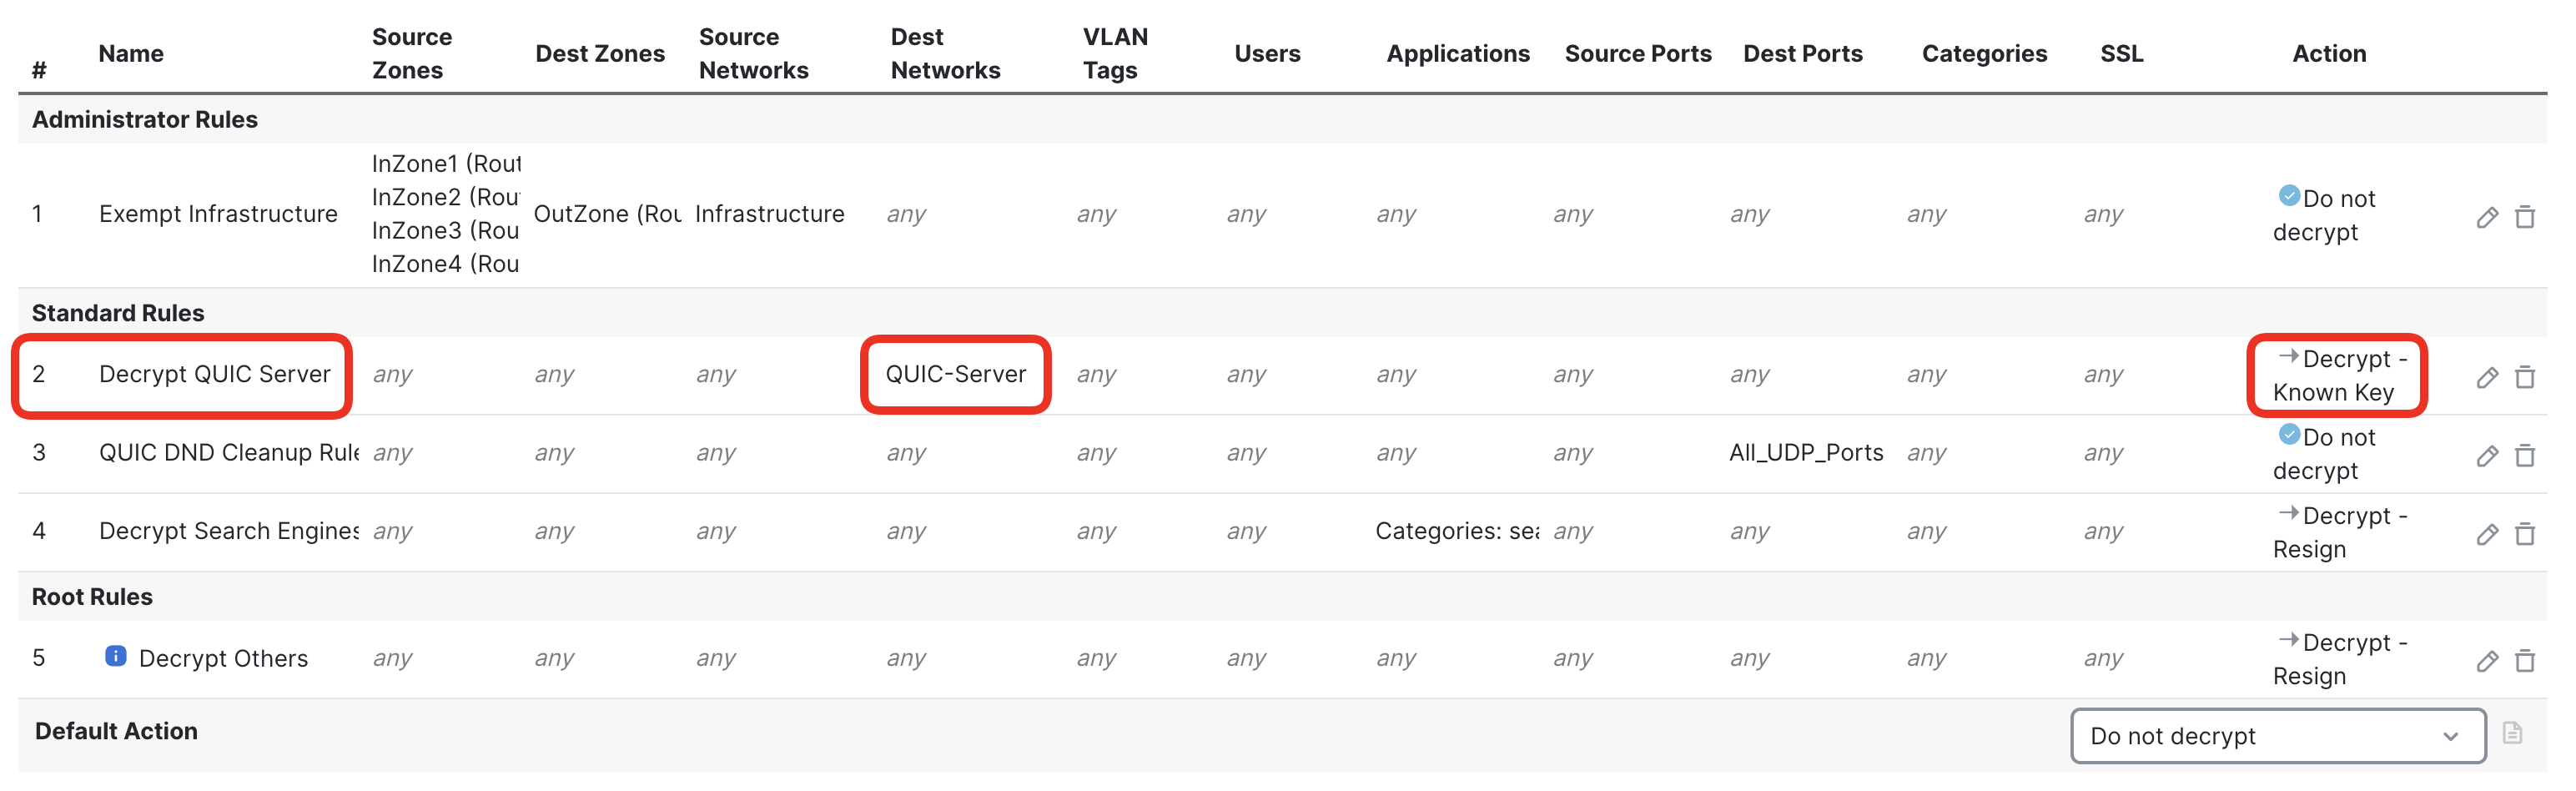
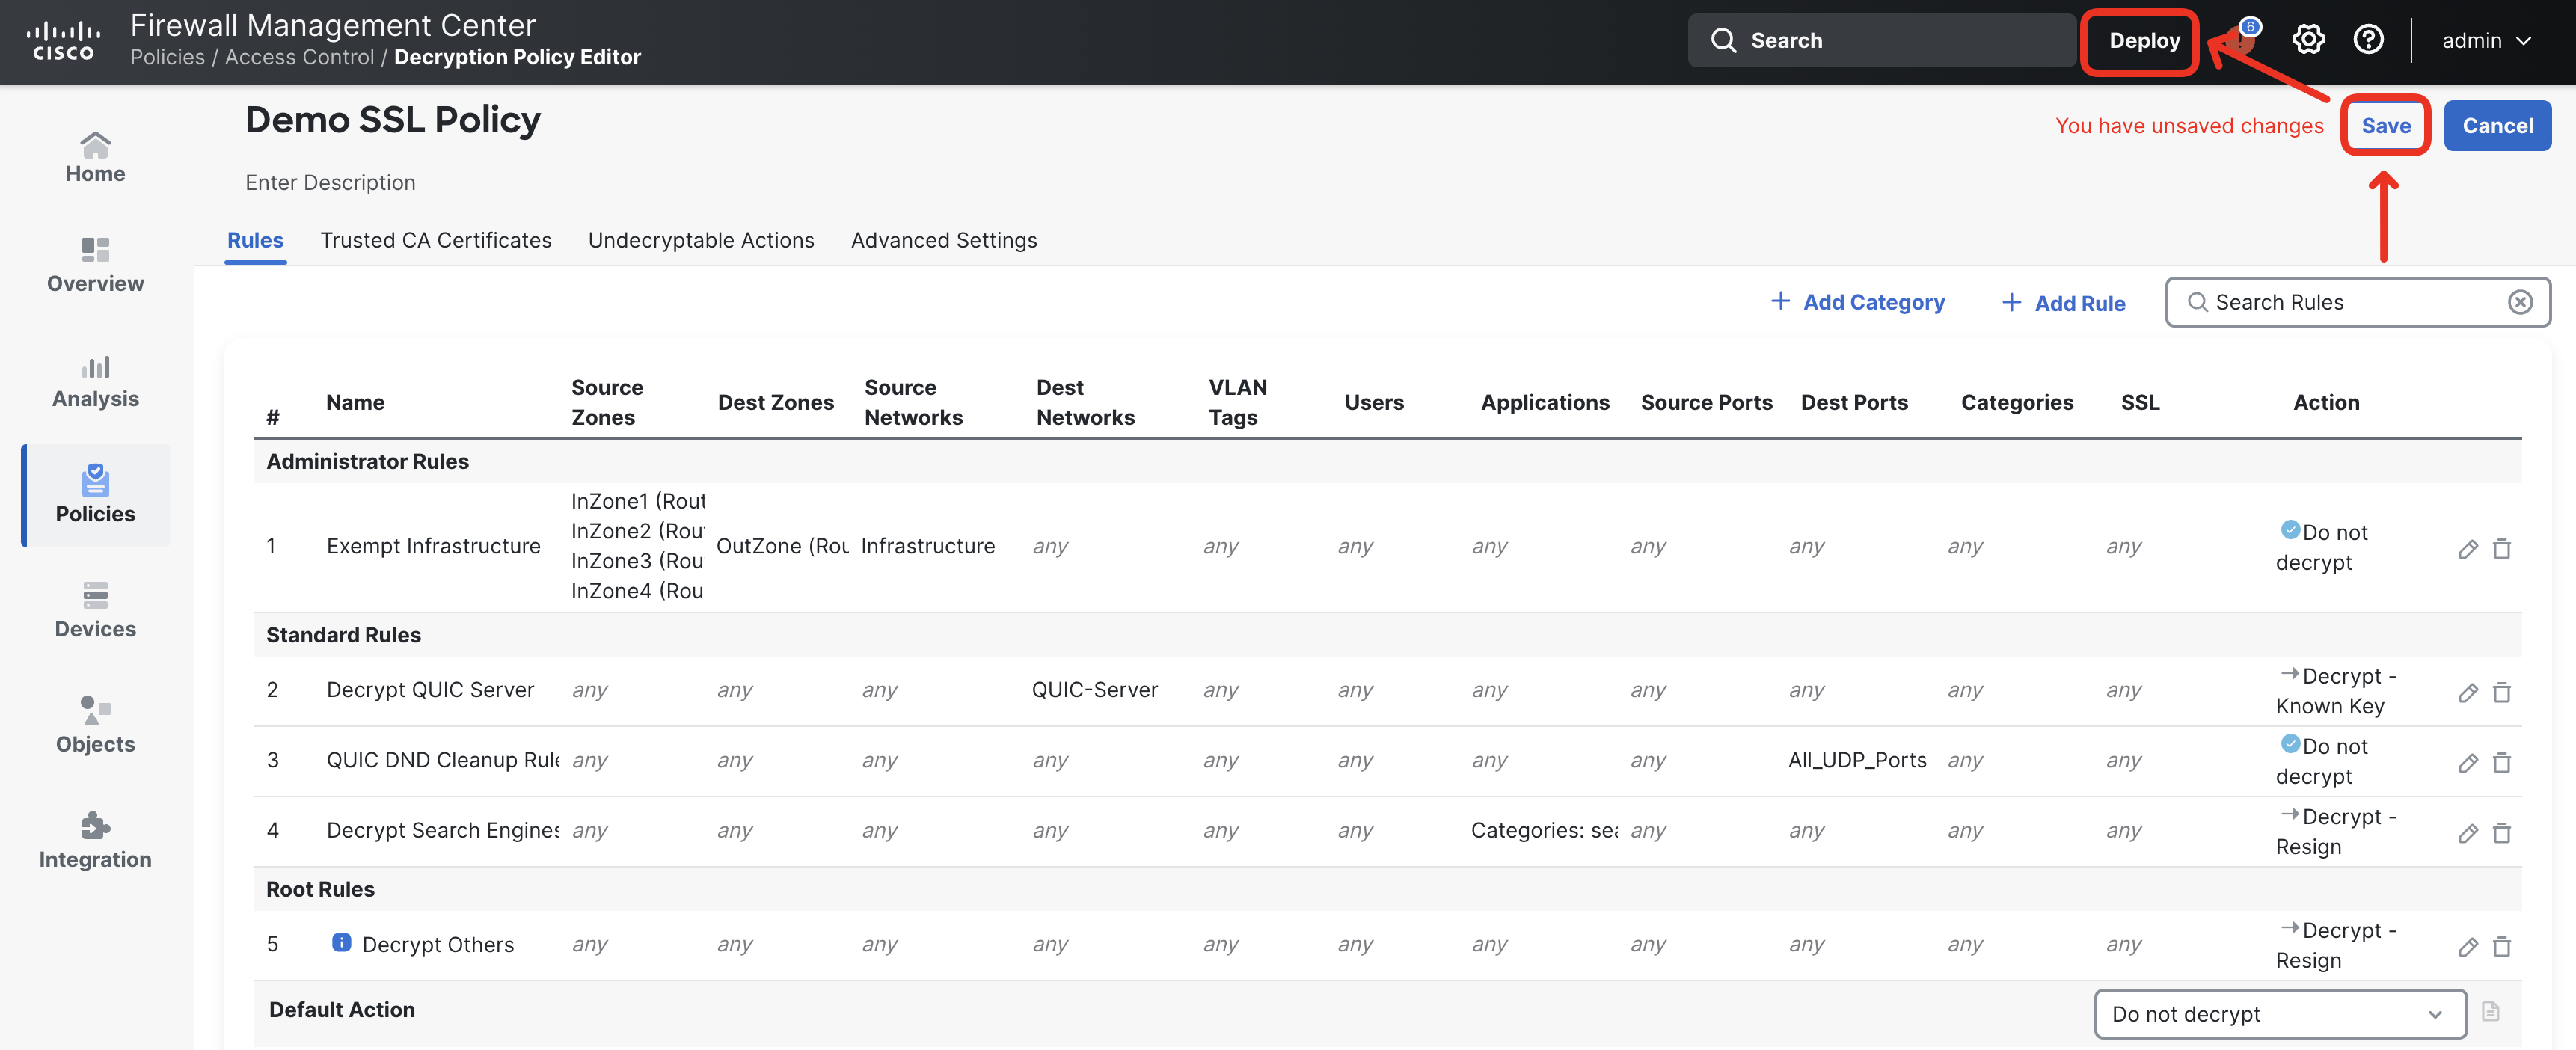
- Save the Decryption Policy and Deploy the updated configuration to the NGFW1.
Task 6 - Test Intrusion Prevention in QUIC decrypted traffic
In this scenario you test Snort intrusion prevention in QUIC traffic decrypted with known-key method.
- Connect to WKST2 and open Firefox with Web Developer Tools enabled. Switch to Network tab.
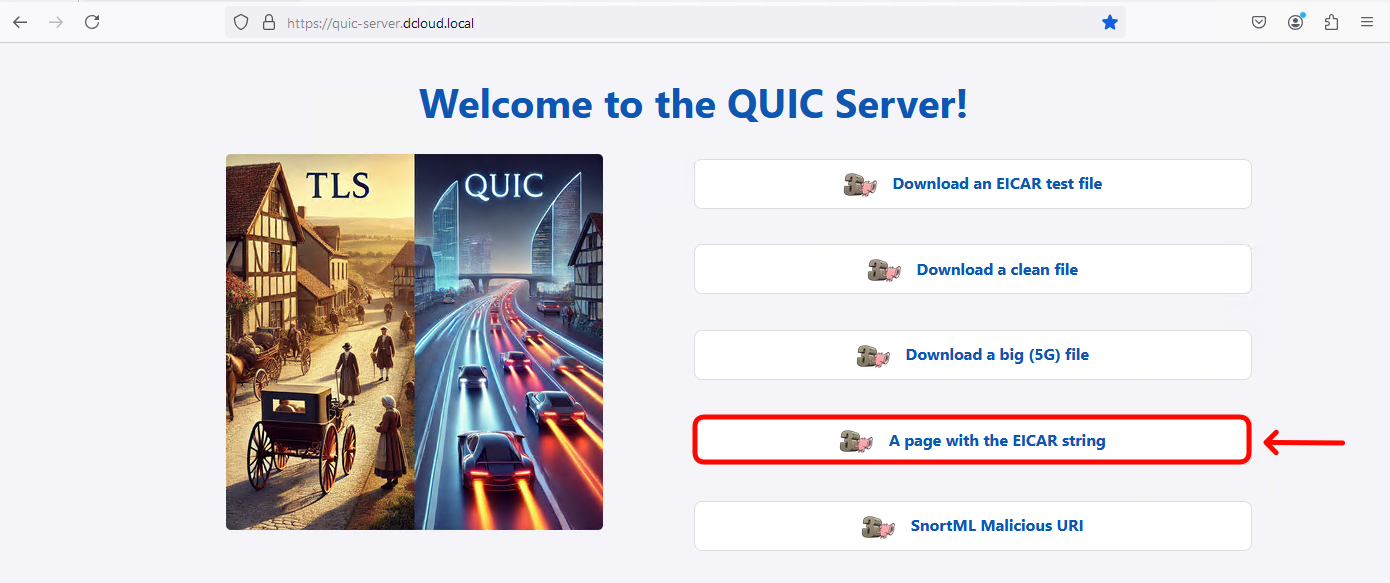
- Navigate to the QUIC Server. Click on the QUIC Server icon or type in https://quic-server.dcloud.local in the address bar. Confirm that Firefox switched to HTTP3/QUIC.
- Click on A page with EICAR string link. The page does not load.
- In the Web Developer Tools confirm, the request to download the EICAR page did not complete.

- Go back to the FMC and navigate to Analysis > Unified Events. Set the filters to display the most recent connection logs to and from the QUIC server:
- set a filter to match connections to the QUIC server: Source or Destination IP = 198.19.10.103
- change the display time to Sliding Time Range and select number of past minutes to display
- Locate the Connection and Intrusion events proving the connection to the EICAR page on the QUIC server was indeed blocked.

- Display the details of the Intrusion event and observe the details.

Tell us how we are doing
We are doing our best to ensure the scenarios in this lab guides are useful, clear and work as expected.
Please share your thoughts to help us improve or fix any problems you may run into..
Click here to provide your feedback or report an issue with this guide