Firewall Roadshow Ignite - Getting Started Guide
Cisco Internal Use Only for Secure Firewall Roadshow Ignite Event
Introduction
This guide showcases the workflow for onboarding a newly provisioned branch Firewall in the Cisco Security Cloud Control and managing it using the cloud-delivered Firewall Management Center (cdFMC) in Cisco Security Cloud Control. You will use Low-Touch Provisioning to onboard the Secure Firewall 1010 and, as part of the onboarding, you will configure standard and advanced settings on the Firewall (Access Control Policy, NAT, etc.). Thereby enabling local LAN users at the branch to access the Internet with increasing protection, providing visibility on the user's activity to the Firewall admin, and storing traffic logs in the Cisco Cloud.
About Firewall Threat Defense Managed by Security Cloud Control
The cloud-delivered Firewall Management Center provides a similar feature-set to an on-premises Firewall Management Center with a familiar interface. The below options are available for onboarding a device:
- Registration Key-Based Onboarding - The administrator generates a registration key from the Device Onboarding Wizard in Security Cloud Control, which is then entered into the firewall using either the Device Manager or the CLI (similar to the FMC onboarding workflow).
- Low-Touch Provisioning - The administrator claims the Firewall by entering the firewall serial number into the Onboarding Wizard in Security Cloud Control. Upon powering up and connecting to the Internet, the Firewall is automatically onboarded. This provides a low-effort onboarding experience, which is especially useful for provisioning remote branches.
- Deploy to a cloud environment - The administrator will use this method to deploy FTDv in a public cloud account. Security Cloud Control will integrate with the public cloud account and leverage APIs to orchestrate the FTD provisioning end to end. This deployment scenario is outside the scope of this guide.
Low-Touch Provisioning
The Low-Touch Provisioning method simplifies the onboarding process as there is no technical prowess needed at the branch to configure the Firewalls. To complete the onboarding, the Firewall needs to be powered-on and have internet connectivity. The Firewall admin simply claims the device for management using the Serial Number.
The Firewall onboarding is split into two groups:
| Branch Office Admin | Firewall Admin |
|---|---|
| 1. Unbox the device and share the Serial Number with Firewall Admin | 1. Login to a Security Cloud Control tenant |
| 2. Cable the device to establish network connectivity | 2. Onboard the Firewall using the Serial Number provided by the Branch admin |
| 3. Connect the power cable to turn on the Firewall | 3. Assign basic settings at the time of onboarding |
| 4. Observe the Status LED till it is onboarded | 4. Configure further features on the Firewall |
Important Info
Tasks in one group can be performed independently of the other group, e.g., the Firewall admin does not need to wait for the Firewall to be plugged in and connected to start the onboarding process.
Data Interface for Management
In this lab setup, we will use the Outside(Ethernet1/1) interface to manage the Firewall. We will not use the dedicated management interface. As part of Low-Touch Provisioning, the Firewall will use the Outside (Ethernet1/1) interface to establish the encrypted management tunnel with Security Cloud Control
The cloud-delivered Firewall Management Center will show the Firewall as managed through the Data Interface. This has multiple benefits in the case of Branch Deployments:
- Branches can be DHCP Enabled as there is no dependency on the Firewall IP
- No dedicated Management Subnet or OOB connection needed
- Outbound Encrypted Management Tunnel eliminates the need to open an HTTPS connection to the Firewall
- Dual ISP design is supported where the ISP2 link can be used to re-establish management connection, in case ISP1 connectivity is degraded
- Automated Configuration Rollback can provide automated recovery if a deployment breaks the management connectivity
- Local Firewall CLI can be used to reconfigure the Data interface to handle disaster recovery in scenarios like link failures, ISP failures etc.
Warning
Some of the screenshots might not exactly match as these are for reference only and were taken in a different state of the lab environment.
Validate Status of the Firewall 1010
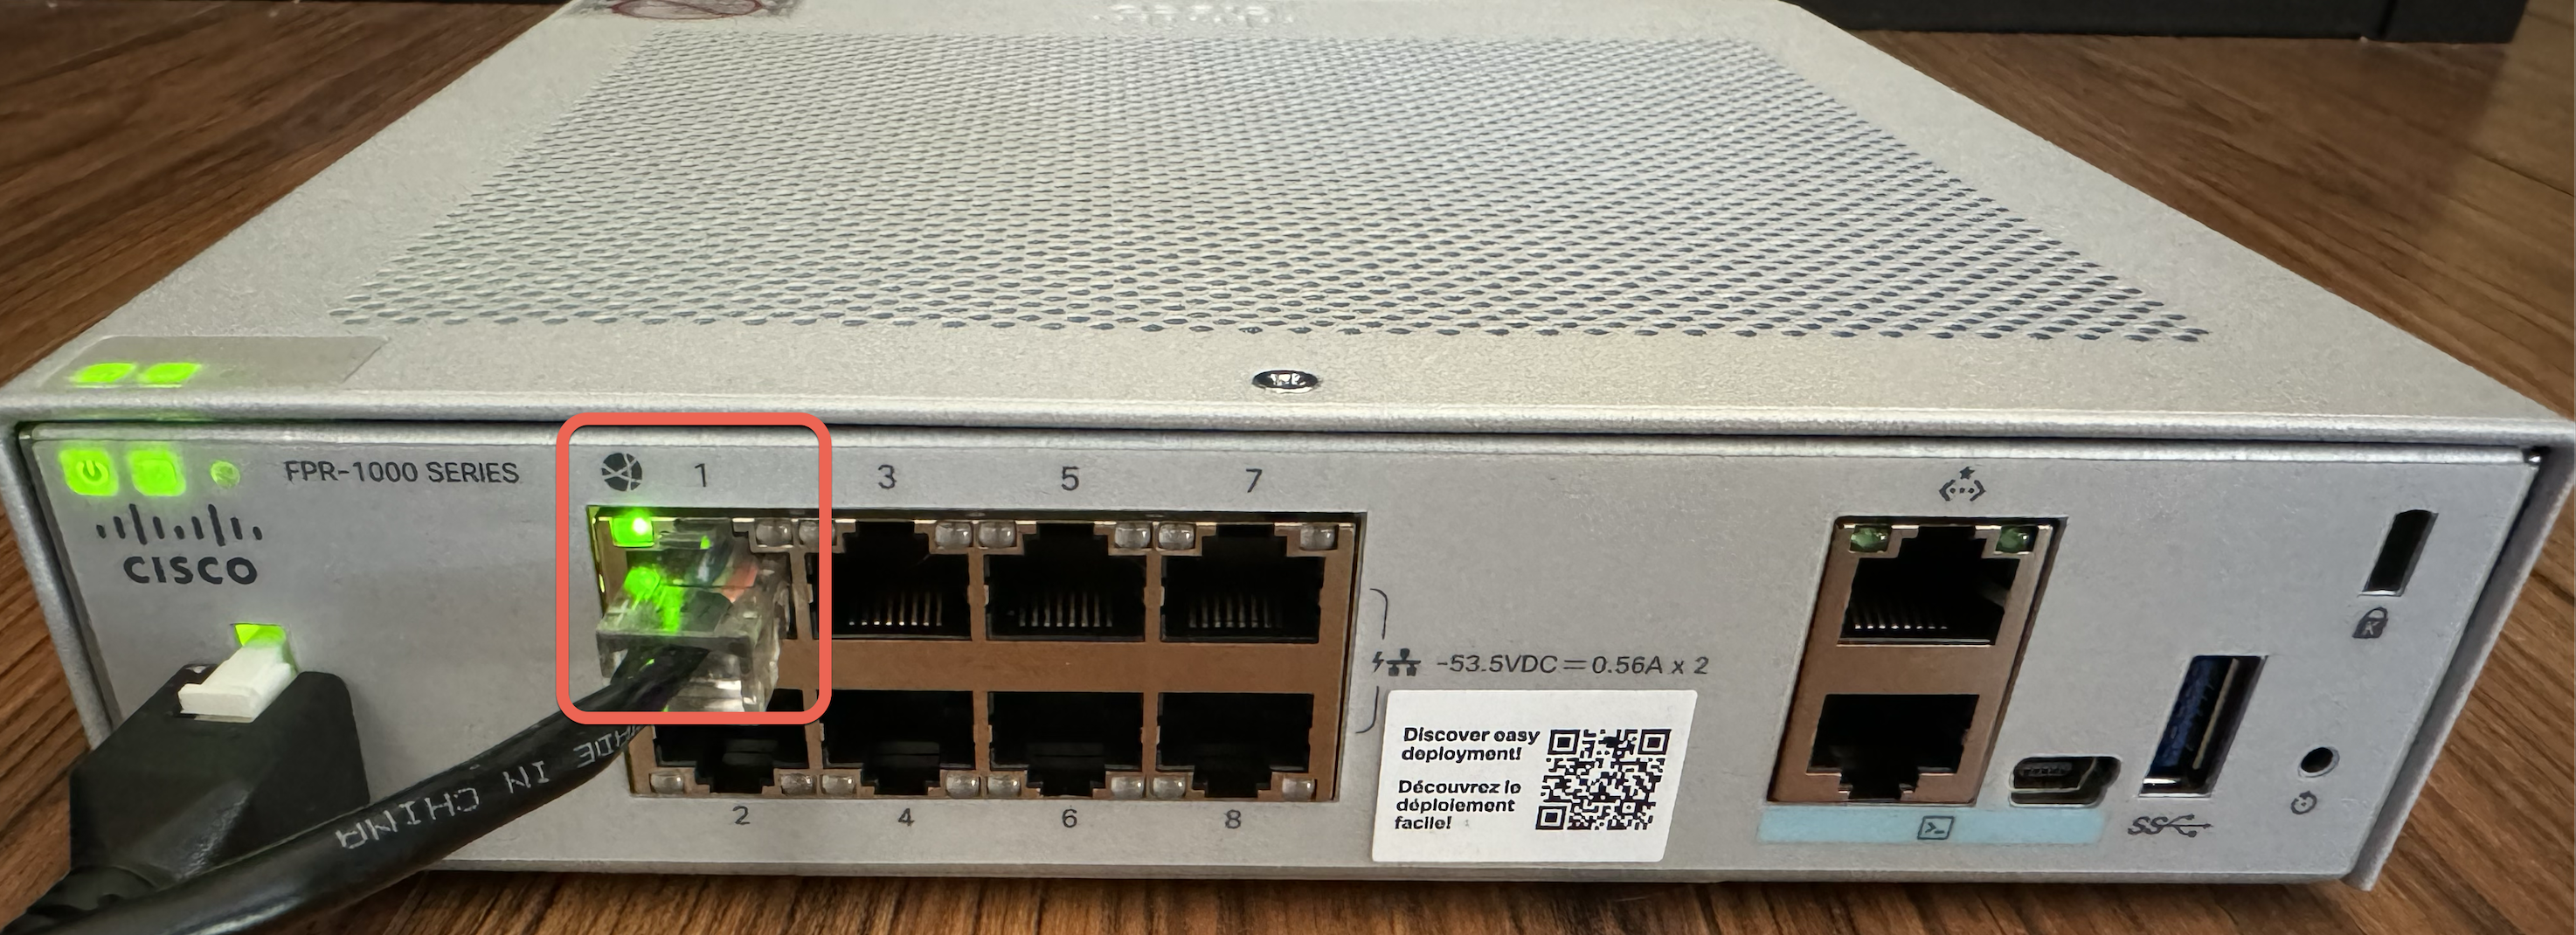
The below diagram indicates where on the physical Firewall 1010 device, you can observe the System rear-panel LEDs. For this guide, only the Power and Status LEDs will be explained.
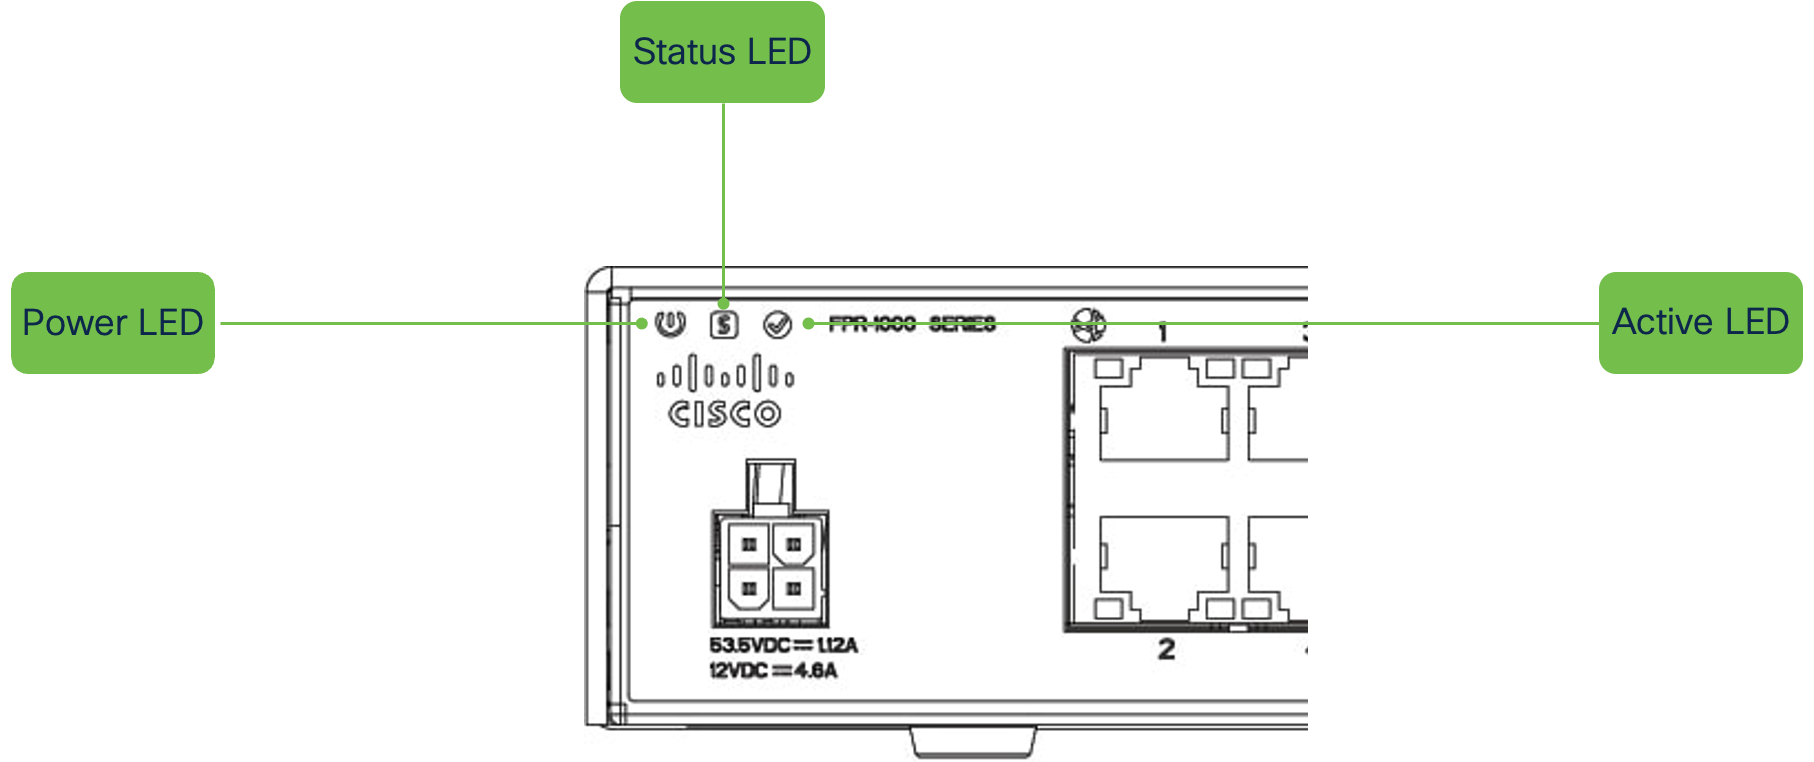
- Confirm normal System Status in a standalone configuration with the following LED Patterns:
- Power LED - Solid Green (Power Supply on)
- Status LED - Green, flashing slowly (Cloud Connected)
- Active LED - Solid Green
Lab Tasks Overview
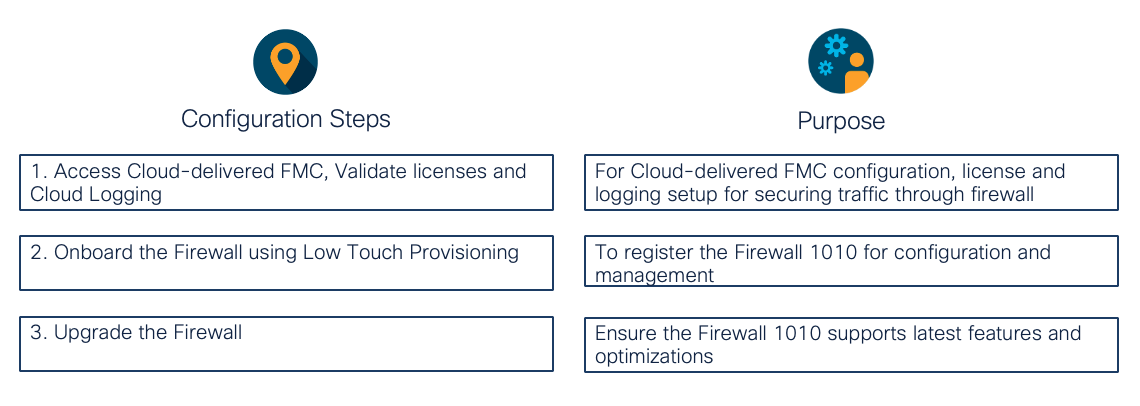
Task 1 - Security Cloud Control and Onboard the Firewall
Note
Before you begin the tasks, please clear your web browser's cache or use incognito/private window on your browser.
-
Login to your Security Cloud Control account by navigating to defenseorchestrator.com in the system browser on your laptop.
Upon login, you will see the Landing page dashboard, which has many actionable insights such as the overall state of the deployment, VPN sessions etc. Since this is a new tenant, the dashboard will be blank and you might be prompted with a carousel about Cisco Security Cloud Control. Explore the carousel by clicking Next through the different pages, otherwise select Close to get started.
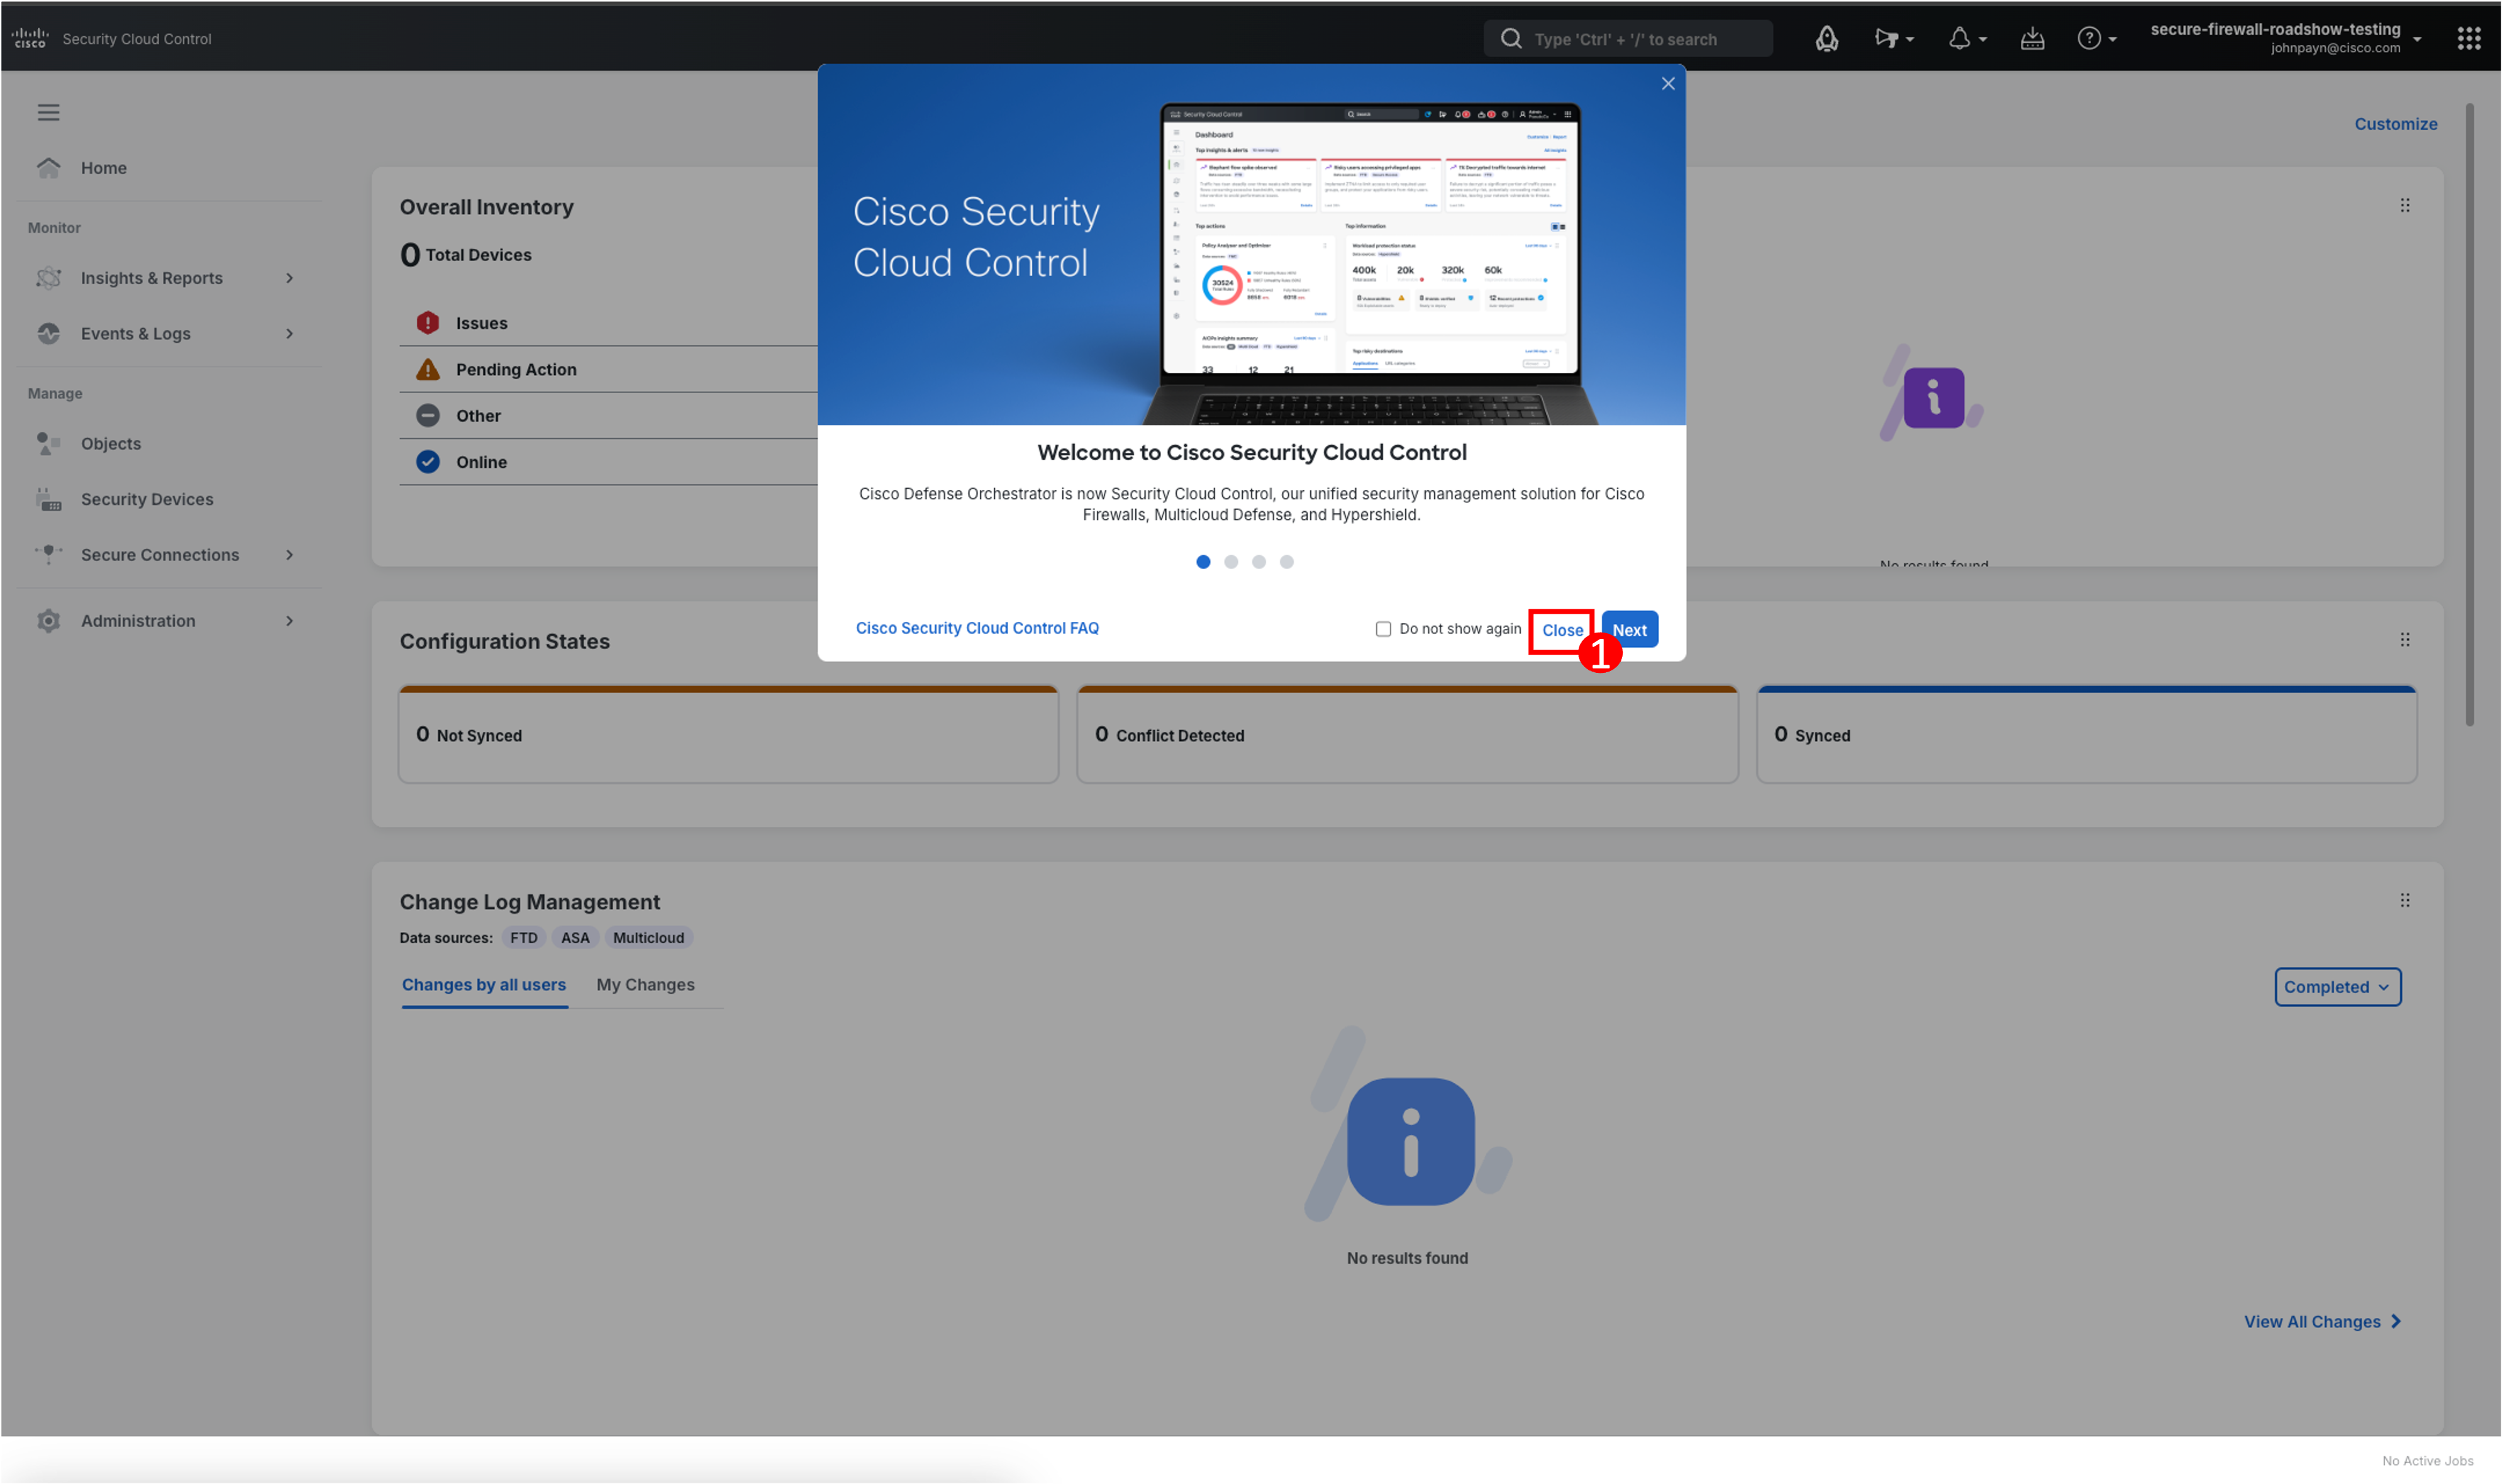
Note
If you do not see the pop-up below, click the rocket icon in the top menu bar to bring up the menu and proceed from Step 3 below.
-
Another widget will appear giving you options to configure your devices. For our purposes, we will need to onboard a firewall to be managed by Security Cloud Control. Click the Manage firewalls tile.
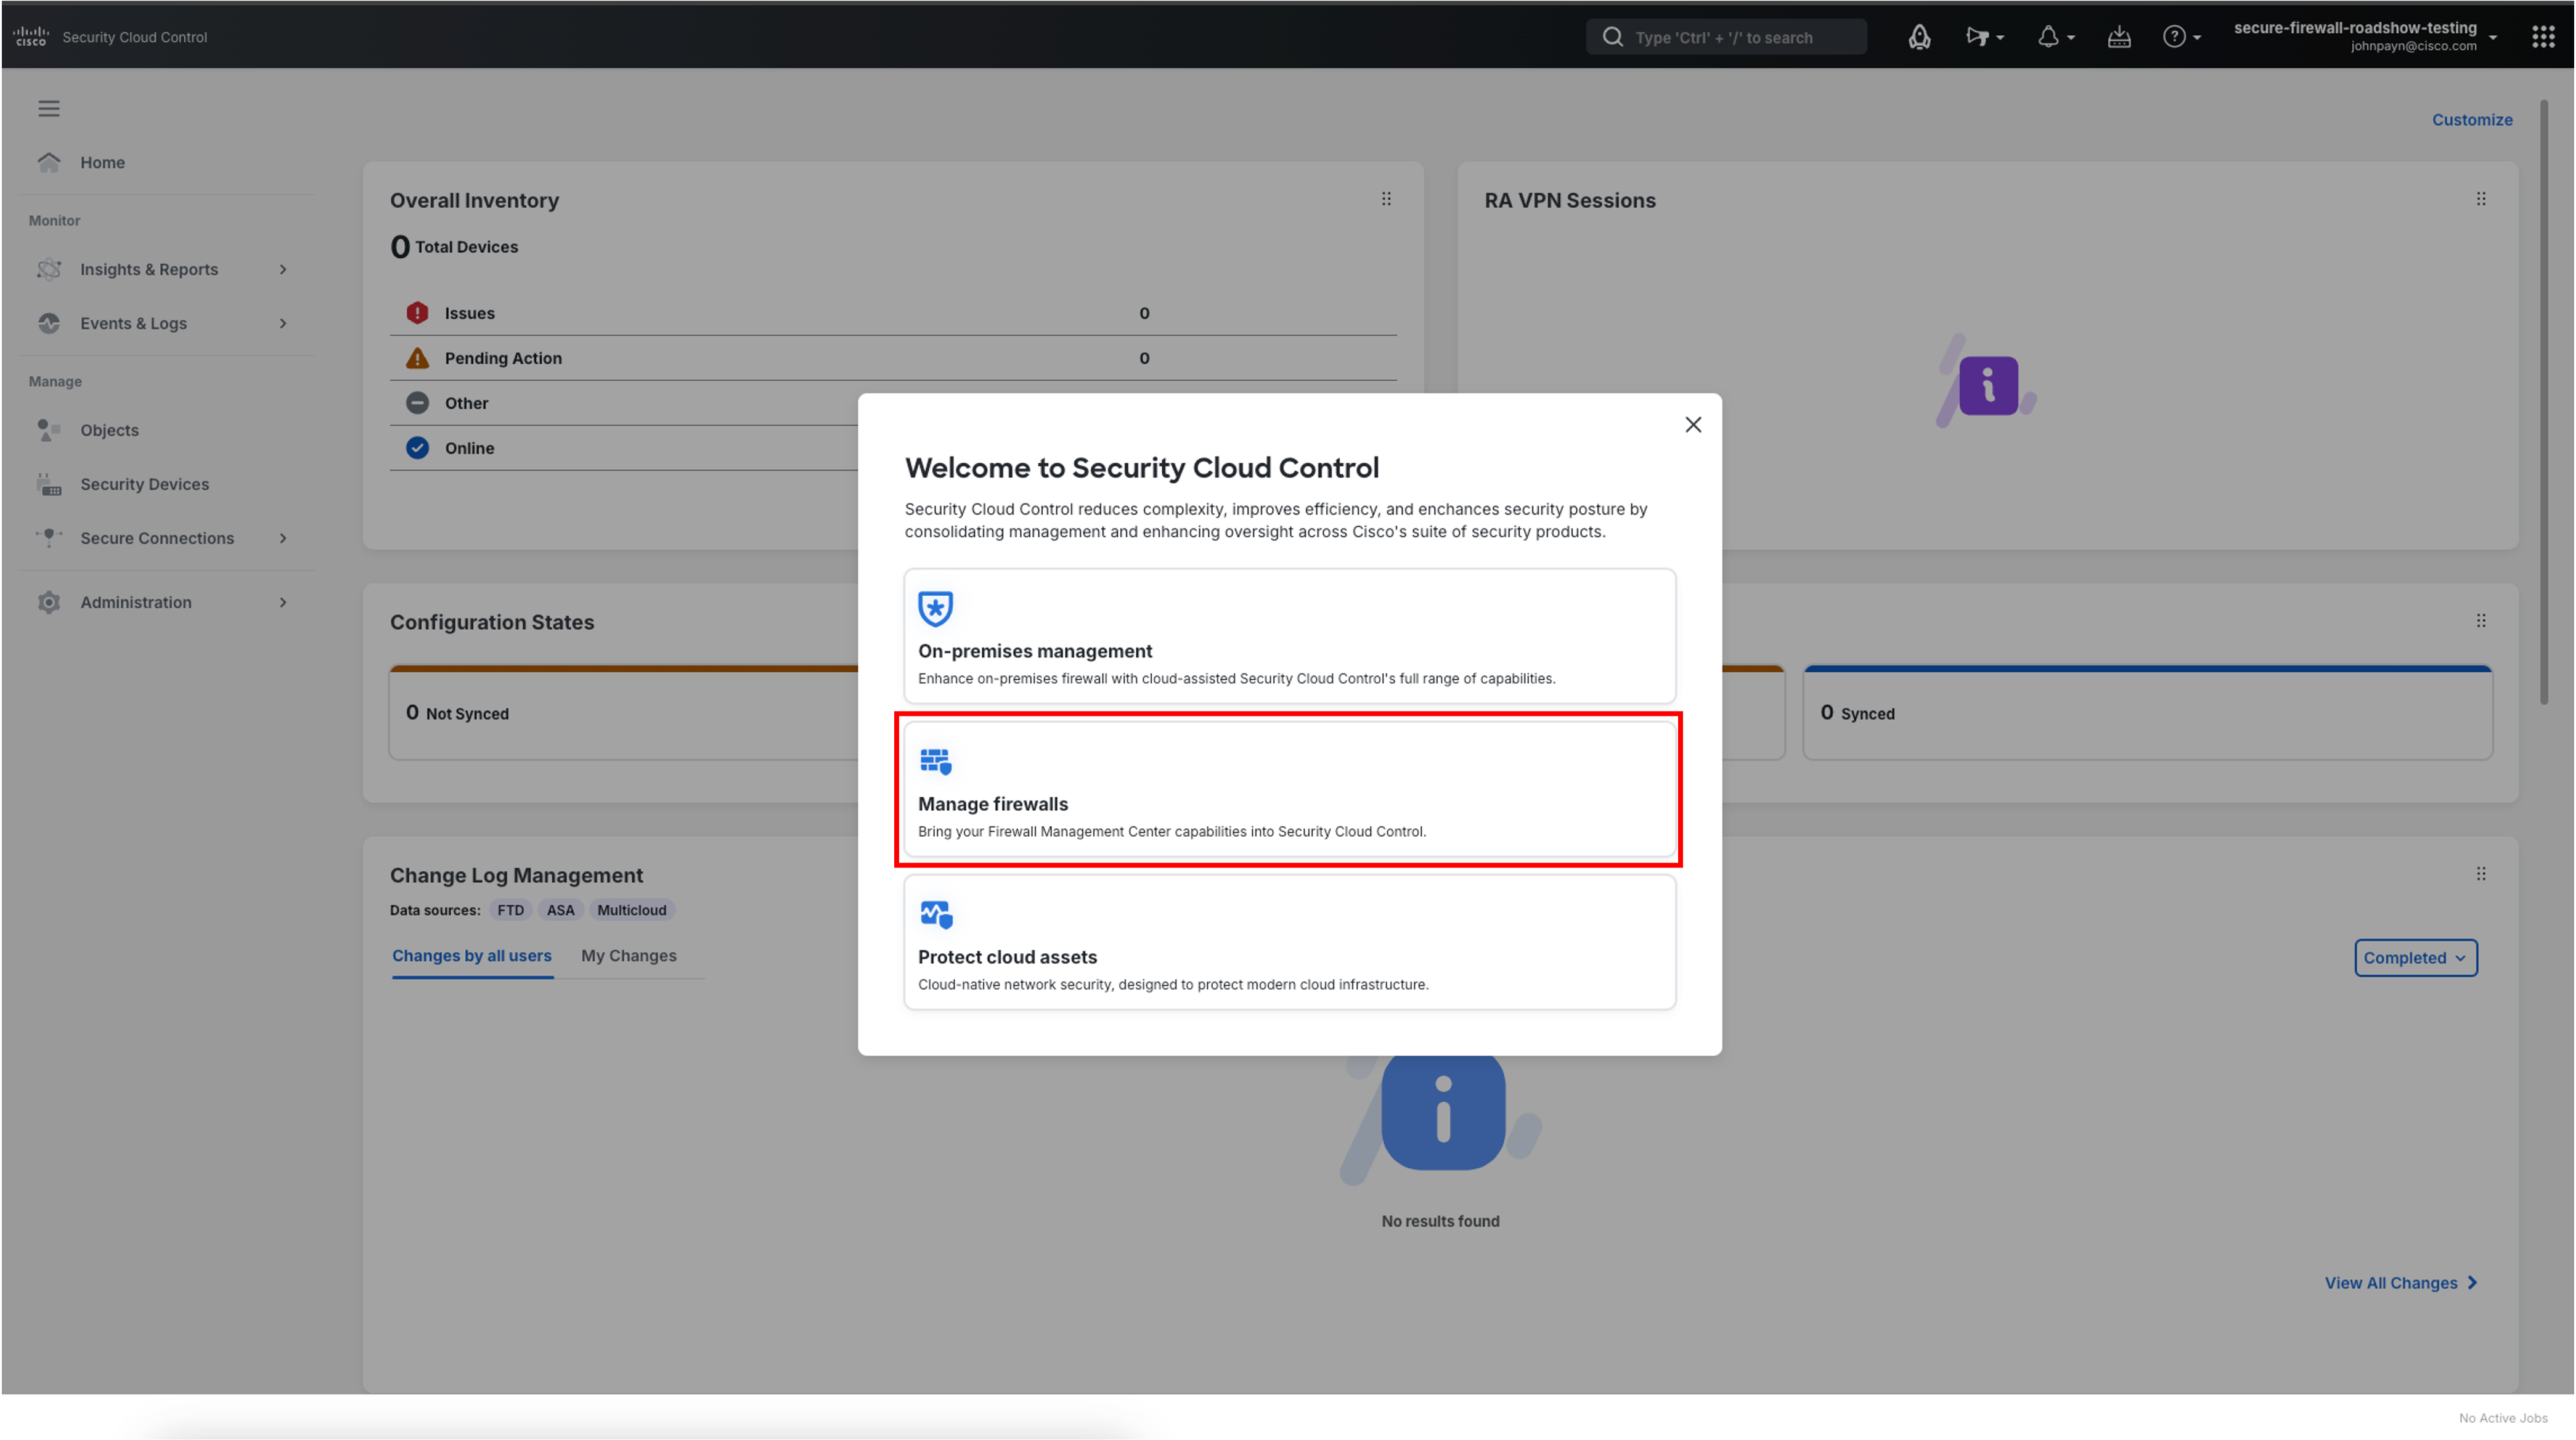
-
In the Getting Started with Security Cloud Control pop-up there are many options for onboarding and managing policies. Click Onboard in the Cisco Secure Firewall FTD tile towards the top of the pop-up.
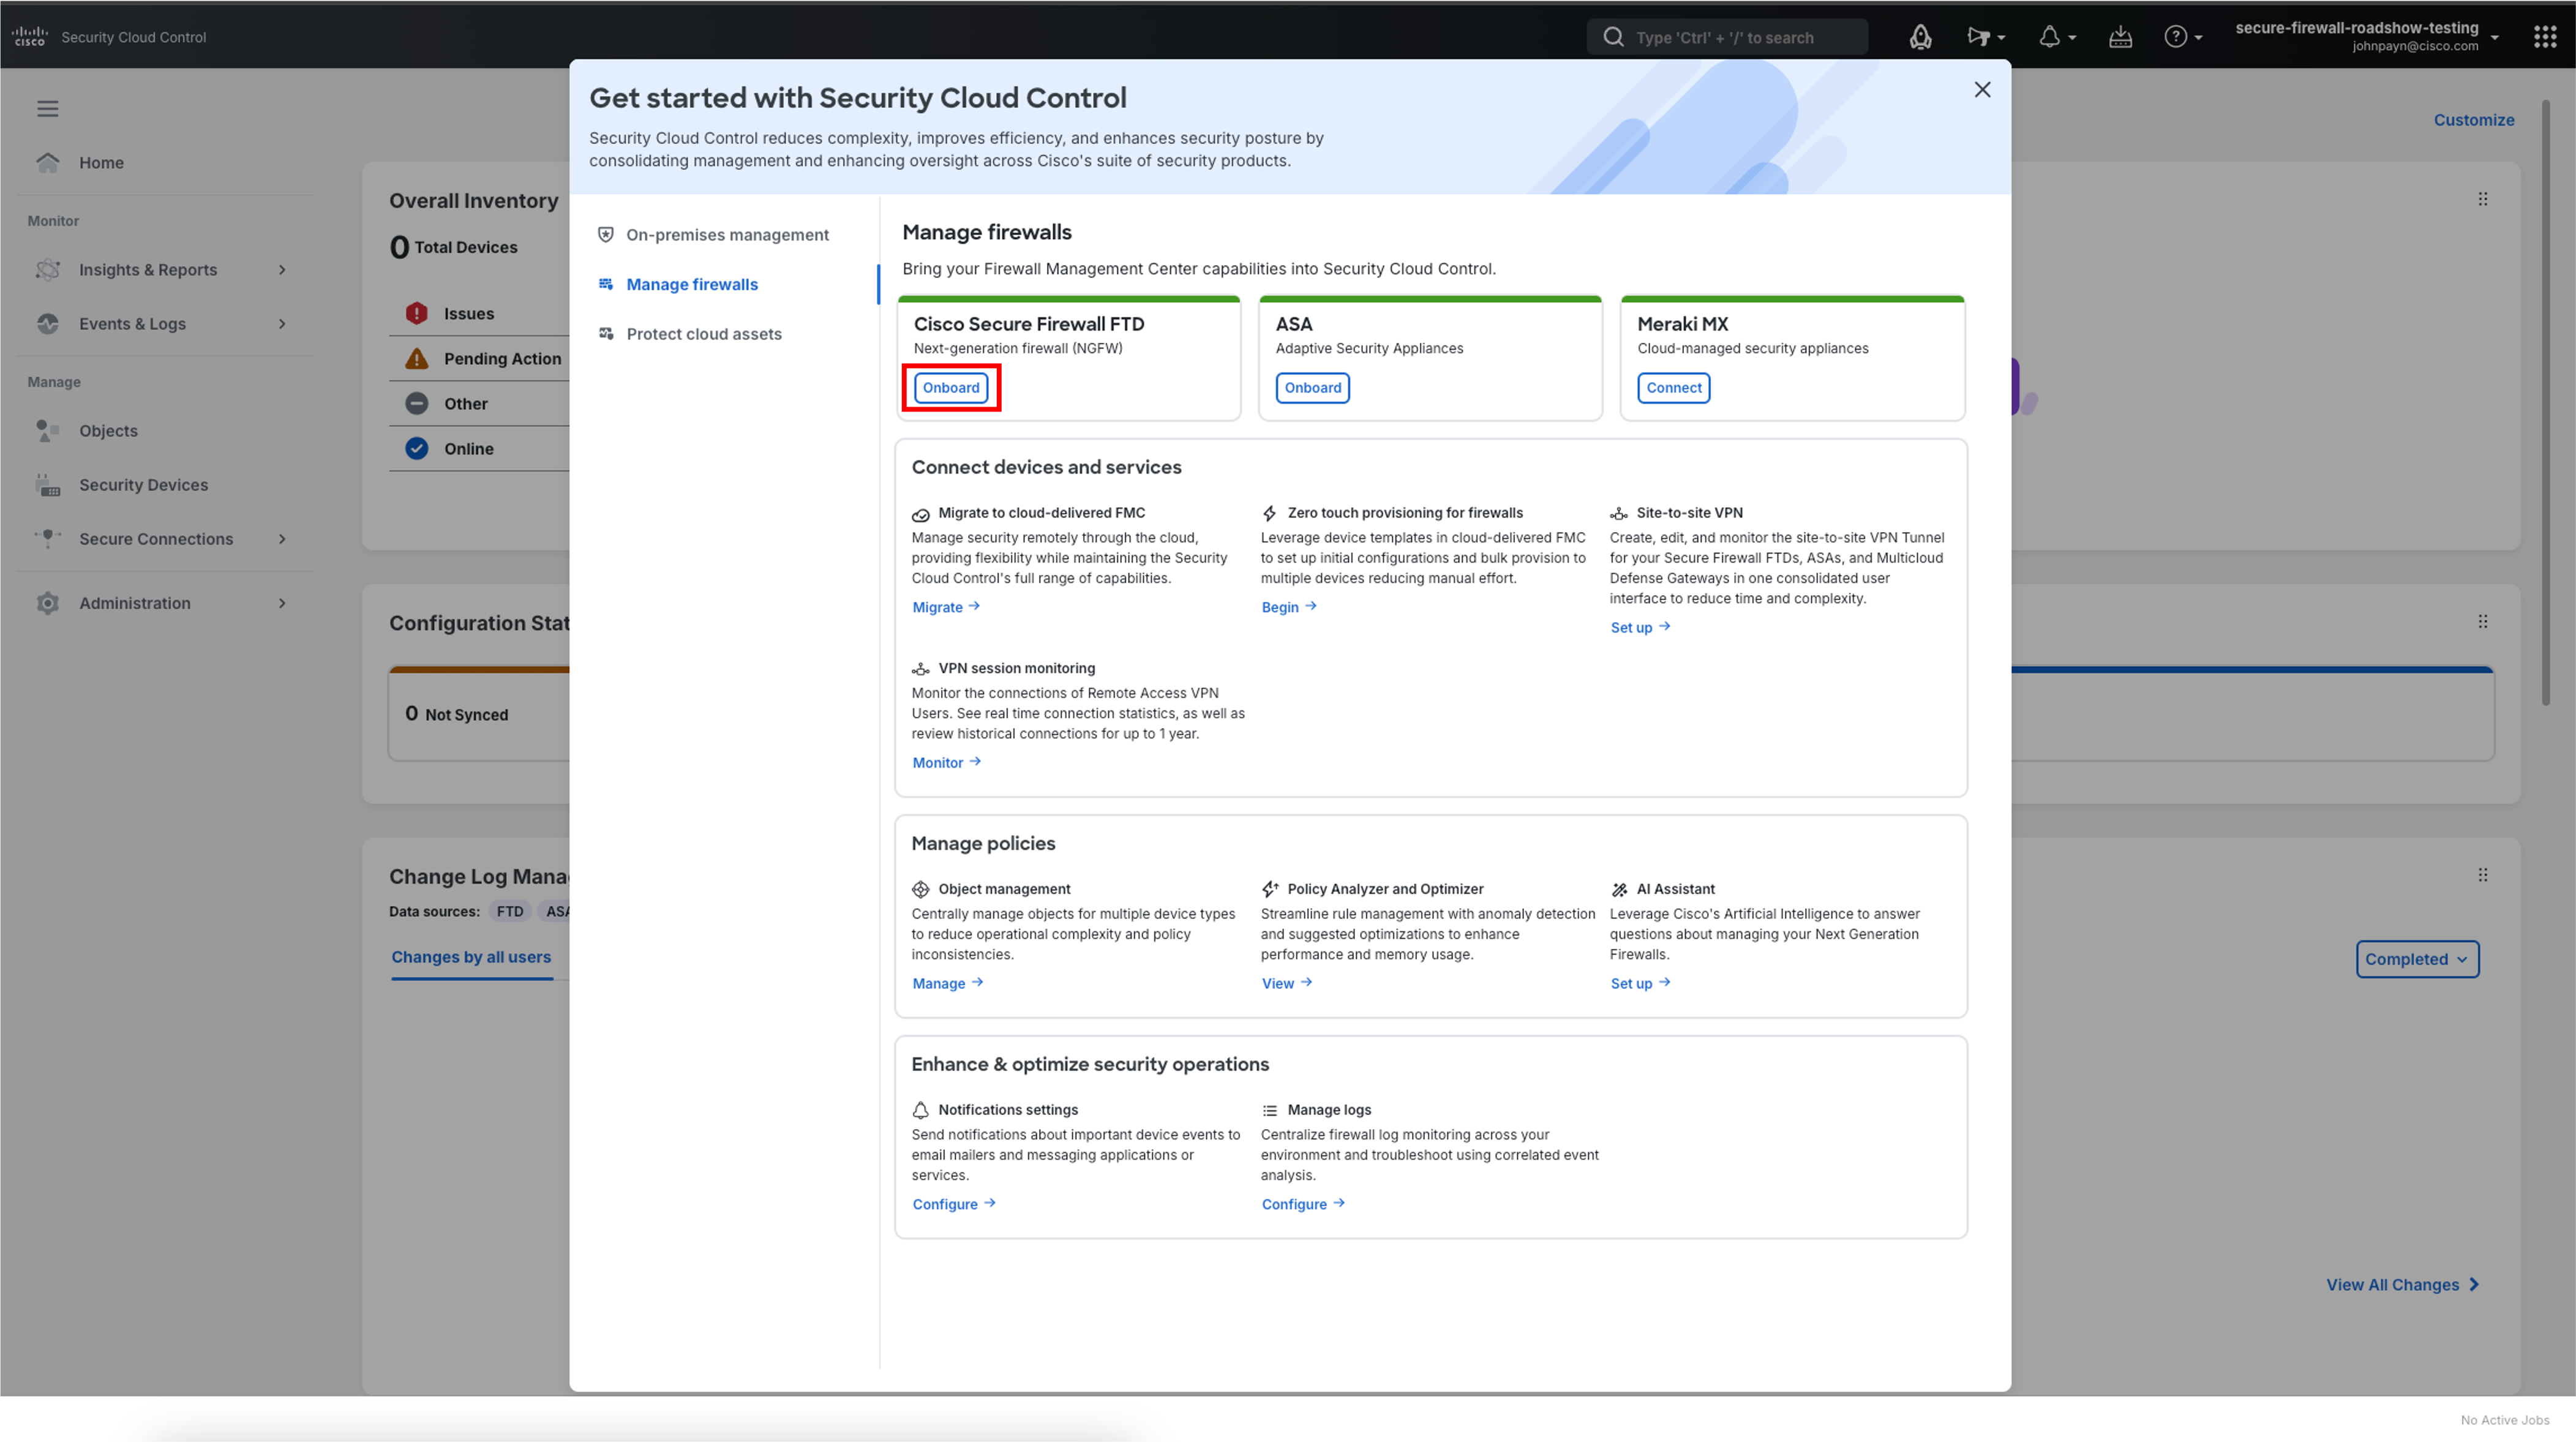
-
Click Accept on the End User License Agreement.
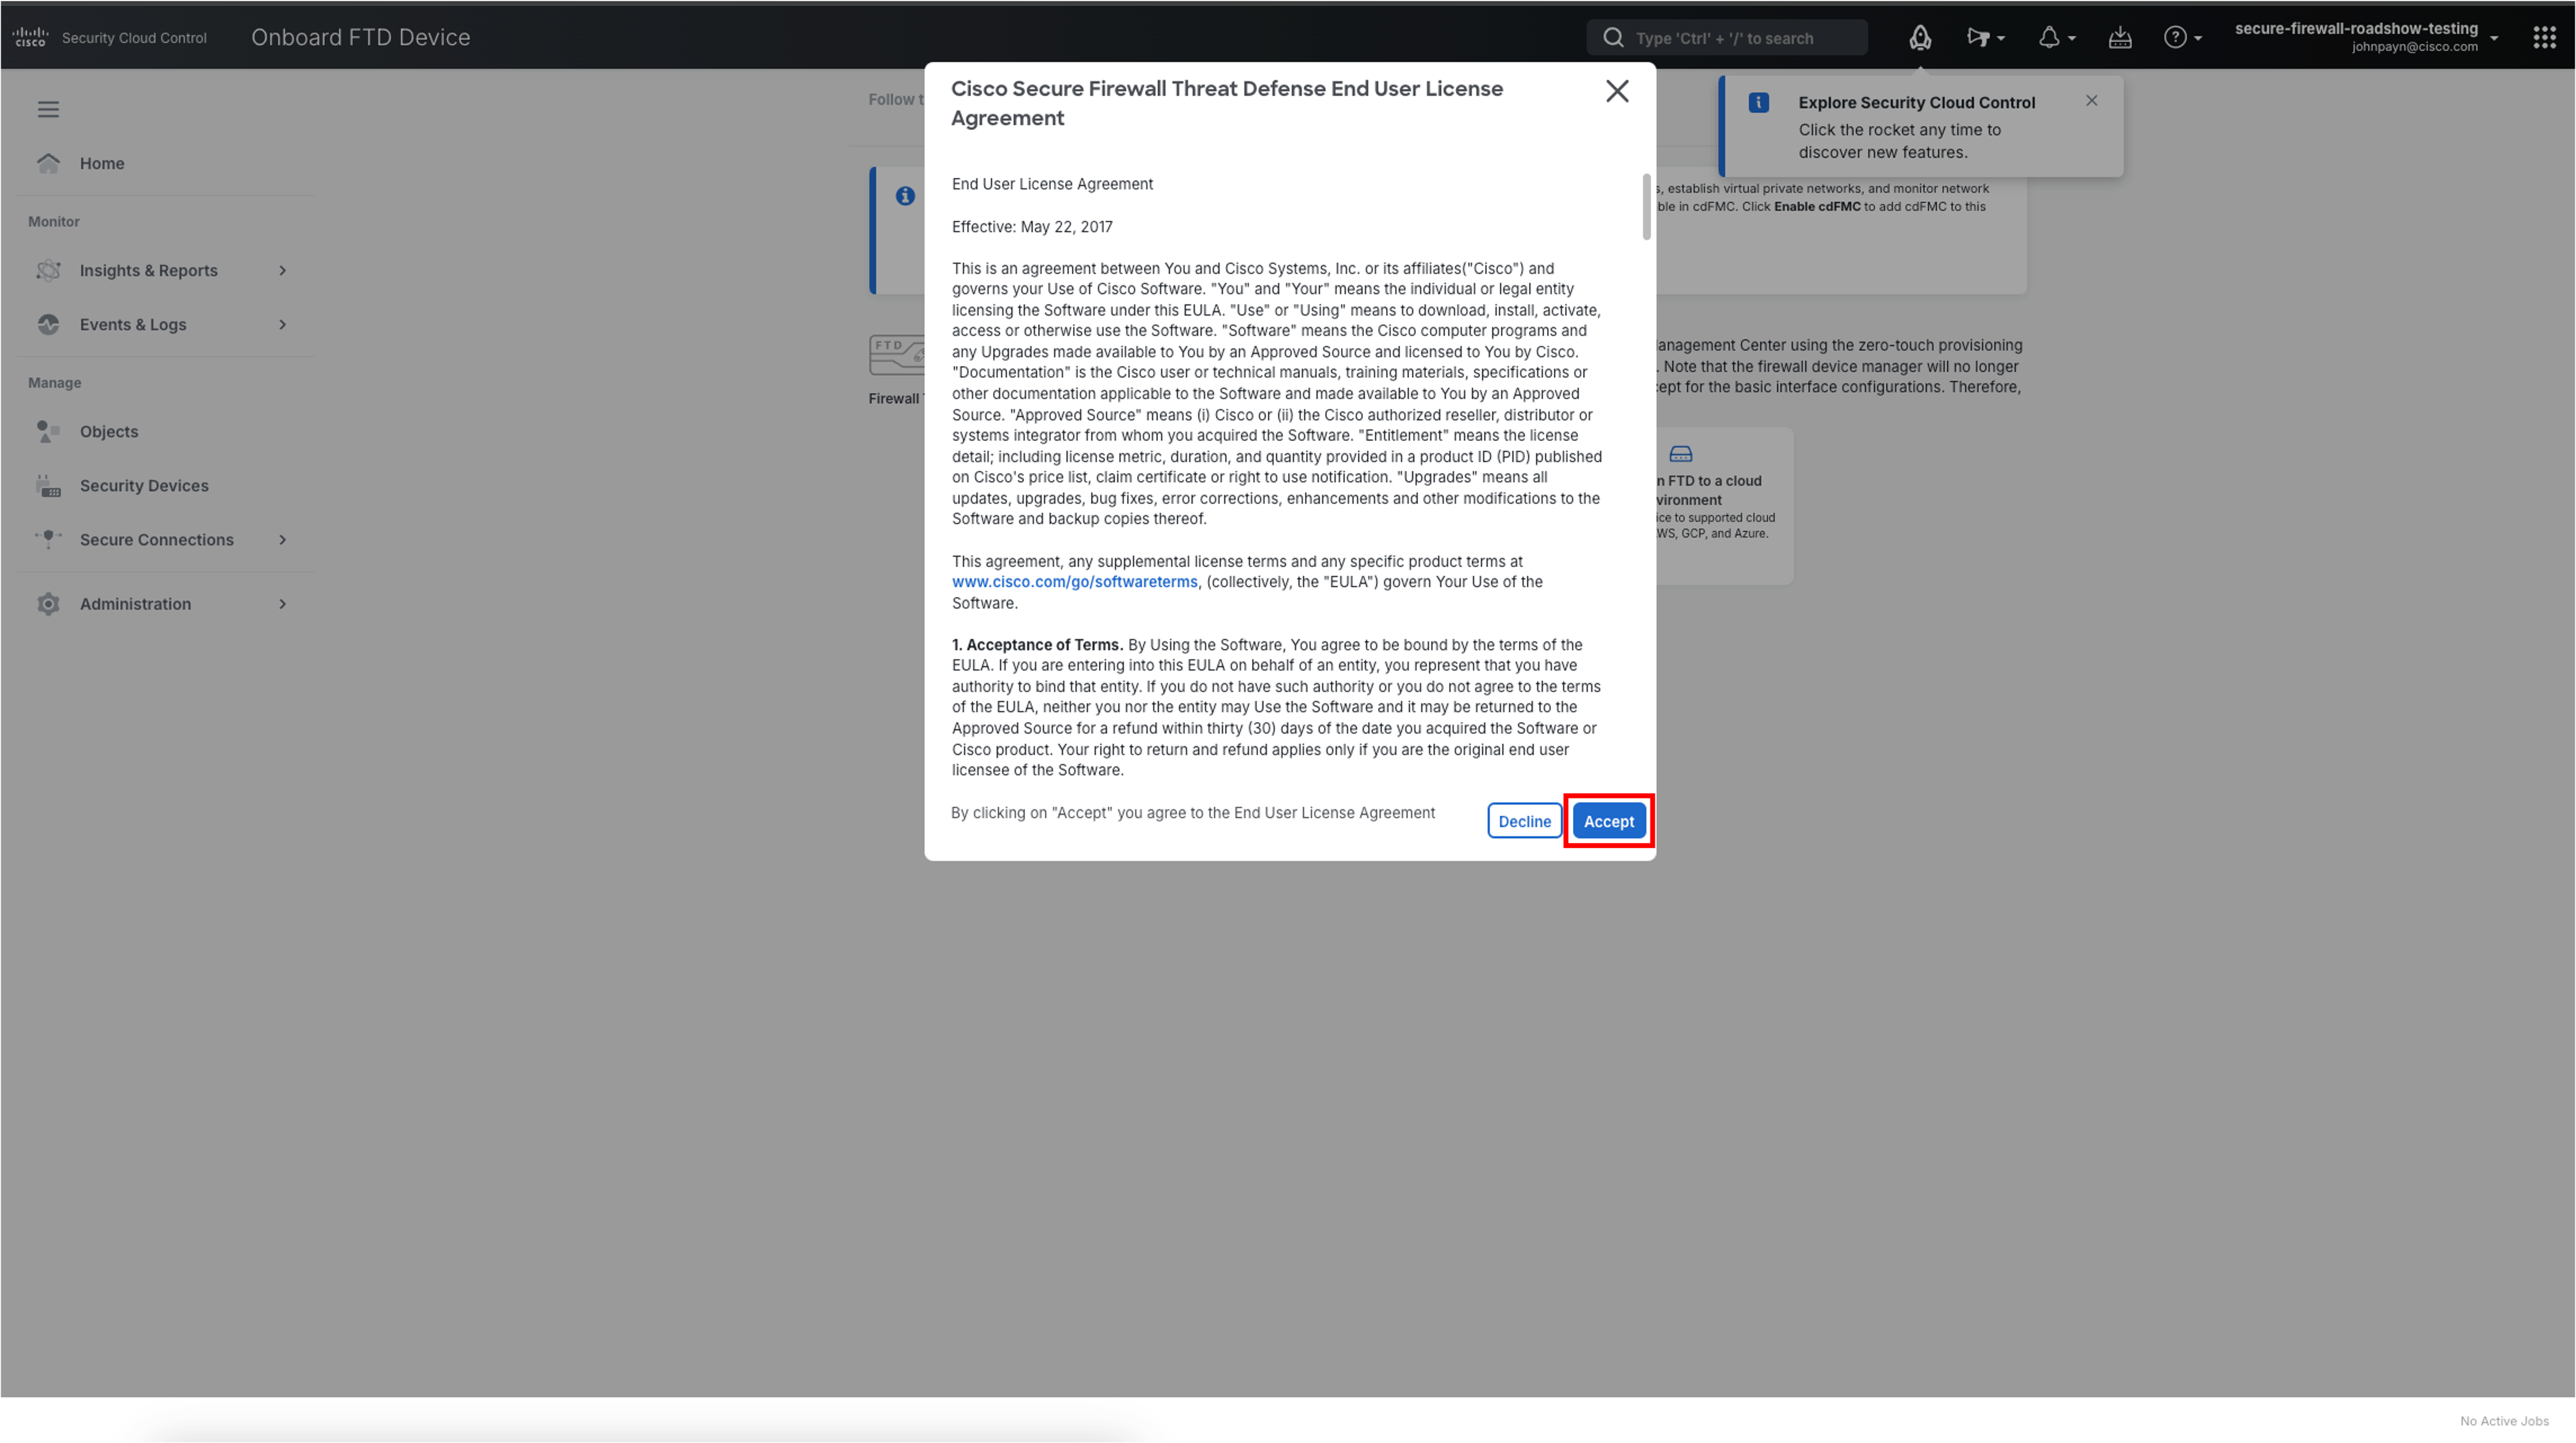
-
A second pop-up will display where you must accept the End User Agreement. Click the checkbox next to I agree to the terms and conditions above and then Accept.
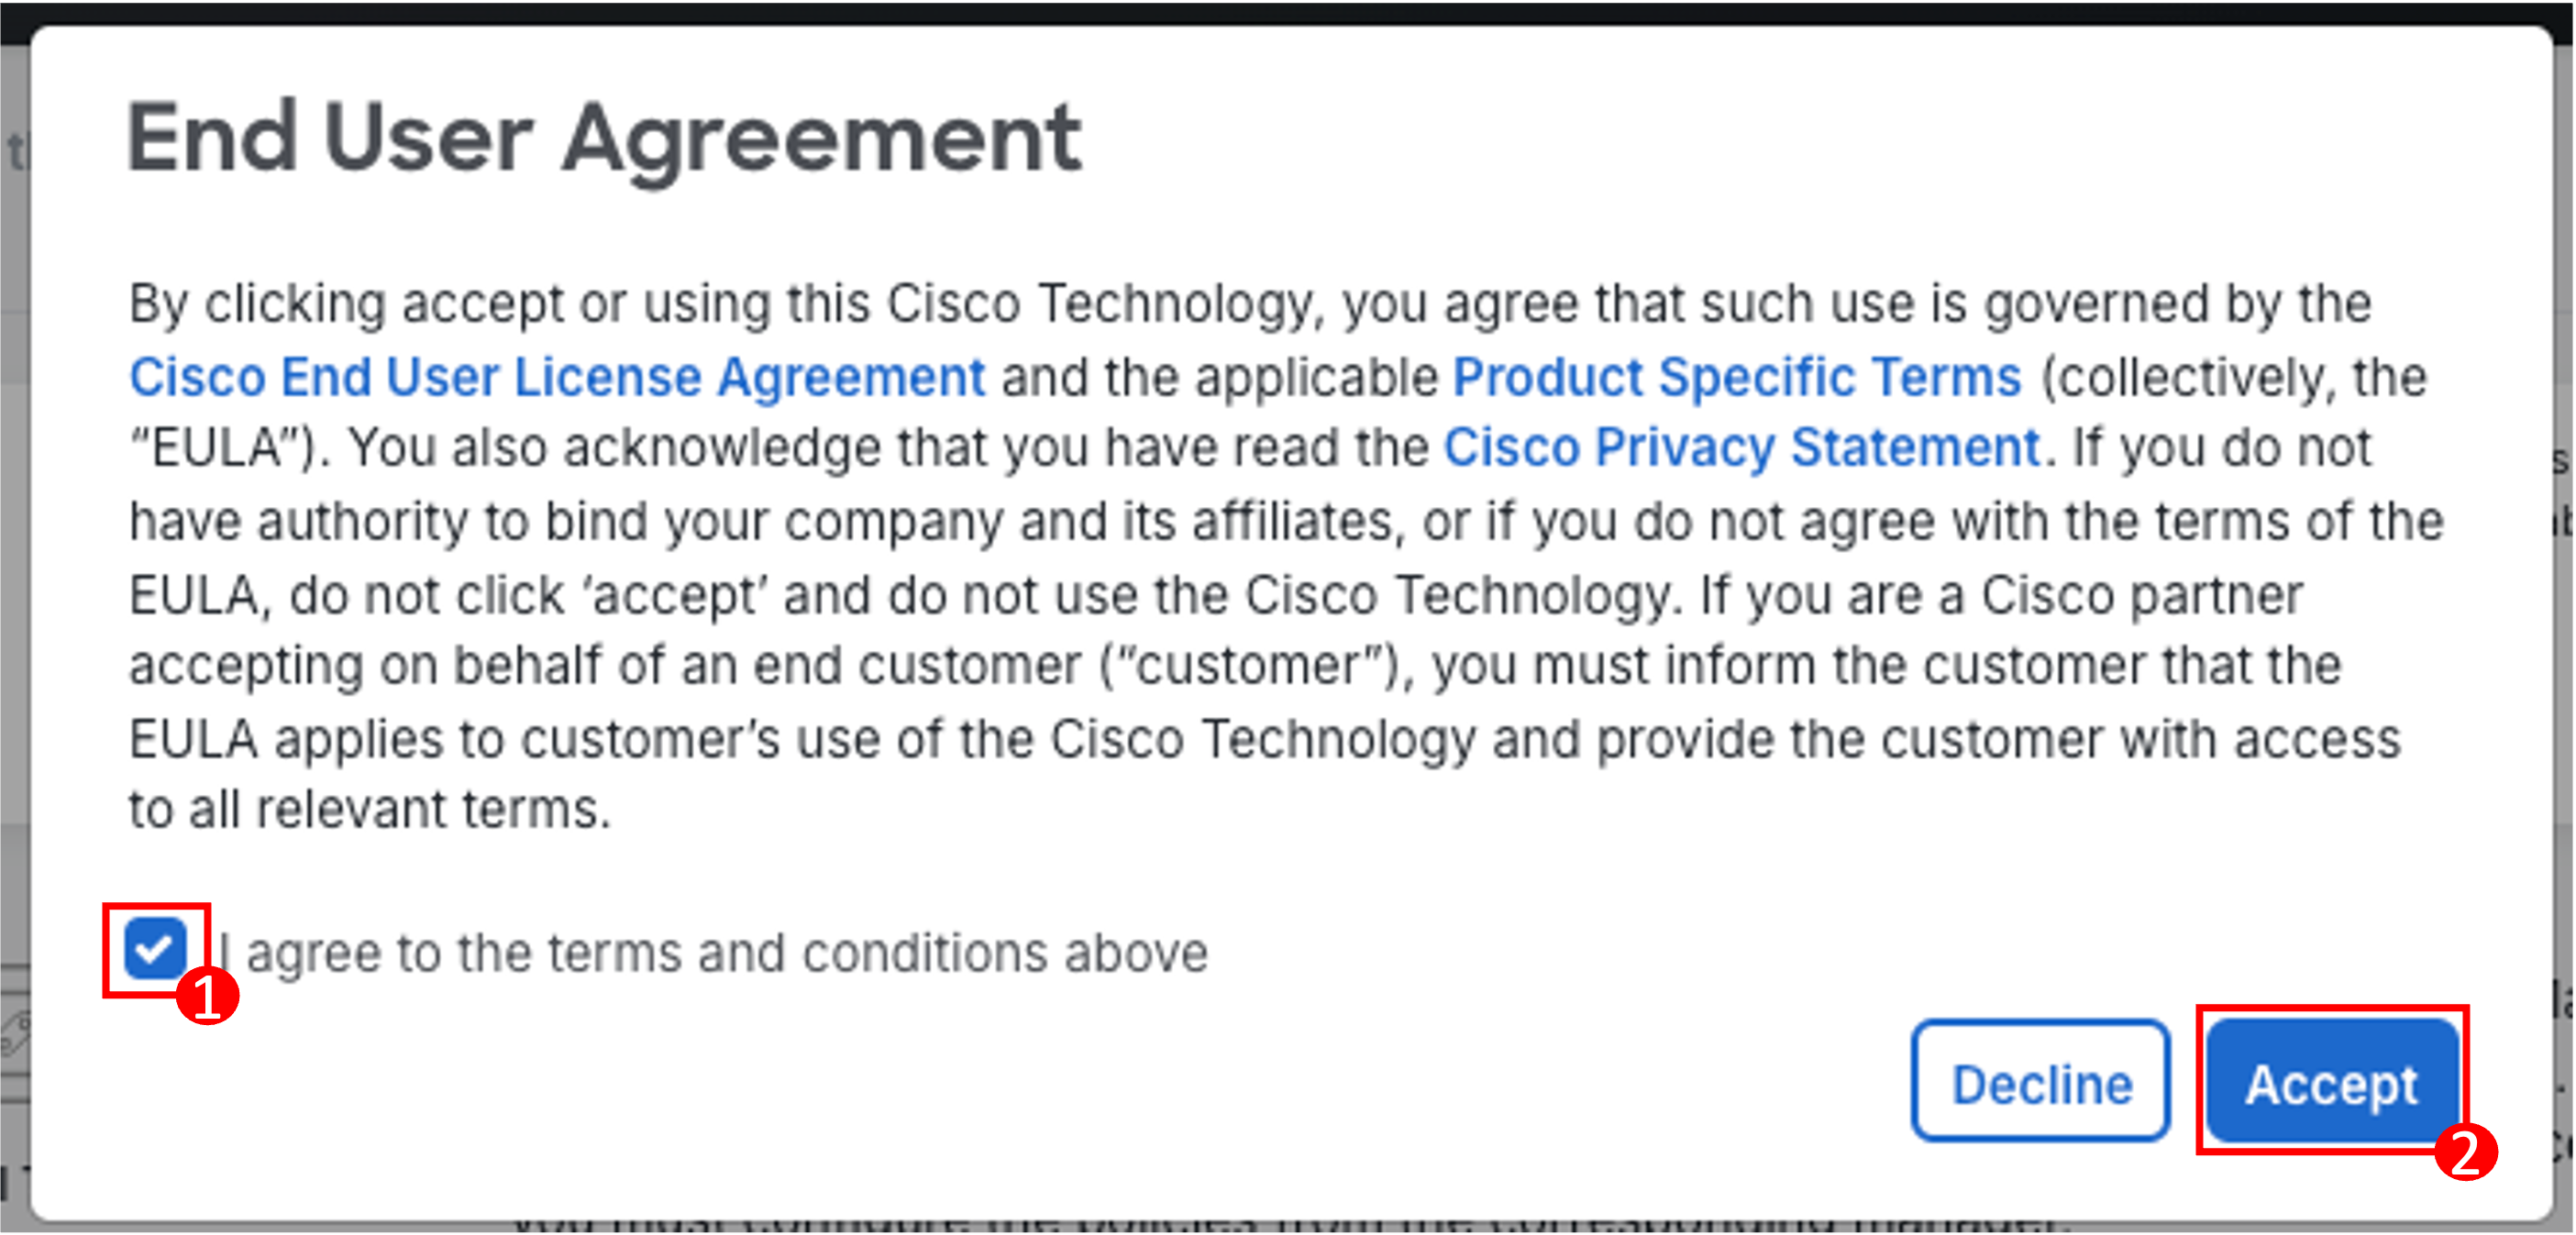
Note
If you have not yet already enabled cdFMC, you may see a banner at the top of the screen a button to Enable cdFMC.
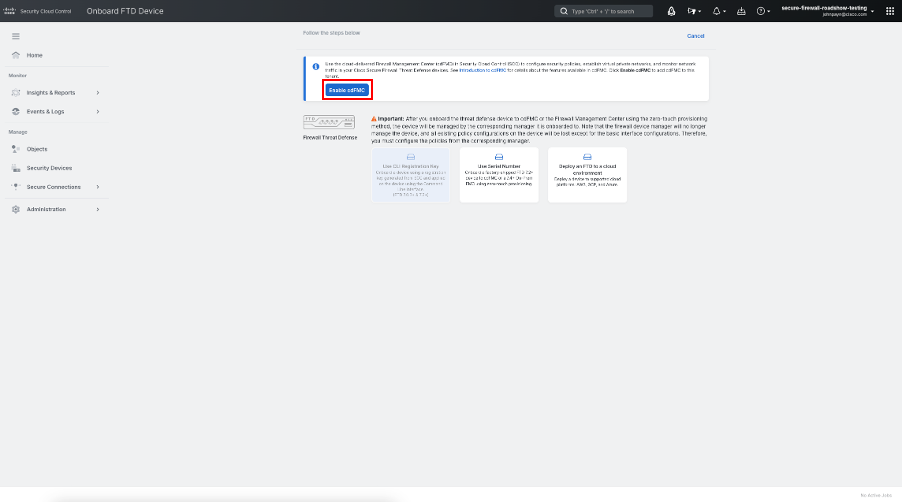
Click Enable cdFMC, and wait for the provisioning to complete. This may take up to 30-minutes to complete and fully provision.
-
This will bring up various onboarding methods supported by Secure Firewall. From the onboarding options, select Use Serial Number.

-
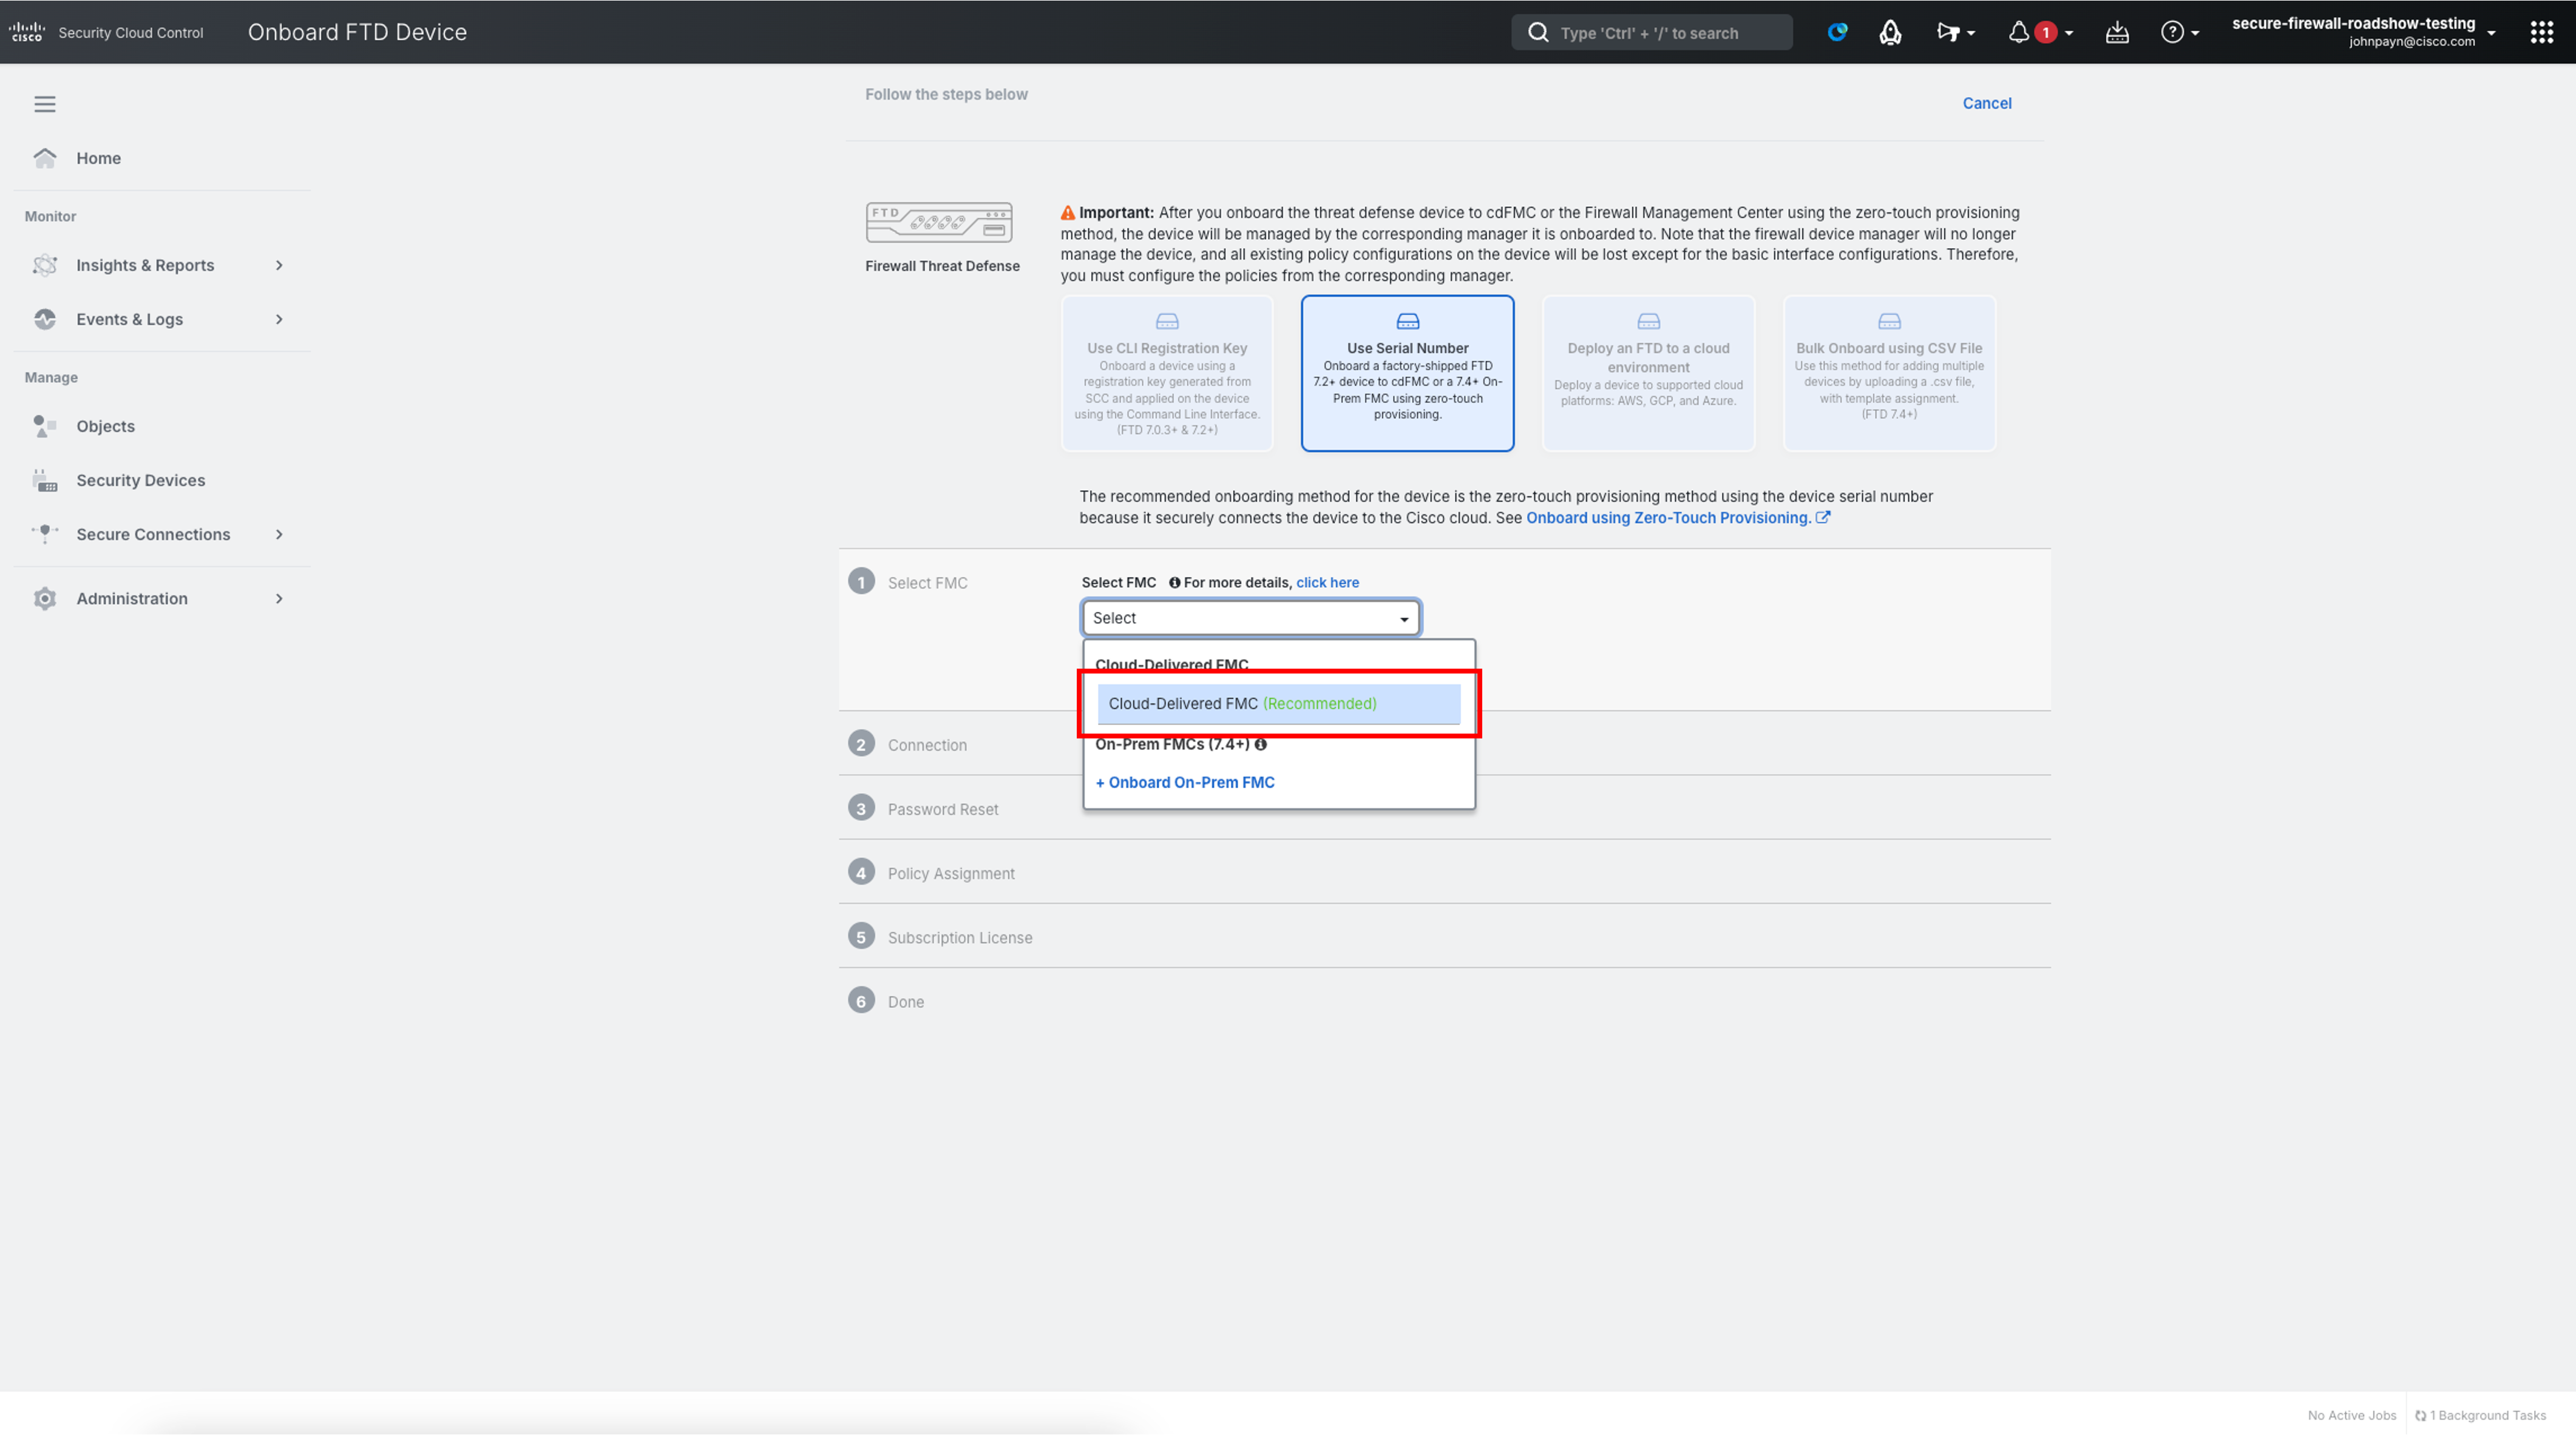
Now, you will be asked to enter various details to complete the onboarding process. In the Select FMC dropdown select Cloud-Delivered FMC (Recommended). Click Next.
-
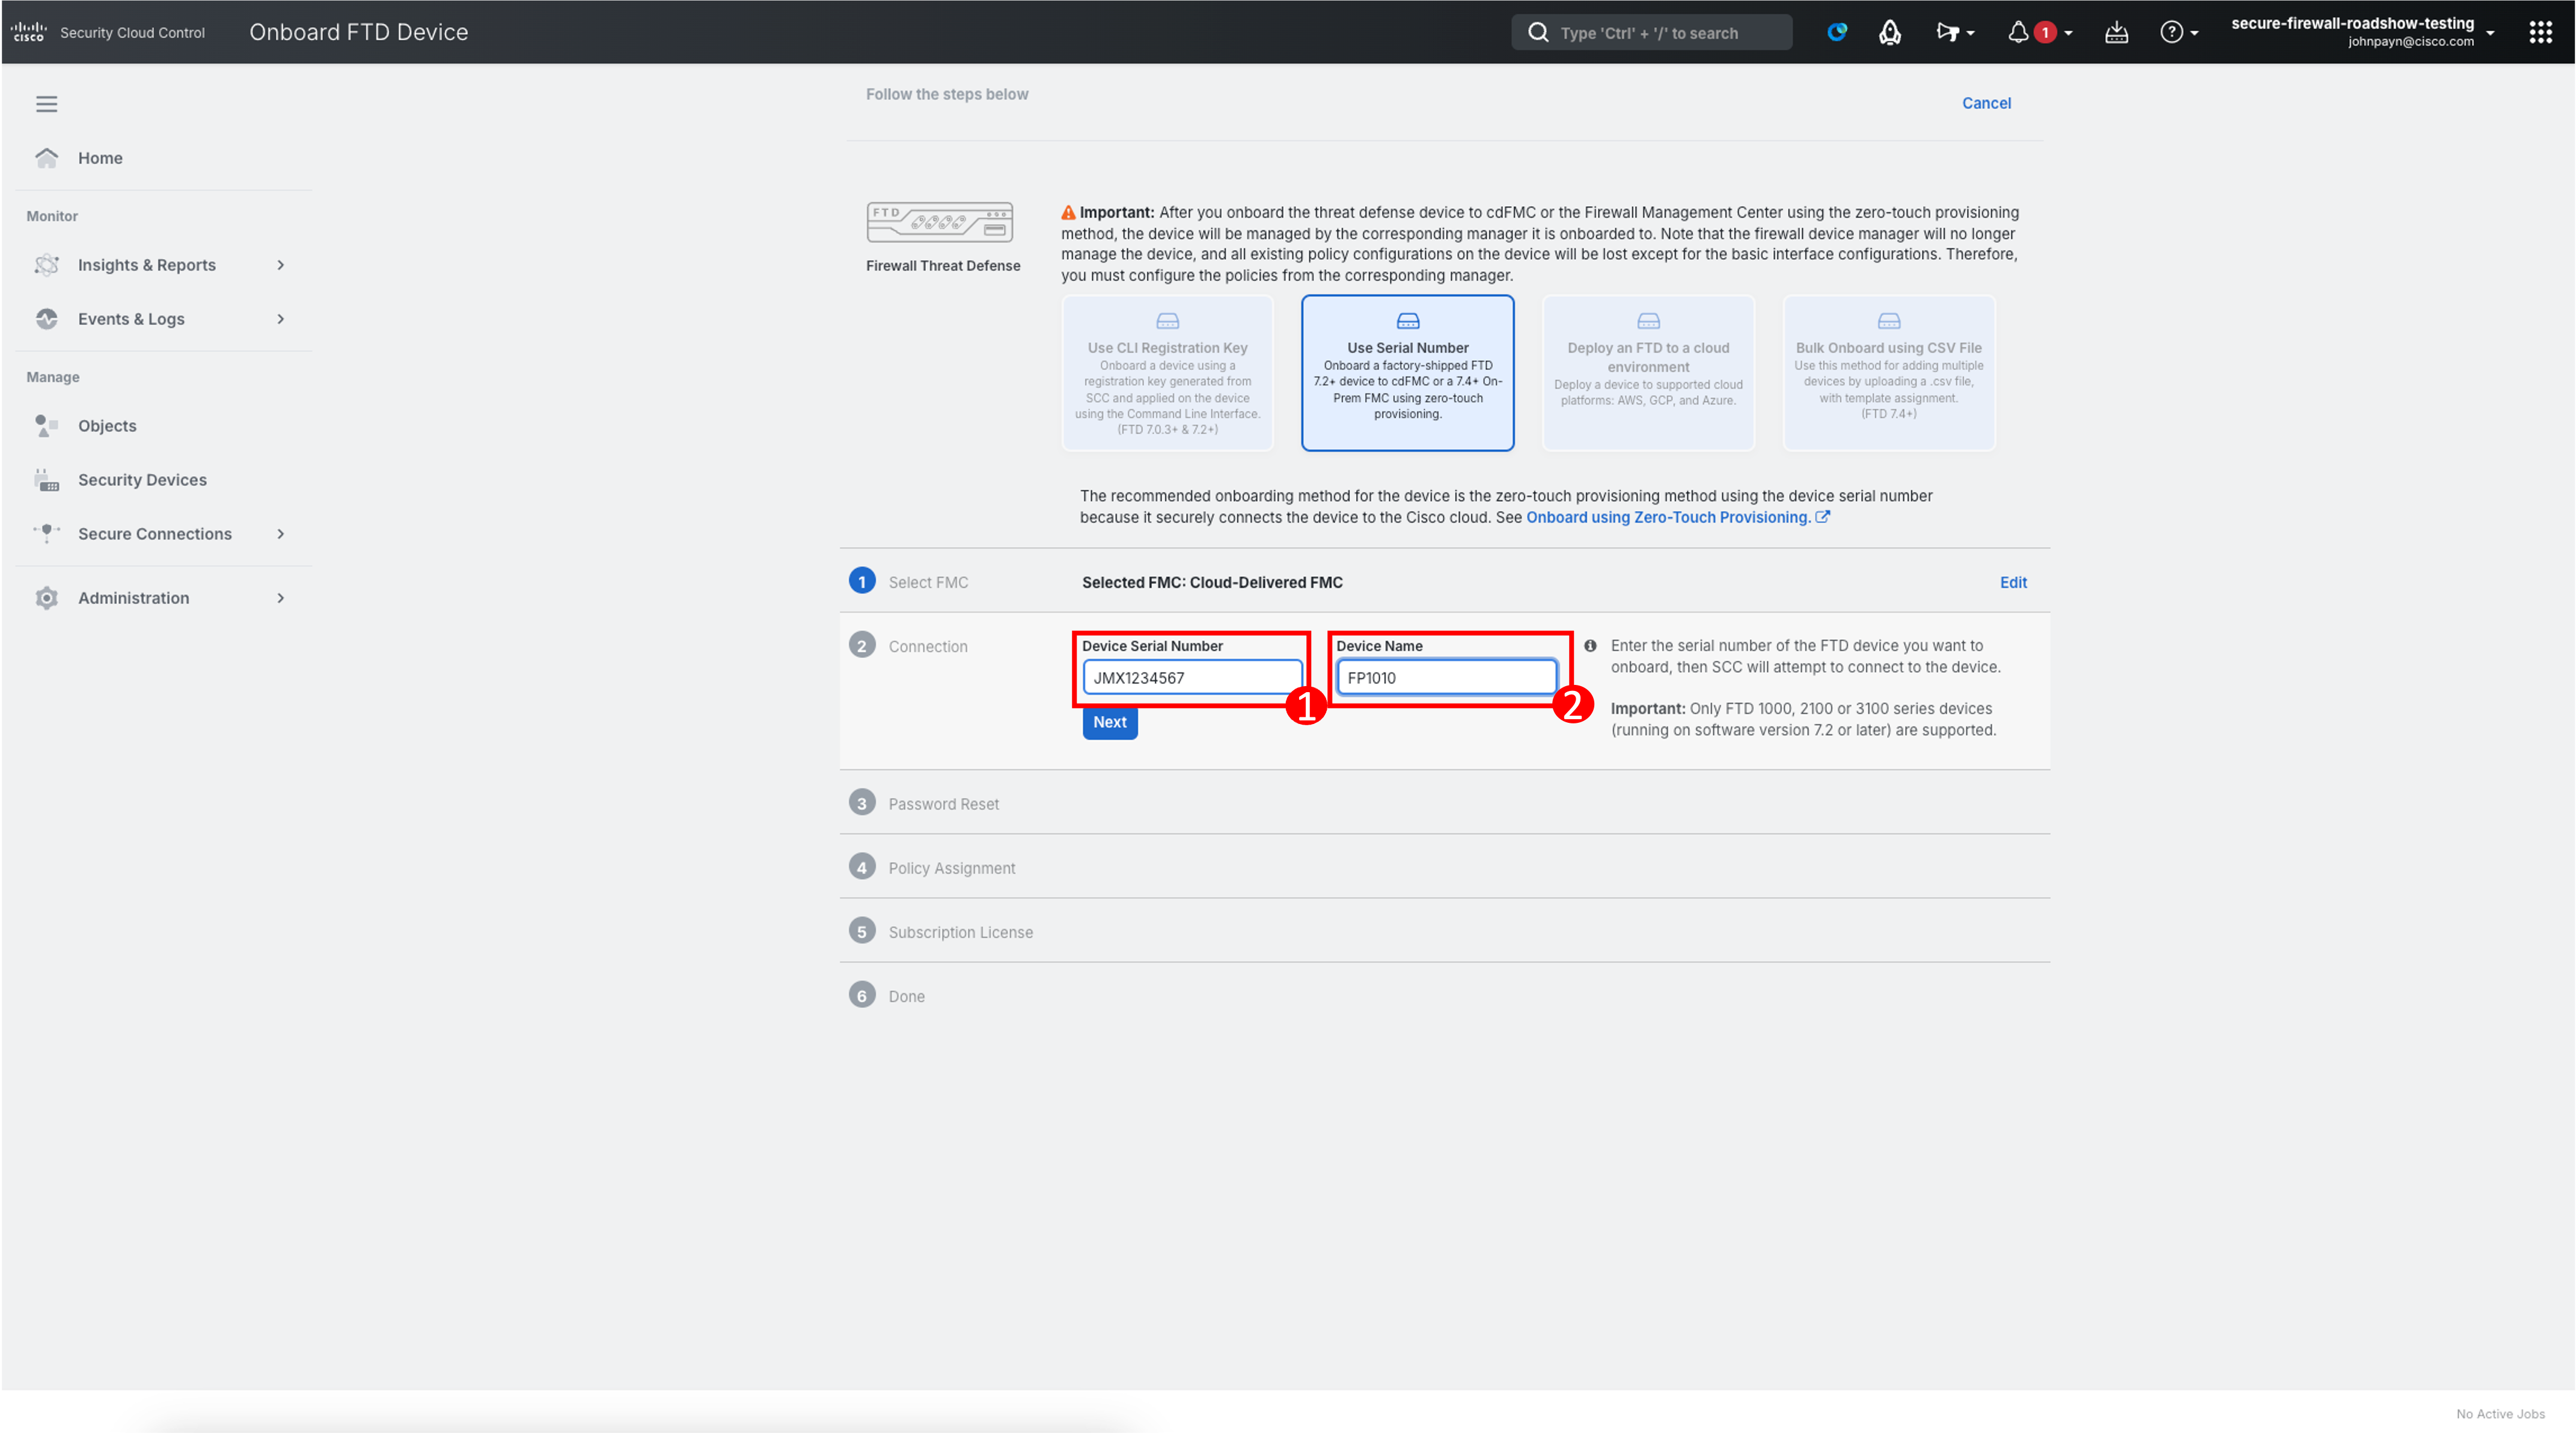
Enter Device Serial Number and Device Name. Click Next.
-
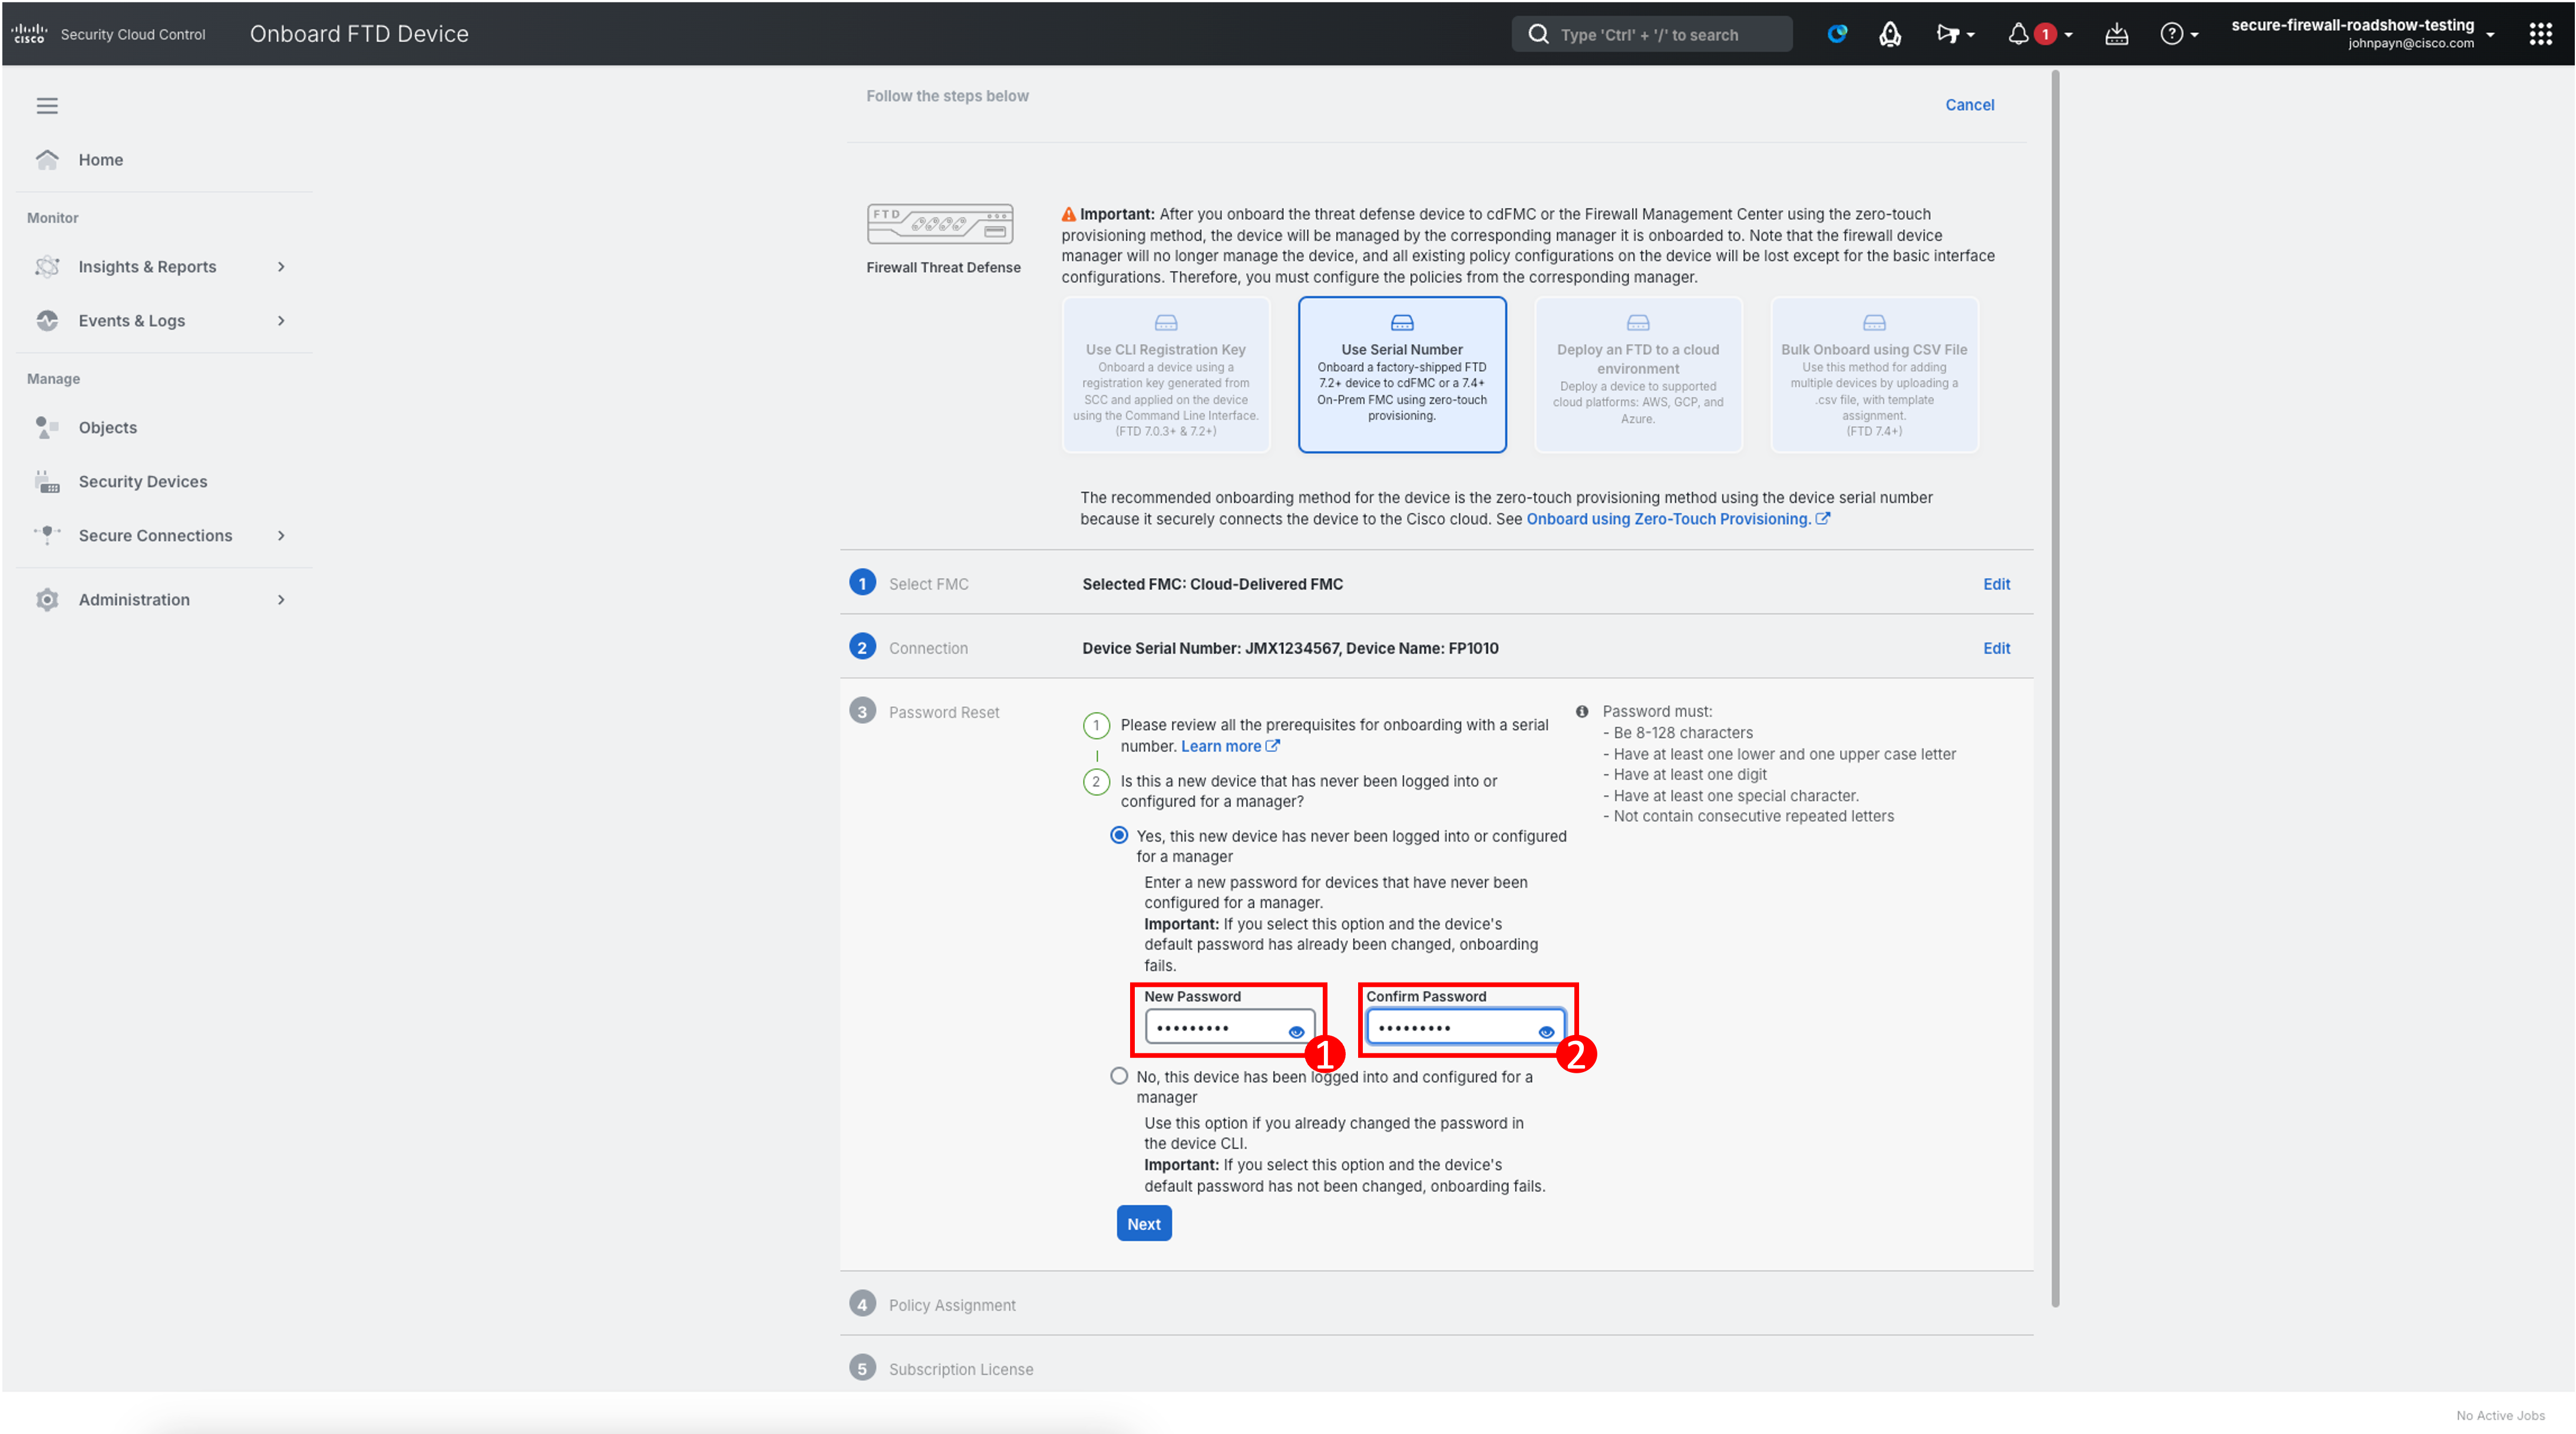
Since this is a new device, enter the password as F!rep0wer in the New Password field and confirm the password in the Confirm Password field. Click Next.
Note
If you have already changed the password from the CLI, select No, this device has been logged into and configured for a manager.
-
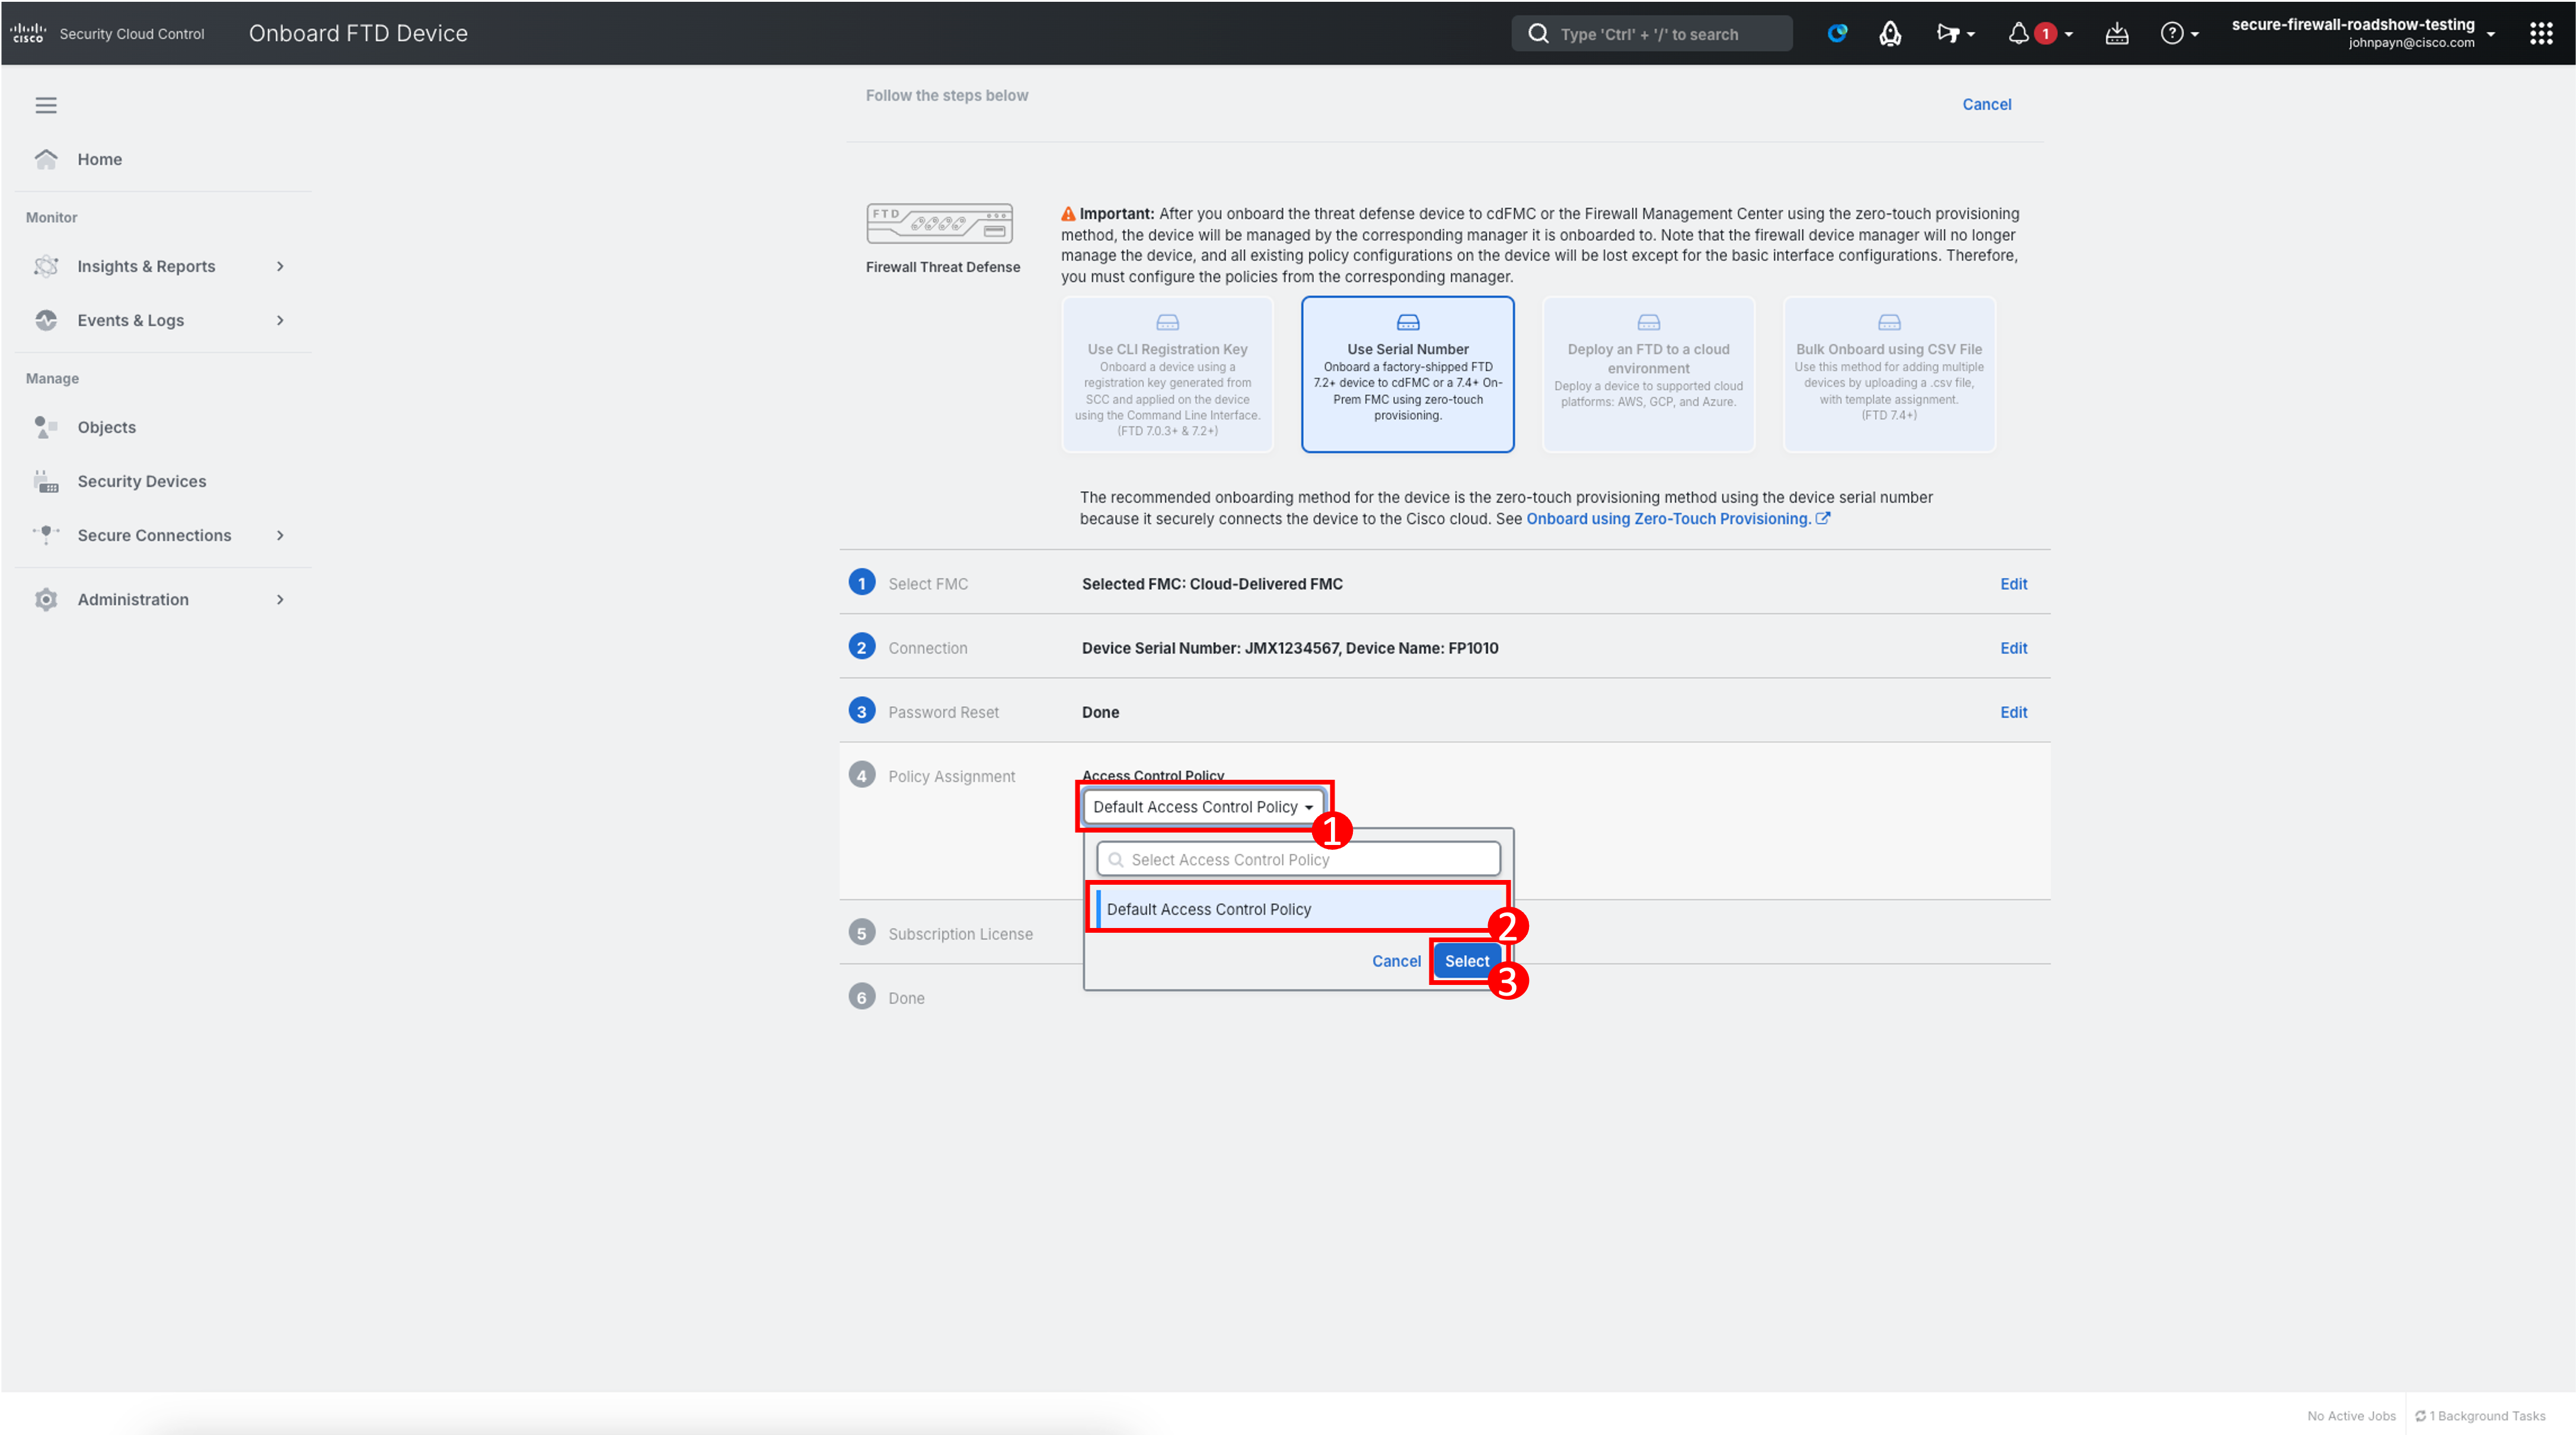
Select the drop-down under the Access Control Policy heading.
-
Ensure Default Access Control Policy is selected from the list.
-
Click Select.
-
-
Click Next.
Note
The Default Access Control Policy is strictly used for onboarding the Firewall. Another Access Control Policy will be created and deployed to the device later in the guides.
-
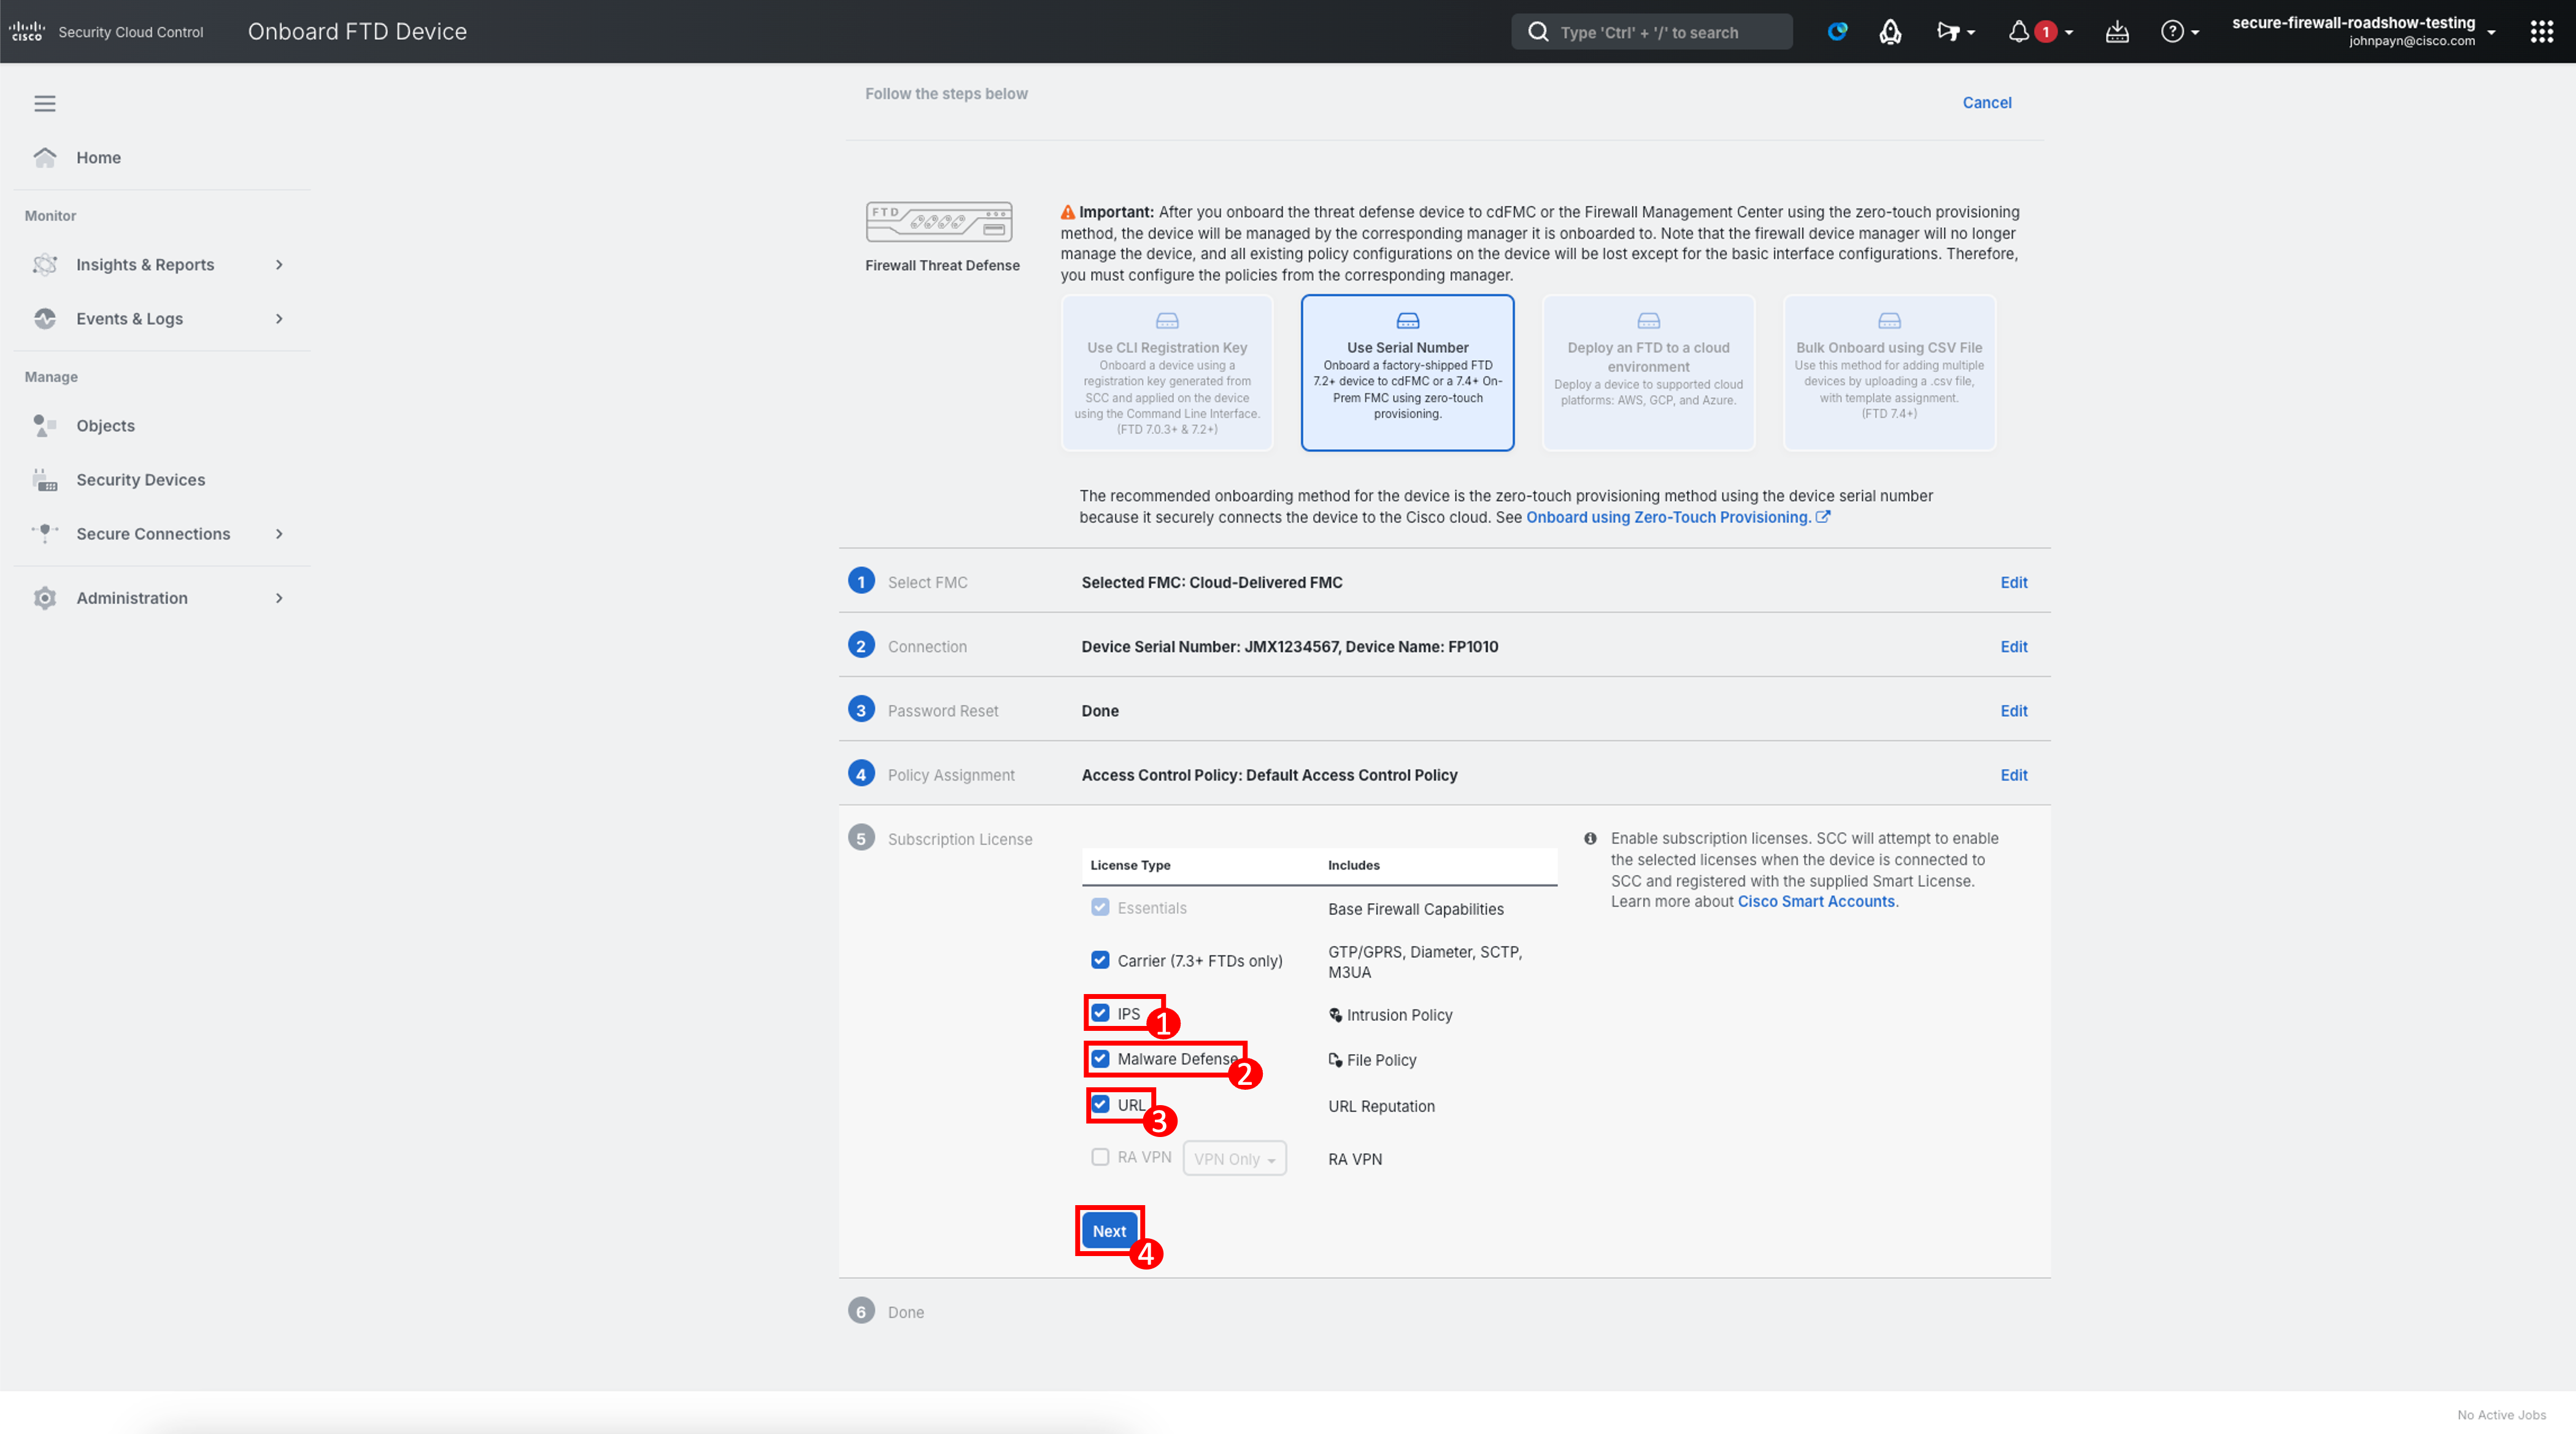
Assign License Types, depending on the type of Firewall being onboarded, and the features you wish to use as part of the license purchase. For the purpose of this lab, we will assign the following licenses to the device:
- Click the checkboxes next to each of the below licenses:
- IPS
- Malware Defense
- URL
- Click the checkboxes next to each of the below licenses:
-
Click Next.
Note
For now, the RA VPN option is greyed out. After onboarding the device, we will register cdFMC with Smart Licensing and then enable the licensing for RA VPN.
-
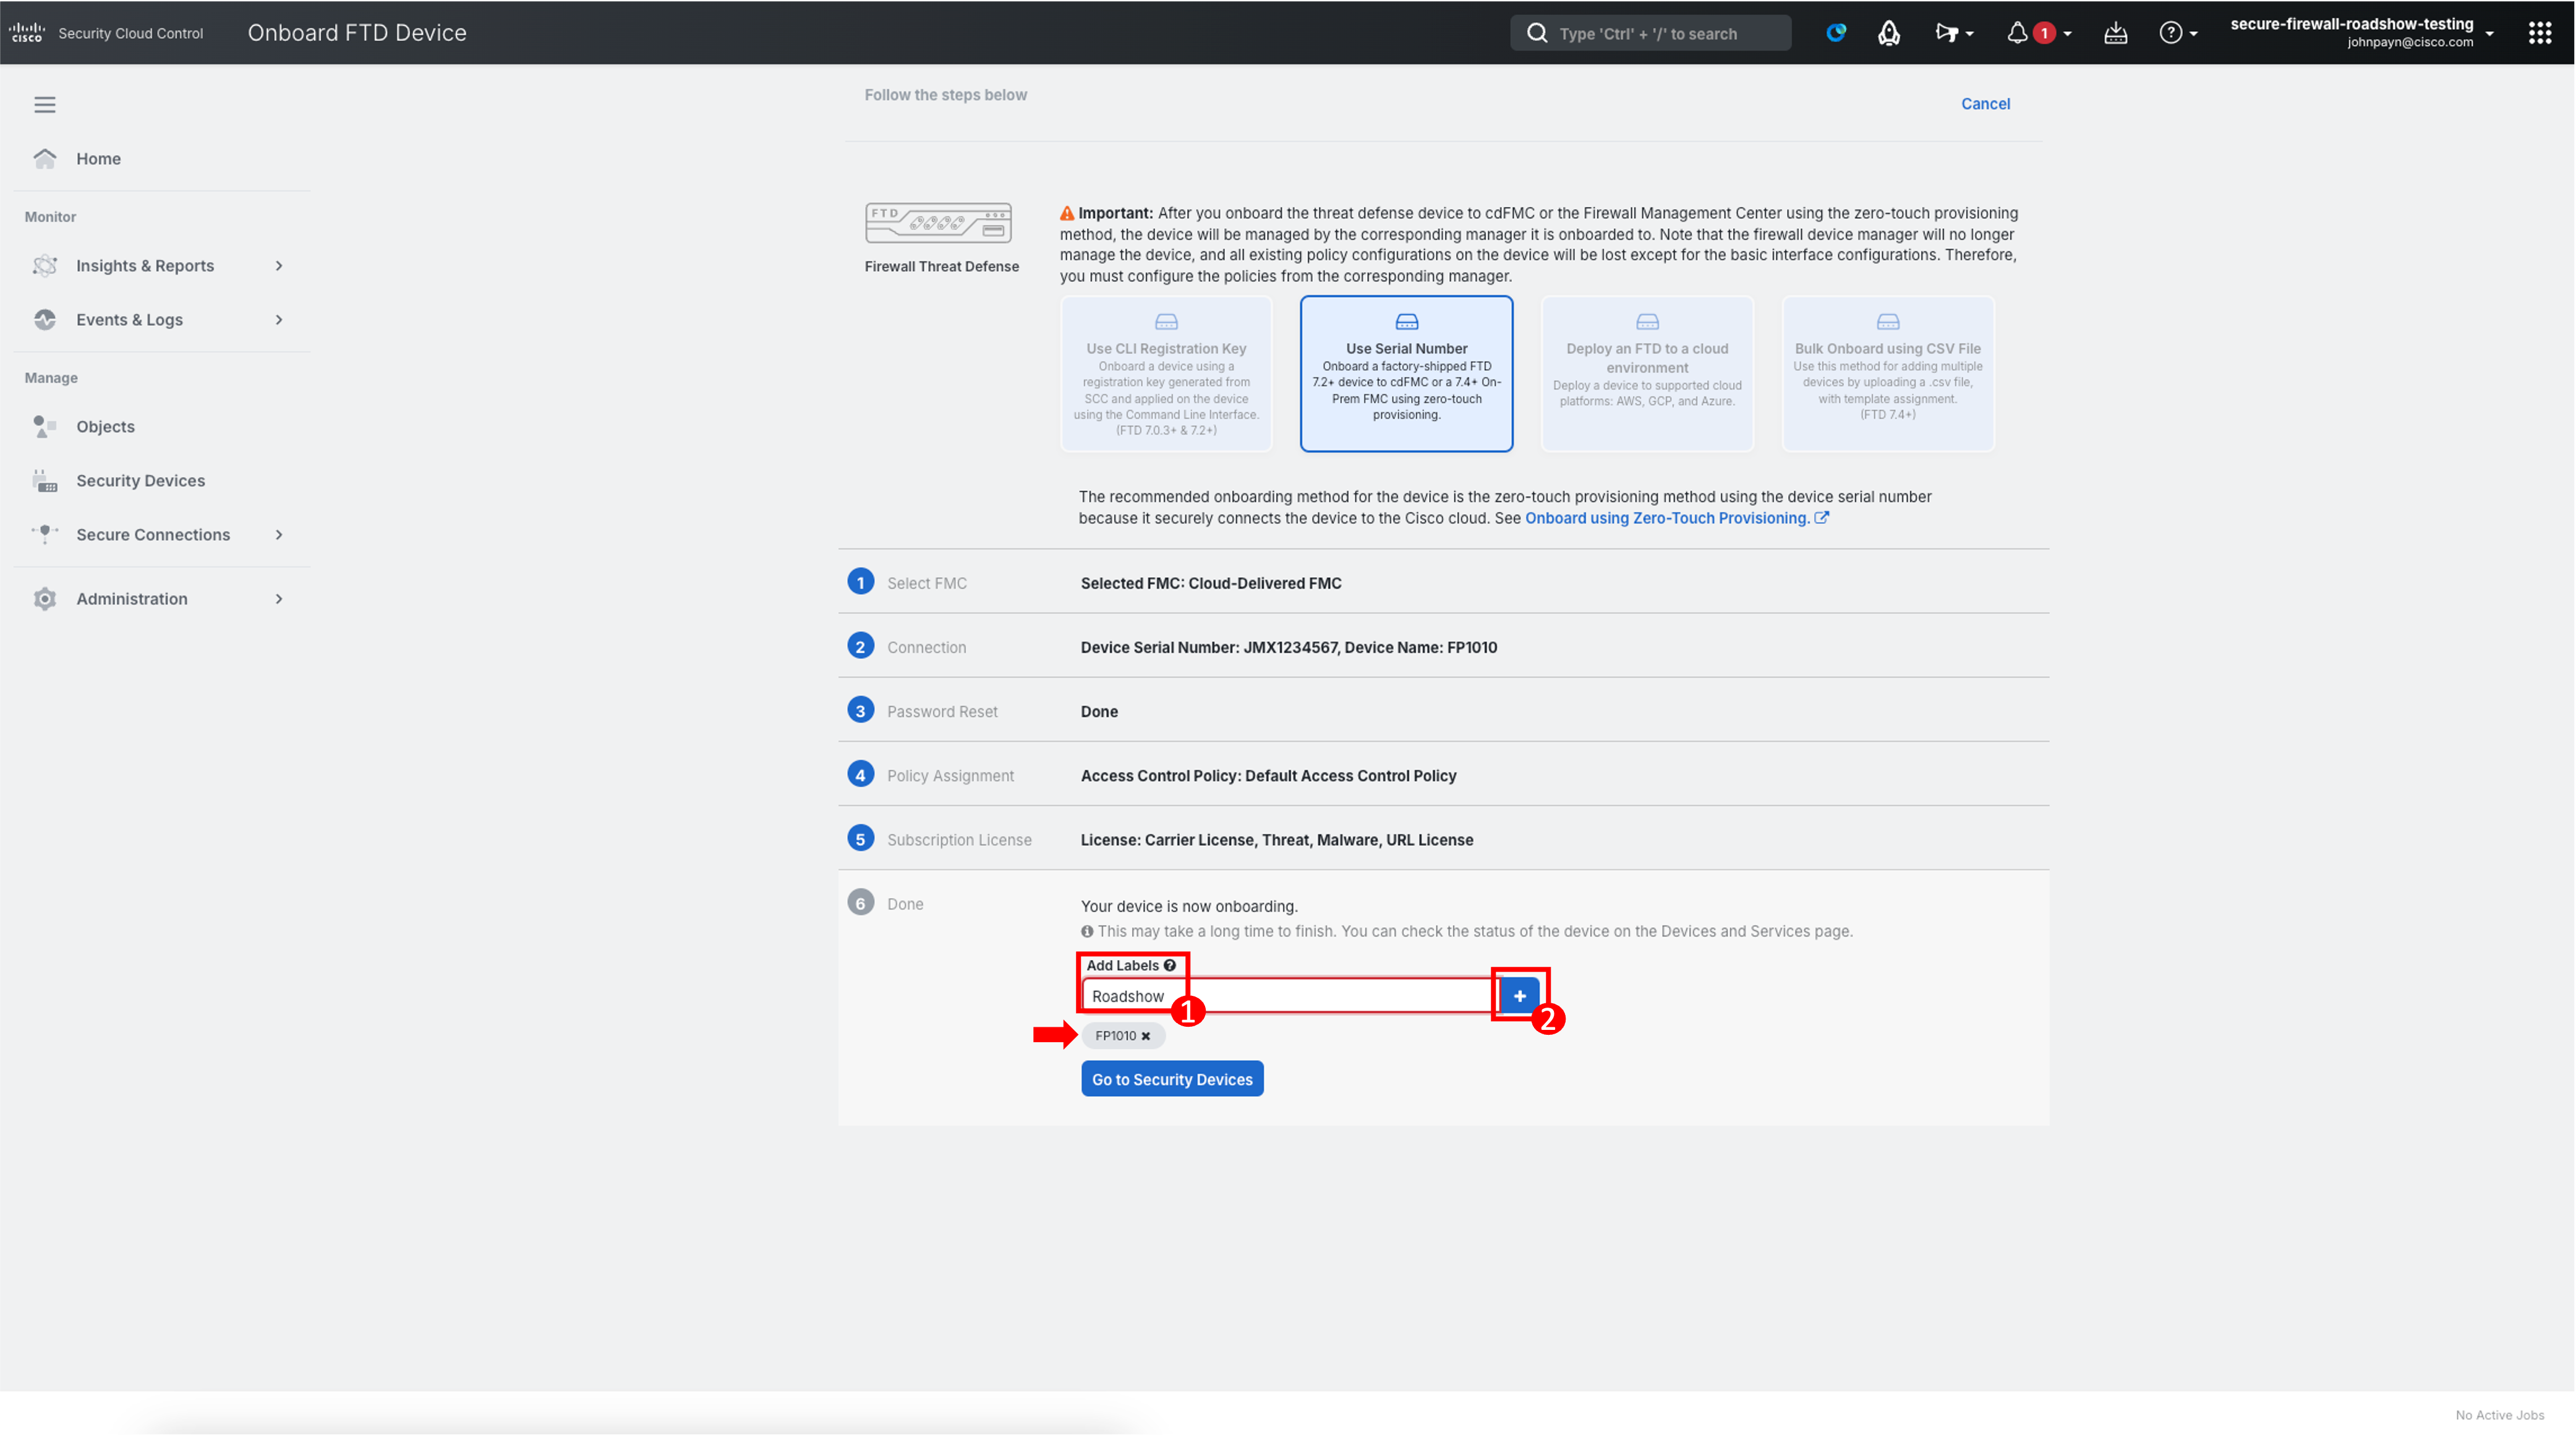
Optionally, you can add labels to help search for the Firewall in the Inventory view. Enter a label and click the blue plus button (plus sign). Labels are applied to the device after it's onboarded to Security Cloud Control. Click Go to Security Devices to monitor the status of the 1010 onboarding process.
-
Low-Touch Provisioning has already started. Security Cloud Control will claim the management of the Firewall with that Serial Number and register the Firewall to Cloud-delivered FMC. You may see the status of the device change to various stages (Pending, Onboarding, Online etc.) this is expected, and you should wait until the onboarding fully completes.

-
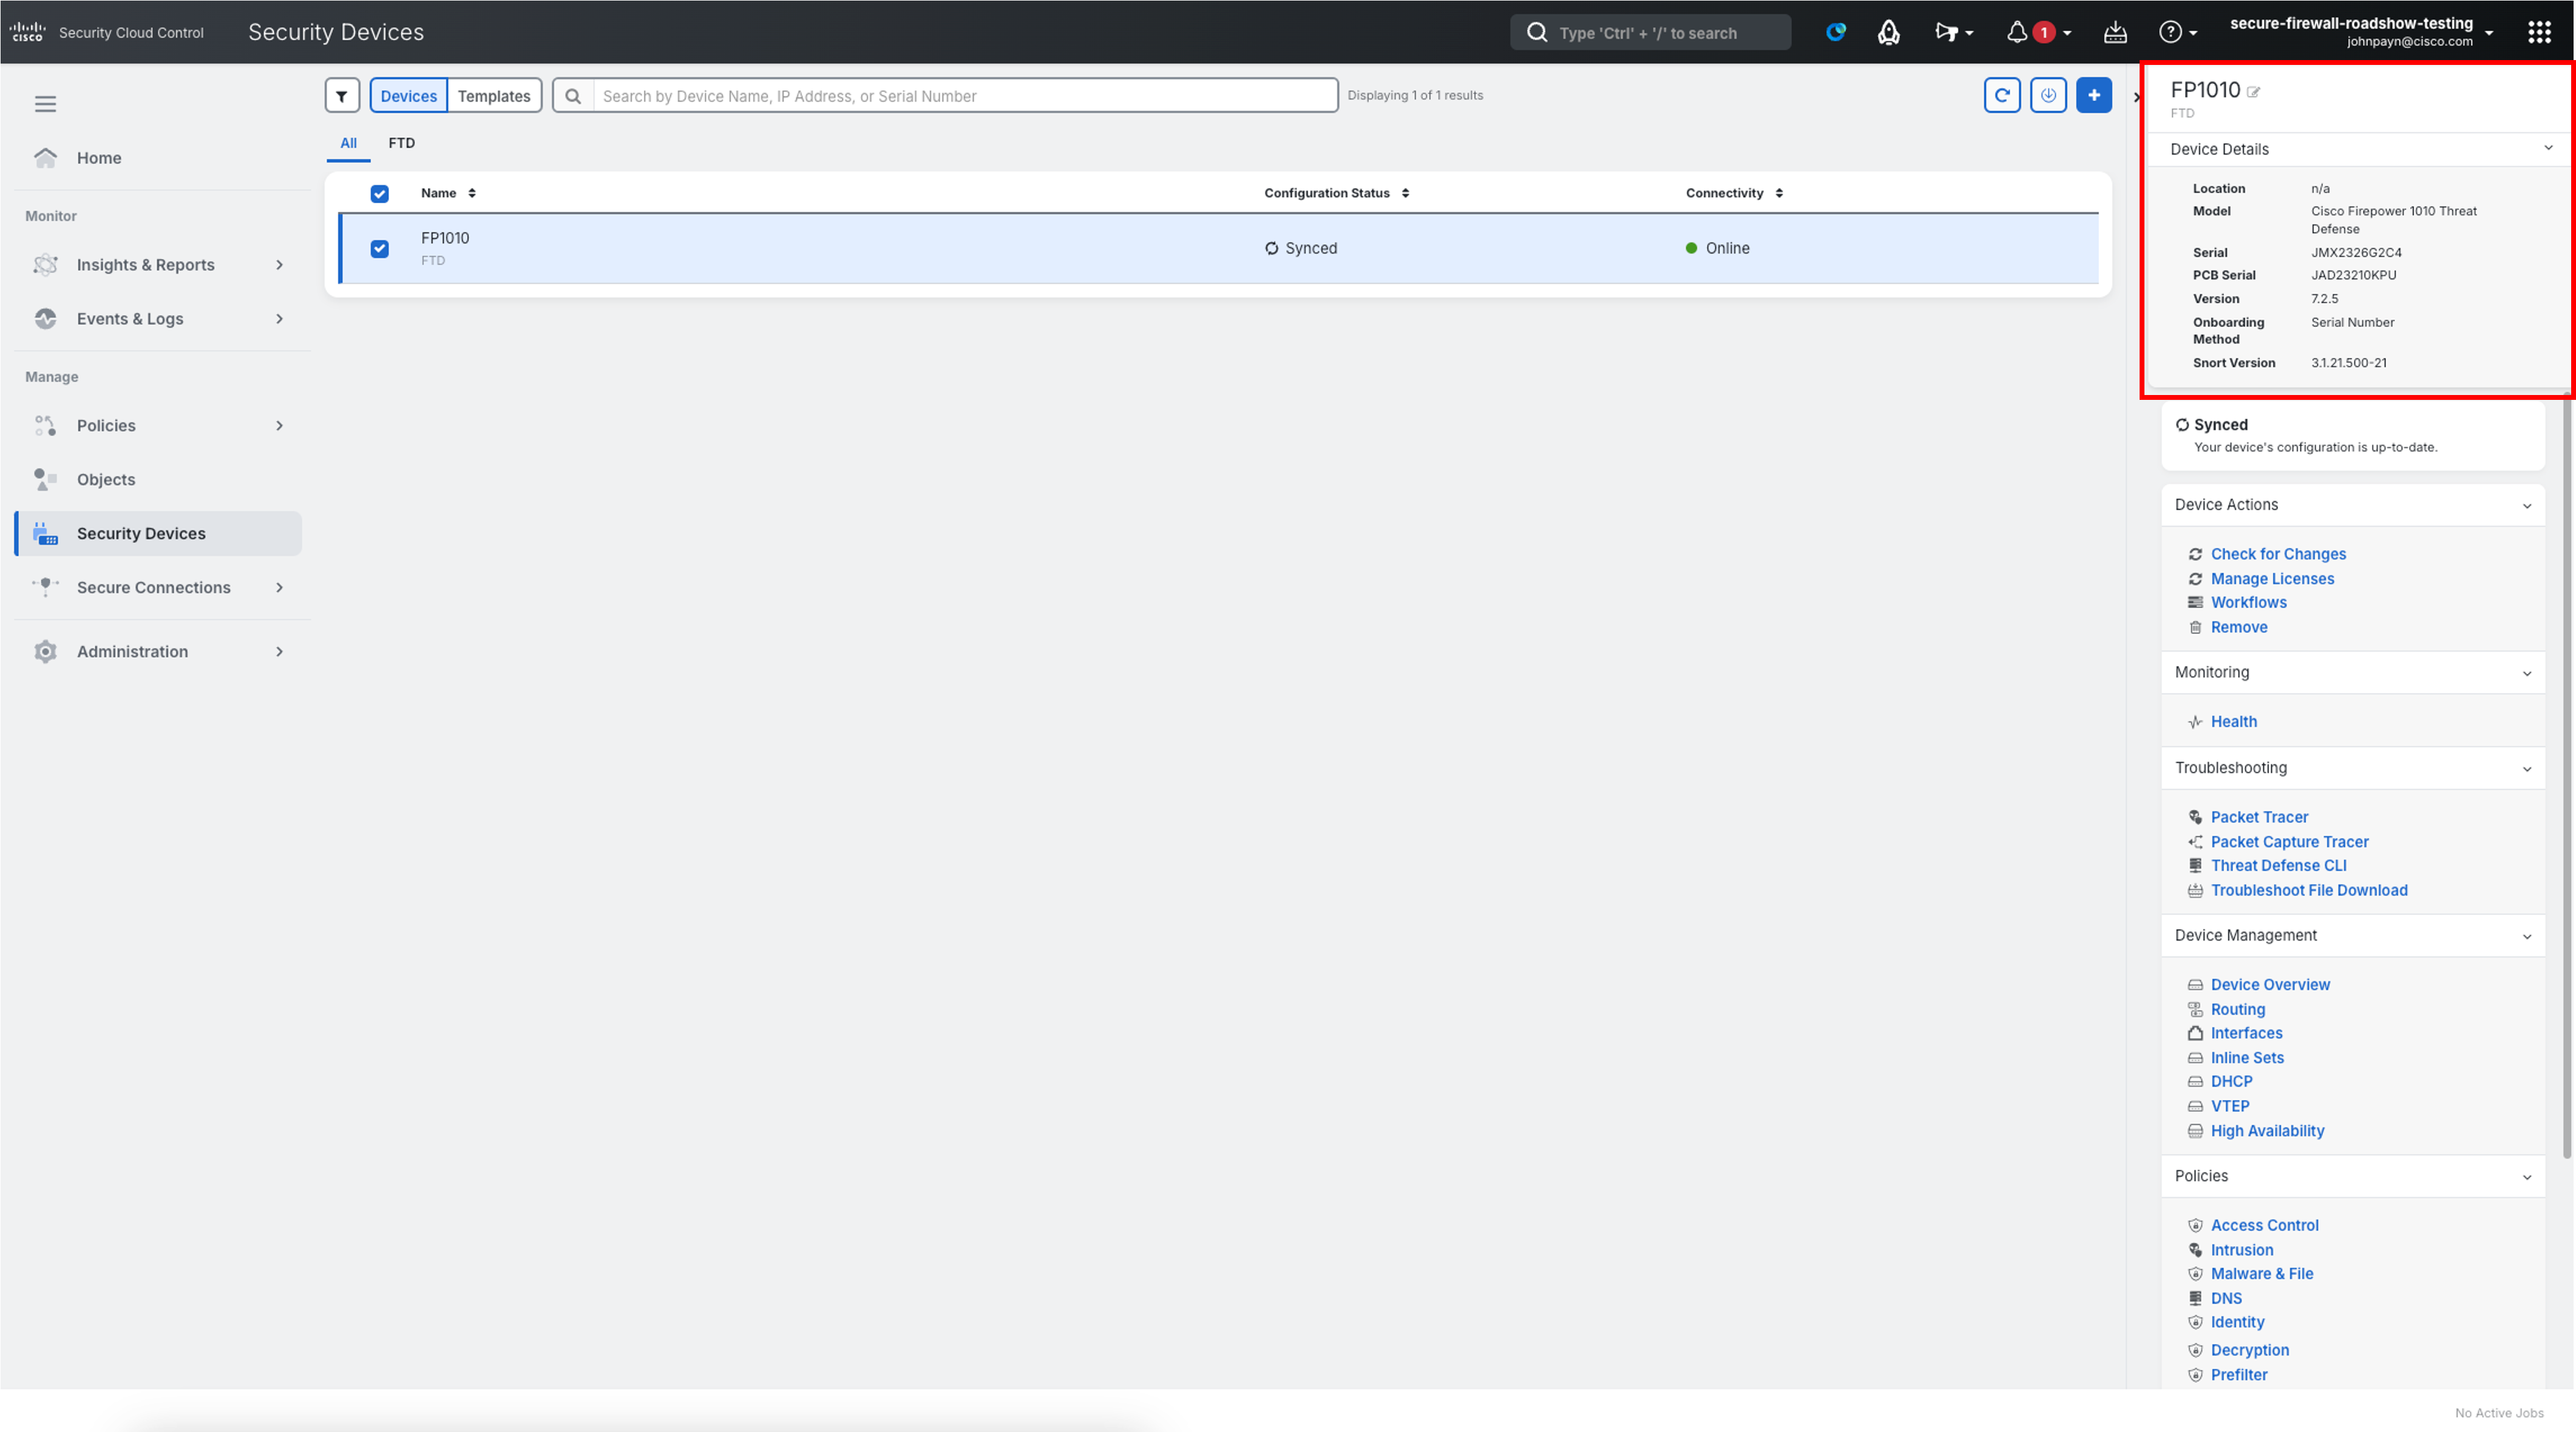
When the Firewall is successfully onboarded and registered, the Configuration Status will be updated to Synced and the Connectivity status will show Online.

-
Upon successful onboarding, click the checkbox next to FP1010 in the list. In the top right-hand pane, contains details about the recently onboarded Firewall.
Task 2 - Validate Licenses and Enable Cloud Logging
In this section, we will ensure the proper licenses are applied to your cdFMC and device as well as enable logging to Security Cloud Control.
-
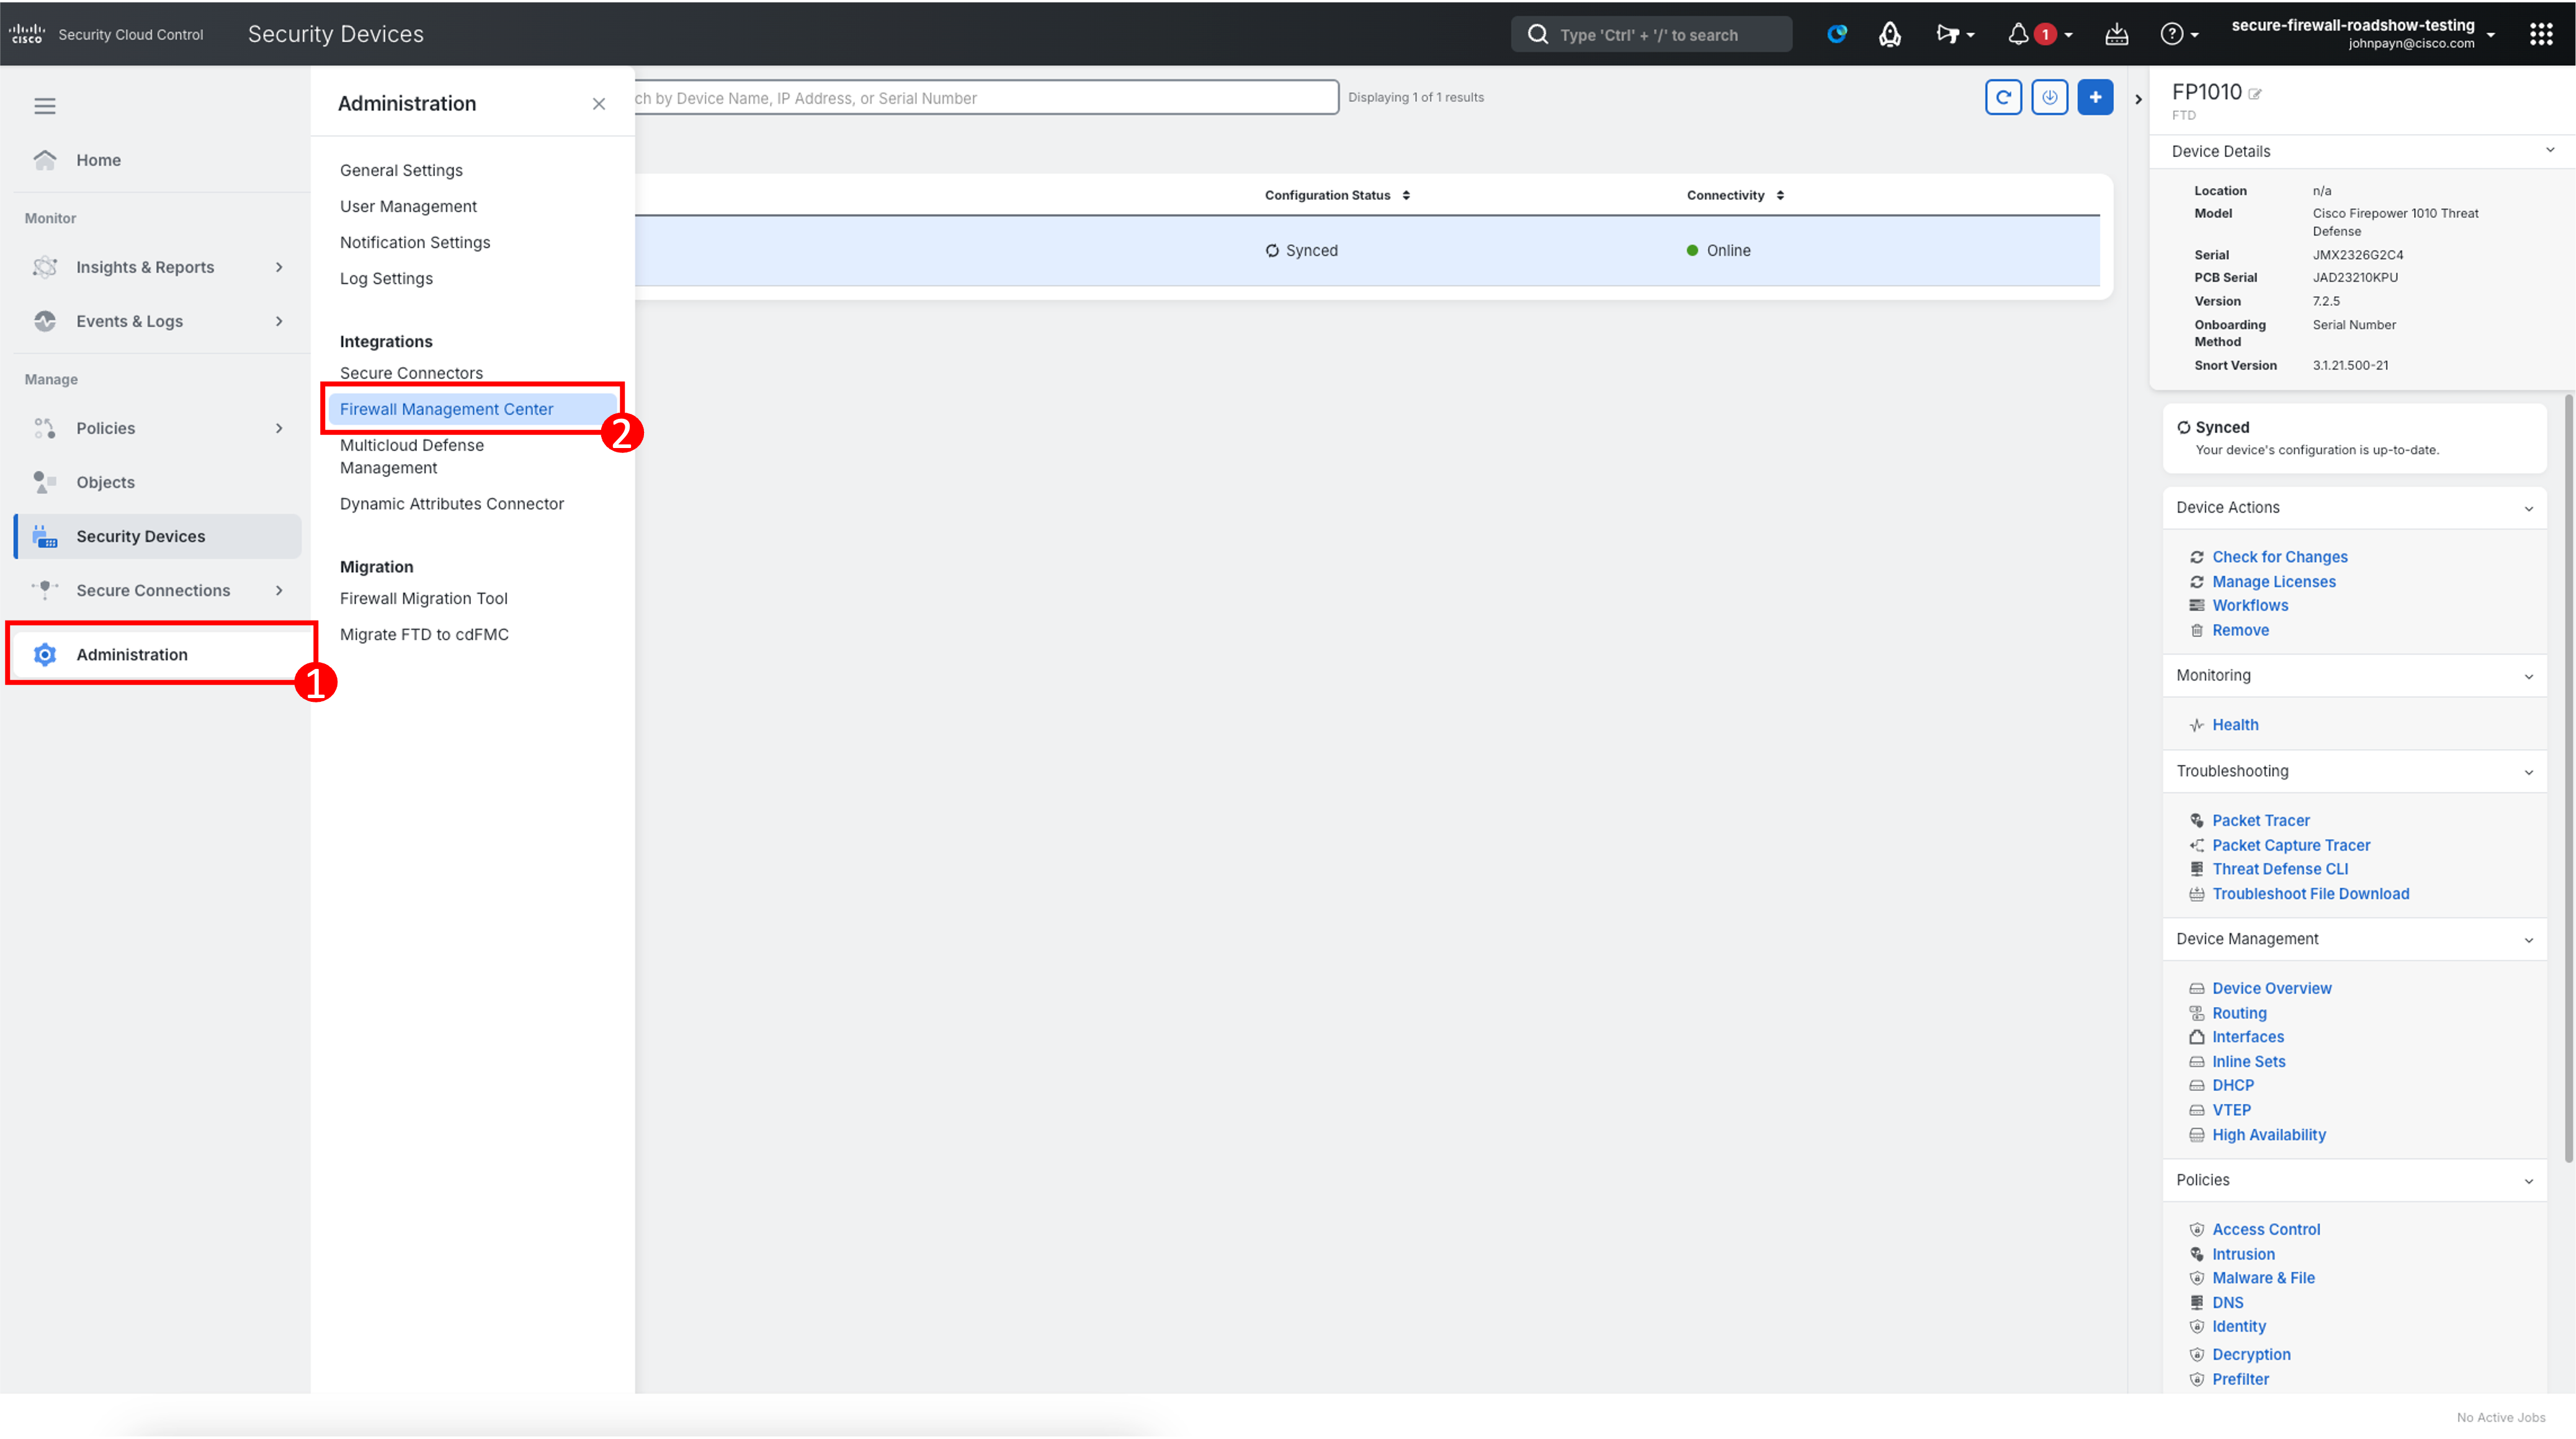
From the Security Devices page, navigate to Administration > Firewall Management Center using the left navigation.
-
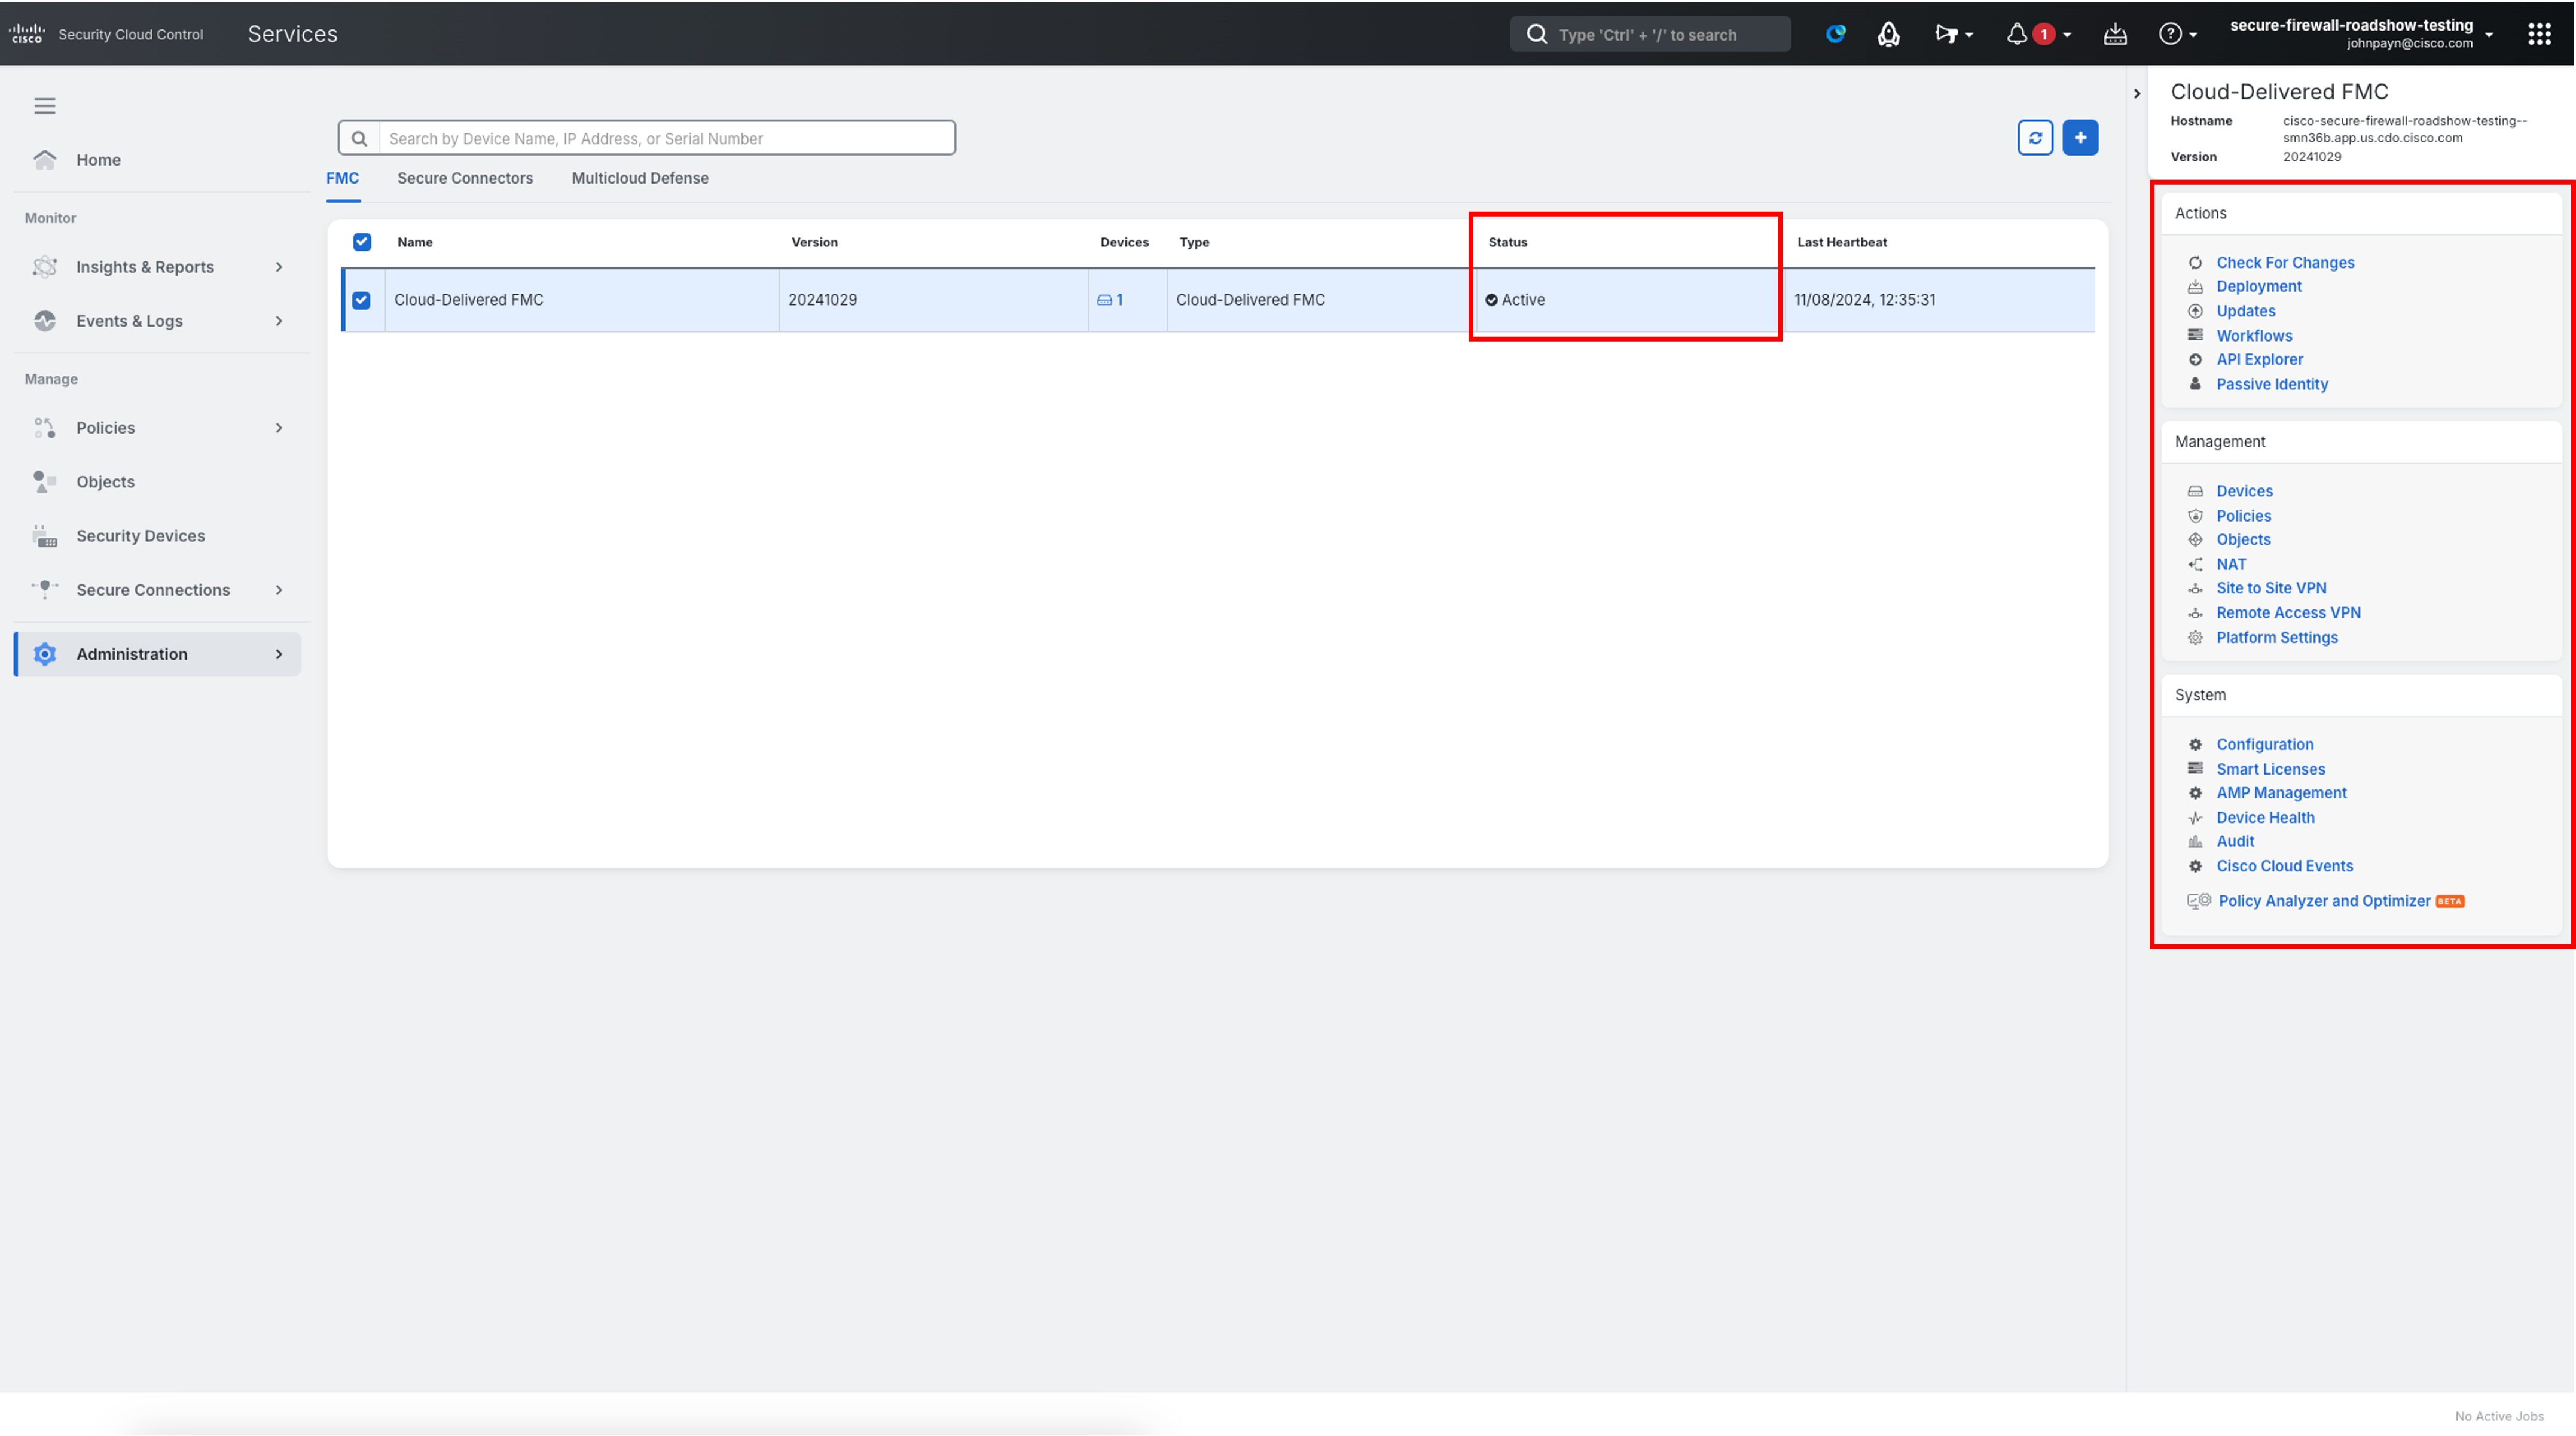
Ensure the Cloud-Delivered FMC status as Active. On the right-hand pane, you will see the Menu options for various configuration workflows within Cloud-delivered FMC. They are useful if you wish to navigate directly to a specific section.
-
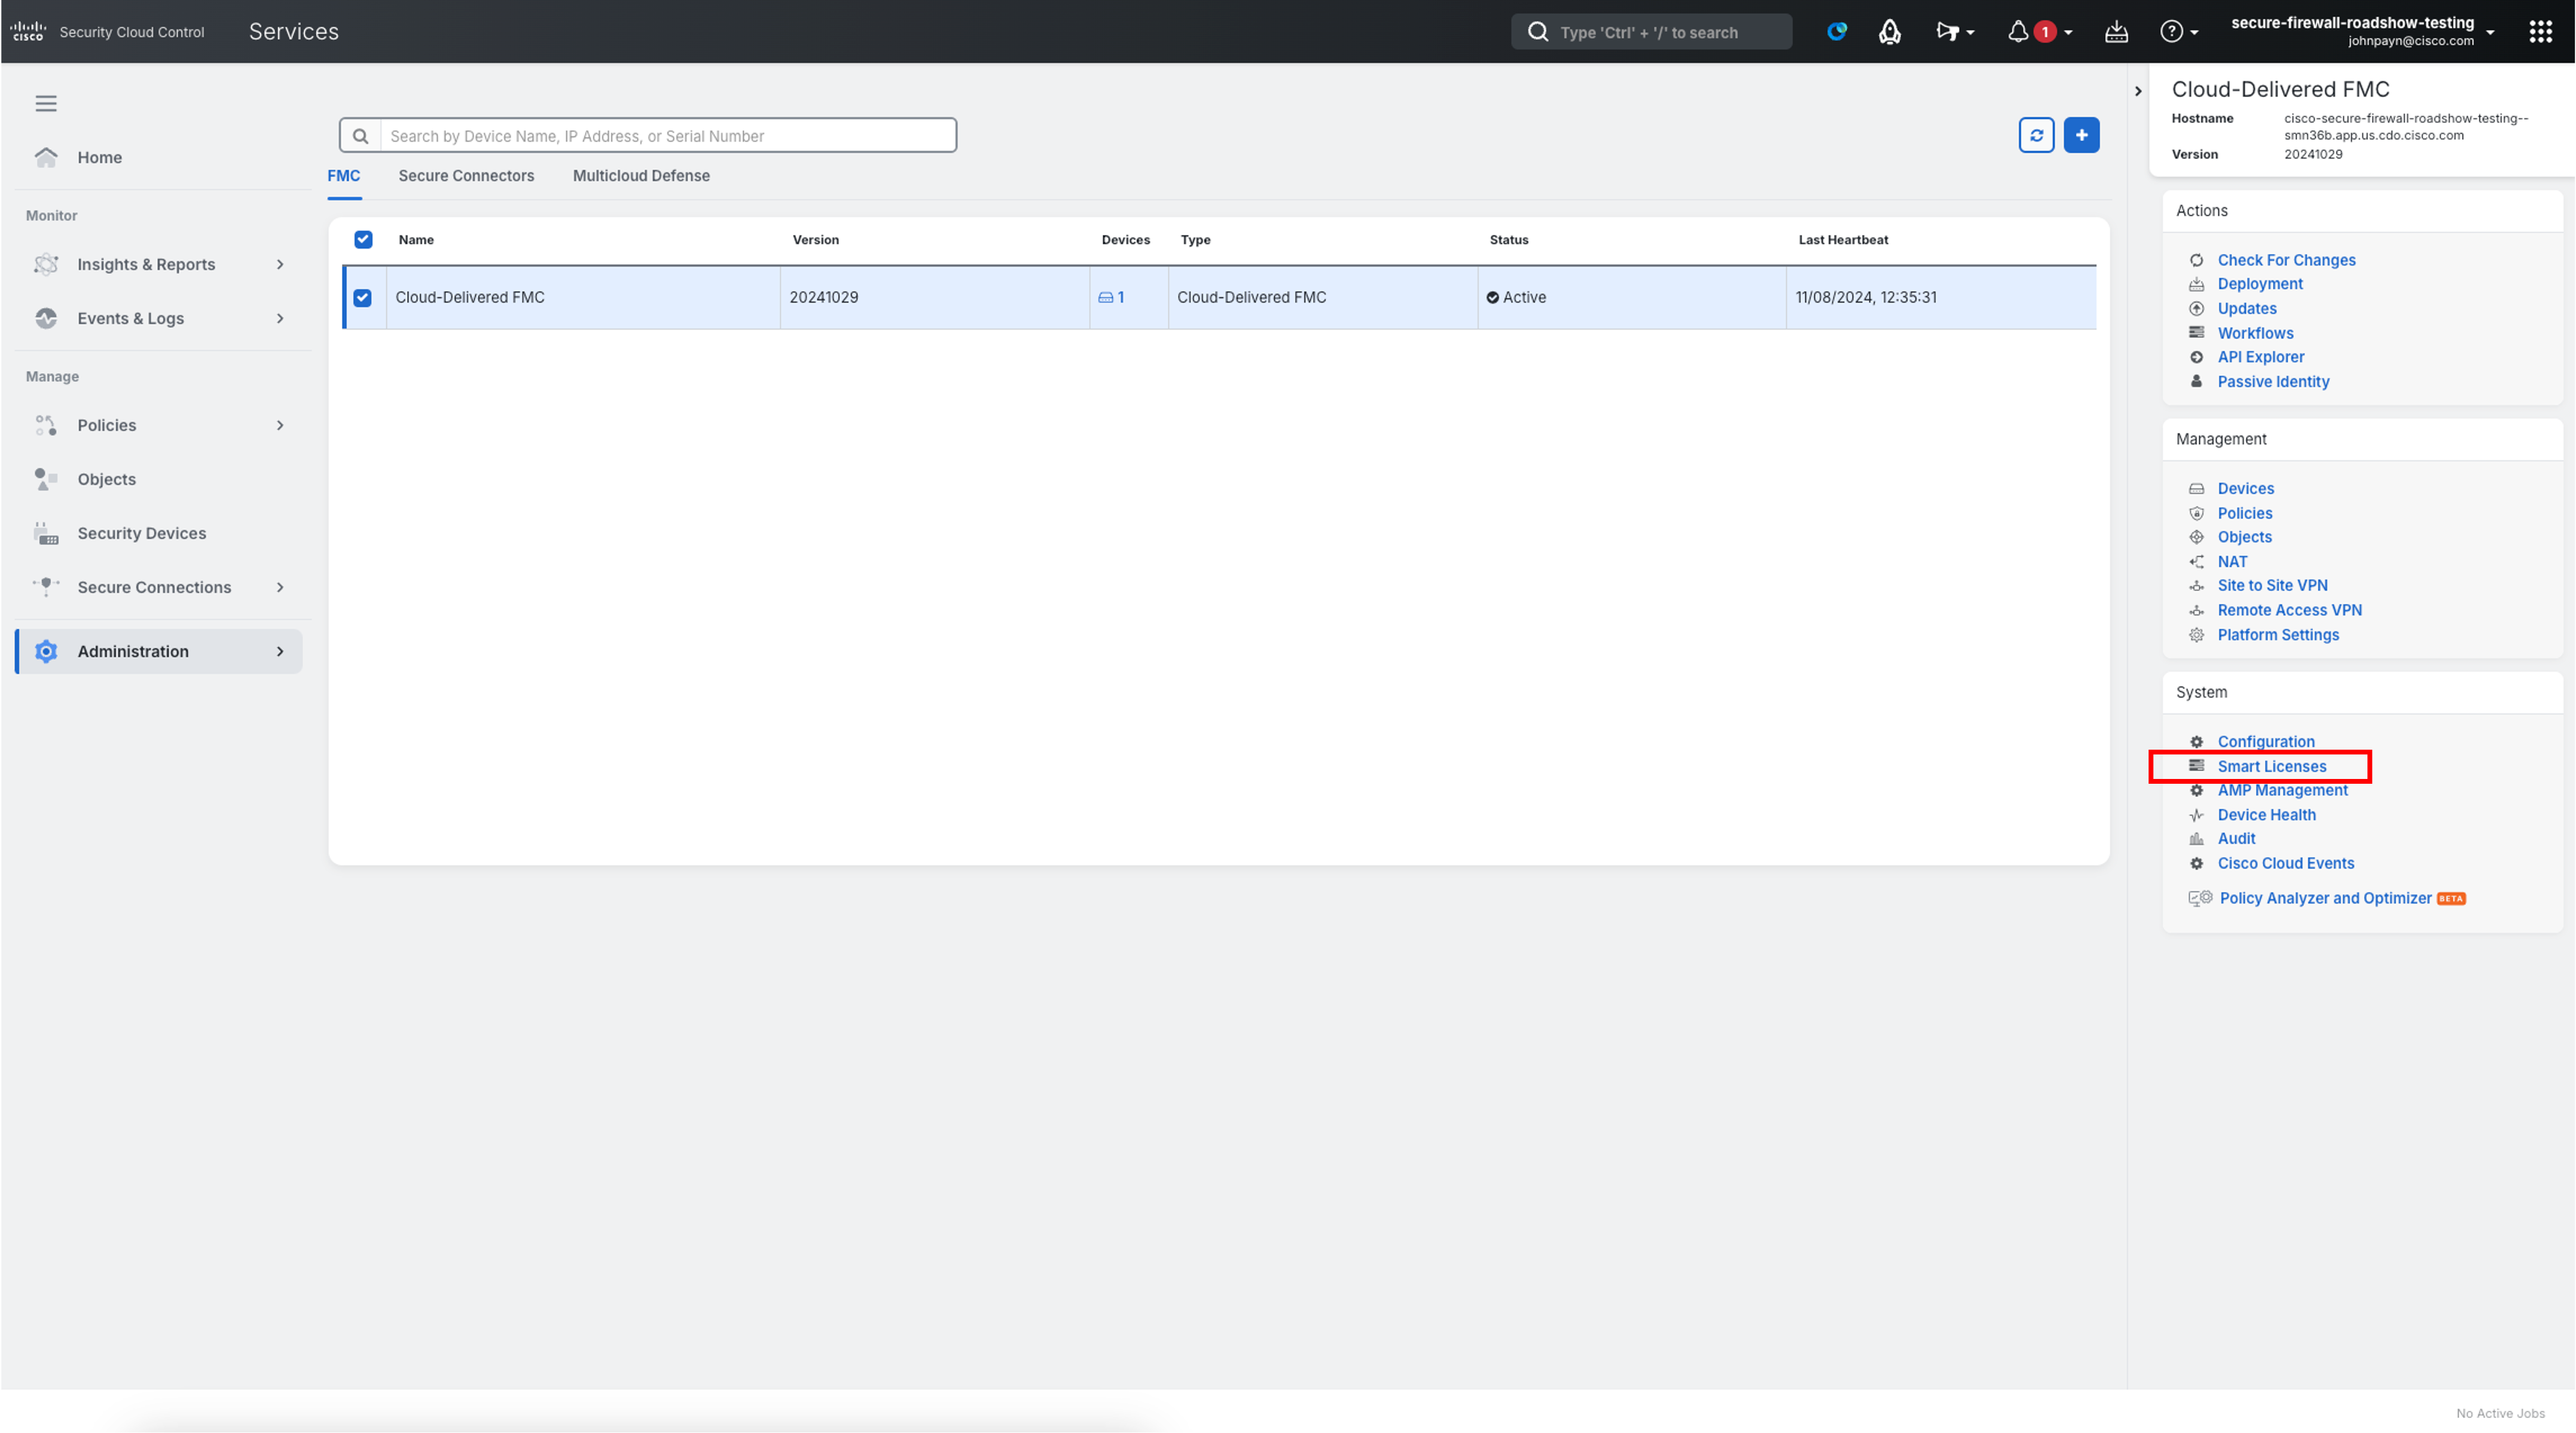
Register the cloud-delivered FMC with your smart licensing account. Click Smart Licenses.
Note:
Prior to this lab, the following licenses should have been requested and deposited into your Smart Account:
- L-FPR1010T-TMC=
- L-AC-APX-LIC-SMART=
If you have not requested those licenses, please proceed with the trial license.
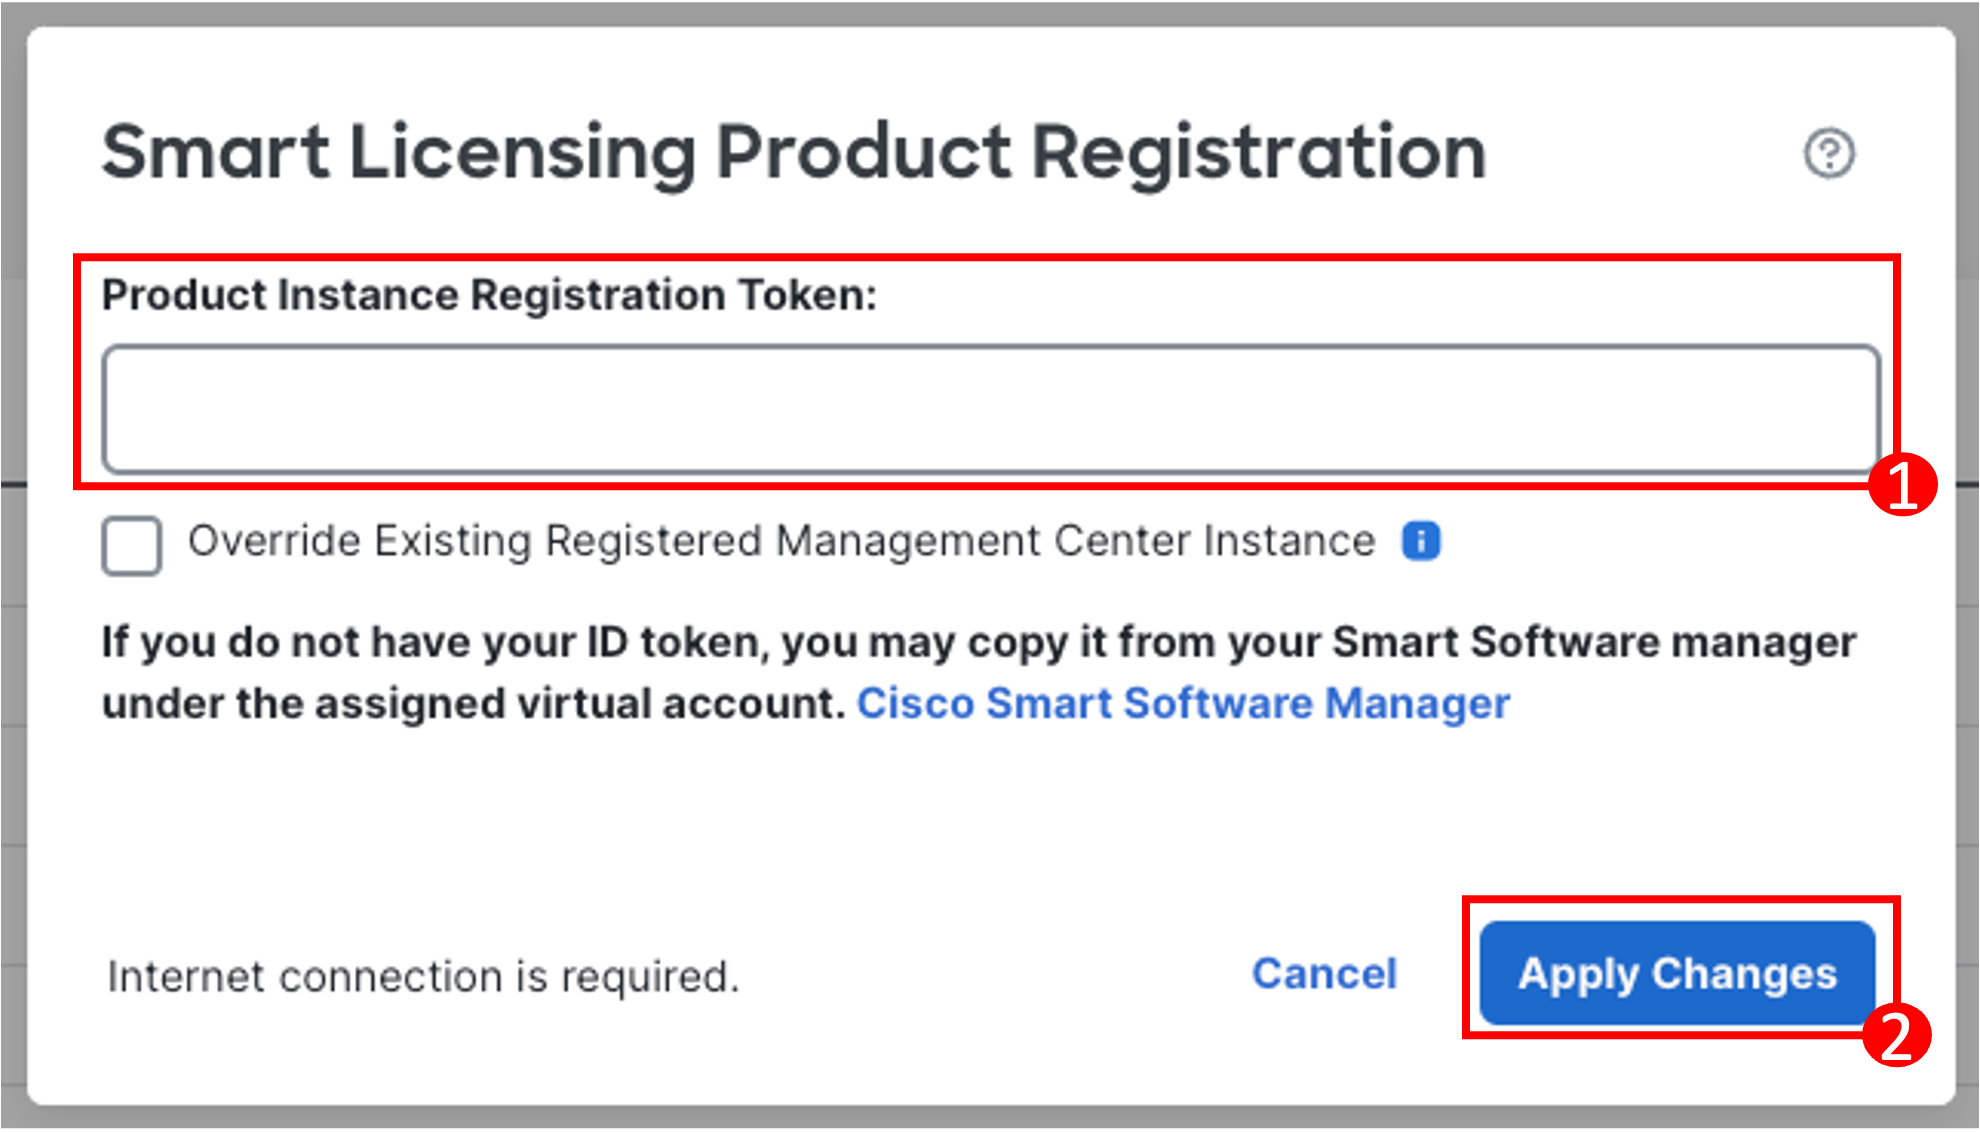
- This will take you to the Smart Licensing registration page within the Cloud-delivered FMC. Click Register. Enter the License Token and click Apply Changes.

- Upon successful smart licensing registration, you should see the name of the Smart Account reflected. Click Return Home to go back to the Landing page.

Note
If your registration fails, simply refresh the page, and re-register
-
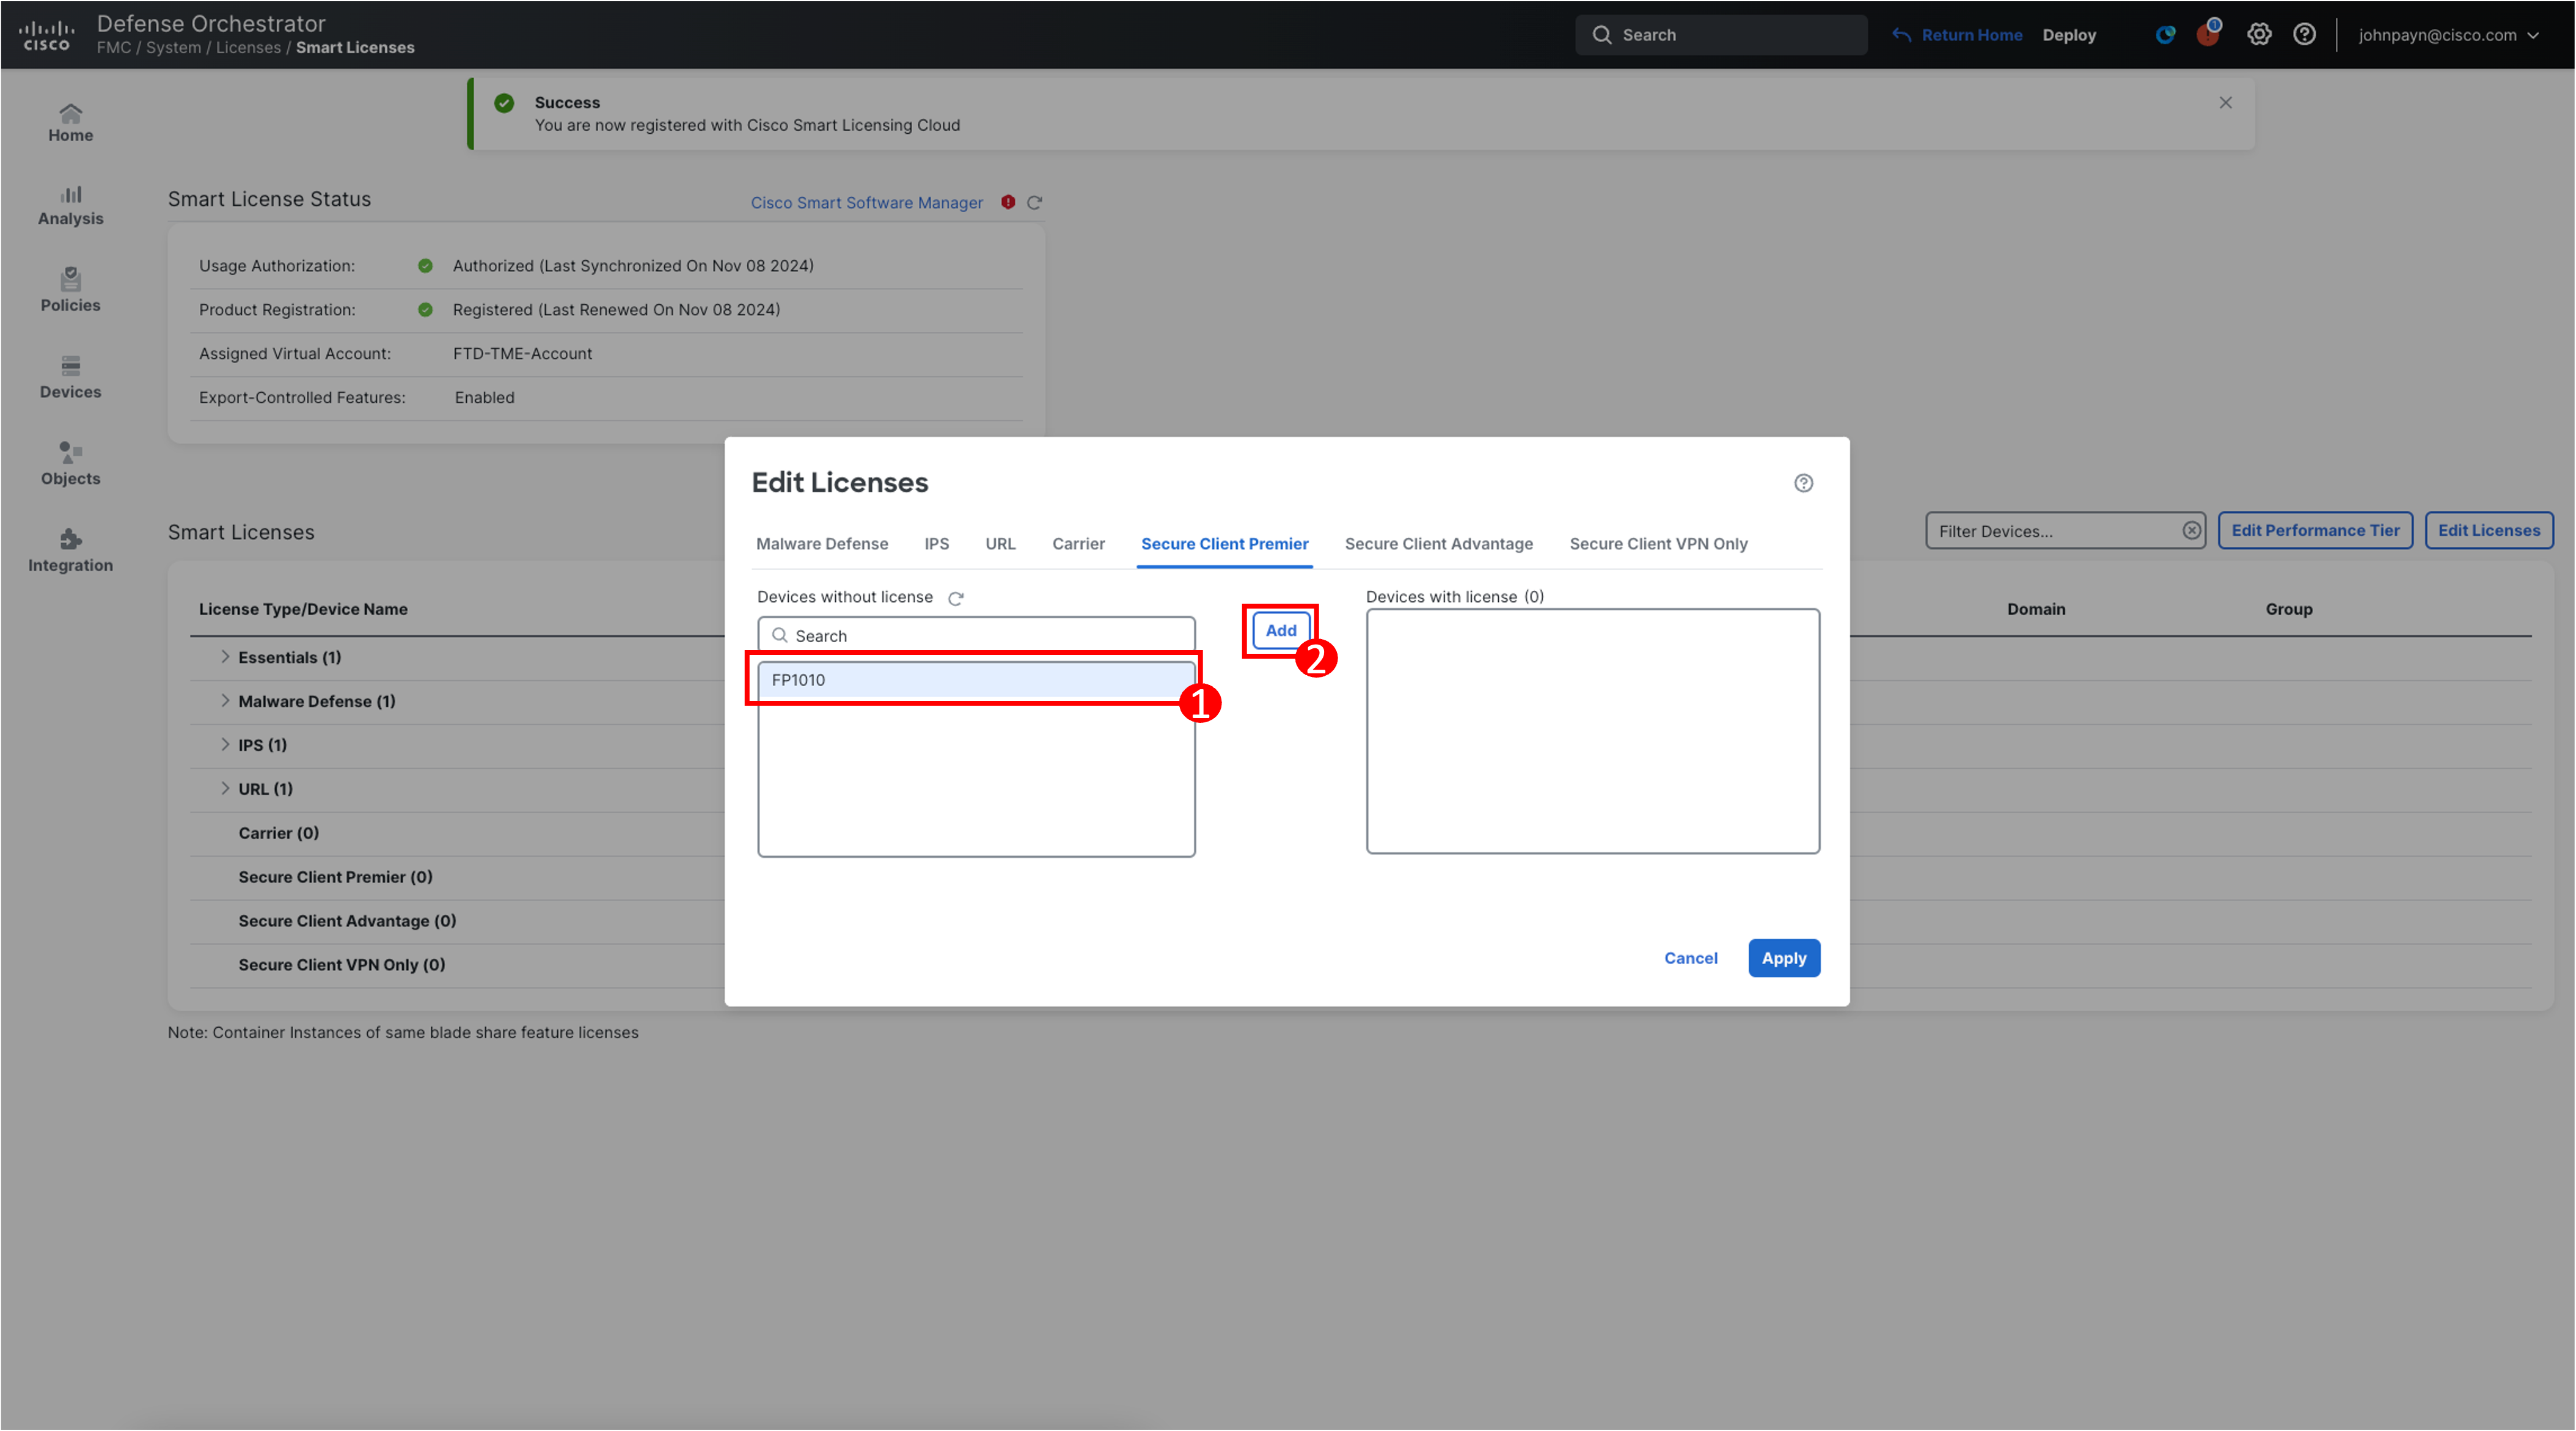
We will now need to add the Secure Client license that was greyed out during the initial onboarding, click Edit Licenses and navigate to the Secure Client Premier tab.
-
Click FP1010 and then Add to move your device to the Devices with license section.
-
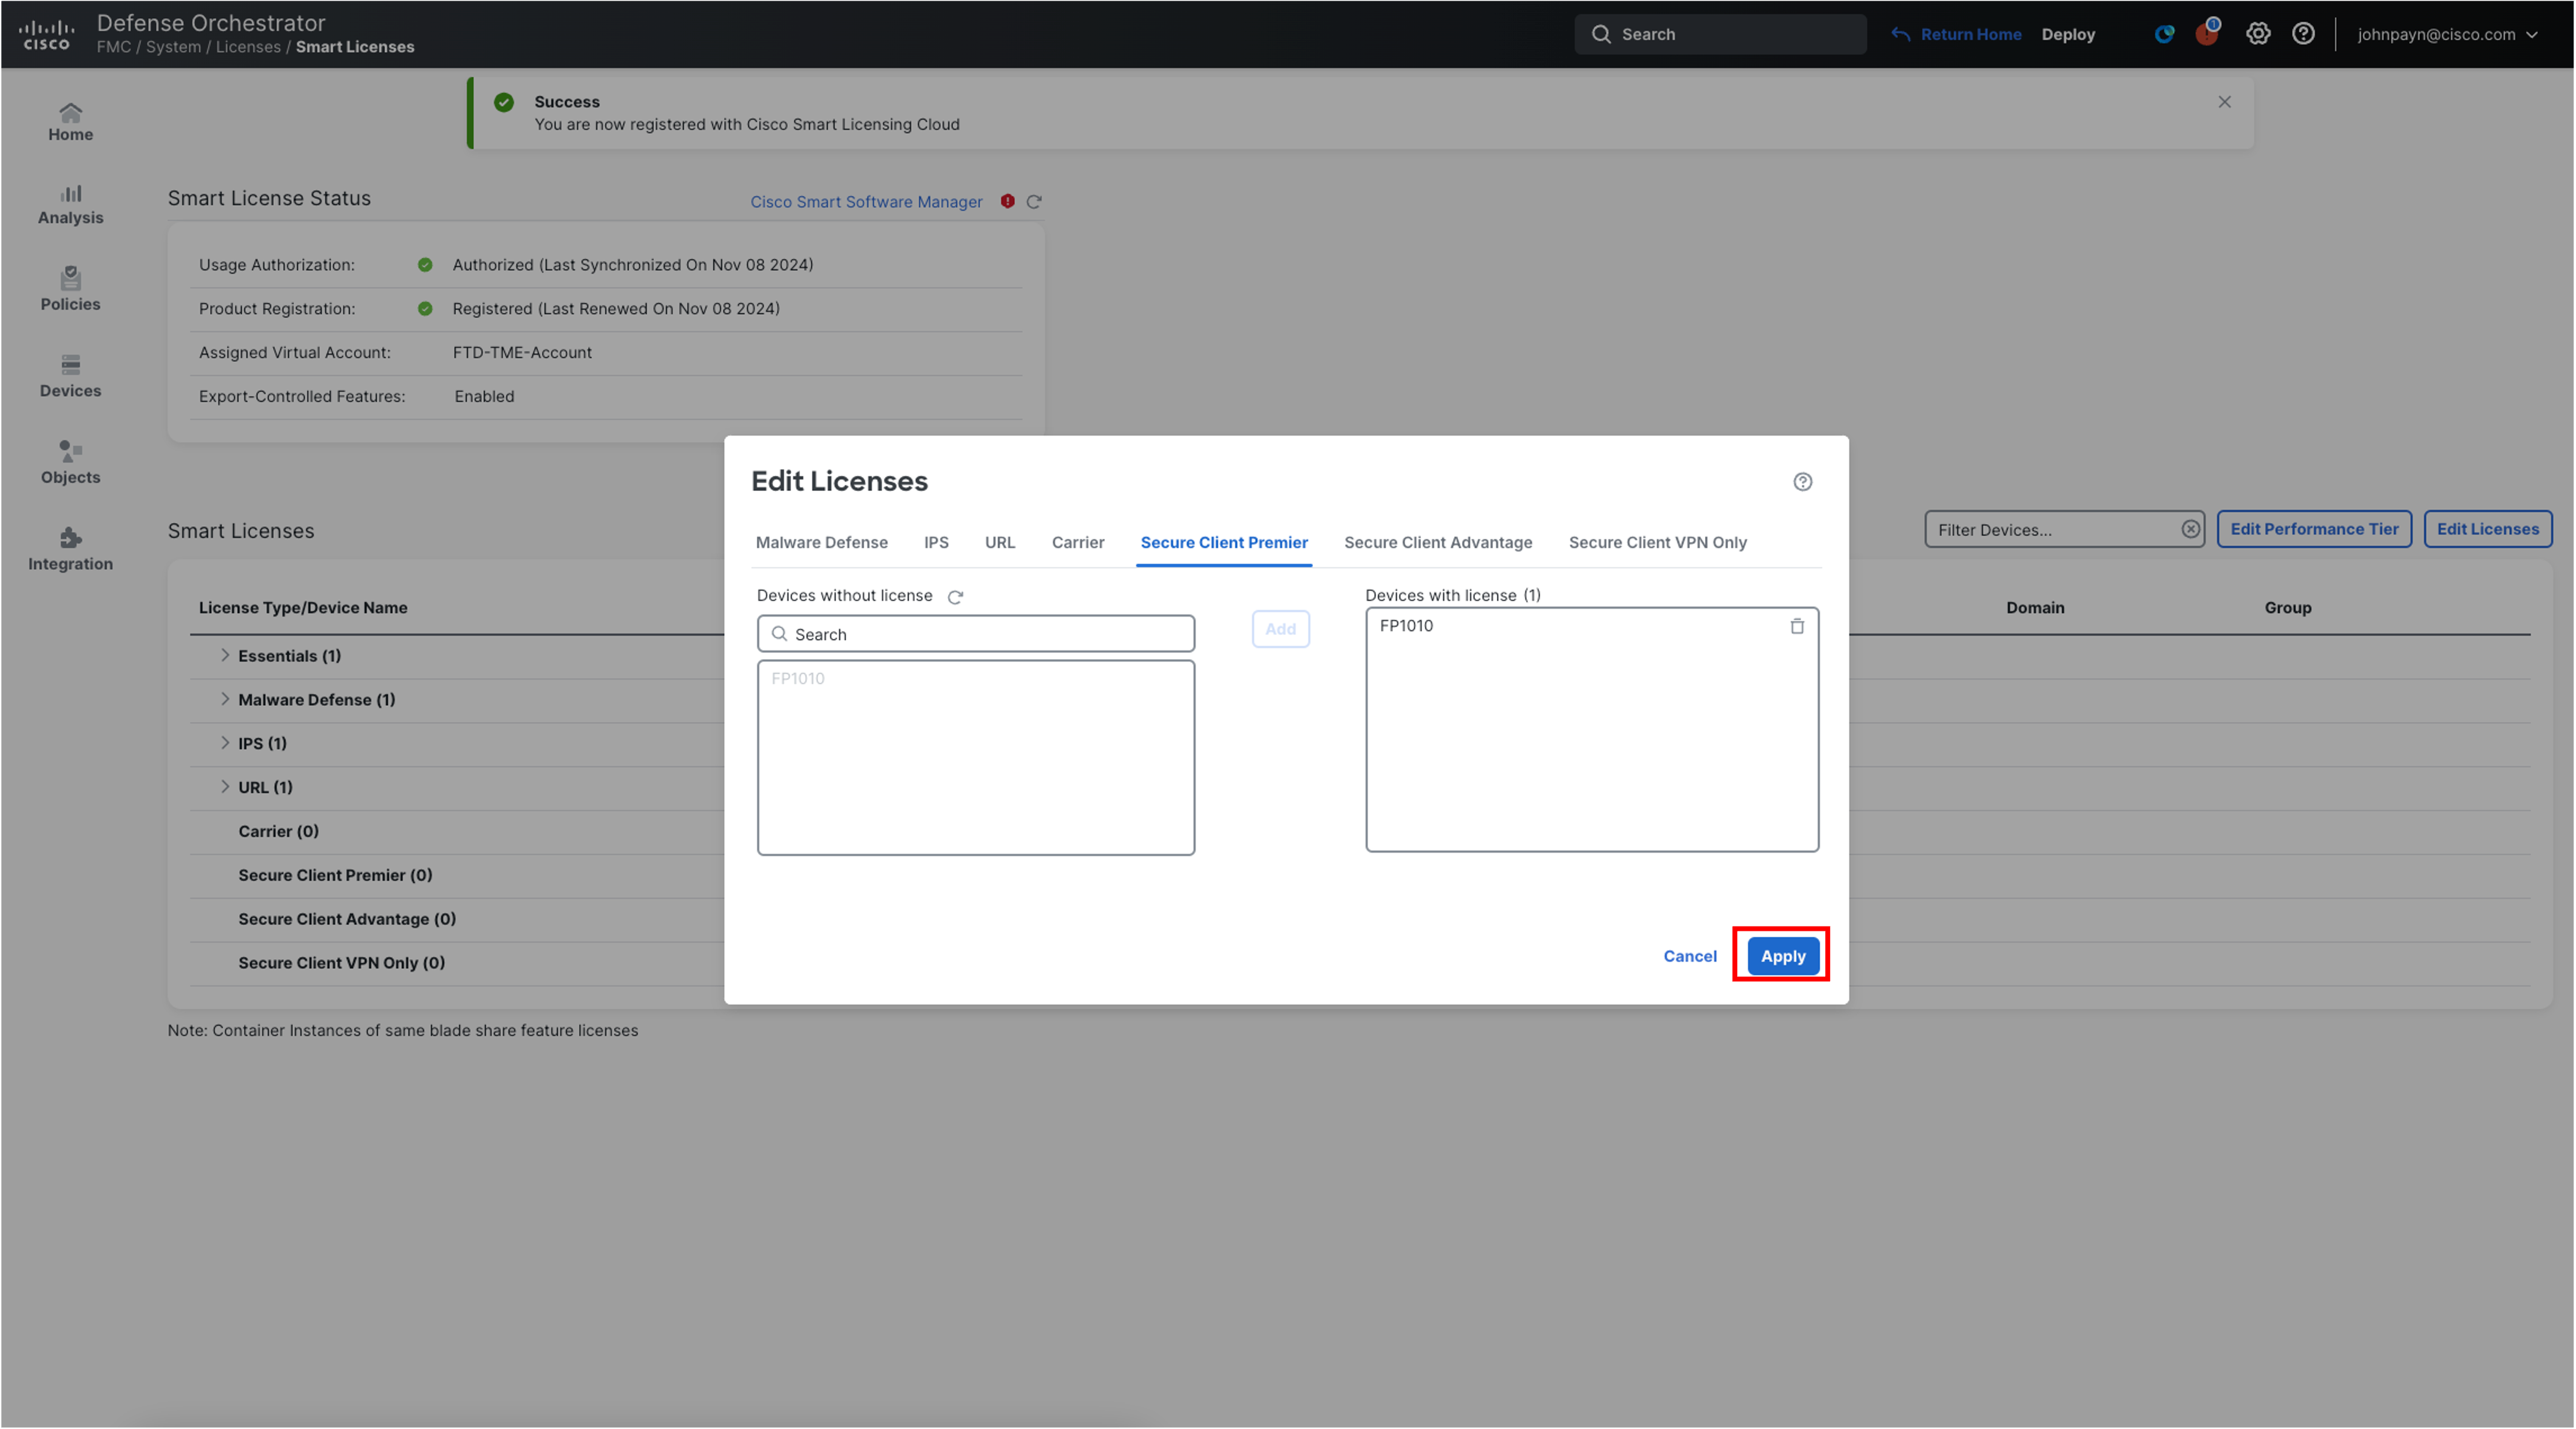
Click Apply.
-
In the top menu bar, click Return Home.
Additional Resources
For additional details on smart licensing on Secure Firewall devices, please refer to the following links:
Smart Licensing
Smart Licensing Youtube Video
Cloud Logging Configuration
Now, we will modify the Cloud Logging configuration to send all the Events from the Firewall to the cloud, where they are displayed in the Unified Event Viewer in Security Cloud Control and also used to populate the FTD Dashboards.
-
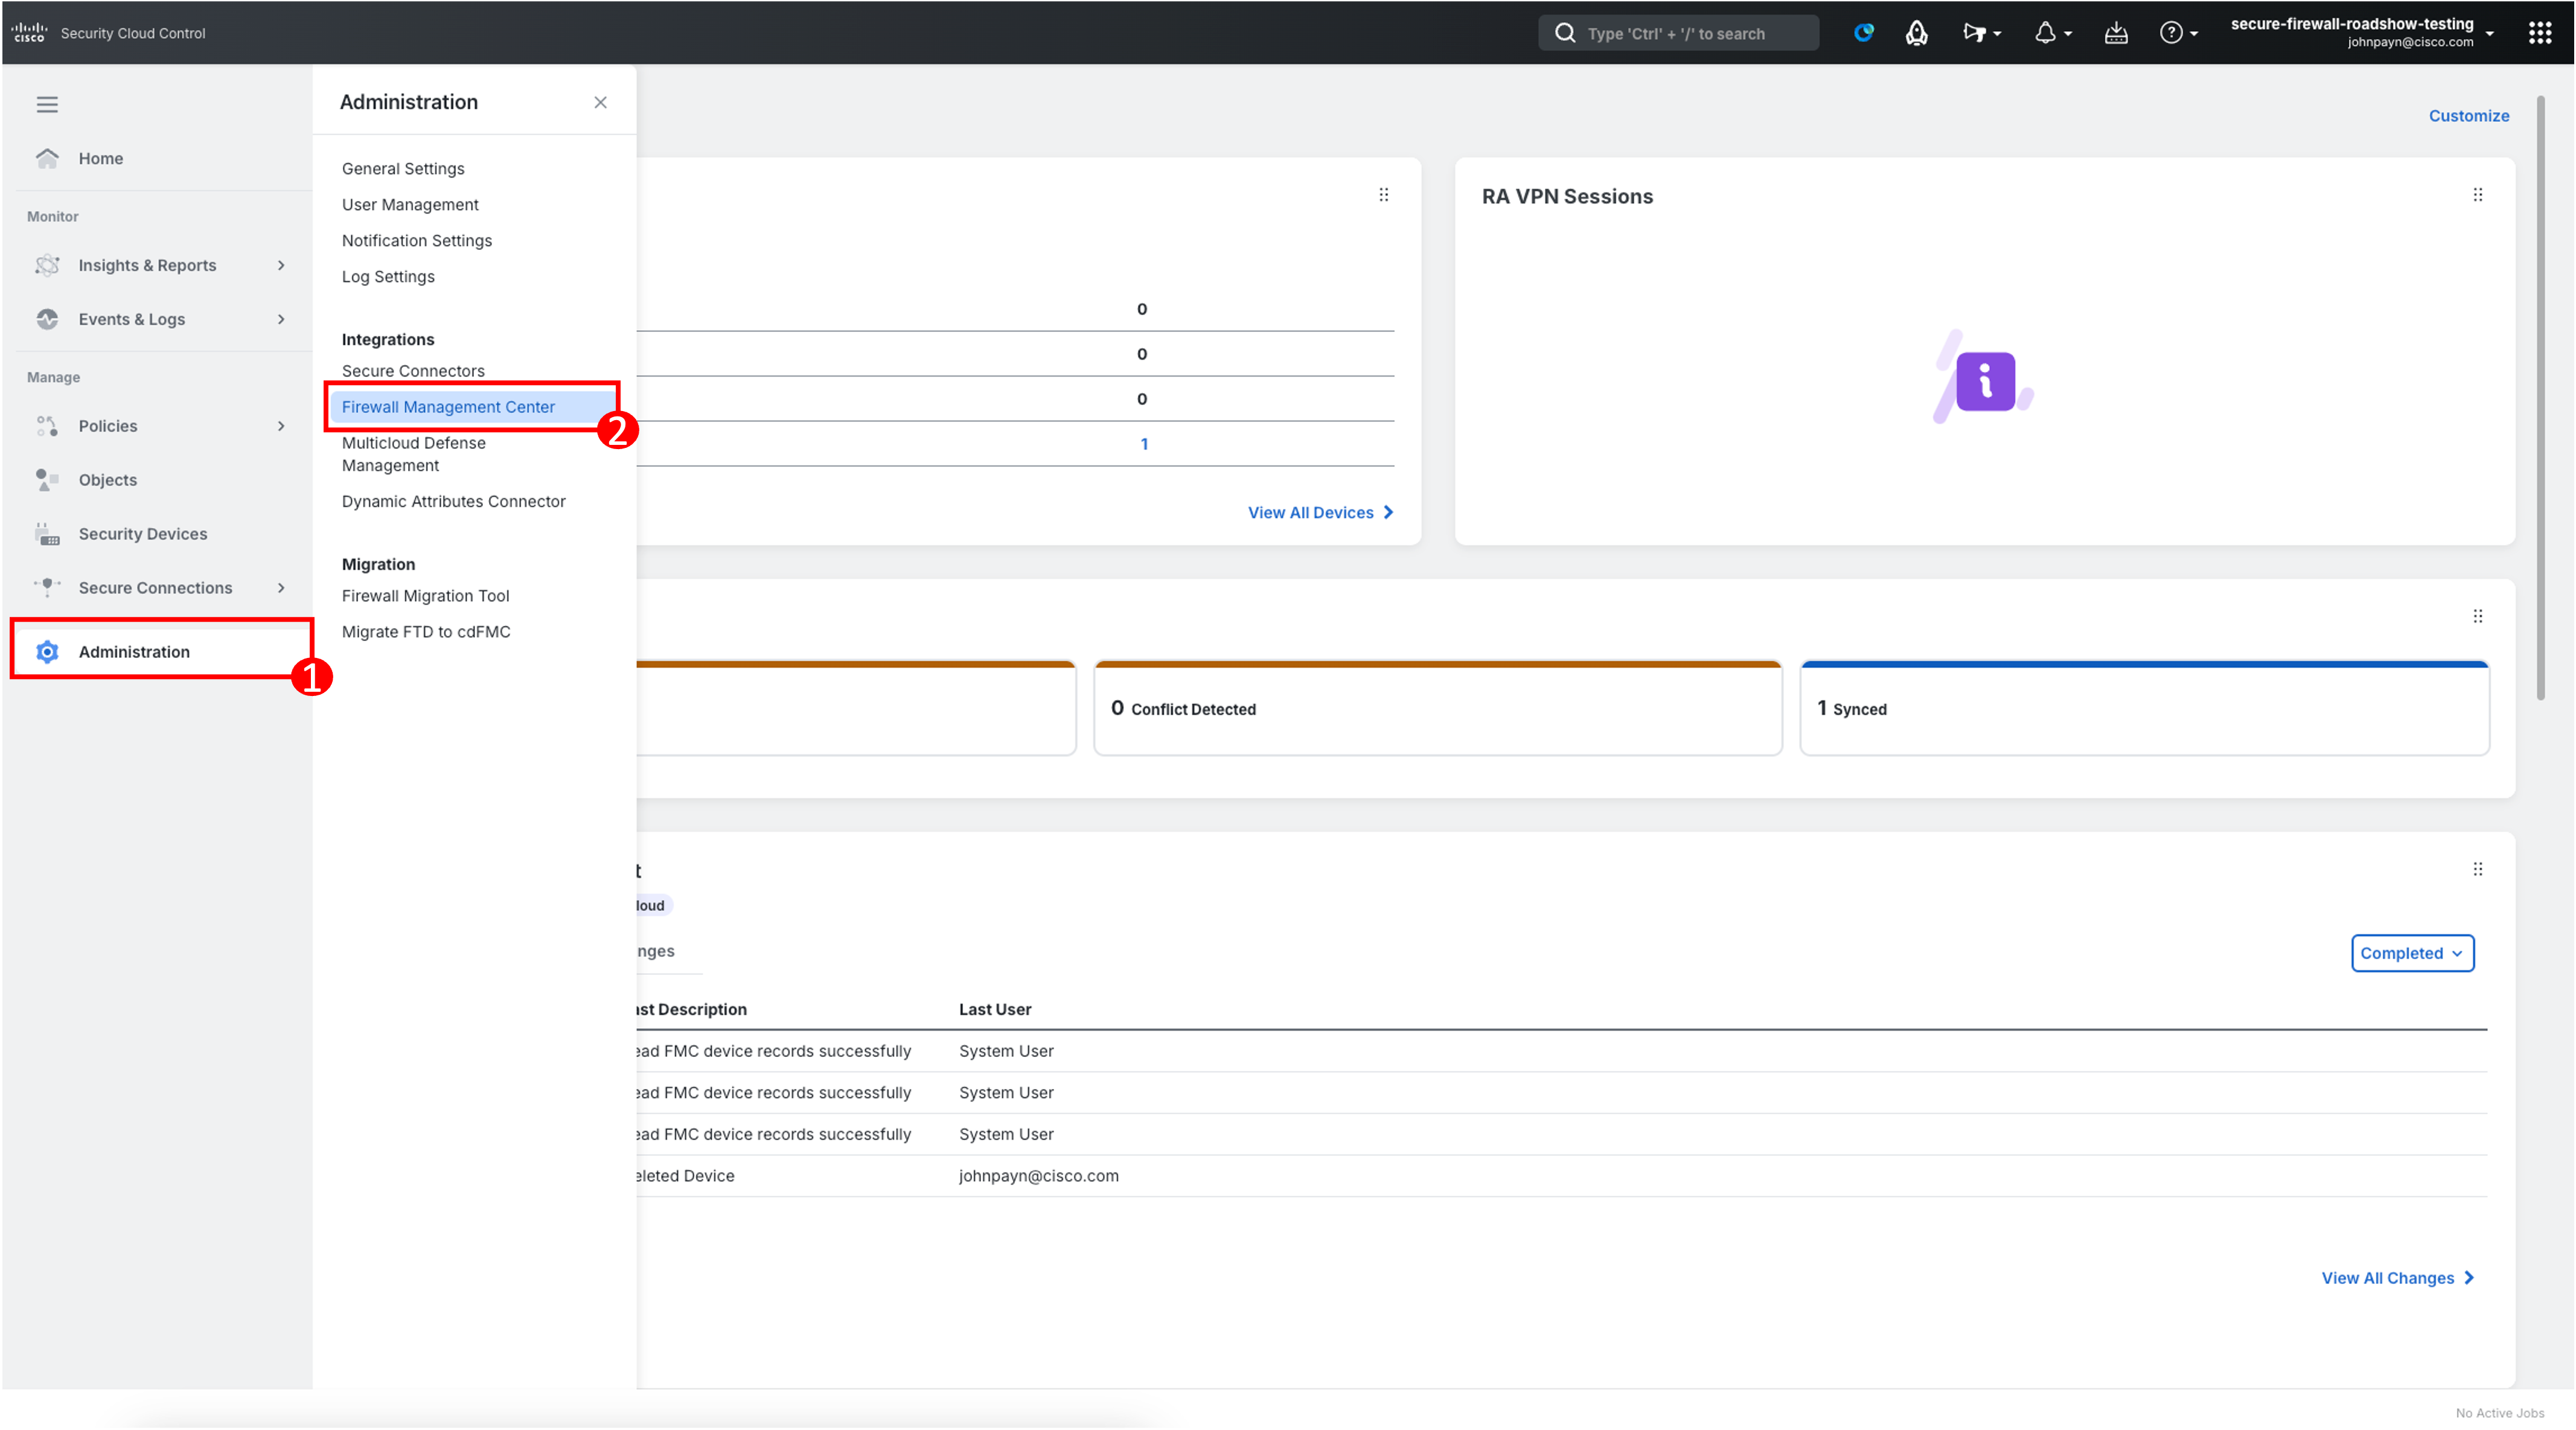
From the left-hand navigation pane, click Administration > Firewall Management Center.
-
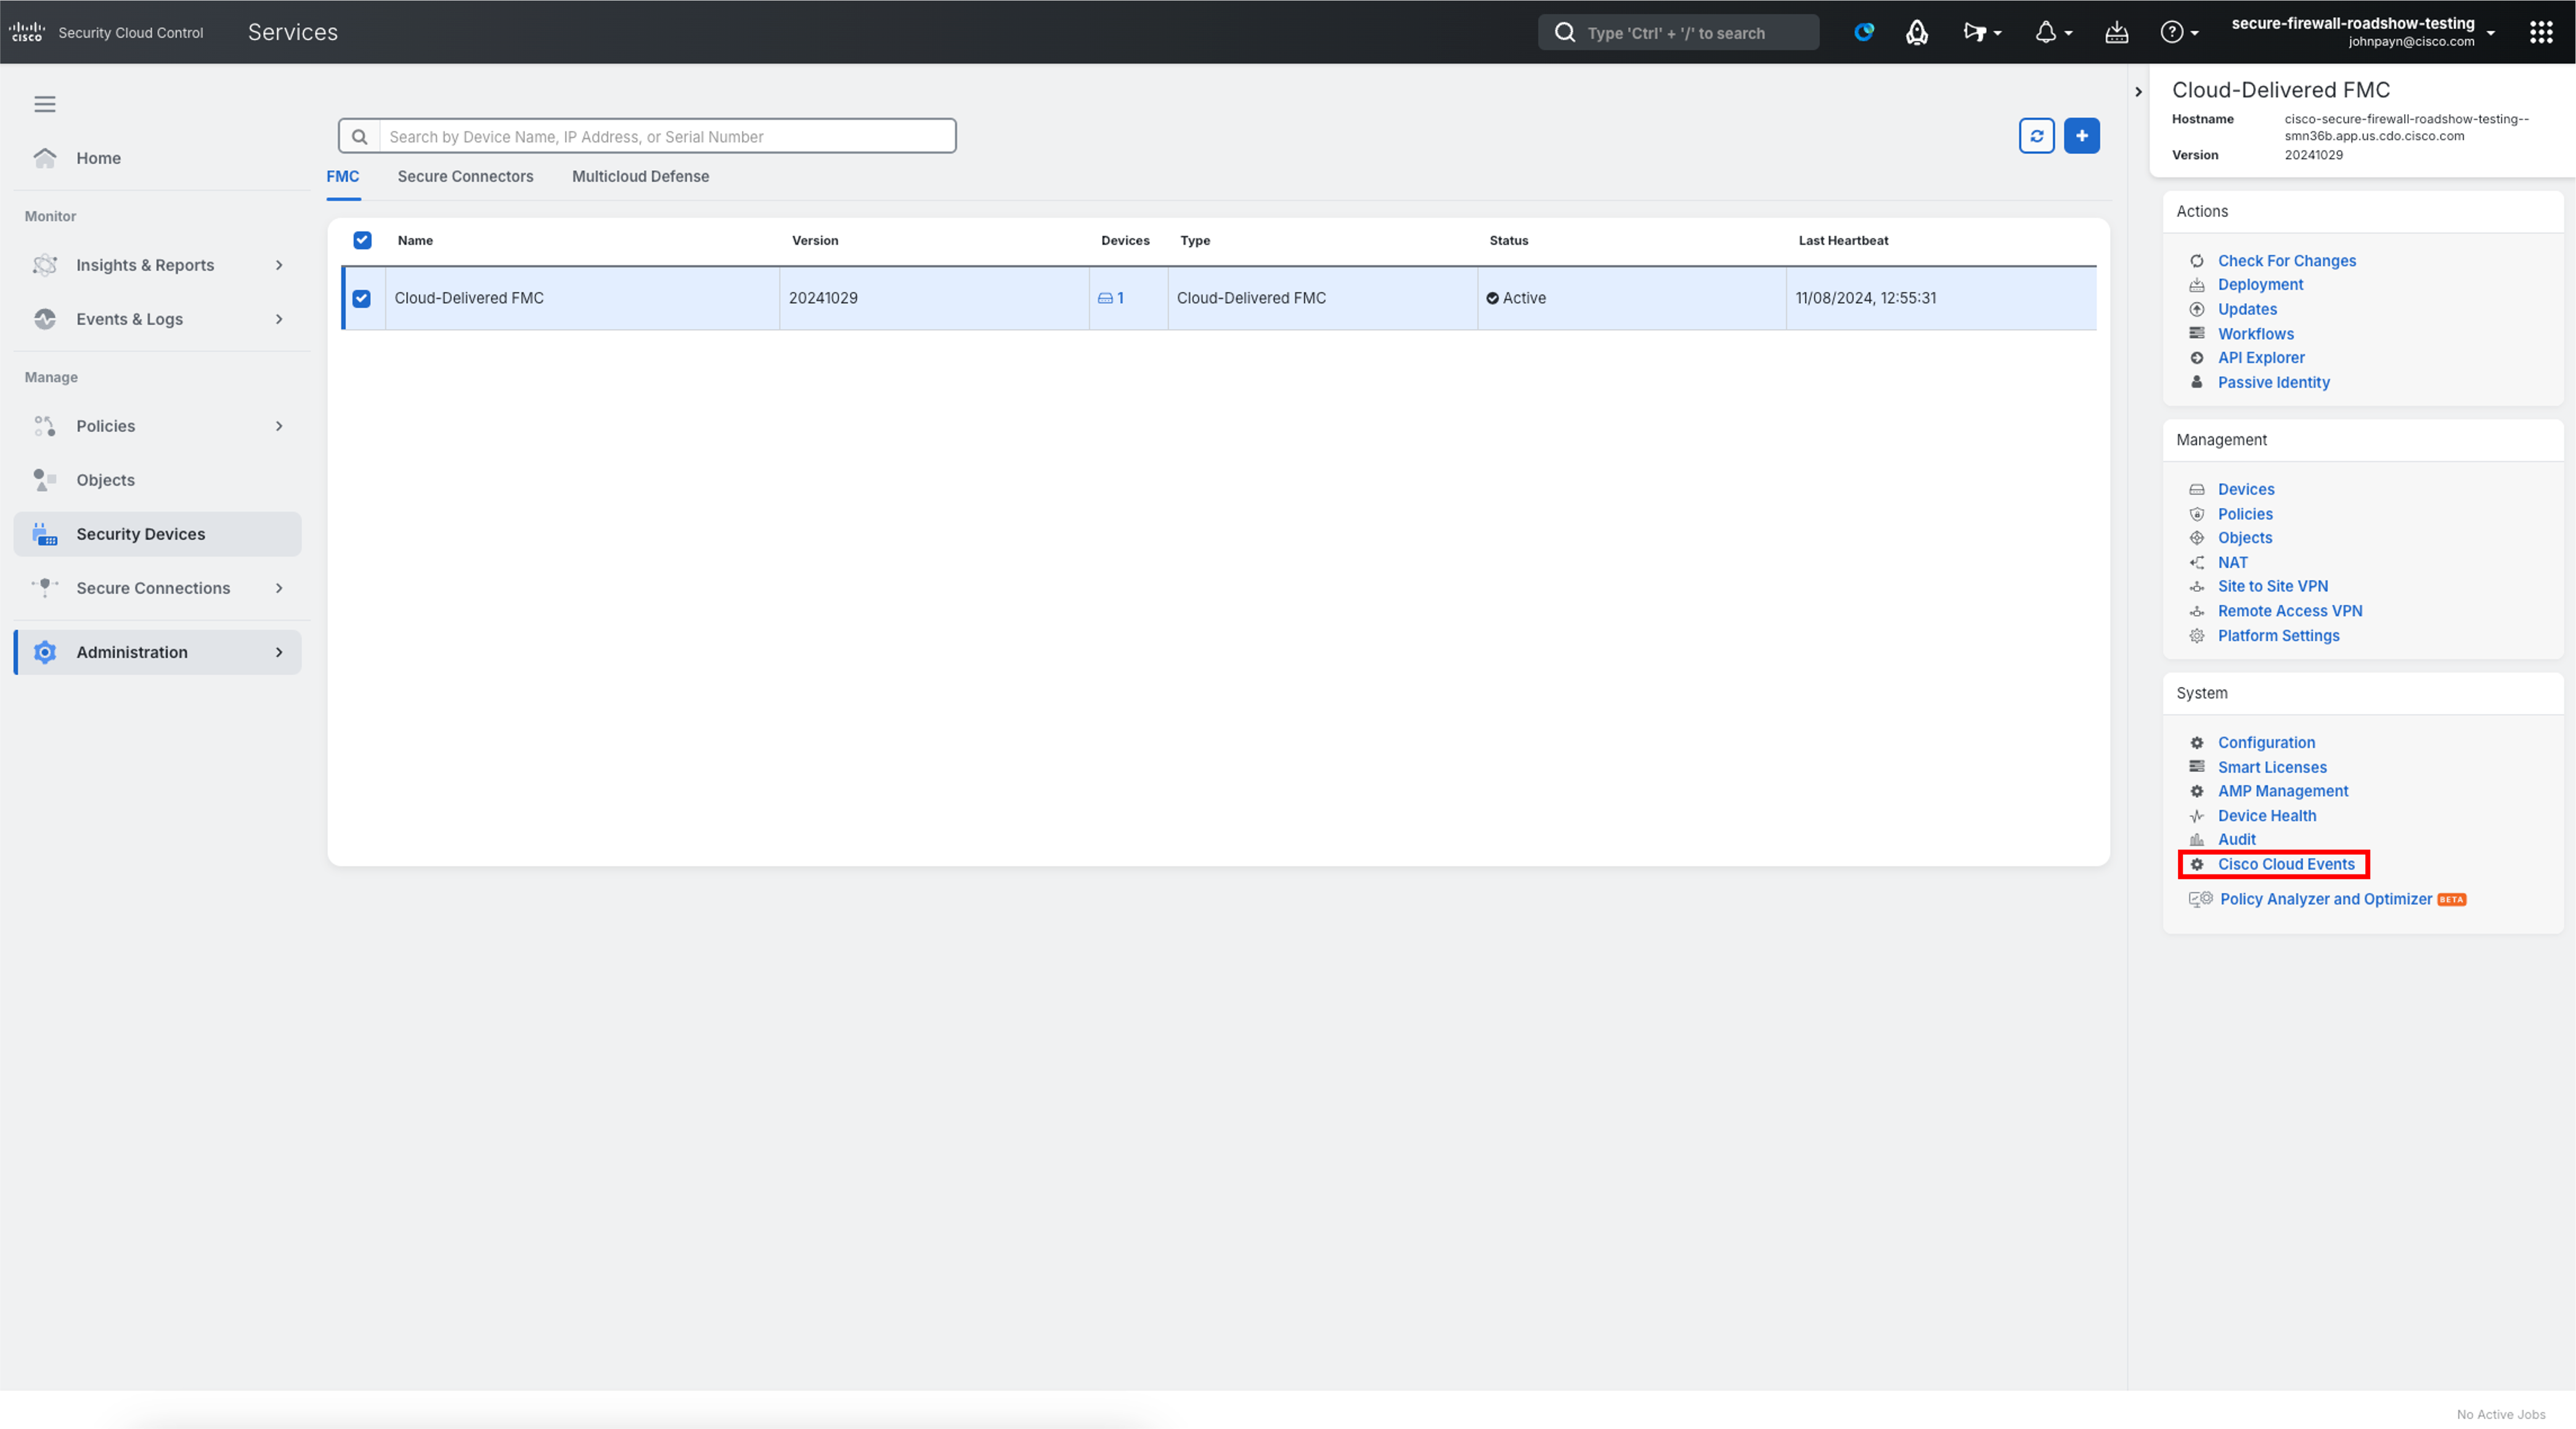
Click Cisco Cloud Events.
-
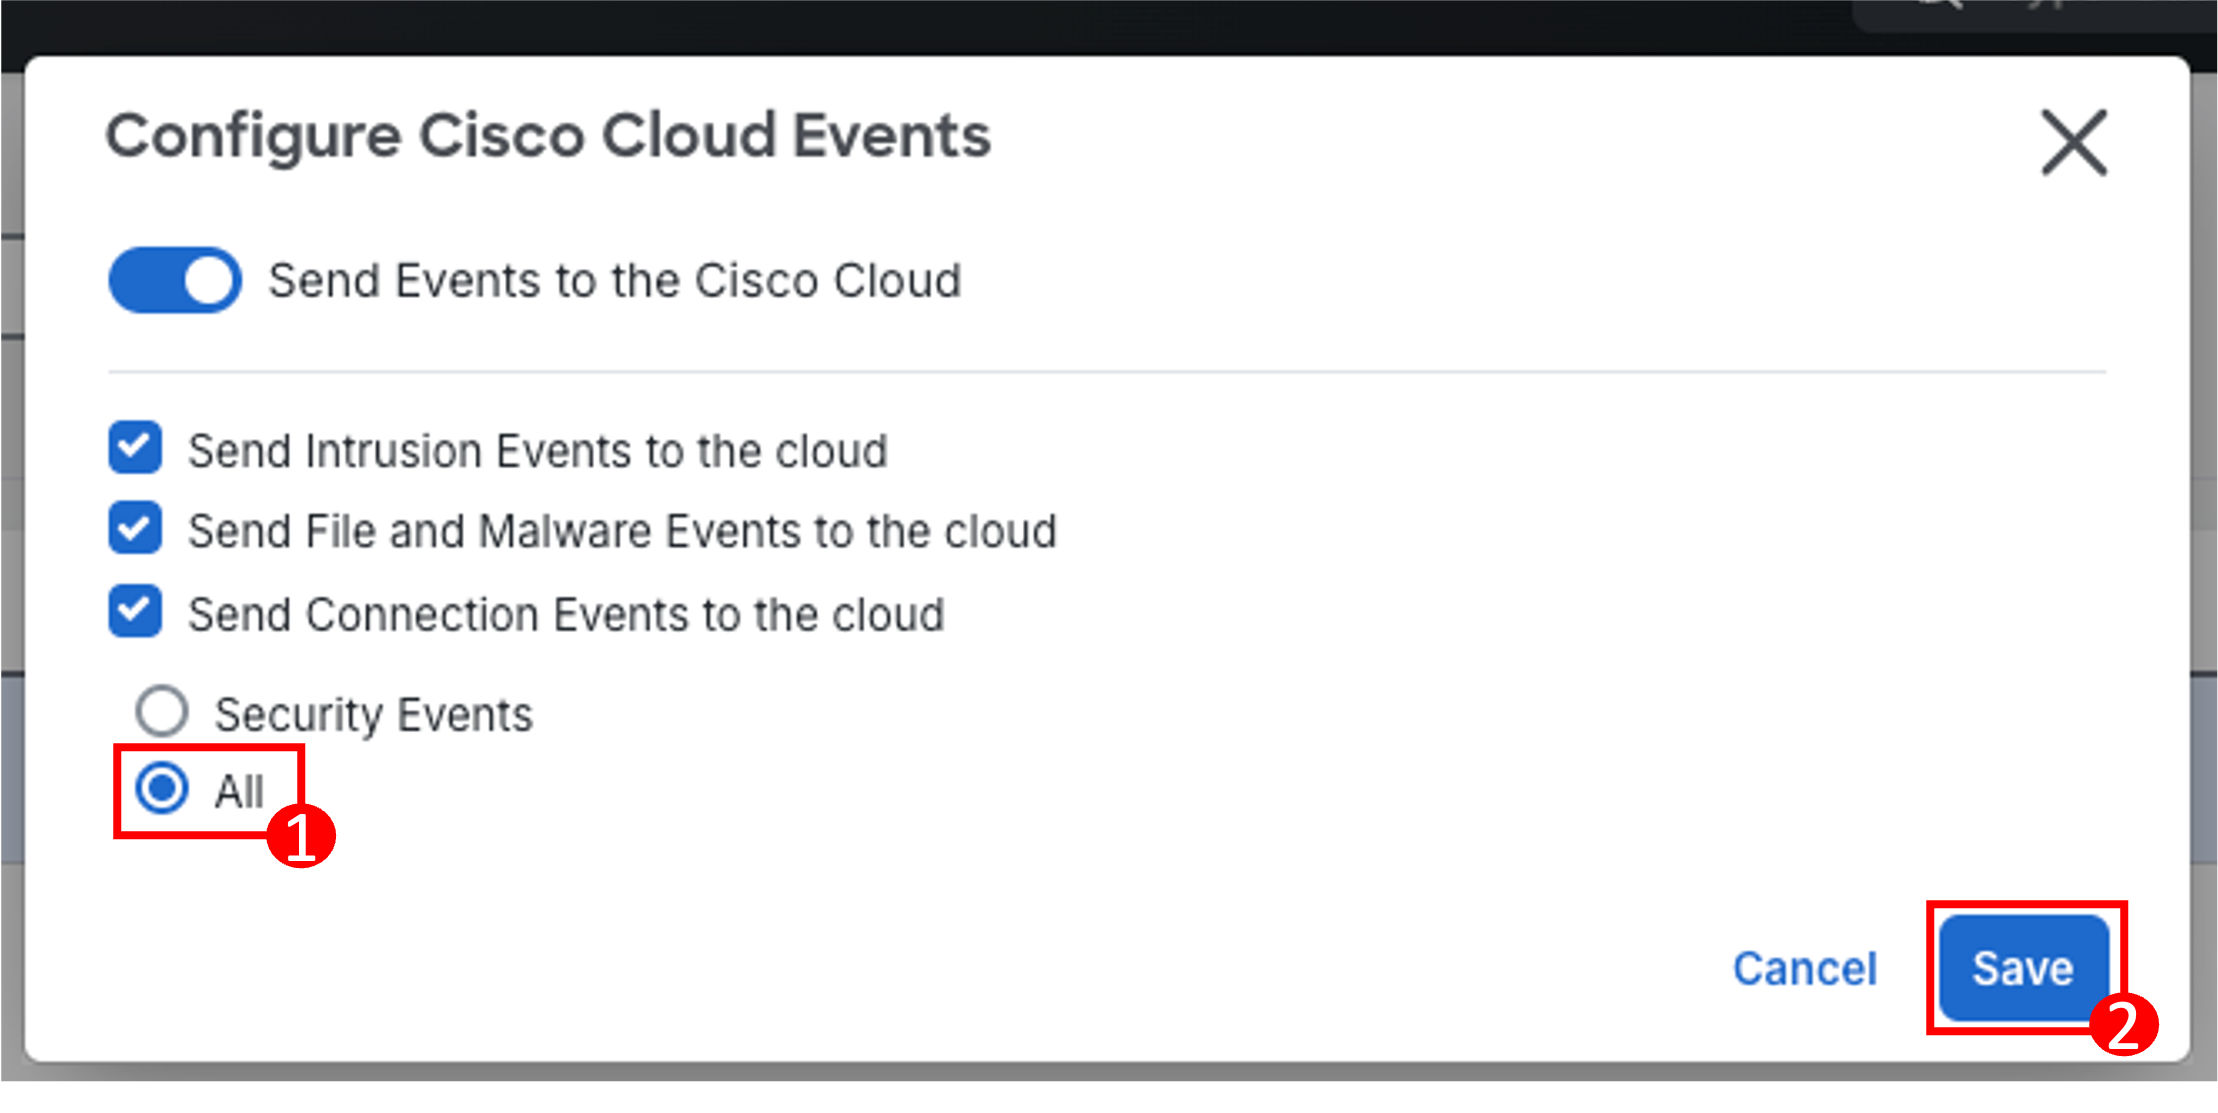
This will open the Cloud Event Configuration window.
- Change the Send Connections Events to the cloud from Security Events to All so that All Connection Events are sent to the cloud.
- Click Save.
Note
By default, the configuration allows Intrusion, File and Malware, and Connection Events associated with Security Events to the cloud. This means that if a flow generated a Connection Event, it will be sent to the cloud only if there was a Security Event associated with the flow (Intrusion, File and Malware, Security Intelligence).
Task 3 - Upgrade the Firewall
In this section, we will upgrade the Firepower 1010 device to software release 7.4.2.
-
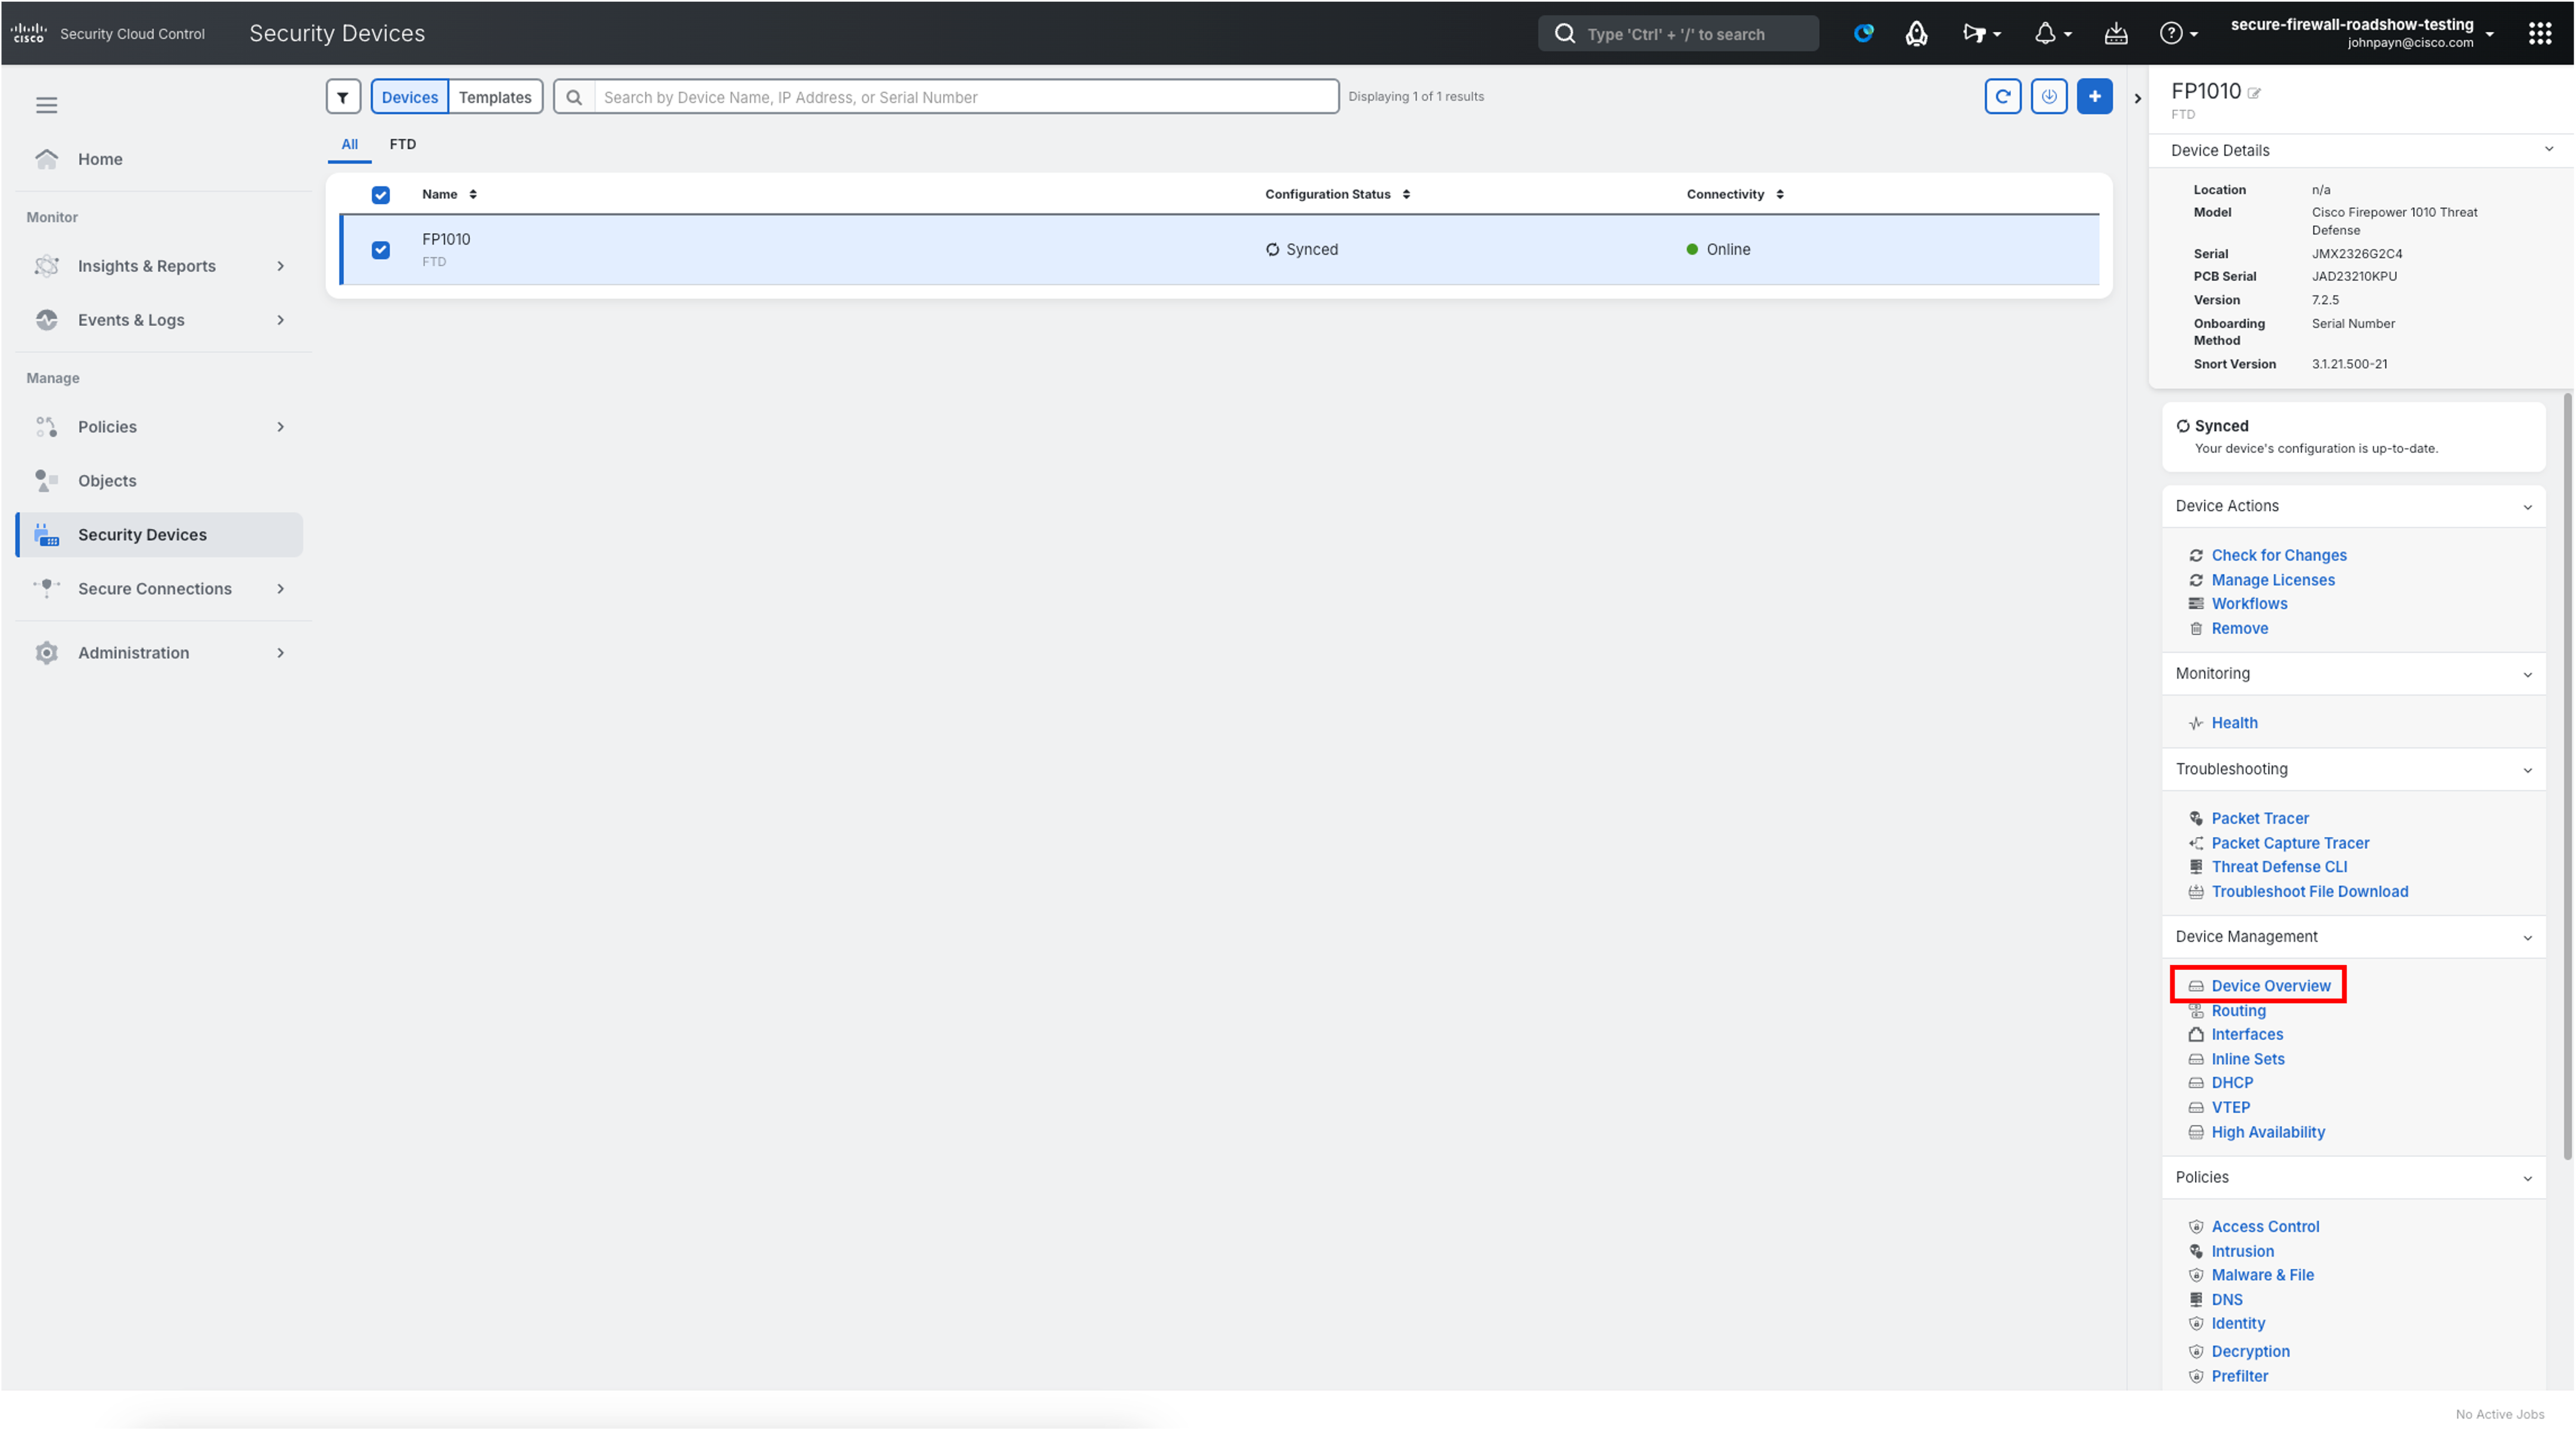
Head back to the Security Devices page and select the FP1010 device. In right-most navigation pane, select Device Overview.
-
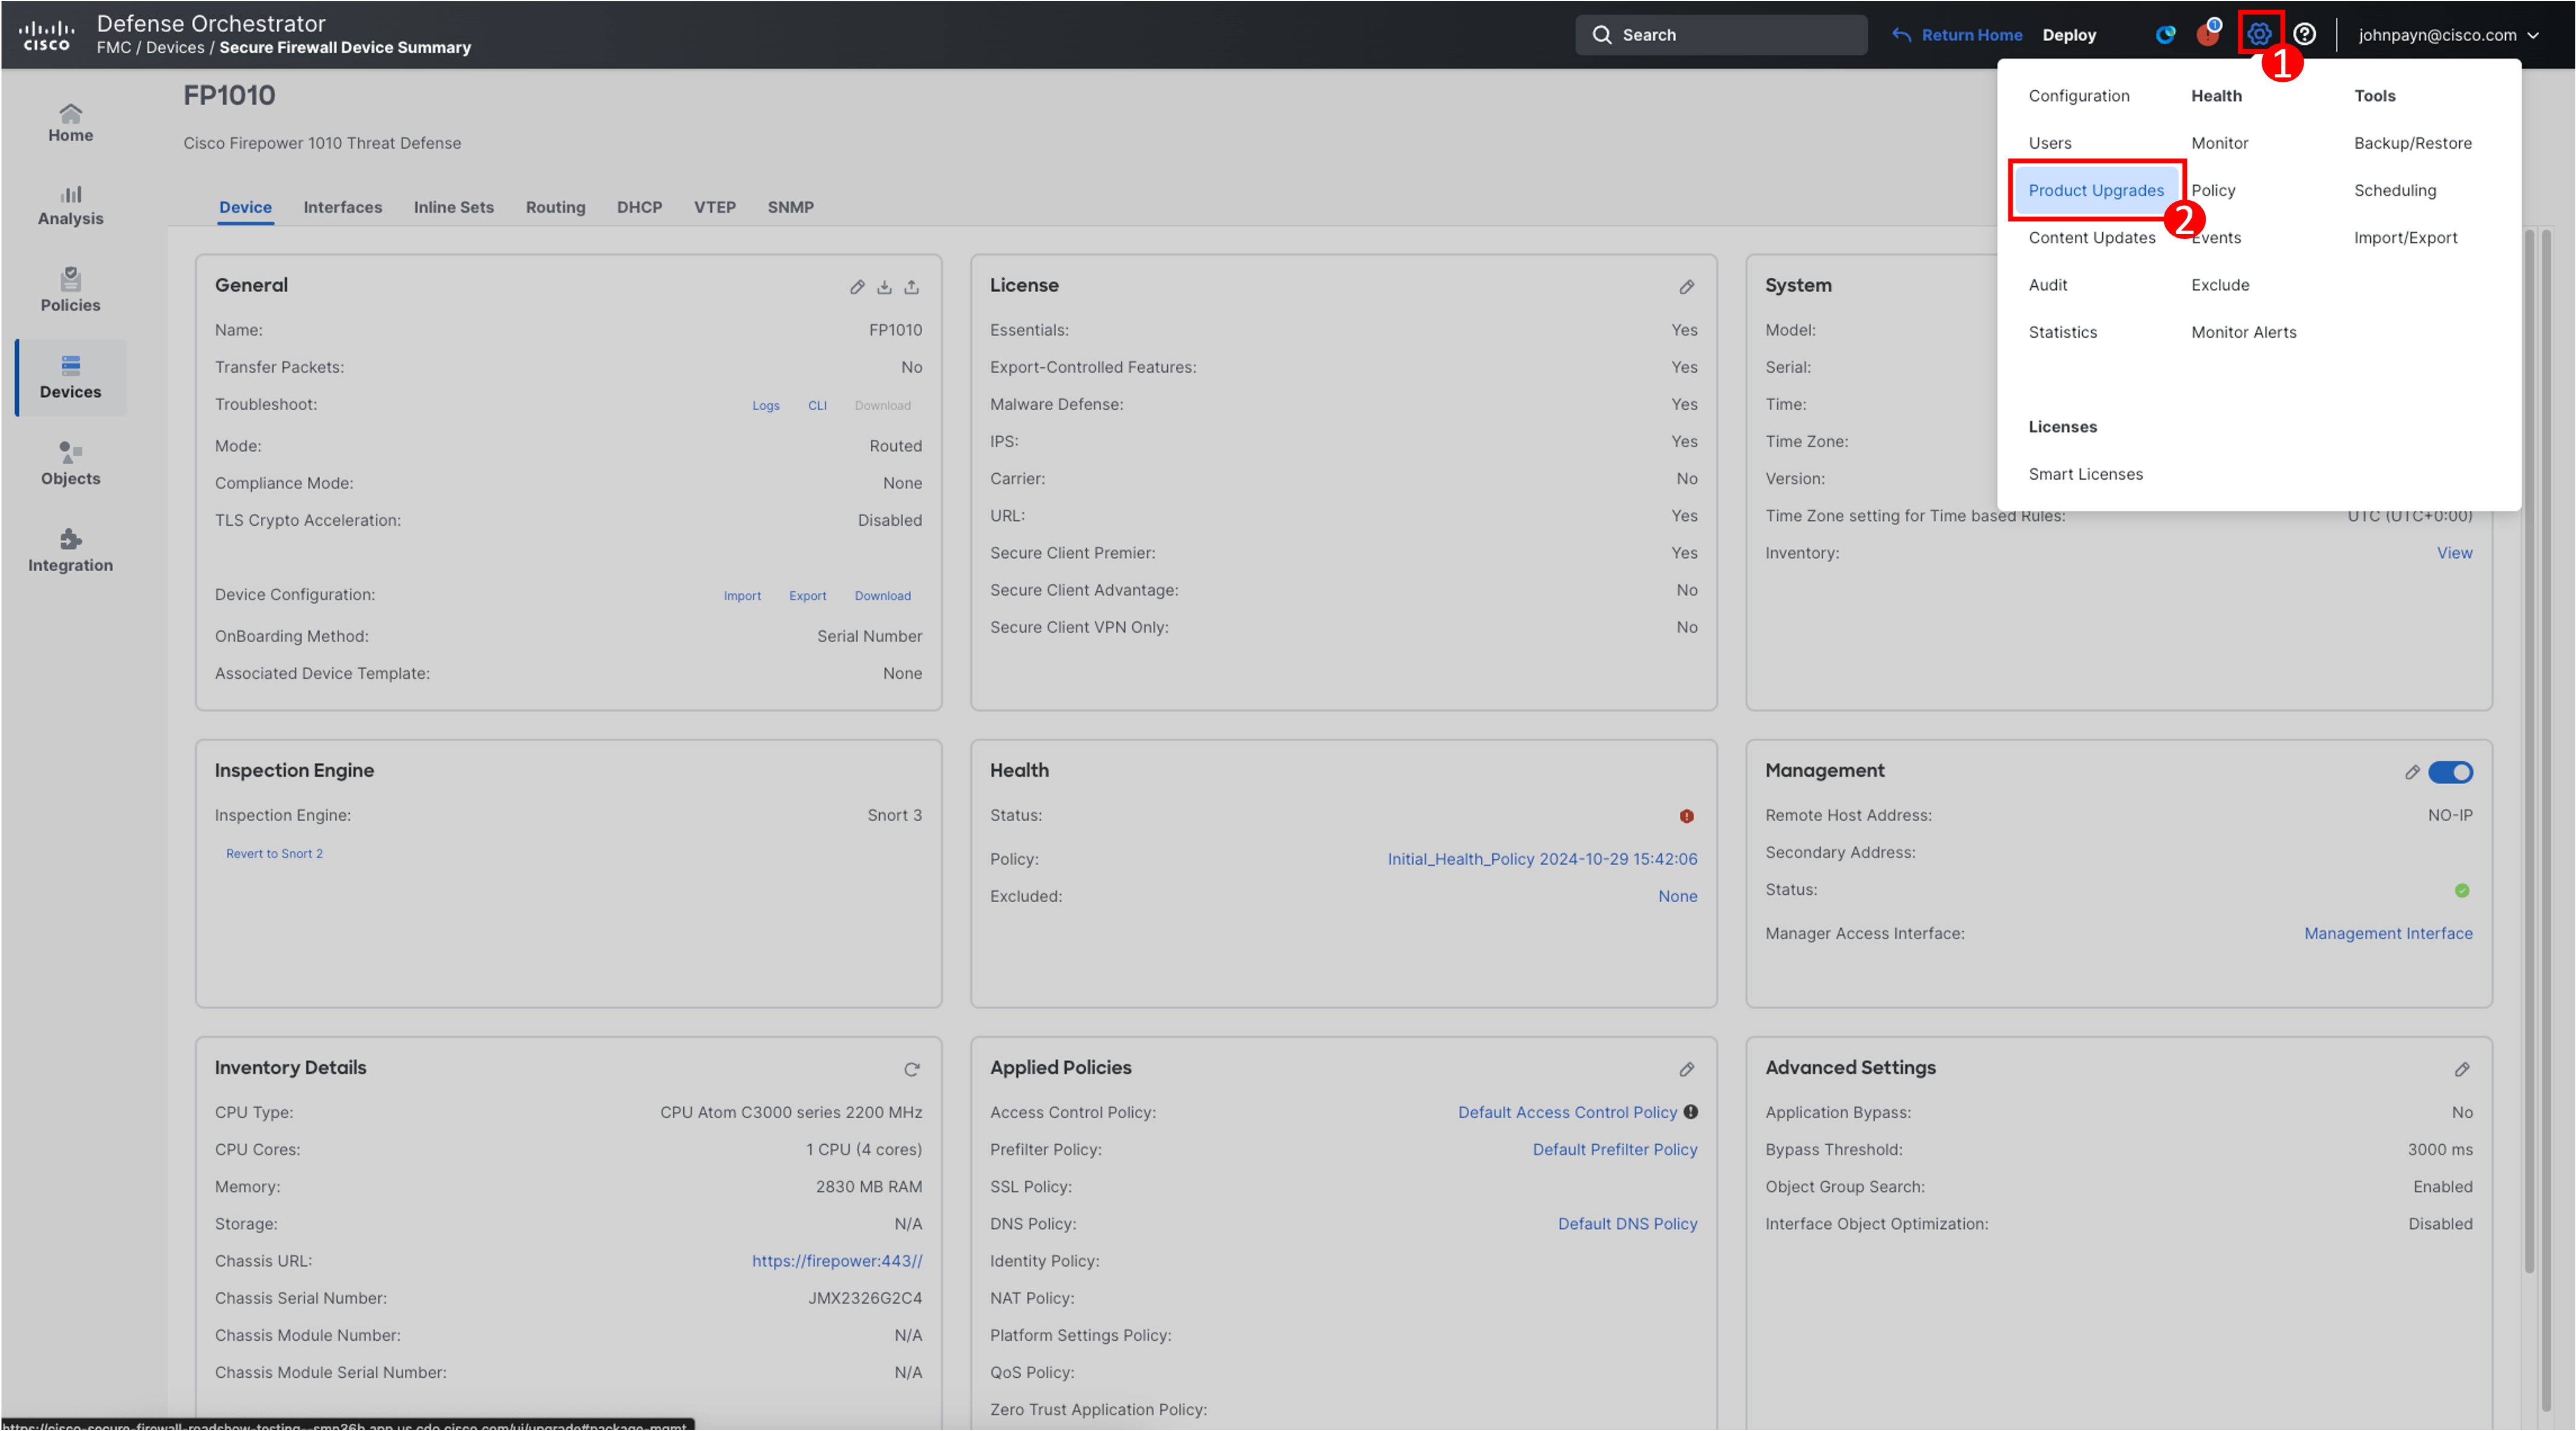
This will open the Device Overview page in cdFMC. We will now need to download the threat defense upgrade package directly from the Firewall Management Center. In the top navigation bar, select System (gear icon) > Product Upgrades.
-
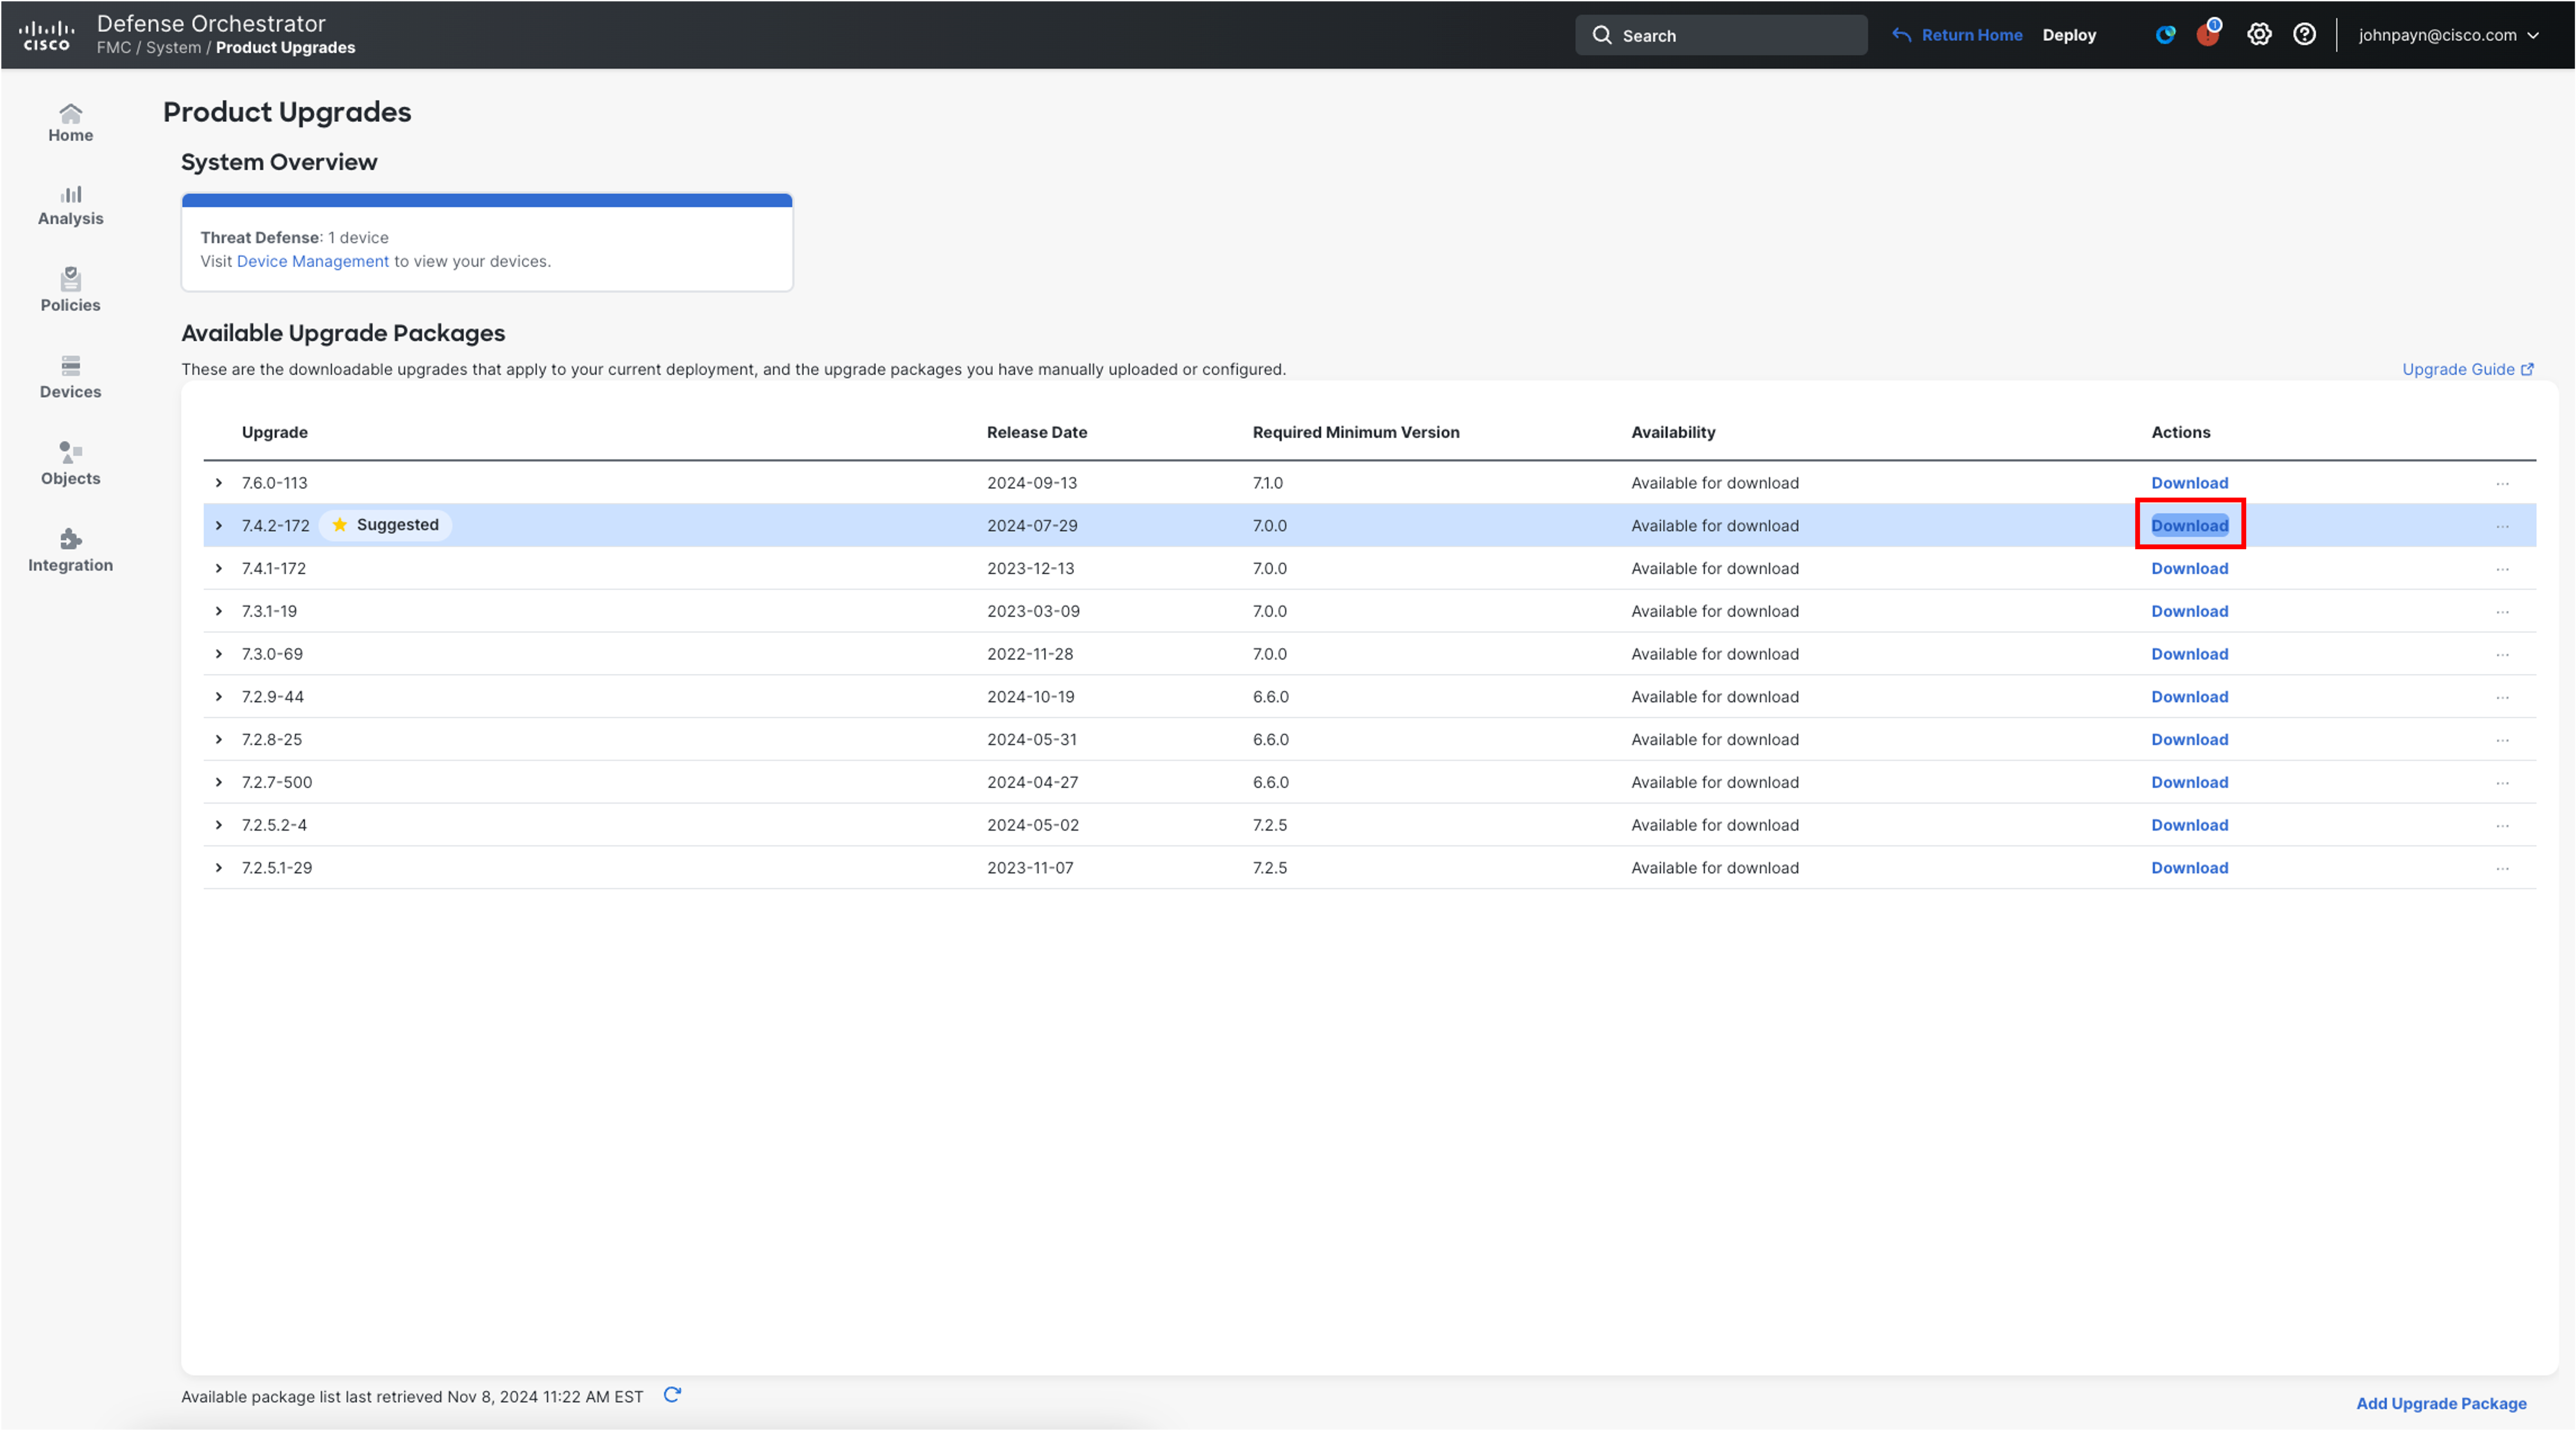
This will open the Product Upgrades page, providing an upgrade-centric overview for your deployment. Here, you can find things like how many devices you have, when they were last upgraded, whether there is an upgrade, and so on. Select Download in the row for 7.4.2-172.
-
In the pop-up, click Download.
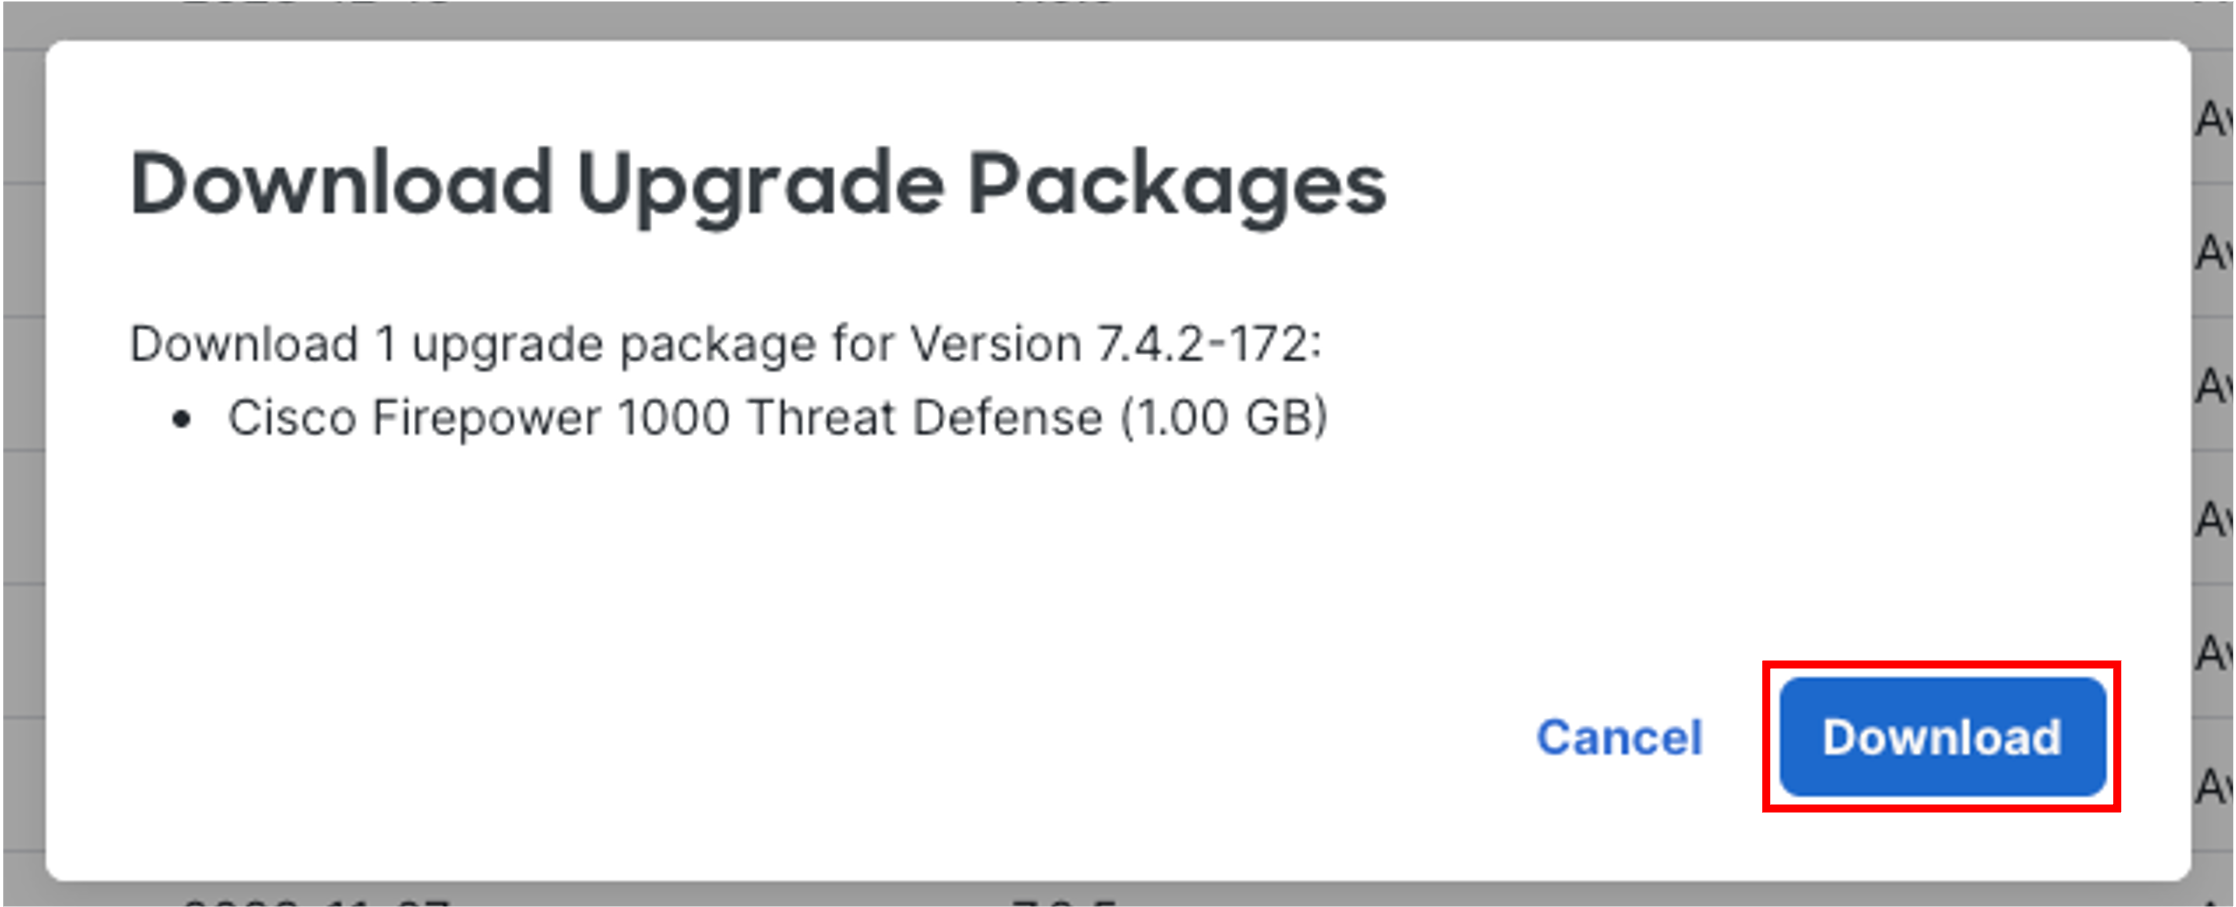
-
Click Close to acknowledge the confirmation of the download and track the progress in the Product Upgrades page.
-
Launch the upgrade wizard by clicking Upgrade next to the target version of 7.4.2-172.
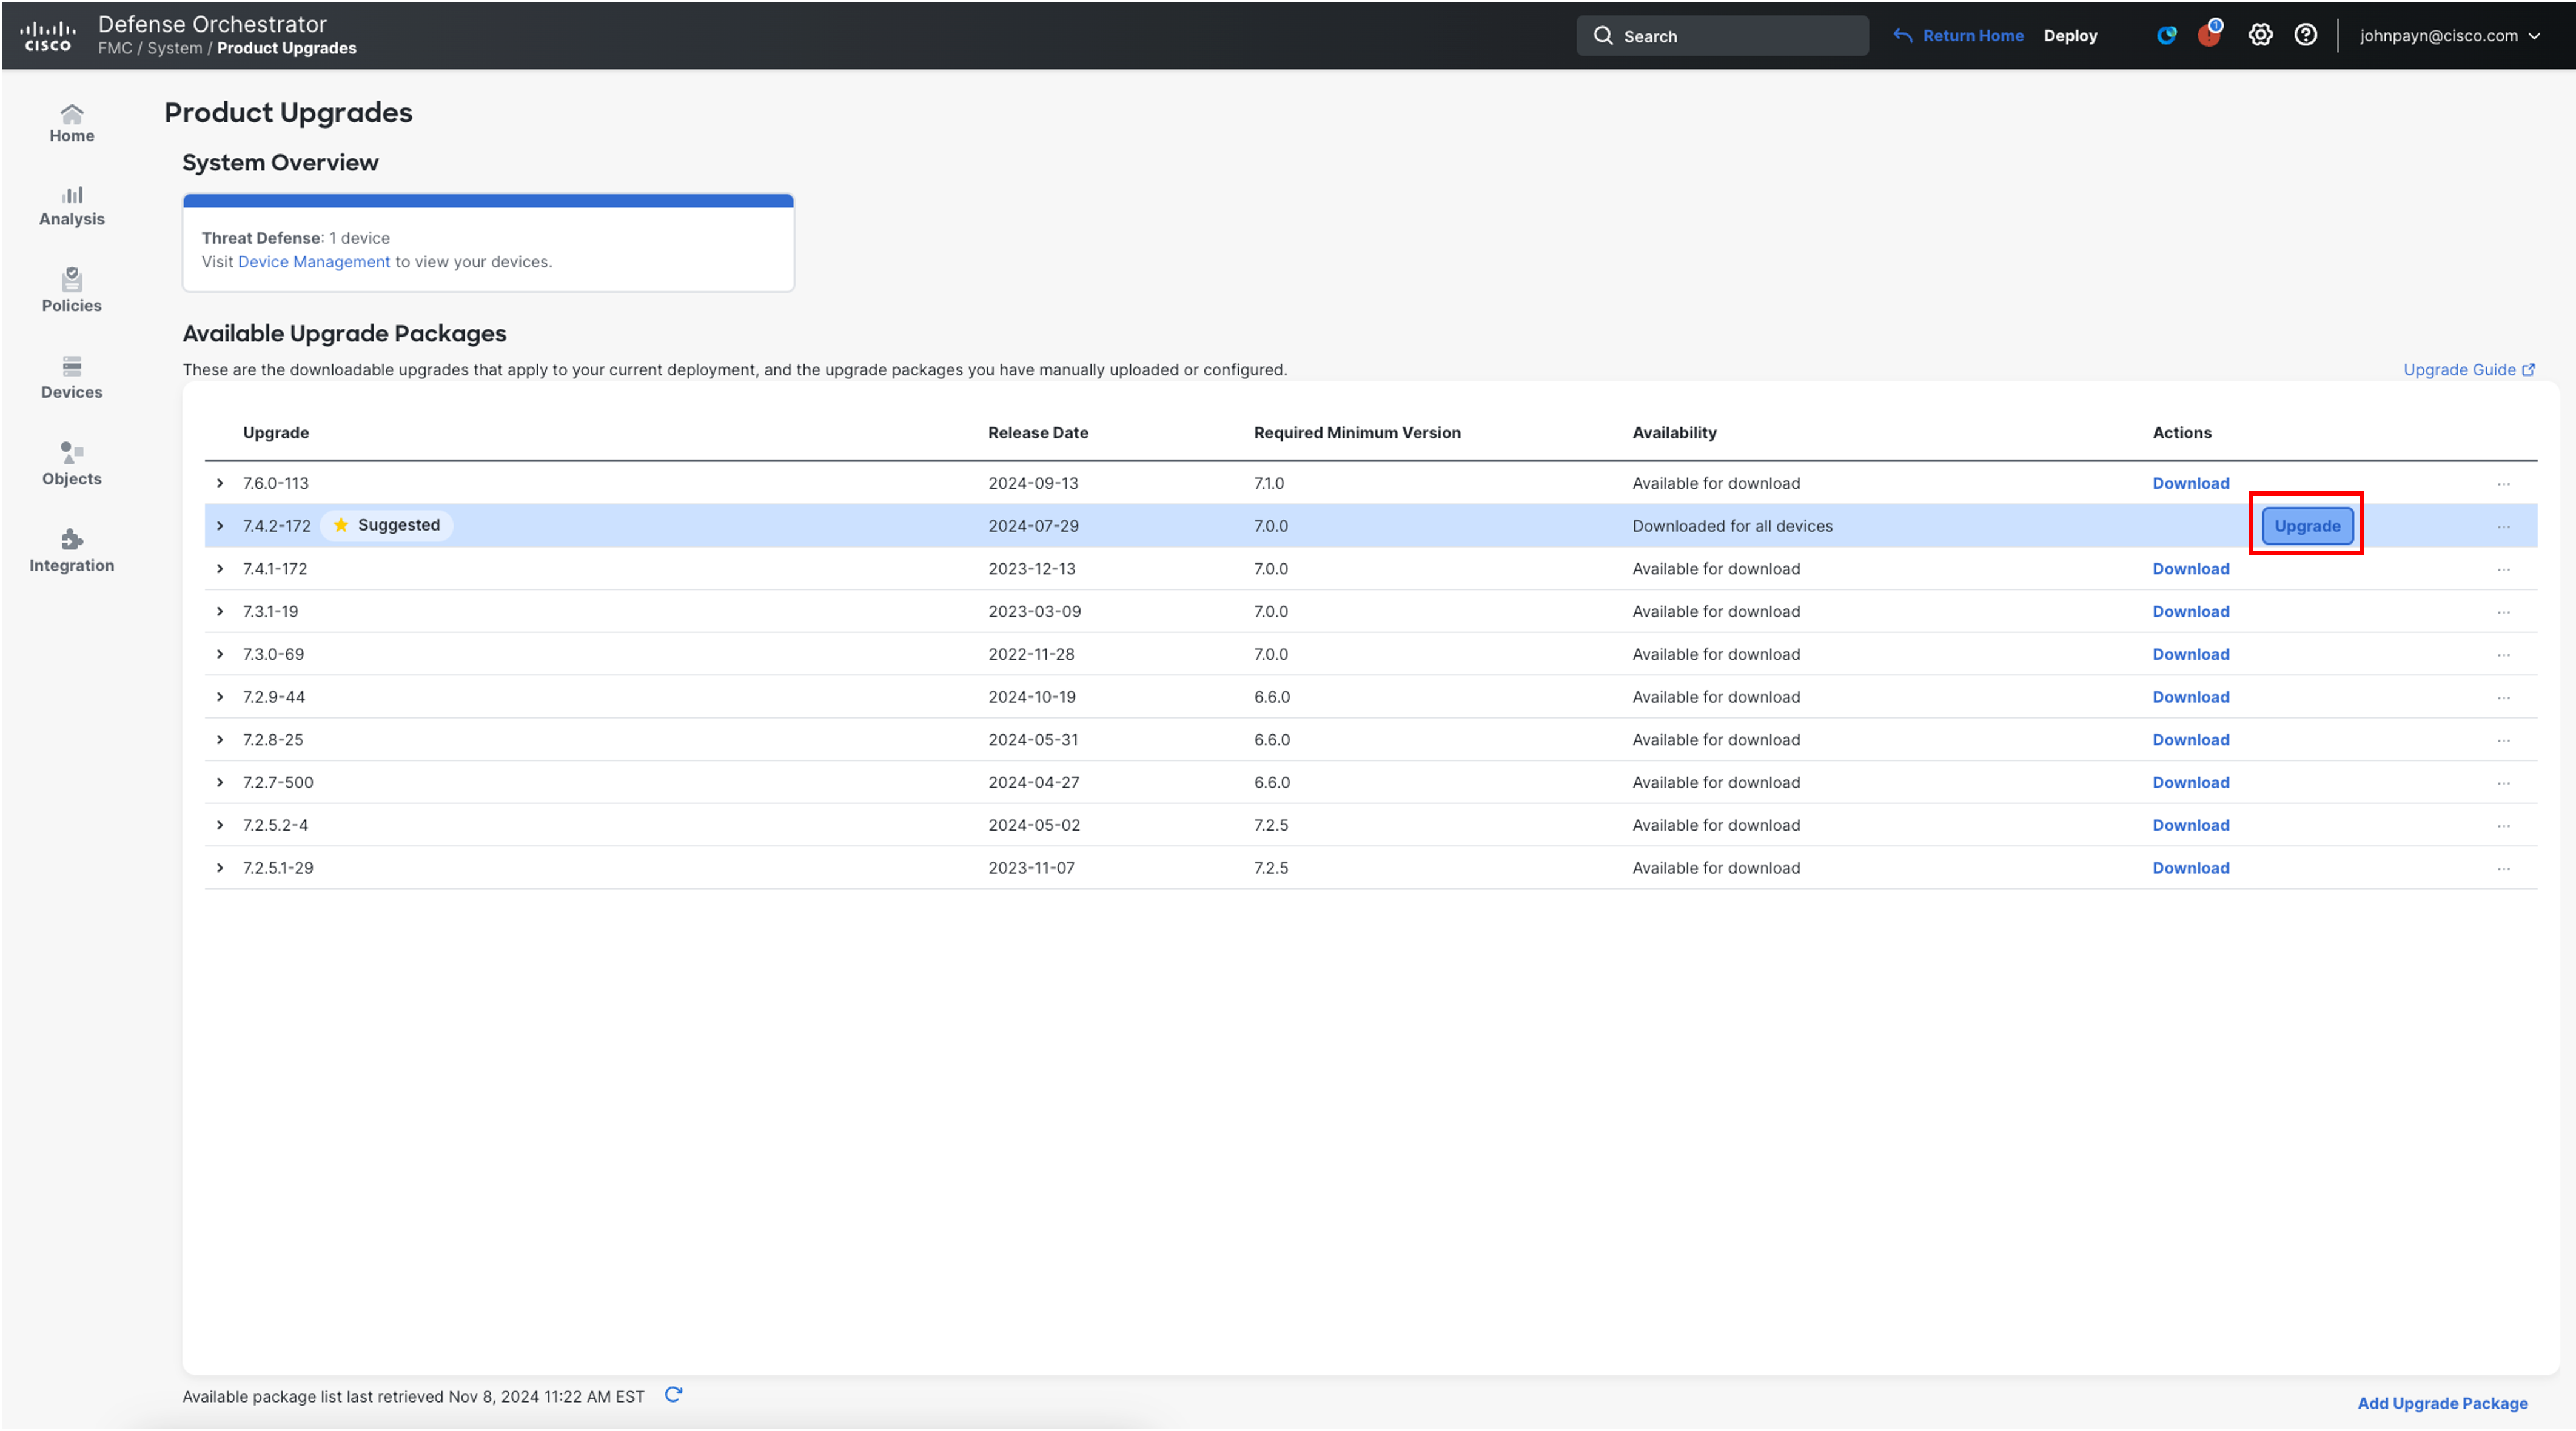
-
In the Device Details pane, select the devices you want to upgrade, in this case your 1010 device (FP1010), and then click Add to Selection.
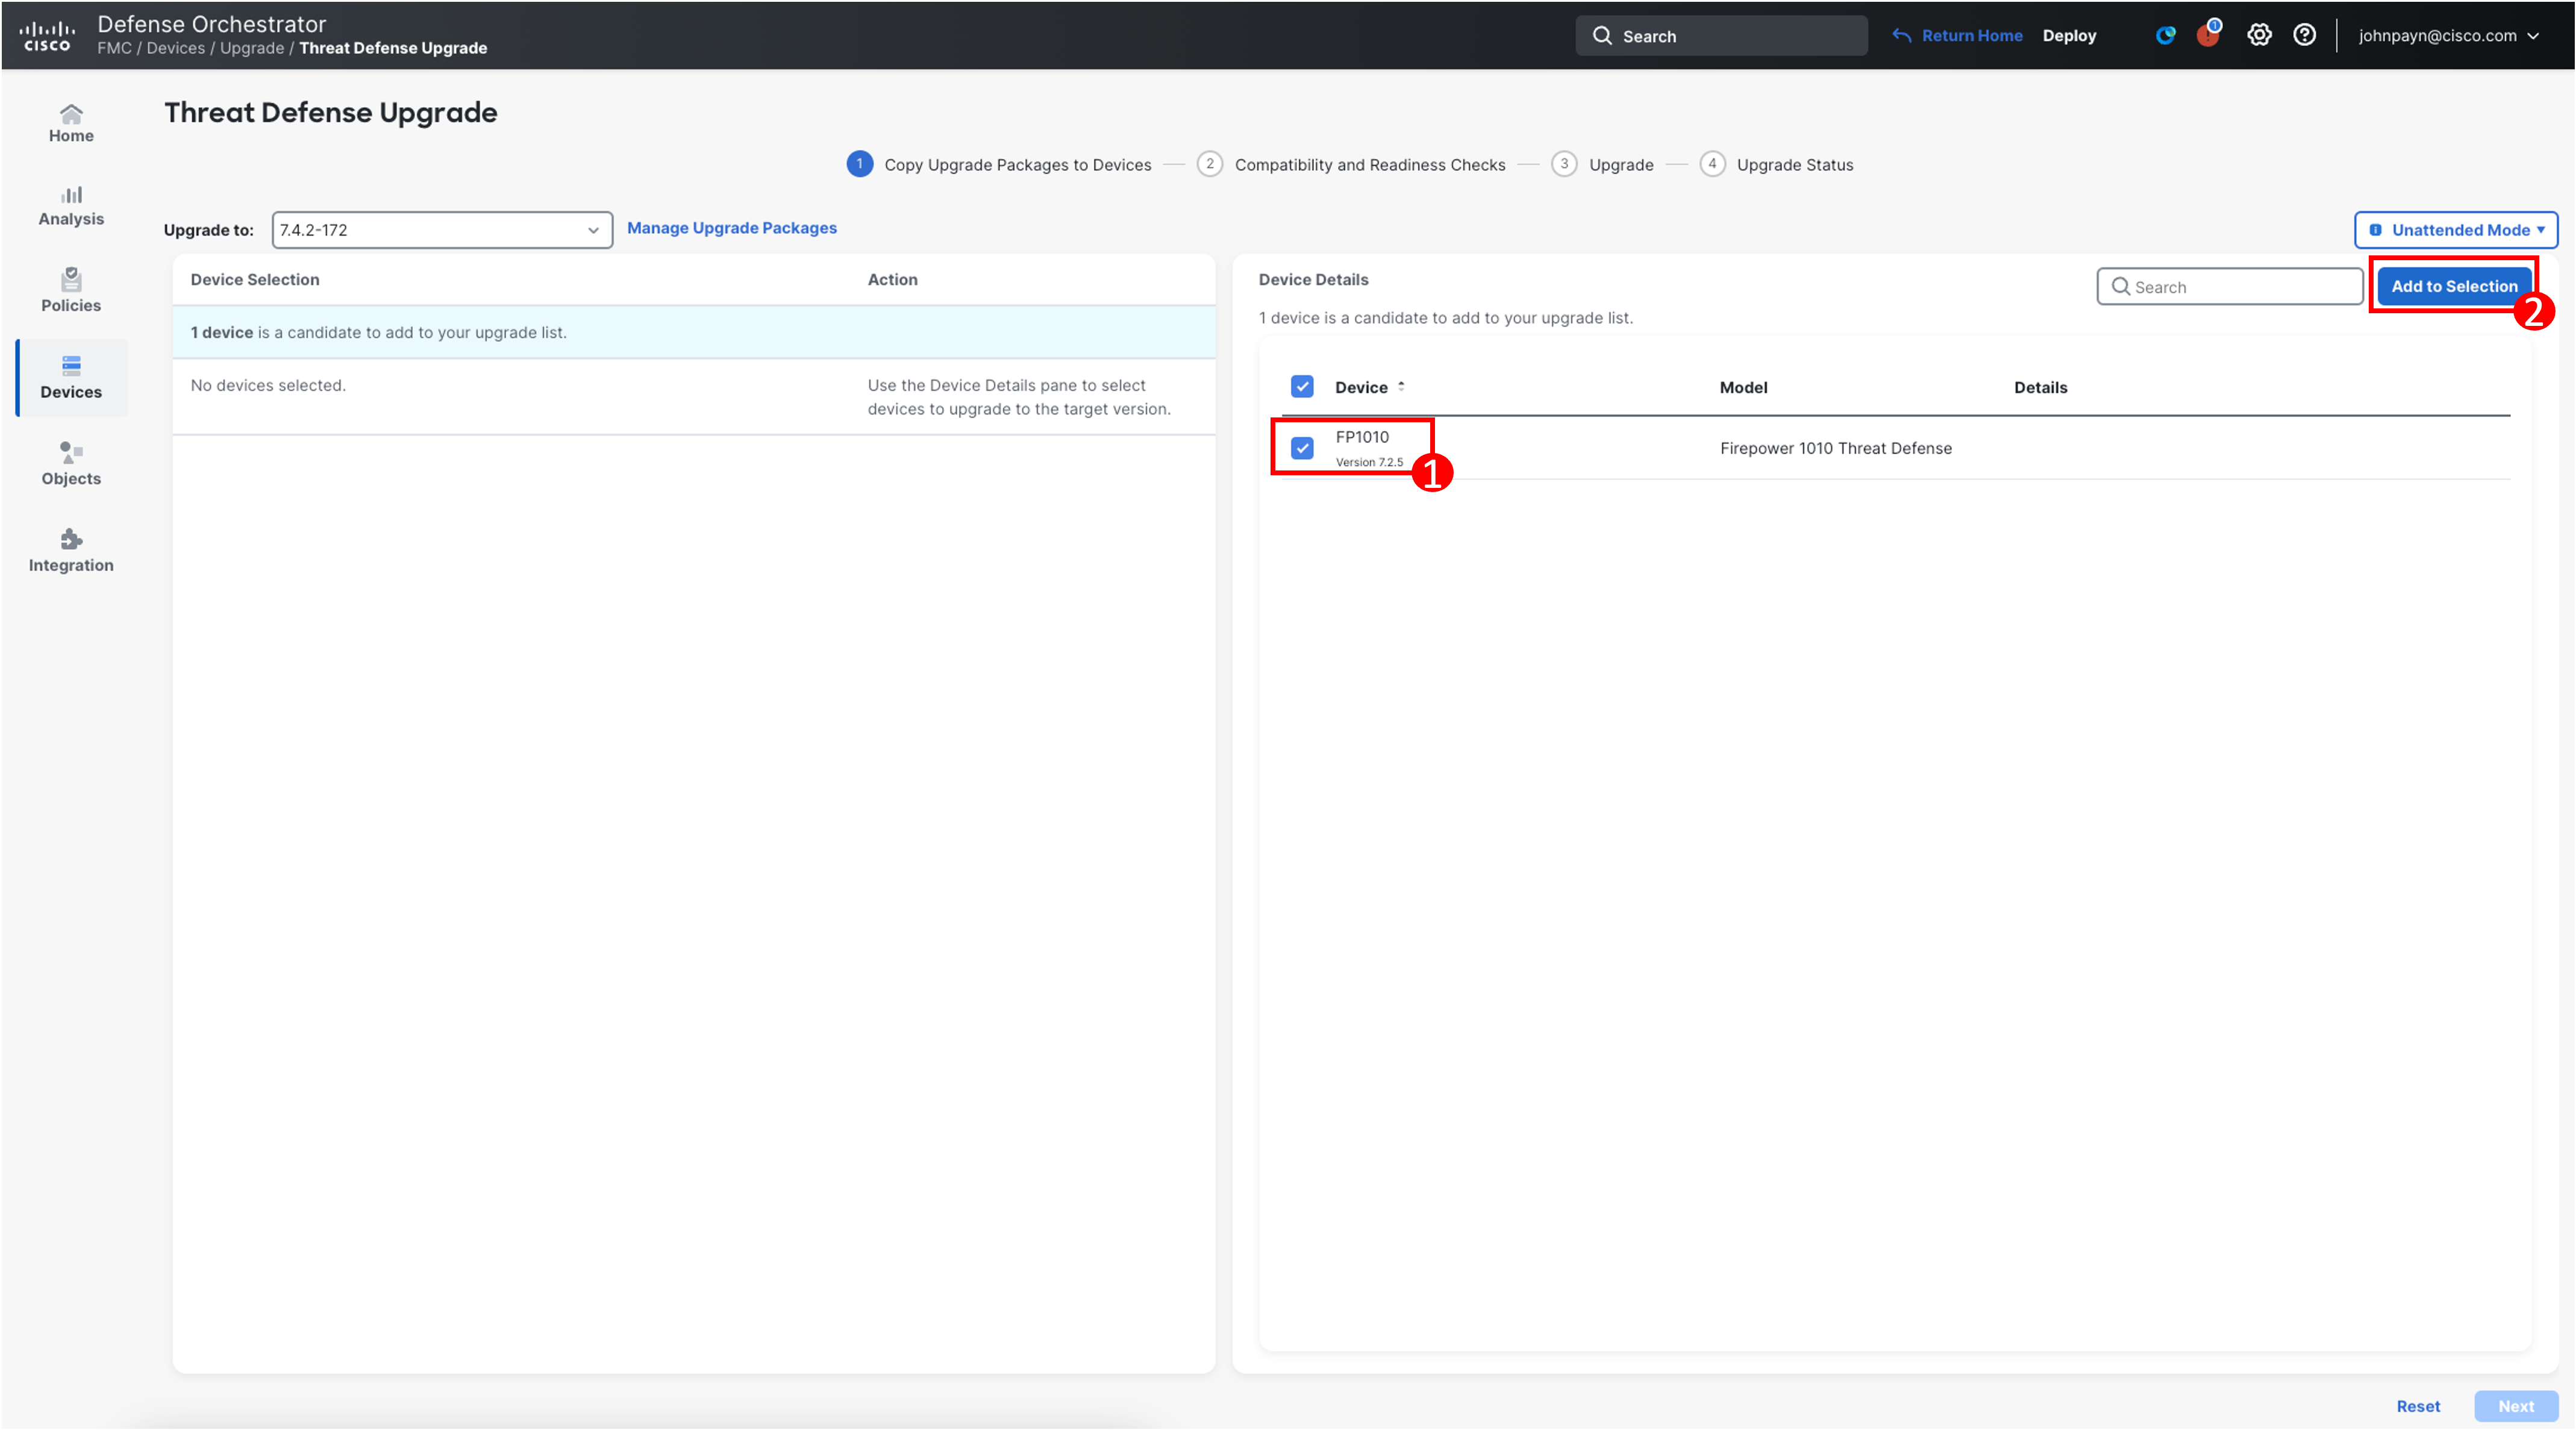
-
Now back in the Threat Defense Upgrade page, you can now begin the upgrade in unattended mode by selecting Unattended Mode > Start.
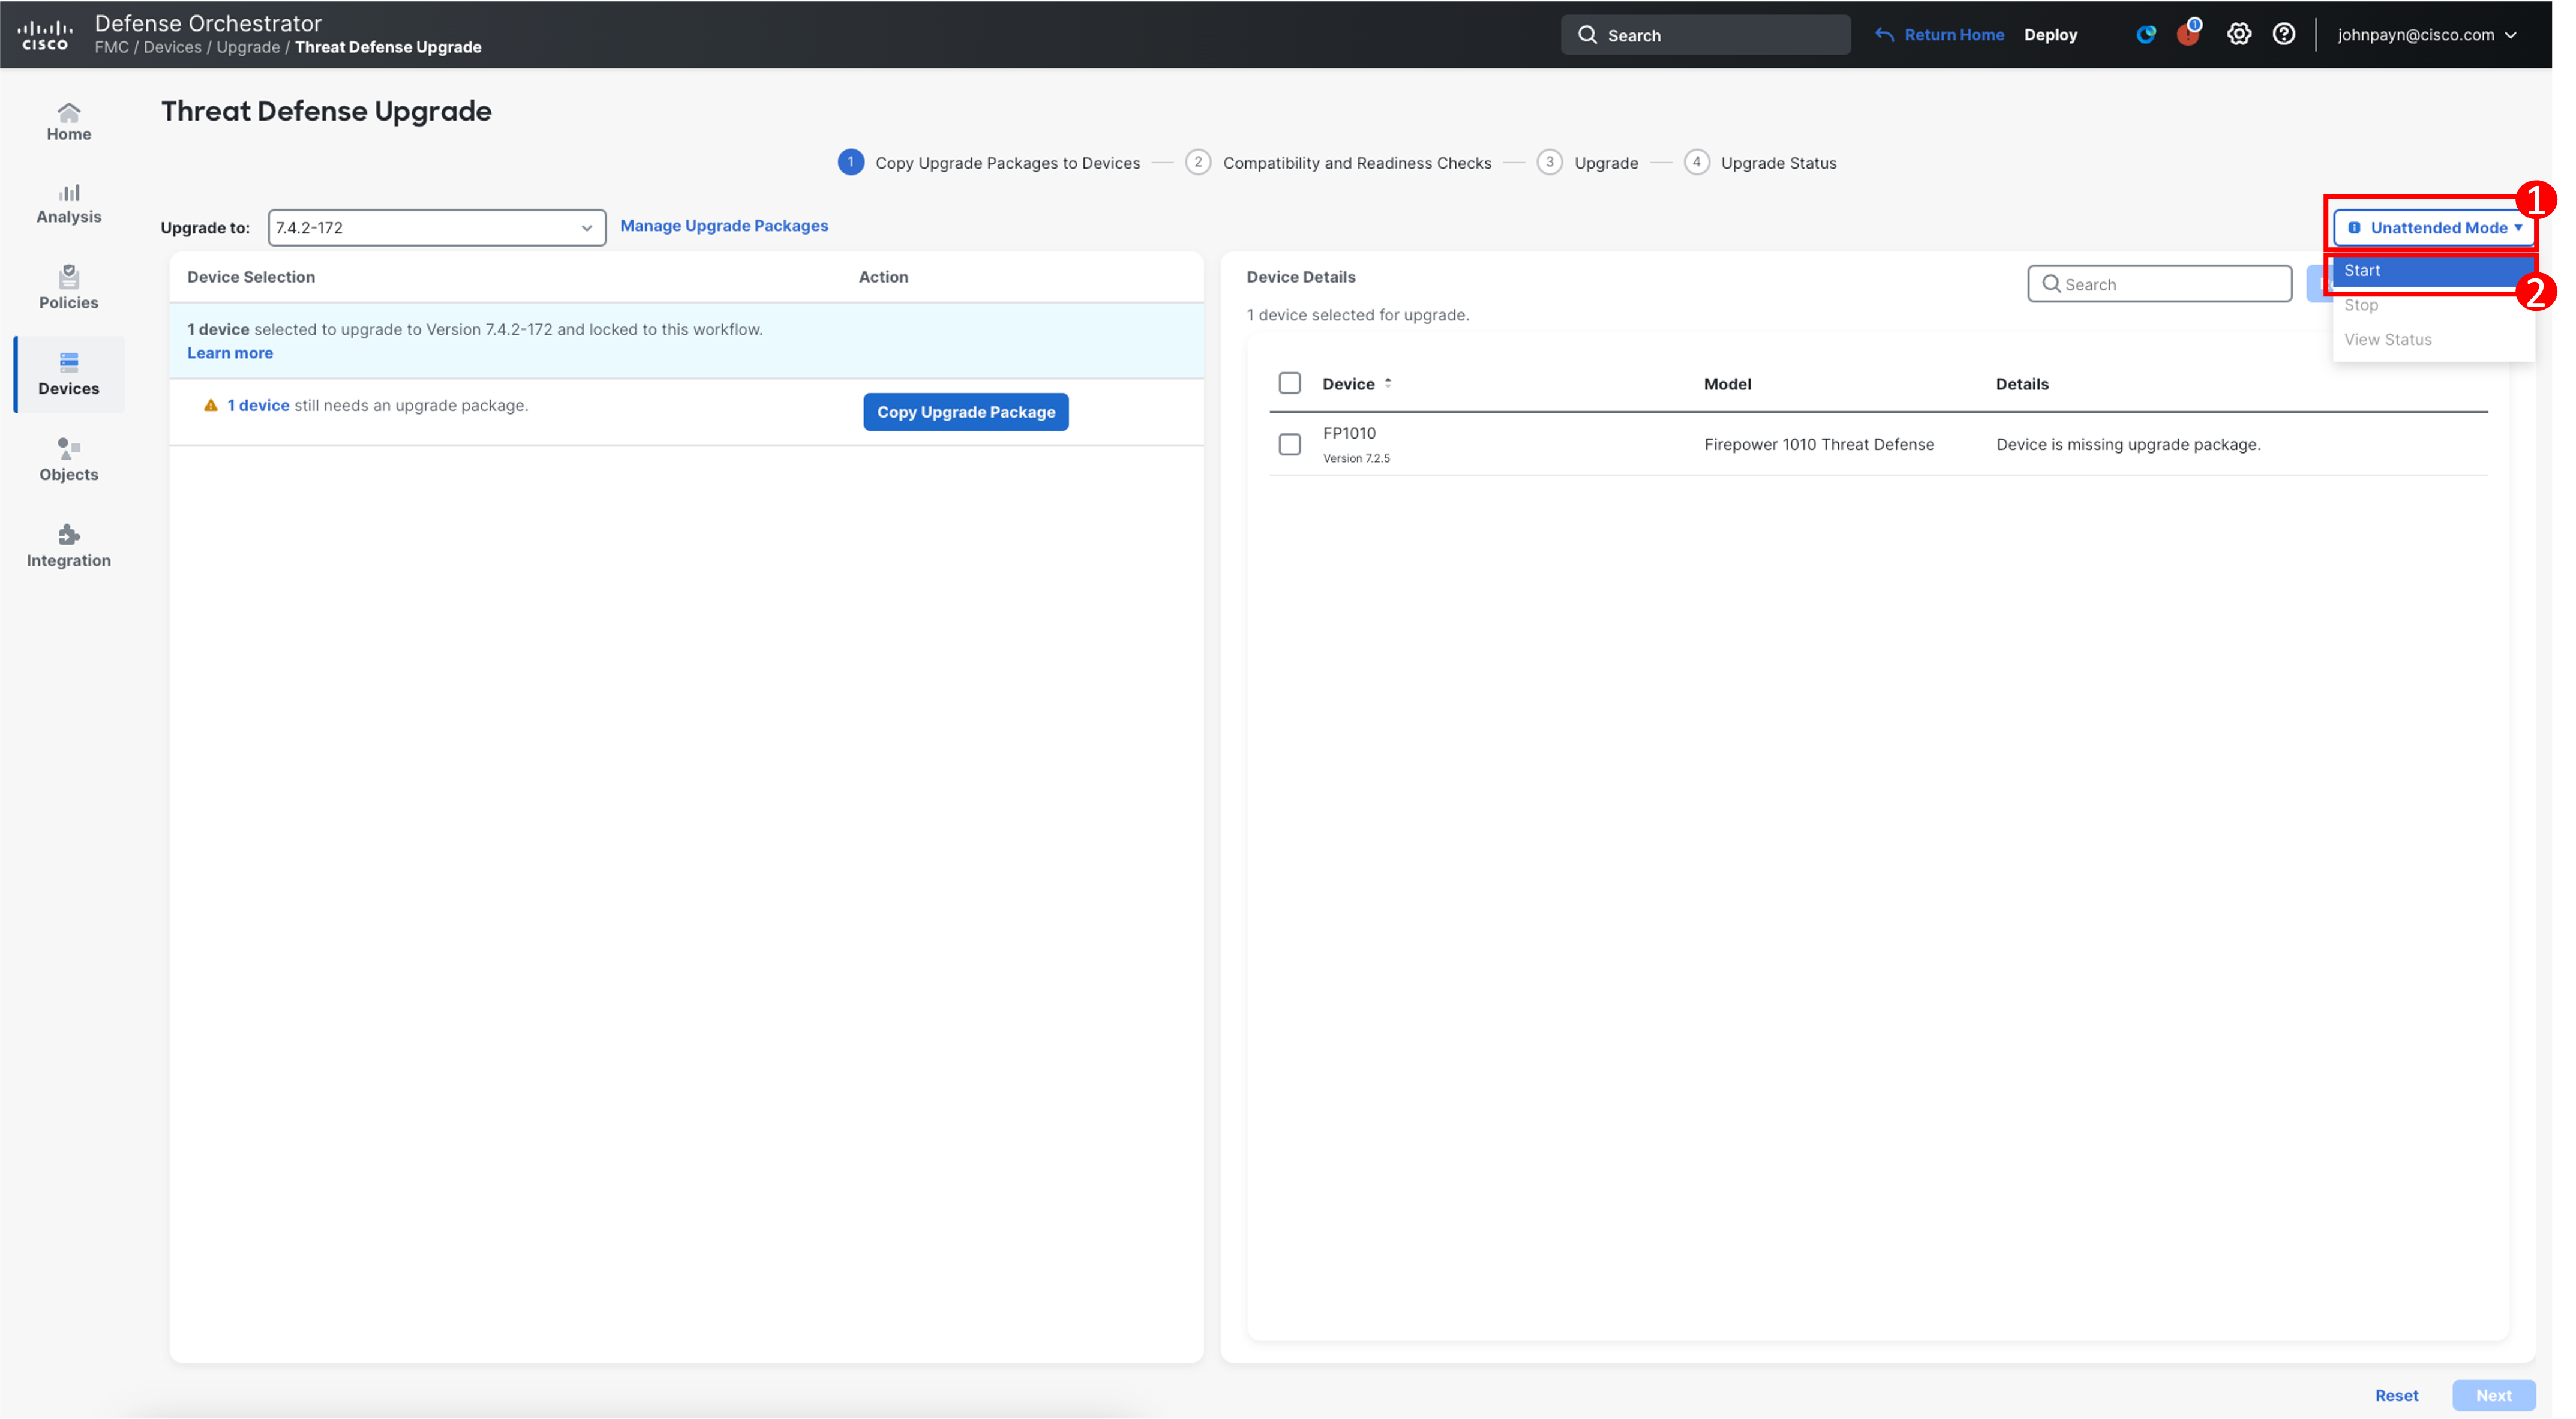
-
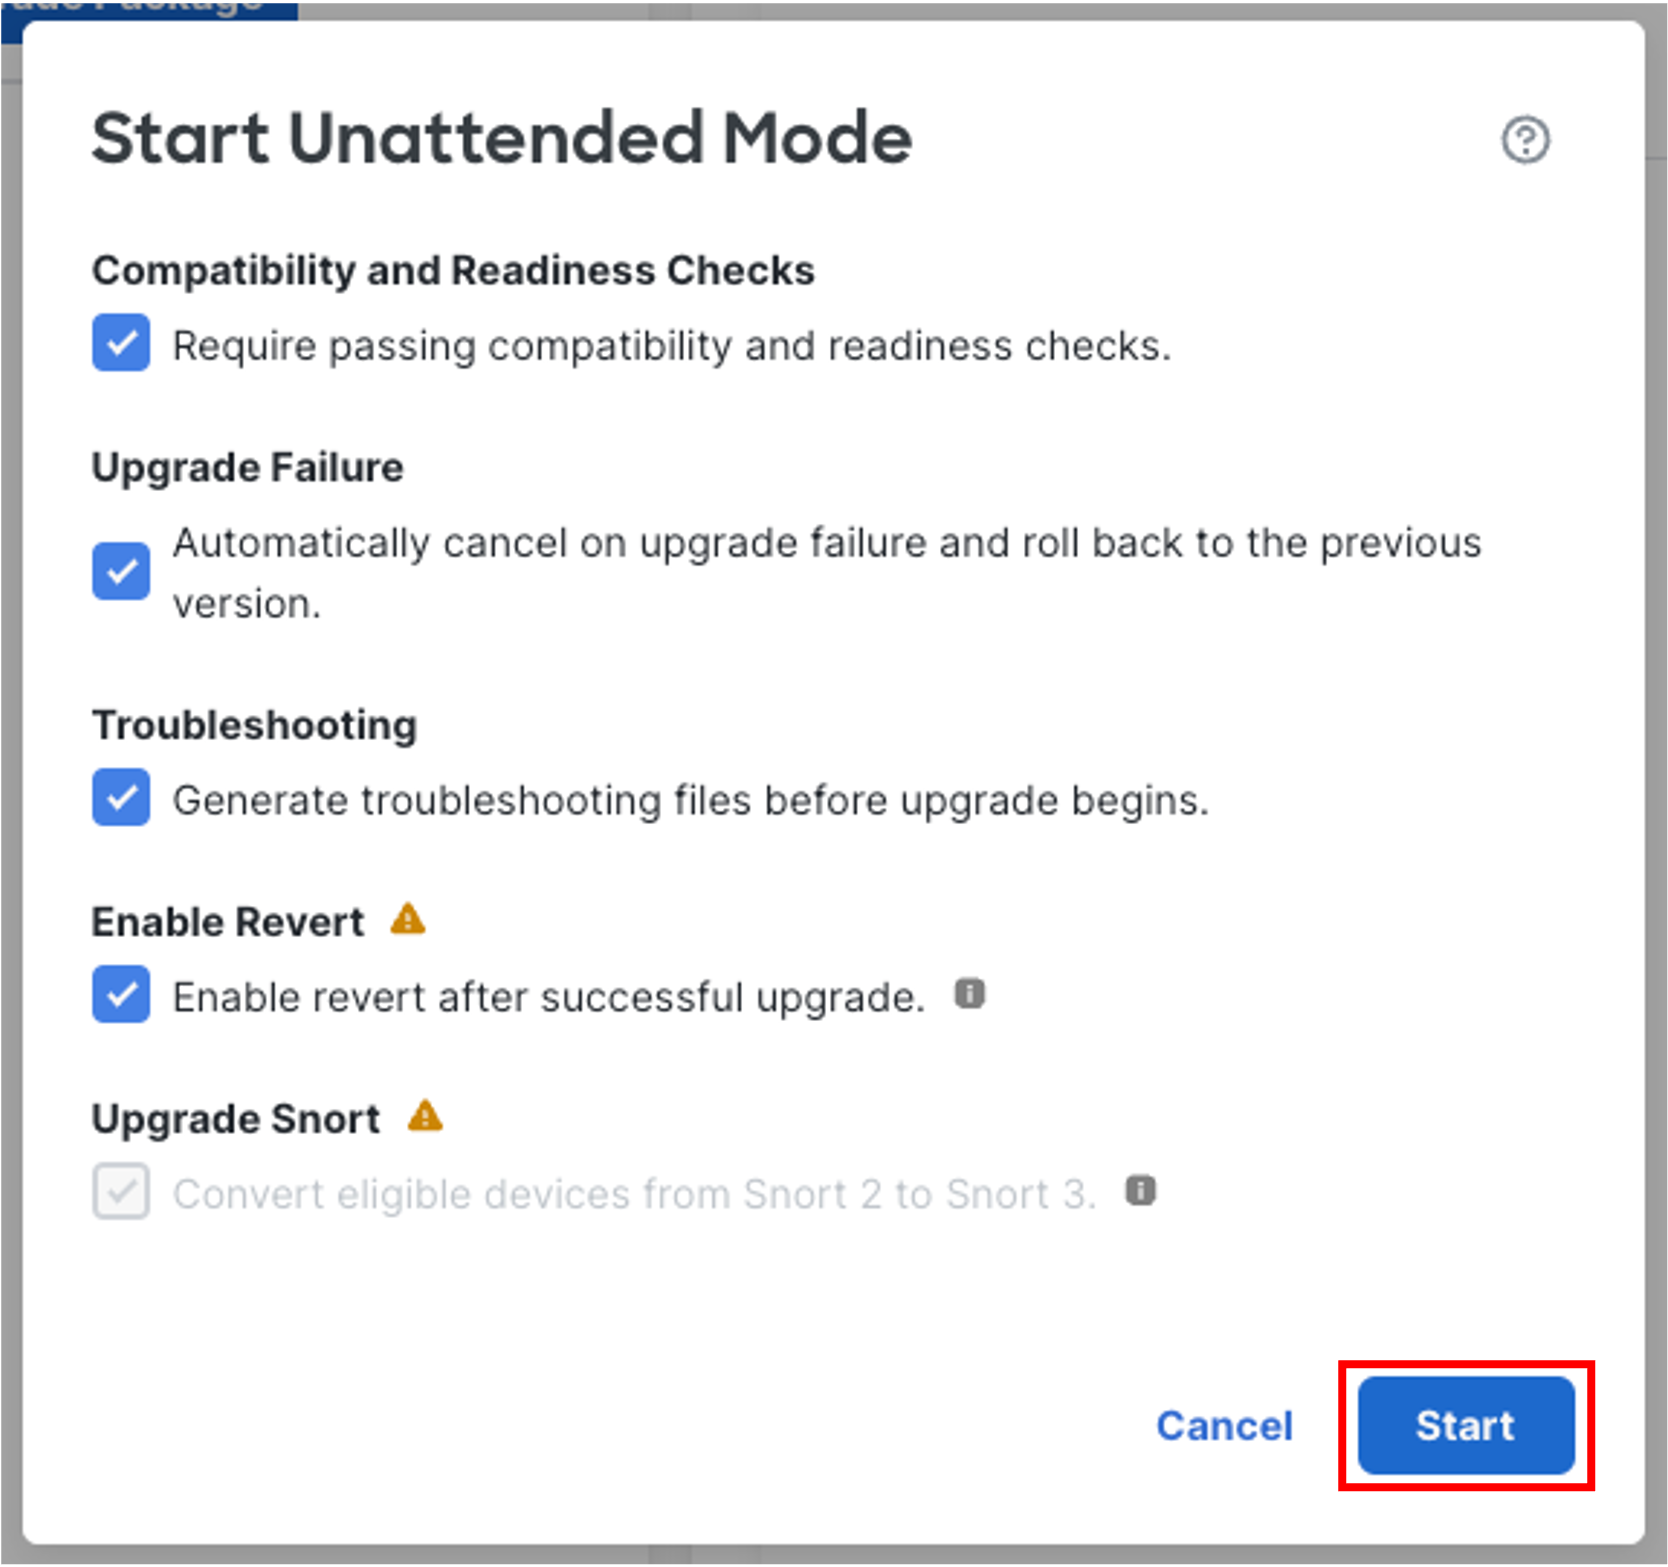
In the Start Unattended Mode pop-up, leave the defaults selected and click Start to begin the upgrade.
Note
Using Unattended Mode will automatically copy the upgrade packages to the device(s), perform compatibility and readiness checks, and begin the upgrade. You can monitor an unattended upgrade under Unattended Mode > View Status.
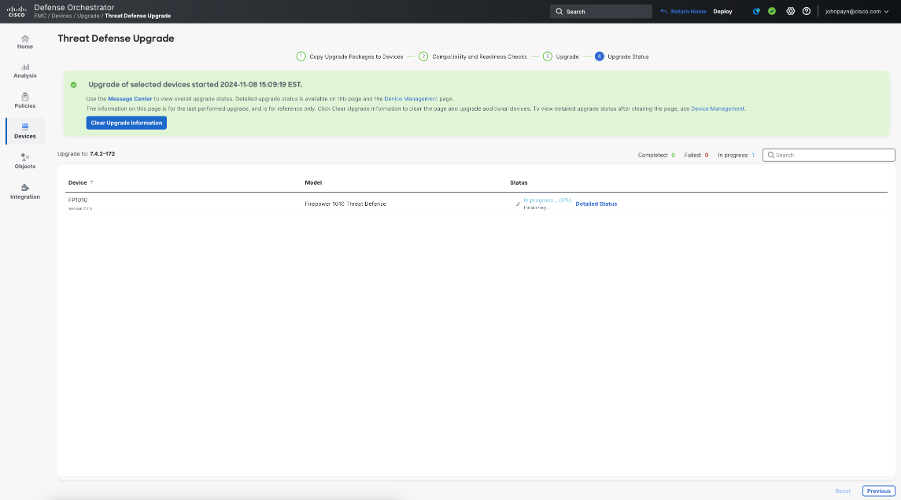
- Track the status of your upgrade using the Threat Defense Upgrade page.
Summary
The concludes the steps required to onboard and beging upgrading the Firewall 1010 to be used as a security appliance in your office/home network.
NOTE
The upgrade process may take some time. While the upgrade is running begin working on the remainder of the lab guides HERE.
📚Additional Resources
Updated about 1 year ago

