
Hybrid Private Access
Introduction
In today’s hybrid world, users access applications from everywhere — office, home, airports, or coffee shops. Traditional network-based security models focus on campus users, VPN solutions focus on remote users, even typical ZTNA solutions are limited to securing remote users accessing private applications.
Cisco's Hybrid Private Access (HPA) redefines this approach by extending Zero Trust principles universally — across all users, whether they are on-premises or in the cloud. It delivers consistent, identity-based access control for both on-network and off-network users and unifies enforcement across Cisco Secure Access and Cisco Secure Firewall, ensuring that every access request — regardless of location or device type — is continuously verified and granted with least privilege.
Core components of HPA
- Cisco Secure Access - Provides cloud enforcement of HPA policies for remote and roaming users.
- Cisco Secure Firewall - Acts as the on-prem enforcement point for users and applications located within corporate or branch networks. It applies the same HPA access policies locally. Only firewalls with 16 cores or more are supported.
- Cisco Secure Firewall Management Center - Centralized management console for Secure Firewall deployments.
- Cisco Secure Client - Installed on user devices; it collects device posture, performs user authentication, and establishes secure connections either through the Secure Access cloud or to on-prem Firewalls, depending on policy and location.
- Cisco Security Cloud Control - Provides a unified secure management plane for both Secure Access and Firewall, simplifying the administration of HPA policies across them.
Overview
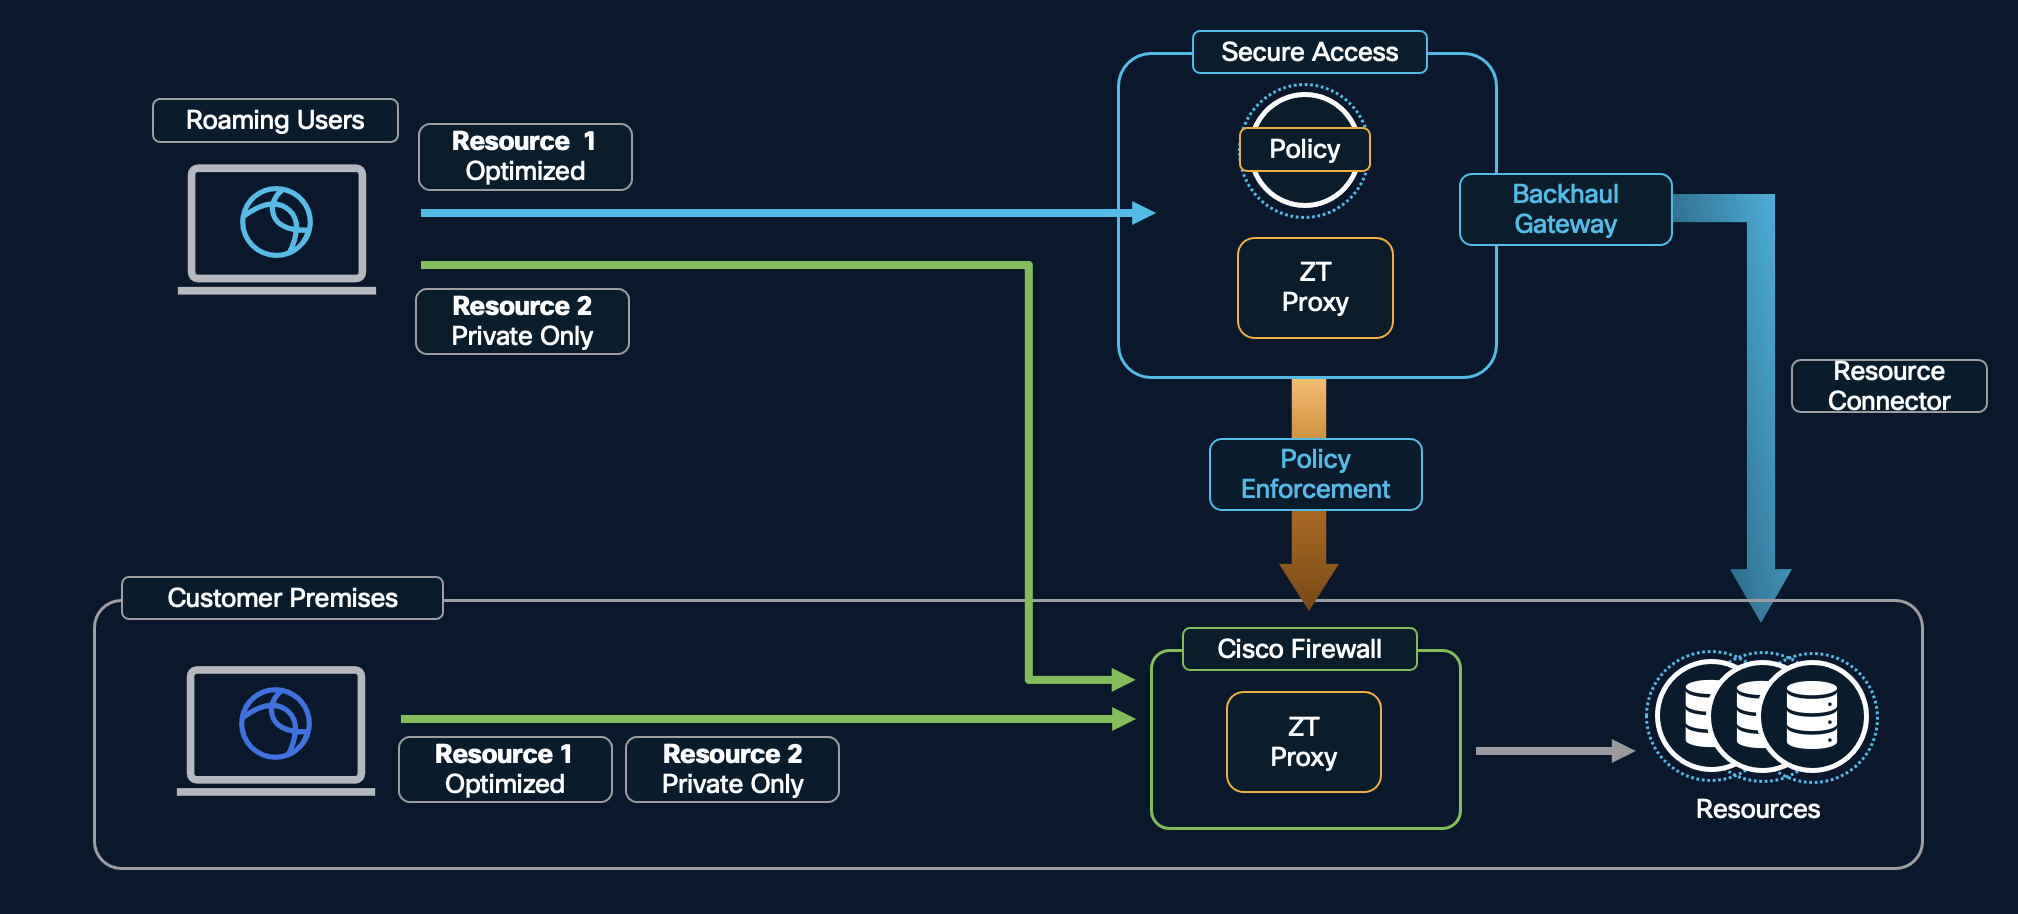
The topology above shows two types of users - one roaming and one within customer premises. Resources shown are again of two types - one optimized and one private only. The optimized resource is accessed via the optimized path which means that, if the user is roaming, its enforcement point is Secure Access and if the user is on-premise, its enforcement point is the on-premise firewall. The private only resource has its enforcement point as the firewall irrespective of the user location.
The optimization of the access to private-only or non-sensitive application is possible due to Trusted Network detection. A Trusted Network is a network location that your organization designates as secure and internal, such as your corporate LAN or branch network. When the Secure Client detects these characteristics, defined as criteria to be matched, it marks the current connection as part of a trusted network. This information is passed to Cisco Secure Access and Secure Firewall for policy decisions under HPA. Here, the on-premise user would be detected as part of a trusted network and the roaming user would be detected as not belonging to a trusted network.
Traffic Flow
Let us look at the traffic flow in different scenarios:
- Roaming user accessing optimized resource.
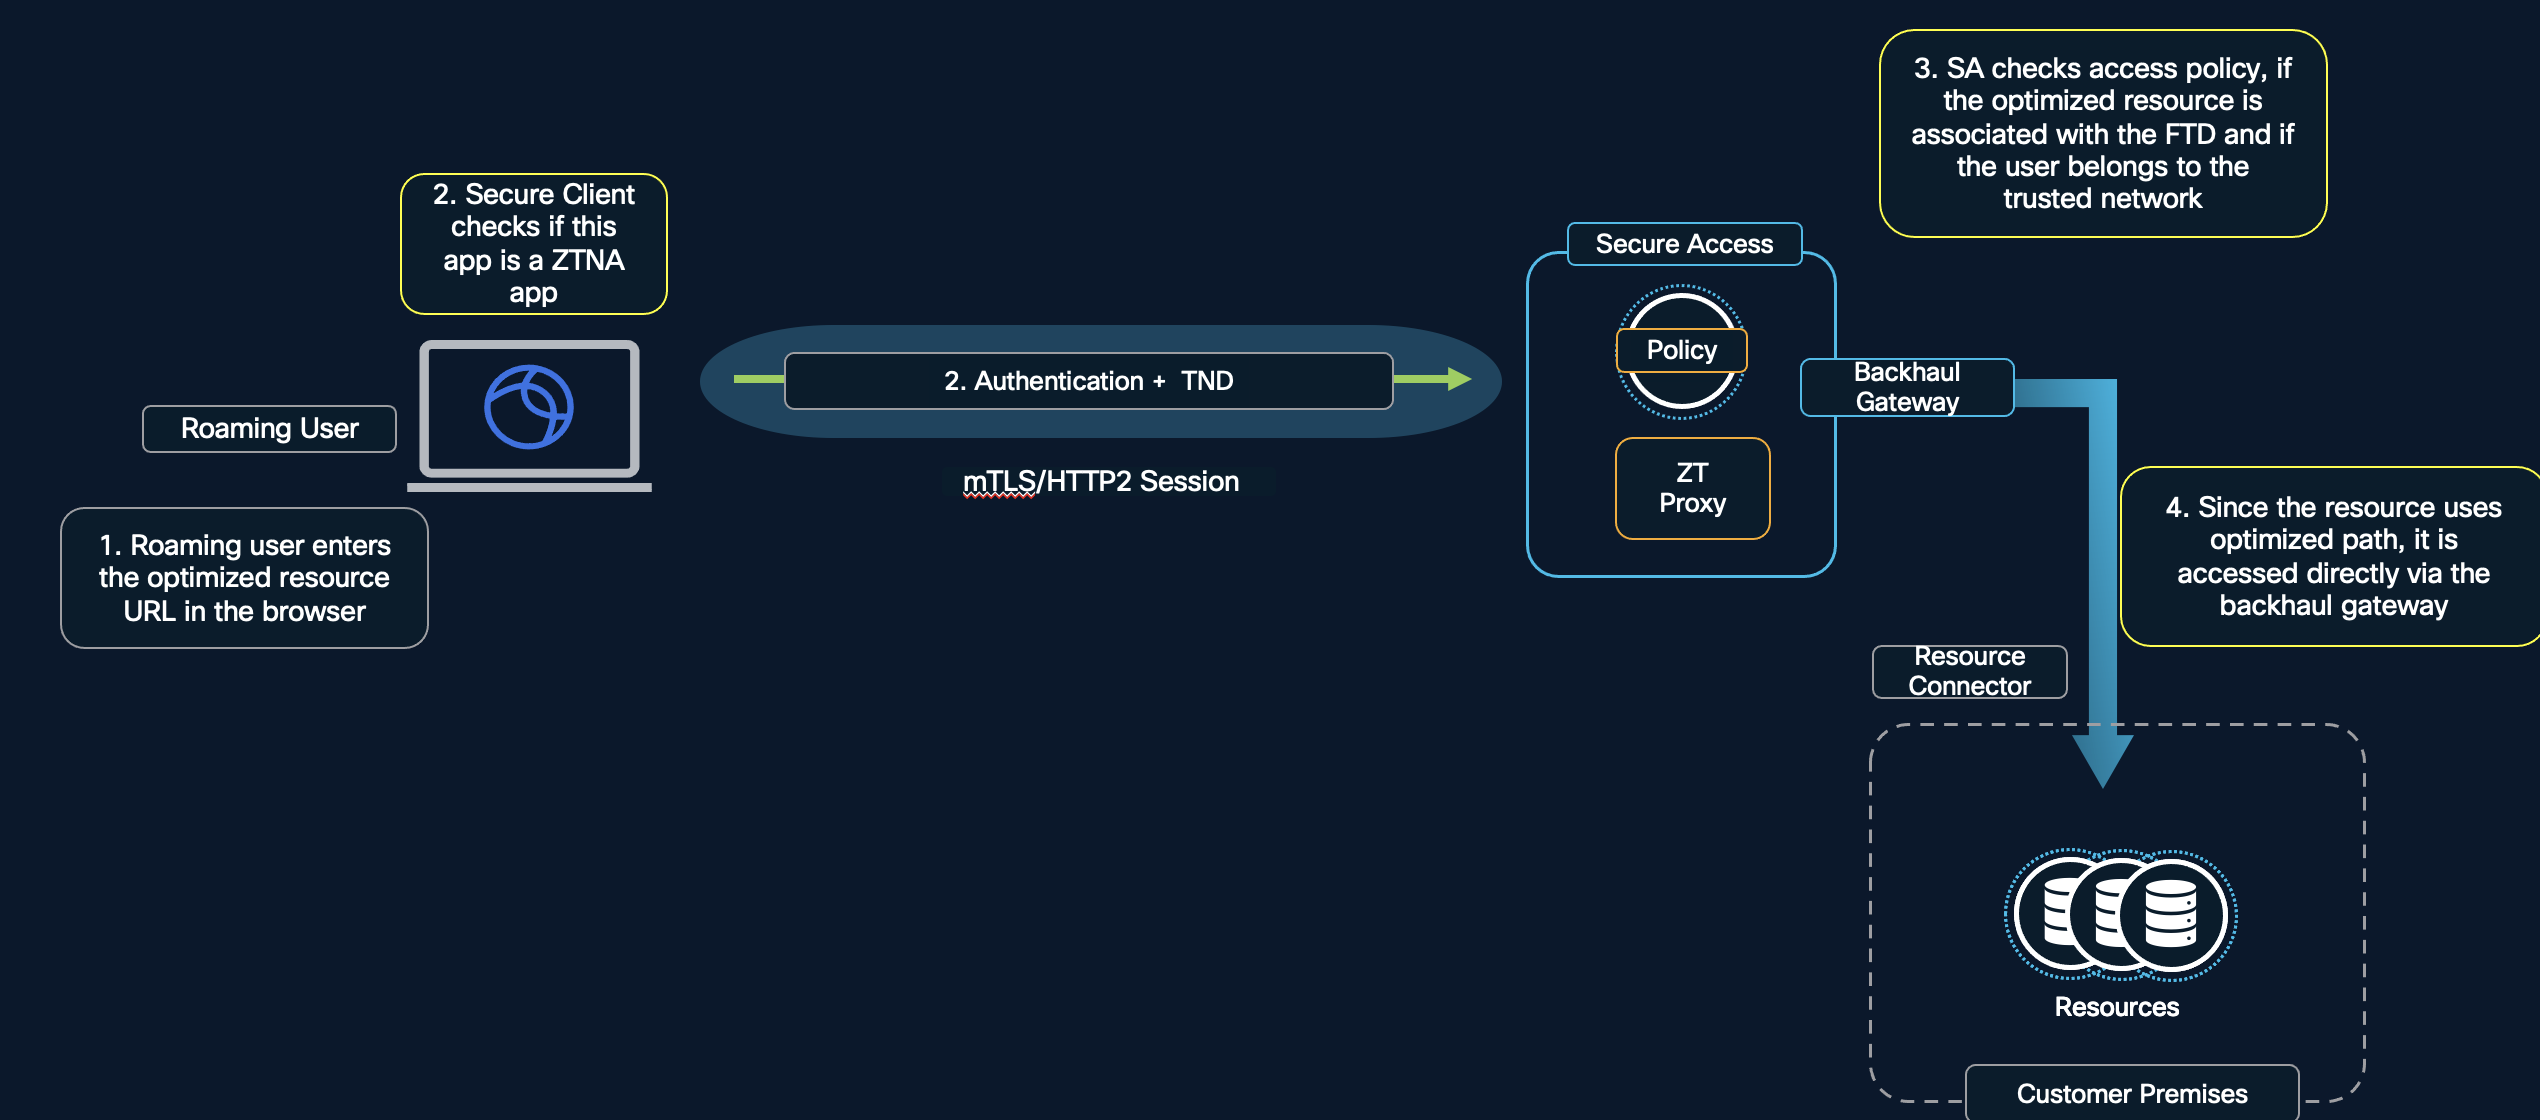
The user identity certificate is presented to Secure Access from the roaming user's workstation. Once it is validated by Secure Access, the mTLS session is established. Here, Secure Access should be able to directly access the resource with the necessary DNS configuration in place via the Resource Connector configured.
- On-premise user accessing optimized resource.
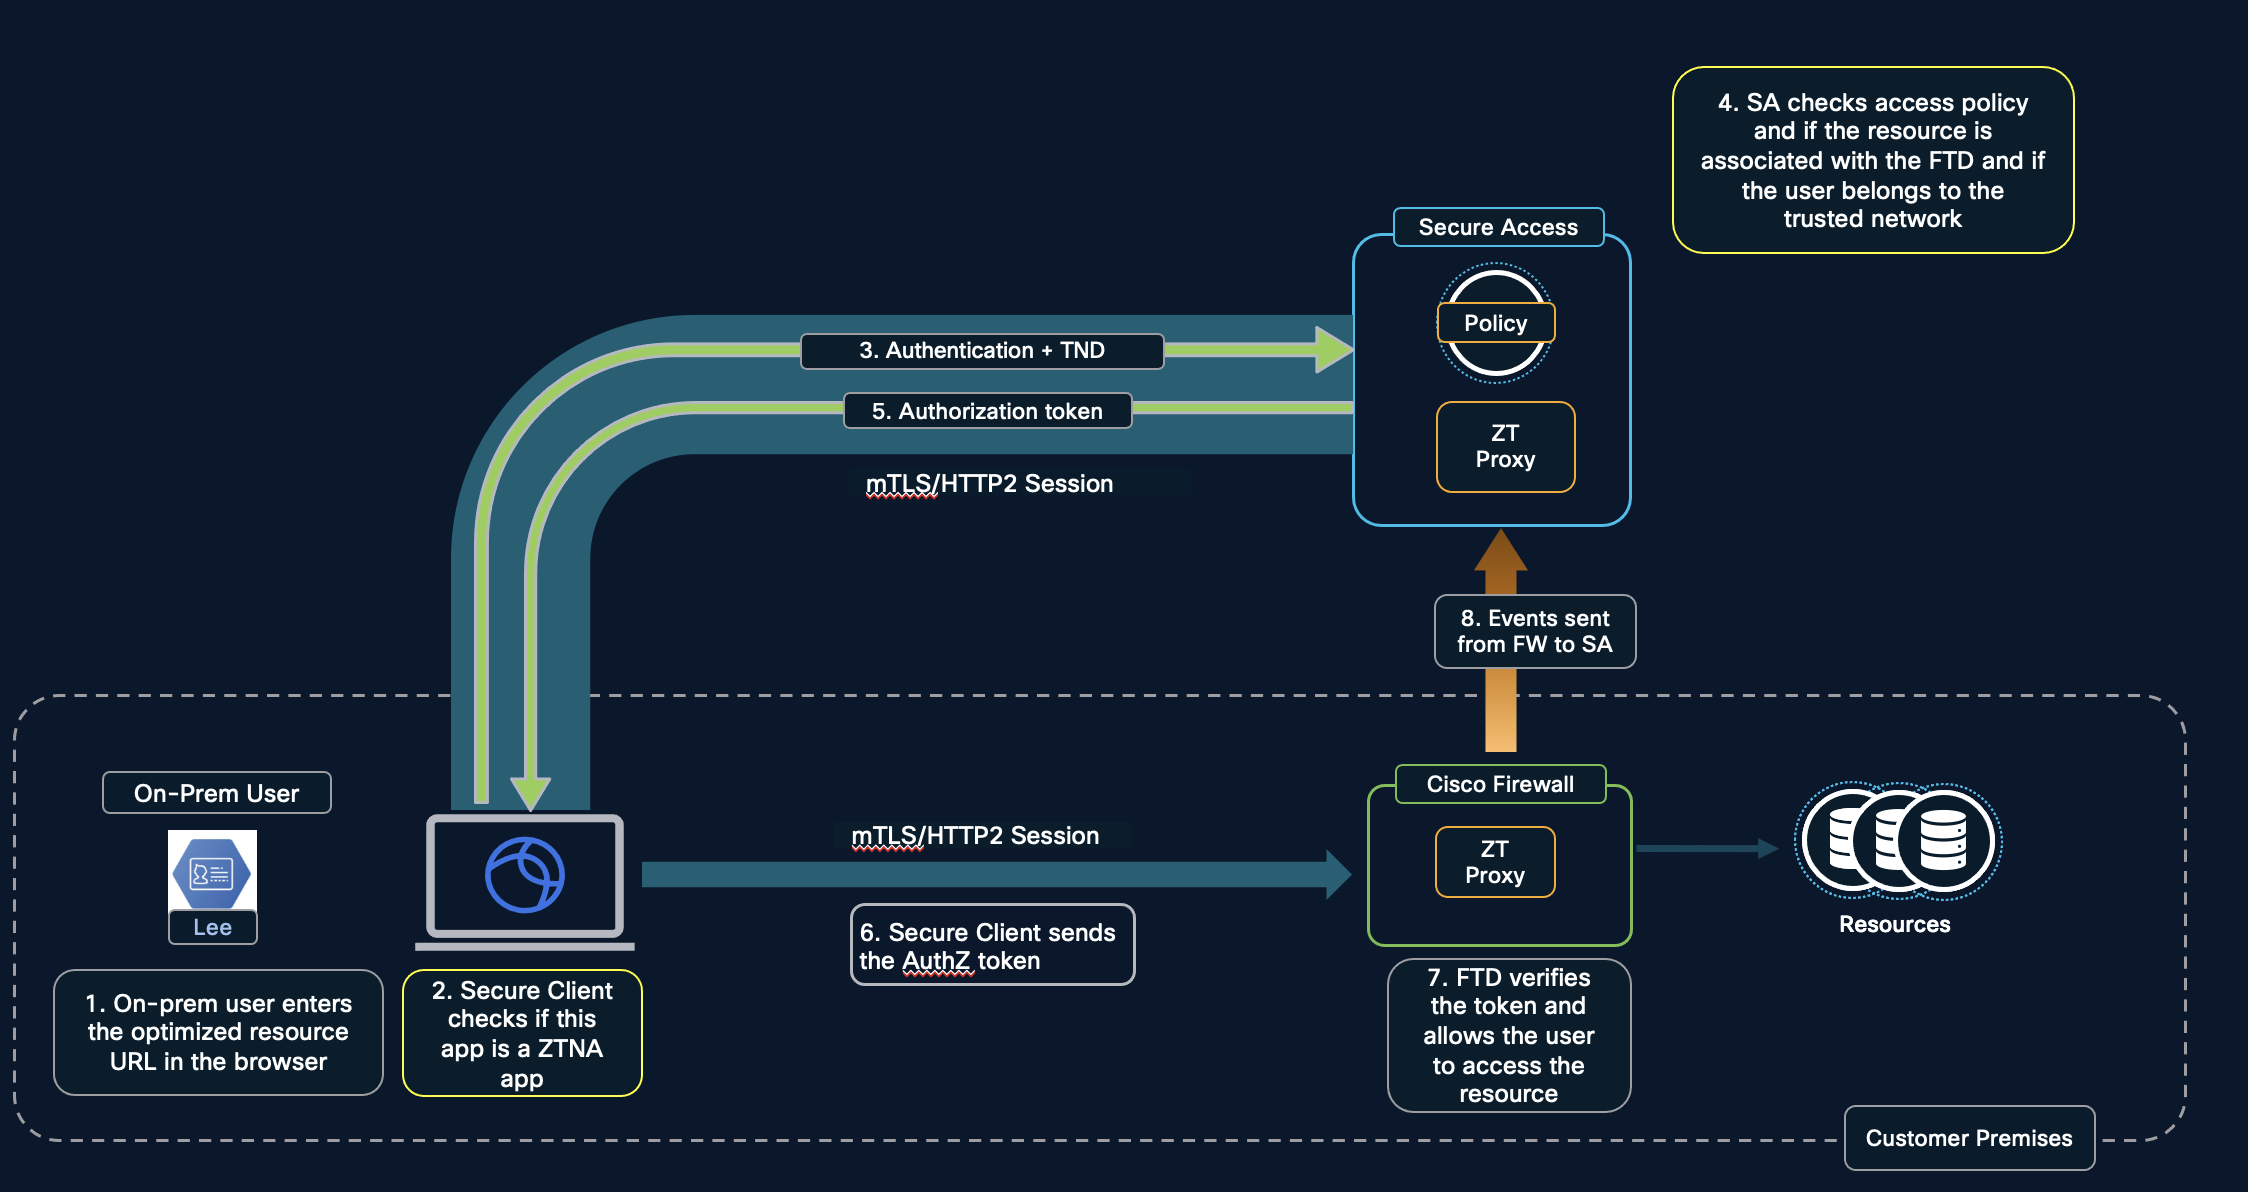
The user identity certificate is presented to Secure Access from the roaming user's workstation. Once it is validated by Secure Access, the mTLS session is established and authorization token is sent. The user identity certificate is again presented to the firewall which has to be validated for the mTLS session to be established between the on-prem user's workstation and the firewall. Here, the on-prem user should be able to resolve the on-premise firewall's FQDN which would be provided as a redirection by Secure Access. The application in this case is resolved by the on-premise firewall for which the necessary DNS configuration should be in place.
- Roaming or on-premise user accessing sensitive resource.
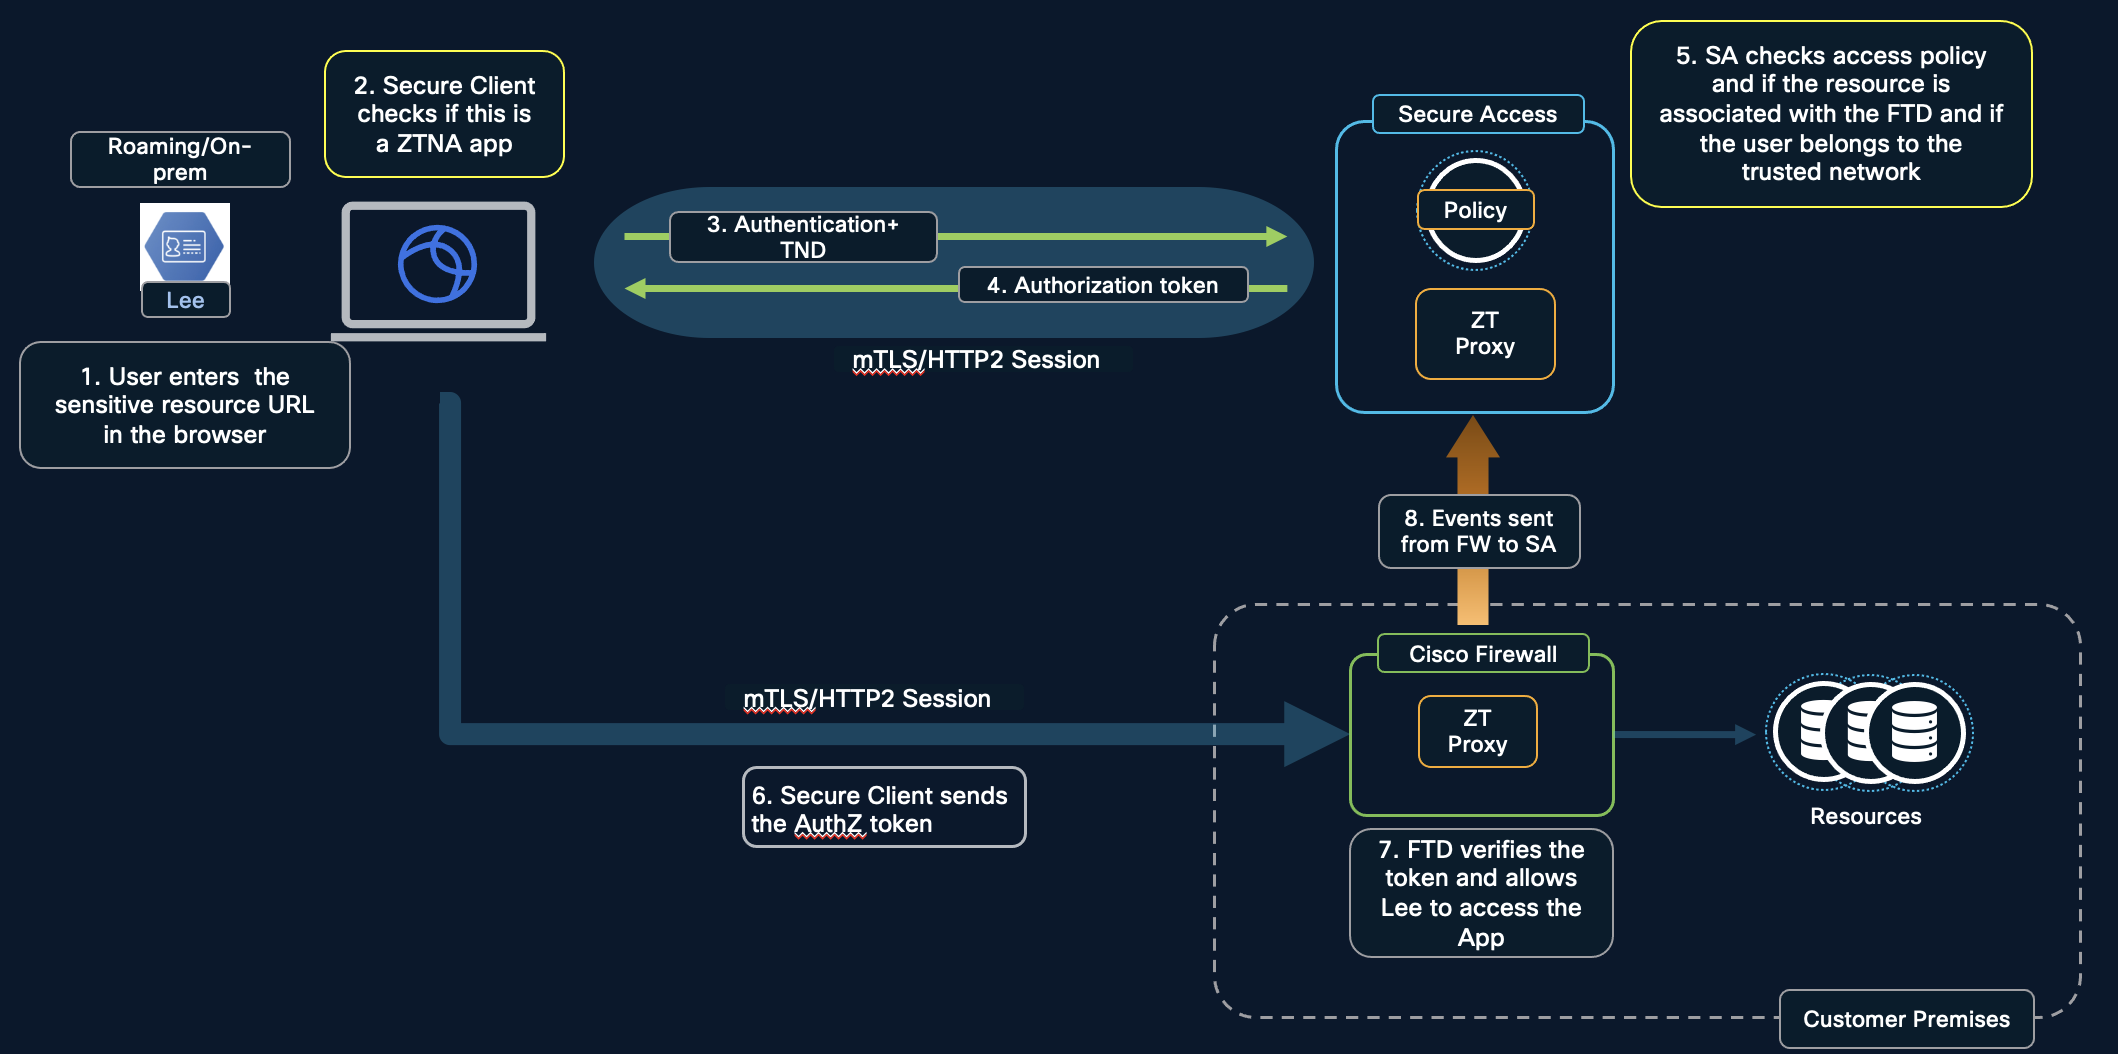
Here, the on-prem user should be able to resolve the on-premise firewall's FQDN which would be provided as a redirection by Secure Access. The application in this case is resolved by the on-premise firewall for which the necessary DNS configuration should be in place.
Configuration
The FMC managing the Secure Firewall can be on-prem or cloud-delivered. If it is an on-prem FMC, on-board it to Secure Cloud Control by following the steps mentioned in On board FMC to SCC
- Configure the Secure Firewall
Log in to the Security Cloud Control (SCC) and navigate to Firewall > Security Devices. Choose the FTD and click on Universal zero trust network access settings under Device Management.
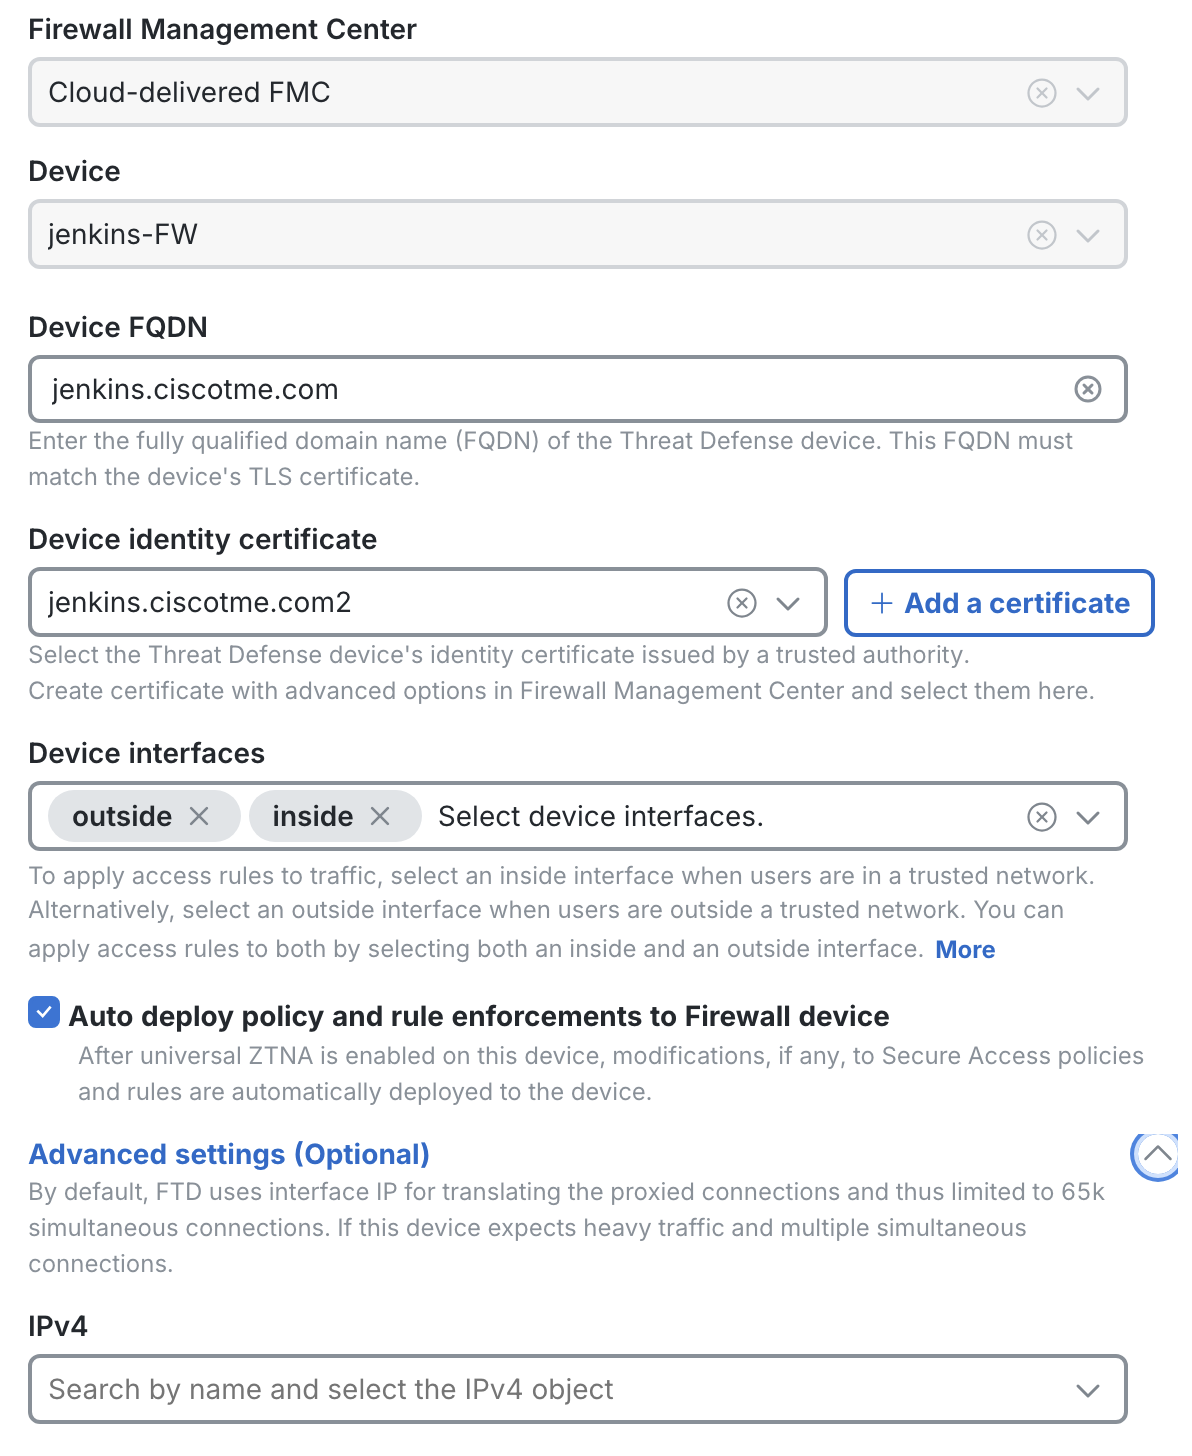
The FMC and Device would be automatically selected here. Enter the below details:
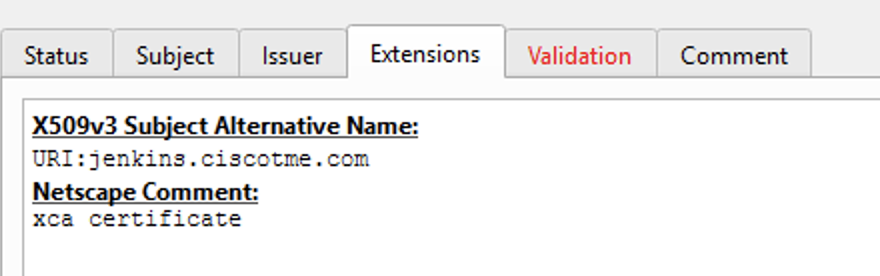
- Device FQDN - The value should match the Common Name as well as Subject Alternative Name (if present) of the Device Identity certificate selected in the next line. This is the FQDN to which Secure Access redirects the clients.
Certificate details as seen in XCA tool:
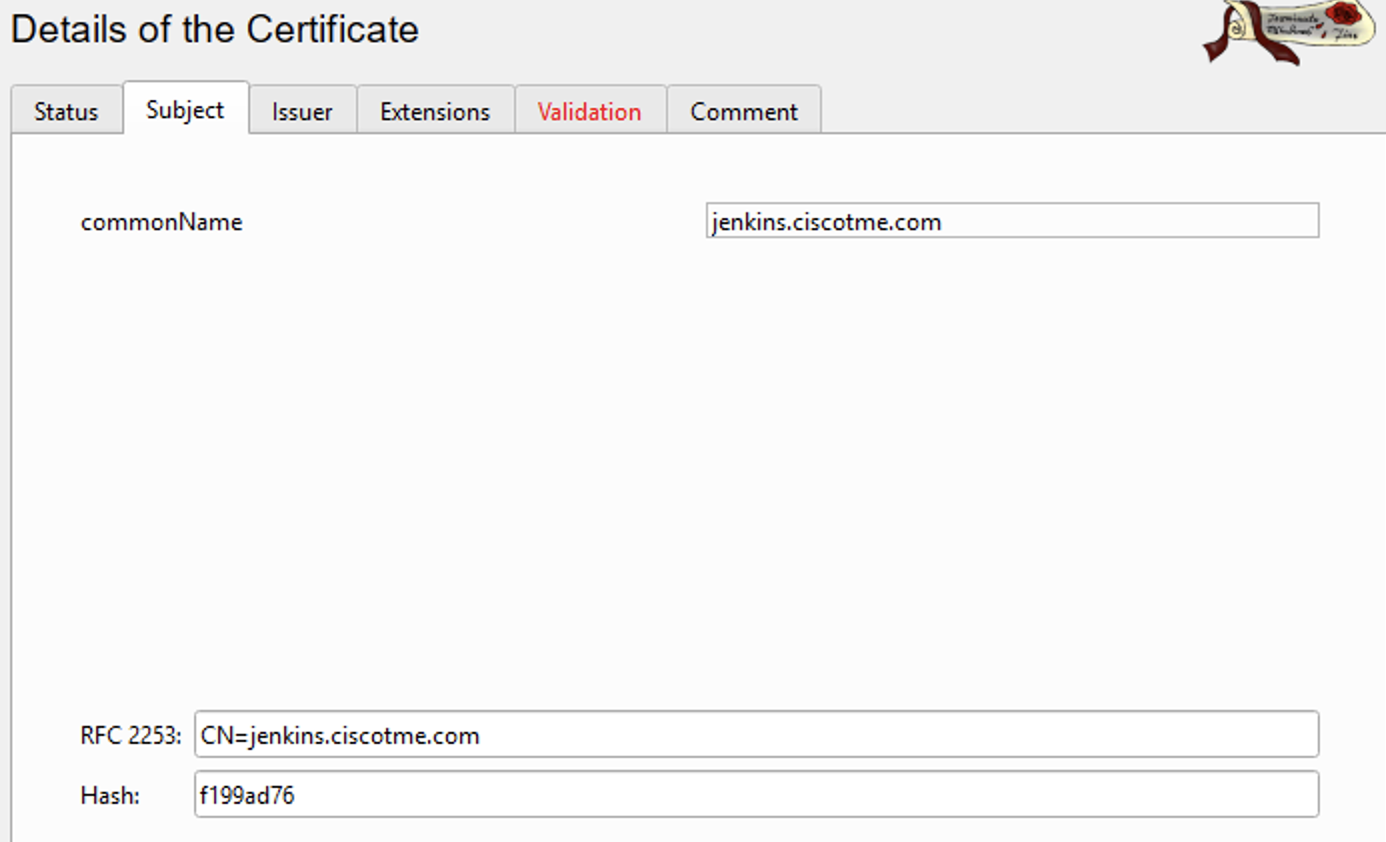
- Device identity certificate - A pkcs12 certificate can be uploaded by clicking on + Add a certificate or it can be selected from the drop down list. To be available in the drop down list, the certificate should be added in the FMC under Objects > PKI > Cert enrollment as enrollment type pkcs12 file.
- Device interfaces - Inside interface deploys access-rules for on-prem users only, outside interface deploys access-rules for remote users only. Select both for deploying access-rules for both on-prem and remote users.
- Auto deploy policy and rule enforcements to firewall device - Select the check box to automatically deploy access rules to the device after they are updated on Secure Access. Here, only the changes pertaining to Universal ZTNA configuration would be pushed to the firewalls automatically. For verifying the configuration and manually deploying the changes to the firewall at a later stage, the box can be kept unchecked.
- Advanced settings (Optional)- By default, FTD uses its interface IP address to connect to the backend servers. For heavy traffic, an additional IP address can be configured here.
The first time Hybrid Private Access is configured on the FTD, a reboot is required along with deployment to reallocate the system resources for universal ZTNA components. Click on Deploy and Reboot.
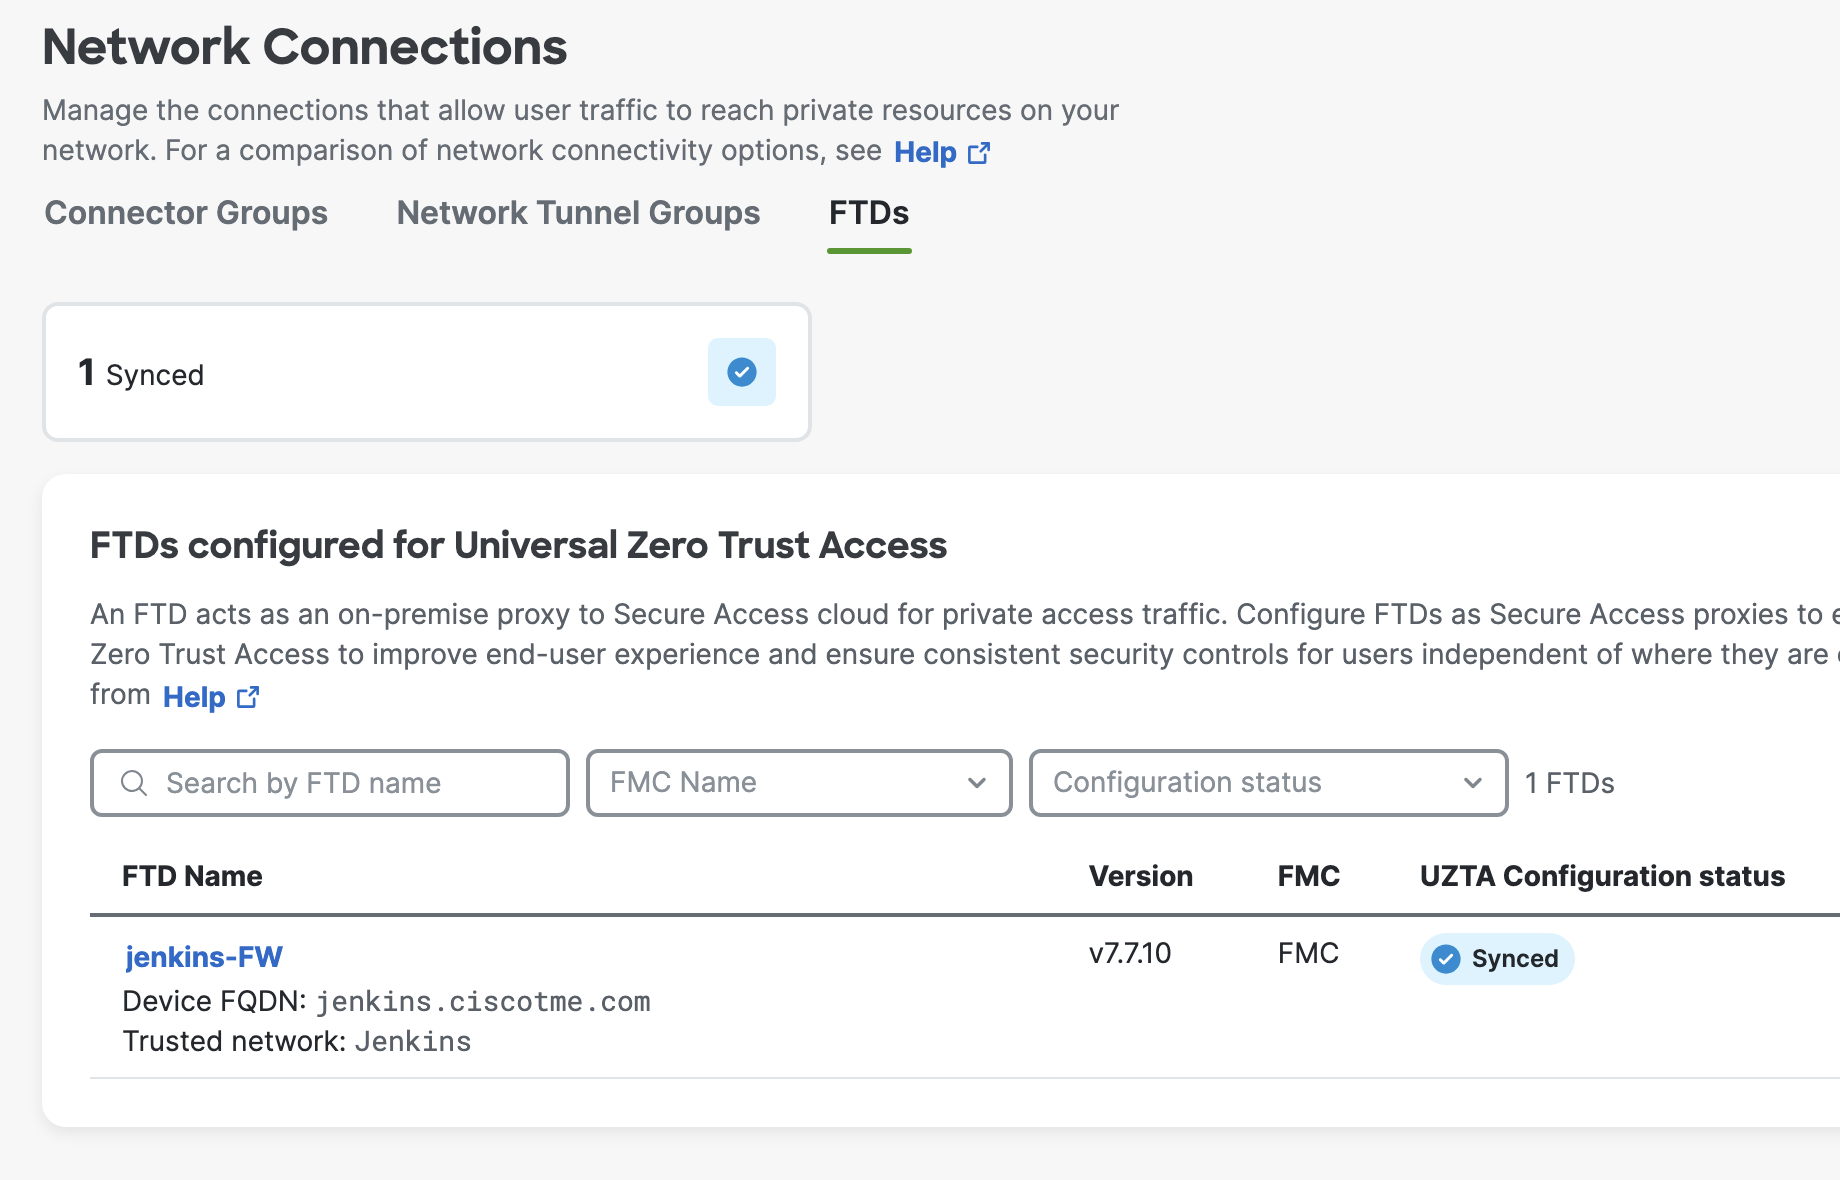
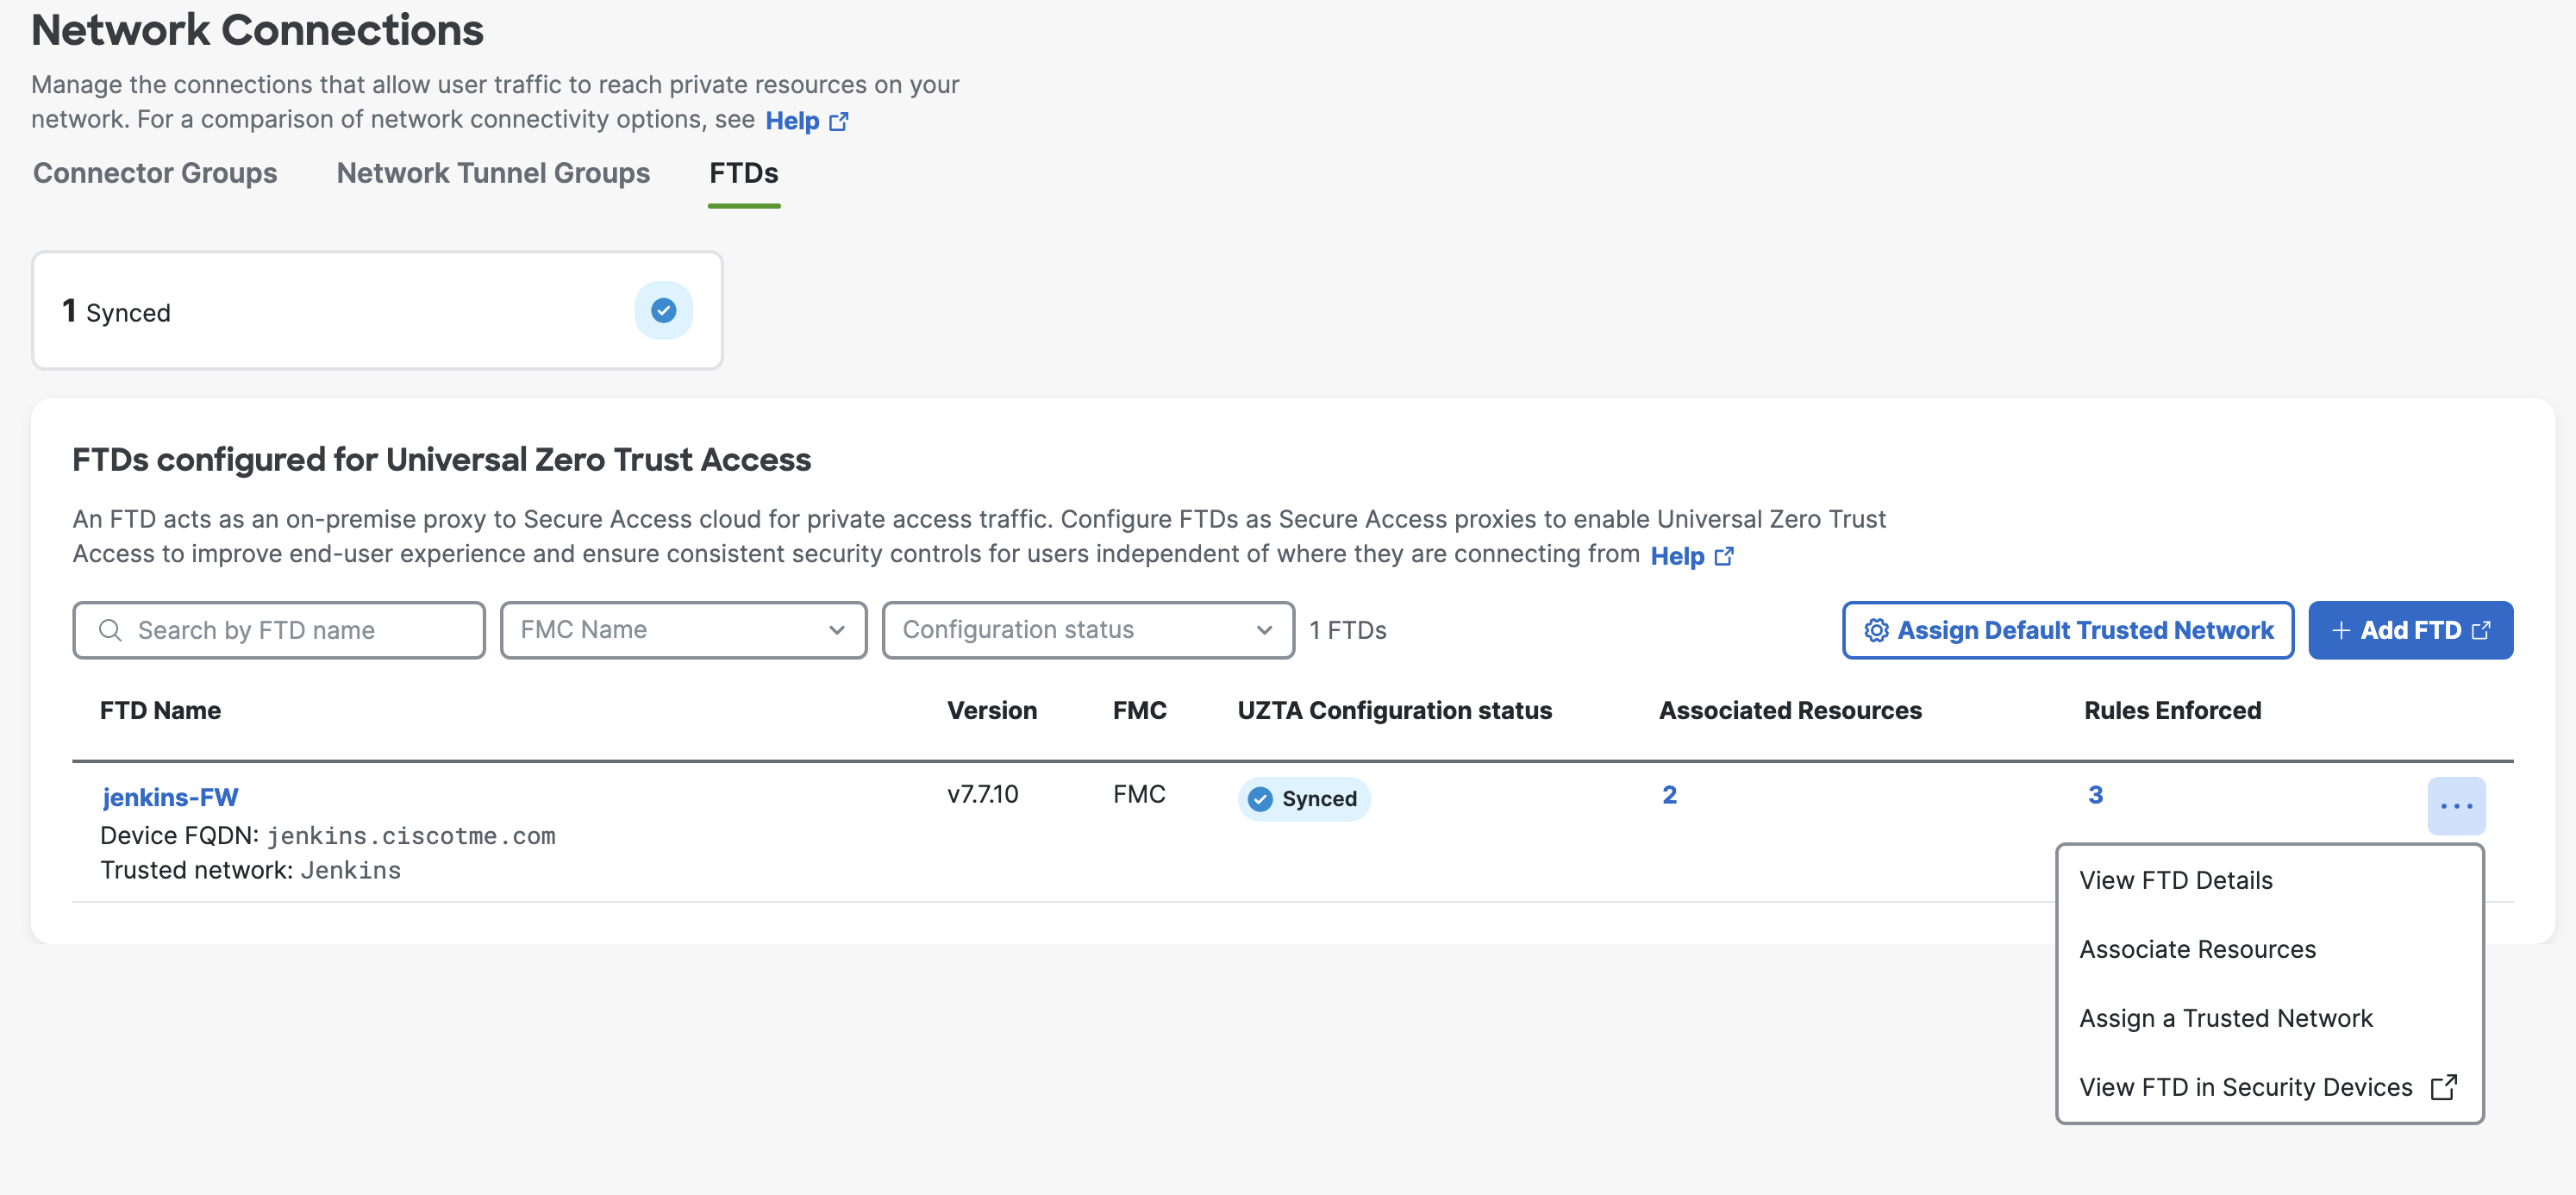
On the Security Cloud Control, navigate to Secure Access > Connect > Network Connections > FTDs and verify that the FTD is populated here with UZTNA configuration status as Synced.
Under FMC, click on Device Management > Select the FTD and click on Edit icon > Select Device tab.
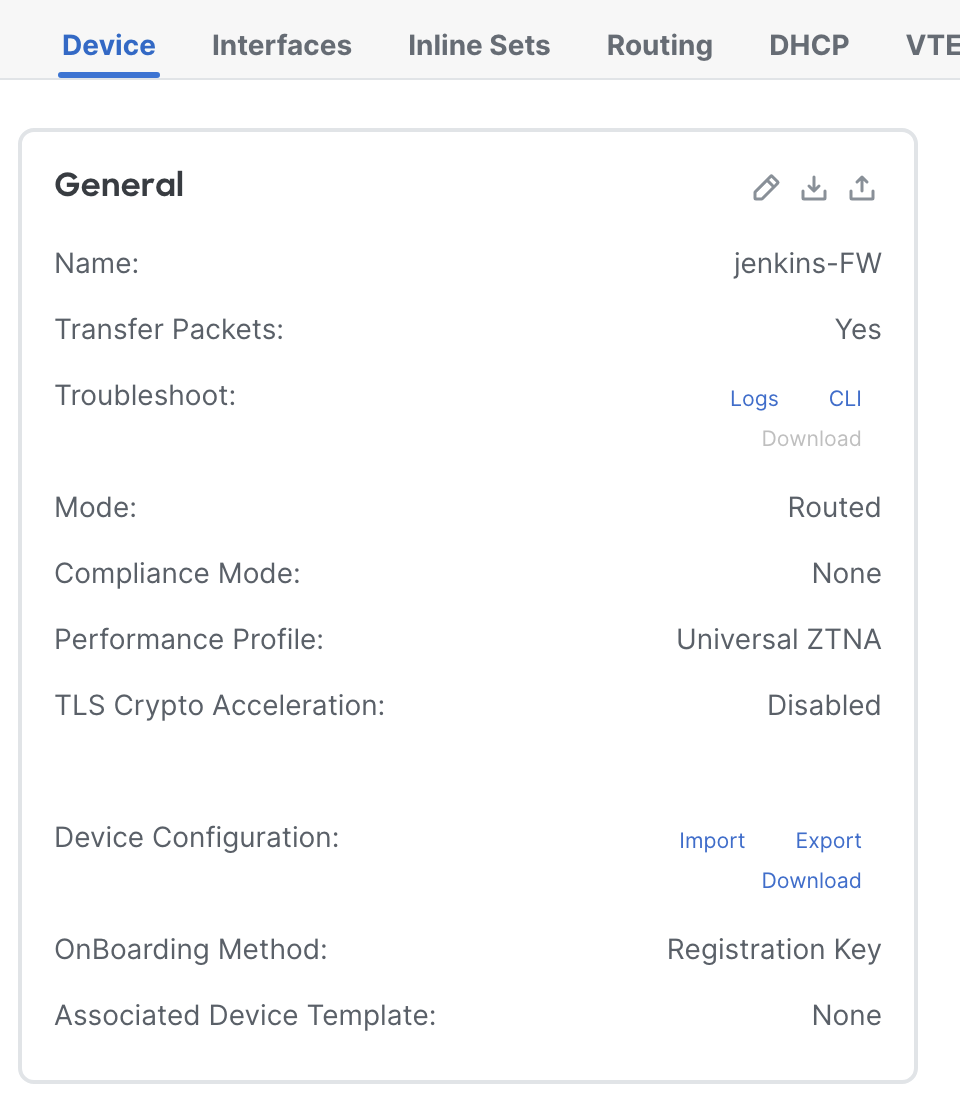
The Performance Profile of a UZTNA-enabled FTD changes to Universal ZTNA. The performance profile configuration under Platform setting cannot be applied to a UZTNA-enabled FTD.
- Configure Private resource on Secure Access
On SCC, navigate to Secure Access > Resources > Private resource. Click on +Add and enter the FQDN, protocol and port details.

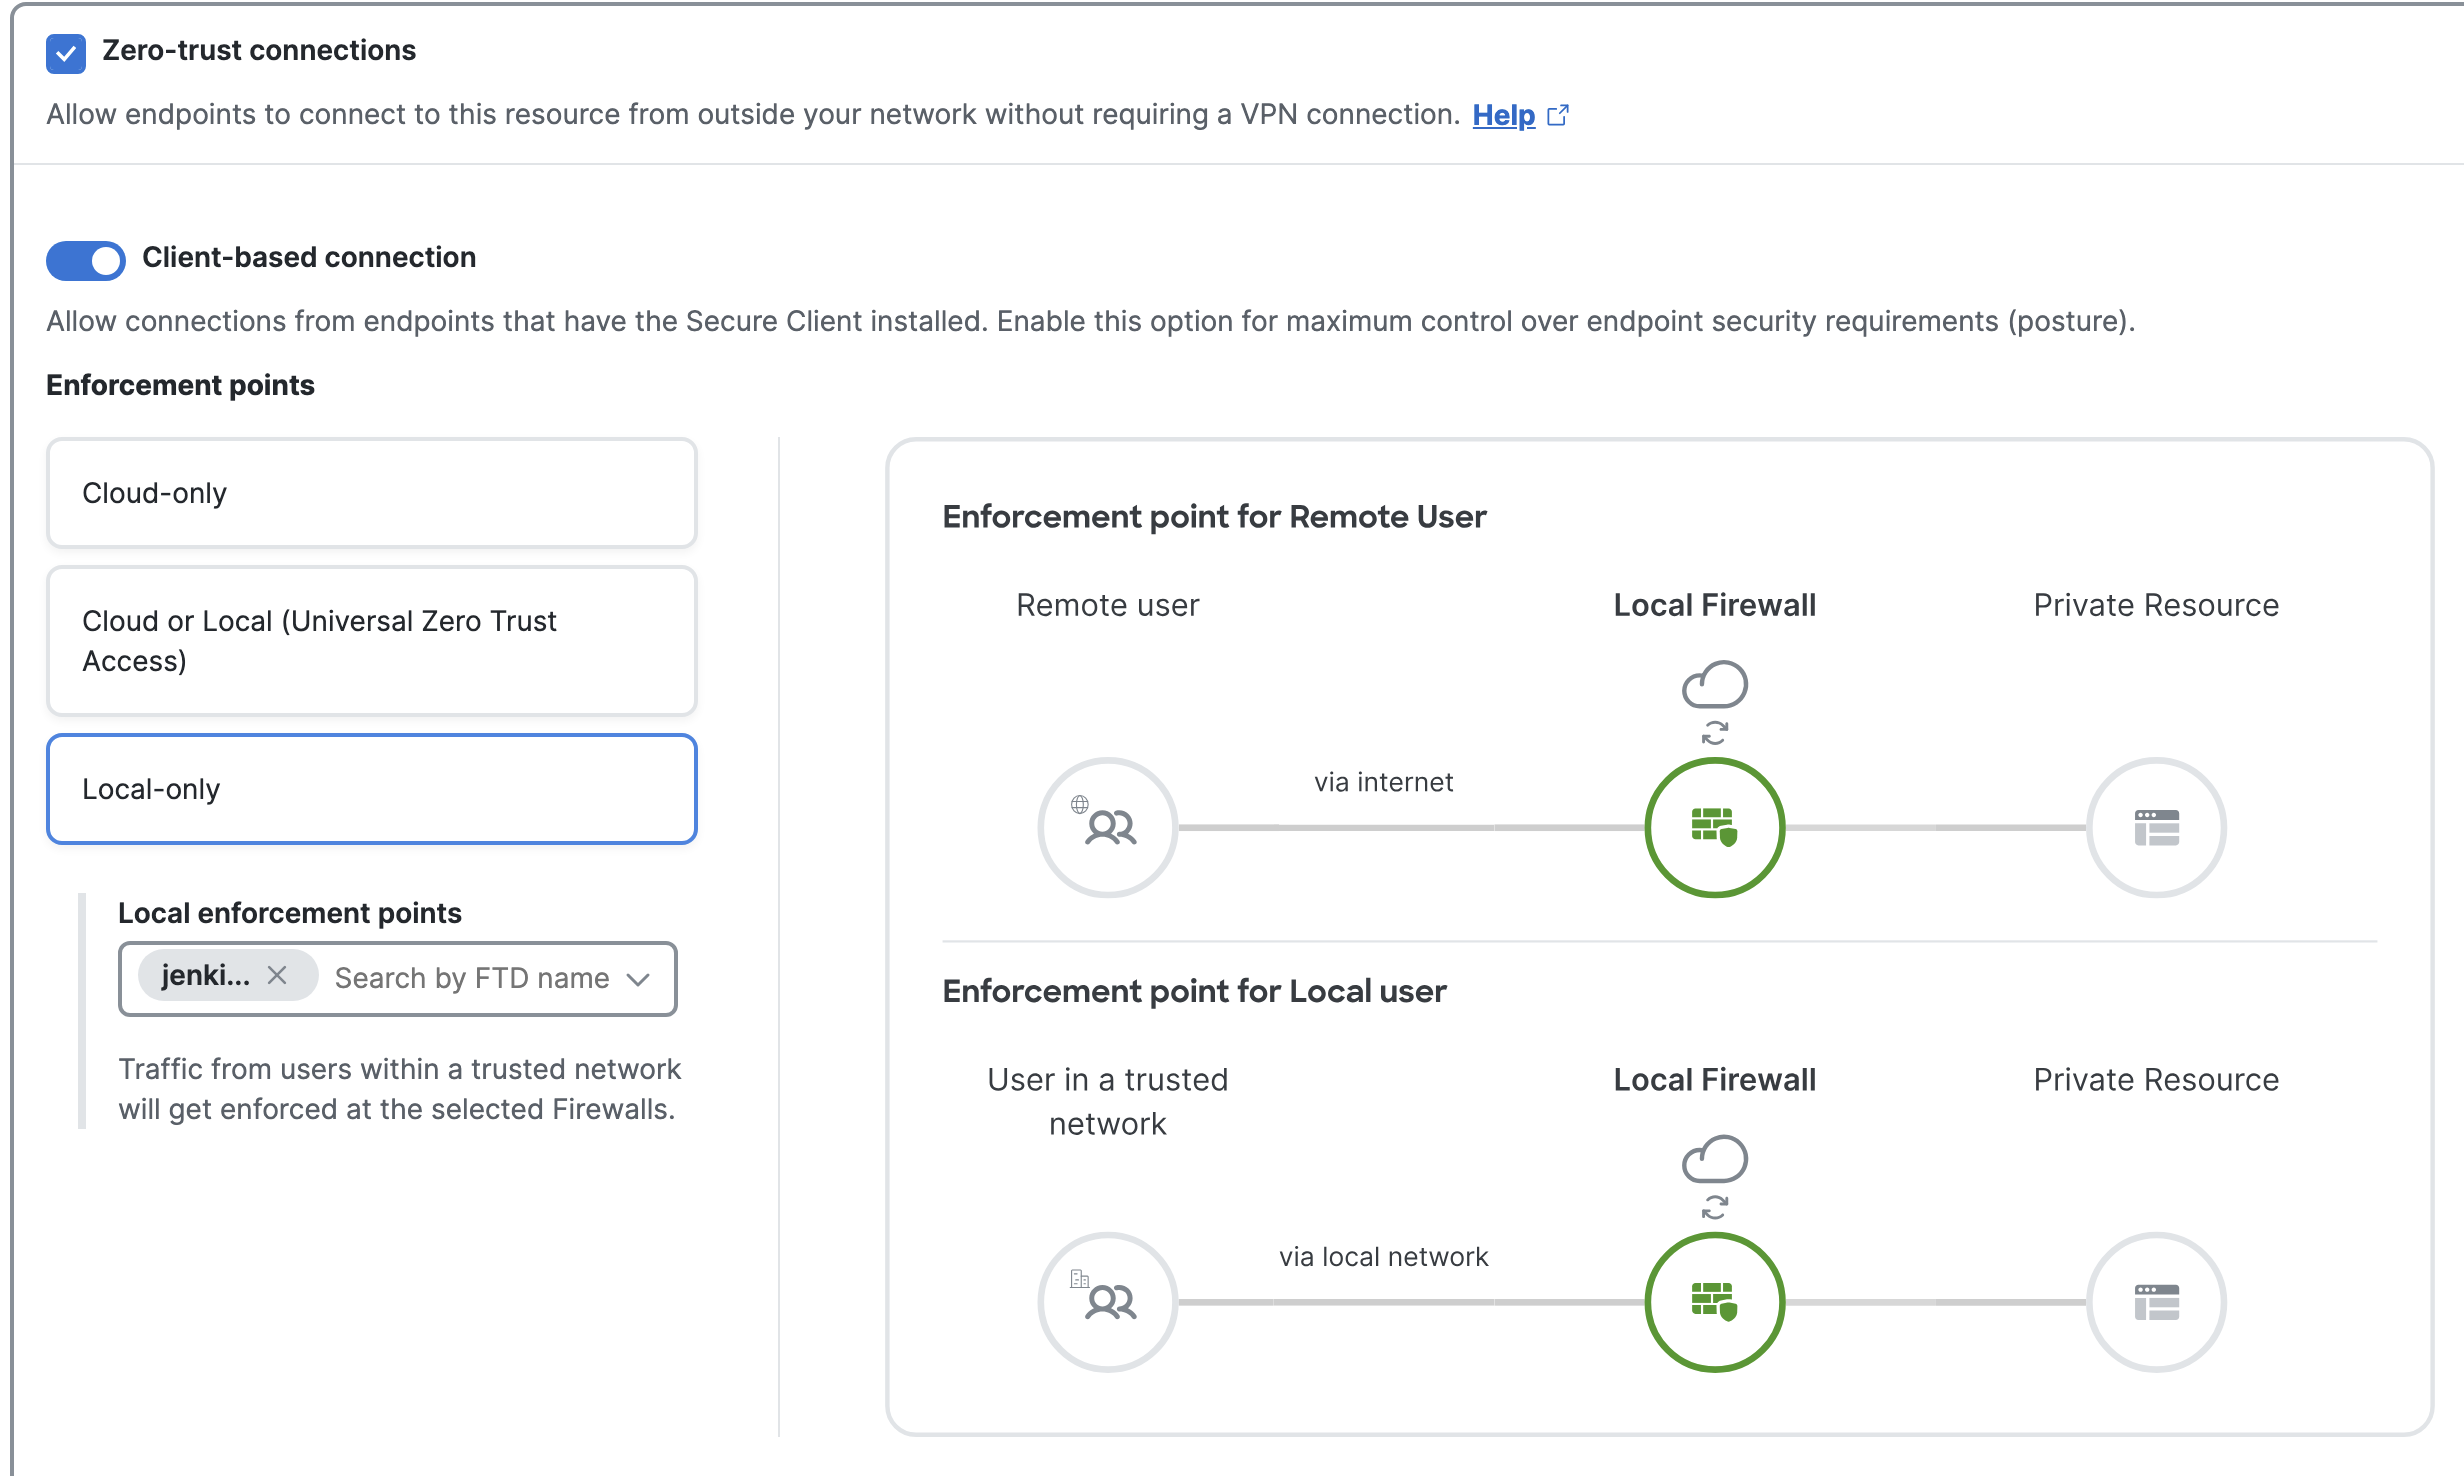
Under Endpoint Connection Methods, select Zero-Trust Connections > Client-based connection. If the application is sensitive, select Local-only. Here, irrespective of the user location, the enforcement point will always be the Secure Firewall. Select the FTD as the local enforcement point from the drop-down.
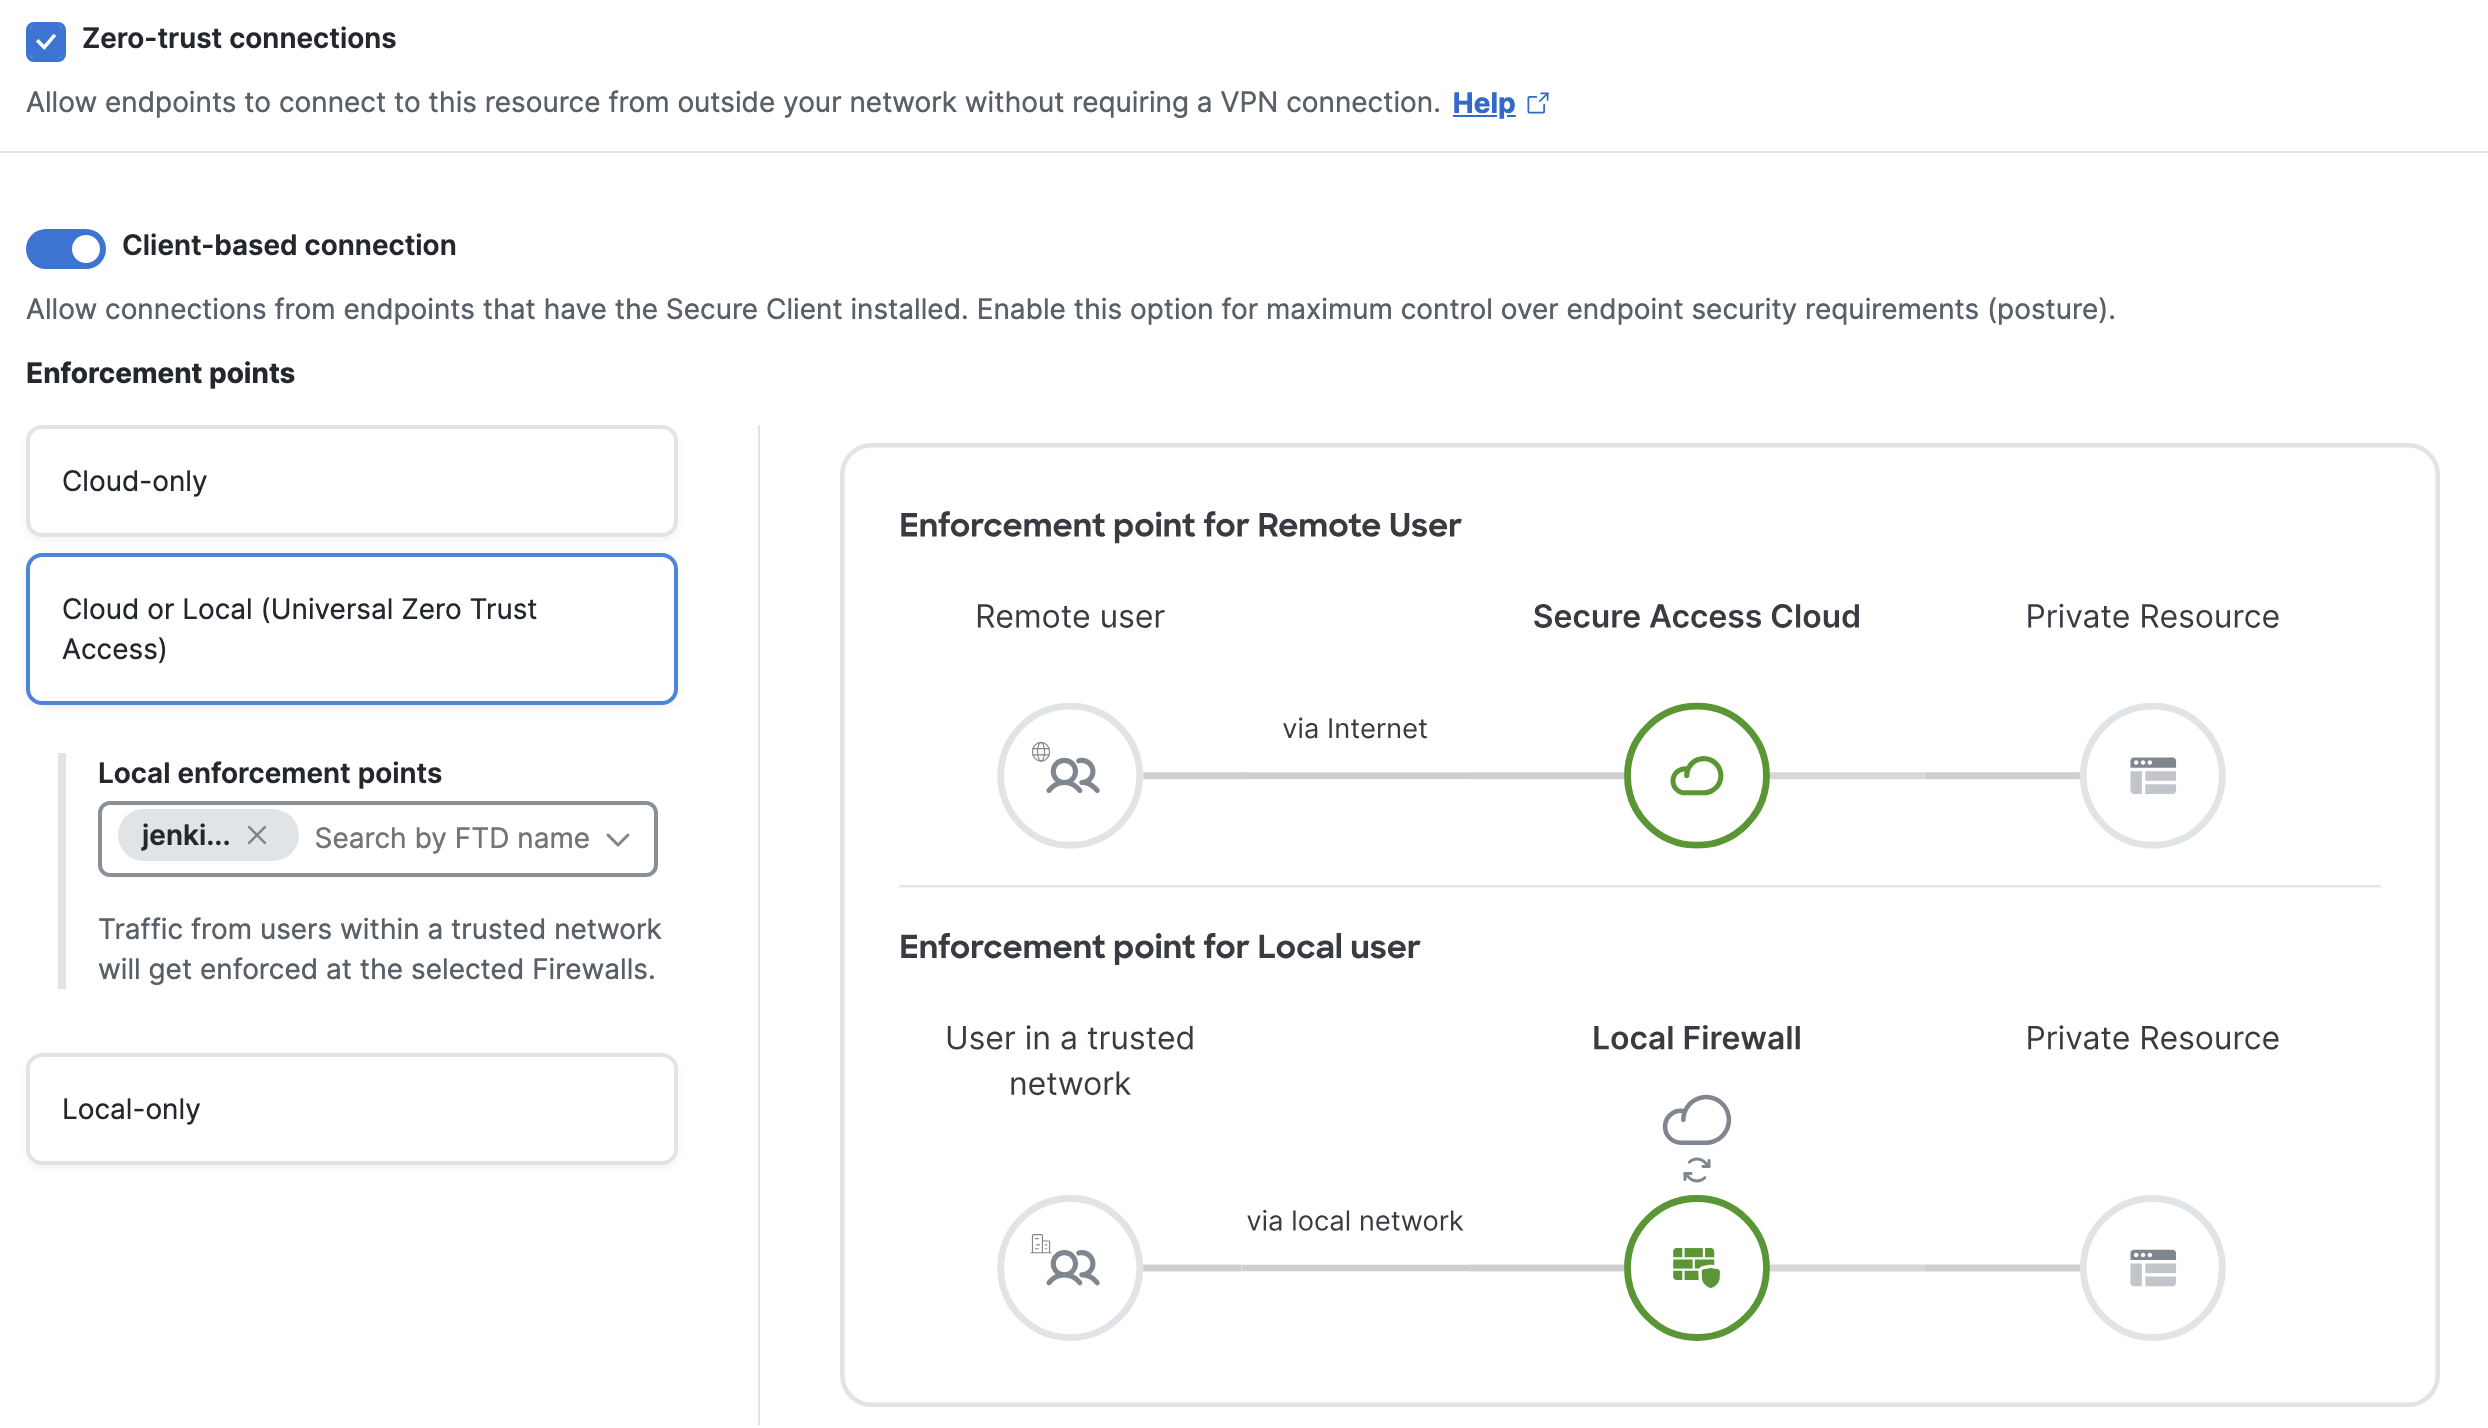
If the application is non-sensitive, select Cloud or Local. Here, the enforcement point would be Secure Access if the user is remote and Secure Firewall if the end user is local. Select the Local enforcement point as the FTD.
- Configure Access Policy on Secure Access
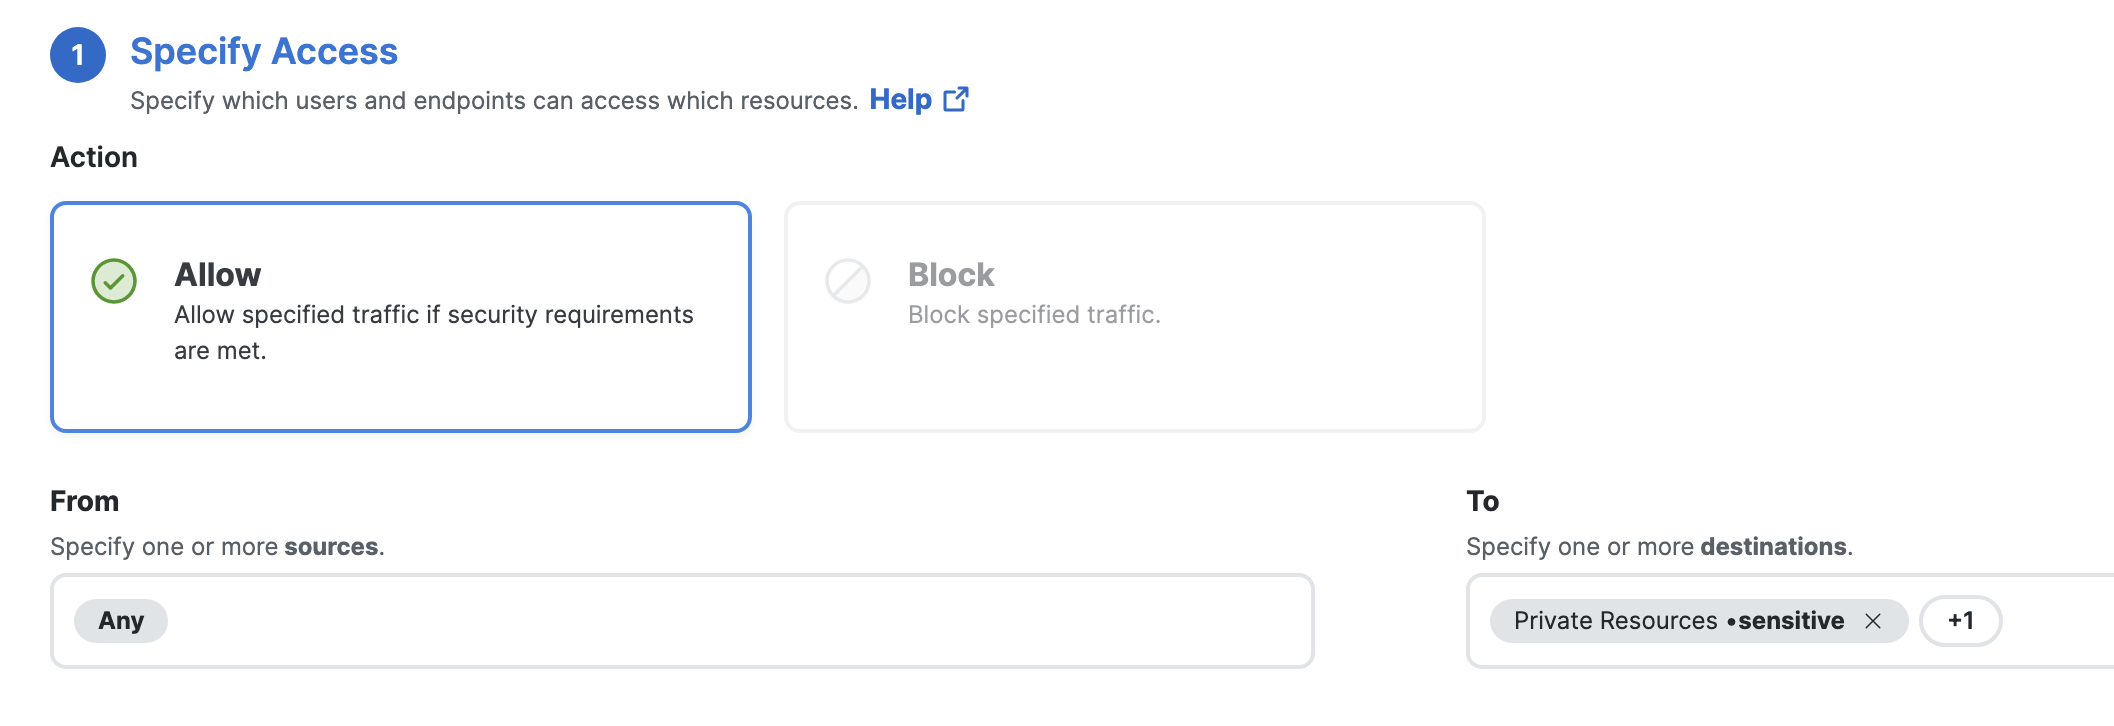
On SCC, navigate to Secure Access > Secure > Access Policy. Click on Add rule. Under Specify Access select Action as Allow. Under From select the sources that need to access the private resource configured above. Under To select the private resource configured above.
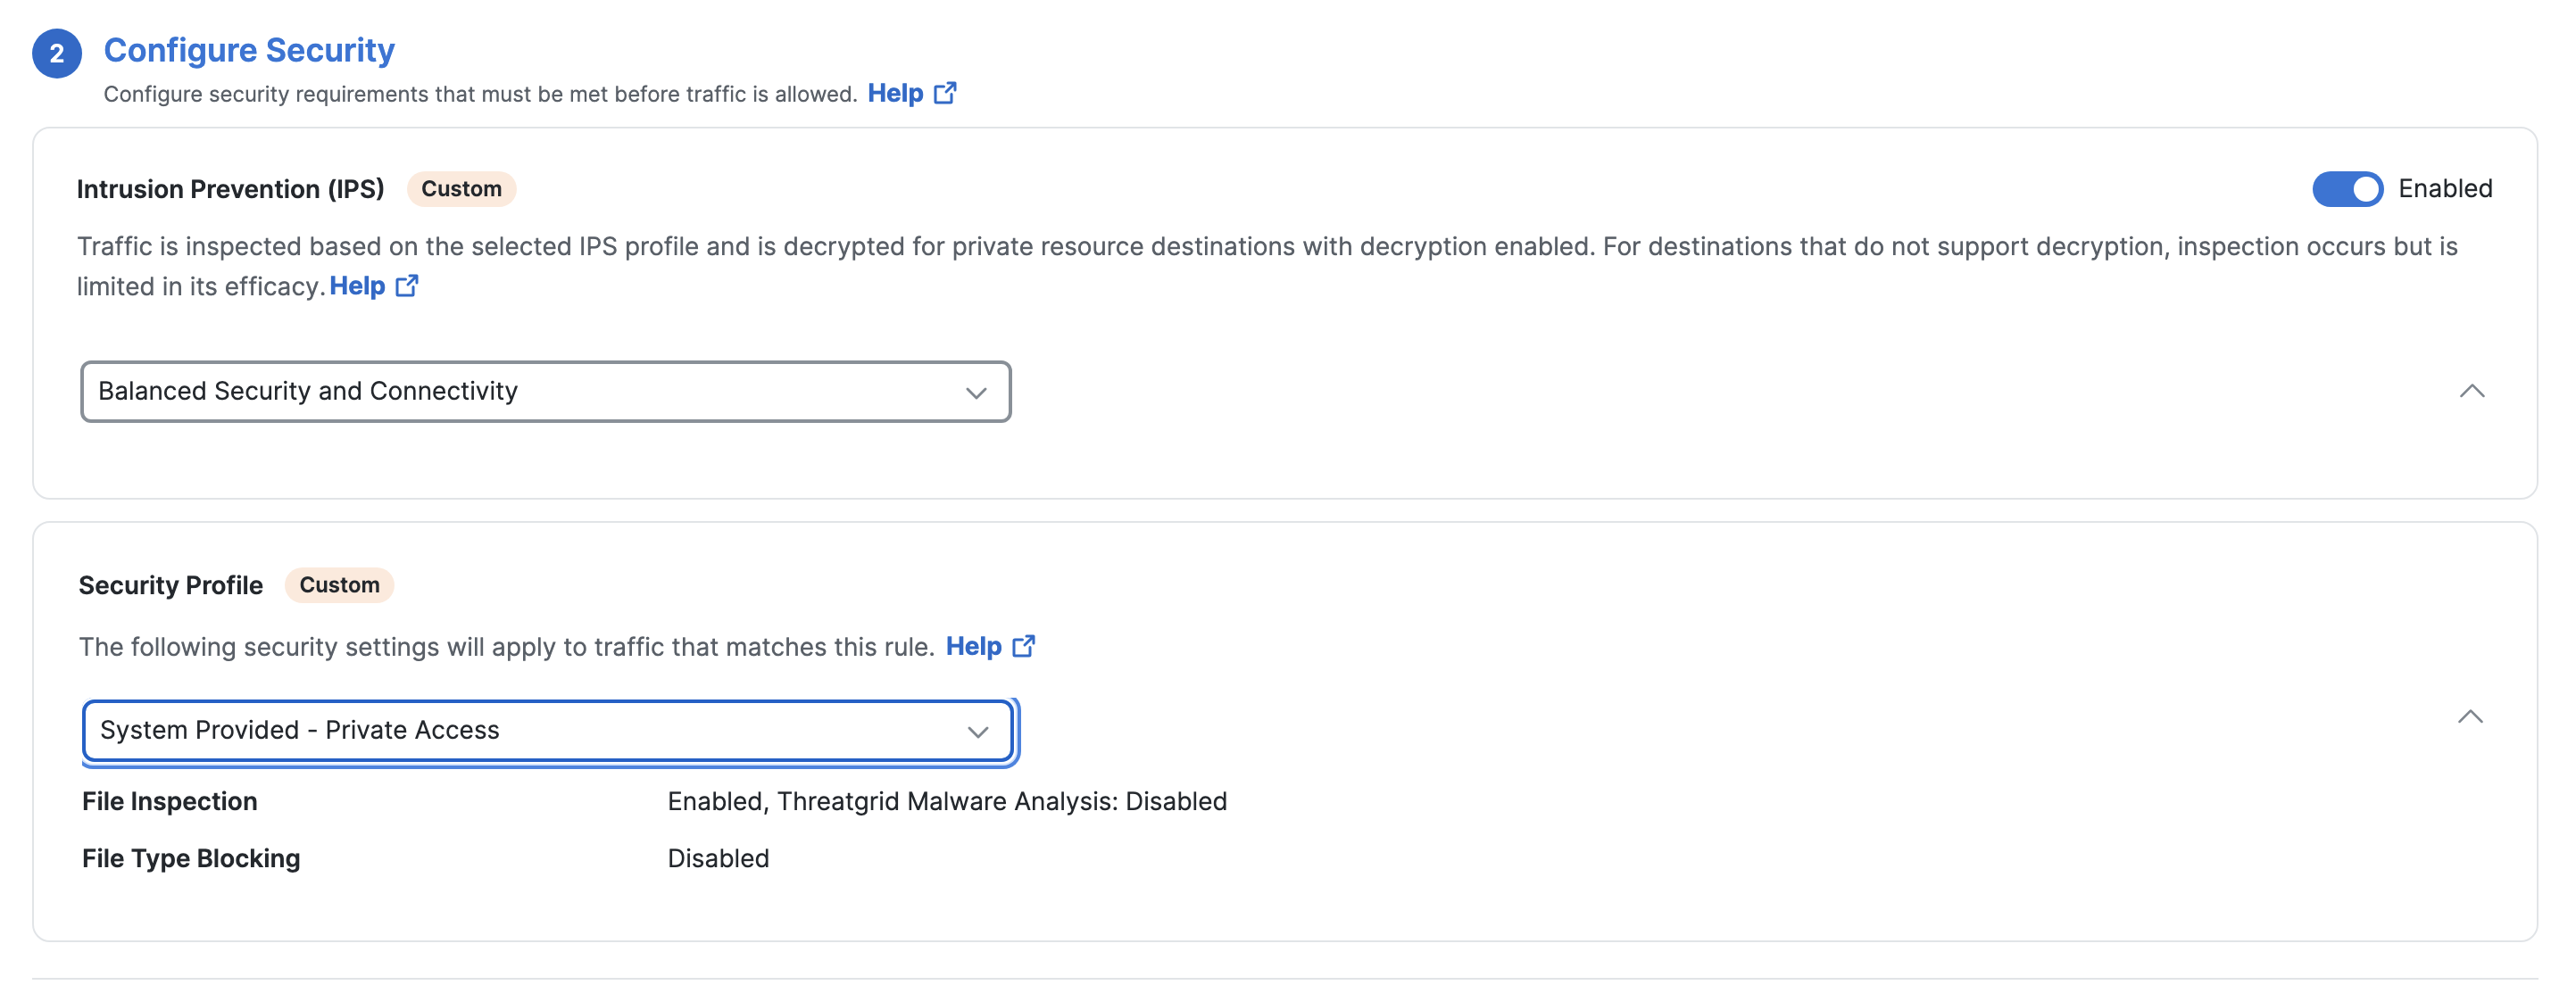
Optionally click on Next to Configure Security wherein you choose the IPS profile and Security profile.
- Configure Trusted Network
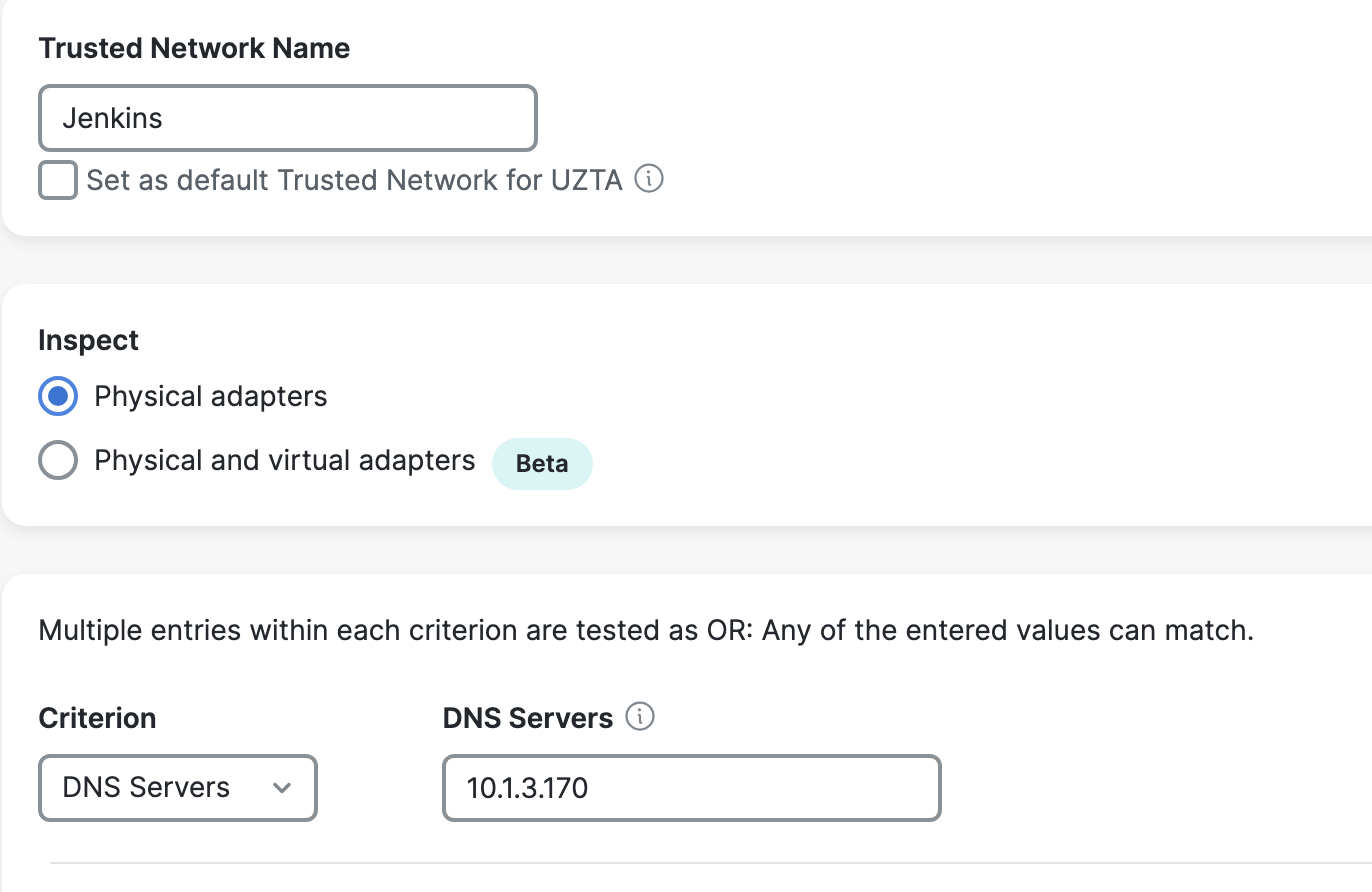
Navigate to Secure Access > Connect > End User Connectivity > Zero Trust Access > Manage Trusted Networks. Click on +Add. Select the criteria which could be any or a combination of the below:
- DNS Servers - DNS server addresses that a network interface may have when the client is in the trusted network.
- DNS Domains - DNS suffixes that a network interface may have when the client is in the trusted network.
- Trusted Servers - The host URL of secure web server that is accessible with a trusted certificate which is to be considered trusted. Secure TND attempts a connection to the server. If the server can be contacted, and the hash is trusted, the "trusted" criteria is met.
An on-prem DNS Server is added below as a criterion which is the DNS server configured for on-prem users.
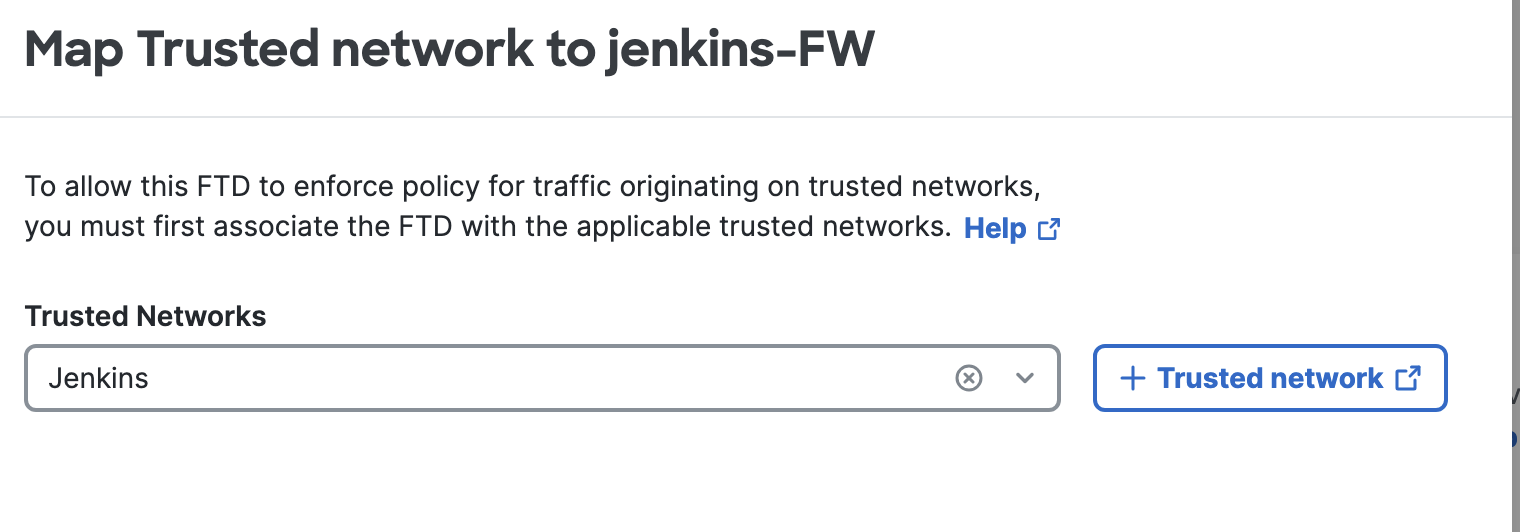
To associate the Trusted Network defined to the FTD, go to Connect > Network Connections > FTDs > Assign a Trusted Network > Select the Trusted Network.
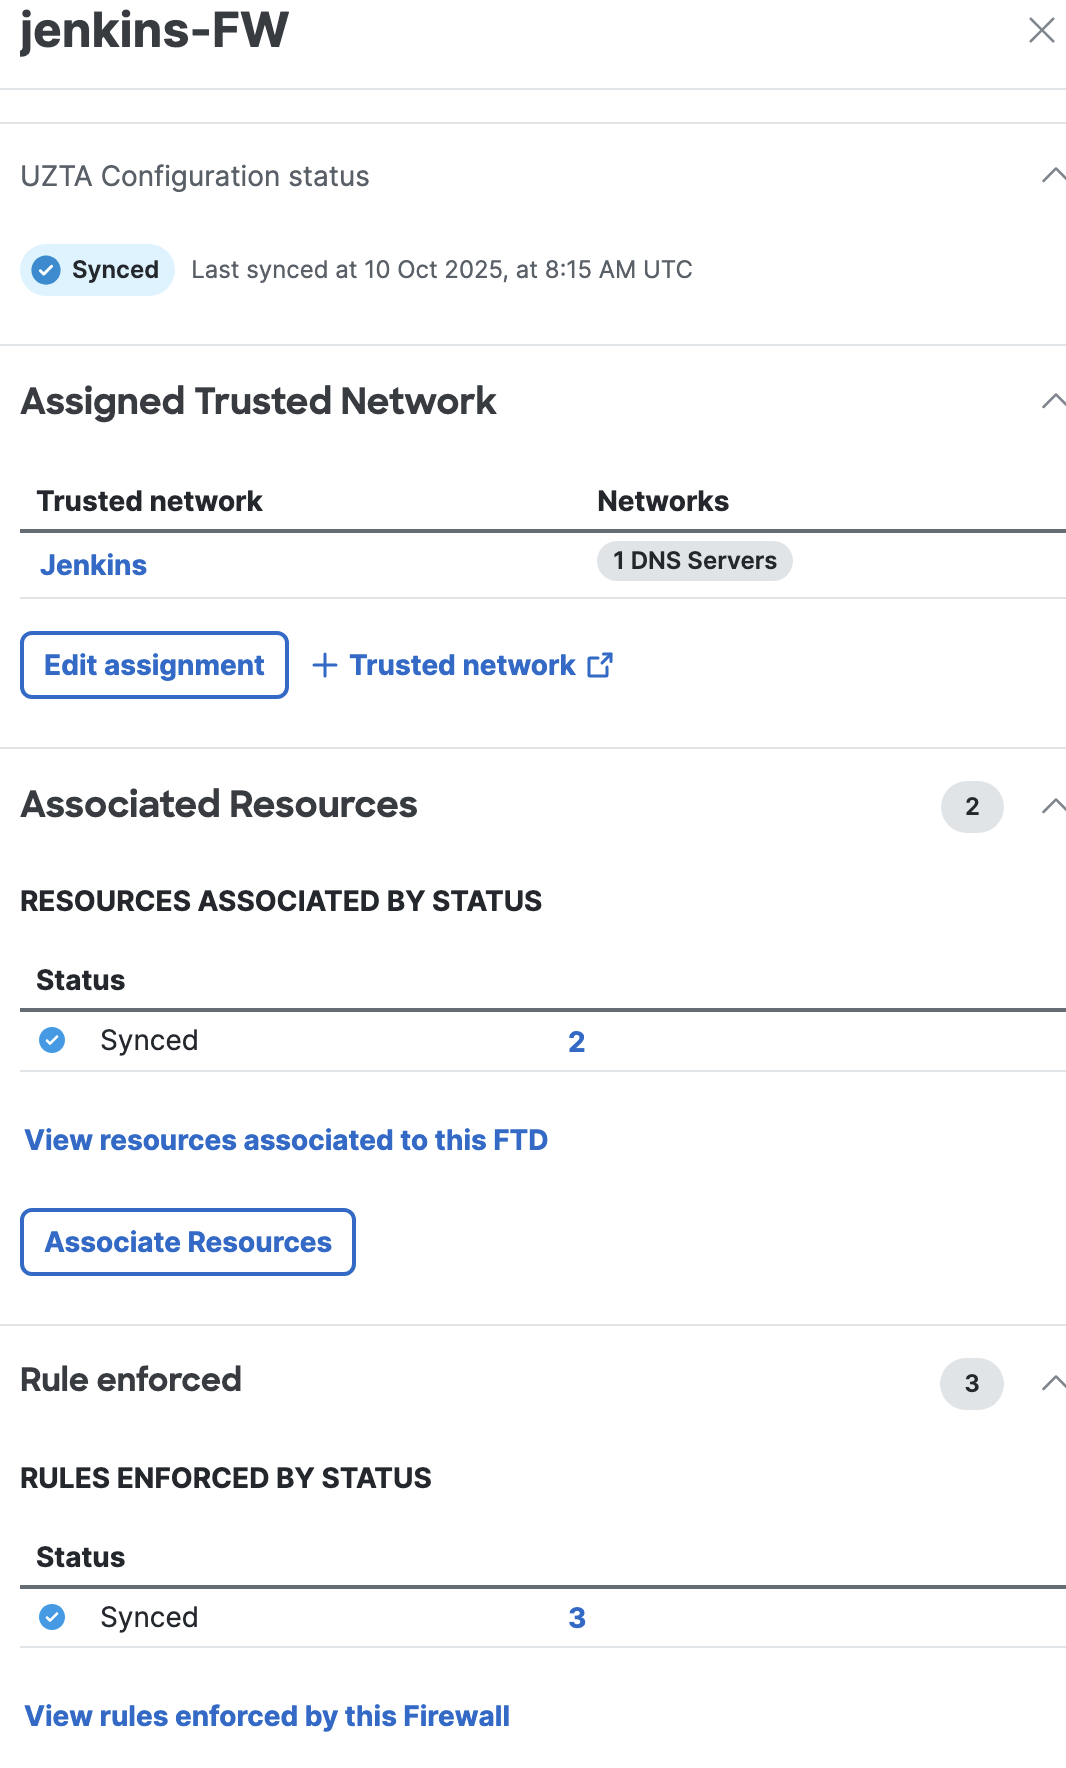
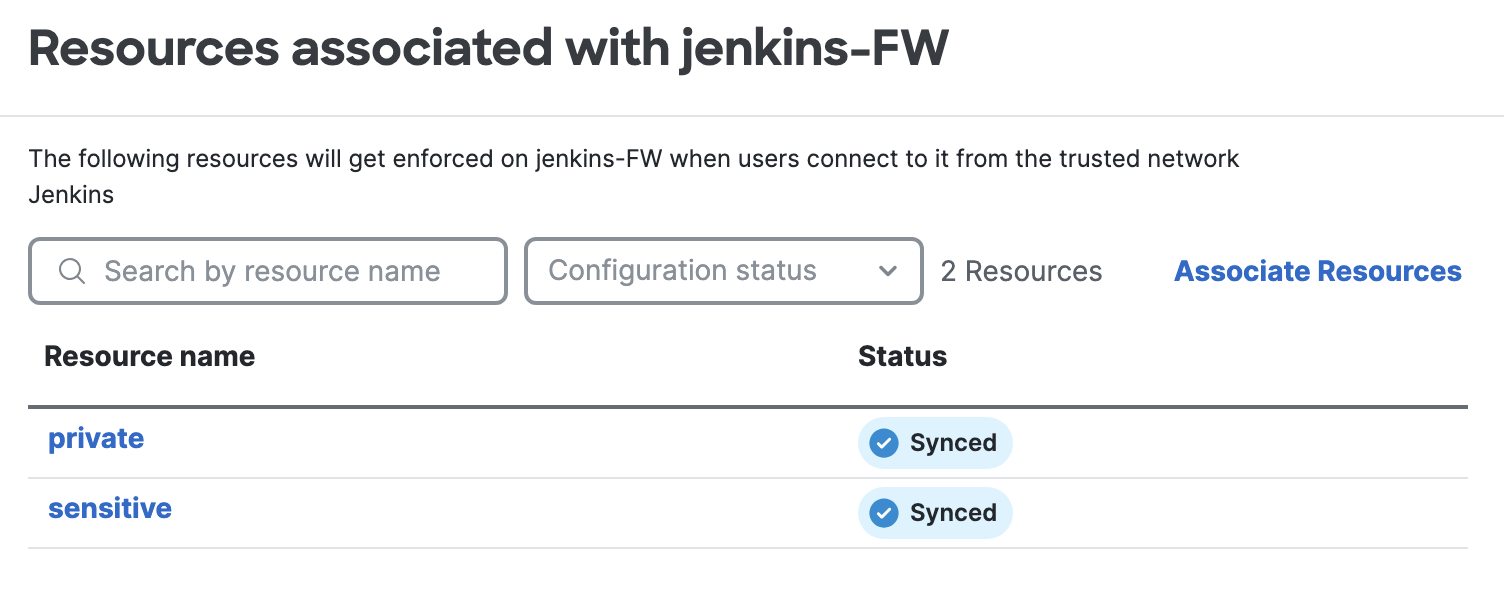
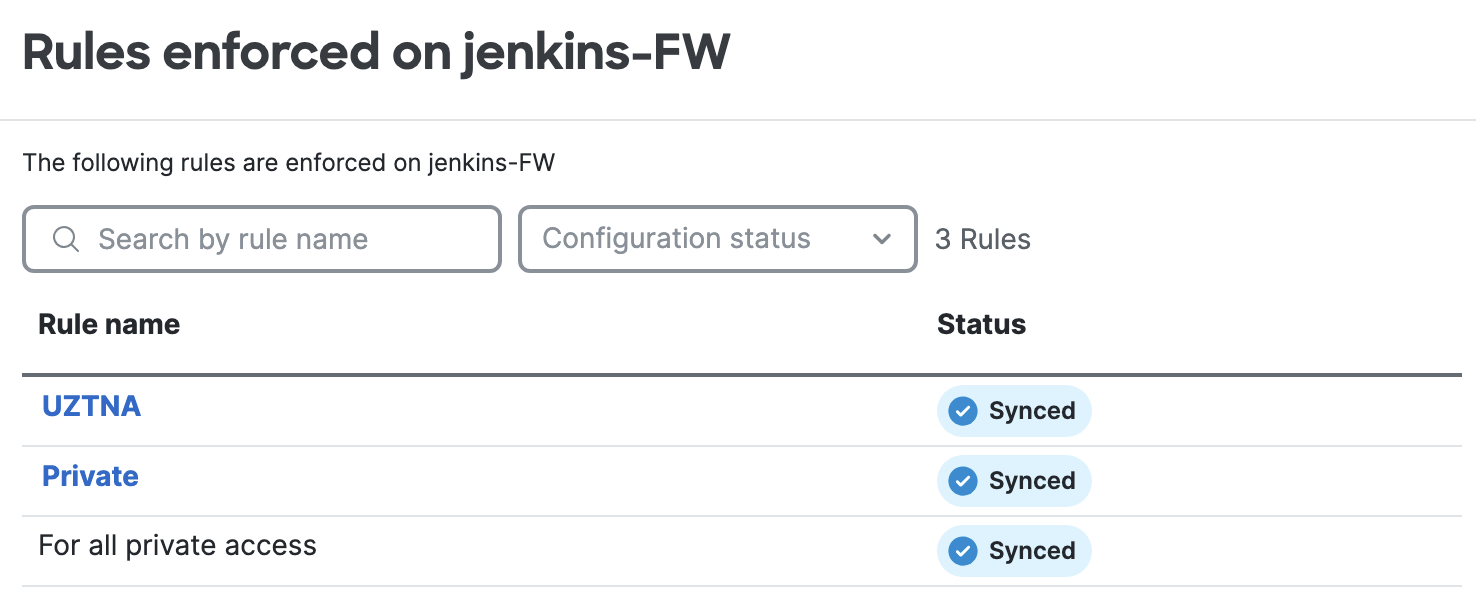
- Verification of the configuration on SCC.
Click on the Secure Firewall to view resources associated to it and rules enforced by it.
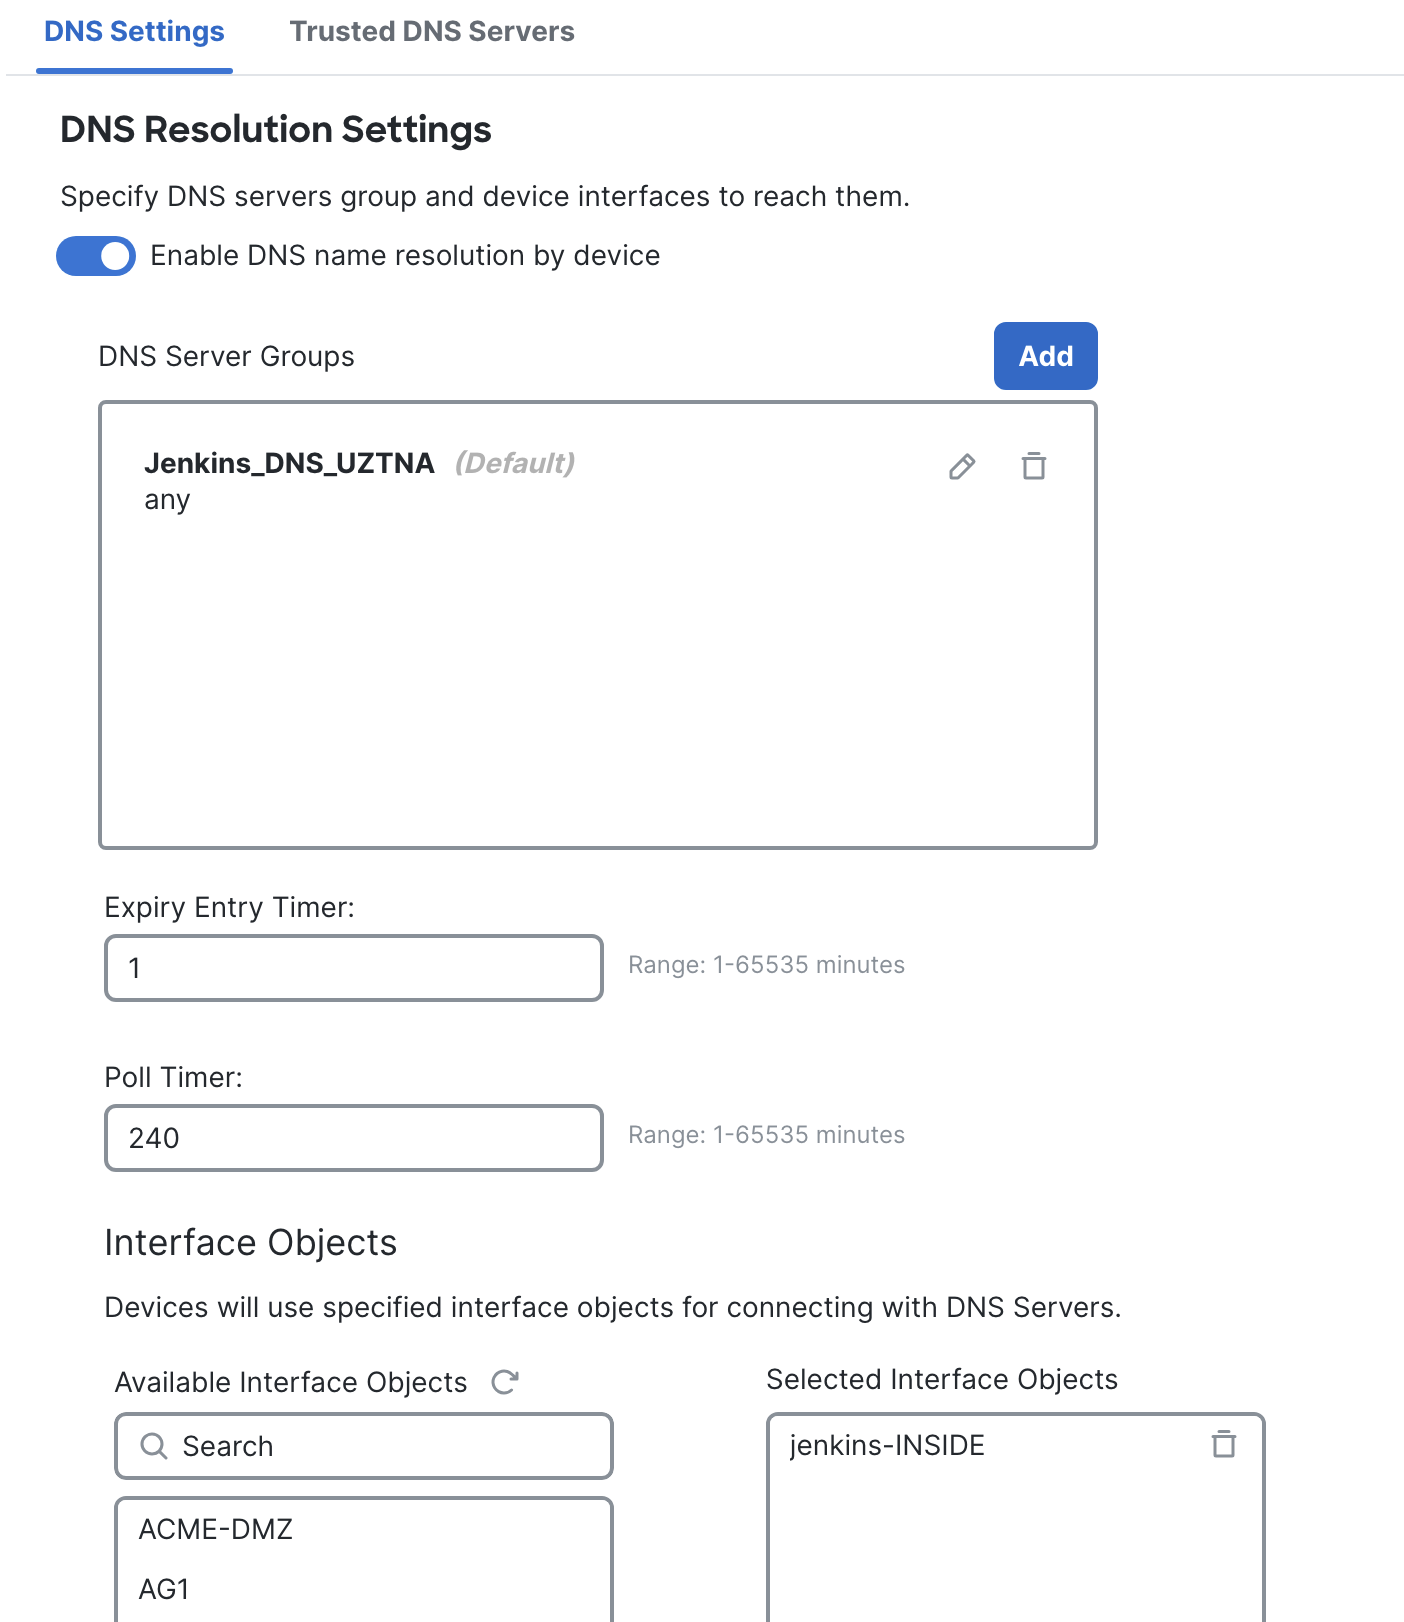
- DNS Server configuration
On the FMC, go to Devices > Platform Settings > Click on the FTD's platform settings policy. If none exist, click on New Policy and select the FTD by clicking on Policy Assignments. Select DNS > Click on Add to add the DNS server group which can resolve the applications behind the firewall. Under Interface Objects, add the interface of the FTD from where the DNS server would be accessible.
- Workstation setup
Download the latest Secure Client predeploy bundle from Secure Client download. While installing it on the workstation ensure that the Zero Trust module is selected.

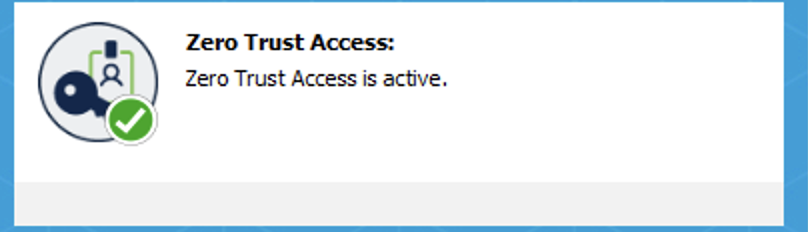
Click Enroll on the Zero Trust Access tile of Secure Client once it is installed and enter the details for authentication. Ensure that the ZTA module is active.
To trust the user, the user's CA certificate has to be uploaded under Secure Access by navigating to Secure > Certificates > Client authentication > upload certificate.
The enrollment configuration file obtained from Secure Access under Connect > End User connectivity > Zero Trust > Enrollment methods > Manage > Use Certificates > Download the enrollment configuration file > Download is to be available on the workstation in the below locations if Windows:
C:\Program Files (x86)\Cisco\Cisco Secure Client\ZTA
C:\ProgramData\Cisco\Cisco Secure Client\ZTA\enrollment_choices
if macOS:
/opt/cisco/secureclient/zta
The Secure Client CA certificate download from Secure > Certificates > Internet destination > Secure Access Root certificate > Download is to be present in the Trusted Root CA of the end user workstation.
Verification
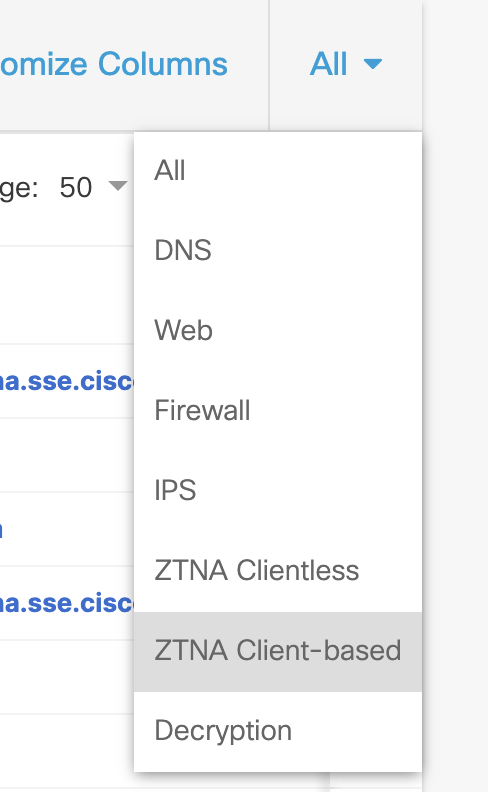
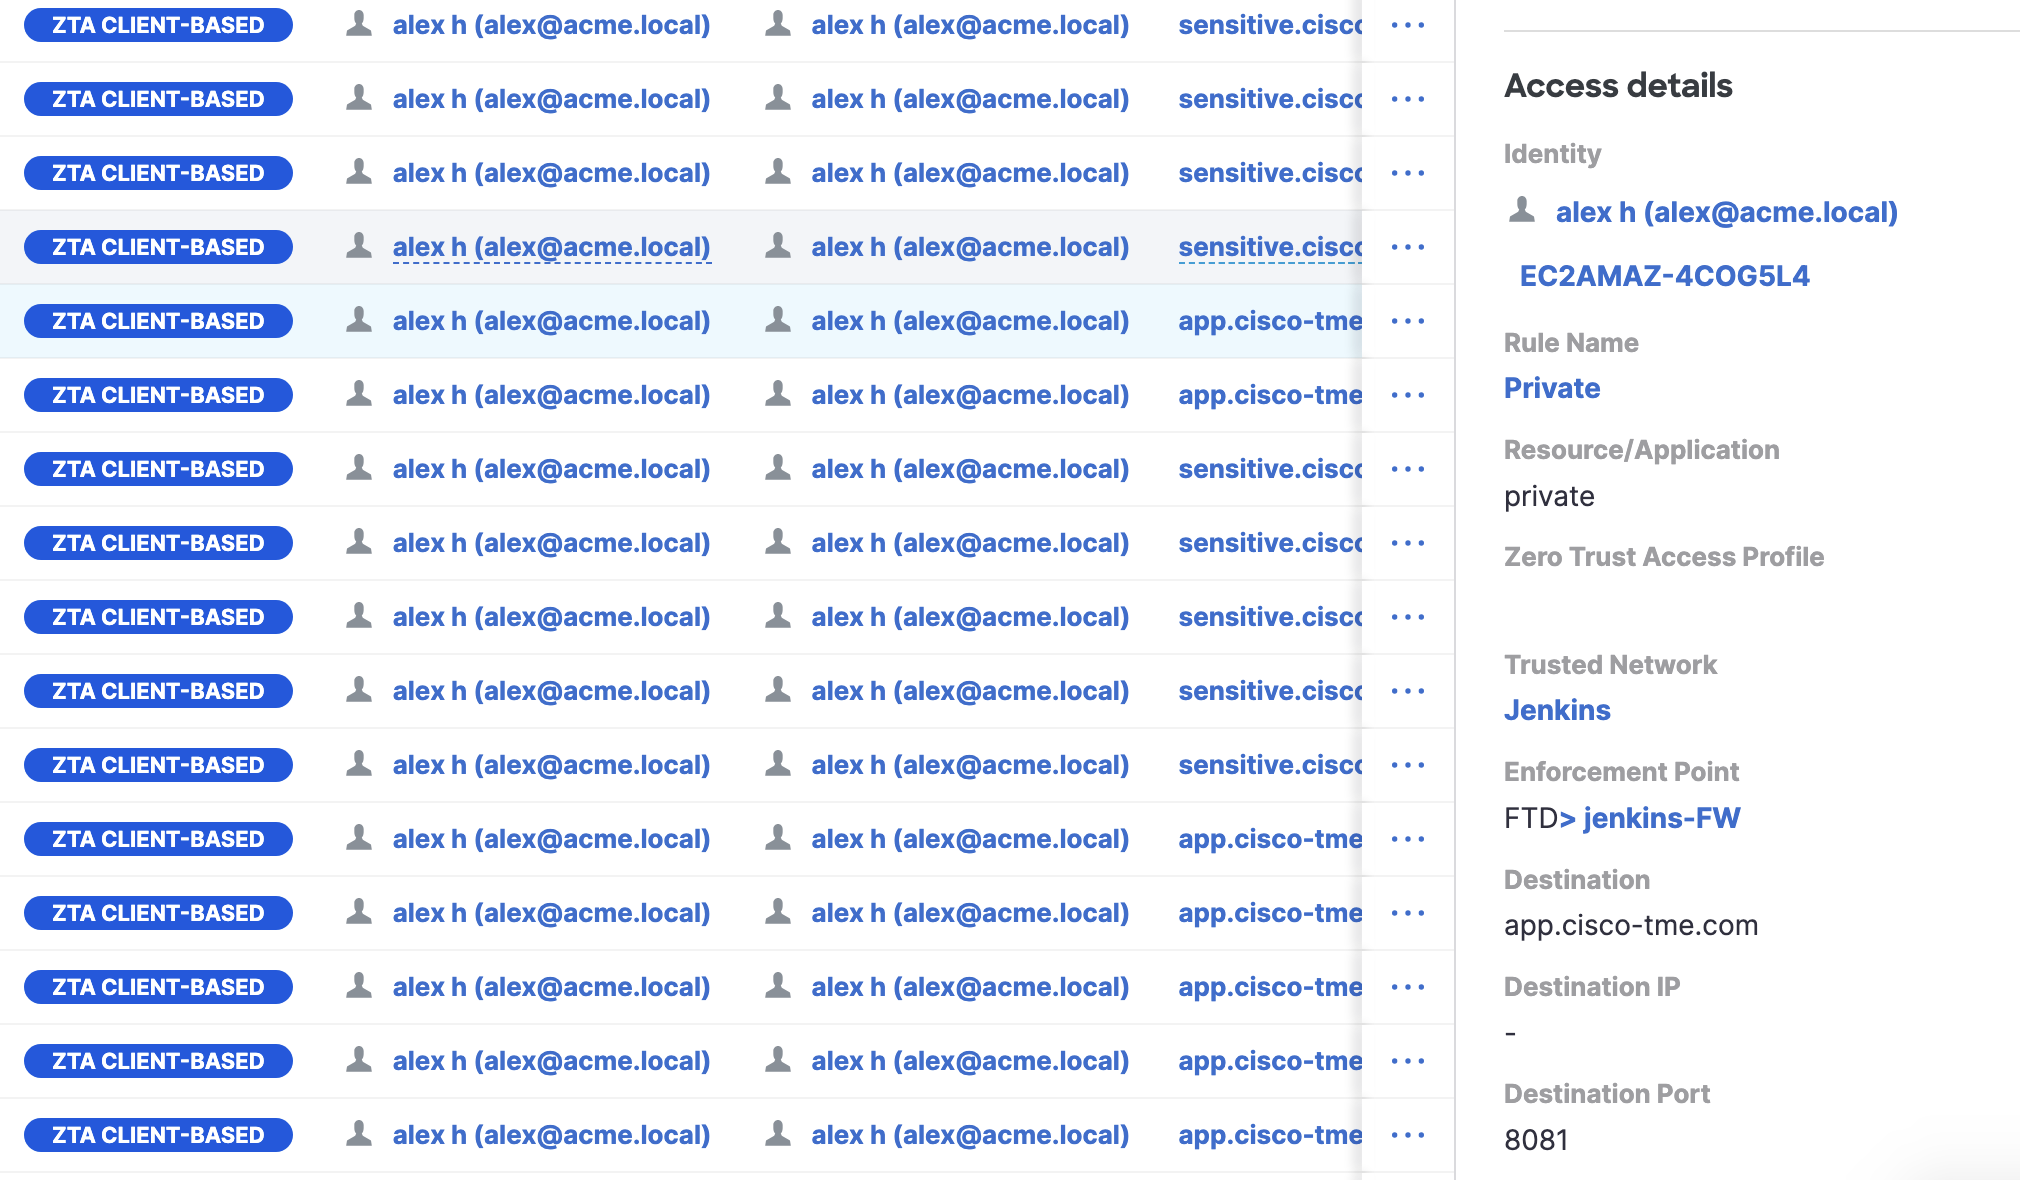
The logs can be viewed under Secure Access > Monitor > Activity Search. The UZTNA logs can be filtered by selecting ZTNA Client-based under the the option All on the top right.
Click on View Actions > View Full Details against an event.
- When an outside workstation access a sensitive application, the below event details will be populated:
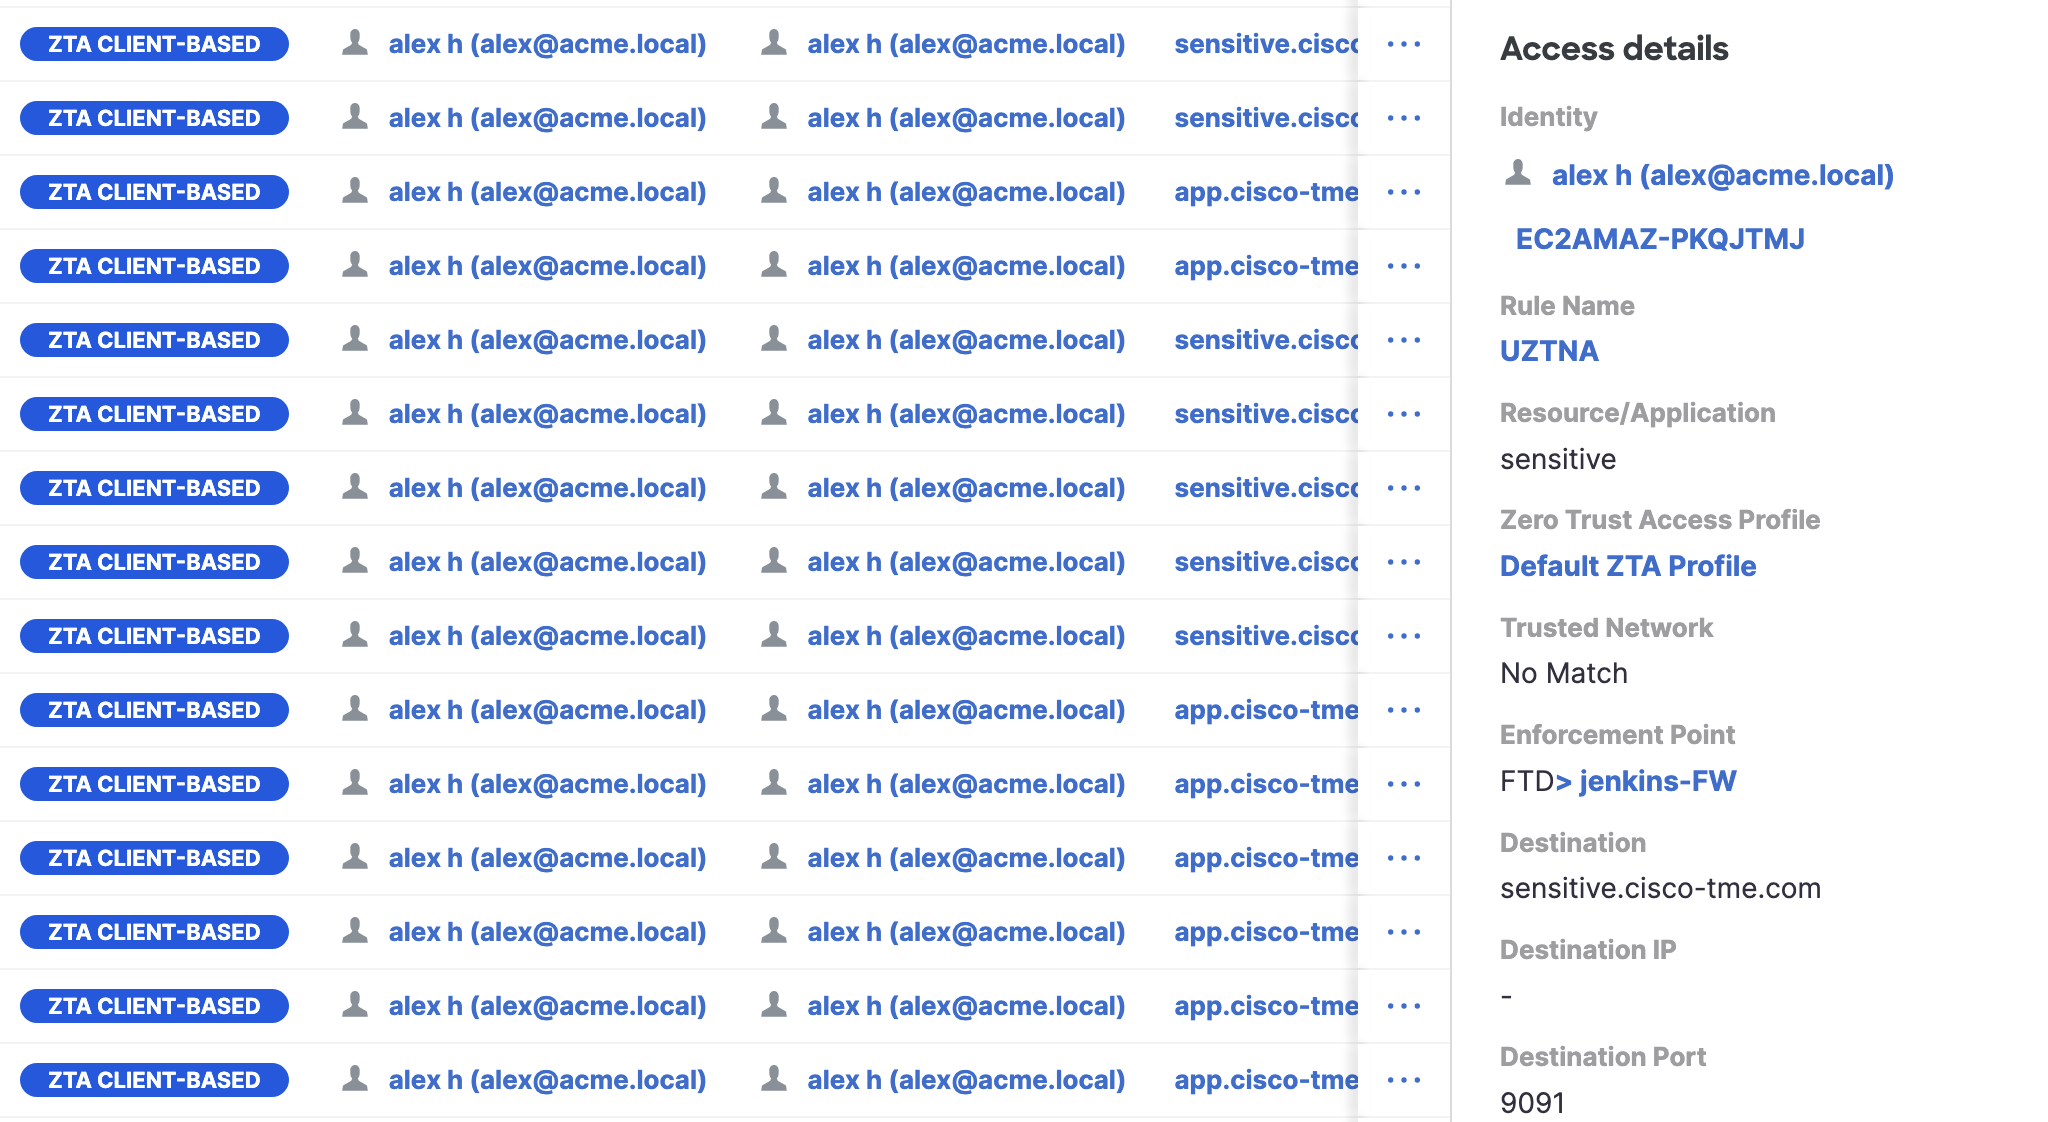
The enforcement point would be FTD since the application is sensitive and No Match would be seen against Trusted Network since the workstation does not belong to Trusted Network.
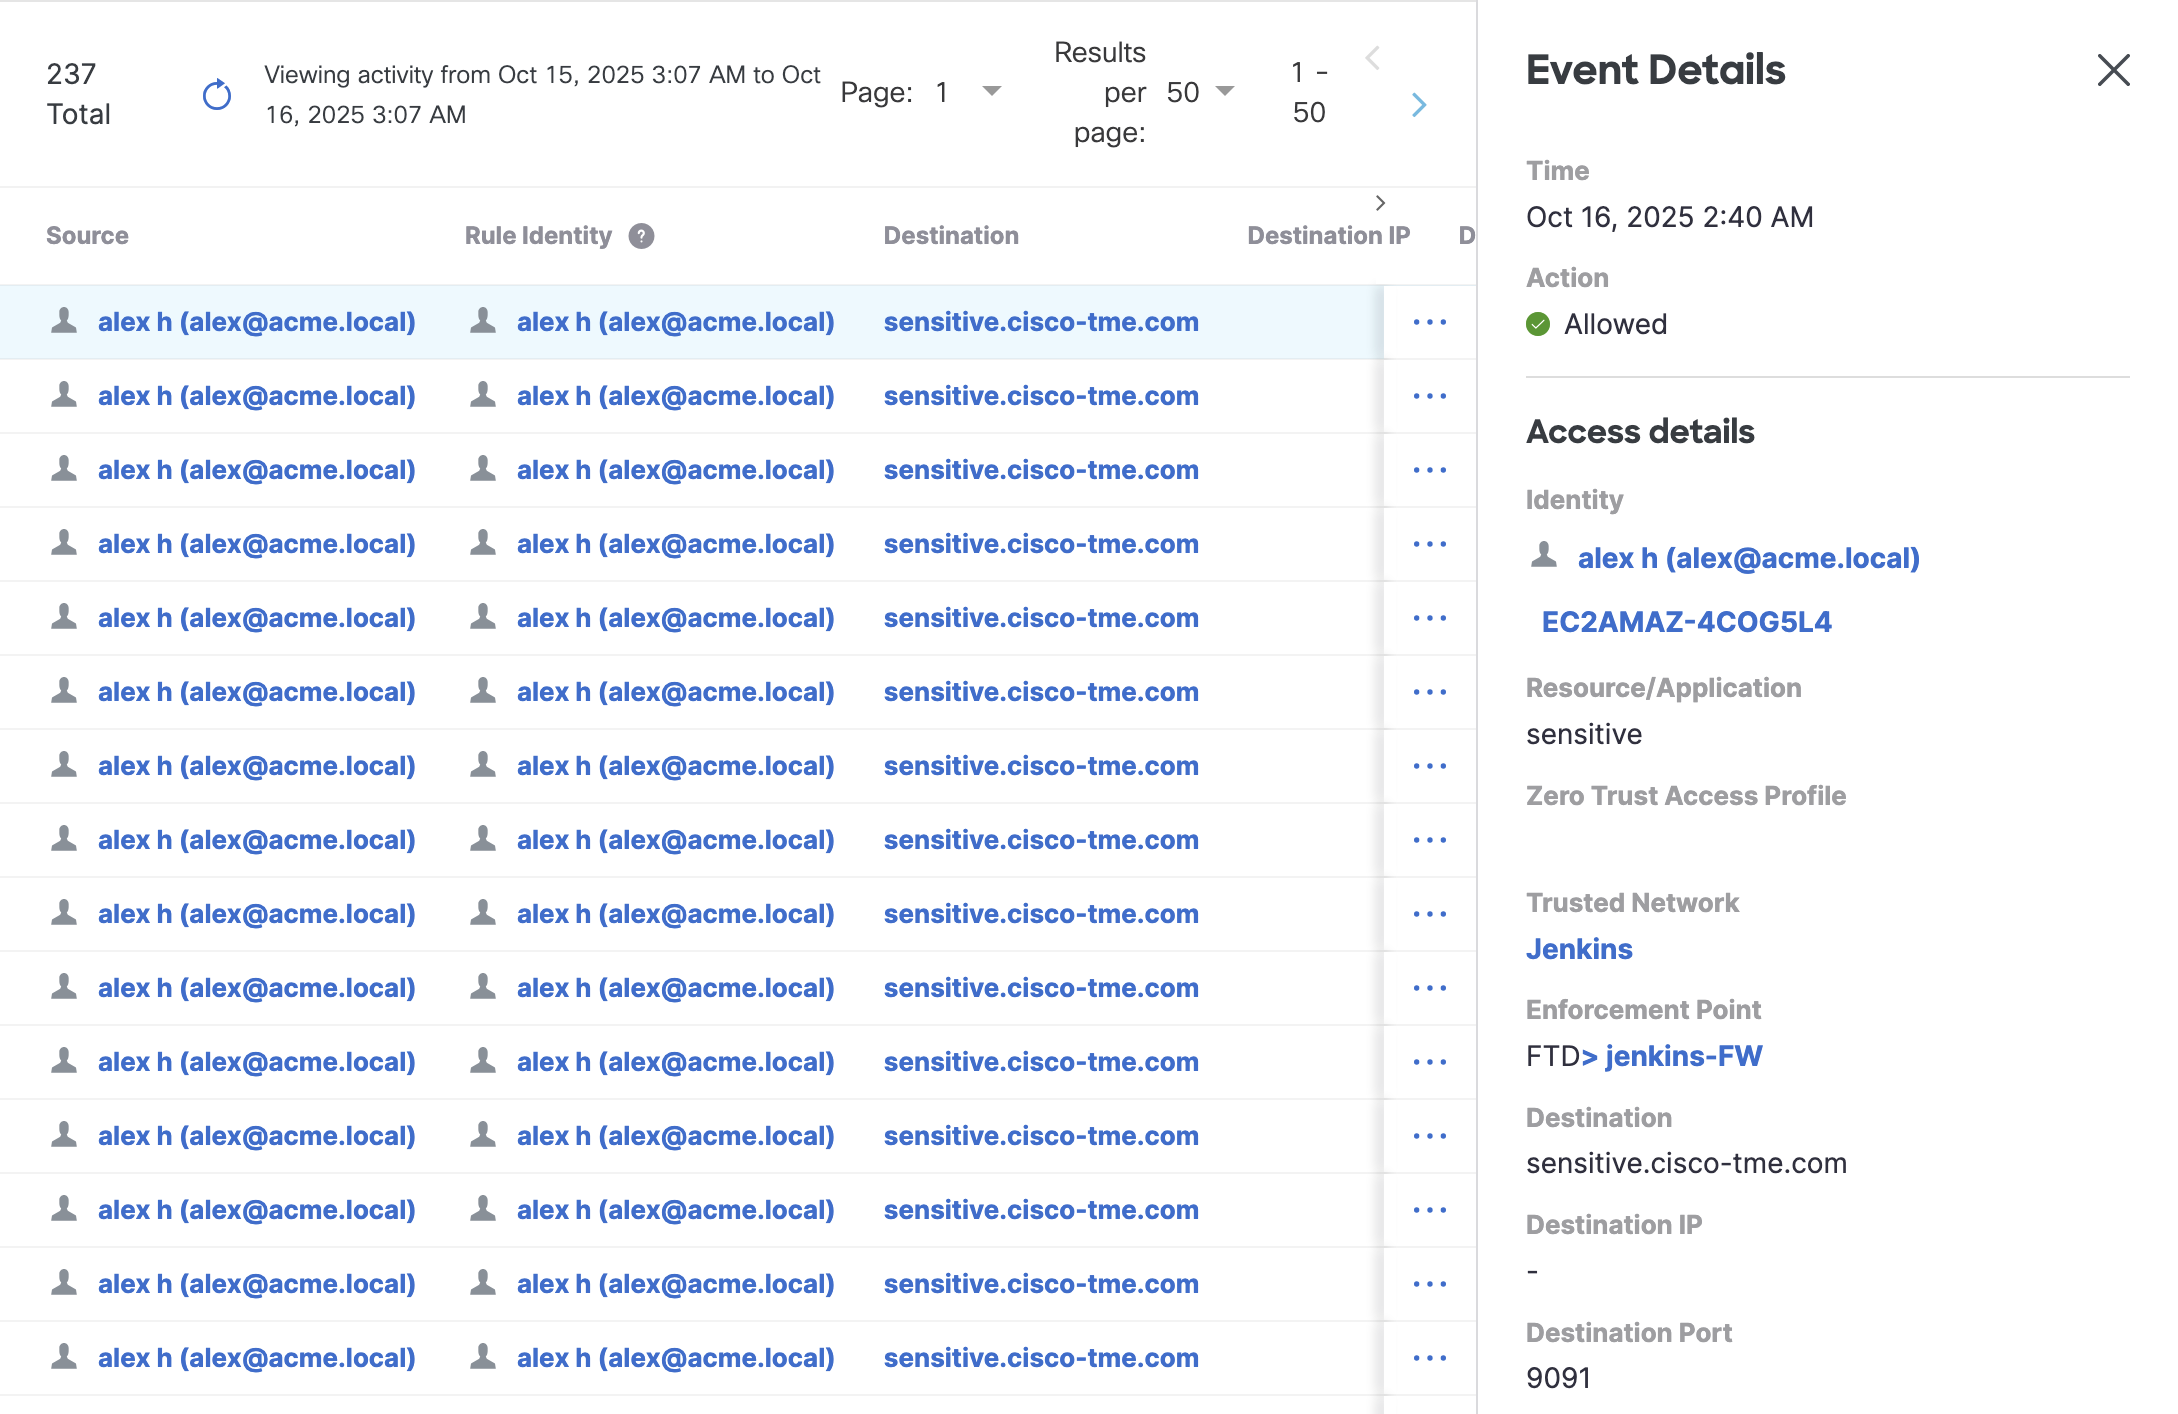
- When an inside workstation accesses a sensitive application, the enforcement point is selected as FTD and the trusted network is matched to the one defined.
- When the same inside workstation accesses a non-sensitive application, the enforcement point is again FTD and the trusted network is matched again.
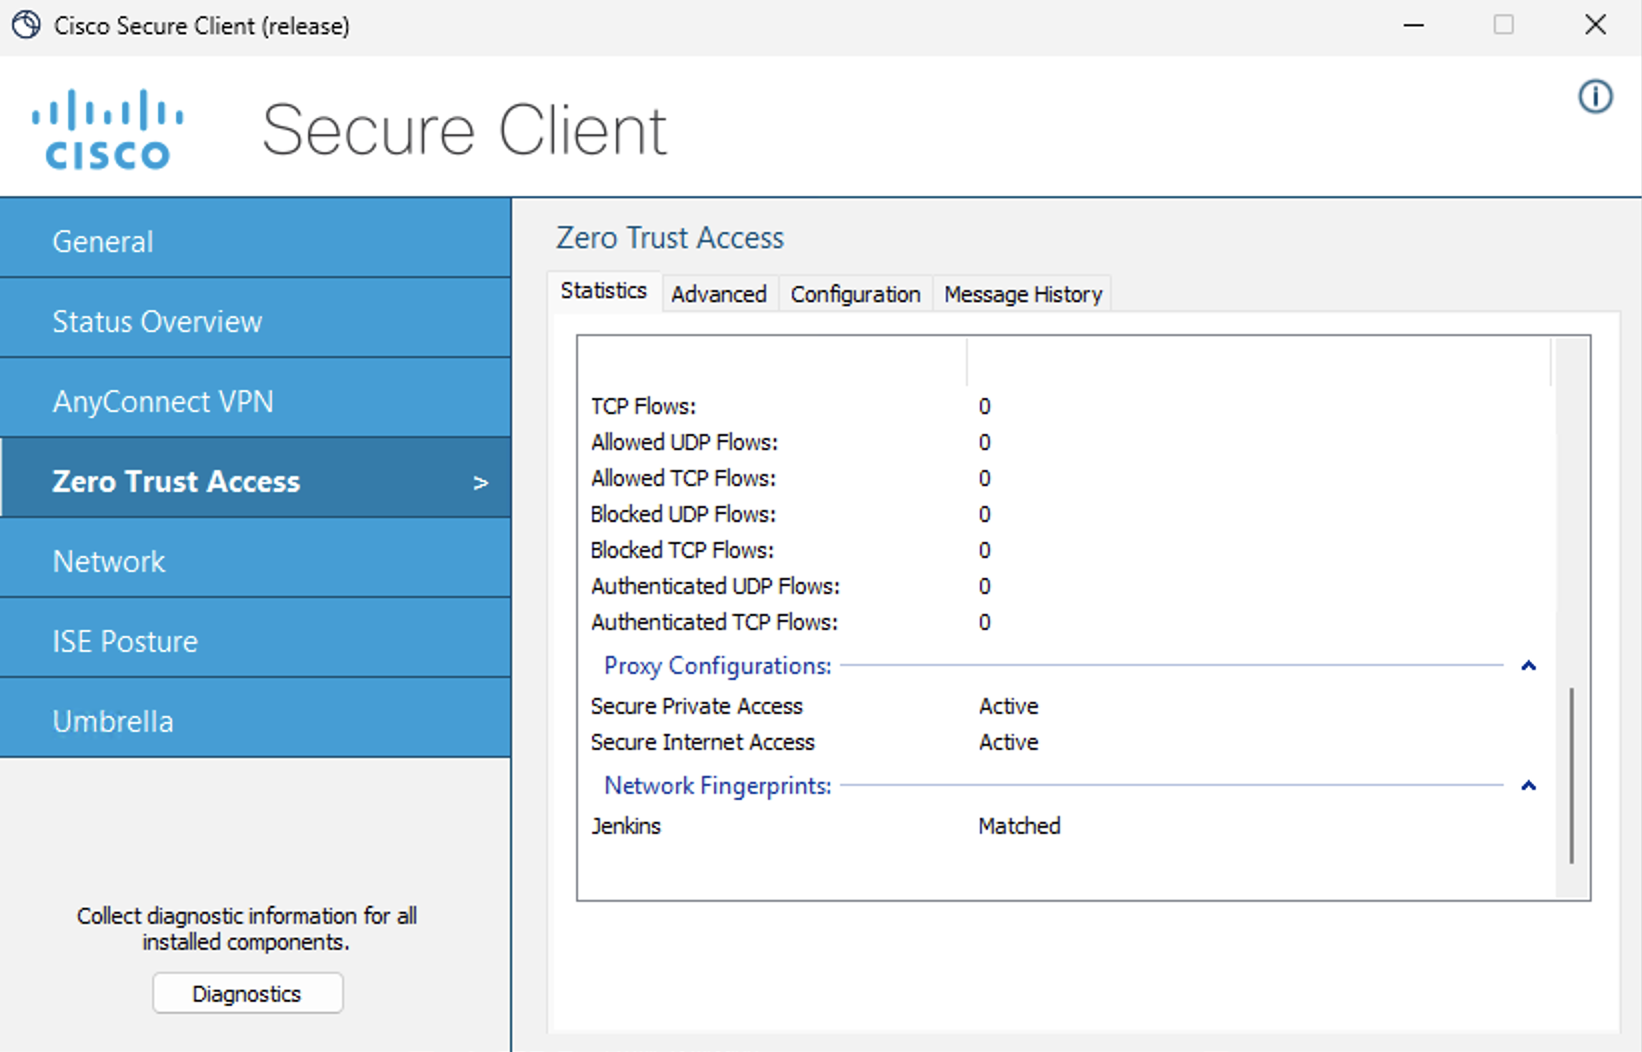
The Trusted Network Detection can also be verified under Secure Client settings on the workstation. Zero Trust Access > Network Fingerprints. The below screenshot is from the inside workstation which has a matched Trusted Network.
Conclusion
With Hybrid Private Access, security, segmentation and unified policy are all bundled in one solution. It is cost optimized as your existing firewall can be leveraged with no requirement of any additional license. The user experience is seamless with the existing Secure Client providing the ZTNA module. The seamless zero trust enforcement across all environments - cloud and on-premise makes Hybrid Private Access a differentiator for Cisco.
Updated 2 months ago