
Threat Protection Best Practices
Introduction
Deploying an effective threat protection policy involves more than simply enabling security features. Cisco Secure Firewall Threat Defense (FTD) provides multiple integrated threat protection capabilities and determining where to begin can be challenging. This guide provides a structured approach to help administrators deploy these capabilities using Cisco-recommended best practices for intrusion prevention, malware protection, and other integrated threat defense features.
The recommendations in this guide are intentionally simple and are intended to serve as a baseline for new deployments. As you gain visibility into your network and applications, you can further tune your policies based on traffic patterns, application requirements, organizational risk tolerance, and performance considerations. Refer to the linked Cisco product documentation for detailed configuration procedures, feature-specific guidance, and release-specific considerations.
Recommended deployment workflow
A useful deployment sequence is Scope, Discover, Protect, Optimize, and Maintain. Start with a trusted protection baseline, then use discovery and event data to improve accuracy over time.
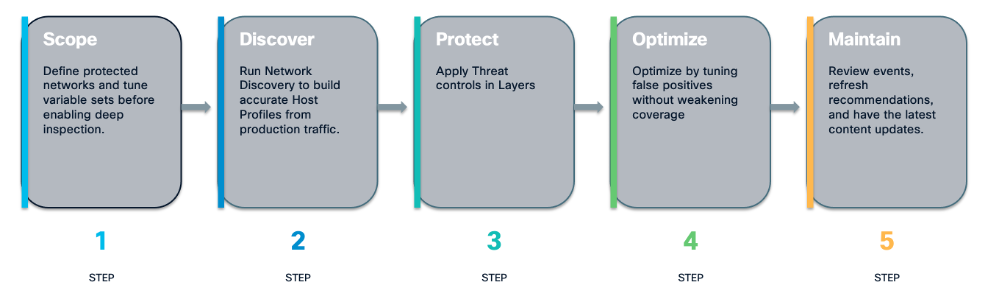
Do not wait for a perfect asset inventory before enabling intrusion prevention. Begin with a trusted baseline, collect representative traffic, and then tune the policy with host data and real events.
1. Scope the traffic
First identify which networks the firewall protects and which traffic flows require deeper inspection. Internet-bound user traffic, inbound published applications, partner traffic, and internal east-west traffic can require different access control rules and different inspection depth.
On the Firewall Management Center, navigate to Objects > Variable Set. It is advisable to not edit the system-provided Default-Set. These are the variables used to define the networks and port numbers in the Intrusion rules under Intrusion policy. You could also create a custom variable-set by clicking on Add Variable Set if you are an advanced user.
• Set $HOME_NET to the networks protected by the firewall. Accurate variables help Snort evaluate rules in the correct direction and reduce unnecessary rule processing.
• It is recommended to not change any variable values other than $HOME_NET.
If using a custom Variable Set, make sure that it is selected under the relevant Access Control Rule under Policies > Access Control > Edit icon of the Access Control Policy > Edit icon of the Access Control Rule. By default, the system-defined Default-Set is selected whenever an Intrusion Policy is chosen. If you are a beginner, keep the variable set as Default-Set with no changes.
• Use separate access control rules inside the Access Control Policy when traffic classes require different intrusion or file policies. However, for simplicity, you could stick to a single Intrusion and File policy across your environment.
For more details on Variable sets refer :
Variable Sets - Management Center Device Configuration Guide, 10.x
2. Enable Network Discovery
Enable Network Discovery early so Management Center can build Host Profiles from production traffic. Host Profiles provide the operating-system, application, service, user, and vulnerability context used by Cisco Recommendations and intrusion-event analysis. This is currently available only on on-prem FMC.
On the Firewall Management Center, navigate to Policies > Network Discovery. Click on Add Rule. It is recommended not to edit the default rule in place.
• Scope discovery to the internal networks you intend to protect by adding them under the Networks tab. Avoid broad, indiscriminate ranges that create unnecessary host data.
• Select the check boxes Hosts and Users to add hosts to the network map and to detect non-authoritative users based on login activity, respectively.
For more details on Network Discovery refer:
Network Discovery - Management Center Device Configuration Guide, 10.x
Network Discovery Policy - secure.cisco.com
3. Apply threat controls in layers
Use early reputation controls to reject known-bad traffic before it reaches more resource-intensive inspection. Encrypted-traffic visibility, intrusion prevention, and file analysis would then be applied to the remaining traffic.
| FEATURE | DESCRIPTION | LICENSE REQUIRED |
|---|---|---|
| Security Intelligence | Blocks or monitors known-bad IP addresses, URLs, and domains early. | IPS |
| URL filtering | Stops malicious URLs and applies web category and reputation policy. | URL |
| Encrypted Visibility Engine | Adds visibility into encrypted sessions and can block threats | IPS |
| Intrusion policy | Detects and blocks exploits, attacks, and protocol anomalies. | IPS |
| File and malware policy | Identifies, analyzes, logs, and blocks files and malware. | Malware (no license required for file-only policy) |
| Port Scan | Detects reconnaissance such as port scans and can block scanners. | No license required |
3.1 Security Intelligence
Security Intelligence is the first phase of access control. It uses reputation intelligence to quickly block or monitor connections involving known malicious IP addresses, URLs, and domains before deeper inspection.
On the Firewall Management Center, navigate to Policies > Access Control > Edit the Access Control Policy > Security Intelligence
Security Intelligence (DNS)
• The configuration for DNS Security Intelligence is done via the DNS policy, which is linked to the Access Control policy as shown below. Clicking on the Edit icon takes you to the DNS policy wherein you can add DNS rules. When you create a new Access Control Policy, Default DNS Policy is assigned to it by default.
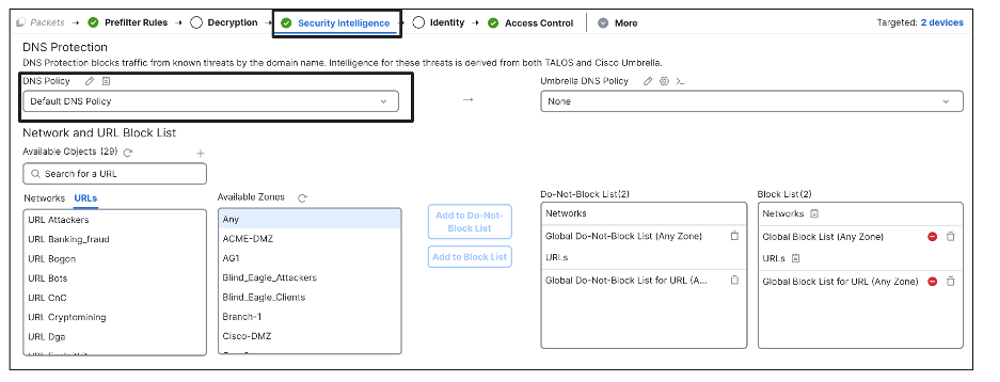
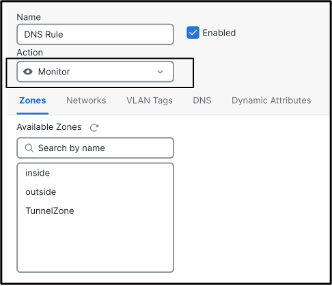
• Click on the Edit icon against it > Add Rule > select the system-provided lists and feeds under the DNS tab > Add to Rule. The default action selected is Domain Not Found which is recommended.
Security Intelligence (IP)
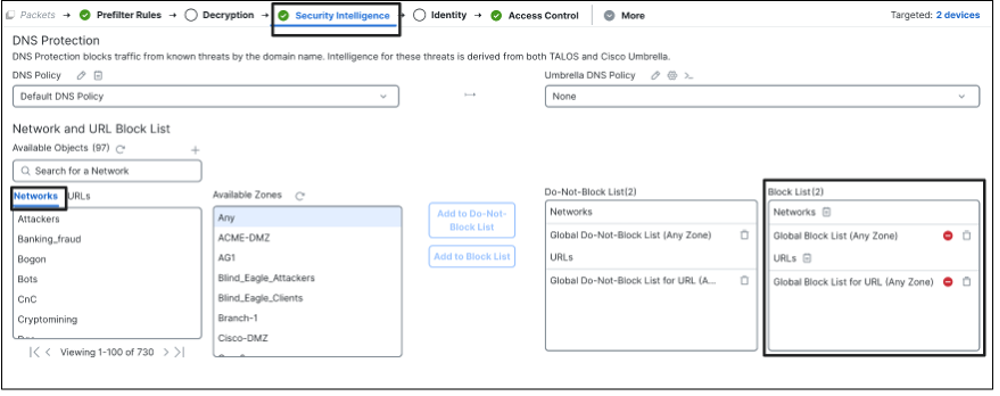
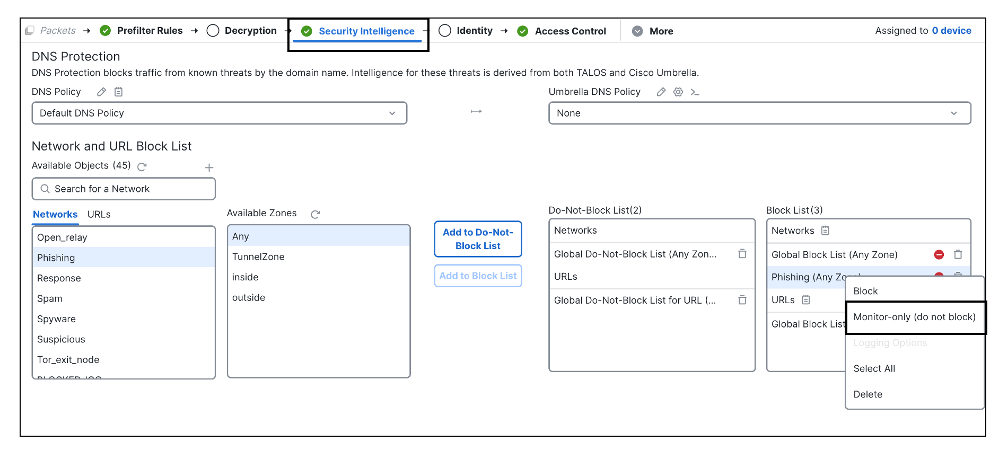
• The configuration for Security Intelligence (IP) is done via the Security Intelligence page as shown below. Use the Cisco-provided feeds and categories as the default block layer. Under Networks tab, select them and click on Add to Block List.
Security Intelligence (URL)
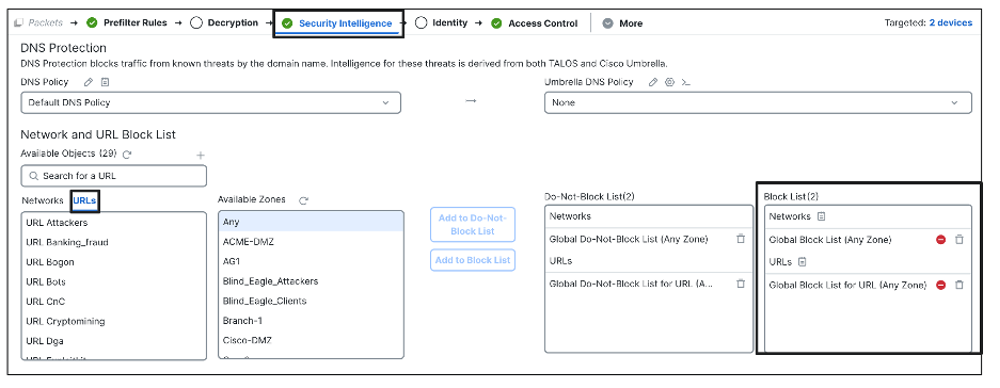
• The configuration for Security Intelligence (URL) is done via the Security Intelligence page as shown below. Use the Cisco-provided feeds and categories as the default block layer. Under URLs tab, select them and click on Add to Block List.
• To supplement the Cisco-provided Security Intelligence feeds with custom threat data, go to Objects > Security Intelligence and add the relevant feeds and/or lists for Network, URL and DNS. You will have to scroll down to see the Security Intelligence Object in the Objects page left pane. Using a custom list would mean manually uploading a .txt file with all the entries but it will have to be uploaded each time there are changes to the list. If there are frequent changes with custom threat data, a custom feed is recommended instead of a list, since it would automatically update it as per the update frequency selected from the feed URL.
• Place new or lower-confidence custom feeds in monitor-only mode first, review the matches, and then enable blocking. For this, add the customer Network or URL to the Block List. Under the Block List, right-click on the Network or URL object and select Monitor-only(do not block).
For DNS, the action can be selected as Monitor under the DNS rule of a DNS Policy.
• Use Do Not Block entries only for verified exceptions so that they are not blocked by Security Intelligence, for example, public IP addresses of your servers. A Do Not Block match is still evaluated by access control and can still be blocked by another security control. Add the entries inside the object with the prefix Global-Do-Not-Block-List under Objects > Security Intelligence.
• Keep logging enabled for blocked connections by clicking on the Logging Options icon under the Block List so that your security team can validate and investigate matches.
• While monitoring in Unified Events, the IP addresses can be immediately added to Global lists by right-clicking on the IP address and selecting Add IP to block list or Add IP to do-not-block list.
• IP-based Security Intelligence blocking is generally less resource-intensive per flow. FTD can drop traffic at the start of the connection, before deeper inspection. DNS and URL/domain blocking require protocol-level inspection.
• Domain feeds can provide broader coverage. One domain may resolve to multiple changing IPs, reducing the number of indicators that must be maintained. This is a coverage benefit, not necessarily a CPU-efficiency benefit.
For more details on Security Intelligence refer:
Security Intelligence - Management Center Device Configuration Guide, 10.x
DNS Policies for Security Intelligence - Management Center Device Configuration Guide, 10.x
3.2 URL filtering
URL filtering controls browser-based HTTP and HTTPS access using URL category and reputation. URL license is required only for URL category and reputation feature, not for manual URL filtering.
On the Firewall Management Center, navigate to Policies > Access Control > Edit the Access Control Policy > Edit Access Control Rule > URL.
• It is recommended to block URLs having Untrusted reputation. The URLs having Untrusted reputation are the ones displaying behavior that is exceptionally bad, malicious, or undesirable. Select Any under Categories and Untrusted and click on Add URL.
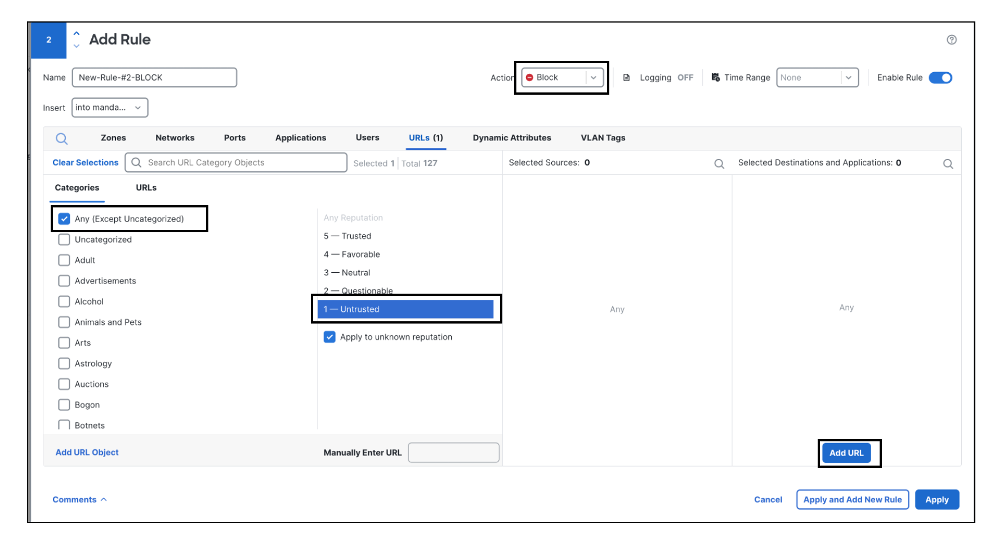
Block Questionable reputation only if you have an aggressive security posture as it can increase false positives.
• Order specific business exceptions before broader URL blocking rules by adding these URLs manually in a rule with Allow action above the Block rule for Untrusted reputation.
• Under Access Control Policy > Advanced settings, keep Enable reputation enforcement on DNS traffic enabled as this evaluates domain category and reputation early in URL transactions, when the browser looks up the domain name to get the IP address.
• Enable TLS Server Identity Discovery under Advanced settings of the Access Control Policy as this provides a way to extract TLS 1.3 server certificate without decrypting the entire packet which helps to match an application or URL criteria.
• As a prerequisite, configure URL category or reputation criteria in at least one Access Control rule. Talos lookups are performed only when required by the applicable rule. Therefore, traffic matched by an earlier Layer 4-only rule will not trigger URL category or reputation lookups. If no rule in your Access Control Policy uses these criteria, the Unified Events will show no Category or Reputation data for URL traffic.
For more details on URL filtering refer:
URL Filtering Rules - Management Center Device Configuration Guide, 10.x
3.3 Encrypted Visibility Engine
Encrypted Visibility Engine (EVE) analyzes encrypted-session metadata and fingerprints without decrypting the payload. It can identify client processes, applications, operating systems, and suspicious encrypted connections. EVE is a useful visibility, but it is not a replacement for decryption when the firewall must inspect payload content or transferred files.
On the Firewall Management Center, navigate to Policies > Access Control > Edit the Access Control Policy > Encrypted Visibility Engine.
• Start in Monitor mode and review process names, threat confidence and false positives before moving to Protect mode.
• In Protect mode, select Very High which means EVE blocks malicious packets with very high threat confidence score.
• Under Manage exceptions, keep EVE exceptions narrow and include a reason. This would include EVE process names, Source and Destination Networks and Dynamic Attributes (if using CSDAC) which should not get blocked based on EVE’s threat score. These could include penetration testing networks, for example.
• If you see false positives wherein the traffic is getting blocked by EVE, you can easily add them to the EVE exception list. Click on the options against Encrypted Visibility Block under the Reason column of Unified Events as shown below, and click on Add EVE exception rule.
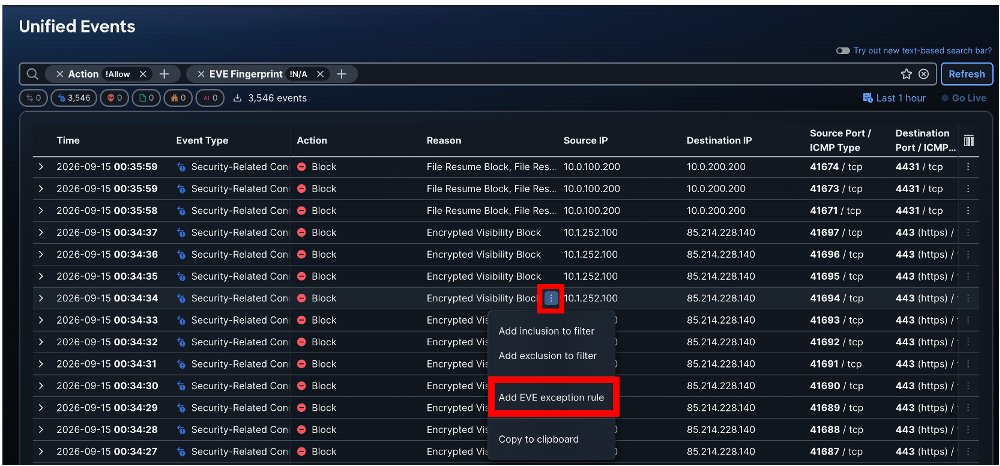
• In Management Center 10.x, the exception list is global and applies to all the access control policies that use EVE.
• Enable access control rule logging so that EVE results appear in Unified Events .
• Use Decryption policy for traffic that requires payload-based intrusion inspection or file and malware analysis.
For more details on EVE refer:
Encrypted Visibility Engine - Management Center Device Configuration Guide, 10.x
EVE secure.cisco.com
3.4 Intrusion prevention
An Intrusion Prevention policy defines how the Snort inspection engine analyzes traffic for exploit attempts, protocol violations, and other malicious activity. It uses intrusion signatures and policy settings to determine whether suspicious traffic should be alerted on, logged, or blocked. The policy is applied through Access Control rules and can be tuned using rule groups, inspection modes, and variable sets. Apply intrusion policies to Allow rules in the access control policy so different traffic classes can receive appropriate inspection.
Talos provides predefined policy tiers that represent different security and availability priorities. It can revise these defaults through Intrusion Rule Updates (LSP) as new threats and vulnerabilities emerge. The system-provided intrusion policies (and network analysis policies) are as below:
- Balanced Security and Connectivity - Built for both speed and detection and serve as a good starting point for most organizations and deployment types. The system uses the Balanced Security and Connectivity policies and settings as defaults in most cases and is the recommended policy.
- Connectivity Over Security - Built for organizations where connectivity (being able to get to all resources) takes precedence over network infrastructure security. The intrusion policy enables far fewer rules than those enabled in the Security over Connectivity policy. Only the most critical rules that block traffic are enabled. Hence, it is not recommended in general.
- Security Over Connectivity - Built for organizations where network infrastructure security takes precedence over user convenience. The intrusion policy enables numerous network anomaly intrusion rules that could alert on or drop legitimate traffic. This is the second recommended policy after Balanced Security and Connectivity.
- Maximum Detection - Built for organizations where network infrastructure security is given even more emphasis than is given by the Security Over Connectivity policies, with the potential for even greater operational impact. For example, the intrusion policy enables rules in a large number of threat categories including malware, exploit kit, old and common vulnerabilities, and known in-the-wild exploits.It is recommended only for coverage testing and in passive deployment scenarios.
- No Rules Active - All intrusion rules are disabled here. This policy provides a starting point if you want to create your own intrusion policy instead of basing it on the enabled rules in one of the other system-provided policies.
• The Intrusion Policy is created by selecting Policies > Intrusion > Create Policy. Select the base policy as Balanced Security and Connectivity or Security Over Connectivity as per your requirement. Click on Snort3 version of the newly created Intrusion policy > View Effective Policy to view the Intrusion rules under it.
• The Intrusion policy created is then selected under the Access Control Policy > Add Rule > Intrusion Policy. Leave the Variable-Set at Default-Set.
• Use a Network Analysis Policy with the same base policy as the intrusion policy. The two policies are designed to work together. The Network Policy is assigned to the Access Control Policy under Advanced settings of the Access Control Policy > Network Analysis and Intrusion Policies > Default Network Analysis Policy. Balanced Security and Connectivity is selected by default.
• Run Cisco Recommendations after Network Discovery has collected representative host data. Review the proposed rule changes before applying them and refresh recommendations after major environment changes. Inside the Intrusion policy > View Effective policy > go to the Recommendations tab and click on Start > Generate. Review the generated rules and click on Accept. The recommendations can also be run as a scheduled task discussed in ‘Maintain the protection’ section of this document, which is recommended over manually generating the recommendations every time.
• Decrypt selected encrypted traffic when intrusion inspection is required; the firewall can inspect only traffic it can see.
• Keep Lightweight Security Package (LSP) updates current and deploy changes through normal validation and change-control procedures discussed further in ‘Maintain the protection’ section of this document.
For more details on Intrusion Policy refer:
Intrusion Prevention - Management Center Device Configuration Guide, 10.x
Intrusion Policy - secure.cisco.com
3.5 File and malware policy
A file policy identifies and controls files transferred through matching access control rules. A malware policy can calculate a file hash, query AMP Cloud, perform local analysis, and submit eligible unknown files to Secure Malware Analytics.
Attach the file policy to an Allow, Interactive Block, or Interactive Block with reset access control rule. A file policy cannot be applied to an access control rule with Block action.
On the Firewall Management Center, navigate to Policies > Malware & File > New File Policy > Save.
• Enable Reset Connection for Block Files and Block Malware actions unless application testing identifies a specific reason not to. This will prevent blocked application sessions from remaining open until the TCP connection resets. If you do not reset connections, the client session will remain open until the TCP connection resets itself. Click on Add Rule and choose the Action. Reset Connection is enabled by default for both Block Files and Block Malware actions.
• If you are monitoring high volumes of traffic, do not store all captured files, or submit all captured files for dynamic analysis. Doing so can negatively impact system performance.
• If you need to store files for action Block Malware and Malware Cloud Lookup, it is recommended to store only Malware and Unknown files.
• Decrypt selected encrypted traffic when file-content inspection is required; the firewall can analyze only files it can see.
• Confirm cloud connectivity and measure performance before enabling malware lookup and dynamic analysis.
For more details on File and Malware Policy refer:
Malware and File Policy - Management Center Device Configuration Guide, 10.x
Malware and File Policy - secure.cisco.com
3.6 Port Scan
Threat Detection can identify port scans and sweeps in permitted or denied traffic and can optionally block scanners for a configured period. Portscan events are generated independently of the intrusion policy.
On the Firewall Management Center, navigate to Policies > Access Control > Edit the Access Control Policy > More > Advanced settings > Edit icon against Threat detection.
• Begin in Detection mode. Medium is the default sensitivity and is a practical starting point. Select Detection under Portscan Mode. Under Configuration keep the Sensitivity as Medium.
• Limit monitored networks to the areas that matter, then review events from vulnerability scanners, monitoring systems, NAT devices, and proxies. Go to Traffic Selection > Monitor and select the networks.
• Add only verified, trusted sources—such as authorized scanners, DNS servers, or web proxies—to Ignore Scanner when their scanning-like traffic is expected. Use Ignore Target sparingly, because it suppresses port-scan detection for the selected hosts or networks. These options are available under Traffic Selection.
• Move to Prevention mode only after the event rate is accurate and false positives have been addressed.
• Define the block duration and a manual unblock procedure before enabling prevention. When you select the Portscan Mode as Prevention, under Prevention tab, the duration is set at 3600 seconds by default which is recommended. You can also exclude networks from getting blocked via Portscan Prevention.
For more details on Port Scan refer:
Threat Detection - Management Center Device Configuration Guide, 10.x
4. Optimize with event evidence
Tuning should reduce false positives without weakening coverage. Use the Unified Event Viewer details to understand why a rule matched before changing the policy.
• Prioritize intrusion and malware events that affect critical assets, show repeated exploit attempts, indicate command-and-control activity, or involve malicious file transfer.
• For high-volume intrusion events, determine whether the cause is an attack, a vulnerable service, expected application behavior, a scanner, a protocol-detection issue, or an incorrect variable.
• Prefer the narrowest change, for example, limit the rule to the correct application or network.
• Compare event volume, application health, throughput, and Snort resource utilization before and after major inspection changes. Device Health can be monitored under Troubleshooting > Health > Monitor > Selecting the Device.
• Do not disable a signature only because it is noisy. First determine why it is firing and whether the policy scope, variables, application detection, or threshold should be corrected.
5. Maintain the protection
Intrusion and malware protection depend on current threat intelligence and regular policy review. Make updates and tuning part of normal firewall operations.
• For URL filtering, either enable automatic updates under Integrations > Cloud Services or have a recurring task scheduled under Administration > Scheduling > Add Task > Select the Job Type as ‘Update URL Filtering Database’.
• For Snort 3 rules, have the latest LSP update by enabling Recurring Rule Update Imports. Go to Administration > Content Updates > Rule Updates. Ensure that Running Snort Rule update version is the latest one as per the date. You could verify this under https://software.cisco.com/download/home . It is recommended to enable Enable Recurring Rule Update Imports from the Support Site and leave the import frequency as per the LSP update frequency which is every Tuesday and Thursday.
• By default, there is a recurring weekly download task for software and VDB downloads. Review this task and edit if required under Administration > Scheduling > Click on the task > Edit icon. Add another task to install the VDB update weekly by clicking on Add Task > selecting the Job Type as Install Latest Update and selecting Vulnerability Database as the Update Item. Ensure there is at least an hour buffer between the download task and the update task.
• Security Intelligence feeds are updated by default every 2 hours. It is recommended to keep the default value which is configurable under Objects > Security Intelligence > DNS Lists and Feeds > Cisco-DNS-and-URL-Intelligence-Feed and Network Lists and Feeds > Cisco-Intelligence-Feed.
• Refresh Cisco Recommendations on a schedule and after major host, application, or network changes. After enabling it under the Intrusion Policy as mentioned in its section above, it can be scheduled under Administration > Scheduling > Add Task > select the Job Type as Cisco Recommended Rules.
• Review intrusion, malware, EVE, DNS, URL, and portscan events for false positives and missed enforcement.
• Review Do Not Block entries, EVE exceptions, URL exceptions and decryption bypasses periodically. Remove entries that are no longer required.
• Keep a tested policy backup and a documented rollback process for production changes.
Conclusion
A strong Secure Firewall threat policy starts with accurate network scope, a current discovery baseline, and layered controls. Use Security Intelligence(IP/DNS/URL) policy to stop high-confidence threats early, EVE and selective decryption for encrypted traffic, Snort 3 for intrusion prevention, and file policies for malware analysis. Then tune with event evidence and keep the security content current.
For further details on Threat capabilities of Firewall refer:
Updated 22 days ago